1. Distributed lock
1.1 what is distributed lock
When we develop a stand-alone application involving concurrent synchronization, we often use synchronized or ReentrantLock to solve the problem of code synchronization between multiple threads. However, when our application works in a distributed cluster, we need a more advanced locking mechanism to deal with the data synchronization between processes across machines, which is distributed locking.
Distributed lock is a way to control synchronous access to shared resources between distributed systems. In distributed systems, it is often necessary to coordinate their actions. If different systems or different hosts of the same system share one or a group of resources, they often need to be mutually exclusive to prevent interference with each other to ensure consistency. In this case, distributed locks need to be used.
Distributed lock can be understood as: controlling the distributed system to operate the shared resources orderly, and ensuring the consistency of data through mutual exclusion.
Some students may ask, can't we solve the problem by using the lock mechanism in Java, such as synchronized and ReentrantLock? Why use distributed locks?
For a simple single project, that is, the runtime program is in the same Java virtual machine, the above Java lock mechanism can indeed solve the problem of multithreading concurrency. For example, the following program code:
public class LockTest implements Runnable {

    public synchronized void get() {
        System.out.println("1 thread  -->" + Thread.currentThread().getName());
        System.out.println("2 thread  -->" + Thread.currentThread().getName());
        System.out.println("3 thread  -->" + Thread.currentThread().getName());
    }

    public void run() {
        get();
    }

    public static void main(String[] args) {
        LockTest test = new LockTest();
        for (int i = 0; i < 10; i++) {
            new Thread(test, "thread -" + i).start();
        }
    }

}
The operation results are as follows:
1 thread -- > thread - 0 2 thread -- > thread - 0 3 thread -- > thread - 0 1 thread -- > thread - 2 2 thread -- > thread - 2 3 thread -- > thread - 2 1 thread -- > thread - 1 2 thread -- > thread - 1 3 thread -- > thread - 1 1 1 thread -- > thread - 3 2 thread -- > thread - 3 1 thread -- > thread - 4 2 thread -- > thread - 4 3 thread -- > thread - 4
However, in the distributed environment, the program is deployed in cluster mode, as shown in the following figure:
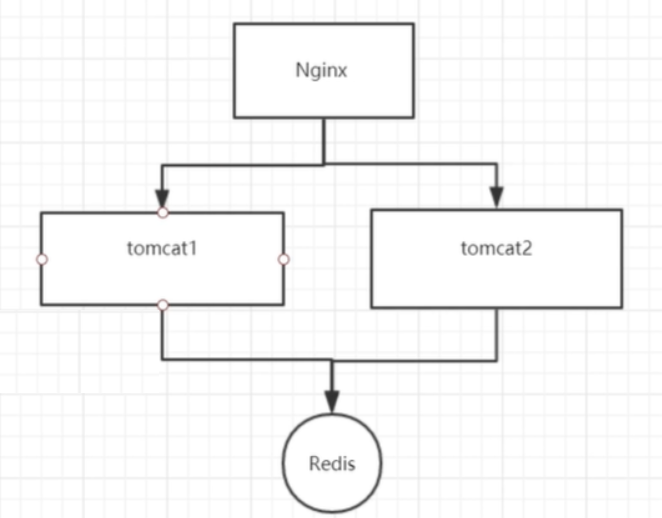
The above cluster deployment method will still cause thread concurrency problems, because synchronized and ReentrantLock are just jvm level locks, and there is no way to control other JVMs. That is, the above two tomcat instances can still be executed concurrently. To solve the concurrency problem in distributed environment, distributed locks must be used.
There are many ways to implement distributed locks, such as database implementation, ZooKeeper implementation, Redis implementation, etc.
1.2 why use distributed locks
In order to illustrate the importance of distributed locks, the following is a case of inventory reduction in an e-commerce project to demonstrate what problems will occur if distributed locks are not used. The code is as follows:
Step 1: import coordinates
<?xml version="1.0" encoding="UTF-8"?>
<project xmlns="http://maven.apache.org/POM/4.0.0"
         xmlns:xsi="http://www.w3.org/2001/XMLSchema-instance"
         xsi:schemaLocation="http://maven.apache.org/POM/4.0.0 http://maven.apache.org/xsd/maven-4.0.0.xsd">
    <modelVersion>4.0.0</modelVersion>
    <parent>
        <groupId>org.springframework.boot</groupId>
        <artifactId>spring-boot-starter-parent</artifactId>
        <version>2.2.5.RELEASE</version>
        <relativePath/>
    </parent>
    <groupId>com.itheima</groupId>
    <artifactId>lock-test</artifactId>
    <version>1.0-SNAPSHOT</version>

    <dependencies>
        <dependency>
            <groupId>org.springframework.boot</groupId>
            <artifactId>spring-boot-starter-web</artifactId>
        </dependency>
        <!--integrate redis-->
        <dependency>
            <groupId>org.springframework.boot</groupId>
            <artifactId>spring-boot-starter-data-redis</artifactId>
            <version>1.4.1.RELEASE</version>
        </dependency>
        <dependency>
            <groupId>com.alibaba</groupId>
            <artifactId>fastjson</artifactId>
            <version>1.2.3</version>
        </dependency>
        <dependency>
            <groupId>com.fasterxml.jackson.core</groupId>
            <artifactId>jackson-databind</artifactId>
        </dependency>
    </dependencies>

</project>
Step 2: configure application YML file
server:
  port: 8080
spring:
  redis:
    host: 68.79.63.42
    port: 26379
    password: itheima123
Step 3: write Controller
package com.itheima.controller;

import org.springframework.beans.factory.annotation.Autowired;
import org.springframework.data.redis.core.StringRedisTemplate;
import org.springframework.web.bind.annotation.GetMapping;
import org.springframework.web.bind.annotation.RestController;

@RestController
public class StockController {
    @Autowired
    private StringRedisTemplate redisTemplate;

    @GetMapping("/stock")
    public String stock(){
        int stock = Integer.parseInt(redisTemplate.opsForValue().get("stock"));
        if(stock > 0){
            stock --;
            redisTemplate.opsForValue().set("stock",stock+"");
            System.out.println("Inventory deduction succeeded, remaining inventory:" + stock);
        }else {
            System.out.println("Insufficient inventory!!!");
        }
        return "OK";
    }
}
Step 4: write the startup class
@SpringBootApplication
public class MyApplication {
    public static void main(String[] args) {
        SpringApplication.run(MyApplication.class,args);
    }
}
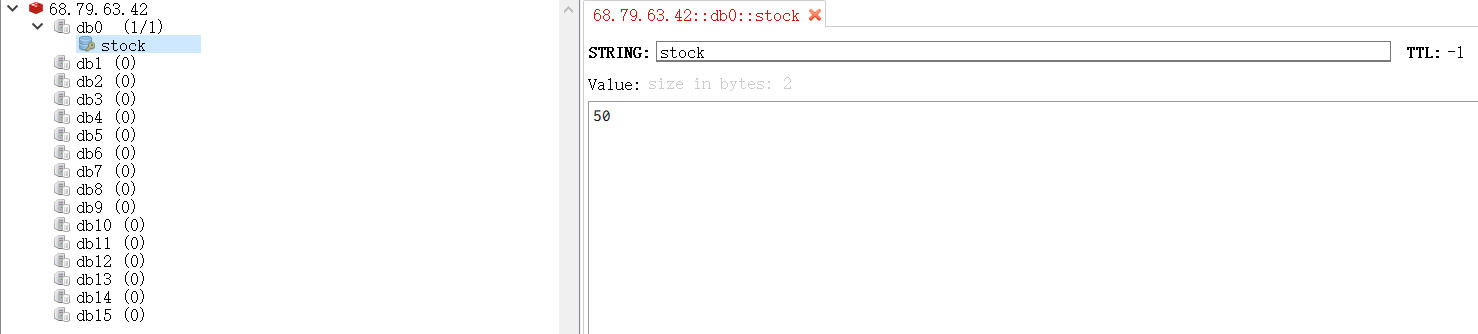
Step 5: set redis
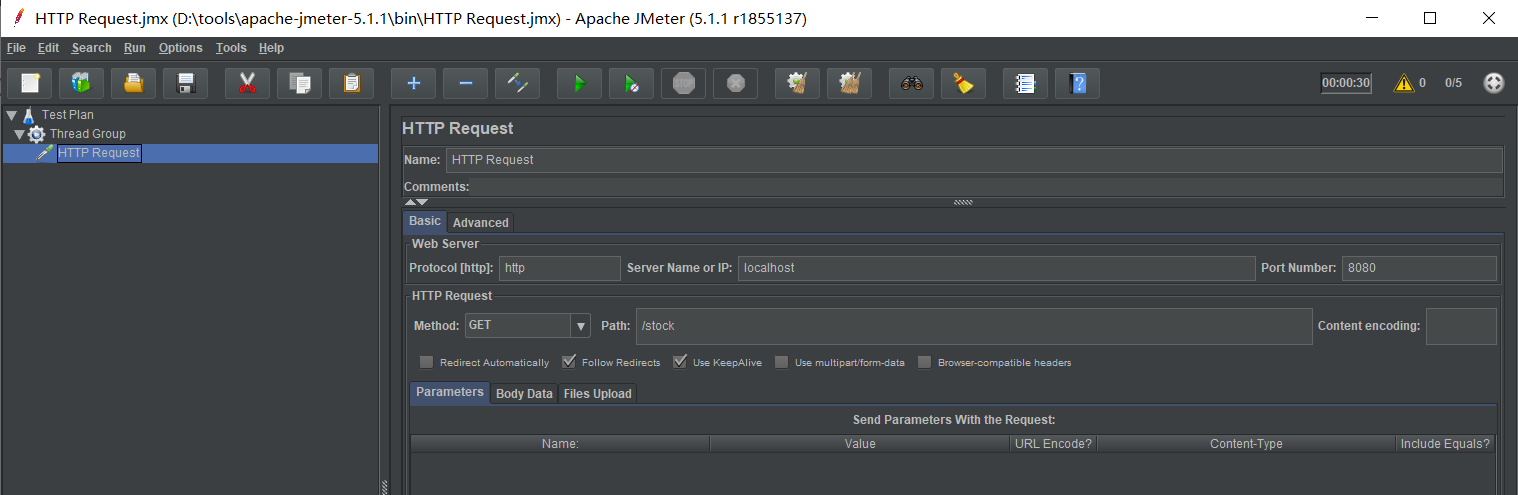
Test method: use jmeter for pressure test, as follows:
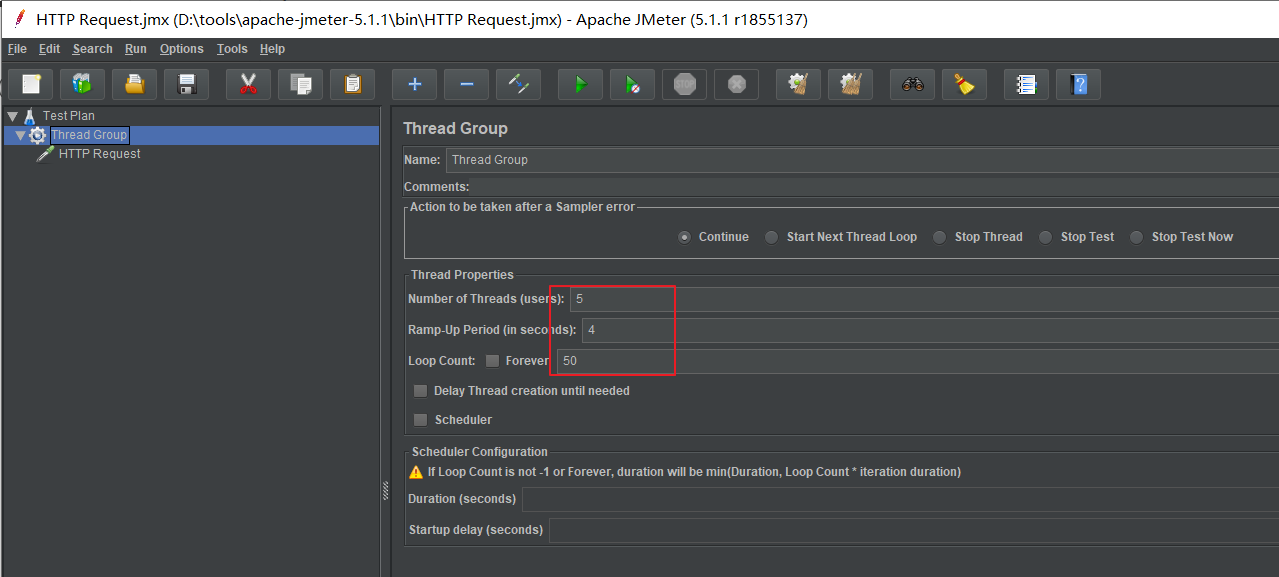
Note: Apache JMeter yes Apache Organization based development Java Pressure test tools. For stress testing software, it was originally designed for Web Application testing, but later extended to other testing areas.
Check the console output and find that thread concurrency has occurred, as follows:
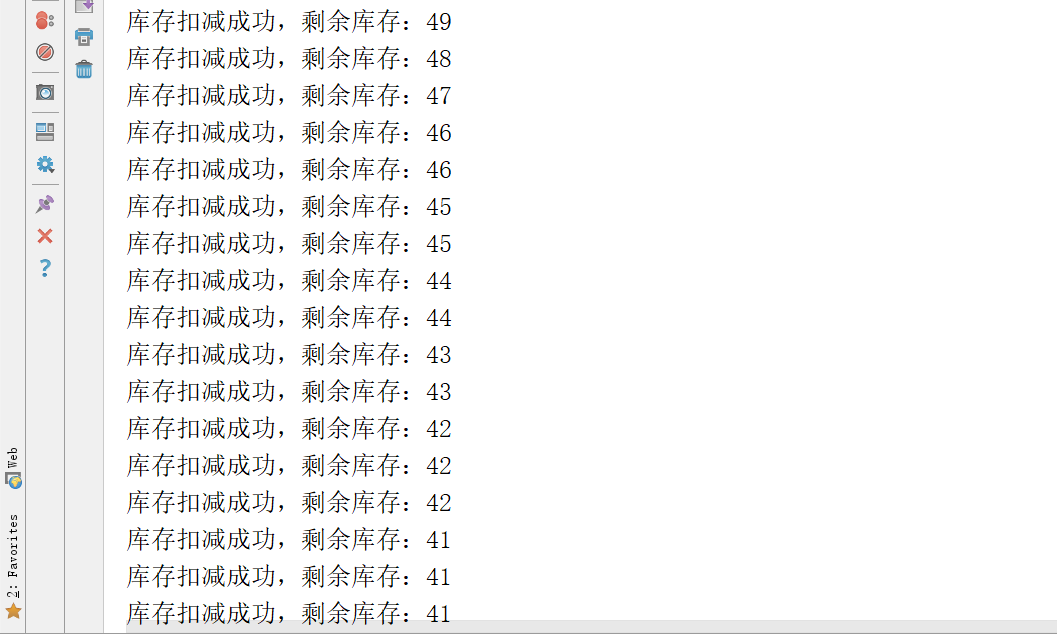
Since the current program is deployed in a Tomcat, that is, the program runs in a jvm, you can synchronize the inventory reduction code, as follows:
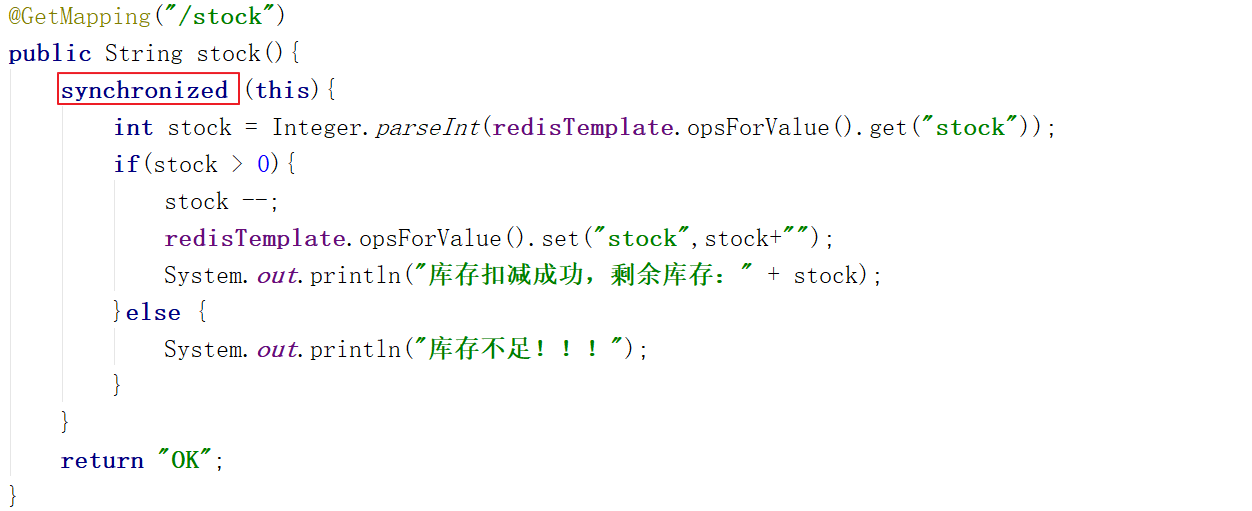
Test again (pay attention to recovering the data in redis). At this time, there is no thread concurrency problem. The console output is as follows:

This shows that if the program runs in a jvm, using synchronized can solve the thread concurrency problem.
Next, cluster the program (as shown in the figure below), load it through Nginx, and then test it.

Operation process:
Step 1: configure Nginx
    upstream upstream_name{
        server 127.0.0.1:8001;
        server 127.0.0.1:8002;
    }

    server {
        listen       8080;
        server_name  localhost;

        location / {
            proxy_pass http://upstream_name;
            proxy_set_header Host $host;
            proxy_set_header X-Real-IP $remote_addr;
            proxy_set_header X-Forwarded-For $proxy_add_x_forwarded_for;
        }
    }
Step 2: modify the application Change the port number in YML to 8001 and 8002 and start the program respectively
Step 3: test again with jemter, and you can see that the concurrency problem occurs again
1.3 characteristics of distributed lock
- In the distributed system environment, a method can only be executed by one thread of one machine at the same time
- High availability acquire lock and release lock
- High performance lock acquisition and release
- Reentrant feature
- It has a lock failure mechanism to prevent deadlock
- It has the non blocking lock feature, that is, if the lock is not obtained, it will directly return to the failure of obtaining the lock
2. Implementation scheme of distributed lock
2.1 database implementation of distributed lock
The core idea of implementing distributed lock based on database is to create a table in the database, which contains fields such as method name, and create a unique index on the method name field. To execute a method, first insert the method name into the table. If the insertion is successful, obtain the lock. After execution, delete the corresponding row data and release the lock. This method is based on the unique index of the database.
The structure of the table is as follows:

The specific implementation process is as follows (based on the previous lock test project):
Step 1: in POM Import maven coordinates from XML
<dependency>
    <groupId>com.baomidou</groupId>
    <artifactId>mybatis-plus-boot-starter</artifactId>
    <version>3.2.0</version>
</dependency>
<dependency>
    <groupId>mysql</groupId>
    <artifactId>mysql-connector-java</artifactId>
</dependency>
Step 2: configure the file application Configuring mybatis plus in YML
server:
  port: 8002
spring:
  redis:
    host: 68.79.63.42
    port: 26379
    password: itheima123
  application:
    name: lockTest
  datasource:
      driver-class-name: com.mysql.cj.jdbc.Driver
      url: jdbc:mysql://127.0.0.1:3306/dlock
      username: root
      password: root
mybatis-plus:
  configuration:
    map-underscore-to-camel-case: false
    auto-mapping-behavior: full
    #log-impl: org.apache.ibatis.logging.stdout.StdOutImpl
  mapper-locations: classpath*:mapper/**/*Mapper.xml
Step 3: create entity class
package com.itheima.entity;

import com.baomidou.mybatisplus.annotation.TableName;
import java.io.Serializable;

@TableName("mylock")
public class MyLock implements Serializable {
    private int id;
    private String methodName;

    public int getId() {
        return id;
    }

    public void setId(int id) {
        this.id = id;
    }

    public String getMethodName() {
        return methodName;
    }

    public void setMethodName(String methodName) {
        this.methodName = methodName;
    }
}
Step 4: create Mapper interface
package com.itheima.mapper;

import com.baomidou.mybatisplus.core.mapper.BaseMapper;
import com.itheima.entity.MyLock;
import org.apache.ibatis.annotations.Mapper;

@Mapper
public interface MyLockMapper extends BaseMapper<MyLock> {
    public void deleteByMethodName(String methodName);
}
Step 5: create Mapper mapping file mylockmapper. In the resources/mapper directory xml
<?xml version="1.0" encoding="UTF-8"?>
<!DOCTYPE mapper PUBLIC "-//mybatis.org//DTD Mapper 3.0//EN" "http://mybatis.org/dtd/mybatis-3-mapper.dtd">
<mapper namespace="com.itheima.mapper.MyLockMapper">
    <delete id="deleteByMethodName" parameterType="string">
        delete from mylock where methodName = #{value}
    </delete>
</mapper>
Step 6: Transform StockController
@Autowired
private MyLockMapper myLockMapper;

@GetMapping("/stock")
public String stock(){
    MyLock entity = new MyLock();
    entity.setMethodName("stock");

    try {
        //Insert data. If no exception is thrown, it indicates that the insertion is successful, that is, the lock is obtained
        myLockMapper.insert(entity);

        int stock = Integer.parseInt(redisTemplate.opsForValue().get("stock"));
        if(stock > 0){
            stock --;
            redisTemplate.opsForValue().set("stock",stock+"");
            System.out.println("Inventory deduction succeeded, remaining inventory:" + stock);
        }else {
            System.out.println("Insufficient inventory!!!");
        }

        //Release lock
        myLockMapper.deleteByMethodName("stock");
    }catch (Exception ex){
        System.out.println("Cannot perform inventory reduction operation without obtaining lock!!!");
    }

    return "OK";
}
By observing the console output, you can see that the thread concurrency problem has been solved in this way.
Note that although distributed locks can be implemented using the database method, there are still some problems with this implementation method:
1. Because it is implemented based on the database, the availability and performance of the database will directly affect the availability and performance of the distributed lock. Therefore, the database needs dual computer deployment, data synchronization and active / standby switching;
2. It does not have the reentrant feature, because the row data always exists before the same thread releases the lock, and the data cannot be successfully inserted again. Therefore, a new column needs to be added in the table to record the information of the machine and thread currently obtaining the lock. When obtaining the lock again, first query whether the information of the machine and thread in the table is the same as that of the current machine and thread, If it is the same, obtain the lock directly;
3. There is no lock invalidation mechanism, because it is possible that after successfully inserting data, the server goes down, the corresponding data is not deleted, and the lock cannot be obtained after the service is restored. Therefore, a new column needs to be added in the table to record the invalidation time, and there needs to be a regular task to clear these invalid data;
4. It does not have the blocking lock feature, and the failure is directly returned if the lock is not obtained. Therefore, it is necessary to optimize the acquisition logic and cycle for multiple times.
5. In the process of implementation, we will encounter various problems. In order to solve these problems, the implementation method will be more and more complex; Depending on the database requires a certain resource overhead, and the performance needs to be considered.
2.2 ZooKeeper realizes distributed lock
ZooKeeper implements distributed locks
2.3 Redis implements distributed locks
Redis is relatively simple to implement distributed locks, that is, it calls the set command of redis to set the value. If it can be set successfully, it means that the lock is successfully added, that is, the lock is obtained. The set key value is deleted by calling the del command, that is, the lock is released.
2.3.1 version I
Lock command: set lock_key lock_value NX
Unlock command: del lock_key
Java program:
@GetMapping("/stock")
public String stock() {
    try {
        //Try locking
        Boolean locked = redisTemplate.opsForValue().setIfAbsent("mylock", "mylock");
        if(locked){//Locking succeeded
            int stock = Integer.parseInt(redisTemplate.opsForValue().get("stock"));
            if(stock > 0){
                stock --;
                redisTemplate.opsForValue().set("stock",stock+"");
                System.out.println("Inventory deduction succeeded, remaining inventory:" + stock);
            }else {
                System.out.println("Insufficient inventory!!!");
            }
            //Release lock
            redisTemplate.delete("mylock");
        }else{
            System.out.println("Cannot perform inventory reduction operation without obtaining lock!!!");
        }
    }catch (Exception ex){
        System.out.println("Exception occurred!!!");
    }

    return "OK";
}
2.3.2 version II
There is a problem in the implementation of version 1 above, that is, when a thread gets the lock, the program hangs, and there is no time to release the lock, so all subsequent threads can't get the lock. To solve this problem, you can set an expiration time to prevent deadlock.
Lock command: set lock_key lock_value NX PX 5000
Unlock command: del lock_key
Java program:
@GetMapping("/stock")
public String stock() {
    try {
        //Try locking
        Boolean locked = redisTemplate.opsForValue().setIfAbsent("mylock", "mylock",5000,TimeUnit.MILLISECONDS);
        if(locked){//Locking succeeded
            int stock = Integer.parseInt(redisTemplate.opsForValue().get("stock"));
            if(stock > 0){
                stock --;
                redisTemplate.opsForValue().set("stock",stock+"");
                System.out.println("Inventory deduction succeeded, remaining inventory:" + stock);
            }else {
                System.out.println("Insufficient inventory!!!");
            }
            //Release lock
            redisTemplate.delete("mylock");
        }else{
            System.out.println("Cannot perform inventory reduction operation without obtaining lock!!!");
        }
    }catch (Exception ex){
        System.out.println("Exception occurred!!!");
    }

    return "OK";
}
2.3.3 version III
For the previous version 2, there is another point that needs to be optimized, that is, locking and unlocking must be the same client, so the current thread id can be set when locking, and whether to add the lock for the current thread can be determined when releasing the lock. If so, release the lock again.
Java program:
@GetMapping("/stock")
public String stock() {
    try {
        String threadId = Thread.currentThread().getId()+"";
        //Try locking
        Boolean locked = redisTemplate.opsForValue().setIfAbsent("mylock",threadId,5000,TimeUnit.MILLISECONDS);
        if(locked){//Locking succeeded
            int stock = Integer.parseInt(redisTemplate.opsForValue().get("stock"));
            if(stock > 0){
                stock --;
                redisTemplate.opsForValue().set("stock",stock+"");
                System.out.println("Inventory deduction succeeded, remaining inventory:" + stock);
            }else {
                System.out.println("Insufficient inventory!!!");
            }
            String myValue = redisTemplate.opsForValue().get("mylock");
            if(threadId.equals(myValue)){
                //Release lock
                redisTemplate.delete("mylock");
            }
        }else{
            System.out.println("Cannot perform inventory reduction operation without obtaining lock!!!");
        }
    }catch (Exception ex){
        System.out.println("Exception occurred!!!");
    }

    return "OK";
}
3. Redisson
3.1 introduction to redisson
Redisson Is set up in Redis A Java in memory data grid based on. It makes full use of a series of advantages provided by Redis key database and provides users with a series of common tool classes with distributed characteristics based on common interfaces in Java utility toolkit. As a tool kit for coordinating single machine multithreaded concurrent programs, it has the ability to coordinate distributed multi machine multithreaded concurrent systems, which greatly reduces the difficulty of designing and developing large-scale distributed systems. At the same time, combined with various characteristic distributed services, it further simplifies the cooperation between programs in the distributed environment.
Redisson has built-in Redis based distributed lock implementation, which is our recommended way to use distributed locks.
The maven coordinates of Redisson are as follows:
<dependency>
    <groupId>org.redisson</groupId>
    <artifactId>redisson</artifactId>
    <version>3.10.1</version>
</dependency>
3.2 Redisson distributed lock usage
Step 1: in POM Import maven coordinates of redisson in XML
<dependency>
    <groupId>org.redisson</groupId>
    <artifactId>redisson</artifactId>
    <version>3.10.1</version>
</dependency>
Step 2: write configuration class
package com.itheima.config;
import org.redisson.Redisson;
import org.redisson.api.RedissonClient;
import org.redisson.config.Config;
import org.springframework.beans.factory.annotation.Value;
import org.springframework.context.annotation.Bean;
import org.springframework.context.annotation.Configuration;

@Configuration
public class RedissonConfig {
    @Value("${spring.redis.host}")
    private String host;
    @Value("${spring.redis.port}")
    private String port;
    @Value("${spring.redis.password}")
    private String password;

    @Bean
    public RedissonClient redissonClient(){
        Config config = new Config();
        config.useSingleServer().setAddress("redis://" + host + ":" + port);
        config.useSingleServer().setPassword(password);
        final RedissonClient client = Redisson.create(config);
        return client;
    }
}
Step 3: transform the Controller
@Autowired
private RedissonClient redissonClient;

@GetMapping("/stock")
public String stock() {
    //Obtain the distributed lock object. Note that locking is not successful at this time
    RLock lock = redissonClient.getLock("mylock");
    try {
        //Try to lock. If the locking is successful, the subsequent program will continue to execute. If the locking is unsuccessful, block and wait
        lock.lock(5000,TimeUnit.MILLISECONDS);

        int stock = Integer.parseInt(redisTemplate.opsForValue().get("stock"));
        if(stock > 0){
            stock --;
            redisTemplate.opsForValue().set("stock",stock+"");
            System.out.println("Inventory deduction succeeded, remaining inventory:" + stock);
        }else {
            System.out.println("Insufficient inventory!!!");
        }
    }catch (Exception ex){
        System.out.println("Exception occurred!!!");
    }finally {
        //Unlock
        lock.unlock();
    }

    return "OK";
}
3.3 Lua script
3.3.1 introduction to Lua
Lua is a lightweight and compact scripting language, which is written in standard C language and open in the form of source code. Its design purpose is to be embedded in the application, so as to provide flexible expansion and customization functions for the application.
From redis2 Since version 6.0, EVAL and EVALSHA commands are provided, which can execute Lua scripts.
3.3.2 benefits of using Lua in redis
Benefits of using Lua in Redis:
- Reduce network overhead. Multiple requests can be sent at one time in the form of script to reduce network delay
- Atomic operation. redis will execute the entire script as a whole and will not be inserted by other commands. Therefore, there is no need to worry about race conditions and transactions during scripting
- Reuse. The script sent by the client will be permanently stored in redis, so that other clients can reuse the script without using code to complete the same logic
3.3.3 how to use Lua in Redis
There are three main commands for using Lua script in redis
- eval
- evalsha
- script load
eval is used to directly execute lua scripts. The usage is as follows:
EVAL script numkeys key [key ...] arg [arg ...]
Key represents the redis key to operate
arg can pass custom parameters
numkeys is used to determine how many keys there are
Script is the lua script you wrote
The lua script uses KEYS[1] and ARGV[1] to get the first key and the first arg passed, and so on
give an example:
eval "return redis.call('set',KEYS[1],ARGV[1])" 1 city beijing
eval "return redis.call('set','name','xiaoming')" 0
eval "return redis.call('del',KEYS[1])" 1 city
eval "return redis.call('get',KEYS[1])" 1 name
eval "if (redis.call('exists', KEYS[1]) == 0) then redis.call('set', KEYS[2], ARGV[1]); redis.call('expire', KEYS[2], ARGV[2]);return nil;end;" 2 citys city beijing 5000
When using the eval command, you can notice that the executed script must be sent every time, which will inevitably have a certain network overhead. Therefore, redis caches the lua script through script load and evalsha:
SCRIPT LOAD script
EVALSHA sha1 numkeys key [key ...] arg [arg ...]
give an example:
script load "return redis.call('get',KEYS[1]);"
evalsha 0e11c9f252fd76115c38403ce6095872b8c70580 1 name