Write before
- Share some knowledge about storage on Linux with your buddies
- This part of things is almost useless, but it needs a clear definition
- The article covers:
- Linux file storage, LVM-related concepts
- Format partitions using the Linxu file system, mount partitions
- Adjust logical volumes, add swap partitions, etc. Actual Demo
- The following concepts can be distinguished
- Primary partition, extended partition, logical partition, swap partition, volume group, physical volume, logical volume, VDO volume, etc.
Suicide is not necessarily weakness, it is often a firm protest, a cruel and helpless way for a fresh and lovely heart to demand meaning from life. ------- Shi Tiesheng's Me and the Tan
1. Standard Partition File Storage
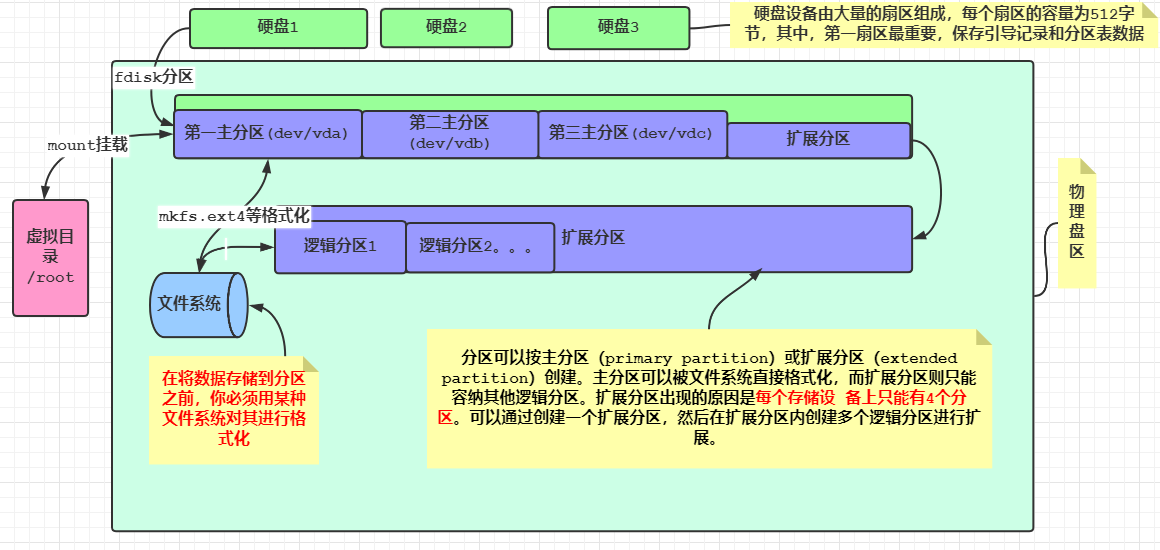
Normally when we get a disk, we use lsblk to view the partition, then fdisk or parted to partition, then mkfs-related specified file system will be used to format the partition, and mount to the corresponding directory, then we can use the directory normally. The order is as follows:
- Identify disks (lsblk)
- partition
- fdisk(MSDOS partition table)
- gdisk(GPT Partition Table > 2.2TB disk)
- Parted (either)
- Formatting (mkfs related)
- Mount
- Access mount point
Specific process
$lsblk    #View partition status
$fdisk /dev/vdc     #Partition/dev/vdc hard drives using the fdisk partitioning tool
p Query partition status
q Exit without saving
n New partition
Select (default p):      #Enter, default is primary partition
Partition number (1-4, default 1):     #The default number of the first partition is 1
First sector :     #Start sector, direct return
Last sector       +500M      #Create a 500M partition
w    #Save Exit
$partprobe /dev/vdb perhaps partx -a /dev/vdb  #Refresh the hard disk partition table:
$mkfs.xfs /dev/vdc1     #Format this partition for vdc1 using the xfs file system
$mount   /dev/vdc1   /mnt    #Mount the new partition into the / mnt directory
$df -h   #h View mount information
$umount   /dev/vdc1   #Unload partition
Below is the storage distribution for my machine. You can see that there is only one disk, two partitions, a normal partition, mounted to the root directory, and a swap partition
┌──[root@liruilongs.github.io]-[~]
└─$ lsblk
NAME   MAJ:MIN RM  SIZE RO TYPE MOUNTPOINT
sda      8:0    0  200G  0 disk
├─sda1   8:1    0  150G  0 part /
└─sda2   8:2    0   10G  0 part [SWAP]
┌──[root@liruilongs.github.io]-[~]
└─$
2. File storage using LVM
We created a file system on the hard disk using the standard partition above, and adding extra space to an existing file system is a painful experience. We can only resize partitions within the available space of the same physical hard disk.
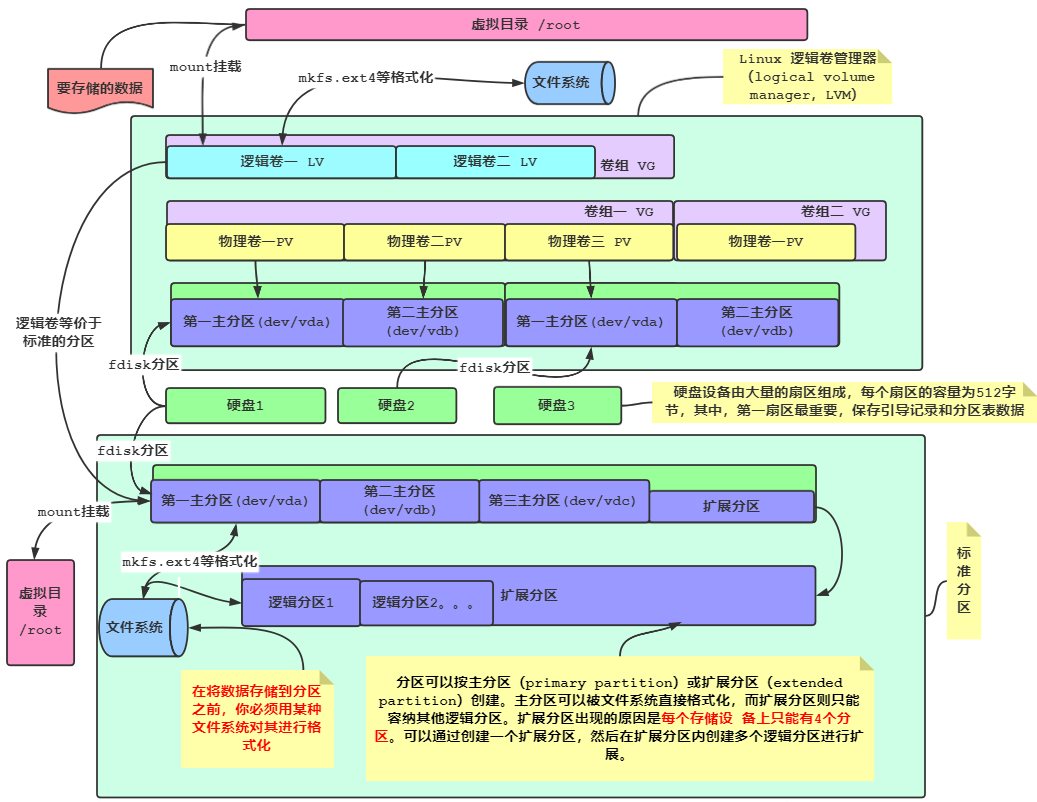
Using the Linux logical volume manager (LVM), you can easily manage disk space without rebuilding the entire file system.
What is LVM
Multiple physical volumes (physical partitions) can be grouped together to form a volume group (VG) through LVM. Logical volume management systems treat a volume group as a physical hard disk, but in fact a volume group may consist of multiple physical partitions distributed across multiple physical hard disks. Volume groups provide a platform for creating logical partitions that contain the file system.
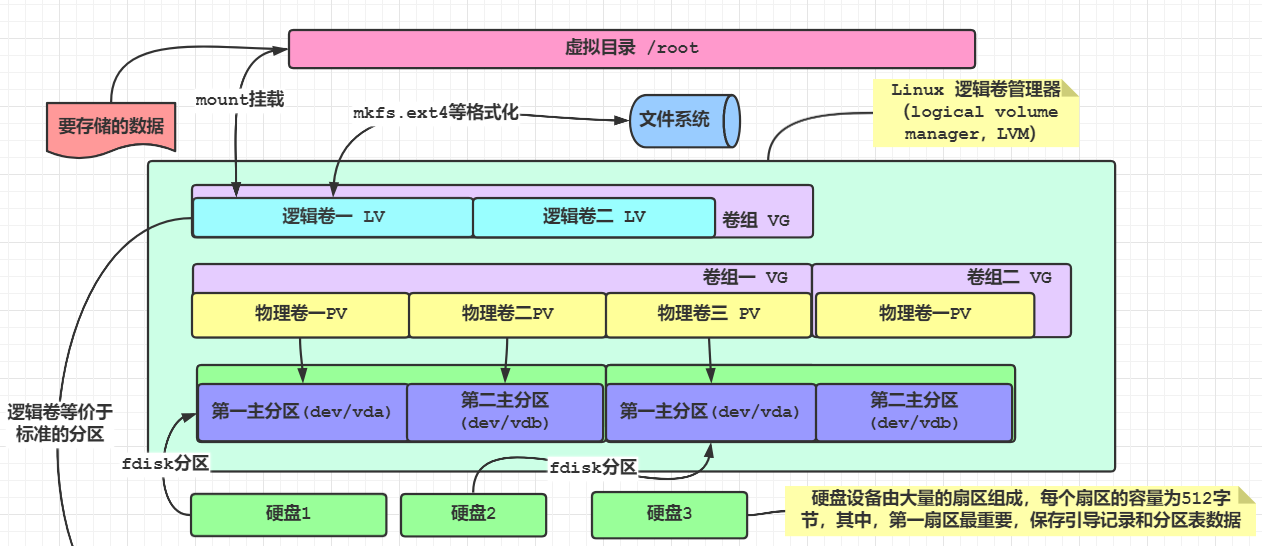
The last layer in the entire structure is the logical volume (LV). Logical volumes provide Linux with a partitioning environment for creating file systems similar to the physical hard disk partitions in Linux that we have been exploring so far. Linux systems treat logical volumes as physical partitions. You can use any standard Linux file system to format the logical volume and then add it to a mount point in the Linux virtual directory.
The idea of LVM Logical Volume Management mechanism is: zero (physical volume PV) to whole (volume group VG), dynamic scaling, on-demand (logical volume LV) allocation. Organize scattered partitions (PV physical devices (physical volumes)) into large volume groups (VG virtual disks) and obtain space as needed (virtual partition LV)
Links between physical volumes, logical volumes, volume groups, snapshot volumes
- Physical Volume (PV): refers to the hard disk partition, or the entire hard disk or the created soft RAID, which is the basic storage device of the LVM.
- Volume Group (VG): A storage pool consisting of one or more physical volumes on which one or more logical volumes can be created.
- Logical Volume (LV): Like hard disk partitions in non-LVM systems, it is built on volume groups and is a standard block device on which file systems can be built.
- Snapshot initial Linux LVM allows you to copy a logical volume to another device while it is online. Traditional backup methods usually lock files when copying them to backup media. Snapshots allow you to ensure critical tasks are running while replicating.
It is conceivable to understand the relationship between the above three: if PV is compared to a plate of the earth, VG is a globe, because the earth is made up of multiple plates, then dividing a region on the globe and labeling it as Asia would equate to an LV.
Interrelation: When you create a volume group, you must reserve space for snapshots of logical volumes. Then the snapshot accesses another entry into the logical volume. As soon as you add a physical volume to the volume group, the physical space provided by the physical volume is divided into blocks that were called PE (Physical Extend) before it was formatted. It is a small box of logical storage. The size of a volume group is composed of multiple PE. The size of a logical volume is to put PE in a logical volume. At this time, PE is no longer called PE, but LE(Logical Extend). In fact, LE in a logical volume is also called PE, but just stand at different angles.
If a physical volume is damaged, the LE stored in the logical volume will also be damaged. To keep the data intact, mirror the PE in the physical volume. The mirror is a complete copy of a logical volume that is updated in real time. When you create a mirrored logical volume, the LVM synchronizes the original logical volume into the mirrored copy
LVM Management Tools
- Physical volume operations (rarely used): pvscan, pvdisplay, pvcreate
- Volume group operations: vgscan (scan), vgdisplay (display), vgcreate, vgremove, vgextend (expansion)
- Logical volume operations: lvscan, lvdisplay, lvcreate, lvremove, lvextend (PE: smallest unit when allocating logical volume space, default is 4M)
Create a volume group:
Create a volume group before creating a logical volume, and then divide the space from the volume group to the logical volume. Syntax:
$vgcreate [-s PE Size] Volume Group Name Partition.. ..
demo
$vgcreate /dev/myvg /dev/vdb2     #Normally create volume group, default extension unit is 4M
$vgdisplay  /dev/myvg   #You can see the size of the expansion unit in the PE column
$vgremove /dev/myvg   #Delete volume group myvg
$vgcreate -s 16MiB /dev/myvg /dev/vdb2    #Create a volume group with an extension unit of 16MiB (currently required for exercises) and then view the PE size with vgdisplay
Expand Volume Group
vgextend Volume Group Name Partition.. ..
Create logical volumes:
grammar
$lvcreate  -L  Size  -n  Name Volume Group Name
$lvcreate  -l  PE Number  -n  Name Volume Group Name
demo
$lvcreate -n mylv -L 800M /dev/myvg    #Create normally
$lvcreate -n mylv -l 50 /dev/myvg    #Once created in the number of extension units, it can be viewed with vgs
$vgs     #View logic
Extended Logical Volume:
$lvextend -L 300M /dev/test/vo    #Expand the logical volume named vo to 300M

$blkid /dev/test/vo    #View the file system of the vo logical volume
$lsblk    #View the mount point of the logical volume again
$xfs_growfs /vo    #Refresh size, if xfs file system
$resize2fs  /vo     #Refresh size, if ext file system
Device Location for Logical Volumes
/dev/Volume Group Name/Logical Volume Name
 perhaps
/dev/mapper/Volume Group Name-Logical Volume Name
Scan Disk LVM Information
$vgscan
  Reading all physical volumes.  This may take a while...
  Found volume group "myvg" using metadata type lvm2
  Found volume group "test" using metadata type lvm2
  Found volume group "rhel" using metadata type lvm2
$pvscan
  PV /dev/vdb2   VG myvg            lvm2 [1008.00 MiB / 208.00 MiB free]
  PV /dev/vdb1   VG test            lvm2 [<2.00 GiB / <1.67 GiB free]
  PV /dev/vda2   VG rhel            lvm2 [<29.00 GiB / 0    free]
  Total: 3 [<31.98 GiB] / in use: 3 [<31.98 GiB] / in no VG: 0 [0   ]
$lvscan
  ACTIVE            '/dev/myvg/mylv' [800.00 MiB] inherit
  ACTIVE            '/dev/test/vo' [336.00 MiB] inherit
  ACTIVE            '/dev/rhel/swap' [<2.17 GiB] inherit
  ACTIVE            '/dev/rhel/root' [<26.83 GiB] inherit
$lsblk
NAME          MAJ:MIN RM  SIZE RO TYPE MOUNTPOINT
sr0            11:0    1 1024M  0 rom
vda           252:0    0   30G  0 disk
├─vda1        252:1    0    1G  0 part /boot
└─vda2        252:2    0   29G  0 part
  ├─rhel-root 253:0    0 26.8G  0 lvm  /
  └─rhel-swap 253:1    0  2.2G  0 lvm  [SWAP]
vdb           252:16   0   10G  0 disk
├─vdb1        252:17   0    2G  0 part
│ └─test-vo   253:2    0  336M  0 lvm  /vo
└─vdb2        252:18   0    1G  0 part
  └─myvg-mylv 253:3    0  800M  0 lvm
vdc           252:32   0   10G  0 disk
└─vdc1        252:33   0  500M  0 part /mnt
$
III. VDO Volumes
What is a VDO volume
A virtual data optimizer that filters and removes data:
VDO (Virtual Data Optimize), a new storage technology introduced on RHEL8/Centos8 (first tested in beta version 7.5), is a technology acquired by Redhat Permabit.
The main purpose of VDO is to save disk space, such as allowing 1T disks to hold 1.5T of data, thereby reducing the cost of data centers.
How does the vdo work? The key principle is to delete and compress. Redeletion is to copy the same data to the hard disk. It used to take up more space, but now it only needs one space. Similar to the large software installation package we upload in Baidu's netdisk, it can transfer seconds, which is actually pre-existing, so there is no need to upload again, and no need to occupy a space in Baidu. On the other hand, data compression, similar to the algorithm for compressing software, can also save more disk space.
VDO is a kernel module designed to reduce disk space occupancy and replication bandwidth through deletion. VDO is based on the block device layer, that is, mapper virtual devices are mapped on the original device and then used directly. The implementation of the function is mainly based on the following technologies:
Exclusion of Zero Blocks: In the initialization phase, the whole zero block is recorded by metadata, which can be explained by an example of mixing water and sand in a water cup, filtering out sand (non-zero space) using a paper filter (zero block exclusion), and then proceeding to the next stage of processing.
Duplicate data deletion: In the second stage, the input data is judged to be redundant (before it is written), this part of the data is judged by the UDS kernel module (Universal Deduplication Service), the part judged to be duplicate data is not written, and the metadata is updated. Point directly to the original stored data block.
Compression: Once zeroing and deletion are complete, LZ4 compression processes each individual block of data, and then the compressed block is stored on the media as a fixed size of 4KB, which also accelerates read performance because a physical block can contain a large number of compressed blocks.
vdo basic operations:
- VDO create--name=VDO volume name--device=device path--vdoLogicalSize=logical size
- vdo list
- VDO status-n VDO volume name
- vdostats [- human-readable] [/dev/mapper/VDO volume name]
- VDO remove-n VDO volume name
Create VDO Volume
$yum  -y  install  vdo     #Packing
$systemctl restart vdo   #Start the service and set the startup self-start
# vdc disk found (this disk cannot be configured before)
$man  vdo   #Search/example, find related configuration commands in the example
$vdo create --name=vdo0 --device=/dev/sdb1 --vdoLogicalSize=10T    #Name is the name of the vdo volume, which physical disk is used by device, and finally, the virtual disk size is defined

$mkfs.xfs  -K   /dev/mapper/myvdo    #Format `-K to speed up`
#Set/etc/fstab file and use Mount-a to detect
/dev/mapper/myvdo /vblock xfs _netdev 0 0      #	`_ The purpose of netdev is to wait for the network-related programs to start before performing the mount task. Usually after the network starts, the vdo service will get up, and then it can be mounted`
4. Exchange zoning
What is a swap partition
Virtual memory equivalent to win, borrows hard disk space when physical memory is low, pre-divides a certain amount of space on the hard disk, and temporarily stores data temporarily not commonly used in memory on the hard disk to free up physical memory space for more active program services. The technology is designed to solve the real physical memory shortage problem.
However, since swap partitions read and write data through hard disk devices, they are certainly slower than physical memory, so the swap partition's resources will not be invoked until the real physical memory is exhausted.
Swap partition: Virtual memory, typically set to 1-2 times physical memory, <16G
Format Exchange Partition
$swapon -s    #Query the status of the swap partition. There is usually a default swap partition that cannot be deleted
# Create a 512M partition with fdisk/dev/vdb first, for example, create vdb3
$mkswap  /dev/vdb3    #Format Exchange Partition
$vim /etc/fstab   ##Modify files on boot mounted disks
/dev/vdb3   swap     swap    defaults        0 0
$swapon  -a  #Test that the above files are correctly modified
$swapon -s  #Viewing again will add swap partitions
Enable/Stop/View Swap Partition Usage:
$swapon   Device Path
$swapoff   Device Path
$swapon  -s
$free
5. Actual Warfare
Adjust logical volume size:
Adjust the logical volume vo and its file system size to 300MiB. Ensure that the file system contents remain unchanged.
$lvscan #Find Logical Volume to Expand
$lvextend -L 300MiB /dev/test/vo #Extended Logical Volume
$blkid /dev/test/vo #Check file system format
$xfs_growfs Mount Point for Logical Volume #For XFS file systems or
$resize2fs Mount Point for Logical Volume #Applicable to EXT2/3/4 file system
Add a swap partition:
$fdisk /dev/vdb #Modify disk vdb
.. ..
Command (m for help): n #Add a new partition
Partition number (2-128, default 2): #Direct Enter (Default)
First sector (4194304-20971486, default 4194304): #Direct Enter (Default)
Last sector, *sectors or +size{K,M,G,T,P} (4194304-20971486,default 20971486): +512M
Created a new partition 2 of type 'Linux filesystem' and of size 512 MiB.
Command (m for help): w #Save partition table and exit
The partition table has been altered.
Syncing disks.
$partprobe /dev/vdb #Refresh partition table
$mkswap /dev/vdb2 #Format self-built partition vdb2
$vim /etc/fstab
/dev/vdb2 swap swap defaults 0 0
$swapon -a #Enable switching devices in fstab
$swapon -s #View swap partition information
Create volume group logical volumes:
Create a new logical volume based on the following requirements:
- The name of the logical volume is mylv, belongs to the myvg volume group, and is 50 extension units in size
- Logical volume extensions in volume group myvg should be 16MiB in size
- Format logical volume mylv using vfat file system
- This logical volume should be automatically mounted to the / mnt/mydata directory at system startup
$fdisk /dev/vdb $Modify Disk vdb
.. ..
Command (m for help): n #Add a new partition
Partition number (3-128, default 3): #Direct Enter (Default)
First sector (5242880-20971486, default 5242880): #Direct Enter (Default)
Last sector, *sectors or +size{K,M,G,T,P} (5242880-20971486,default 20971486): +1000M
Created a new partition 3 of type 'Linux filesystem' and of size 1000 MiB.
Command (m for help): w #Save partition table and exit
The partition table has been altered.
Syncing disks.
$partprobe /dev/vdb #Refresh partition table
$vgcreate -s 16MiB myvg /dev/vdb3 #Volume building group (using partition vdb3)
$lvcreate -l 50 -n mylv myvg #Build Logical Volume
$mkfs.vfat /dev/myvg/mylv #Format
$mkdir /mnt/mydata #Create mount point directory
$vim /etc/fstab #Set Up Mount
/dev/myvg/mylv /mnt/mydata vfat defaults 0 0
$mount -a #Enable & test boot mount
Creating VDO volumes using VDO
Create a new VDO volume according to the following requirements:
- Use unpartitioned disks (/dev/vdc)
- The name of this VDO volume is myvdo
- The logical size of this VDO volume is 50G
- This VDO volume is formatted using the xfs file system
- This VDO volume is automatically mounted to the / vblock directory at system startup
$yum install vdo #Packing
$systemctl enable --now vdo #Start Service
$vdo create --name=myvdo --device=/dev/vdc --vdoLogicalSize=50G
 #New VDO Volume
$mkfs.xfs -K /dev/mapper/myvdo #Format
#Or mkfs. Ext4-E nodiscard...
$mkdir /vblock #Create mount point directory
$vim /etc/fstab
/dev/mapper/myvdo /vblock xfs _netdev 0 0
$mount -a #Enable & test boot mount