premise
Recently, I'm learning the reverse of app. I'm going to build an app myself, and then make a spoof of it with reverse tools.
choice
The tangle is whether to use Mac app or IOS app. After a tangle, I chose Mac app.
reason:
- Development experience
You don't need a simulator for Mac app s. The castrated version of the MAC for 15 years ran from the simulator, which was called a noise and card. - Development efficiency
If the computer is too laggy, the development efficiency will be higher, mainly because the mood will be good, otherwise, if the card is too long, it will be very annoying when writing code. - simple
Just open XCode and run directly.
Go to the pit
- It's not easy to think
I think the development is similar to that of IOS, but there are few articles about the development of Mac app The number of app s is also small - In the past, Objective-C has always been an important language in Apple's ecology. In recent years, although it mainly promotes Swift, it should not die, right?
I didn't expect that there are too few Objective-C developers now - XCode 11
Well, you're right. It's XCode11. This version of XCode UI should be updated, so all the articles I can find are written in Objective-C. at that time, the XCode UI was different from the current UI - StoryBoard
Responsible for UI layer display. There are many magic operations. If you can't find it, it's JJ. You can't play it at all. Of course, apple now mainly promotes SwiftUI, so... I always feel that Microsoft is really good when I use it. winform drag control is really simple.- Bind a click event to a button
I haven't been able to find how the storyboard UI is associated with the controller for nearly a day, and then naturally I can't find the click event of the button- How to associate controller s
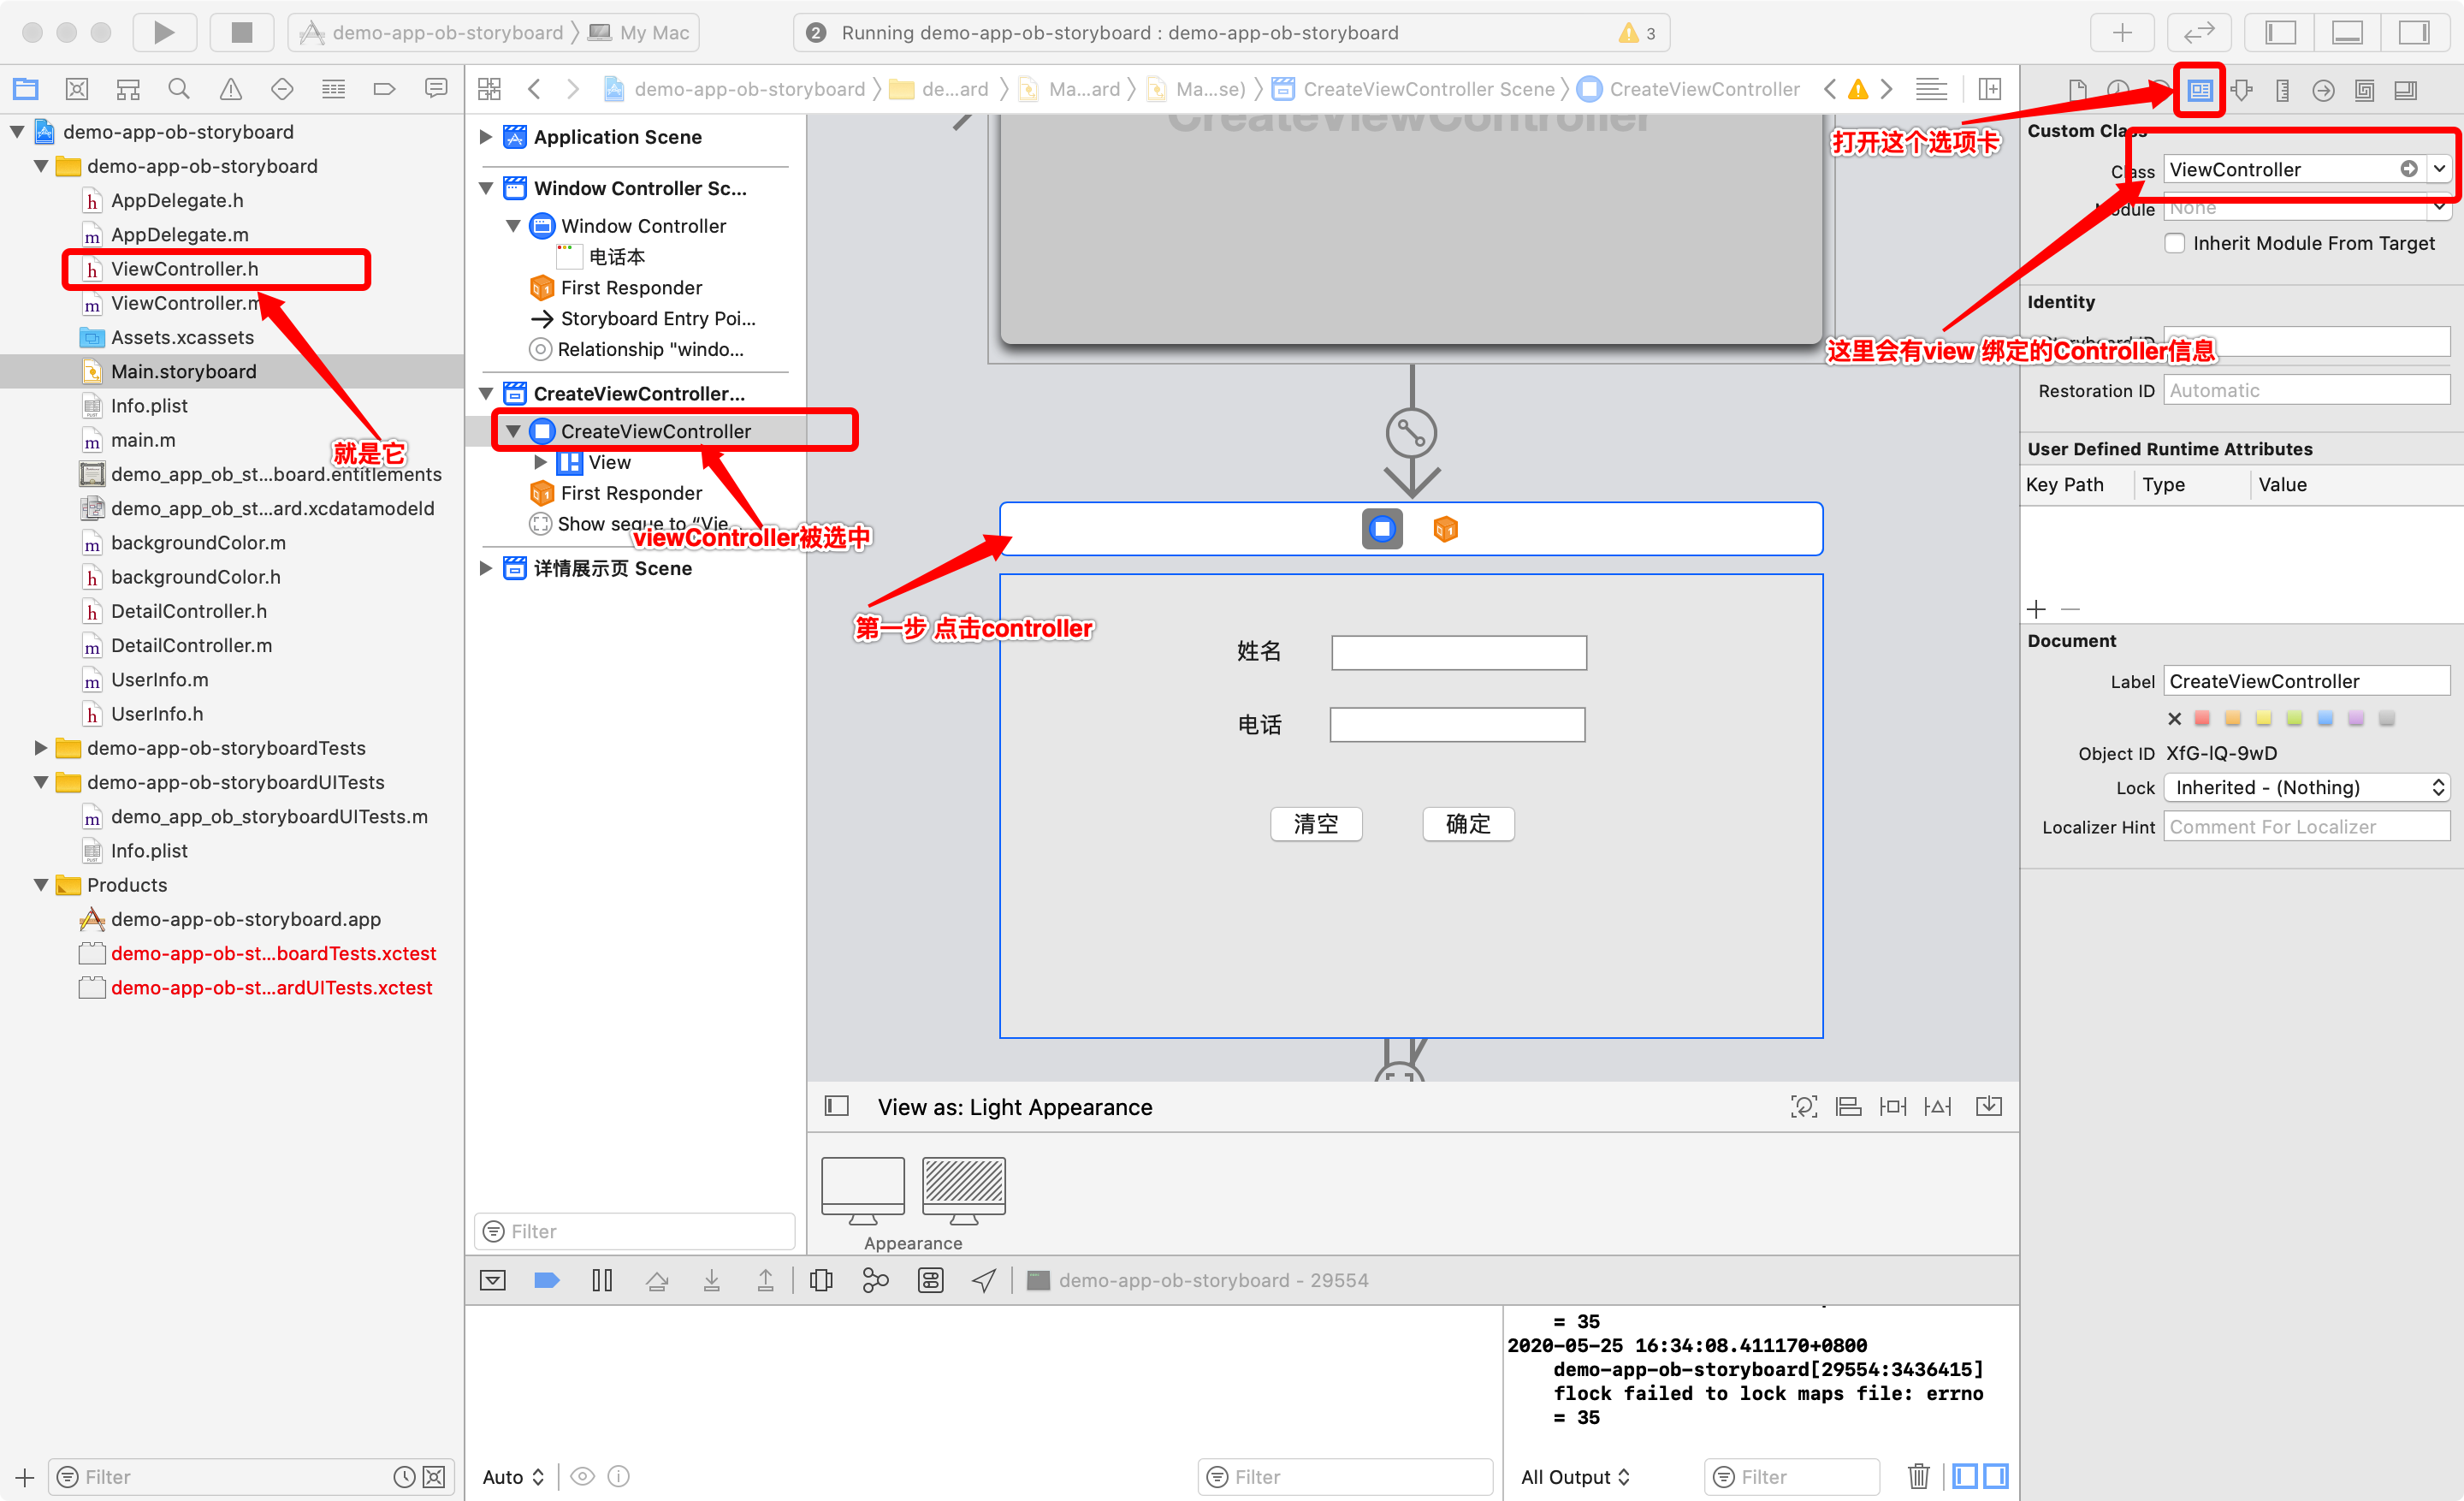
#import <Cocoa/Cocoa.h>
@interface ViewController : NSViewController
@end
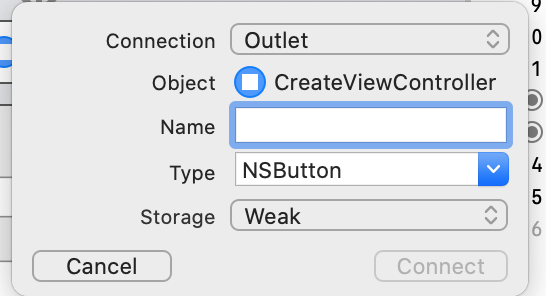
- How to add a click event to a button
-
Open the storyboard file in xcode and find the button you want to add the click event.
-
Find the associated controller in the file list on the left, press and hold the option key, and then click. There are two screens, one is storyboard and the other is code
-
Hold down the control key, click the button and drag to the code file.
-
dialog appears and fill in your content
-
end
Simple gif
-
- How to associate controller s
- Bind a click event to a button
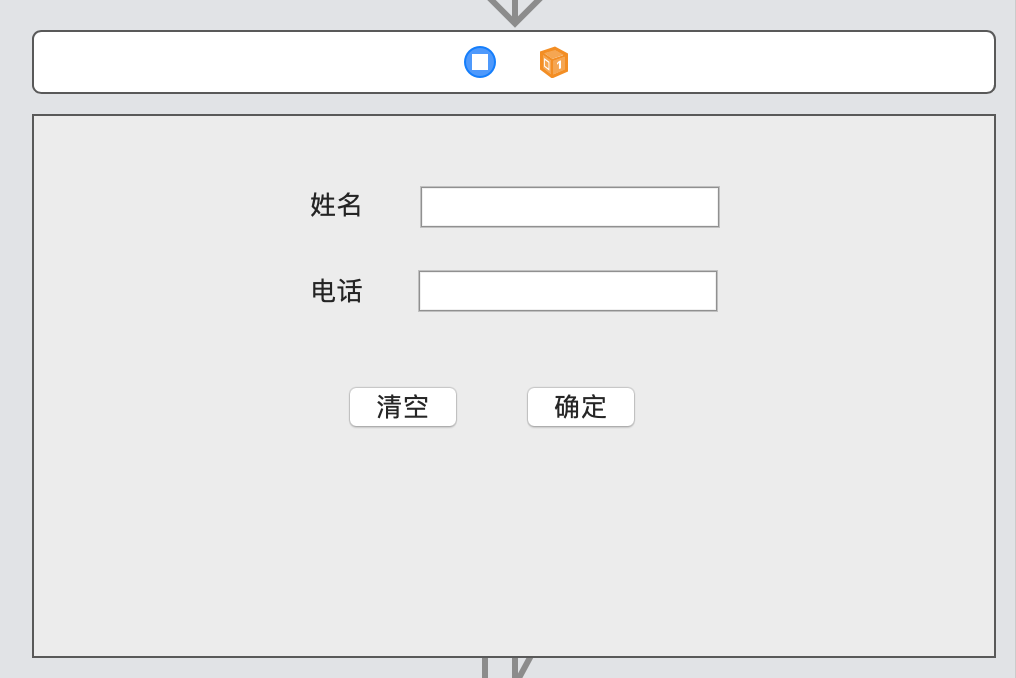
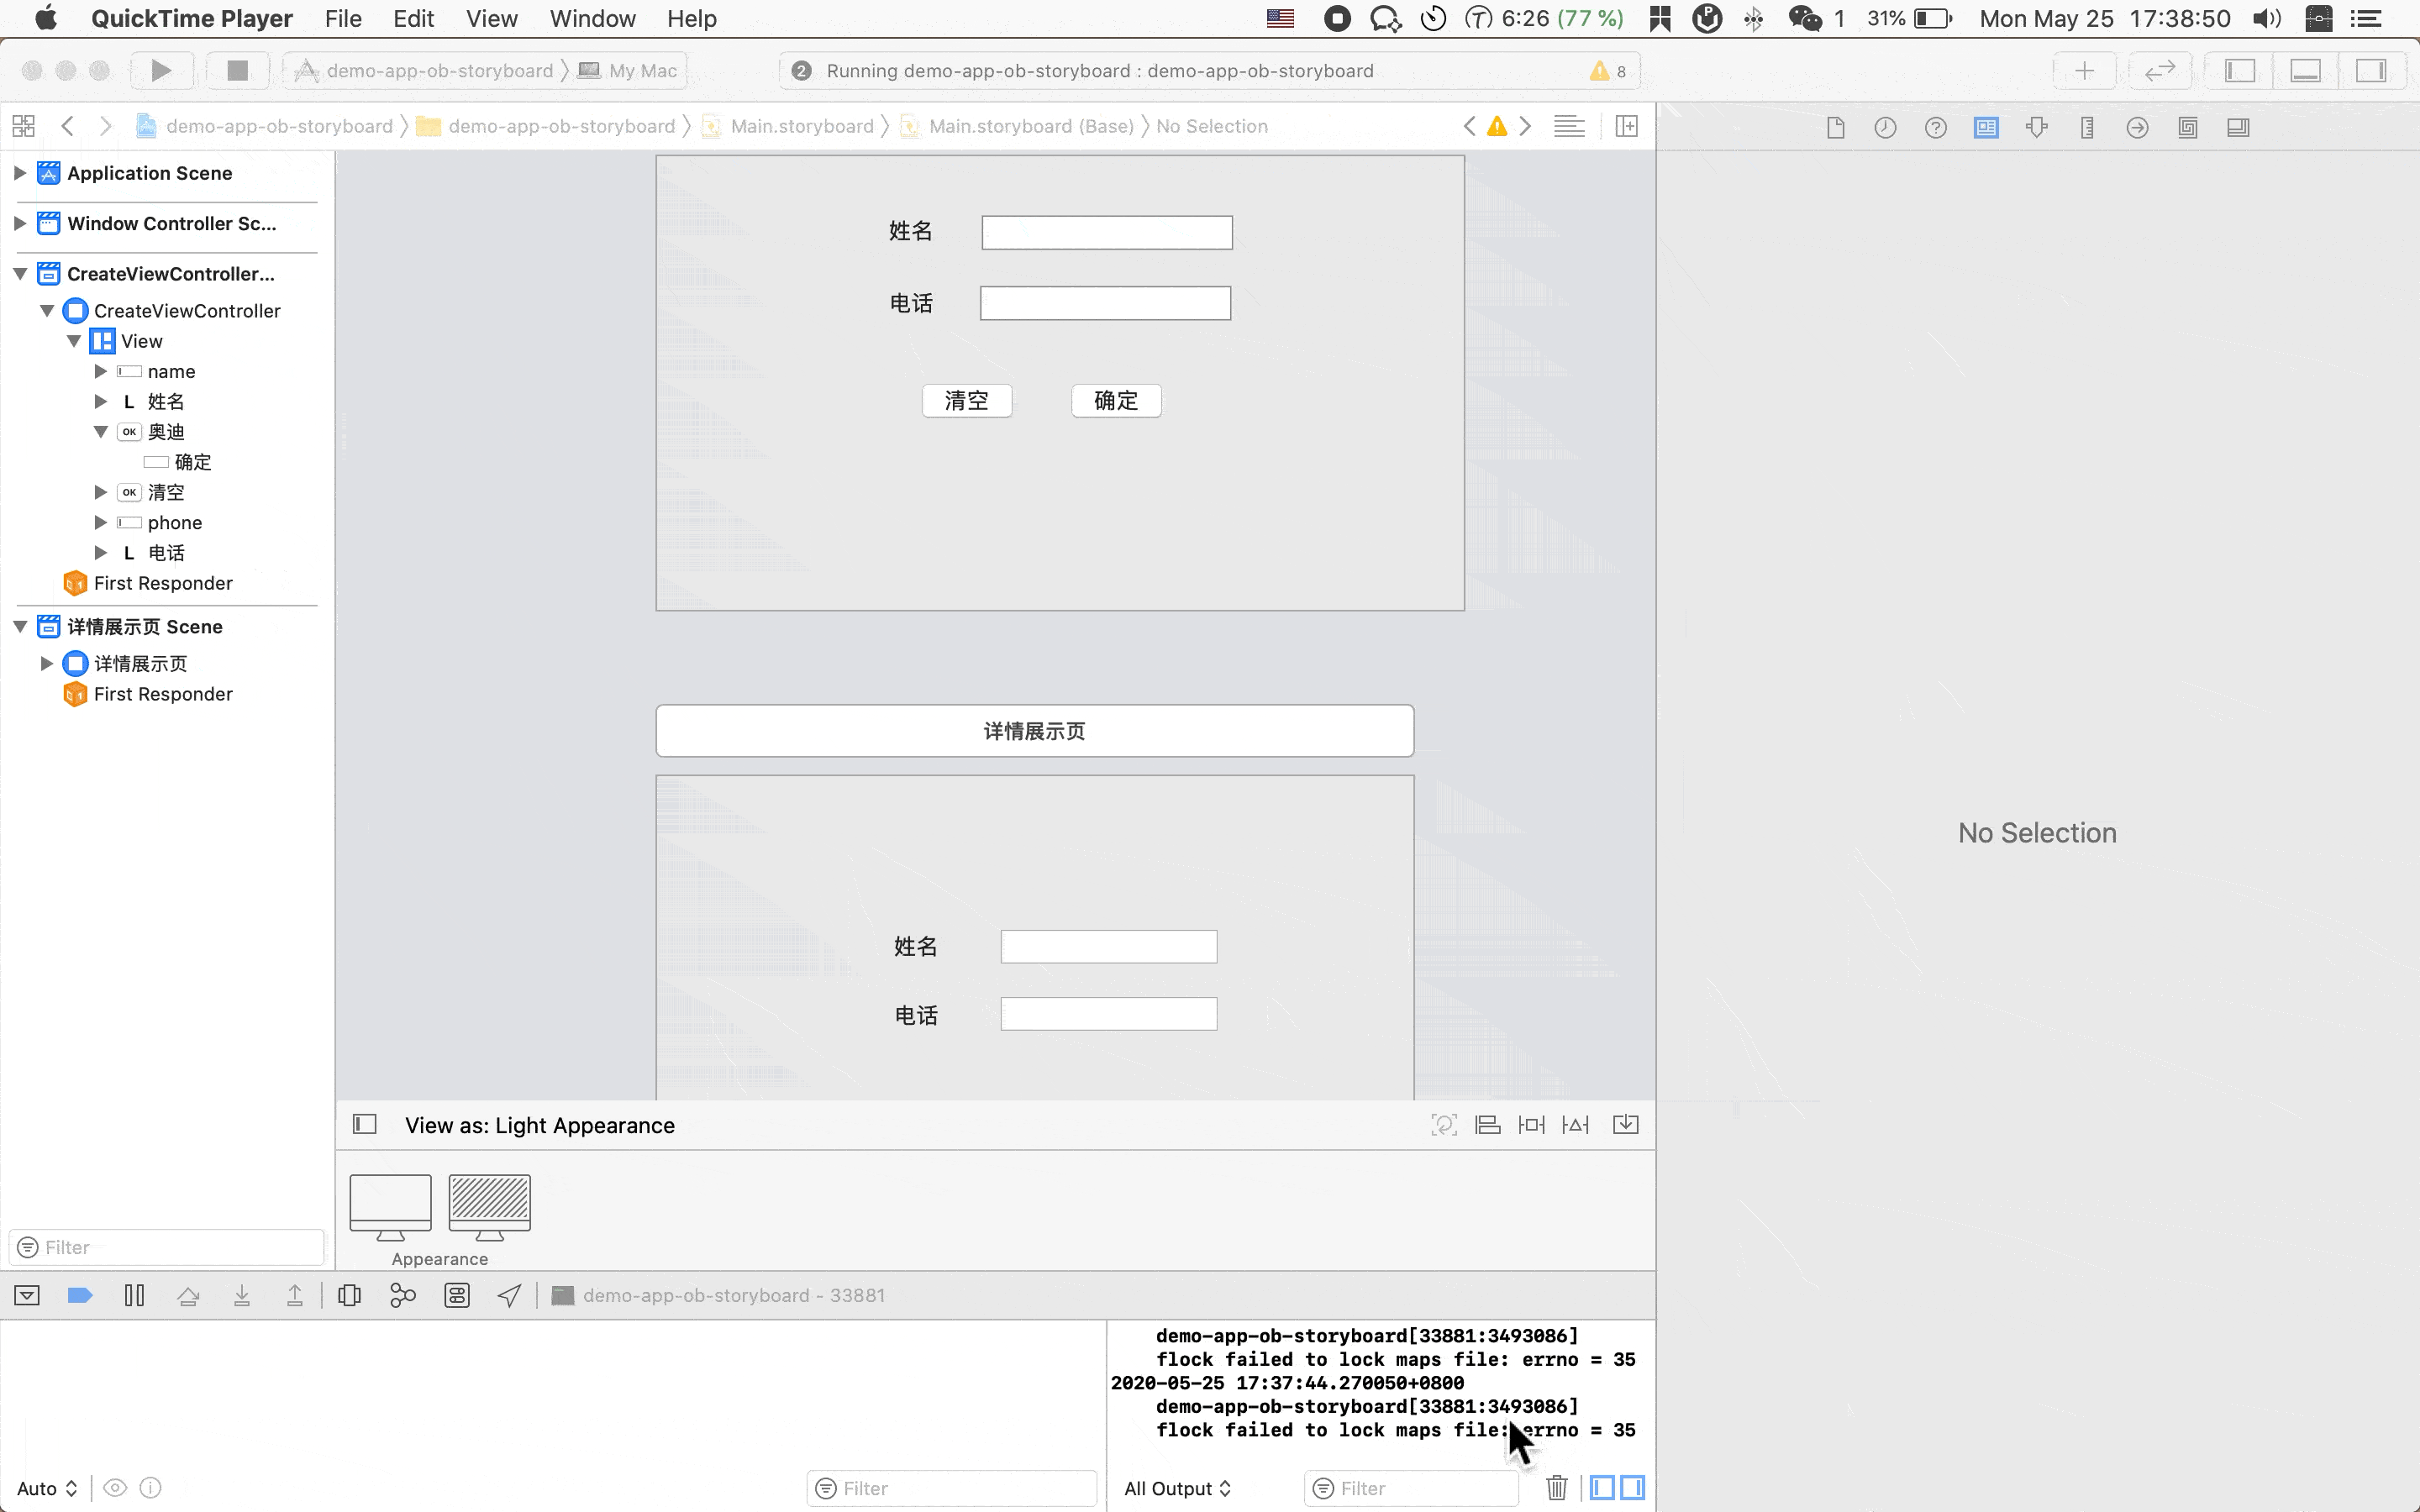
app functions
-
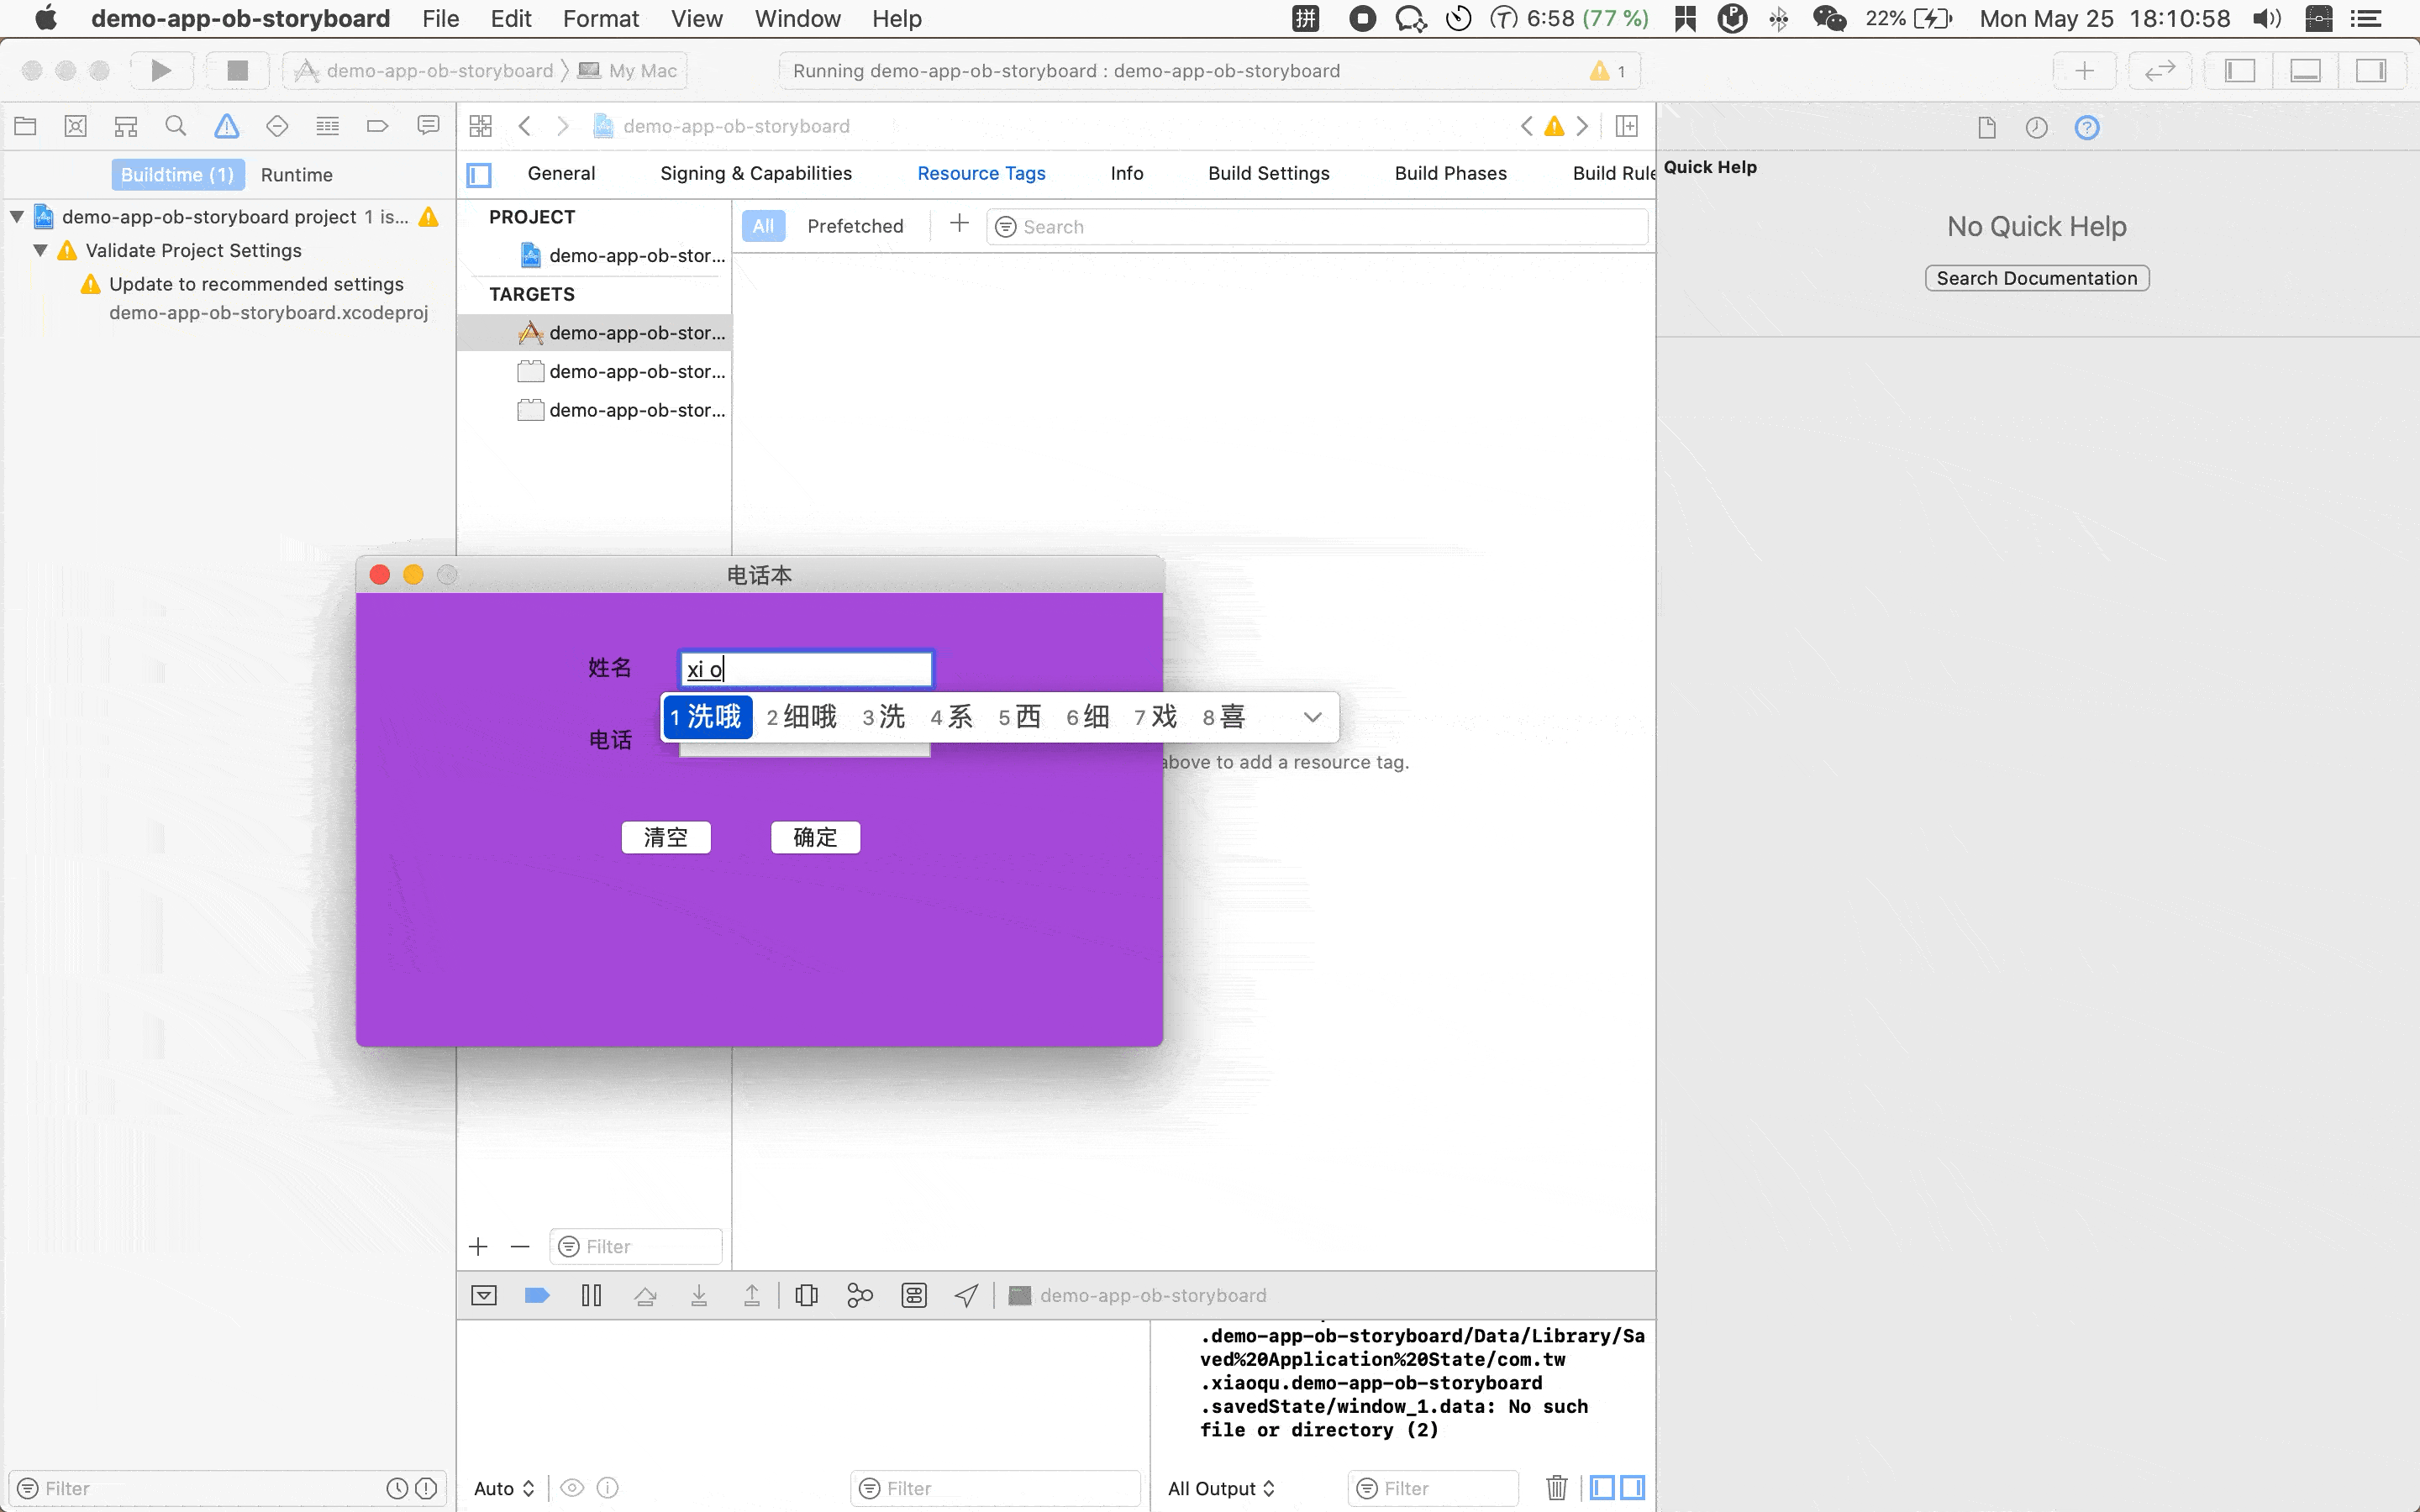
Add a page
- Click a clear button to clear the data entered on the page
- An OK button, after clicking, will carry the information to the details display page
- Two label s, two input boxes
- Set the background color of the view
-
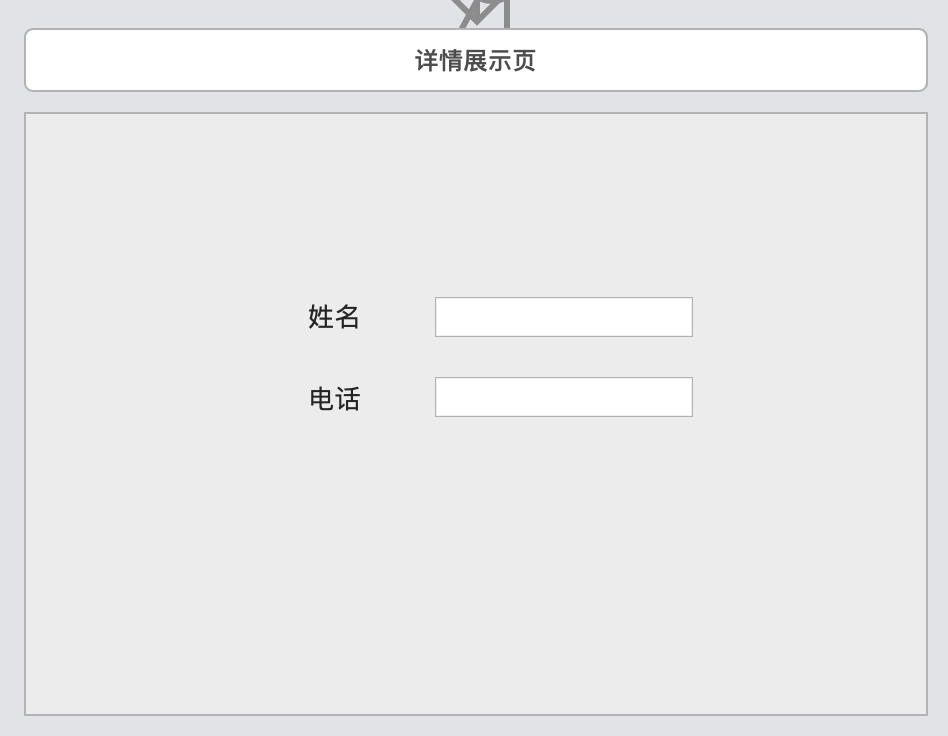
A detail display page
- Show the contents filled in on the previous page
- Show the contents filled in on the previous page
Problems encountered
- What is in the code or in the input box
In viewcontroller Bind two attributes in H, and then you can use them directly in impl
How to do it: split the screen, and then ctrl drag, and then two attributes will be generated
// interface
#import <Cocoa/Cocoa.h>

@interface ViewController : NSViewController
@property (weak) IBOutlet NSTextField *nameTextField;
@property (weak) IBOutlet NSTextField *phoneTextField;
@end

//impl
#import "ViewController.h"

@implementation ViewController

@synthesize nameTextField;
@synthesize phoneTextField;

// Get the contents of the name input box
- (NSString *)getName {
    return [nameTextField stringValue];
}
// Get the contents of the mobile phone number input box
- (NSString *)getPhone {
    return [phoneTextField stringValue];
}
//Clear the contents of the input box
- (IBAction)CancelClicked:(id)sender {
    [nameTextField setStringValue:@""];
    [phoneTextField setStringValue:@""];
}
// other code
@end
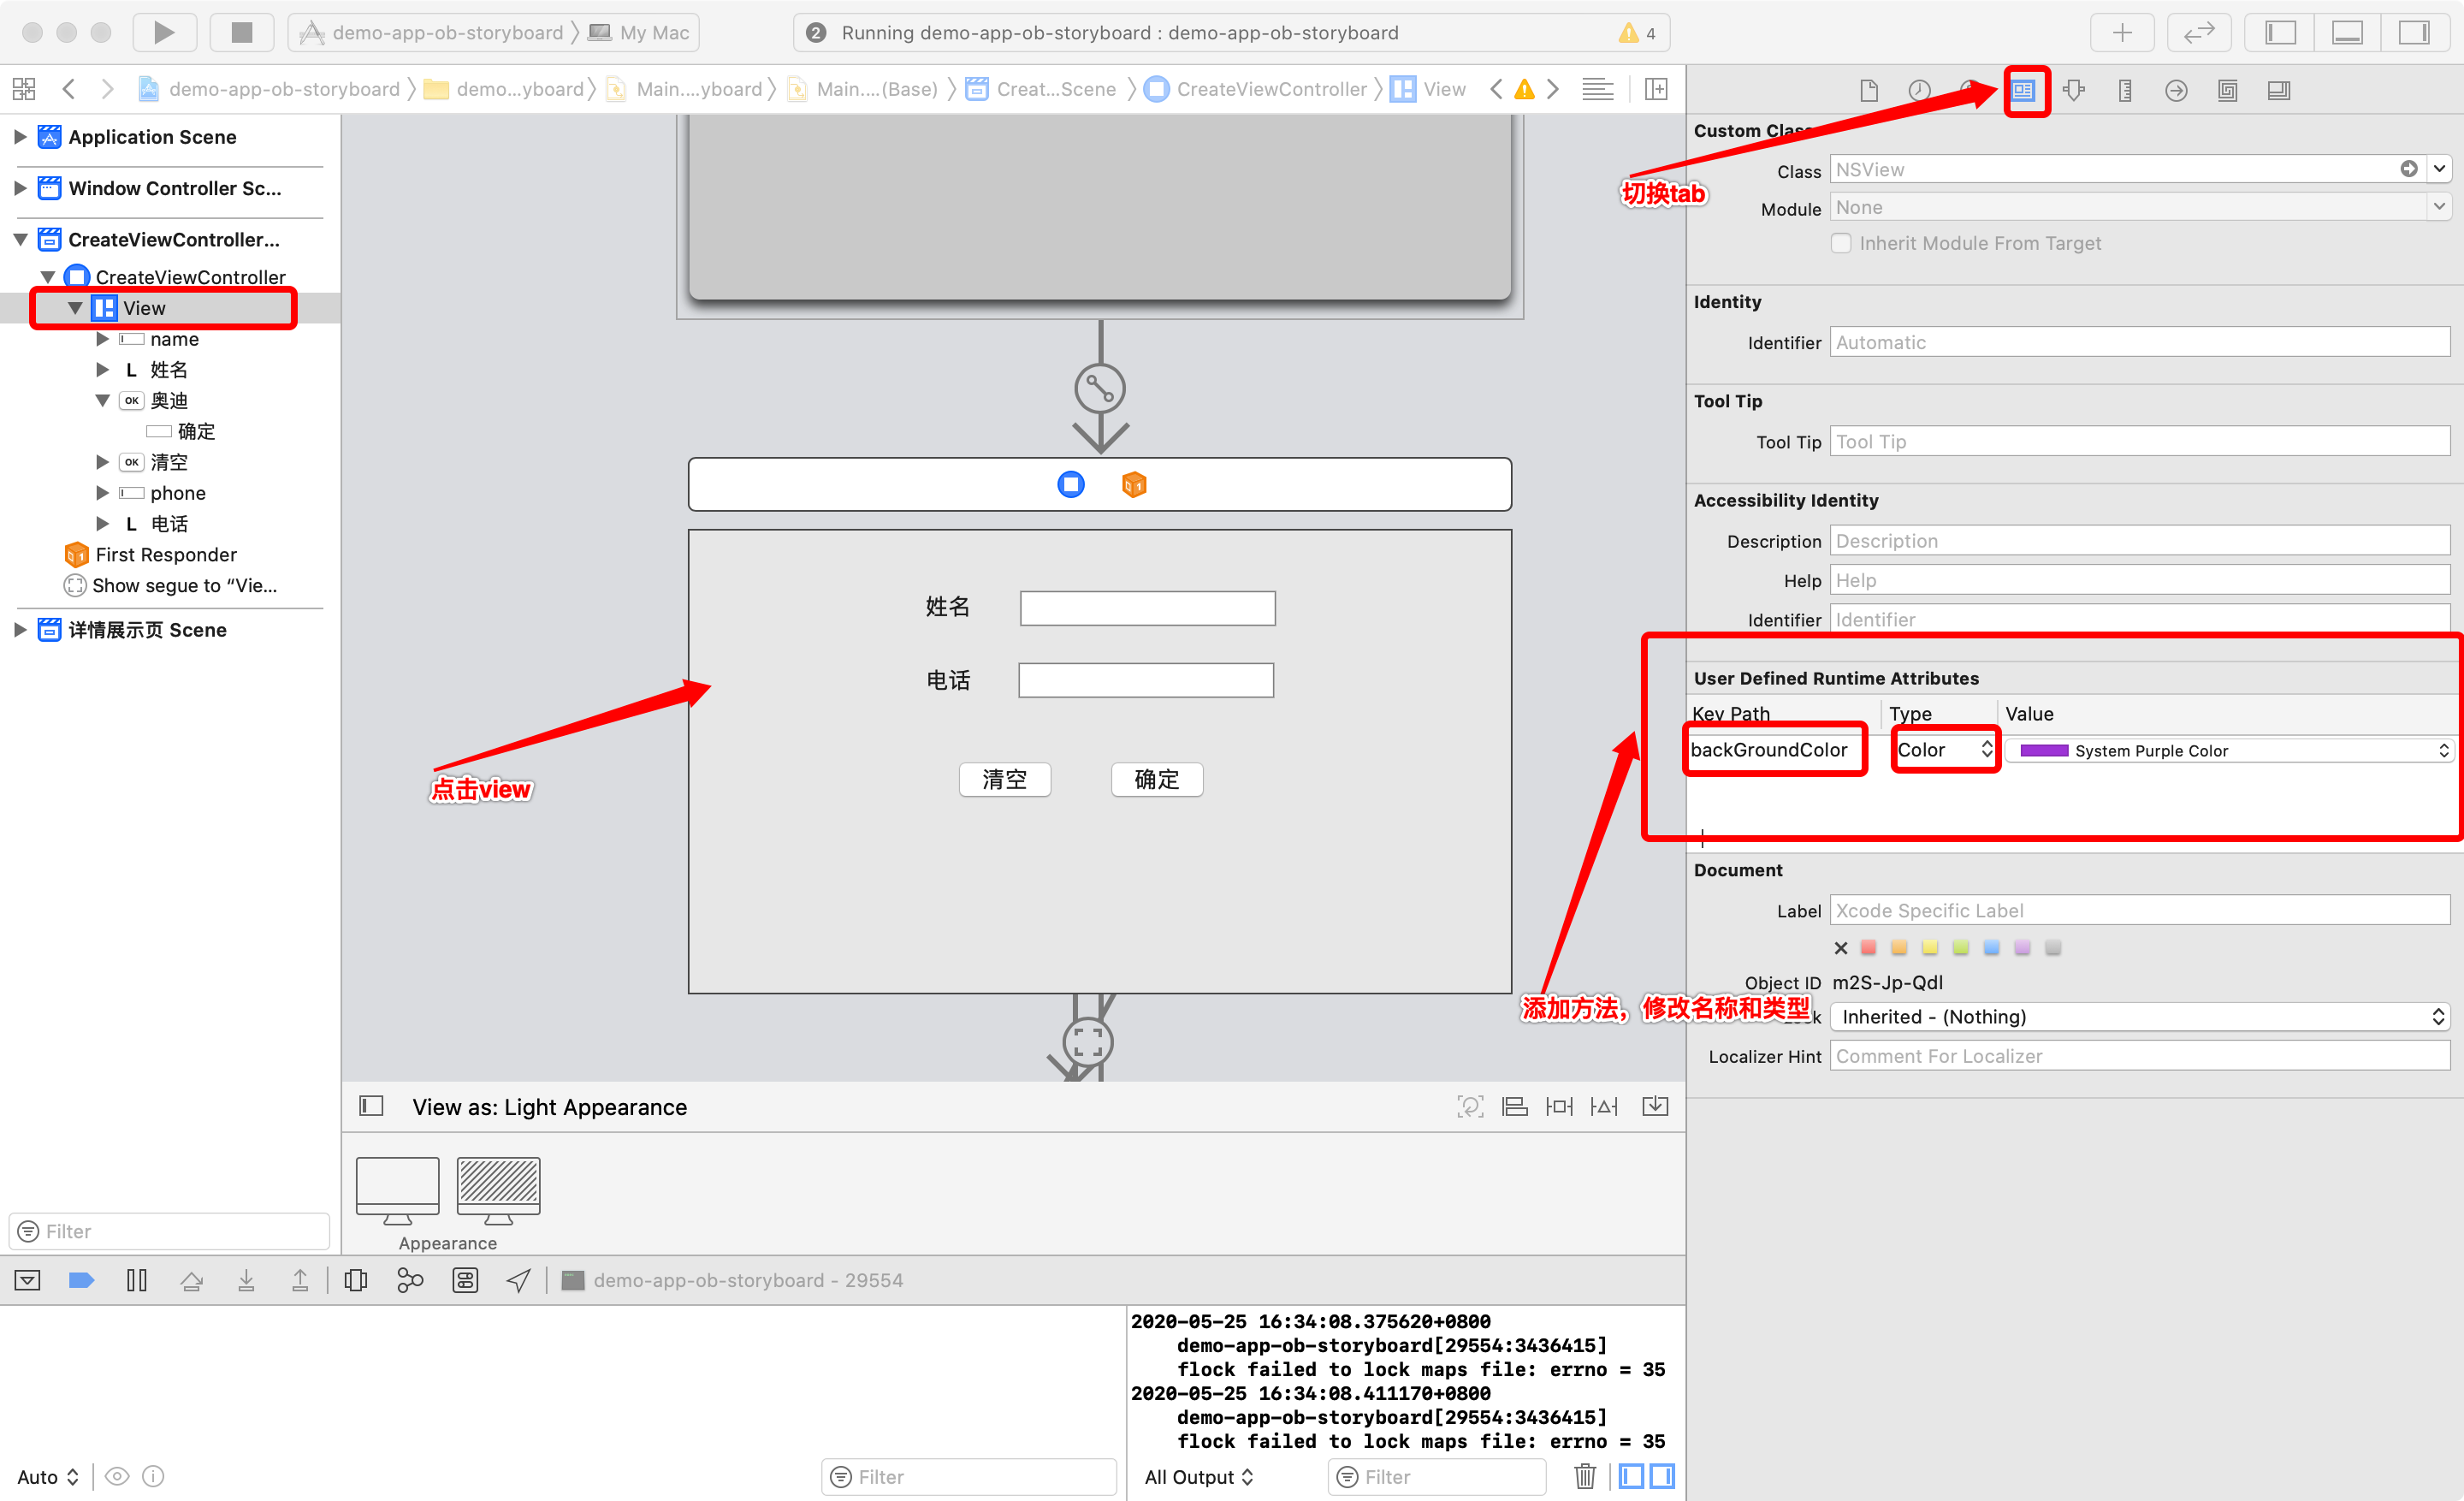
- How to set the background color
Expand NSView, add the method of setting background color, and then bind it to the UI layer,- Implementation code
// interface
#import <Foundation/Foundation.h>
#import <AppKit/AppKit.h>

@interface NSView (backGroundColor)
-(void) setBackGroundColor: (NSColor *) color;
@end

//impl
#import "backgroundColor.h"

@implementation NSView (backgroundColor)
- (void)setBackGroundColor:(NSColor *)color {
    [self setWantsLayer:YES];
    self.layer = [CALayer layer];
    [self.layer setBackgroundColor:[color CGColor]];
}
@end
- binding
The input name is consistent with the extension method, and the set method is omitted
- How to click OK to jump to another interface
Find the button in the storyboard interface and drag ctrl to the interface you want to jump to after clicking it
Then the dialog appears
That's it.
- How to pass the value
Let's take a look at what is established between the two interfaces
It's an NSStoryboardSegue type thing
@interface NSStoryboardSegue : NSObject

/* NSStoryboardSegue instances have optional identifiers that can be assigned in Interface Builder. These identifiers can be used in overrides of -[NSViewController prepareForSegue:sender:] to differentiate segues. */
@property (nullable, readonly, copy) NSStoryboardSegueIdentifier identifier;

/* Subclasses of NSStoryboardSegue can use this property to access the source view or window controller that is being segued away from. */
@property (readonly, strong) id sourceController;

/* Subclasses of NSStoryboardSegue can use this property to access the destination view or window controller that's being segued to. This property is also essential for overrides of -[NSViewController prepareForSegue:sender:], which is passed to the source view controller. This property allows the receiver of -[NSViewController prepareForSegue:sender:] to access and pass configuration data to the destination controller. */
@property (readonly, strong) id destinationController;

@end
Is it clear that there are sourceController and destinationController
- step
1. Rewrite the - (void) prepareforsegue: (nstoryboardsegue *) segue sender: (nullable ID) sender method of SourceController(NSViewController)
```objective-c
  - (void)prepareForSegue:(NSStoryboardSegue *)segue sender:(nullable id)sender {
        DetailController *detailController = [[DetailController alloc] init]; // destinationController
        detailController = segue.destinationController;
        UserInfo *userInfo = [[UserInfo alloc] init];
        [userInfo setName:[self getName] andPhone:[self getPhone]];
        detailController.userInfo= userInfo;//Set the value to pass
    }
```
2. destinationController
 Add a property to receive the passed value in`viewDidLoad`Method to assign the passed value to view upper
```objective-c
// interface
    @interface DetailController : NSViewController
    @property UserInfo *userInfo;
    @property (weak) IBOutlet NSTextField *nameTextField;
    @property (weak) IBOutlet NSTextField *phoneTextField;
    @end


// impl
    @implementation DetailController
    @synthesize userInfo;
    @synthesize nameTextField;
    @synthesize phoneTextField;

    - (void)viewDidLoad {
        [super viewDidLoad];
        [nameTextField setStringValue:[userInfo name]];
        [phoneTextField setStringValue:[userInfo phone]];
    }
    @end
```
end
An error was encountered
resource fork, Finder information, or similar detritus not allowed
Command CodeSign failed with a nonzero exit code
Solution: enter the root directory of the project and execute xattr -cr
quote
- Mac Os DarkMode
- iOS - Code Sign Error in macOS High Sierra Xcode - resource fork, Finder information, or similar detritus not allowed - Stack Overflow
Source code
https://github.com/1483523635/simple-MacOS-app
Blog original address
https://github.com/1483523635/blogs/blob/master/MacOSApp/StoryBoard.md