[source code analysis] PyTorch distributed Autograd (4) -- how to cut into the engine
catalogue
- [source code analysis] PyTorch distributed Autograd (4) -- how to cut into the engine
0x00 summary
Above, we saw a series of basic classes such as AutogradMetadata, DistAutogradContainer and DistAutogradContext. We know how distributed autograd transfers based on RPC, how to interact between nodes, and how to distinguish and maintain these sessions. The main purpose of this paper is to see how back propagation cuts into the engine.
0x01 previous
Let's recall the contents of the previous articles.
First, for distributed autograd, we need to track all RPCs during forward propagation to ensure that backward propagation is performed correctly. To this end, when executing RPC, we attach send and recv functions to the autograd diagram.
- The send function is attached to the origin node of RPC, and its output edge points to the autograd function of RPC input tensor. During backward propagation, the input of the send function is received from the target and is the output of the corresponding recv function.
- The recv function is attached to the RPC accept target node, and its input is obtained from some operators, which execute on the RPC accept target using the input tensor. During backward propagation, the output gradient of the recv function will be sent to the source node and used as the input of the send method.
- Each send recv pair is assigned a globally unique autograd_message_id to uniquely identify the send recv pair. This is useful for finding the corresponding function on the remote node during backward propagation.
- For RRef, whenever we call torch.distributed.rpc.RRef.to_here(), we all add an appropriate send recv pair for the tensors involved.
Secondly, in the specific code of forward propagation, we store the send and recv functions of each autograd propagation in the context. This ensures that we save references to the appropriate nodes in the autograd diagram to keep them active. In addition, this makes it easy to find the corresponding send and recv functions during backward propagation.
Thirdly, the following are some message definitions in torch / CSR / distributed / RPC / message. H:
// Messages with autograd info
FORWARD_AUTOGRAD_REQ = 0x0f | MessageTypeFlags::REQUEST_TYPE,
FORWARD_AUTOGRAD_RESP = 0x10 | MessageTypeFlags::RESPONSE_TYPE,

// Messages to propagate gradients on the backward pass.
BACKWARD_AUTOGRAD_REQ = 0x11 | MessageTypeFlags::REQUEST_TYPE,
BACKWARD_AUTOGRAD_RESP = 0x12 | MessageTypeFlags::RESPONSE_TYPE,
Earlier, we saw forward_ AUTOGRAD_ How to call req in forward propagation assumes the following code: rpc.rpc_sync("worker1", torch.add, args=(t1, t2)), the call sequence is:
- rpc_sync call_ invoke_rpc.
- _ invoke_rpc call_ invoke_rpc_builtin.
- It is then called to pyRpcBuiltin and then called to sendMessageWithAutograd.
- sendMessageWithAutograd builds forward internally_ AUTOGRAD_ Req message, finally sent using RPC.
So far, we have several questions about the overall process:
- At the beginning of the back calculation diagram, how to initiate back propagation and pass it to the next link of back propagation?
- In the internal link of back propagation, backward_ AUTOGRAD_ When is req called? When is the recv operation called? In the context, recvuutogradfunctions_ Where was it set up?
- How do the above two links enter the distributed autograd engine?
Next, we will analyze these questions. The core is how to enter the dist.autograd engine.
0x02 calculation diagram
Let's start with a few examples from the calculation diagram.
2.1 general examples
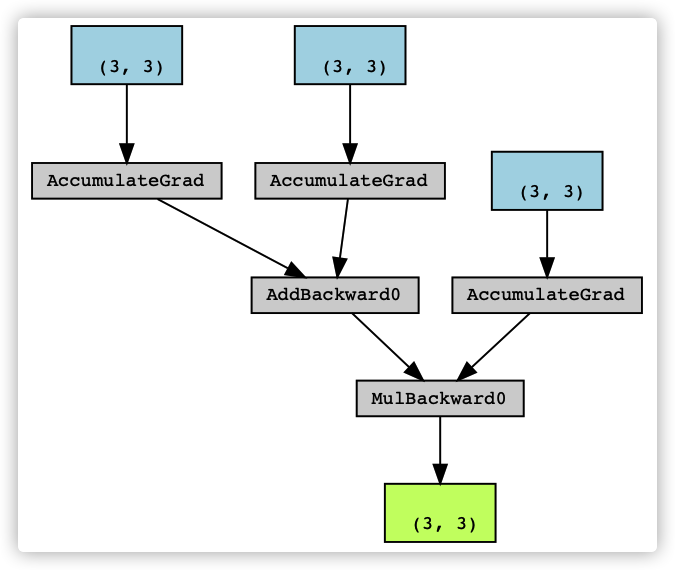
First, let's take a look at ordinary computing. This is the local version of the official legend of dist.auto. You can see that the calculation diagram is composed of AddBackward0, AccumulateGrad and MulBackward0.
t1 = torch.rand((3, 3), requires_grad=True)
t2 = torch.rand((3, 3), requires_grad=True)
t3 = t1 + t2
t4 = torch.rand((3, 3), requires_grad=True)
t5 = torch.mul(t3, t4)
next_functions = t5.grad_fn.next_functions
The specific correspondence is shown in the figure below:
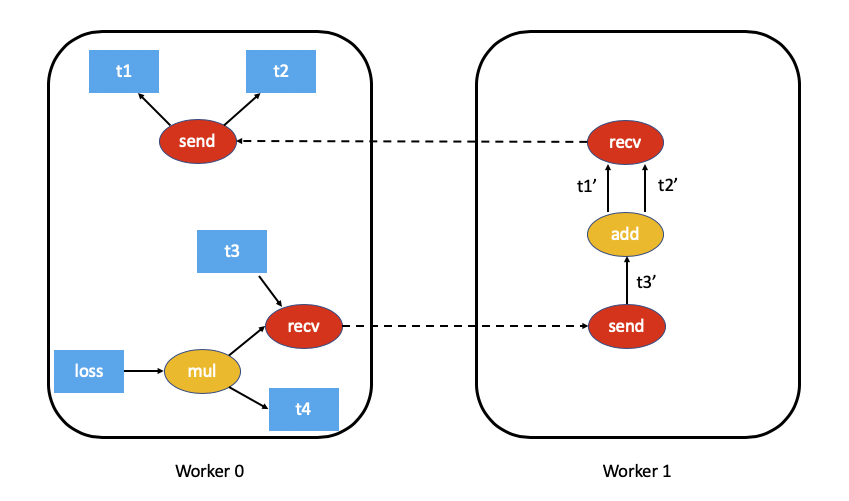
2.2 distributed example
Let's take a look at the distributed example. This example is the code roughly corresponding to the legend in the official design. We named torch.mul(t3, t4) t5 and added loss.
def worker0():
    # On worker 0:

    # Setup the autograd context. Computations that take
    # part in the distributed backward pass must be within
    # the distributed autograd context manager.
    with dist_autograd.context() as context_id:
      t1 = torch.rand((3, 3), requires_grad=True)
      t2 = torch.rand((3, 3), requires_grad=True)

      # Perform some computation remotely.
      t3 = rpc.rpc_sync("worker1", torch.add, args=(t1, t2))

      # Perform some computation locally based on remote result.
      t4 = torch.rand((3, 3), requires_grad=True)
      t5 = torch.mul(t3, t4)

      # Compute some loss.
      loss = t5.sum()

      # Run the backward pass.
      dist_autograd.backward(context_id, [loss])

      # Retrieve the gradients from the context.
      dist_autograd.get_gradients(context_id)

      print(loss)
Under distributed, t3 runs in different places.
- T5 corresponds to mul, t5.grad_fn is < mulbackward0 object at 0x7fbf18d297b8 >.
- t3.grad_fn is < CppFunction object at 0x7fbf18d11a20 >, that is, recv corresponds to CppFunction.
- loss is tensor(5.5680, grad_fn =).
- The rest are None.
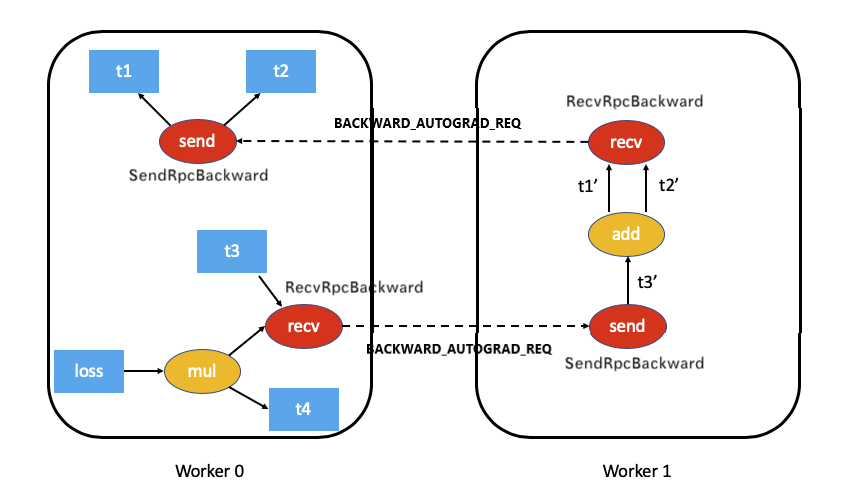
Let's show the design legend again. The above example code is worker 0 on the left of the figure below. t3 actually runs in worker 1. You can see some characteristics in the distributed context.
2.3 Distributed Annotation version
For better explanation, we printed some log s as comments.
def _verify_send(send_function):
print(send_function.name())
next_funcs = send_function.next_functions
print(next_funcs[0][0].name())
print(next_funcs[1][0].name())
def _verify_recv(recv_function):
print(recv_function.name())
next_funcs = recv_function.next_functions
print(len(next_funcs))
def worker0():
# On worker 0:
# Setup the autograd context. Computations that take
# part in the distributed backward pass must be within
# the distributed autograd context manager.
with dist_autograd.context() as context_id:
t1 = torch.rand((3, 3), requires_grad=True)
t2 = torch.rand((3, 3), requires_grad=True)
# Perform some computation remotely.
#t3 = rpc.rpc_sync("worker1", my_add, args=(t1, t2))
t3 = rpc.rpc_sync("worker1", torch.add, args=(t1, t2))
# Perform some computation locally based on remote result.
t4 = torch.rand((3, 3), requires_grad=True)
t5 = torch.mul(t3, t4)
# Compute some loss.
loss = t5.sum()
print("--- send ---")
ctx = dist_autograd._retrieve_context(context_id)
send_functions = ctx._send_functions()
_verify_send(list(send_functions.values())[0])
print("--- loss ---")
print(loss)
mul_func = loss.grad_fn.next_functions[0][0]
print(mul_func.name())
next_funcs = mul_func.next_functions
print(next_funcs[0][0].name())
print(next_funcs[1][0].name())
print("---- recv ----")
recv_functions = ctx._recv_functions()
_verify_recv(list(recv_functions.values())[0])
# Run the backward pass.
dist_autograd.backward(context_id, [loss])
# Retrieve the gradients from the context.
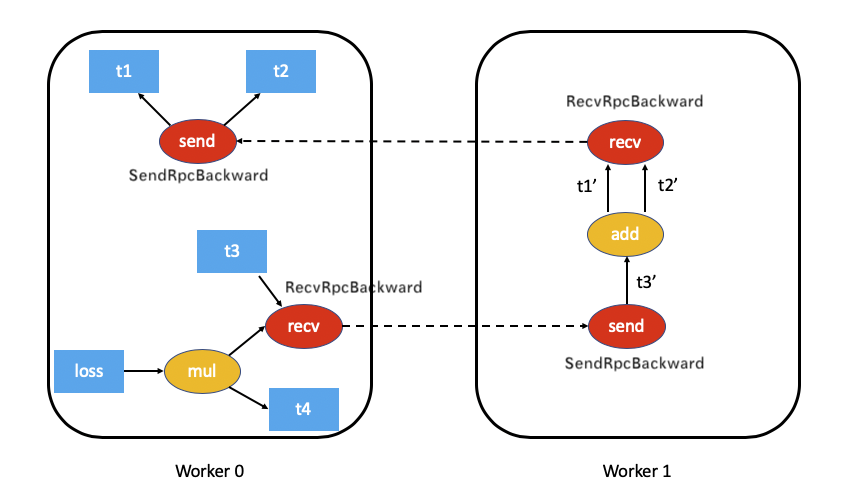
dist_autograd.get_gradients(context_id)The print result is:
--- send ---
torch::distributed::autograd::SendRpcBackward
torch::autograd::AccumulateGrad
torch::autograd::AccumulateGrad

--- loss ---
tensor(3.5197, grad_fn=<SumBackward0>)
MulBackward0
torch::distributed::autograd::RecvRpcBackward
torch::autograd::AccumulateGrad

---- recv ----
torch::distributed::autograd::RecvRpcBackward
After adding the distributed correlation operator, the legend is as follows:
0x03 back propagation
Next, let's see how to enter the dist autograd engine. Combined with our legend, it is:
- How does worker 0 actively initiate back propagation and then enter the distributed engine?
- How does woker 0 internally initiate a back propagation request for worker 1?
- How does worker 1 passively accept back propagation messages and then enter the distributed engine?
3.1 initiate back propagation
Let's find out how to initiate back propagation, in bottom-up order. There are also two types:
- One is to initiate actively, such as calling the backward method on the loss of worker 0 in the figure above.
- One is internal implicit initiation. For example, t3 in worker 0 above tells worker 1 through recv that you should start back propagation.
3.1.1 external initiative
3.1.1.1 example
Let's look at how the backward of distributed autograd can be called actively from top to bottom. For example, the call will be shown in the example.
def worker0():
    # On worker 0:

    with dist_autograd.context() as context_id:
      t1 = torch.rand((3, 3), requires_grad=True)
      t2 = torch.rand((3, 3), requires_grad=True)

      # Perform some computation remotely.
      t3 = rpc.rpc_sync("worker1", torch.add, args=(t1, t2))

      # Perform some computation locally based on remote result.
      t4 = torch.rand((3, 3), requires_grad=True)
      t5 = torch.mul(t3, t4)

      # Compute some loss.
      loss = t5.sum()

      # Run the backward pass.
      dist_autograd.backward(context_id, [loss]) // This will call
3.1.1.2 C + + world
In torch/_ C/_ distributed_ In autograd.pyi, we can see the following comments:
# This module is defined in torch/csrc/distributed/autograd/init.cpp
So let's go to the torch / CSR / distributed / autograd / init.cpp file.
Part of the code is omitted. Here you can see that the context is generated and backward and get are defined_ Gradients, etc.
PyObject* dist_autograd_init(PyObject* _unused, PyObject* noargs) {
  auto autograd_module =
      THPObjectPtr(PyImport_ImportModule("torch.distributed.autograd"));
  auto torch_C_module = THPObjectPtr(PyImport_ImportModule("torch._C"));
  auto torch_C_m = py::handle(torch_C_module).cast<py::module>();
  auto m = torch_C_m.def_submodule("_distributed_autograd", "distributed autograd bindings");
  auto module = py::handle(m).cast<py::module>();

  auto distAutogradContext =
      shared_ptr_class_<DistAutogradContext>(module, "DistAutogradContext")
          .def(
              "_context_id",
              &DistAutogradContext::contextId,
              py::call_guard<py::gil_scoped_release>())
          .def(
              "_recv_functions",
              [](const DistAutogradContext& ctx) {
                std::map<int64_t, py::object> funcs;
                for (const auto& map_entry : ctx.recvFunctions()) {
                  funcs.emplace(
                      map_entry.first,
                      py::reinterpret_steal<py::object>(
                          torch::autograd::functionToPyObject(
                              map_entry.second)));
                }
                return funcs;
              })
          .def(
              "_send_functions",
              [](const ContextPtr& ctx) {
                std::map<int64_t, py::object> funcs;
                for (const auto& map_entry : ctx->sendFunctions()) {
                  funcs.emplace(
                      map_entry.first,
                      py::reinterpret_steal<py::object>(
                          torch::autograd::functionToPyObject(
                              map_entry.second)));
                }
                return funcs;
              })
          .def("_known_worker_ids", &DistAutogradContext::getKnownWorkerIds);

  module.def(
      "_new_context",
      []() -> const ContextPtr {
        return DistAutogradContainer::getInstance().newContext();
      },
      py::return_value_policy::reference);

  py::options options;
  options.disable_function_signatures();

  module.def(
      "backward",
      backward,
      py::arg("contextId"),
      py::arg("roots"),
      py::arg("retain_graph") = false,
      py::call_guard<py::gil_scoped_release>());

  module.def(
      "get_gradients",
      [](int64_t contextId) -> py::dict {
        const auto& autogradContext =
            DistAutogradContainer::getInstance().retrieveContext(contextId);
        return torch::jit::toPyObject(IValue(autogradContext->getGradients()));
      },
      py::arg("context_id"));

  Py_RETURN_TRUE;
}
} // namespace
The specific backward is defined in torch / CSR / distributed / autograd / autograd.cpp.
void backward(
    int64_t context_id,
    const variable_list& roots,
    bool retain_graph) {
  RECORD_FUNCTION(
      kDistAutogradBackwardProfilingKey, std::vector<c10::IValue>());
  try {
    DistEngine::getInstance().execute(context_id, roots, retain_graph);
  } catch (std::exception& e) {
    // FIXME: crashes if exception type is not RuntimeError
    throw std::runtime_error(e.what());
  }
}
As you can see, DistEngine::getInstance().execute(context_id, roots, retain_graph) will be called to complete the back propagation. This enters the engine.
3.1.2 internal implicit initiation
Because it is implicitly initiated, the code is relatively hidden. This time, we use the bottom-up method to peel silk and cocoon. We know that if backpropagation is required between nodes, backward will be sent_ AUTOGRAD_ Req, so we from BACKWARD_AUTOGRAD_REQ starts the search.
3.1.2.1 BACKWARD_AUTOGRAD_REQ
In torch / CSR / distributed / autograd / RPC_ messages/propagate_ gradients_ In req.cpp, PropagateGradientsReq::toMessageImpl will call BACKWARD_AUTOGRAD_REQ.
Message PropagateGradientsReq::toMessageImpl() && {
  std::vector<at::IValue> ivalues;
  // Add all the grad tensors.
  for (const auto& grad : grads_) {
    ivalues.emplace_back(grad);
  }

  // Now add autograd metadata.
  ivalues.emplace_back(autogradMetadata_.autogradContextId);
  ivalues.emplace_back(autogradMetadata_.autogradMessageId);

  // Add retain graph.
  ivalues.emplace_back(retainGraph_);

  // Now pickle using JIT pickler.
  std::vector<torch::Tensor> tensorTable;
  std::vector<char> payload =
      jit::pickle(c10::ivalue::Tuple::create(std::move(ivalues)), &tensorTable);

  return Message(
      std::move(payload),
      std::move(tensorTable),
      MessageType::BACKWARD_AUTOGRAD_REQ); // It will be used here
}
3.1.2.2 PropagateGradientsReq
Continue to find who sent the BACKWARD_AUTOGRAD_REQ, who called toMessageImpl? It was originally in torch / CSR / distributed / autograd / functions / recvrpc_ Backward.cpp PropagateGradientsReq is built here, and toMessage will be used to build a message. That is, the call of RecvRpcBackward will send a BACKWARD_AUTOGRAD_REQ.
variable_list RecvRpcBackward::apply(variable_list&& grads) { // Call Node
std::vector<Variable> outputGrads;
for (size_t i = 0; i < grads.size(); i++) {
const auto& grad = grads[i];
if (grad.defined()) {
outputGrads.emplace_back(grad);
} else {
// Put in zeros for a tensor with no grad.
outputGrads.emplace_back(input_metadata(i).zeros_like());
}
}
auto sharedContext = autogradContext_.lock();
// Send the gradients over the wire and record the future in the autograd
// context.
PropagateGradientsReq gradCall( // Here, PropagateGradientsReq is built
autogradMetadata_,
outputGrads,
sharedContext->retrieveGraphTask()->keep_graph_);
// Send the gradients over to the appropriate node.
auto rpcAgent = rpc::RpcAgent::getCurrentRpcAgent();
auto jitFuture = rpcAgent->send( // Send it to the next node in the backward propagation process
rpcAgent->getWorkerInfo(fromWorkerId_),
std::move(gradCall).toMessage(), // PropagateGradientsReq::toMessageImpl is called here
rpc::kUnsetRpcTimeout,
deviceMap_);
// Record the future in the context.
sharedContext->addOutstandingRpc(jitFuture);
// 'recv' function sends the gradients over the wire using RPC, it doesn't
// need to return anything for any downstream autograd function.
return variable_list();
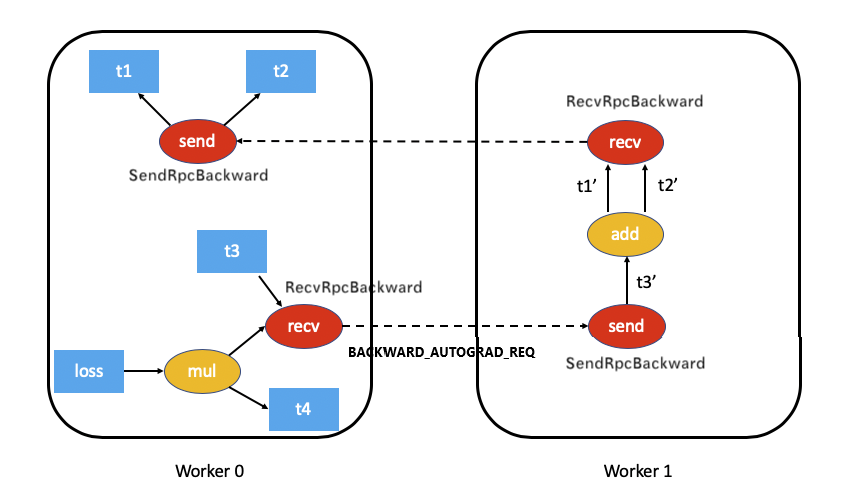
}Therefore, we know that during the execution of RecvRpcBackward, backward will be sent_ AUTOGRAD_ Req, send to the next node. Where to call RecvRpcBackward? We will introduce it in the next DistEngine.
At this time, the details are as follows: t3 of worker 0 sends backup to worker 1_ AUTOGRAD_ Req message.
                                                                +
                                                       worker 0 | worker 1
                                                                |
                                                                |
 RecvRpcBackward                         PropagateGradientsReq  |
       +                                          +             |
       |                                          |             |
       |                                          |             |
       |                                          |             |
       v                                          |             |
                                                  |             |
     apply()                                      |             |
       +                                          |             |
       |                                          v             |
       |                                                        |
       | +------------------------------>  toMessageImpl        |
       |                                          +             |
       |                                          |             |
       |   Message(BACKWARD_AUTOGRAD_REQ)         |             |
       | <----------------------------------------+             |
       |                                                        |
       |                                                        |
       v                                                        |
                                                                |
rpcAgent+>send(Message)  +-------------------------------------------->
       +                             BACKWARD_AUTOGRAD_REQ      |
       |                                                        |
       |                                                        |
       v                                                        |
                                                                +
The corresponding example diagram is:
3.2 acceptance of back propagation
Let's look at how the receiver handles back propagation. We return to worker 1 again, that is, how the send node in the figure accepts back propagation messages.
3.2.1 accept message
When generating TensorPipeAgent, configure RequestCallbackImpl as a callback function. This is the unified response function of agent. When we mentioned the agent receiving logic earlier, we will enter the requestcallback nopthon:: processrpc function. You can see a pair of backward_ AUTOGRAD_ Processing logic of req.
This is the normal process of RPC.
void RequestCallbackNoPython::processRpc(
    RpcCommandBase& rpc,
    const MessageType& messageType,
    const int64_t messageId,
    const c10::intrusive_ptr<JitFuture>& responseFuture,
    std::shared_ptr<LazyStreamContext> ctx) const {

  switch (messageType) {

    case MessageType::BACKWARD_AUTOGRAD_REQ: {
      processBackwardAutogradReq(rpc, messageId, responseFuture); // Call here
      return;
    };
3.2.2 message processing
In processBackwardAutogradReq:
- Get DistAutogradContainer.
- Get the context, which was previously established in the forward propagation process. As can be seen from the above, in this legend, each autograd propagation in worker 0 and worker 1 shares the same context context id.
- Obtain the corresponding SendRpcBackward from the context through the context id of the sender. Here we see how context is used.
- Use sendFunction as a parameter and call executeSendFunctionAsync for engine processing.
void RequestCallbackNoPython::processBackwardAutogradReq(
    RpcCommandBase& rpc,
    const int64_t messageId,
    const c10::intrusive_ptr<JitFuture>& responseFuture) const {
  auto& gradientsCall = static_cast<PropagateGradientsReq&>(rpc);
  const auto& autogradMetadata = gradientsCall.getAutogradMetadata();

  // Retrieve the appropriate autograd context.
  auto autogradContext = DistAutogradContainer::getInstance().retrieveContext(
      autogradMetadata.autogradContextId); // Get the context id of the sender

  // Lookup the appropriate 'send' function to enqueue.
  std::shared_ptr<SendRpcBackward> sendFunction = // sendFunction is obtained according to the sender context id and message id
      autogradContext->retrieveSendFunction(autogradMetadata.autogradMessageId);

  // Attach the gradients to the send function.
  sendFunction->setGrads(gradientsCall.getGrads()); // Set gradient

  // Now execute the autograd graph using the "distributed engine."
  auto execFuture = DistEngine::getInstance().executeSendFunctionAsync( // Call engine
      autogradContext, sendFunction, gradientsCall.retainGraph());

  // Our response is satisfied when the rpcs come back.
  execFuture->addCallback([responseFuture, messageId](JitFuture& execFuture) {
    if (!execFuture.hasError()) {
      Message m = std::move(PropagateGradientsResp()).toMessage();
      m.setId(messageId);
      responseFuture->markCompleted(
          IValue(c10::make_intrusive<Message>(std::move(m))));
    } else {
      responseFuture->setError(execFuture.exception_ptr());
    }
  });
}
In DistEngine::executeSendFunctionAsync of worker 1, it will perform rolling processing and finally send BACKWARD_AUTOGRAD_REQ is downstream of its back propagation, so we continue to modify and expand the example diagram and add a BACKWARD_AUTOGRAD_REQ.
3.3 summary
We can see that there are two ways to enter dist autograd engine and start back propagation:
- One is that the sample code explicitly calls backward, and then calls DistEngine::getInstance().execute, which is worker 0.
- One is to passively call DistEngine::getInstance().executeSendFunctionAsync, that is, worker 1 (of course, the send of worker 0 also corresponds to a passive call).