Effect screenshot

Introduction to experimental environment
Install PIL, numpy, numexpr and other modules
 pip install pillow
 pip install numpy
 pip install numexpr
Experimental principle

Experimental steps
Get resources
Experimental materials
After downloading, unzip resources Zip and photos Zip file.
● resources / photos: folder containing 218 photos. You can choose a photo to practice;
●resoures/xindexingcao57.ttf: font file;
●resoures/lyf.jpg: a picture of Liu Yifei (goddess). After seeing the final effect picture, you can know the function of this picture;
After decompression, enter the Resources folder to create a new blend Py file, the experimental functions are tested in this file.
Set constant
Now start writing code. First, import relevant modules, as shown in the following figure:
#coding:utf-8

from __future__ import division
import PIL
from PIL import Image, ImageFont, ImageDraw
import numpy, os, random, time
import numexpr

STAG = time.time()

# W_num: how many photos are in a row
# H_num: how many photos are in a row
# W_size: how wide is the photo
# H_size: how high is the photo
# Root: the root directory of the script
root=""
# Will w_ Setting num to a larger value can achieve better results, such as 7, 15
# However, please note that due to the environmental constraints of the experimental building, a larger value will consume more memory, which may lead to program crash.
W_num =3
# Reference W_num
H_num = 3
W_size = 640
H_size = 360

# aval: path to store all photos
alpha = 0.5
aval = []
Here, we import PIL, numexpr, Image module, etc.
Several variables are set at the same time, and the annotation details the meaning of each constant.
Get all pictures
# name: getAllPhotos
# todo: get the path of all photos
def getAllPhotos():
    STA = time.time()
    root = os.getcwd() + "/"  # os.getcwd gets the absolute path where the current file is located
    src = root+"/photos/"  # src is the path of the assembled picture folder
    for i in os.listdir(src):  # Traverse all jpg/png pictures in the folder and store them in the global array aval written above
        if os.path.splitext(src+i)[-1] == ".jpg" or os.path.splitext(src+i)[-1] == ".png":
            aval.append(src+i)
os.getcwd() is to get the current path and assign it to the root variable.
Then traverse the photos in photos, splice the path of each photo, and add it to aval.
zoom
# name: scale
# todo: make the photo the same size
def scale(img_path, dst_width,dst_height):

    STA = time.time()
    im = Image.open(img_path)
    if im.mode != "RGBA":
        im = im.convert("RGBA")  # Convert all picture modes to RGBA
    s_w,s_h = im.size
    if s_w < s_h:
        im = im.rotate(90)  # Resize the picture to a consistent size

    #if dst_width*0.1/s_w > dst_height*0.1/s_h:
    #    ratio = dst_width*0.1/s_w
    #else:
    #    ratio = dst_height*0.1/s_h
    resized_img = im.resize((dst_width, dst_height), Image.ANTIALIAS)
    resized_img = resized_img.crop((0,0,dst_width,dst_height))
    print("scale Func Time %s"%(time.time()-STA))

    return resized_img
● since the size of each photo is different, it is mainly to change the photo to the same size.
● since the mode of each photo has both RGB and RGBA, we directly use the convert method in PIL to convert the mode of all photos to RGBA. Then, after calling the resize method, shrink the photo to the same size.
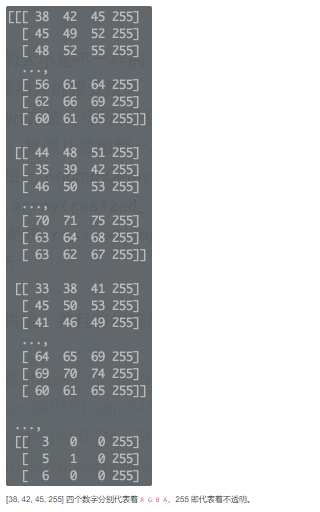
● here we will focus on numpy Array method, numpy Array can create an array, numpy Array (resized_img) [: dst_height,: dst_width] is_ IMG is converted into a two-dimensional array (dst_height, dst_width). Each array element is a list with four constant values. Print out as shown in the following figure:
Splicing, mixing
# name: jointAndBlend
# todo: create a new picture and save it
def jointAndBlend():
    iW_size = W_num * W_size
    iH_size = H_num * H_size
    I = numpy.array(scale(root+"lyf.jpg", iW_size, iH_size))
    I = numexpr.evaluate("""I*(1-alpha)""")

    for i in range(W_num):
        for j in range(H_num):
            SH = I[(j*H_size):((j+1)*H_size), (i*W_size):((i+1)*W_size)]
            STA = time.time()
            DA = scale(random.choice(aval), W_size, H_size)
            print("Cal Func Time %s"%(time.time()-STA))
            res  = numexpr.evaluate("""SH+DA*alpha""")
            I[(j*H_size):((j+1)*H_size), (i*W_size):((i+1)*W_size)] = res

    Image.fromarray(I.astype(numpy.uint8)).save("blend.png")
● this part is the core of the project, which is highlighted here.
●root+‘lyf.jpg 'is the photo to be mixed with the spliced photo; And use numpy The method of array converts it into matrix I; Note: the size of I is (W_numW_size, H_numH_size), which is the W of the telescopic photo generation matrix in step 7_ numH_ Num times
● the third line of code is to call numexpr The evaluate method multiplies each element in the matrix by (1-alpha).
● the next double traversal is the realization of specific splicing.
● since the scale of Matrix I is the W of the expansion photo generation matrix in step 6_ numH_ Num times, so we take the matrix SH of (W_size, H_size) from left to right and from top to bottom
● DA is the matrix generated by calling the method in step 7
● then calculate SH+DA*alpha and put the result back to the position of SH in the I matrix. Here, the pixels at the same point in the two photos are multiplied by (1-alpha) and alpha respectively, and then added, so that the two photos will be mixed together. The value of alpha can be set by yourself. Here, 0.5 is set. It is not difficult to see that the mixing method selected here is to add the pixels at the same point of the two photos according to a certain proportion, and select alpha=0.5 at the same time.
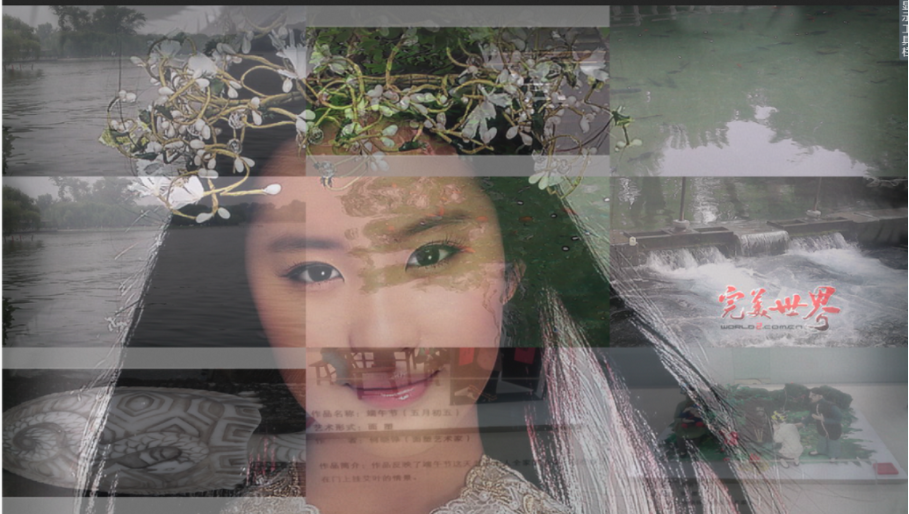
● call fromarray method to convert Matrix I into picture object and save it as blend Png, the photo is shown in the figure below.
rotate
# name: rotate
# todo: rotate photo blend py
def rotate():
    imName = "blend.png"
    print("Rotating picture into...")
    STA = time.time()
    im = Image.open(imName)
    im2 = Image.new("RGBA", (W_size * int(W_num + 1), H_size * (H_num + 4)))
    im2.paste(im, (int(0.5 * W_size), int(0.8 * H_size)))
    im2 = im2.rotate(359)
    im2.save("rotate.png")
    print("rotate Func Time %s"%(time.time()-STA))
● imName is the name of the photo saved in the previous step.
And call image Open opens the photo and assigns it to the image object im.
● the fifth line is to call image New to create a new photo im2, the first parameter is the photo mode, and the second parameter is the width and height of the photo, represented by tuples.
Then we call the paste method to put im in the second image object im2, and the second parameter is the center point placed.
● call the rotate method to rotate the photo
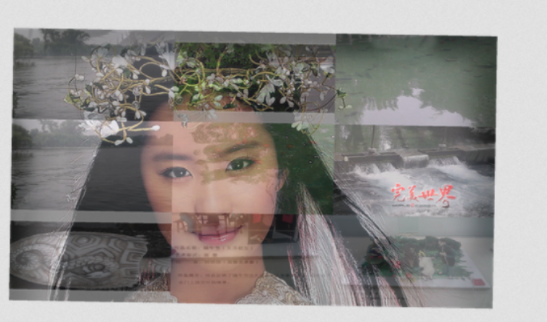
● call the save method to save the photo as rotate Png, the specific photo effect is shown in the figure below:
Add text to photos
# name: addText
# todo: write blessings in the picture
def addText():
    print("Adding blessings to the picture...")
    img = Image.open("blend.png")
    fontWeight=W_num*W_size//12
    font = ImageFont.truetype('xindexingcao57.ttf', fontWeight)
    draw = ImageDraw.Draw(img)
    draw.ink = 21 + 118*256 + 65*256*256

#    draw.text((0,H_size * 6),unicode("happy every day",'utf-8'),(0,0,0),font=font)

    draw.text((W_size * 0.5, fontWeight), "happy life written by python", font = font)
    img.save("addText.png")
● PIL is very powerful and can add text to the picture
●font = ImageFont.truetype: import fonts. The first parameter is the font file and the second parameter is the font size
● draw = ImageDraw(img): generate a brush. The parameter is the picture object to write in the picture.
●draw.ink = R + G256 + B256*256: to set the color of the brush
●draw.text: to write in a picture object, the first parameter is the position of the font, represented by tuples, the second parameter is the content, and the third parameter is the font.
● finally, save the picture as addtext by using the save method png. By now, the work has been basically completed

Execution procedure
if __name__ == "__main__":

    getAllPhotos()
    jointAndBlend()
    rotate()
    addText()
    print("Total Time %s"%(time.time()-STAG))
if name = = "main": it can be understood as the main function of C language as the entry function (execute the module separately).
Just call each function
results of enforcement
python3 blend.py # After execution, you can view several generated pictures in the same level directory
Relevant description
1. alpha: this parameter determines the mixing effect. You can change this parameter freely and observe the changes of photos. The value range is (0 – 1).
2. The introduction of PIL and numpy is not detailed here. You should read the relevant documents again. Related documents
3. The 196 photos spliced here are landscape photos. When the landscape photos are replaced with people photos, the effect is better and the final photos are more beautiful.
4. Due to the use of numpy, numexpr and other libraries, the operation speed is accelerated Py processes 196 photos, splicing, selecting, mixing and adding text, which takes about 55 seconds in total.
5. The first mixed photo is very important (lyf.jpg here). You can use PS to modify the size and so on.