Several ways of injecting components
In Spring, there are four ways to inject components into containers:
- Package scanning + Component annotation (@ Controller,@Service, @Repository, @Component)
- @Bean annotation implementation
- @Import annotation implementation
- Use FactoryBean provided by Spring
Let's talk about the above four ways in detail.
preparation in advance
1. Introduce Spring related dependencies
<dependencies>
    <!-- Spring5.0 After that, Spring Related dependencies are included in spring-webmv Since this time-->
    <dependency>
        <groupId>org.springframework</groupId>
        <artifactId>spring-webmvc</artifactId>
        <version>5.3.5</version>
    </dependency>

    <!-- junit test -->
    <dependency>
        <groupId>junit</groupId>
        <artifactId>junit</artifactId>
        <version>4.13.2</version>
        <scope>test</scope>
    </dependency>
</dependencies>
- The Spring version we use is 5.3.5, Spring 5 After 0, some core dependencies of Spring are included in Spring MVC, so when importing dependencies, we only need to import Spring webmvc!
- junit we use as a unit test
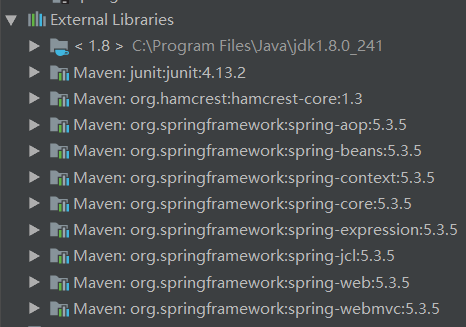
Check the project dependencies and find that all the jar packages we need have been imported!
2. Project structure design
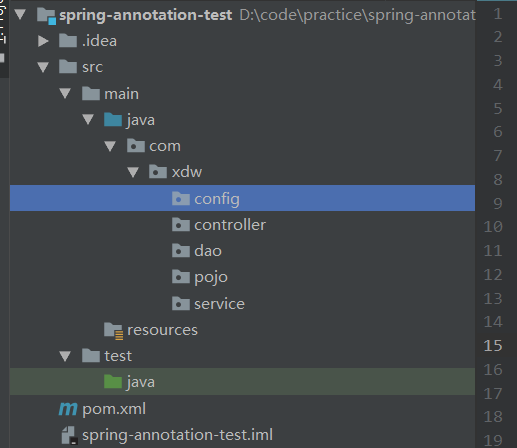
3. Write the Spring Configuration class and use @ Configuration to inject the Configuration file into the ioc container
package com.xdw.config;
import org.springframework.context.annotation.Configuration;
@Configuration
public class MainConfigOfComponent {
}
4. Write a test class and check whether the configuration file is registered successfully
import com.xdw.config.MainConfigOfComponent;
import org.junit.Test;
import org.springframework.context.ApplicationContext;
import org.springframework.context.annotation.AnnotationConfigApplicationContext;

public class TestBeanComponent {

    @Test
    public void test01() {
        AnnotationConfigApplicationContext applicationContext = new AnnotationConfigApplicationContext(MainConfigOfComponent.class);
        printAllBeanNames(applicationContext);
    }


    public void printAllBeanNames(ApplicationContext applicationContext) {
        String[] names = applicationContext.getBeanDefinitionNames();
        for (String name : names) {
            System.out.println(name);
        }
    }

}
- Here, because we use the method of configuring the class, we use the AnnotationConfigApplicationContext to obtain the ioc container instead of the ClassPathXmlApplicationContext used in the previous xml file configuration
- applicationContext.getBeanDefinitionNames(); Method is used to get the IDs of all bean s in the container
- @Configuration is essentially a @ Component annotation. The id of the generated bean defaults to the class name (initial lowercase)
The test shows that the configuration class id we wrote has been successfully registered in the ioc container

Method 1: package scanning + Component annotation
test
1. Create new test classes (Controller, Service, Dao) and modify them with annotations @ Controller, @ Service, @ Repository
BookController:
package com.xdw.controller;

import org.springframework.stereotype.Controller;

@Controller
public class BookController {
}
BookService:
package com.xdw.service;

import org.springframework.stereotype.Service;

@Service
public class BookService {
}
BookDao:
package com.xdw.dao;

import org.springframework.stereotype.Repository;

@Repository
public class BookDao {
}
2. Use the annotation @ ComponentScan on the configuration class to specify the package to be automatically scanned
@ComponentScan(value={"com.xdw"})
@Configuration
public class MainConfigOfComponent {

}
3. Write test methods, run and view results!
public class TestBeanComponent {

    @Test
    public void test01() {

        AnnotationConfigApplicationContext applicationContext = new AnnotationConfigApplicationContext(MainConfigOfComponent.class);
        printAllBeanNames(applicationContext);
    }

    public void printAllBeanNames(ApplicationContext applicationContext) {
        String[] names = applicationContext.getBeanDefinitionNames();
        for (String name : names) {
            System.out.println(name);
        }
    }
}
Run the test method and the results are as follows:
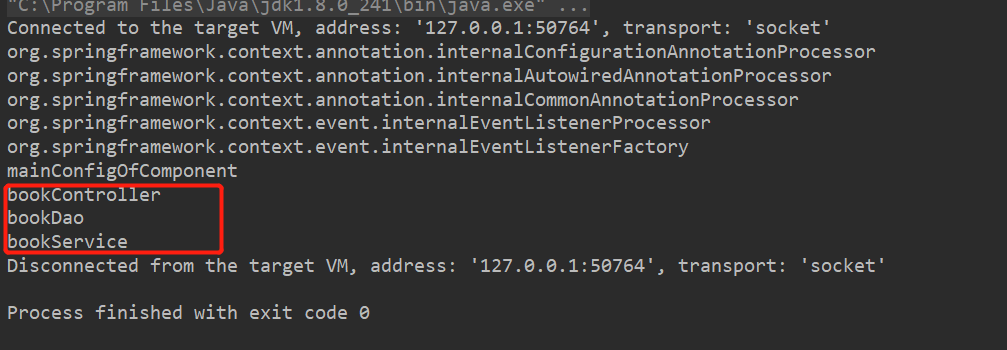
It can be found that the newly created classes have been successfully injected into the ioc container!
@ComponentScan annotation attribute description
In the above test, we completed our component registration by using @ ComponentScan automatic package scanning annotation + Component annotation (@ Controller,@Service, @Repository, @Component)!
@The ComponentScan annotation provides many properties for us to flexibly register components into containers.
-
value attribute: used to specify the package to be scanned. In the above example, we set it to "com.xdw", which means scanning com.xdw All classes under xdw package and all classes under sub package
-
excludeFilters property: exclude some components according to the specified rules during scanning
-
includeFilters = Filter[]; Specify which components only need to be included during scanning, and be sure to set useDefaultFilters to false when using
-
We can also use the @ ComponentScans annotation to configure multiple @ ComponentScans
-
The excludeFilters and includeFilters attributes need to be used together with the @ Filter annotation. @ Filter provides us with the following ways to Filter or select components:
FilterType.ANNOTATION: according to annotation (common)
FilterType.ASSIGNABLE_TYPE: refers to the specified type (also commonly used)
FilterType.ASPECTJ: use ASPECTJ expression, not commonly used
FilterType.REGEX: use regular expressions
FilterType.CUSTOM: custom rules
Examples of several over rate selection methods
Because the excludeFilters property is basically the same as the includeFilters property, we use the excludeFilters property to test here.
We choose the following three commonly used for testing:
1.FilterType.ANNOTATION: according to the annotation
Add the following comments to the configuration class MainConfigOfComponent:
@ComponentScan(value={"com.xdw"},
        includeFilters = {@Filter(type= FilterType.ANNOTATION, value= Controller.class)},
        useDefaultFilters = false)
@Configuration
public class MainConfigOfComponent {
}
Note: when using the includeFilters property, be sure to set useDefaultFilters = false, otherwise includeFilters will not take effect!
Test run:

It was found that only bookController was successfully injected into the container!
2.FilterType.ASSIGNABLE_TYPE according to the specified type
Modify the configuration class as follows:
@ComponentScan(value={"com.xdw"},
        includeFilters = {@Filter(type= FilterType.ASSIGNABLE_TYPE, value= BookService.class)},
        useDefaultFilters = false)
@Configuration
public class MainConfigOfComponent {

}
Test run:

It is found that only bookService is successfully registered in the container at present
3.FilterType.CUSTOM custom type
Click the FilterType enumeration class, and we find that
/** Filter candidates using a given custom
* {@link org.springframework.core.type.filter.TypeFilter} implementation.
*/
CUSTOM
To use custom types, we need to write a class to implement the TypeFilter interface.
Write MyTypeFilter class to implement TypeFilter interface:
package com.xdw.filter;

import org.springframework.core.io.Resource;
import org.springframework.core.type.AnnotationMetadata;
import org.springframework.core.type.ClassMetadata;
import org.springframework.core.type.classreading.MetadataReader;
import org.springframework.core.type.classreading.MetadataReaderFactory;
import org.springframework.core.type.filter.TypeFilter;

import java.io.IOException;

public class MyTypeFilter implements TypeFilter {

    /**
     *
     * @param metadataReader    Currently scanned class information
     * @param metadataReaderFactory You can read the information of any other class
     *
     */
    @Override
    public boolean match(MetadataReader metadataReader, MetadataReaderFactory metadataReaderFactory) throws IOException {

        // Get all annotation information of the current class
        AnnotationMetadata annotationMetadata = metadataReader.getAnnotationMetadata();

        // Get the information of the current scanning class
        ClassMetadata classMetadata = metadataReader.getClassMetadata();

        // Get current classpath information
        Resource resource = metadataReader.getResource();

        // Here we use the name. If Dao is included, it will be injected into the ioc container
        if(classMetadata.getClassName().contains("Dao")) {
            return true;
        }
        return false;
    }
}
Modify the configuration class, set includeFilters, set the type of Filter to CUSTOM, and set the value to mytypefilter we just wrote class
@ComponentScan(value={"com.xdw"},
        includeFilters = {@Filter(type= FilterType.CUSTOM, value= MyTypeFilter.class)},
        useDefaultFilters = false)
@Configuration
public class MainConfigOfComponent {
}
Test:

We found that only bookDao successfully registered in the container!
summary
1. @ComponentScan should be used in conjunction with @ Controller,@Service, @Repository, @Component and other annotations
2. When the includeFilters and excludeFilters attributes of @ componentscan are used, they need to be used in combination with Filter []
3. When using the includeFilters attribute of @ ComponentScan, be sure to set useDefaultFilters = false at the same time, otherwise it will not take effect
Mode 2: @ Bean injection component
test
1. Create Person class
package com.xdw.pojo;


public class Person {

    private Integer age;

    private String name;

    public Person() {
    }

    public Person(Integer age, String name) {
        this.age = age;
        this.name = name;
    }

    public Integer getAge() {
        return age;
    }

    public void setAge(Integer age) {
        this.age = age;
    }

    public String getName() {
        return name;
    }


    public void setName(String name) {
        this.name = name;
    }

    @Override
    public String toString() {
        return "Person{" +
                "age=" + age +
                ", name='" + name + '\'' +
                '}';
    }
}
2. Write test class
package com.xdw.config;


import com.xdw.pojo.Person;
import org.springframework.context.annotation.Bean;
import org.springframework.context.annotation.ComponentScan;
import org.springframework.context.annotation.Configuration;


@ComponentScan(value={"com.xdw"})
@Configuration
public class MainConfigOfComponent {


    @Bean
    public Person person() {
        return new Person(10, "Outlaw maniac: Zhang San");
    }

}
3. Write test classes and run tests
import com.xdw.config.MainConfigOfComponent;
import com.xdw.pojo.Person;
import org.junit.Test;
import org.springframework.context.ApplicationContext;
import org.springframework.context.annotation.AnnotationConfigApplicationContext;

public class TestBeanComponent {

    @Test
    public void test01() {

        AnnotationConfigApplicationContext applicationContext = new AnnotationConfigApplicationContext(MainConfigOfComponent.class);
        printAllBeanNames(applicationContext);

        Person person = (Person) applicationContext.getBean("person");
        System.out.println(person);
    }


    public void printAllBeanNames(ApplicationContext applicationContext) {
        String[] names = applicationContext.getBeanDefinitionNames();
        for (String name : names) {
            System.out.println(name);
        }
    }
}
The test results are as follows:
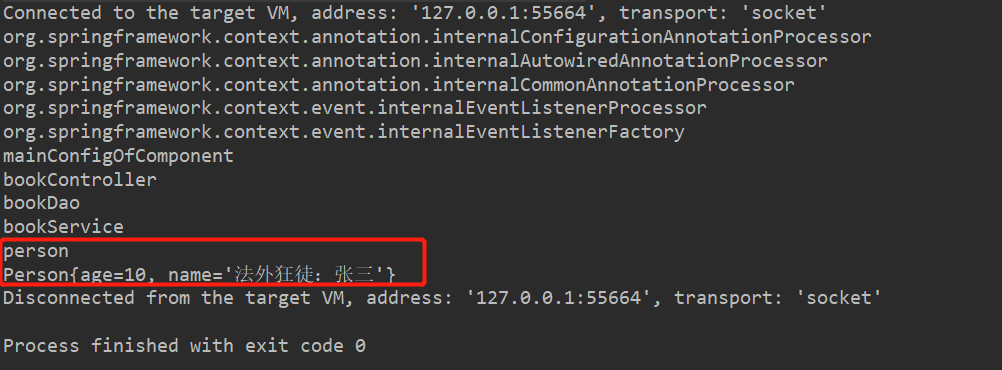
It is found that the class we just created has been successfully injected into the ioc container.
@Bean annotation description
1. Type is the return value, and id is the method name by default
2. There are two ways to modify id: a. modify method name b. set name or value attribute for @ Bean
@Bean(value="person01")
public Person person() {
    return new Person(10, "Outlaw maniac: Zhang San");
}
Scope of Bean @ scope
bean instances have the following four scopes:
- singleton: single instance. When ioc starts, it will create objects and put them into the container. In the future, each acquisition will be directly obtained from the container (map.get())
- prototype: multi instance. When the ioc container is started, objects will not be created and injected into the ioc container. In the future, each acquisition will call the creation method
- Request: create an instance for the same request
- Session: create an instance of the same session
The default singleton mode is used when the scope is not specified.
Singleton mode test
Configure class methods:
// The scope is not specified. The default mode is singleton mode
@Bean
public Person person() {
    System.out.println("person Object start creation");
    return new Person(10, "Outlaw maniac: Zhang San");
}
Write test method:
@Test
public void test02() {
    AnnotationConfigApplicationContext applicationContext = new AnnotationConfigApplicationContext(MainConfigOfComponent.class);
    System.out.println("Container initialization completed");
}
Run the test and the results are as follows:

We found that in singleton mode, when the default container is initialized, the object has been loaded into the ioc container.
Modify the test method as follows:
@Test
public void test02() {
    AnnotationConfigApplicationContext applicationContext = new AnnotationConfigApplicationContext(MainConfigOfComponent.class);
    System.out.println("Container initialization completed");
    Person person01 = (Person)applicationContext.getBean("person");
    Person person02 = (Person) applicationContext.getBean("person");
    System.out.println(person01 == person02);
}
The test results are as follows:

We found that we took person from the container twice, and the two objects taken out are the same!
We add @ Lazy annotation on the method of creating bean. The code is as follows:
@Lazy   // It means that the container will inject beans into the container only when we get beans for the first time
@Bean
public Person person() {
    System.out.println("person Object start creation");
    return new Person(10, "Outlaw maniac: Zhang San");
}
After running, the test results are as follows:

When the container starts, no object is created and put into the container. The object is created and put into the container only when we call it for the first time.
Summary:
1. The bean injected into the container by @ bean does not specify the scope. The default mode is singleton mode
2. By default, the singleton mode creates objects and puts them into the container when the container is started. We can use @ Lazy lazy to load annotations. Let's create objects and initialize them when we use them for the first time.
3. In singleton mode, there is only one bean in the container. No matter how many times it is taken out, the object taken out is the same.
Multi instance mode test
Add the following annotation for the method of creating bean:
@Scope("prototype")
@Bean
public Person person() {
    System.out.println("person Object start creation");
    return new Person(10, "Outlaw maniac: Zhang San");
}
The test results are as follows:
@Test
public void test02() {
    AnnotationConfigApplicationContext applicationContext = new AnnotationConfigApplicationContext(MainConfigOfComponent.class);
    System.out.println("Container initialization completed");
    Person person01 = (Person)applicationContext.getBean("person");
    Person person02 = (Person) applicationContext.getBean("person");
    System.out.println(person01 == person02);
}
After running, the test results are as follows:

Summary:
1. Multi instance mode: when the container is initialized, no instance will be created
2. Every time you fetch a bean, the container will create a new bean
We can hardly use the two modes of request and session, so we won't explain them too much here.
@Conditional annotation
We can use @ Conditional annotation to judge according to certain conditions and inject bean s into the container if the conditions are met.
Let's check the @ Conditional source code
@Target({ElementType.TYPE, ElementType.METHOD})
@Retention(RetentionPolicy.RUNTIME)
@Documented
public @interface Conditional {

	/**
	 * All {@link Condition} classes that must {@linkplain Condition#matches match}
	 * in order for the component to be registered.
	 */
	Class<? extends Condition>[] value();

}
It is found that the annotation has a value attribute, which must inherit the Condition interface.
test
Requirements: we create a new type of SystemData and write two methods to create bean s in the configuration class. The IDs are windows and linux respectively; According to the system type, if it is a Windows system, create an instance with the id of windows respectively. If it is linux, create an instance with the id of linux.
1. Write two custom condition classes to implement the condition interface:
package com.xdw.condition;

import org.springframework.beans.factory.config.ConfigurableListableBeanFactory;
import org.springframework.beans.factory.support.BeanDefinitionRegistry;
import org.springframework.context.annotation.Condition;
import org.springframework.context.annotation.ConditionContext;
import org.springframework.core.env.Environment;
import org.springframework.core.type.AnnotatedTypeMetadata;

public class WindowsCondition implements Condition {

    /**
     *
     *
     * @param context  Determine the context (environment) that the condition can use
     * @param metadata notes
     *
     */
    @Override
    public boolean matches(ConditionContext context, AnnotatedTypeMetadata metadata) {
        // 1. Obtain beanFactory used by ioc
        ConfigurableListableBeanFactory beanFactory = context.getBeanFactory();
        // 2. Get class loader
        ClassLoader classLoader = context.getClassLoader();
        // 3. Obtain current environmental information
        Environment environment = context.getEnvironment();
        // 4. Get the registration class defined by the bean. You can judge the registration of the bean in the container or register the bean in the container
        BeanDefinitionRegistry registry = context.getRegistry();

//        BeanDefinition definition = registry.getBeanDefinition("person");

        String property = environment.getProperty("os.name");
        if(property.contains("Windows")) {
            return true;
        }
        return false;
    }
}
package com.xdw.condition;

import org.springframework.beans.factory.config.ConfigurableListableBeanFactory;
import org.springframework.beans.factory.support.BeanDefinitionRegistry;
import org.springframework.context.annotation.Condition;
import org.springframework.context.annotation.ConditionContext;
import org.springframework.core.env.Environment;
import org.springframework.core.type.AnnotatedTypeMetadata;

public class LinuxCondition implements Condition {

    /**
     *
     *
     * @param context  Judgment condition context (environment)
     * @param metadata  metadata
     * @return {@code true} if the condition matches and the component can be registered,
     * or {@code false} to veto the annotated component's registration
     */
    @Override
    public boolean matches(ConditionContext context, AnnotatedTypeMetadata metadata) {

        // 1. Obtain beanFactory used by ioc
        ConfigurableListableBeanFactory beanFactory = context.getBeanFactory();
        // 2. Get class loader
        ClassLoader classLoader = context.getClassLoader();
        // 3. Obtain current environmental information
        Environment environment = context.getEnvironment();
        // 4. Get the registration class defined by the bean. You can judge the registration of the bean in the container or register the bean in the container
        BeanDefinitionRegistry registry = context.getRegistry();

        String property = environment.getProperty("os.name");
        if(property.contains("Linux")) {
            return true;
        }


        return false;
    }
}
2. Add two methods to register bean s in the configuration class
@Conditional(value={WindowsCondition.class})
@Bean("windows")
public SystemData systemData01() {
    System.out.println("windows Already created");
    return new SystemData("windows System!");
}


@Conditional(value={LinuxCondition.class})
@Bean("linux")
public SystemData systemData02() {
    System.out.println("linux Already created");
    return new SystemData("linux System!");
}
Run the test and the results are as follows:

We can see that because our current system is windows, the bean with id windows is created and injected into the container!
summary
1. @Bean annotation, the default object name is the method name, and the object type is the return type of the method; The object name can be modified through the name attribute of the @ Bean annotation or by directly modifying the method name.
2. The default Scope of @ bean annotation is singleton mode, which can be modified through @ Scope annotation
3. The singleton mode is created and initialized when the container is started by default. We can use @ Lazy annotation to realize Lazy loading. Beans are created and initialized only when they are used for the first time.
4. We can use @ Conditional annotation to load and initialize bean s only when certain conditions are met. This annotation can be placed on both methods and classes
Method 3: use @ Import annotation
We can use @ Import to quickly Import a component into the container.
Use @ Import directly
Create a new Color class:
package com.xdw.pojo;

public class Color {
}
Add the following comments on the configuration class:
@Import(value={Color.class})
@Configuration
public class MainConfigOfComponent {}
Write the test method, print out all bean s registered in the container, and run the test results as follows:
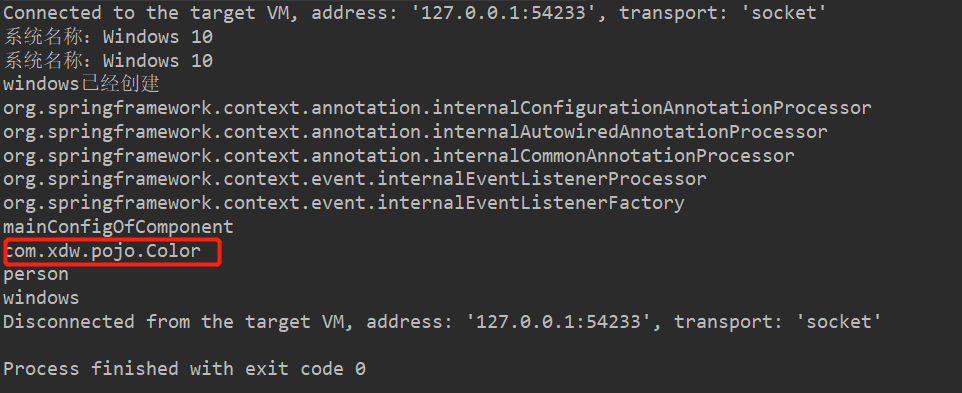
We found that the class we just created has been successfully injected into the container.
Summary: @ import (components to be imported into the container), these components will be automatically registered in the container, and the id is the full class name by default
ImportSlector
This method needs to implement the ImportSlector interface. The selectImports method needs to be rewritten in the interface path, which will return an array to be instantiated.
Two new classes are added:
package com.xdw.pojo;

public class Red {
}
package com.xdw.pojo;

public class Blue {
}
Write the MyImportSelector class and implement the ImportSlector interface as follows:
package com.xdw.selector;

import org.springframework.context.annotation.ImportSelector;
import org.springframework.core.type.AnnotationMetadata;

public class MyImportSelector implements ImportSelector {

    @Override
    public String[] selectImports(AnnotationMetadata importingClassMetadata) {
        return new String[]{"com.xdw.pojo.Red", "com.xdw.pojo.Blue"};
    }
}
This class overrides the selectImports method and returns the full class name of the class we just created.
Modify the @ Import annotation on the configuration class and add the MyImportSelector we created into the @ Import annotation:
@Import(value={Color.class, MyImportSelector.class})
@Configuration
public class MainConfigOfComponent {
The test results are as follows:

The class we just created has been successfully injected into the container.
Summary: the object name created in this way is also the full class name by default.
ImportBeanDefinitionRegistrar
We can also manually register beans into the container through ImportBeanDefinitionRegistrar.
Create a new class RainBow:
package com.xdw.pojo;

public class RainBow {
}
Write the class myimportbeandefinitionregister to implement the importbeandefinitionregister interface:
package com.xdw.selector;

import com.xdw.pojo.RainBow;
import org.springframework.beans.factory.support.BeanDefinitionRegistry;
import org.springframework.beans.factory.support.RootBeanDefinition;
import org.springframework.context.annotation.ImportBeanDefinitionRegistrar;
import org.springframework.core.type.AnnotationMetadata;

public class MyImportBeanDefinitionRegistrar implements ImportBeanDefinitionRegistrar {

    /**
     *
     * AnnotationMetadata:  Annotation information of the current class
     * BeanDefinitionRegistry: BeanDefinition Registration class
     *               Call all the bean s that need to be added into the container:
     *                   BeanDefinitionRegistry.registerBeanDefinition()Method to register manually
     * @param registry current bean definition registry
     */
    @Override
    public void registerBeanDefinitions(AnnotationMetadata importingClassMetadata, BeanDefinitionRegistry registry) {

        if(registry.containsBeanDefinition("com.xdw.pojo.Red") && registry.containsBeanDefinition("com.xdw.pojo.Blue")) {

            RootBeanDefinition rootBeanDefinition = new RootBeanDefinition(RainBow.class);
            registry.registerBeanDefinition("rainBow", rootBeanDefinition);
        }
    }
}
Here we add a simple judgment. If there are objects named "com.xdw.pojo.Red" and "com.xdw.pojo.Blue" in the ioc container, the rainBow object will be loaded.
Add the MyImportBeanDefinitionRegistrar class written by us to the @ Import annotation:
@Import(value={Color.class, MyImportSelector.class, MyImportBeanDefinitionRegistrar.class})
@Configuration
public class MainConfigOfComponent {}
Test:

Our newly created rainBow was successfully loaded into the ioc container.
summary
@There are three ways to Import bean s into containers:
1. @ import (components to be imported into the container), these components will be automatically registered in the container, and the id is the full class name by default
2. ImportSlector: return the full class name array of the components to be imported (this method is often used in Springboot)
3. ImportBeanDefinitionRegistrar: manually register beans into the container
Method 4: use FactoryBean provided by Spring
test
We also use the previous Color class to comment out the previous @ Import.
Write ColorFactoryBean class to implement FactoryBean interface:
package com.xdw.factory;

import com.xdw.pojo.Color;
import org.springframework.beans.factory.FactoryBean;

public class ColorFactoryBean implements FactoryBean {

    /**
     * Whether it is single instance mode: true single instance mode false multi instance mode
     *
     * @return
     */
    @Override
    public boolean isSingleton() {
        return true;
    }


    /**
     * Equivalent to class
     * @return
     * @throws Exception
     */
    @Override
    public Object getObject() throws Exception {
        return new Color();
    }


    @Override
    public Class<?> getObjectType() {
        return Color.class;
    }
}
Write the configuration class and register the ColorFactoryBean we just created with the @ Bean annotation
@Configuration
public class MainConfigOfComponent {


    @Bean
    public ColorFactoryBean colorFactoryBean() {
        return new ColorFactoryBean();
    }
}
Write test class:
@Test
public void test04() {

    AnnotationConfigApplicationContext applicationContext = new AnnotationConfigApplicationContext(MainConfigOfComponent.class);
    // In fact, what you get is the object created by the factory bean calling getObject
    Object factoryBean = applicationContext.getBean("colorFactoryBean");
    System.out.println(factoryBean.getClass());

    // Get the factory class itself
    Object bean = applicationContext.getBean("&colorFactoryBean");
    System.out.println(bean.getClass());

}
Operation results:

summary
Use FactoryBean provided by Spring
1. By default, the object created by the factory bean calling getObject is obtained (obtained by name)
2. To get the factory bean itself, we need to add one to the front&