catalogue
three point three @ Resource annotation
three point four @ Similarities and differences between Autowired and @ Resource
4.2 configuration initialization and destruction
5. Configure based on Java classes
6. Comparison between annotation and XML
7. Integrated development of XML and annotation
introduce
(1) What is annotation?
A: annotation is a special code tag, format: @ annotation name (attribute name = attribute value, attribute name = attribute value..)
(2) Annotation scope?
A: annotations work on classes, methods, and properties
(3) Purpose of using annotation
Answer: simplify xml configuration
1. Preparation
1. If you want to use annotation form, you must introduce aop package

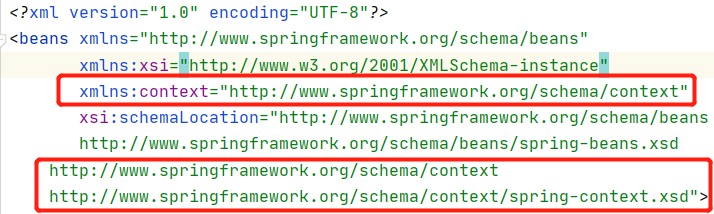
2. A context constraint must be introduced into the configuration file
xmlns:context="http://www.springframework.org/schema/context"

 http://www.springframework.org/schema/context
 http://www.springframework.org/schema/context/spring-context.xsd">
3. Configure component scanning
Configure which package to use component scanning under
<context:component-scan base-package="com.yixin.dao"/>
2. Annotation development
2.1 @Component
Introduction: configure a class and hand it over to Spring for management.
For example, the following is equivalent to < bean id = "book" class = "XXX" >
@Component("book")code:
@Component("book")
public class Book {
 public int id=1;
 public String name="Wholeheartedly";
}
Test:
@Test
public void test(){
 ApplicationContext context = new ClassPathXmlApplicationContext("bean1.xml");
 Book book=context.getBean("book", Book.class);
 System.out.println(book.name);
}
2.2 @Value
Function: set common attribute value
(1) You can directly add @ value("value") to the direct name without providing a set method;
@Component("book")
public class Book {
 @Value("2")
 public int id;
 @Value("Wholeheartedly")
 public String name;
}
(2) If a set method is provided, you can add @ value("value") to the set method or @ value("value") to the attribute name;
@Component("book")
public class Book {

 public int id;
 @Value("Wholeheartedly")
 public String name;

 @Value("2")
 public void setId(int id) {
 this.id = id;
 }
 public void setName(String name) {
 this.name = name;
 }
}
2.3 derived notes
@Three derived annotations of Component
Objective: for better stratification.
Function: the three functions are similar.
@Controller: web layer
@Service: service layer
@Repository: dao layer
Controller
@Controller("book")
public class Book {
 @Value("2")
 public int id;
 @Value("Wholeheartedly")
 public String name;
}
Service
@Service("book")
public class Book {
 @Value("2")
 public int id;
 @Value("Wholeheartedly")
 public String name;
}
Repository
@Repository("book")
public class Book {
 @Value("2")
 public int id;
 @Value("Wholeheartedly")
 public String name;
}
Automatic assembly:
get ready:
Entity class Book:
@Component("book")
public class Book {
 @Value("2")
 private int id;
 @Value("Wholeheartedly")
 private String name;
}
Entity class Teacher:
@Component("teacher")
public class Teacher {
 @Value("1")
 private int id;
 @Value("Miss Wang")
 private String name;
}
3. Automatic assembly
3.1 @Autowired
Assembly attribute process:
(1) By default, spring will preferentially find the corresponding component (bean) in the container according to the attribute type (modified by annotation), and assign the value when it is found;
(2) If multiple components of the same type are found, the name of the attribute is used as the id of the component (bean) to find it in the container.
Entity class Student:
@Component("student")
public class Student {
 @Value("One heart classmate")
 private String name;
 @Autowired
 private Teacher teacher;
 @Autowired
 private Book book;
}
3.2 @Qualifier notes
Note: it cannot be used alone
It can be used in combination with Autowired: @ Qualifier specifies the id of the component to be assembled instead of using the attribute name.
@Component("student")
public class Student {
 @Value("One heart classmate")
 private String name;
 @Autowired
 @Qualifier("teacher")//Find the class whose bean id is teacher
 private Teacher teacher;

 @Autowired
 @Qualifier("book")
 private Book book;
}
Use @ Qualifier annotation:
When the IOC container finds multiple components of the same type in the container according to the attribute type, and then finds the name of the attribute in the container as the id of the component (bean), if it cannot find it, it uses these two annotations to specify the id of the bean to be assembled.
three point three @ Resource annotation
Execution process:
(1) @ Resource if there is a specified name attribute, first search the configuration file Bean by name;
(2) If no name is specified, the default byName method is used for assembly;
(3) If (2) is unsuccessful, it will be assembled automatically by byType.
(4) If they are not successful, an exception is reported.
@Component("student")
public class Student {
 @Value("One heart classmate")
 private String name;
 @Resource(name = "teacher")
 private Teacher teacher;
 @Resource(name ="book")
 private Book book;
}
three point four @ Similarities and differences between Autowired and @ Resource
The same: both of them implement the automatic assembly function, which can be written in the field or in the setter method.
Different:
(1) The execution order is different, @ Autowired (if name is not specified) first byType, then byName, and @ Resource first byName, then byType.
(2) Once the name attribute in @ Resource is specified, it will only be assembled by name.
(3) @ Autowired is assembled by type by default. By default, dependent objects must exist. If null value is allowed, its required property can be set to false, such as @ Autowired(required=false). If we want to use name assembly, we can use it in combination with @ Qualifier note.
(4) @ Autowired is defined by Spring; @ Resource is the java specification.
4.@scope
Scope of action:
- Singleton: by default, Spring will create this object in singleton mode. Close the factory and all objects will be destroyed.
- prototype: multi instance mode. When the factory is closed, all objects will not be destroyed. The internal garbage collection mechanism will recycle.
@Component("book")
@Scope("prototype")
public class Book {
 @Value("2")
 private int id;
 @Value("Wholeheartedly")
 private String name;
}
4.2 configuration initialization and destruction
@PostConstruct: the method that initializes the class
@PreDestroy: the method that makes the destroy call to the class
code:
@Component("book")
public class Book {
@Value("2")
private int id;
@Value("Wholeheartedly")
private String name;
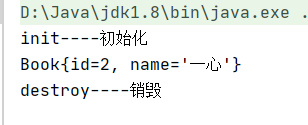
@PostConstruct
public void init(){
System.out.println("init----initialization");
}
@PreDestroy
public void destroy(){
System.out.println("destroy----Destroy");
}
}Test:
@Test
public void test(){
 ApplicationContext context = new ClassPathXmlApplicationContext("bean1.xml");
 Book book=context.getBean("book",Book.class);
 System.out.println(book);

 ((ClassPathXmlApplicationContext) context).close();
}
Output:
5. Configure based on Java classes
Introduction: provide Bean definition information through Java classes
(1) Write entity class Book
@Component("book")
public class Book {
 @Value("2")
 private int id;
 @Value("Wholeheartedly")
 private String name;
}
(2) Create a new config configuration package and write a MyConfig configuration class
@Configuration//Represents that this is a configuration class
public class MyConfig {
 @Bean//Register a bean through the method. The return value here is the bean type, and the method name is the bean id!
 public Book book(){
 return new Book();
 }
}
Test:
@Test
public void test2(){
 ApplicationContext applicationContext =
 new AnnotationConfigApplicationContext(MyConfig.class);
 Book book = applicationContext.getBean("book",Book.class);
 System.out.println(book);
}
If there are multiple configuration classes, how should I import them? MyConfig2:
@Configuration
public class MyConfig2 {
}
Import configuration class MyConfig2 to MyConfig:
@Configuration//Represents that this is a configuration class
@Import(MyConfig2.class) //Import and merge other configuration classes, similar to the inculde label in the configuration file
public class MyConfig {
 @Bean//Register a bean through the method. The return value here is the bean type, and the method name is the bean id!
 public Book book(){
 return new Book();
 }
}
6. Comparison between annotation and XML
| advantage | shortcoming | |
| annotation |
| Unable to configure the class in the third-party jar package (the annotation is not provided by itself and cannot be used) |
| XML |
|
|
In general, compare the two:
Note: it is a kind of distributed metadata, which is tightly bound to the source code.
xml: it is a kind of centralized metadata without binding with source code.
Therefore, the choice of annotation and XML can be viewed from two perspectives: decentralized or centralized, and source code binding / unbound.
7. Integrated development of XML and annotation
- XML management Bean
- Annotation complete attribute injection
- In the process of use, there is no need to scan. The scanning is for the annotation on the class
Use attribute annotation @ Resource @Value @Autowired @Qulifier without scanning
But you need to configure in XML:
<context:annotation-config/>
epilogue
The above is the explanation of Spring annotation development by Xinxin students. Annotation development will be often used in future development work. Be sure to master it.