1, Introduction
Spring Boot is a new framework provided by pivot team. It is designed to simplify the initial construction and development process of new spring applications. The framework uses a specific way to configure, so that developers no longer need to define a templated configuration.
Spring Boot has the advantages of rapid development and is especially suitable for building microservice systems. In addition, it encapsulates various commonly used suites, such as mybatis, hibernate, redis, mongodb, etc.
2, Quick start
In this article, we will learn how to quickly create a Spring Boot application. Through this list, I have a preliminary understanding of Spring Boot and experience its simple structure and rapid development features.
3, Create project
Spring officially provides a very convenient tool Spring Initalizr to help us create Spring Boot applications.
1. Use the Spring Initalizr page to create
Step 1: visit Spring Initializr: https://start.spring.io/
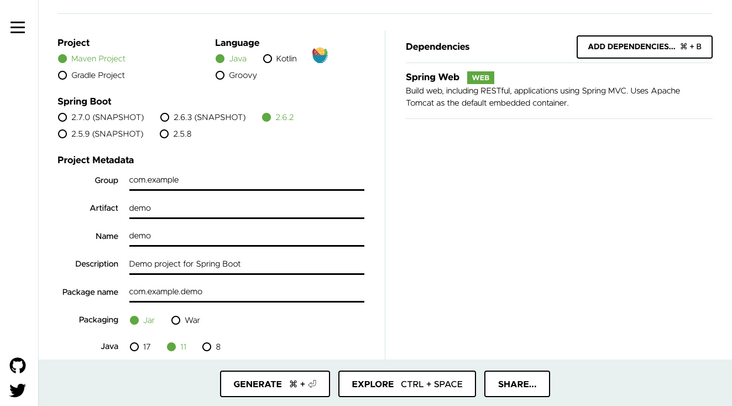
- Project: what build tool to use, Maven or Gradle;
- Language: what programming language, Java
- Spring Boot: the selected Spring Boot version; The latest version 2.6.2 will be used here.
- Project Metadata: metadata of the project; In fact, it is the basic element of Maven project
- Dependencies: select the Spring Boot component to be added; This article will implement an Http interface, so you can select Web components. Just enter the Web, and the page will automatically associate and display the matching optional components:
Step 2: click "Generate Project" to generate a project; At this time, the browser will download a compressed package with the same name as the above Artifact.
Step 3: unzip the project package and import it into Maven project with compiler. Take IntelliJ IDEA as an example:
- Select the extracted project folder and click OK
- Click: Import project from external model, select Maven, and click Next to the end.
- If your environment has multiple versions of JDK, please select Java 8 when choosing Java SDK (depending on the Java version you selected in the first step)
2. Create with IntelliJ IDEA
If you use IntelliJ IDEA to write Java programs, you can also directly create Spring Boot applications in the compiler.
Step 1: from the menu bar, select file = > New = > Project, We can see the create function window as shown in the figure below.
The address pointed to by the Initial Service Url is the address of the Spring Initializr tool officially provided by Spring, so the project created here is actually implemented based on its Web tool.
Step 2: click Next. After waiting for a while, we can see the project information window as shown in the figure below:
In fact, as like as two peas in the Web version, we have the same content as Spring Initializr.
Step 3: continue to click Next to enter the window of selecting Spring Boot version and dependency management: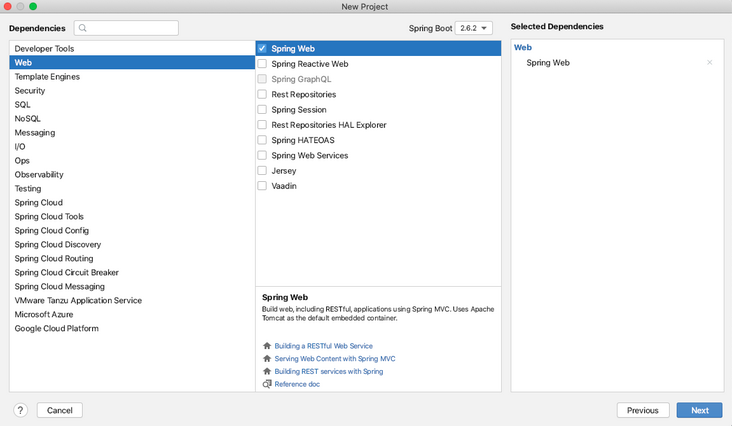
Step 4: click Next to enter the final details about engineering physical storage. Finally, click Finish to complete the construction of the project.
4, Project structure
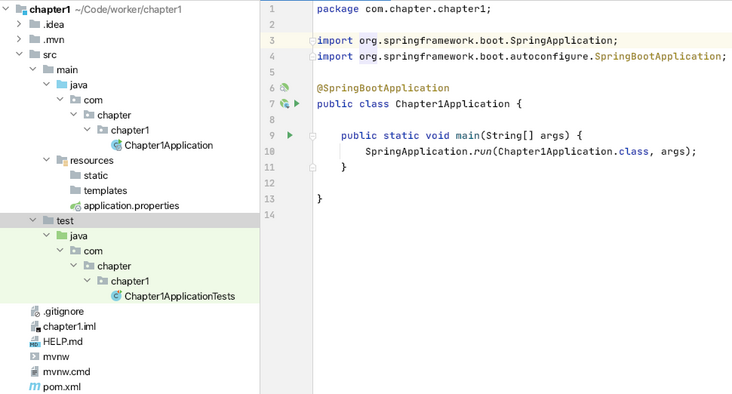
Through the above steps, the basic project is created. As shown in the figure above, the Spring Boot infrastructure consists of three files
- Program entry under src/main/java: Chapter1Application
- Configuration file under src/main/resources: application properties
- Test entry under src/test /: Chapter1ApplicationTests
The generated Chapter1Application and Chapter1ApplicationTests classes can be run directly to start the currently created project. Because the project does not cooperate with any data access or Web module, the program will end after loading Spring.
5, Project dependency
<?xml version="1.0" encoding="UTF-8"?>
<project xmlns="http://maven.apache.org/POM/4.0.0" xmlns:xsi="http://www.w3.org/2001/XMLSchema-instance"
         xsi:schemaLocation="http://maven.apache.org/POM/4.0.0 https://maven.apache.org/xsd/maven-4.0.0.xsd">
    <modelVersion>4.0.0</modelVersion>
    <parent>
        <groupId>org.springframework.boot</groupId>
        <artifactId>spring-boot-starter-parent</artifactId>
        <version>2.6.2</version>
        <relativePath/> <!-- lookup parent from repository -->
    </parent>
    <groupId>com.chapter</groupId>
    <artifactId>chapter1</artifactId>
    <version>0.0.1-SNAPSHOT</version>
    <name>chapter1</name>
    <description>SpringBoot Chapter I</description>
    <properties>
        <java.version>1.8</java.version>
    </properties>
    <dependencies>
        <dependency>
            <groupId>org.springframework.boot</groupId>
            <artifactId>spring-boot-starter-web</artifactId>
        </dependency>

        <dependency>
            <groupId>org.springframework.boot</groupId>
            <artifactId>spring-boot-starter-test</artifactId>
            <scope>test</scope>
        </dependency>
    </dependencies>

    <build>
        <plugins>
            <plugin>
                <groupId>org.springframework.boot</groupId>
                <artifactId>spring-boot-maven-plugin</artifactId>
            </plugin>
        </plugins>
    </build>

</project>
Open POM XML, let's take a look at the dependencies of the Spring Boot project:
As shown above, there are four main parts:
- Project Metadata: the Project Metadata entered during creation, that is, the basic elements of Maven project, including groupId, artifactId, version, name, description, etc
- Parent: inherit the dependency management of spring boot starter parent, control version and package
- Dependencies: project specific dependencies. Spring boot starter web is used to implement the HTTP interface (Spring MVC is included in this dependency); Spring boot starter test is used to write dependency packages for unit tests. The use of more functional modules will be gradually expanded in the later tutorials.
- Build: build the configuration part. You can use the Spring Boot parent plug-in to directly run the Spring Boot plug-in.
6, Write an HTTP interface
- Create TestController class as follows:
package com.chapter.chapter1;

import org.springframework.web.bind.annotation.RequestMapping;
import org.springframework.web.bind.annotation.RestController;

@RestController
public class TestController {
    @RequestMapping("/test")
    public String index() {
        return "Hello World";
    }
}
@Respontroller: equivalent to the combination of @ Controller+@ResponseBody annotation. There is no need to add @ ResponseBody annotation in front of the method to return json data
So far, the goal has been completed. A blank Spring Boot project has been built through Maven, and a simple request processing has been realized by introducing a web module.
- Start the main program and use tools such as PostMan to initiate the request: http://localhost:8080/test , you can see the page return: Hello World
7, Write unit test cases
Open the test entry Chapter1ApplicationTests class under src/test /. Next, write a simple unit test to simulate http requests, as follows:
import org.junit.jupiter.api.BeforeEach;
import org.junit.jupiter.api.Test;
import org.springframework.boot.test.context.SpringBootTest;
import org.springframework.http.MediaType;
import org.springframework.test.web.servlet.MockMvc;
import org.springframework.test.web.servlet.request.MockMvcRequestBuilders;
import org.springframework.test.web.servlet.setup.MockMvcBuilders;

import static org.hamcrest.Matchers.equalTo;
import static org.springframework.test.web.servlet.result.MockMvcResultMatchers.content;
import static org.springframework.test.web.servlet.result.MockMvcResultMatchers.status;


@SpringBootTest
class Chapter1ApplicationTests {
    private MockMvc mvc;

    @BeforeEach
    public void setUp() {
        mvc = MockMvcBuilders.standaloneSetup(new TestController()).build();
    }

    @Test
    public void getHello() throws Exception {
        mvc.perform(MockMvcRequestBuilders.get("/test").accept(MediaType.APPLICATION_JSON))
                .andExpect(status().isOk())
                .andExpect(content().string(equalTo("Hello World")));
    }

}
Use MockServletContext to build an empty WebApplicationContext, so that the TestController we created can be created in the @ BeforeEach function and passed to mockmvcbuilders In the standalonesetup() function.
Note that the following contents are introduced to make the status, content and equalTo functions available
import static org.hamcrest.Matchers.equalTo;
import static org.springframework.test.web.servlet.result.MockMvcResultMatchers.content;
import static org.springframework.test.web.servlet.result.MockMvcResultMatchers.status;
So far, the goal has been completed. A blank Spring Boot project has been built through Maven, and a simple request processing has been realized by introducing a web module.