Articles Catalogue
- 1. Spring declarative transactions
- 1.1 Spring declarative transaction Convention
- 1.2 Annotation @Transactional Configuration Item
- 1.3 Spring transaction manager
- 1.4 Use transactions in Spring Boot
- 2. Transaction isolation level
- 3. Transaction Communication Behavior
- 4. Annotation @Transactional Self-Call Failure Problem
1. Spring declarative transactions
1.1 Spring declarative transaction Convention
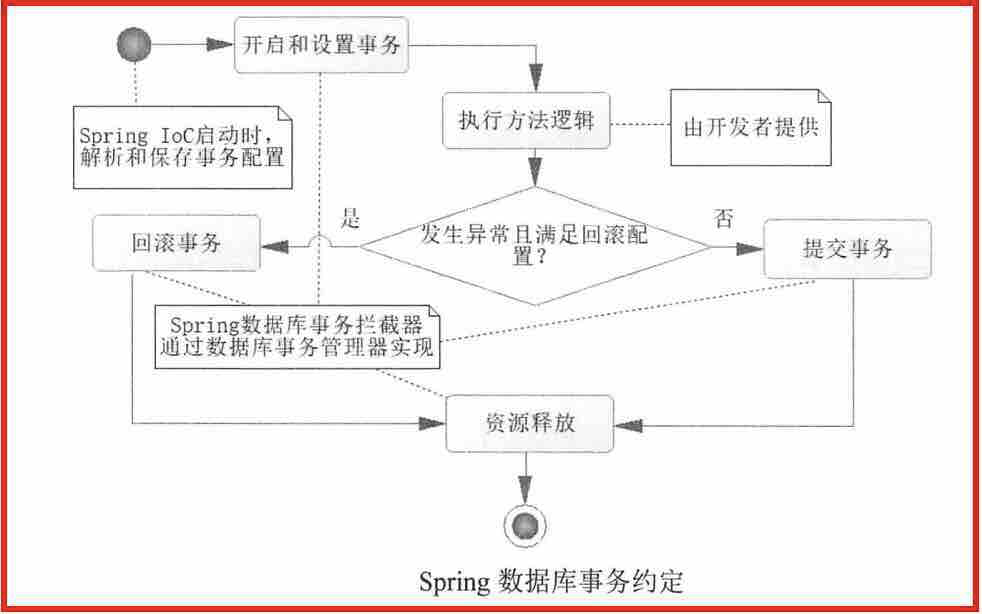
For declarative transactions, annotate with annotation @Transactional to tell Spring where to enable database transactions.
Annotation @Transactional can be annotated on a class or method, and when it is annotated on a class, all public non-static methods representing that class will enable transaction functionality.
_In the annotation @Transactional, many attributes are also allowed to be configured, such as the isolation level of transactions, propagation behavior and exception types, that is, to determine what exception occurs to roll back transactions or what exception does not roll back transactions. These configurations are that the Spring IoC container parses the configuration information when it is loaded, stores it in the Transaction Definition Interface Implementation Class, and records which classes or methods need to start the transaction function and what strategies are adopted to execute the transaction.
_In the whole process, all we need to do is annotate @Transactional and configure the properties of the classes or methods that need transactions.
1.2 Annotation @Transactional Configuration Item
_Note @Transactional configuration items include:
- value
- transactionManager
- timeout
- readOnly
- rollbackFor
- rollbackForClassName
- noRollbackFor
- noRollbackForClassName
- propagation
- isolation
For a detailed explanation of the annotation @Transactional configuration item, please refer to the series of blogs. Spring Uses Blog Portal Series The eleventh article Spring Usage Chapter (11) - Spring and MyBatis Transaction Management Section 4.2.
1.3 Spring transaction manager
In the aforementioned transaction process, the transaction opens, rolls back and submits are all completed by the transaction manager. In Spring, the top-level interface of the transaction manager is Platform Transaction Manager.
__After the integration of Spring Boot and MyBatis, the most commonly used transaction manager in Spring database transaction is DataSource Transaction Manager, which is a class that implements the interface Platform Transaction Manager.
The source code for the Platform Transaction Manager interface is as follows:
//
// Source code recreated from a .class file by IntelliJ IDEA
// (powered by Fernflower decompiler)
//

package org.springframework.transaction;

import org.springframework.lang.Nullable;
import org.springframework.transaction.TransactionDefinition;
import org.springframework.transaction.TransactionException;
import org.springframework.transaction.TransactionStatus;

public interface PlatformTransactionManager {
	//Get the transaction, which also sets the data properties
    TransactionStatus getTransaction(@Nullable TransactionDefinition var1) throws TransactionException;

	//Submission transaction
    void commit(TransactionStatus var1) throws TransactionException;

	//Roll back transactions
    void rollback(TransactionStatus var1) throws TransactionException;
}
_Spring weaves these methods into the corresponding process according to the Convention in transaction management, where the parameter of getTransaction method is a Transaction Definition, which is generated by the configuration item of annotation @Transactional that we configure, so it can set the transaction ownership. Sex, and commit and rollback transactions can also be performed through commit and rollback methods.
In Spring Boot, when you rely on mybatis-spring-boot-starter, it automatically creates a DataSource Transaction Manager object as a transaction manager. If it relies on spring-boot-starter-data-jpa, it will automatically create JpaTransaction Manager objects as transaction managers, so we generally do not need to create our own transaction managers but use them directly.
1.4 Use transactions in Spring Boot
_This demo project allows you to use your last blog Spring Boot 2.x Usage Chapter (2) - Accessing Database In the database.
The first step is to add project-related dependencies to the pom file as follows:
<?xml version="1.0" encoding="UTF-8"?>
<project xmlns="http://maven.apache.org/POM/4.0.0"
         xmlns:xsi="http://www.w3.org/2001/XMLSchema-instance"
         xsi:schemaLocation="http://maven.apache.org/POM/4.0.0 http://maven.apache.org/xsd/maven-4.0.0.xsd">
    <parent>
        <artifactId>springboot-learning-demo</artifactId>
        <groupId>com.ccff.springboot.demo</groupId>
        <version>0.0.1-SNAPSHOT</version>
    </parent>
    <modelVersion>4.0.0</modelVersion>

    <artifactId>chapter6</artifactId>

    <dependencies>
        <dependency>
            <groupId>mysql</groupId>
            <artifactId>mysql-connector-java</artifactId>
        </dependency>
        <!--Introducing Third Party Data Sources DBCP rely on-->
        <dependency>
            <groupId>org.apache.commons</groupId>
            <artifactId>commons-dbcp2</artifactId>
        </dependency>
        <!--MyBatis Relevant dependency-->
        <dependency>
            <groupId>org.mybatis.spring.boot</groupId>
            <artifactId>mybatis-spring-boot-starter</artifactId>
            <version>1.3.1</version>
        </dependency>
    </dependencies>

    <build>
        <resources>
            <resource>
                <directory>${basedir}/src/main/java</directory>
                <includes>
                    <include>**/*.xml</include>
                </includes>
            </resource>
        </resources>
    </build>

</project>
The second step is to create POJO User class and SexEnum gender enumeration type. The code is as follows:
package com.ccff.springboot.demo.chapter6.pojo;

import com.ccff.springboot.demo.chapter6.enumration.SexEnum;
import org.apache.ibatis.type.Alias;

/**
 * Created by wangzhefeng01 on 2019/8/7.
 */
@Alias(value = "user")      //Define an alias for MyBatis
public class User {
    private Long id = null;

    private String userName = null;

    private SexEnum sex = null;

    private String note = null;

    public User() {
    }

    public User(Long id, String userName, SexEnum sex, String note) {
        this.id = id;
        this.userName = userName;
        this.sex = sex;
        this.note = note;
    }

    public Long getId() {
        return id;
    }

    public void setId(Long id) {
        this.id = id;
    }

    public String getNote() {
        return note;
    }

    public void setNote(String note) {
        this.note = note;
    }

    public SexEnum getSex() {
        return sex;
    }

    public void setSex(SexEnum sex) {
        this.sex = sex;
    }

    public String getUserName() {
        return userName;
    }

    public void setUserName(String userName) {
        this.userName = userName;
    }
}
package com.ccff.springboot.demo.chapter6.enumration;

/**
 * Created by wangzhefeng01 on 2019/8/7.
 */
public enum SexEnum {
    MALE(1,"male"),
    FEMALE(2,"female");

    private Integer id;
    private String value;

    SexEnum(Integer id, String value) {
        this.id = id;
        this.value = value;
    }

    public static SexEnum getSexEnumById(Integer id){
        for (SexEnum sex : SexEnum.values()) {
            if (sex.getId() == id){
                return sex;
            }
        }
        return null;
    }

    public Integer getId() {
        return id;
    }

    public void setId(Integer id) {
        this.id = id;
    }

    public String getValue() {
        return value;
    }

    public void setValue(String value) {
        this.value = value;
    }
}
The third step is to create MyBatis Mapper interface file. The code is as follows:
package com.ccff.springboot.demo.chapter6.dao;

import com.ccff.springboot.demo.chapter6.pojo.User;
import org.springframework.stereotype.Repository;

/**
 * Created by wangzhefeng01 on 2019/8/8.
 */
@Repository
public interface UserDao {
    User getUser(Long id);
    int insertUser(User user);
}
Step 4: Create Mapper mapping XML file userMapper.xml corresponding to the Mapper interface file under the com.ccff.springboot.demo.chapter6.mapper package, as follows:
<?xml version="1.0" encoding="UTF-8" ?>
<!DOCTYPE mapper
        PUBLIC "-//mybatis.org//DTD Mapper 3.0//EN"
        "http://mybatis.org/dtd/mybatis-3-mapper.dtd">
<mapper namespace="com.ccff.springboot.demo.chapter6.dao.UserDao">
    <select id="getUser" parameterType="long" resultType="user">
        select id, user_name as userName, sex, note from t_user where id = #{id}
    </select>

    <insert id="insertUser" useGeneratedKeys="true" keyProperty="id">
        insert into t_user(user_name,note) value(#{userName},#{note})
    </insert>
</mapper>
Step 5: Create the IUserService interface and its implementation class UserService Impl, as follows:
package com.ccff.springboot.demo.chapter6.service;

import com.ccff.springboot.demo.chapter6.pojo.User;

/**
 * Created by wangzhefeng01 on 2019/8/8.
 */
public interface IUserService {
    User getUser(Long id);
    int insertUser(User user);
}
package com.ccff.springboot.demo.chapter6.service.impl;

import com.ccff.springboot.demo.chapter6.dao.UserDao;
import com.ccff.springboot.demo.chapter6.pojo.User;
import com.ccff.springboot.demo.chapter6.service.IUserService;
import org.springframework.beans.factory.annotation.Autowired;
import org.springframework.stereotype.Service;

/**
 * Created by wangzhefeng01 on 2019/8/8.
 */
@Service
public class UserServiceImpl implements IUserService {
    @Autowired
    UserDao userDao = null;

    @Override
    @Transactional(isolation = Isolation.READ_COMMITTED, timeout = 1)
    public User getUser(Long id) {
        return userDao.getUser(id);
    }

    @Override
    @Transactional(isolation = Isolation.READ_COMMITTED, timeout = 1)
    public int insertUser(User user) {
        return userDao.insertUser(user);
    }
}
_In the above code, annotation @Transactional is annotated in the method, which means that the two methods will enable Spring database transaction mechanism. In the transaction configuration, the isolation level of read-write submission is adopted, which limits the timeout time to one second.
Step 6: Create a controller for testing. The code is as follows:
package com.ccff.springboot.demo.chapter6.controller;

import com.ccff.springboot.demo.chapter6.pojo.User;
import com.ccff.springboot.demo.chapter6.service.IUserService;
import org.springframework.beans.factory.annotation.Autowired;
import org.springframework.web.bind.annotation.GetMapping;
import org.springframework.web.bind.annotation.RequestMapping;
import org.springframework.web.bind.annotation.RestController;

import java.util.HashMap;
import java.util.Map;

/**
 * Created by wangzhefeng01 on 2019/8/8.
 */
@RestController
@RequestMapping("/user")
public class UserController {
    @Autowired
    IUserService userService = null;

    @GetMapping("/getUser")
    public User getUser(Long id){
        return userService.getUser(id);
    }

    @GetMapping("/insertUser")
    public Map<String,Object> insertUser(String userName, String note){
        User user = new User();
        user.setUserName(userName);
        user.setNote(note);
        //The result fills in the primary key and returns the number of inserts.
        int affectedColnumNum = userService.insertUser(user);
        Map<String,Object> result = new HashMap<>();
        result.put("success",affectedColnumNum == 1);
        result.put("user",user);
        return result;
    }
}
The seventh step is to configure MySQL database, third-party data source DBCP, MyBatis and log information in application.properties configuration file. The specific configuration is as follows:
#spring.datasource.driver-class-name=com.mysql.cj.jdbc.Driver
spring.datasource.url=jdbc:mysql://localhost:3306/spring_boot_chapter5
spring.datasource.username=root
spring.datasource.password=20161224cc

# =========================== Configuration of third-party DBCP2 data sources===========================
# Specify the database connection pool type
spring.datasource.type=org.apache.commons.dbcp2.BasicDataSource
# Maximum number of waiting connections, set 0 to unlimited
spring.datasource.dbcp2.max-idle=10
# Maximum number of connection activities
spring.datasource.dbcp2.max-total=50
# Maximum number of milliseconds to wait in ms. Error messages will occur over time
spring.datasource.dbcp2.max-wait-millis=10000
# Number of database connection pool initialization connections
spring.datasource.dbcp2.initial-size=5
# =========================== Configuration of third-party DBCP2 data sources===========================

# =========================== Configure MyBatis===========================
# MyBatis mapping file wildcard
mybatis.mapper-locations=classpath:com/ccff/springboot/demo/chapter6/mapper/*.xml
# MyBatis Scan Alias Pack, in conjunction with Annotation@Alias
mybatis.type-aliases-package=com.ccff.springboot.demo.chapter6.pojo
# Configure the scan package for typeHandler
mybatis.type-handlers-package=com.ccff.springboot.demo.chapter6.typehandler
# =========================== Configure MyBatis===========================

# =========================== Configuration logs===========================
logging.level.root=debug
logging.level.org.springframework=debug
logging.level..org.org.mybatis=debug
# =========================== Configuration logs===========================
At the same time, modify Spring Boot's startup class Chapter6Application and add annotation @MapperScan to this class to assemble the Mapper interface by scanning. The specific modifications are as follows:
package com.ccff.springboot.demo.chapter6;

import org.mybatis.spring.annotation.MapperScan;
import org.springframework.boot.SpringApplication;
import org.springframework.boot.autoconfigure.SpringBootApplication;
import org.springframework.stereotype.Repository;

/**
 * Created by wangzhefeng01 on 2019/8/8.
 */
@SpringBootApplication
@MapperScan(basePackages="com.ccff.springboot.demo.chapter6.dao", annotationClass = Repository.class)
    public class Chapter6Application {
    public static void main(String[] args) {
        SpringApplication.run(Chapter6Application.class, args);
    }
}
_Start Spring Boot startup class Chapter6 Application, and enter links in the browser to get the following results, indicating that the environment has been successfully built.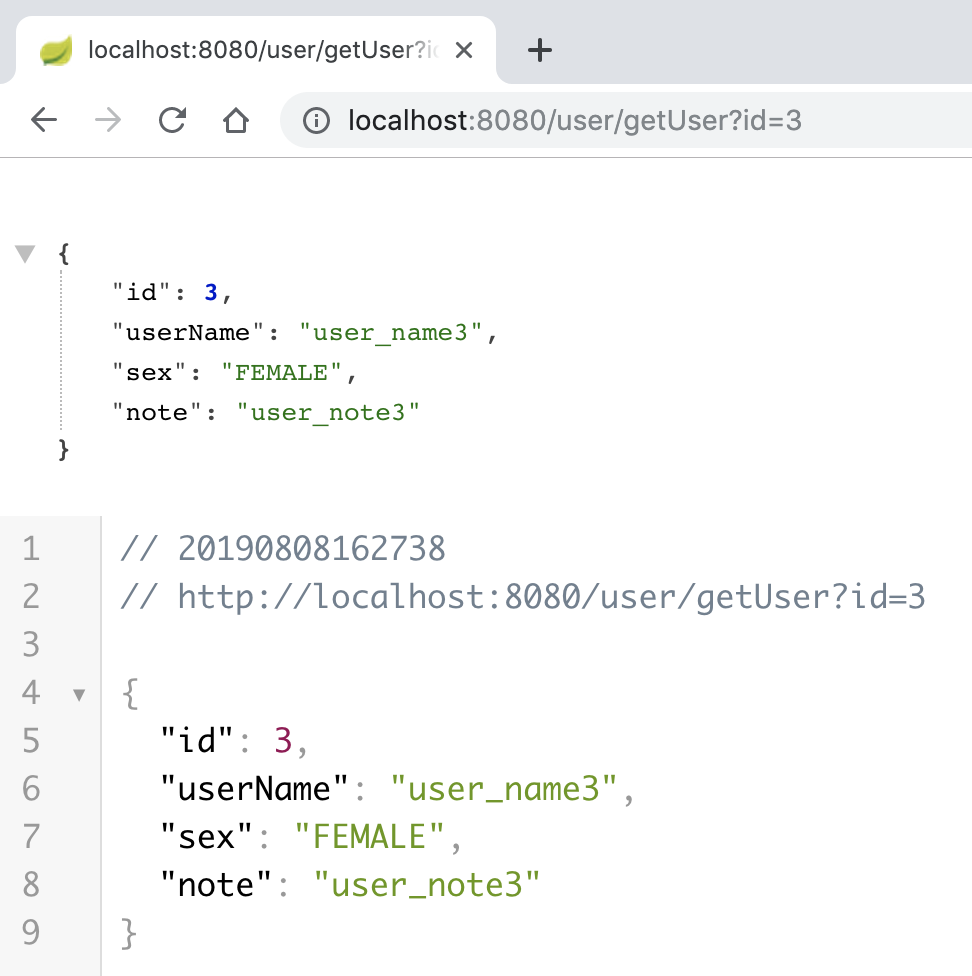
_Test results of inserting user information method are as follows: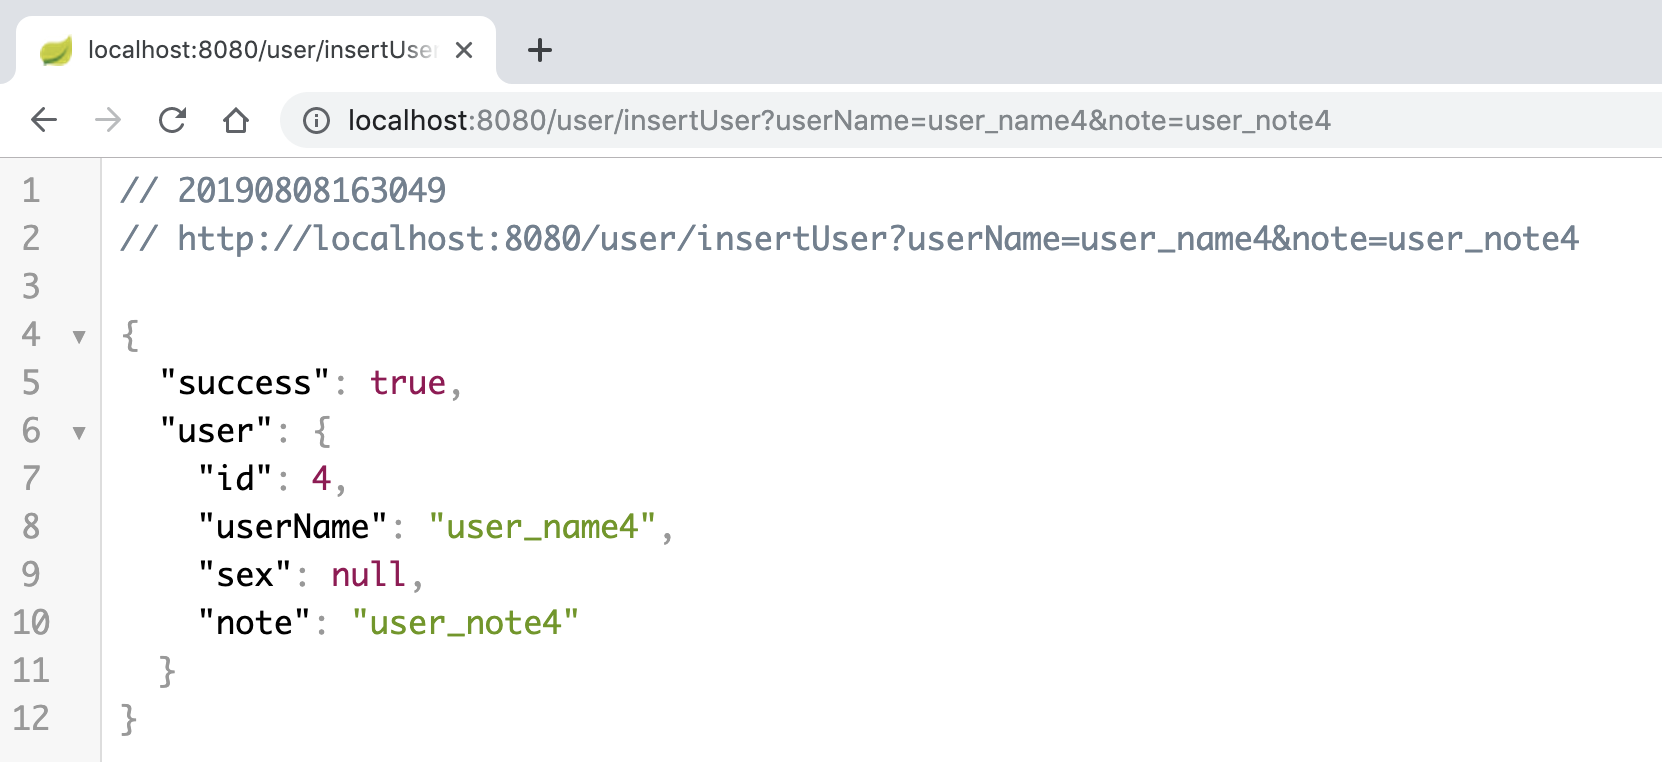

2. Transaction isolation level
For a detailed explanation of the isolation level of transactions, please refer to the series of blogs. Spring Uses Blog Portal Series The eleventh article Spring Usage Chapter (11) - Spring and MyBatis Transaction Management The content of Section 3.1 in this section.
3. Transaction Communication Behavior
3.1 Detailed Explanation of Communication Behavior
For a detailed explanation of the isolation level of transactions, please refer to the series of blogs. Spring Uses Blog Portal Series The eleventh article Spring Usage Chapter (11) - Spring and MyBatis Transaction Management Section 3.2.
3.2 Testing propagation behavior in Spring Boot
There are seven kinds of communication behaviors, of which the following three are commonly used:
- REQUIRED
- REQUIRES_NEW
- NESTED
_Next, we test the three common communication behaviors mentioned above in the demonstration case of using transactions in Spring Boot.
The first step is to create a new service interface IUserBatchService and its implementation class UserBatchService Impl. The code is as follows:
package com.ccff.springboot.demo.chapter6.service;

import com.ccff.springboot.demo.chapter6.pojo.User;

import java.util.List;

/**
 * Created by wangzhefeng01 on 2019/8/8.
 */
public interface IUserBatchService {
    public int insertUsers(List<User> userList);
}
package com.ccff.springboot.demo.chapter6.service.impl;

import com.ccff.springboot.demo.chapter6.pojo.User;
import com.ccff.springboot.demo.chapter6.service.IUserBatchService;
import com.ccff.springboot.demo.chapter6.service.IUserService;
import org.springframework.beans.factory.annotation.Autowired;
import org.springframework.stereotype.Service;
import org.springframework.transaction.annotation.Isolation;
import org.springframework.transaction.annotation.Propagation;
import org.springframework.transaction.annotation.Transactional;

import java.util.List;

/**
 * Created by wangzhefeng01 on 2019/8/8.
 */
@Service
public class UserBatchServiceImpl implements IUserBatchService {
    @Autowired
    IUserService userService = null;

    @Override
    @Transactional(isolation = Isolation.READ_COMMITTED, propagation = Propagation.REQUIRED)
    public int insertUsers(List<User> userList) {
        int count = 0;
        for (User user : userList){
            //Calling a submethod will use the propagation behavior defined by the annotation @Transactional
            count += userService.insertUser(user);
        }
        return count;
    }
}
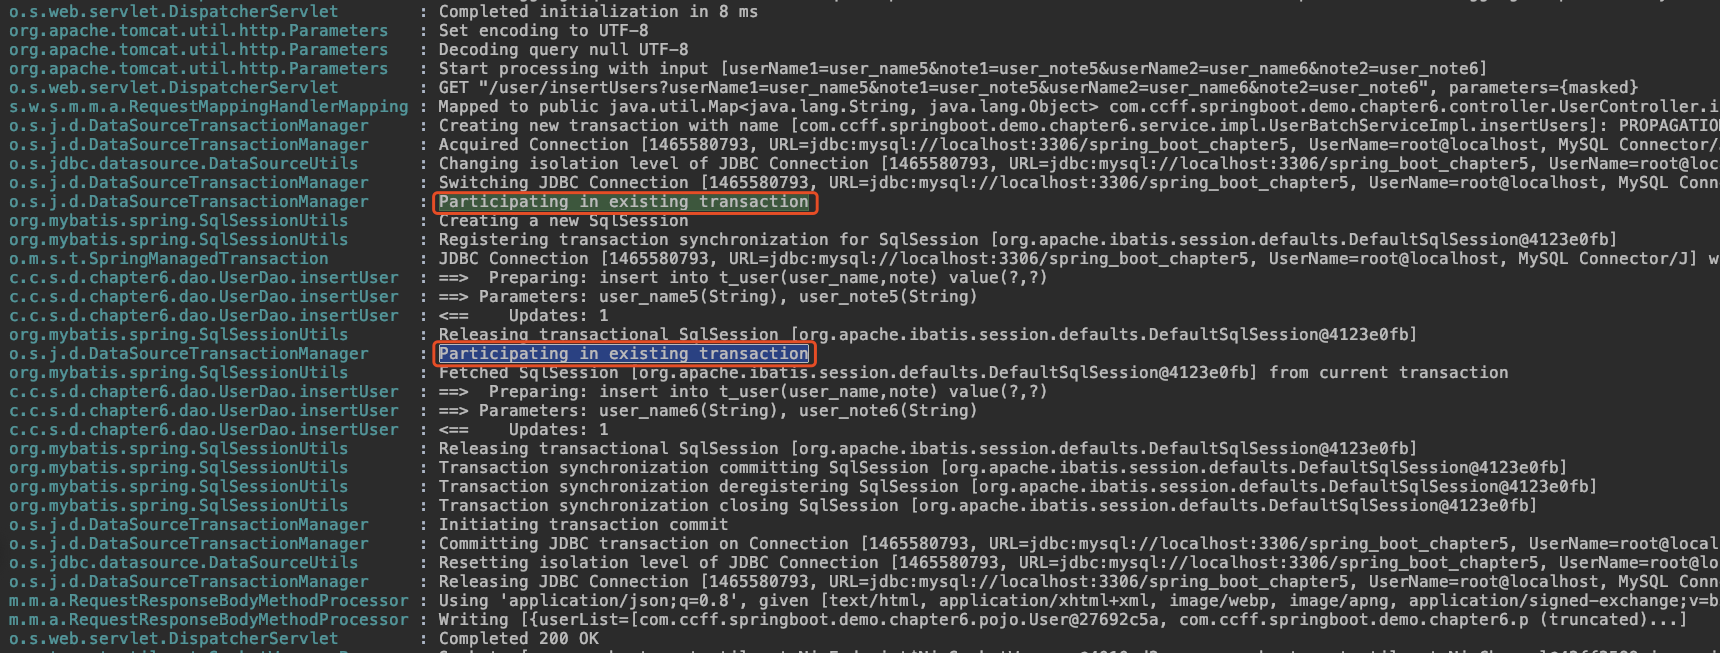
_In the insertUsers method, the insertUser method in the IUserService will be invoked, but the propagation behavior is not defined in the insertUser method. It will use REQUIRED, that is, it will follow the current transaction, so it will use the same transaction as the insertUsers method.
_. insertUsers method is added to UserController controller class for testing. The specific code is as follows:
package com.ccff.springboot.demo.chapter6.controller;

import com.ccff.springboot.demo.chapter6.pojo.User;
import com.ccff.springboot.demo.chapter6.service.IUserBatchService;
import com.ccff.springboot.demo.chapter6.service.IUserService;
import org.springframework.beans.factory.annotation.Autowired;
import org.springframework.web.bind.annotation.GetMapping;
import org.springframework.web.bind.annotation.RequestMapping;
import org.springframework.web.bind.annotation.RestController;

import java.util.ArrayList;
import java.util.HashMap;
import java.util.List;
import java.util.Map;

/**
 * Created by wangzhefeng01 on 2019/8/8.
 */
@RestController
@RequestMapping("/user")
public class UserController {
    @Autowired
    IUserService userService = null;
    @Autowired
    IUserBatchService userBatchService = null;

    @GetMapping("/getUser")
    public User getUser(Long id){
        return userService.getUser(id);
    }

    @GetMapping("/insertUser")
    public Map<String,Object> insertUser(String userName, String note){
        User user = new User();
        user.setUserName(userName);
        user.setNote(note);
        //The result fills in the primary key and returns the number of inserts.
        int affectedColnumNum = userService.insertUser(user);
        Map<String,Object> result = new HashMap<>();
        result.put("success",affectedColnumNum == 1);
        result.put("user",user);
        return result;
    }

    @GetMapping("/insertUsers")
    public Map<String,Object> insertUsers(String userName1, String note1, String userName2, String note2){
        User user1 = new User();
        user1.setUserName(userName1);
        user1.setNote(note1);

        User user2 = new User();
        user2.setUserName(userName2);
        user2.setNote(note2);

        List<User> userList = new ArrayList<>();
        userList.add(user1);
        userList.add(user2);

        //The result fills in the primary key and returns the number of inserts.
        int affectedColnumNum = userBatchService.insertUsers(userList);
        Map<String,Object> result = new HashMap<>();
        result.put("success",affectedColnumNum > 0);
        result.put("userList",userList);
        return result;
    }
}
_Enter the corresponding address in the browser and get the following results:
4. Annotation @Transactional Self-Call Failure Problem
_Spring database transaction agreement, its implementation principle is AOP, and AOP principle is dynamic proxy, in the process of self-invocation, is the call of the class itself, rather than the proxy object to call, then there will be no AOP, so Spring can not weave the code into the agreed process, so the annotation @Transactio is generated. Nal self-invocation invalidation problem.
There are two ways to solve the problem of @Transactional self-invocation invalidation of annotations:
- Calling another Service with one Service is called by the proxy object
- You can get proxy objects from the Spring IoC container to enable AOP
_For a detailed explanation of annotation @Transactional self-invocation invalidation, please refer to the series of blogs. Spring Uses Blog Portal Series The eleventh article Spring Usage Chapter (11) - Spring and MyBatis Transaction Management Six sections in this section.