Spring boot(6) data access
Learning video: https://www.bilibili.com/video/BV19K4y1L7MT?p=62&spm_id_from=pageDriver
1. Automatic configuration of data source - HikariDataSource
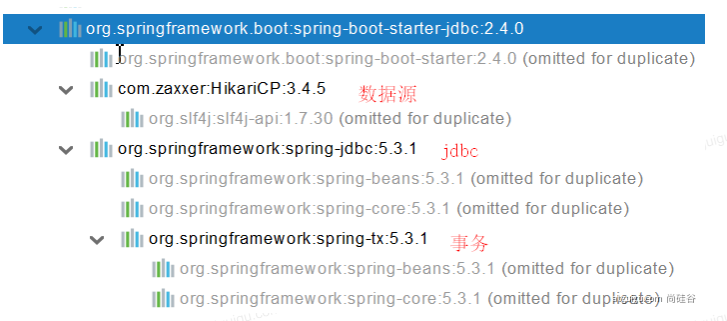
1.1 importing JDBC scenarios
        <dependency>
            <groupId>org.springframework.boot</groupId>
            <artifactId>spring-boot-starter-data-jdbc</artifactId>
        </dependency>

After importing the data source, you need to import the database driver to indicate which database to use
Default version:<mysql.version>8.0.22</mysql.version>

        <dependency>
            <groupId>mysql</groupId>
            <artifactId>mysql-connector-java</artifactId>
<!--            <version>5.1.49</version>-->
        </dependency>
Want to modify the version
1,Import specific version directly( maven (principle of proximity)
2,Redeclare version( maven (principle of proximity priority of attributes)
    <properties>
        <java.version>1.8</java.version>
        <mysql.version>5.1.49</mysql.version>
    </properties>
1.2 automatic configuration
Automatically configured classes:
-
DataSourceAutoConfiguration: automatic configuration of data source
-
- Modify the configuration related to the data source: spring datasource
- The configuration of database connection pool is automatically configured only when there is no DataSource in its own container
- The bottom configured connection pool is HikariDataSource
	@Configuration(proxyBeanMethods = false)
	@Conditional(PooledDataSourceCondition.class)
	@ConditionalOnMissingBean({ DataSource.class, XADataSource.class })
	@Import({ DataSourceConfiguration.Hikari.class, DataSourceConfiguration.Tomcat.class,
			DataSourceConfiguration.Dbcp2.class, DataSourceConfiguration.OracleUcp.class,
			DataSourceConfiguration.Generic.class, DataSourceJmxConfiguration.class })
	protected static class PooledDataSourceConfiguration
-
DataSourceTransactionManagerAutoConfiguration: automatic configuration of the transaction manager
-
JdbcTemplateAutoConfiguration: the automatic configuration of JdbcTemplate can be used to crud the database
-
- You can modify the configuration item @ ConfigurationProperties(prefix = "spring.jdbc") to modify the JdbcTemplate
- @ Bean@Primary JdbcTemplate; There is this component in the container
-
JndiDataSourceAutoConfiguration: automatic configuration of jndi
-
XADataSourceAutoConfiguration: distributed transaction related
1.3 modifying configuration items
spring:
  datasource:
    url: jdbc:mysql://localhost:3306/db_account
    username: root
    password: 123456
    driver-class-name: com.mysql.jdbc.Driver
1.4 testing
@Slf4j
@SpringBootTest
class Boot05WebAdminApplicationTests {

    @Autowired
    JdbcTemplate jdbcTemplate;


    @Test
    void contextLoads() {

//        jdbcTemplate.queryForObject("select * from account_tbl")
//        jdbcTemplate.queryForList("select * from account_tbl",)
        Long aLong = jdbcTemplate.queryForObject("select count(*) from account_tbl", Long.class);
        log.info("Total records:{}",aLong);
    }

}
2. Use Druid data source
2.1 Druid official website
github: https://github.com/alibaba/druid
There are two ways to integrate third-party technology:
- custom
- Find starter
2.2 customization method
1. Create data source
        <dependency>
            <groupId>com.alibaba</groupId>
            <artifactId>druid</artifactId>
            <version>1.1.17</version>
        </dependency>

<bean id="dataSource" class="com.alibaba.druid.pool.DruidDataSource"
		destroy-method="close">
		<property name="url" value="${jdbc.url}" />
		<property name="username" value="${jdbc.username}" />
		<property name="password" value="${jdbc.password}" />
		<property name="maxActive" value="20" />
		<property name="initialSize" value="1" />
		<property name="maxWait" value="60000" />
		<property name="minIdle" value="1" />
		<property name="timeBetweenEvictionRunsMillis" value="60000" />
		<property name="minEvictableIdleTimeMillis" value="300000" />
		<property name="testWhileIdle" value="true" />
		<property name="testOnBorrow" value="false" />
		<property name="testOnReturn" value="false" />
		<property name="poolPreparedStatements" value="true" />
		<property name="maxOpenPreparedStatements" value="20" />
spring boot can use yml mode
2.StatView
The purposes of StatViewServlet include:
- Provide html page for monitoring information display
- JSON API that provides monitoring information
	<servlet>
		<servlet-name>DruidStatView</servlet-name>
		<servlet-class>com.alibaba.druid.support.http.StatViewServlet</servlet-class>
	</servlet>
	<servlet-mapping>
		<servlet-name>DruidStatView</servlet-name>
		<url-pattern>/druid/*</url-pattern>
	</servlet-mapping>
3.StatFile
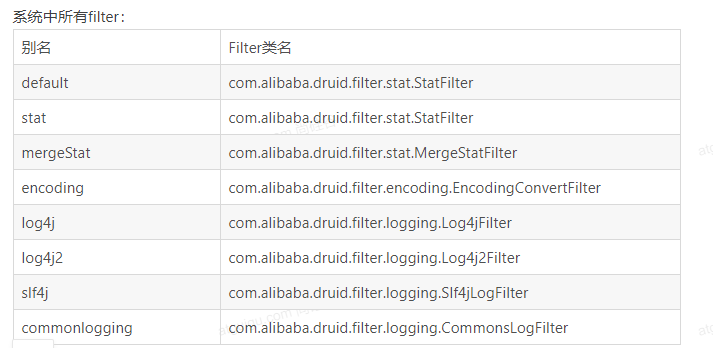
The following attributes need to be configured in the data source:; Multiple filter s, multiple uses and segmentation are allowed; For example:

Slow SQL record
<bean id="stat-filter" class="com.alibaba.druid.filter.stat.StatFilter">
    <property name="slowSqlMillis" value="10000" />
    <property name="logSlowSql" value="true" />
</bean>

use slowSqlMillis Definition slow SQL Duration of
2.3 use the official Starter mode
1. Introduce starter
        <dependency>
            <groupId>com.alibaba</groupId>
            <artifactId>druid-spring-boot-starter</artifactId>
            <version>1.1.17</version>
        </dependency>
2. Automatic configuration
-
Extension configuration item spring datasource. druid
-
DruidSpringAopConfiguration.class to monitor the of SpringBean; Configuration item: spring datasource. druid. aop-patterns
-
DruidStatViewServletConfiguration.class, monitoring page configuration: spring datasource. druid. stat-view-servlet; Default on
-
DruidWebStatFilterConfiguration.class, web monitoring configuration; spring.datasource.druid.web-stat-filter; Default on
-
DruidFilterConfiguration.class}) configuration of all Druid filter s
    private static final String FILTER_STAT_PREFIX = "spring.datasource.druid.filter.stat";
    private static final String FILTER_CONFIG_PREFIX = "spring.datasource.druid.filter.config";
    private static final String FILTER_ENCODING_PREFIX = "spring.datasource.druid.filter.encoding";
    private static final String FILTER_SLF4J_PREFIX = "spring.datasource.druid.filter.slf4j";
    private static final String FILTER_LOG4J_PREFIX = "spring.datasource.druid.filter.log4j";
    private static final String FILTER_LOG4J2_PREFIX = "spring.datasource.druid.filter.log4j2";
    private static final String FILTER_COMMONS_LOG_PREFIX = "spring.datasource.druid.filter.commons-log";
    private static final String FILTER_WALL_PREFIX = "spring.datasource.druid.filter.wall";
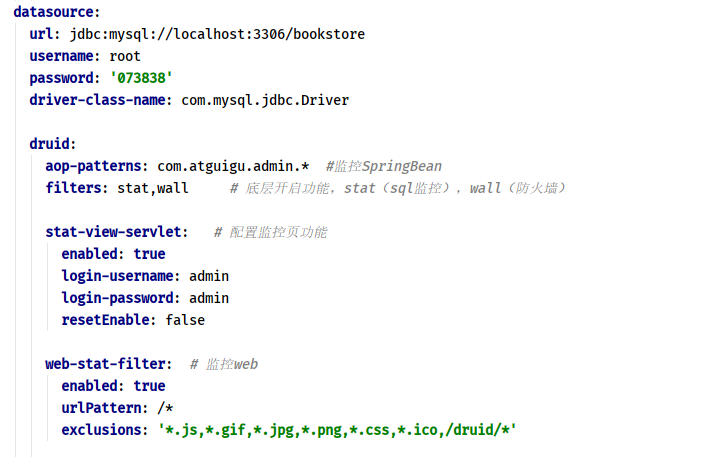
3. Configuration example
spring:
  datasource:
    url: jdbc:mysql://localhost:3306/bookstore
    username: root
    password: '073838'
    driver-class-name: com.mysql.jdbc.Driver

    druid:
      aop-patterns: com.atguigu.admin.*  #Monitoring springbeans
      filters: stat,wall     # Bottom open function, stat (sql monitoring), wall (firewall)

      stat-view-servlet:   # Configure monitoring page function
        enabled: true
        login-username: admin
        login-password: admin
        resetEnable: false

      web-stat-filter:  # Monitoring web
        enabled: true
        urlPattern: /*
        exclusions: '*.js,*.gif,*.jpg,*.png,*.css,*.ico,/druid/*'


      filter:
        stat:    # Detailed configuration of stat in the above filters
          slow-sql-millis: 1000
          logSlowSql: true
          enabled: true
        wall:
          enabled: true
          config:
            drop-table-allow: false
Access monitoring address: http://localhost:8080/druid/
3. Integrate mybatis
3.1 introduction of starter
        <dependency>
            <groupId>org.mybatis.spring.boot</groupId>
            <artifactId>mybatis-spring-boot-starter</artifactId>
            <version>2.1.0</version>
        </dependency>
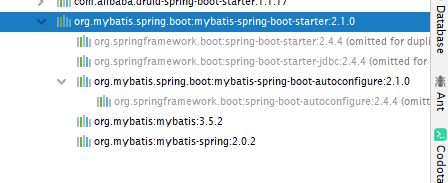
Imported jar package:

3.2 configuration mode
Development steps
1. Introduce the starter of mybatis and druid, and configure it

2. Write global configuration and mapper configuration files and specify the location in yml

to configure:
mybatis:
  config-location: classpath:mybatis/mybatis-config.xml #Global profile location
  mapper-locations: classpath:mybatis/mapper/*.xml #sql mapping file location
3. Write bean, mapper, service and controller
BookUser:
@Data
public class BookUser {
    private Long id;
    private String username;
    private String password;
    private String email;
}
UserMapper:
@Mapper
public interface UserMapper {
    public BookUser getUser(Long id);
}
sql mapping file usermapper xml:
<?xml version="1.0" encoding="UTF-8" ?>
<!DOCTYPE mapper PUBLIC "-//mybatis.org//DTD Mapper 3.0//EN" "http://mybatis.org/dtd/mybatis-3-mapper.dtd">
<mapper namespace="com.deserts.boot.mapper.UserMapper">
    <select id="getUser" resultType="com.deserts.boot.bean.BookUser" parameterType="long">
        select * from bs_user where id = #{id}
    </select>
</mapper>
UserService:
@Service
public class UserService {
    @Autowired
    UserMapper userMapper;

    public BookUser getById(Long id){
        return userMapper.getUser(id);
    }
}
UserController:
@RestController
public class UserController {
    @Autowired
    UserService userService;

    @GetMapping("/user")
    public BookUser getUserById(@RequestParam("id") Long id){
        BookUser user = userService.getById(id);
        return user;
    }
}
4. Test results:

Two global configuration methods
1. As above, use xml configuration and specify the location of the configuration file
mybatis:
  config-location: classpath:mybatis/mybatis-config.xml #Global profile location
  mapper-locations: classpath:mybatis/mapper/*.xml #sql mapping file location
2. Direct configuration using yml
mybatis:
  mapper-locations: classpath:mybatis/mapper/*.xml #sql mapping file location
  configuration: #Global configuration
    map-underscore-to-camel-case: true #Enable hump naming mapping
3.3 annotation mode
Simple statements can be written directly using annotations without writing mapper mapping files
@Mapper
public interface UserMapper {
    @Select("select * from bs_user where id = #{id}")
    public BookUser getUser(Long id);
}
The two methods can also be mixed
3.4 summary of development steps
- Introducing mybatis starter
- Configure application In yaml, specify the mapper location
- Write Mapper interface and mark @ Mapper annotation
- The simple method is directly annotated, and the complex method is written in mapper XML binding mapping@ MapperScan("com.atguigu.admin.mapper") is simplified, and other interfaces do not need to be annotated with @ mapper annotation*
4. Integrate mybatis plus
Join dependency
        <dependency>
            <groupId>com.baomidou</groupId>
            <artifactId>mybatis-plus-boot-starter</artifactId>
            <version>3.4.1</version>
        </dependency>
Auto configuration
- The MybatisPlusAutoConfiguration configuration class is bound to the MybatisPlusProperties configuration item.
- SqlSessionFactory is automatically configured. The bottom layer is the default data source in the container
- Maperlocations is automatically configured. There are default values. The mapping file is placed in classpath: / mapper / * * / * The XML path can be automatically scanned
- SqlSessionTemplate is also automatically configured in the container