1, Cache conceptual knowledge
1. What cache is it
The word Cache is often heard in daily life. What is Cache? In fact, Cache is the buffer of data exchange (called Cache), which is the place where data (frequently used data) is temporarily stored. When users query data, they first look for it in the Cache. If they find it, they will execute it directly; If you can't find it, look it up in the database.
The essence of cache is to trade space for time, sacrifice the real-time performance of data, and temporarily replace the latest data from the database with the data in the server memory, so as to reduce the database IO, reduce the server pressure, reduce the network delay and speed up the page opening speed.
2. Advantages and disadvantages of caching
advantage:
- Faster response
- Reduce the read operation of the database and reduce the pressure of the database
Disadvantages:
-
The memory capacity is relatively small compared with the hard disk
-
The data in the cache may be inconsistent with the data in the database
-
Memory power failure will empty data, resulting in data loss
3. Why cache
Generally, on the remote server, considering the large amount of client requests and some data requests, these hot data should be frequently read from the database, causing pressure on the database and slow response of the client. Therefore, in some data that do not consider real-time, these data are often stored in memory. When requested, they can directly read the data in memory and respond in time.
Caching mainly solves the problems of high performance, high concurrency and reducing database pressure. The essence of cache is to store the data in memory. When the data does not change in essence, try to avoid directly connecting to the database for query, because the database may collapse when the concurrency is high. Instead, read the data from the cache and query the database only when it is not found in the cache, which greatly reduces the number of reads and writes to the database, Increase the performance of the system and the amount of concurrency it can provide.
2, Redis conceptual knowledge
1. Introduction to Redis
Redis is a high-performance key value open source database. It is a non relational database. It is a database solution to solve a series of problems such as high concurrency, high expansion and big data storage. However, it can not replace the relational database and can only be used as an extension in a specific environment.
2. Why use Redis as cache
- Support high availability: Redis supports master\slave master \ slave mechanism, sentinel mode and cluster mode, which greatly ensures the stability and high availability of Redis operation.
- Support multiple data structures: Redis not only supports simple Key/Value data, but also provides storage of list, set, zset, hash and other data structures.
- Support data persistence: the data in memory can be persisted in the disk. When it is down or restarted, it can be loaded into Redis again, so as not to or reduce the loss of data.
- Perfect ecology: Redis has become the preferred target of caching in the industry, so many languages and tools support it.
3. Data types supported by Redis
The data structure types supported by Redis include:
- String (string)
- hash table
- list
- set
- Ordered set (zset)
In order to ensure reading efficiency, Redis stores data objects in memory and supports periodic writing of updated data to disk files. Moreover, it also provides intersection and union, as well as some sorting operations in different ways.
The features of redis determine its functions. It can be used to do the following things!
- Ranking list, using zset can easily realize the sorting function
- The counter can count the reading amount, likes and other functions by using the atomic self increment operation in redis
- Simple message queue and list storage structure meet the principle of first in first out. lpush/rpop or rpush/lpop can be used to realize simple message queue
- Session sharing. In distributed systems, redis can be used to realize session sharing. Spring Session, a distributed solution officially provided by spring, is implemented using redis
4. Redis cache FAQ
1. Cache penetration
Cache penetration: refers to querying a certain nonexistent data. Since the cache needs to be queried from the database when it misses, if the data cannot be found, it will not be written to the cache, which will cause the nonexistent data to be queried in the database every request, resulting in cache penetration.
Several solutions:
- Cache null value. When the query object from DB is null, the null value should also be stored in the cache. The specific value needs to use a special ID to distinguish it from the real cached data. In addition, its expiration time is set to a shorter time.
- Using the bloom filter, the bloom filter can judge that a key must not exist (it is not guaranteed to exist, because the bloom filter structure cannot be deleted, but the old value may be replaced by the new value, and it may still judge that it may exist after deleting the old value). On the basis of buffering, the bloom filter data structure is constructed, The corresponding key is stored in the bloom filter. If it exists, the value corresponding to the key is empty.
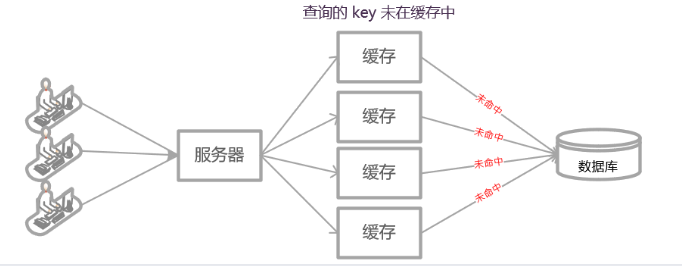
2. Buffer breakdown
Cache breakdown: a key is very hot and frequently accessed. It is in the situation of centralized high concurrency access. When the key fails, a large number of requests break through the cache and directly request the database, which is like cutting a hole in a barrier.
Several solutions:
- Set the L2 cache or set the hotspot cache to never expire, which needs to be configured according to the actual situation.
- Using a mutex lock, if the cache expires during execution, first obtain the distributed lock, load the data from the database during execution, store the data in the cache if it is found, and continue the action if it is not found. In this process, it can ensure that only one thread operates the database and avoid a large number of requests to the database.
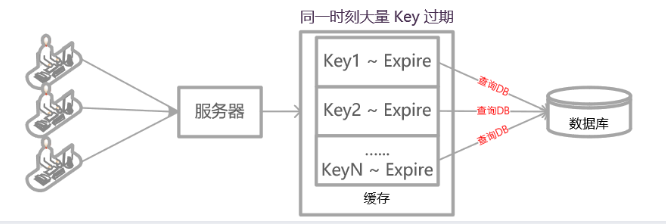
3. Cache avalanche

Cache avalanche: when the cache server restarts or a large number of caches fail in a certain period of time, it will also bring great pressure to the back-end system (such as DB), resulting in database back-end failure, resulting in application server avalanche.
Several solutions:
- Cache components are designed to be highly available. Cache high availability refers to the high availability of components storing cache, which can prevent a series of problems such as single point of failure, machine failure, machine room downtime and so on. For example, Redis sentinel and Redis Cluster have achieved high availability.
- Request current limiting and service fuse degradation mechanism to limit the number of service requests and quickly fuse degradation when the service is unavailable.
- Set a certain random distribution of cache expiration time to avoid cache invalidation at the same time.
- The cache strategy is updated regularly. For the data with low real-time requirements, it is updated regularly.
4. Cache consistency
Using cache may lead to data inconsistency, as follows:
- Successful updating of database - > failed to update cache - > inconsistent data
- Update cache succeeded - > update database failed - > inconsistent data
- Database update succeeded - > cache elimination failed - > data inconsistency
- Successfully eliminated cache - > failed to update database - > query cache mis
Therefore, when using cache, we should consider whether the cached data has consistency requirements in combination with the actual situation.
3, Spring boot integrates redis
1. Using redis cache
1. Introduce redis dependency
In POM Redis dependency is introduced into the XML file, as follows
<dependency>
    <groupId>org.springframework.boot</groupId>
    <artifactId>spring-boot-starter-data-redis</artifactId>
</dependency>
2. Modify project startup class
Add the annotation @ EnableCaching to enable the caching function, as follows:
package com.demo;

import org.mybatis.spring.annotation.MapperScan;
import org.springframework.boot.SpringApplication;
import org.springframework.boot.autoconfigure.SpringBootApplication;
import org.springframework.cache.annotation.EnableCaching;

@SpringBootApplication
@MapperScan("com.demo")
@EnableCaching
public class DemoApplication {

    public static void main(String[] args) {
        SpringApplication.run(DemoApplication.class, args);
    }

}
3. Configure redis database
In application Configure Redis connection information in properties as follows:
spring:
  redis:
    # redis Library
    database: 0
    # redis server address
    host: localhost
    # redis port number
    port: 6379
    # redis password
    password:
    # Connection timeout (MS)
    timeout: 1000
    lettuce:
      pool:
        # Maximum number of links in connection pool (negative number means no limit)
        max-active: 8
        # Maximum blocking waiting time of connection pool (negative number indicates no limit)
        max-wait: -1
        # Maximum number of free connections in connection pool
        max-idle: 8
        # Minimum number of free connections in connection pool
        min-idle: 0
4. Create redis configuration class
Create a new Redis cache configuration class, as follows:
import org.springframework.cache.CacheManager;
import org.springframework.context.annotation.Bean;
import org.springframework.context.annotation.Configuration;
import org.springframework.data.redis.cache.RedisCacheConfiguration;
import org.springframework.data.redis.cache.RedisCacheManager;
import org.springframework.data.redis.connection.RedisConnectionFactory;
import org.springframework.data.redis.serializer.*;

import java.time.Duration;

/**
 * Redis Configuration class
 */
@Configuration
public class RedisConfig {

    /**
     * Configure cache manager
     * @param factory Redis Thread safe connection factory
     * @return Cache manager
     */
    @Bean
    public CacheManager cacheManager(RedisConnectionFactory factory) {
        // Two sets of default configurations are generated, and the cache can be customized through the Config object
        RedisCacheConfiguration cacheConfig1 = RedisCacheConfiguration.defaultCacheConfig()
                // Set the expiration time to 10 minutes
                .entryTtl(Duration.ofMinutes(10))
                // Set cache prefix
                .prefixKeysWith("cache:user:")
                // Disable caching of null values
                .disableCachingNullValues()
                // Set key serialization
                .serializeKeysWith(keyPair())
                // Set value serialization
                .serializeValuesWith(valuePair());

        RedisCacheConfiguration cacheConfig2 = RedisCacheConfiguration.defaultCacheConfig()
                // Set the expiration time to 30 seconds
                .entryTtl(Duration.ofSeconds(30))
                .prefixKeysWith("cache:admin:")
                .disableCachingNullValues()
                .serializeKeysWith(keyPair())
                .serializeValuesWith(valuePair());

        // Return to Redis cache manager
        return RedisCacheManager.builder(factory)
                .withCacheConfiguration("user", cacheConfig1)
                .withCacheConfiguration("admin", cacheConfig2)
                .build();
    }

    /**
     * Configure key serialization
     * @return StringRedisSerializer
     */
    private RedisSerializationContext.SerializationPair<String> keyPair() {
        return RedisSerializationContext.SerializationPair.fromSerializer(new StringRedisSerializer());
    }

    /**
     * Configure value serialization, and replace the default serialization with GenericJackson2JsonRedisSerializer
     * @return GenericJackson2JsonRedisSerializer
     */
    private RedisSerializationContext.SerializationPair<Object> valuePair() {
        return RedisSerializationContext.SerializationPair.fromSerializer(new GenericJackson2JsonRedisSerializer());
    }

}
5. redis operation
SpringBoot provides two bean s to operate redis, namely RedisTemplate and StringRedisTemplate. The main differences between them are as follows:
The RedisTemplate uses the JdkSerializationRedisSerializer. When storing data, the data will be serialized into byte arrays and then stored in the Redis database;
StringRedisTemplate uses StringRedisSerializer.
Examples are as follows:
@RestController
public class UserController {

    @Autowired
    private UserService userServer;

    @Autowired
    StringRedisTemplate stringRedisTemplate;


    /**
     * Query all courses
     */
    @RequestMapping("/allCourses")
    public String findAll() {
        List<Courses> courses = userServer.findAll();

        // Write query results to redis cache
        stringRedisTemplate.opsForValue().set("hot", String.valueOf(courses));

        // Read redis cache
        System.out.println(stringRedisTemplate.opsForValue().get("courses"));

        return "ok";
    }
}
2. Annotations using SpringCache
1. Notes
- @CacheConfig: it is generally configured on the class and specifies the cache name, which is consistent with the cache name in "set cache manager" above.
- @Cacheable: used to cache the returned results of the method. If the cache already exists, it will be obtained directly from the cache. The cached key can be specified from the input parameter, and the cached value is the returned value of the method.
- @CachePut: whether the cache exists or not, the cache will be added again every time. The key of the cache can be specified from the input parameter. The value of the cache is the return value of the method, which is often used for updating.
- @CacheEvict: used to clear the cache
- @Caching: used to set multiple caches at one time.
2. Common annotation configuration parameters
- Value: the name of the cache configured in the cache manager, which can be understood as the concept of a group. There can be multiple sets of cache configurations in the cache manager. Each set has a name, similar to the group name. This value can be configured. Select which cache name to use, and the configuration corresponding to that cache name will be applied after configuration.
- Key: the cached key. It can be empty. If it is specified, it should be written according to the SpEL expression. If it is not specified, it will be combined according to all the parameters of the method by default.
- Condition: the condition for caching. It can be empty. It is written in spiel and returns true or false. Caching can only be performed when it is true.
- unless: the condition of not caching, like condition, is also written by spiel. If it returns true or false, it will not be cached.
3. Automatic caching
@Cacheable can be marked on a method or a class. When marked on a method, it means that the method supports caching. When marked on a class, it means that all methods of the class support caching.
If the @ Cacheable annotation is added, the value will be stored in redis after the method is called, and will be returned directly from redis in the next call.
@Service
@CacheConfig(cacheNames = "user")
public class UserService {

    @Autowired
    private UserMapper userMapper;

    // Get all users
    @Cacheable(key = "'allUsers'", unless = "#result==null")
    public List<Courses> findAll() {
        return userMapper.allUsers();
    }
}
4, Case description
1. Create entity class (model layer)
public class User {
    private String username;
    private String password;

    public String getUsername() {
        return username;
    }

    public void setUsername(String username) {
        this.username = username;
    }

    public String getPassword() {
        return password;
    }

    public void setPassword(String password) {
        this.password = password;
    }
}
2. Create interface (mapper layer)
@Component
public interface UserMapper {

    // Query all users
    @Select("select * from user_tbl")
    List<Courses> allUsers();

    // Update user information
    @Update("update user_tbl set password=#{password} where username=#{username};")
    boolean updateUser(String username, String password);

    // delete user
    @Select("delete from user_tbl where username = #{username};")
    Integer delUser(String username);
}
3. Create a service class (service layer)
@Service
@CacheConfig(cacheNames = "user")
public class UserService {

    @Autowired
    private UserMapper userMapper;

    // Query all users
    @Cacheable(key = "'allUsers'", unless = "#result==null")
    public List<Courses> allUsers() {
        return userMapper.allUsers();
    }

    // Update user information
    @CachePut(key = "#user.username")
    public void updateUser(String username, String password) {
        userMapper.updateUser(username, password);
    }

    // delete user
    @CacheEvict(key = "#username")
    public void delUser(String username) {
        userMapper.delUser(username);
    }
}
4. Create controller (controller layer)
@RestController
public class UserController {

    @Autowired
    private UserService userServer;

    @Autowired
    StringRedisTemplate stringRedisTemplate;


    /**
     * Query all users
     */
    @RequestMapping("/allUsers")
    public String allUsers() {
        userServer.allUsers();
        return "ok";
    }


    /**
     * Update user information
     */
    @RequestMapping("/updateUser")
    public String updateUser() {
        String username = "tom";
        String password = "abc123";
        userServer.updateUser(username,password);
        return "ok";
    }


    /**
     * delete user
     */
    @RequestMapping("/delUser")
    public String delUser() {
        String username = "tom";
        userServer.delUser(username);
        return "ok";
    }

}