Spring Boot learning
Official website: https://spring.io/projects/spring-boot#overview
file: https://docs.spring.io/spring-boot/docs/2.2.6.RELEASE/reference/html/
Reference video: [crazy God says Java] the latest tutorial of SpringBoot, IDEA version, is easy to understand_ Beep beep beep_ bilibili
Project complete reference code: lexiaoyuan/SpringBootStudy: My Spring Boot study notes (github.com),Springboot study: my Spring Boot study notes (gitee.com)
Spring Security
Official website: https://spring.io/projects/spring-security
file: https://docs.spring.io/spring-security/site/docs/5.3.2.BUILD-SNAPSHOT/reference/html5/
Meet spring security
Spring Security is the security framework for the spring project and the default technology selection of the Spring Boot underlying security module. It can realize powerful Web security control. For security control, we only need to introduce the Spring Boot starter security module and configure a small amount to realize powerful security management!
Remember several classes:
- WebSecurityConfigurerAdapter: custom Security policy
- AuthenticationManagerBuilder: custom authentication policy
- @Enable WebSecurity: enable WebSecurity mode
The two main goals of Spring Security are "authentication" and "authorization" (access control).
Authentication
Authentication is about verifying your credentials, such as user name / user ID and password, to verify your identity.
Authentication is usually done by user name and password, sometimes in combination with authentication factors.
Authorization
Authorization occurs after the system successfully verifies your identity, and will eventually grant you full access to resources (such as information, files, databases, funds, locations, almost anything).
This concept is universal, not just in Spring Security.
Test environment construction
-
Create a new Spring Boot project and import the web and thymeleaf modules
-
Import static resources in the resources directory (refer to the complete project code: https://github.com/lexiaoyuan/SpringBootStudy/tree/main/springboot_study/springboot_07_security,https://gitee.com/lexiaoyuan/spring-boot-study/tree/master/springboot_study/springboot_07_security)
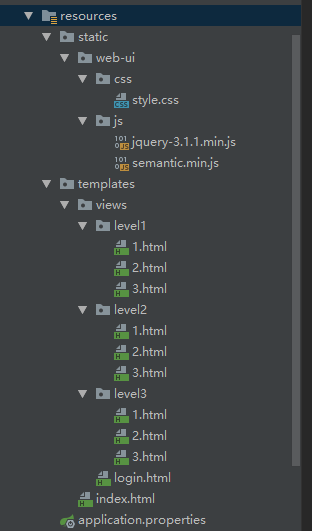
- Create a controller package, and create a routercontroller under the controller package Java, used to jump to various pages
@Controller
public class RouterController {
    @GetMapping({"/", "/index"})
    public String index(){
        return "index";
    }

    @GetMapping("/toLogin")
    public String login(){
        return "views/login";
    }

    @GetMapping("/level1/{id}")
    public String level1(@PathVariable("id") int id) {
        return "views/level1/"+id;
    }

    @GetMapping("/level2/{id}")
    public String level2(@PathVariable("id") int id) {
        return "views/level2/"+id;
    }

    @GetMapping("/level3/{id}")
    public String level3(@PathVariable("id") int id) {
        return "views/level3/"+id;
    }

}
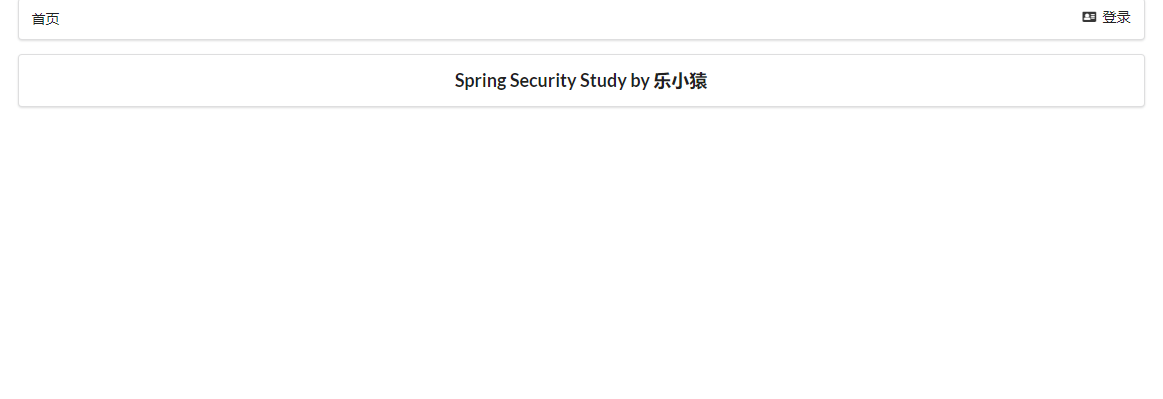
- Run the project to access: http://localhost:8080/ , test whether the page Jump is normal, normal!

Certification and authorization
- Introduce the Spring Security module in POM Adding dependencies to XML
<dependency>
    <groupId>org.springframework.boot</groupId>
    <artifactId>spring-boot-starter-security</artifactId>
</dependency>
-
Write a configuration class, create a new config directory, and create a new securityconfig java
@EnableWebSecurity public class SecurityConfig extends WebSecurityConfigurerAdapter { // to grant authorization @Override protected void configure(HttpSecurity http) throws Exception { // Request authorization rule http.authorizeRequests() .antMatchers("/").permitAll() // The home page is accessible to everyone .antMatchers("/level1/**").hasRole("vip1") .antMatchers("/level2/**").hasRole("vip2") .antMatchers("/level3/**").hasRole("vip3"); // Open the login page. If you don't have permission, it defaults to the login page / login http.formLogin(); } // authentication @Override protected void configure(AuthenticationManagerBuilder auth) throws Exception { // Get the user and corresponding role from memory. This data should be read from the database //Spring security 5.0 adds a variety of encryption methods and changes the password format. //If we want our project to log in normally, we need to modify the code in configure. We need to encrypt the password transmitted from the front end in some way //BCrypt encryption is officially recommended by spring security. auth.inMemoryAuthentication().passwordEncoder(new BCryptPasswordEncoder()) .withUser("lexiaoyuan").password(new BCryptPasswordEncoder().encode("123456")).roles("vip1", "vip2") .and() .withUser("root").password(new BCryptPasswordEncoder().encode("123456")).roles("vip1", "vip2", "vip3") .and() .withUser("beta").password(new BCryptPasswordEncoder().encode("123456")).roles("vip1"); } } -
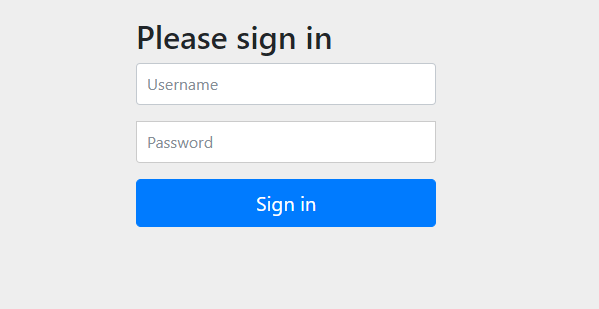
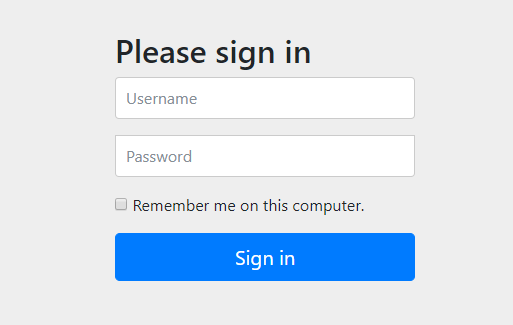
Run the project to access: http://localhost:8080/ , want to enter level 1 (or 2 or 3). Or direct access to: http://localhost:8080/login , it will automatically jump to a login page (provided by the frame).
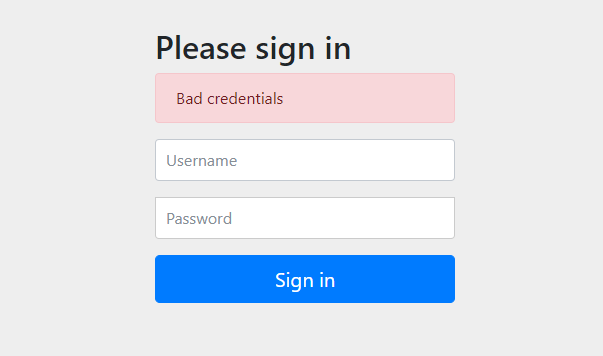
- If you enter the wrong user name and password (except for the three users defined above: lexiaoyuan, root, beta and the corresponding password), you will jump to http://localhost:8080/login?error
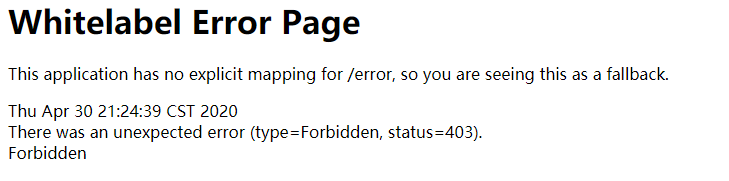
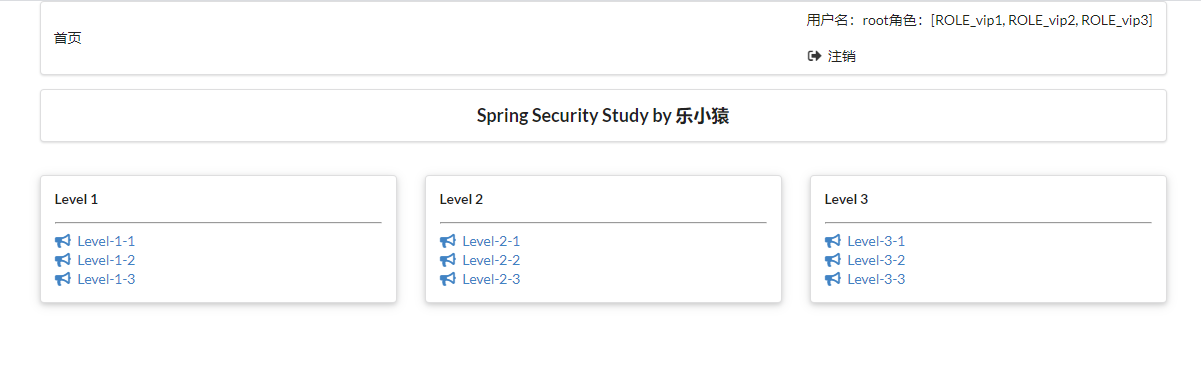
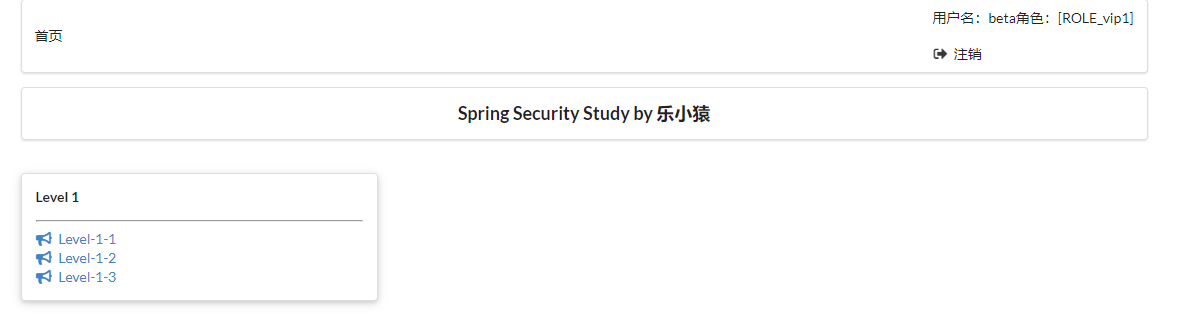
- Enter level yuan, 123456, log in, and click the link in level. It is found that you can only access level 1 and level 2. An error will be reported when accessing Level 3.

- Similarly, you can only access the corresponding page after entering other set users. Test successful!
Logout and permission control
- Enable logoff function
// to grant authorization
@Override
protected void configure(HttpSecurity http) throws Exception {
    // Request authorization rule
    http.authorizeRequests()
        .antMatchers("/").permitAll()   // The home page is accessible to everyone
        .antMatchers("/level1/**").hasRole("vip1")
        .antMatchers("/level2/**").hasRole("vip2")
        .antMatchers("/level3/**").hasRole("vip3");

    // Open the login page. If you don't have permission, it defaults to the login page / login
    http.formLogin();

    // Enable logoff function
    http.logout();
}
- Front end index Add a logout button in HTML, and the request is / logout (the default request address in the source code)
<!--Login and logout-->
<div class="right menu">
    <!--Not logged in-->
    <a class="item" th:href="@{/toLogin}">
        <i class="address card icon"></i> Sign in
    </a>
    <a class="item" th:href="@{/logout}">
        <i class="sign-out icon"></i> cancellation
    </a>
</div>
- Test it. Run the project to access: http://localhost:8080/login
After logging in, click log out
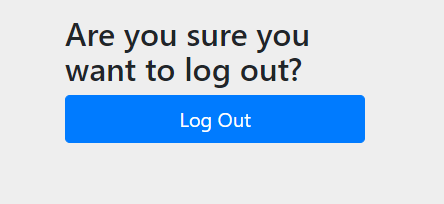
Click the Log Out button
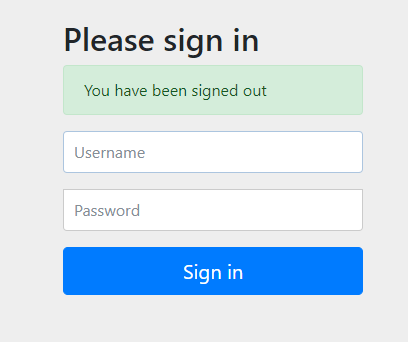
Jump back to the login page
- After logging off successfully, jump to the home page
@Override
protected void configure(HttpSecurity http) throws Exception {
    // ...
    // Log off successfully and jump to the home page
    http.logout().logoutSuccessUrl("/");
}
- Test it, rerun the project, and visit: http://localhost:8080/login , after successful login, click the logout button and jump to the home page. success!
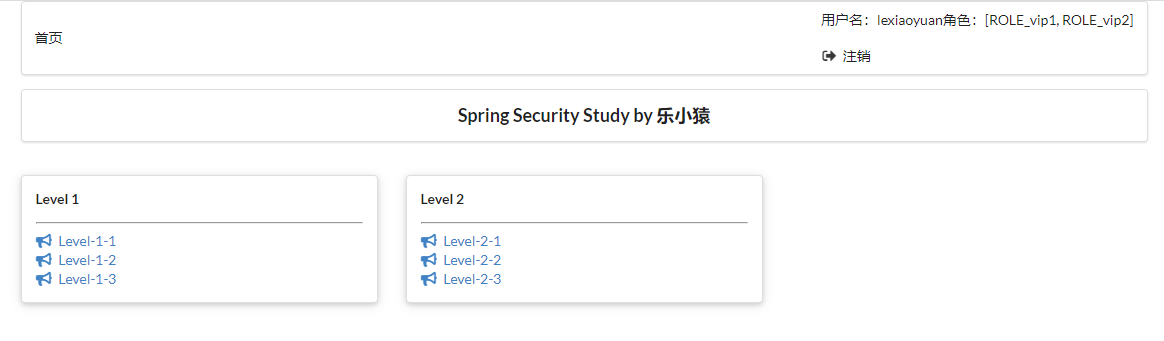
Modify the navigation bar according to the authentication status
When the user does not log in, only the login button is displayed on the navigation bar. After the user logs in, the navigation bar can display the login user information and logout button.
You need to combine some methods provided by Thymeleaf + Spring Security.
Official documents: https://www.thymeleaf.org/doc/articles/springsecurity.html
GitHub address: https://github.com/thymeleaf/thymeleaf-extras-springsecurity
Official examples: https://github.com/thymeleaf/thymeleafexamples-springsecurity
- First, in POM Introducing new dependencies into XML
<!-- https://mvnrepository.com/artifact/org.thymeleaf.extras/thymeleaf-extras-springsecurity5 -->
<dependency>
    <groupId>org.thymeleaf.extras</groupId>
    <artifactId>thymeleaf-extras-springsecurity5</artifactId>
    <version>3.0.4.RELEASE</version>
</dependency>
- Modify index HTML, add namespace
xmlns:sec="http://www.thymeleaf.org/extras/spring-security"
- Modify index HTML, determine whether to log in through sec:authorize="isAuthenticated()
<!--Login and logout-->
<div class="right menu">
    <!--If you are not logged in-->
    <div sec:authorize="!isAuthenticated()">
        <a class="item" th:href="@{/toLogin}">
            <i class="address card icon"></i> Sign in
        </a>
    </div>

    <!--Logged in-->
    <div sec:authorize="isAuthenticated()">
        <a class="item">
            user name:<span sec:authentication="name"></span>
            Role:<span sec:authentication="principal.authorities"></span>
        </a>
        <a class="item" th:href="@{/logout}">
            <i class="sign-out icon"></i> cancellation
        </a>
    </div>
</div>
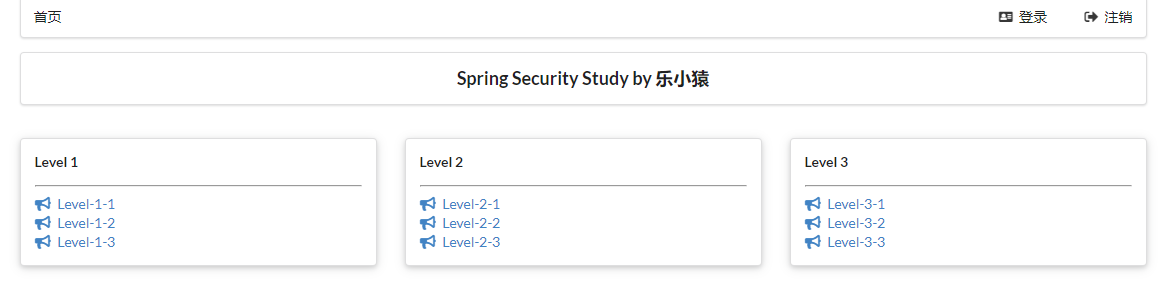
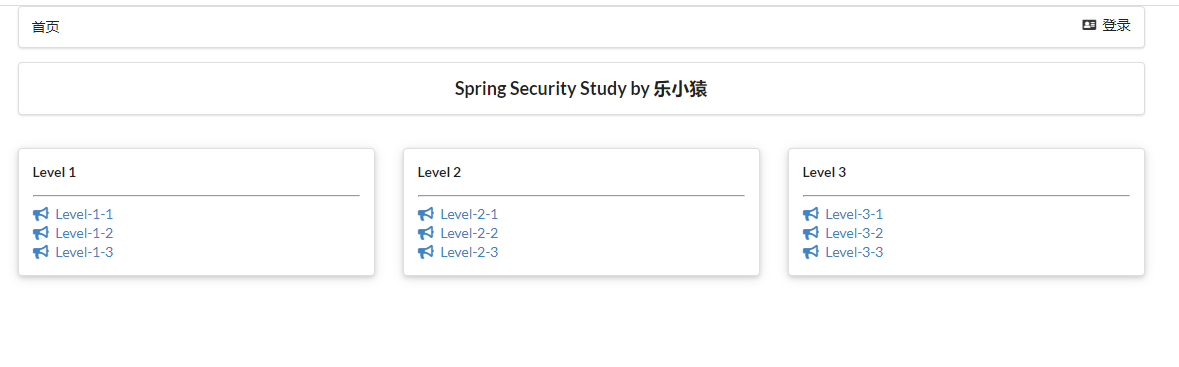
- Rerun the project to access: http://localhost:8080/ , you can see that only the login button is displayed
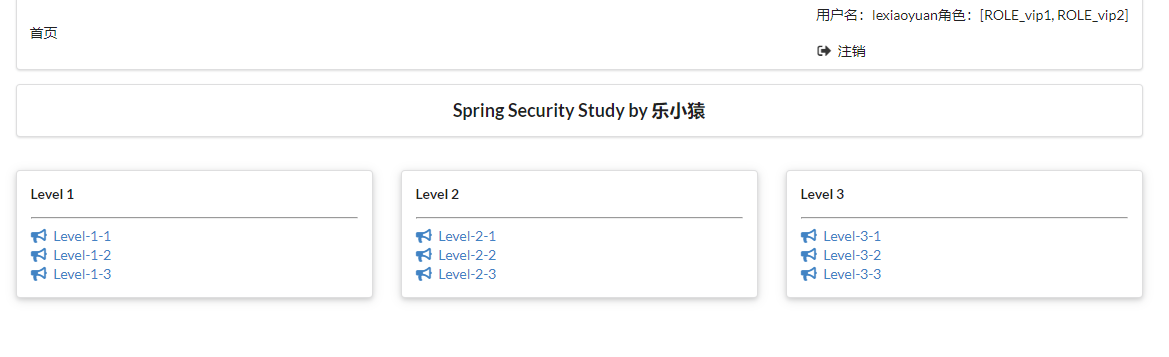
- visit: http://localhost:8080/login After logging in successfully, you can see that the logged in user and his / her roles are displayed
- Click logout again, confirm logout, and return to the home page.


- OK, this requirement is completed!
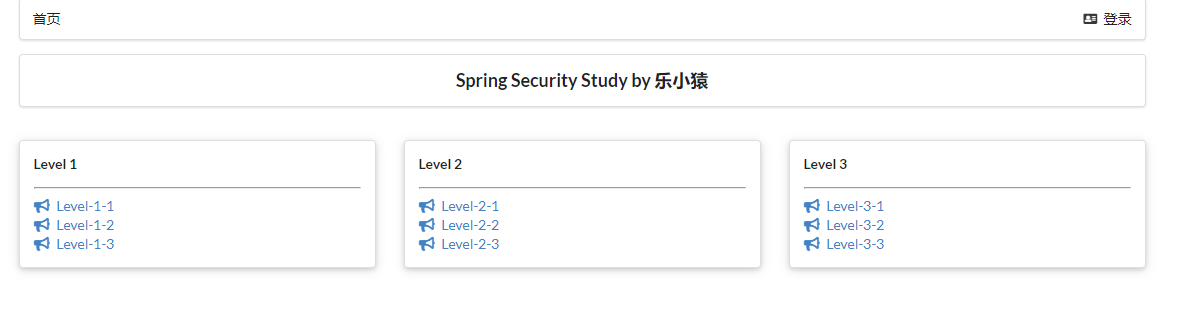
Different pages are displayed according to different roles of users
- Continue to modify index HTML, use sec:authorize="hasRole('vip1 ')" to complete role function authentication
<!--sec:authorize="hasRole('vip1')"-->
<div class="column" sec:authorize="hasRole('vip1')">
    <div class="ui raised segment">
        <div class="ui">
            <div class="content">
                <h5 class="content">Level 1</h5>
                <hr>
                <div><a th:href="@{/level1/1}"><i class="bullhorn icon"></i> Level-1-1</a></div>
                <div><a th:href="@{/level1/2}"><i class="bullhorn icon"></i> Level-1-2</a></div>
                <div><a th:href="@{/level1/3}"><i class="bullhorn icon"></i> Level-1-3</a></div>
            </div>
        </div>
    </div>
</div>

<!--sec:authorize="hasRole('vip2')"-->
<div class="column" sec:authorize="hasRole('vip2')">
    <div class="ui raised segment">
        <div class="ui">
            <div class="content">
                <h5 class="content">Level 2</h5>
                <hr>
                <div><a th:href="@{/level2/1}"><i class="bullhorn icon"></i> Level-2-1</a></div>
                <div><a th:href="@{/level2/2}"><i class="bullhorn icon"></i> Level-2-2</a></div>
                <div><a th:href="@{/level2/3}"><i class="bullhorn icon"></i> Level-2-3</a></div>
            </div>
        </div>
    </div>
</div>

<!--sec:authorize="hasRole('vip3')"-->
<div class="column" sec:authorize="hasRole('vip3')">
    <div class="ui raised segment">
        <div class="ui">
            <div class="content">
                <h5 class="content">Level 3</h5>
                <hr>
                <div><a th:href="@{/level3/1}"><i class="bullhorn icon"></i> Level-3-1</a></div>
                <div><a th:href="@{/level3/2}"><i class="bullhorn icon"></i> Level-3-2</a></div>
                <div><a th:href="@{/level3/3}"><i class="bullhorn icon"></i> Level-3-3</a></div>
            </div>
        </div>
    </div>
</div>
- Re Build the project. Test: Visit: http://localhost:8080/ , you can see that you haven't logged in yet, and none of them are displayed
Note: if the access is not updated after re building, the thymeleaf template may be cached, which can be found in application Properties, and then re run the project
spring.thymeleaf.cache=false
- visit: http://localhost:8080/login After successful login, you can see the page that the corresponding user is allowed to display.

- ok, logout and permission control are complete!
Remember me
- Open remember me
@Override
protected void configure(HttpSecurity http) throws Exception {
    // ...
    // Open and remember me
    http.rememberMe();
}
- visit: http://localhost:8080/login , there will be one more button to remember me, enter the user name and password, and check remember me to log in
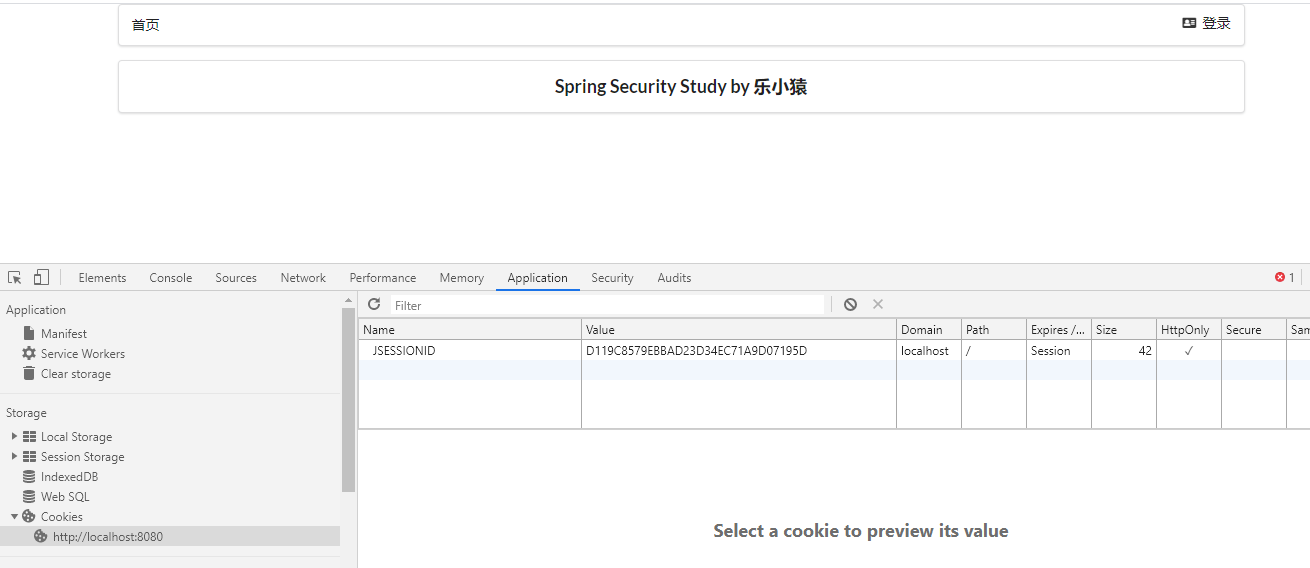
- Press F12 to view the browser's cookie. You can see that after successful login, the cookie will be sent to the browser for saving
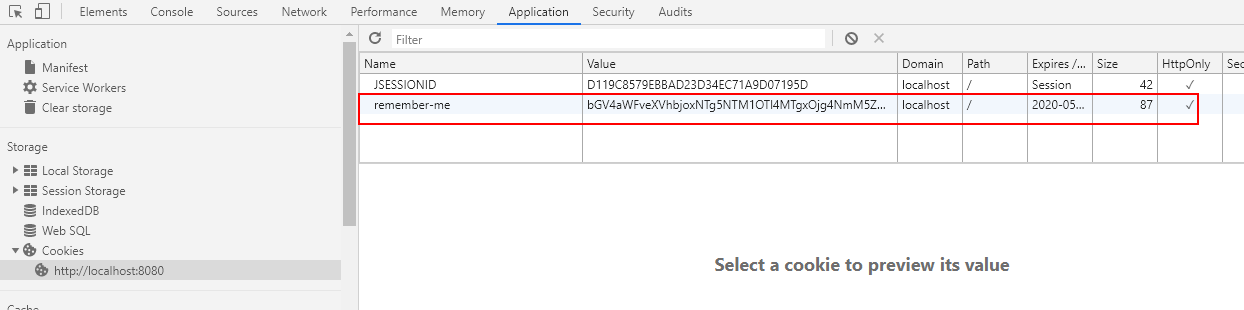
- Close the browser and visit again http://localhost:8080/ , the home page will be displayed directly without login

- After clicking log off and confirm, you can see that the cookie has been deleted
Custom home page
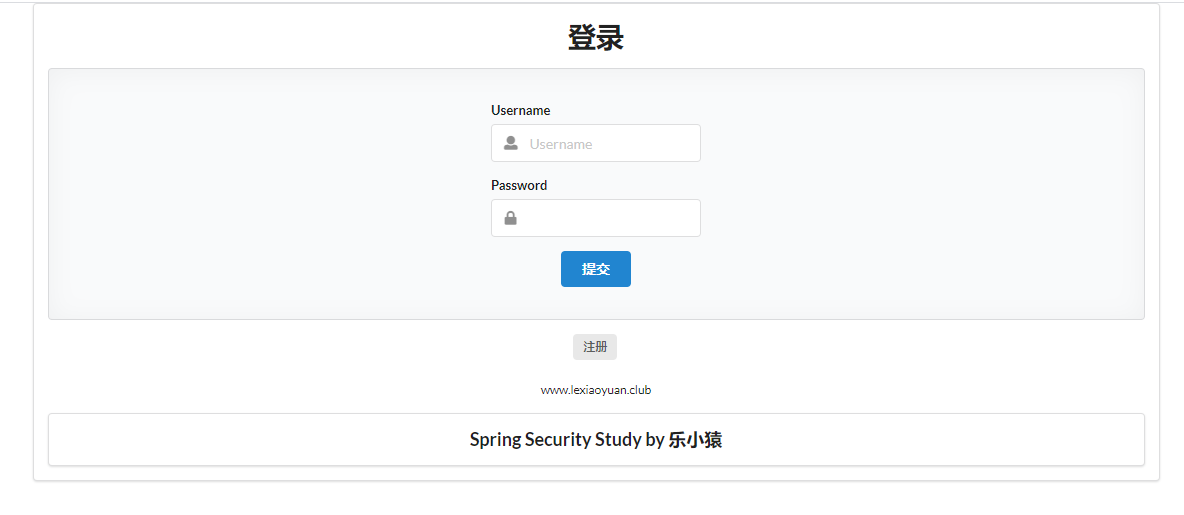
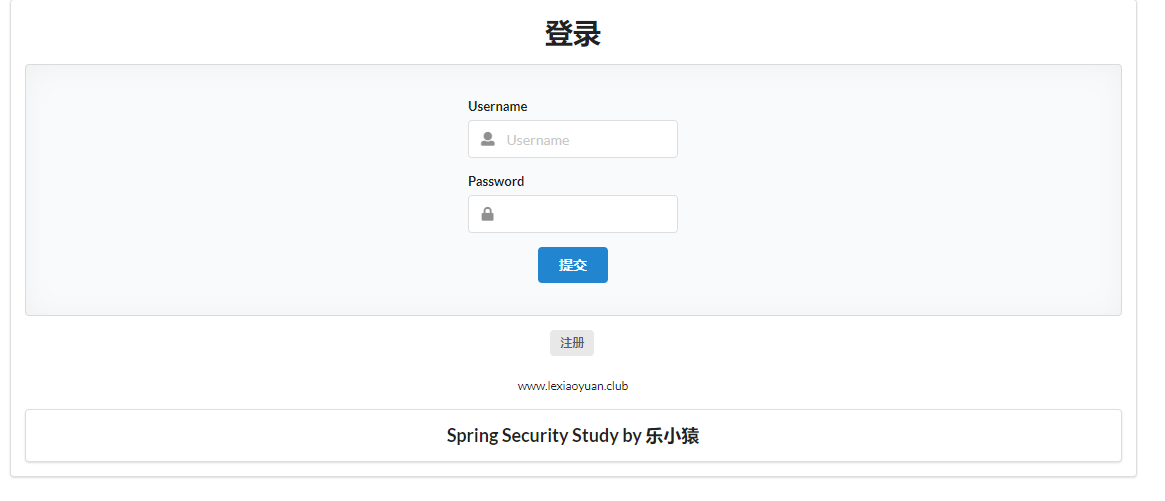
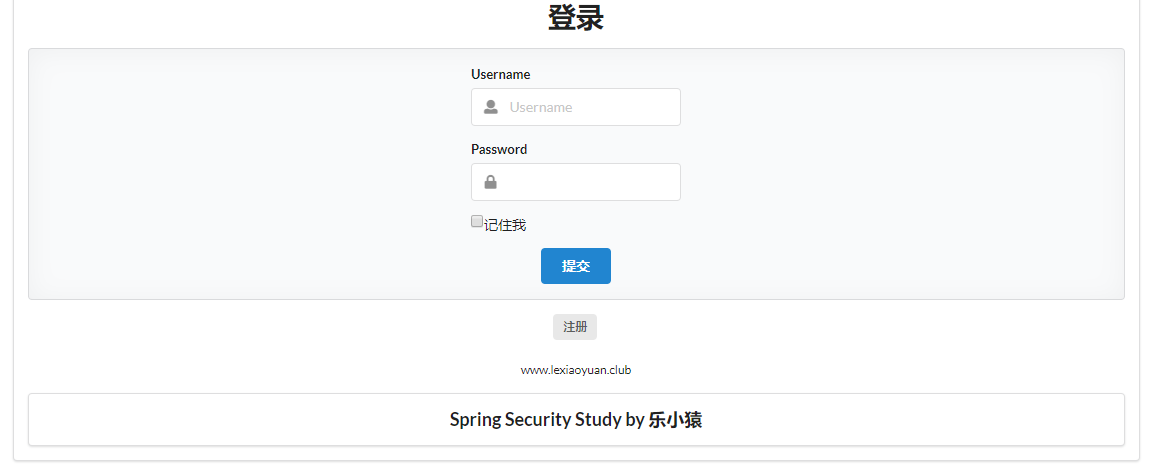
Now this Login page is the default of spring security. How can we use the Login interface written by ourselves?
- Open custom login page
// Custom home page: loginPage("/toLogin")
http.formLogin().loginPage("/toLogin");
- Point to our custom request at the front end
<a class="item" th:href="@{/toLogin}">
    <i class="address card icon"></i> Sign in
</a>
- Test: access: http://localhost:8080/ , click the login button to jump to the login page written by yourself
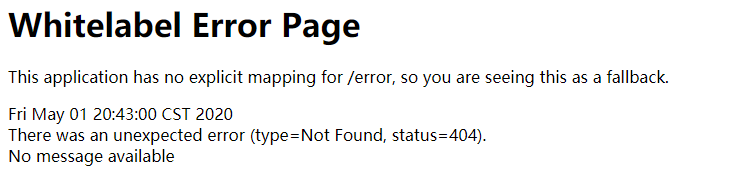
- After entering the user name and password and clicking the login button, an error will be reported because we have not written the request to accept login
- Accept login request: [method 1]: modify login HTML, which is submitted to the / toLogin request by post
<form th:action="@{/toLogin}" method="post">
    <div class="field">
        <label>Username</label>
        <div class="ui left icon input">
            <input type="text" placeholder="Username" name="username">
            <i class="user icon"></i>
        </div>
    </div>
    <div class="field">
        <label>Password</label>
        <div class="ui left icon input">
            <input type="password" name="password">
            <i class="lock icon"></i>
        </div>
    </div>
    <input type="submit" class="ui blue submit button"/>
</form>
Note: the input name attribute of user name and password in the submitted form must be username and password (this is the default accepted name and needs to be matched), otherwise it will jump to http://localhost:8080/toLogin?error , the page is still on the login page.
- To rebuild the project, visit: http://localhost:8080/toLogin After entering the user name and password, you can see that you log in normally.
- Accept login request: [method 2]: continue setting after the customized home page
// Custom home page: loginPage("/toLogin")
// Request to log in to submit form: loginProcessingUrl("/login")
http.formLogin()
        .loginPage("/toLogin")
        .usernameParameter("username")
        .passwordParameter("password")
        .loginProcessingUrl("/login");
- Then modify login HTML, go / login request
<form th:action="@{/login}" method="post">
    <div class="field">
        <label>Username</label>
        <div class="ui left icon input">
            <input type="text" placeholder="Username" name="username">
            <i class="user icon"></i>
        </div>
    </div>
    <div class="field">
        <label>Password</label>
        <div class="ui left icon input">
            <input type="password" name="password">
            <i class="lock icon"></i>
        </div>
    </div>
    <input type="submit" class="ui blue submit button"/>
</form>
- After rerunning the project, access: http://localhost:8080/toLogin After entering the user name and password, you can see it or log in normally.

- In the custom page implementation, remember my function in login Add a multi selection box to remember me in HTML
<div class="field">
    <input type="checkbox" name="remember">Remember me
</div>
Note: if the value of the name attribute is "remember me", it can be omitted rememberMeParameter("remember")
- Continue to configure after opening the remember me method rememberMeParameter("remember")
// Set the name of my input to submit rememberMeParameter("remember"), the default is remember me
http.rememberMe().rememberMeParameter("remember");
- Rerun the project to access: http://localhost:8080/toLogin , you can see that there is an additional selection box to remember me. After entering the user name and password, check remember me and log in. You can see that you have successfully logged in.

- Close the browser and visit: http://localhost:8080/ , you can see that the logged in page will be displayed directly. You don't have to log in again.

- OK, customize the home page!
Complete code of configuration class attached
@EnableWebSecurity
public class SecurityConfig extends WebSecurityConfigurerAdapter {

    // to grant authorization
    @Override
    protected void configure(HttpSecurity http) throws Exception {
        // Request authorization rule
        http.authorizeRequests()
                .antMatchers("/").permitAll()   // The home page is accessible to everyone
                .antMatchers("/level1/**").hasRole("vip1")
                .antMatchers("/level2/**").hasRole("vip2")
                .antMatchers("/level3/**").hasRole("vip3");

        // Open the login page. If you don't have permission, it defaults to the login page / login
        // Custom home page: loginPage("/toLogin")
        // Request to log in to submit form: loginProcessingUrl("/login")
        http.formLogin()
                .loginPage("/toLogin")
                .usernameParameter("username")
                .passwordParameter("password")
                .loginProcessingUrl("/login");

        // Turn on the logoff function logout()
        // Log out successfully and jump to the home page logoutSuccessUrl("/")
        http.logout().logoutSuccessUrl("/");

        // After using the custom login page, you need to turn off the csrf function: Cross Site Request Forgery. By default, logout requests can only be submitted through post
        //http.csrf().disable();

        // Open and remember me
        // Set the name of my input to submit rememberMeParameter("remember"), the default is remember me
        http.rememberMe().rememberMeParameter("remember");
    }

    // authentication
    @Override
    protected void configure(AuthenticationManagerBuilder auth) throws Exception {

        // Get the user and corresponding role from memory. This data should be read from the database
        //Spring security 5.0 adds a variety of encryption methods and changes the password format.
        //If we want our project to log in normally, we need to modify the code in configure. We need to encrypt the password transmitted from the front end in some way
        //BCrypt encryption is officially recommended by spring security.
        auth.inMemoryAuthentication().passwordEncoder(new BCryptPasswordEncoder())
                .withUser("lexiaoyuan").password(new BCryptPasswordEncoder().encode("123456")).roles("vip1", "vip2")
                .and()
                .withUser("root").password(new BCryptPasswordEncoder().encode("123456")).roles("vip1", "vip2", "vip3")
                .and()
                .withUser("beta").password(new BCryptPasswordEncoder().encode("123456")).roles("vip1");
    }
}