Preface
Spring is translated into Chinese as "spring". Indeed, in a certain period of time, it has brought spring to Java developers. However, with the expansion of our project scale, there are more and more places where spring needs to be configured. To exaggerate, "configuration takes two hours, Coding takes five minutes". With the development of software industry step by step, this complex xml configuration will gradually withdraw from the stage of history.
Introduction to SpringBoot
From: Baidu Encyclopedia
Spring Boot is a new framework provided by the Pivotal team, which is designed to simplify the initial construction and development process of new spring applications. The framework uses a specific way to configure, so that developers no longer need to define a templated configuration. In this way, Spring Boot is committed to becoming a leader in the booming area of rapid application development.
The features of SpringBoot are as follows:
-
You can create independent Spring applications, and based on their Maven or Gradle plug-ins, you can create executable JARs and WARs;
-
Embedded Servlet containers such as Tomcat or Jetty;
-
Provide automatically configured "starter" project object model (POMS) to simplify Maven configuration;
-
Configure the Spring container as automatically as possible;
-
Provide ready features such as metrics, health checks, and external configurations;
-
Absolutely no code generation, no XML configuration required.
Own understanding:
Spring boot, as the name suggests, gives the impression that it is a project that spring starts. In the past, when we want to start a spring project, we often need to configure a lot of xml configuration files. However, after using spring boot, we can start the whole project directly without even writing a line of xml. This "zero configuration" method reduces a lot of workload for developers, and enables developers to focus on the design of business logic and the logic of the project The collection is more perfect.
In addition, it adopts the configuration style of JavaConfig, and the way to import components is also changed from the original direct configuration to @ enablexxx. This pure Java code configuration and the way to import components make the code look more elegant, so SpringBoot is now favored by large and small companies and most programmers, not for no reason.
The reason why spring boot can simplify the configuration file to start directly is that it has two internal design strategies: out of the box and convention is greater than configuration.
Out of the box: in the development process, add the relevant dependency package through the pom file of maven project, and then use the corresponding annotation to replace the tedious XML configuration to manage the object life cycle.
Convention is greater than configuration: the target structure is configured by SpringBoot itself, and the software design paradigm in which developers add information to the structure. Although this feature reduces some flexibility and increases the complexity of BUG positioning, it reduces the number of decisions developers need to make, and reduces a large number of XML configurations, and can automate code compilation, testing and packaging.
So in this blog, we need to understand all the things, should start from these two characteristics, step by step in-depth spring boot auto assembly principle.
Out of the box principle
To understand this feature, first of all, you need to realize the convenience brought by the whole process of out of the box use.
Experience out of the box
SpringBoot provides a place for us to quickly create a SpringBoot project: https://start.spring.io/
We just need to name the whole project in this web page, and then select the components we need to get a spring boot project that can run directly.
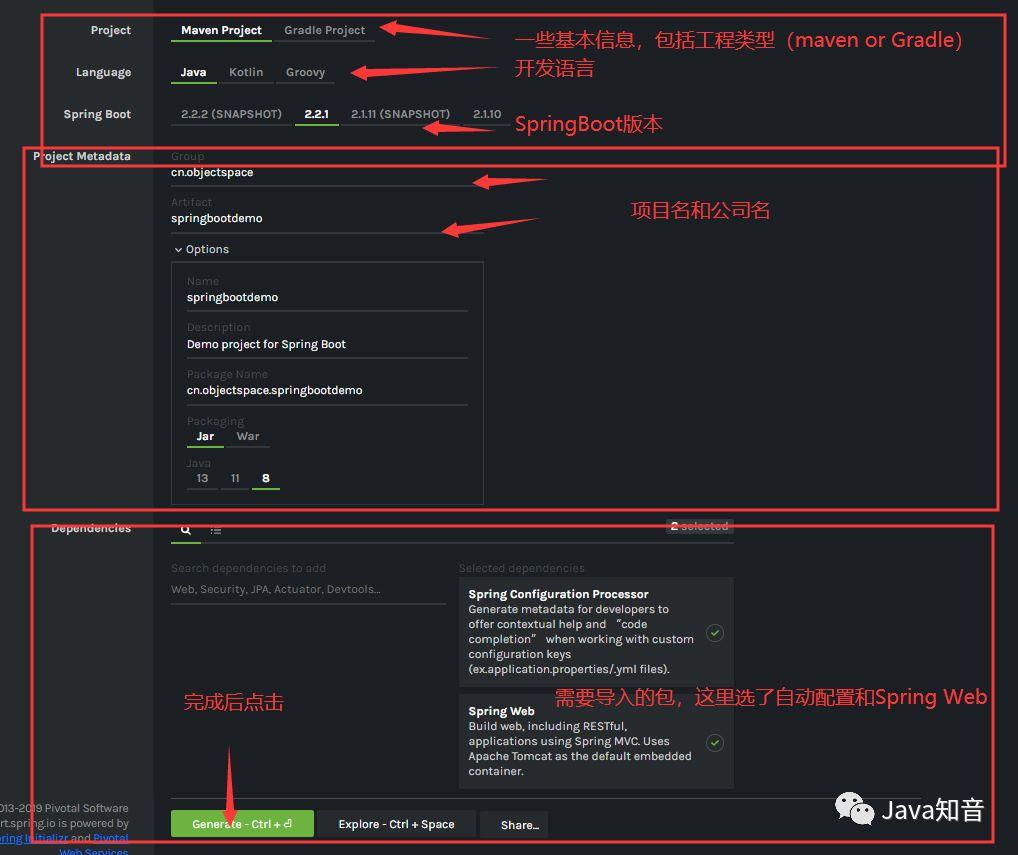
We just need to fill in the above information and click Generate to download a spring boot project directly, then import our IDE, Eclipse or IDEA, and then run it directly.
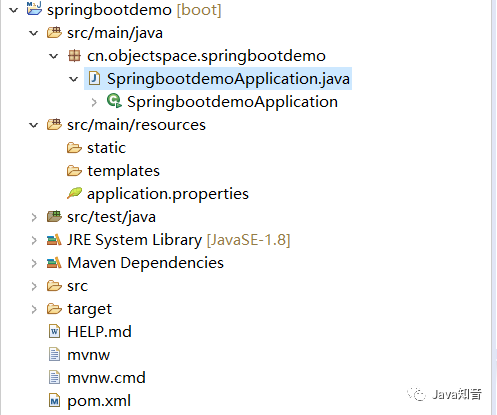
Overall project structure:
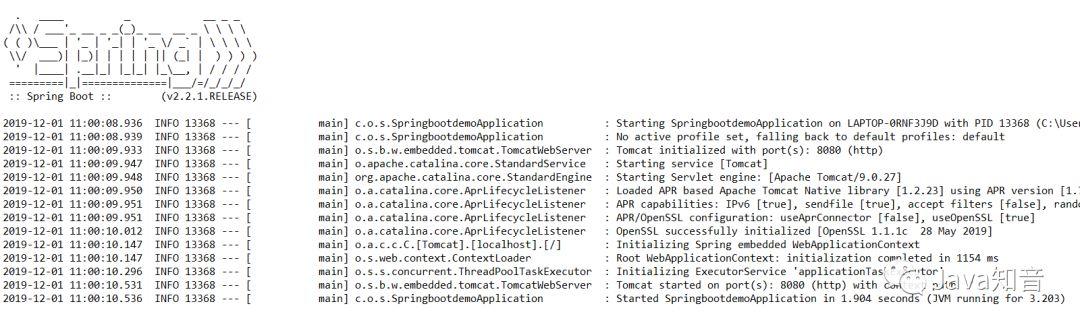
Start up:
Visit: http://localhost:8080/
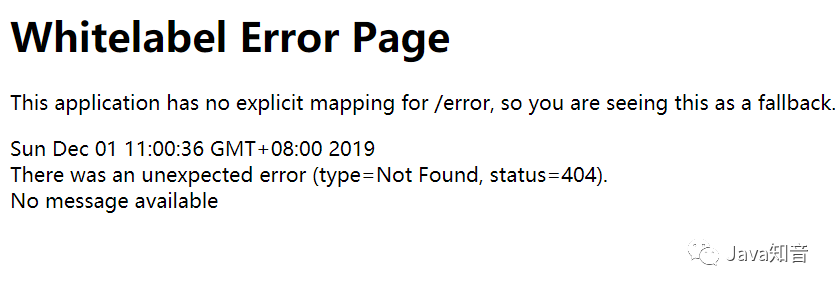
Represents the success of the entire SpringBoot project.
Analysis of out of the box principle
Compare SSM configuration
In fact, in the above out of the box use, we have introduced a spring MVC component, but you can see that we have started the project without any configuration. Looking back at the spring MVC configuration of SSM framework in the past, I have a copy of it for you to compare.
spring-web.xml:
<?xml version="1.0" encoding="UTF-8"?>
<beans xmlns="http://www.springframework.org/schema/beans"
    xmlns:xsi="http://www.w3.org/2001/XMLSchema-instance" xmlns:context="http://www.springframework.org/schema/context"
    xmlns:mvc="http://www.springframework.org/schema/mvc"
    xsi:schemaLocation="http://www.springframework.org/schema/beans
    http://www.springframework.org/schema/beans/spring-beans.xsd
    http://www.springframework.org/schema/context
    http://www.springframework.org/schema/context/spring-context.xsd
    http://www.springframework.org/schema/mvc
    http://www.springframework.org/schema/mvc/spring-mvc-3.2.xsd">
    <!-- To configure SpringMVC -->
    <!-- 1.open SpringMVC Annotation mode -->
    <!-- Simplified configuration: (1)automatic logon DefaultAnootationHandlerMapping,AnotationMethodHandlerAdapter
        (2)Provide some columns: data binding, number and date format @NumberFormat, @DateTimeFormat, xml,json Default read / write support -->
    <mvc:annotation-driven />

    <!-- 2.Static resource default servlet To configure (1)Add processing to static resources: js,gif,png (2)Permitted use"/"Make an overall map -->
    <mvc:resources mapping="/resources/**" location="/resources/" />
    <mvc:default-servlet-handler />

    <!-- 3.Define view parser -->
    <bean id="viewResolver"
        class="org.springframework.web.servlet.view.InternalResourceViewResolver">
        <property name="prefix" value="/WEB-INF/html/"></property>
        <property name="suffix" value=".html"></property>
    </bean>
    <!-- File upload parser -->
    <bean id="multipartResolver"
        class="org.springframework.web.multipart.commons.CommonsMultipartResolver">
        <property name="defaultEncoding" value="utf-8"></property>
        <property name="maxUploadSize" value="10485760000"></property><!-- Maximum upload file size -->
        <property name="maxInMemorySize" value="20971520"></property>
    </bean>
    <!-- stay spring-mvc.xml After this configuration is added to the file, spring Back to the page utf-8 Coded -->
    <bean
        class="org.springframework.web.servlet.mvc.annotation.AnnotationMethodHandlerAdapter">
        <property name="messageConverters">
            <list>
                <bean
                    class="org.springframework.http.converter.StringHttpMessageConverter">
                    <property name="supportedMediaTypes">
                        <list>
                            <value>text/html;charset=UTF-8</value>
                        </list>
                    </property>
                </bean>
            </list>
        </property>
    </bean>
    <!-- 4.scanning web Dependent bean -->
    <context:component-scan base-package="com.SchoolShop.o2o.web" />
    <!-- 5.Permission interceptor -->
</beans>
web.xml:
<servlet>
      <servlet-name>spring-dispatcher</servlet-name>
      <servlet-class>org.springframework.web.servlet.DispatcherServlet</servlet-class>
      <init-param>
          <param-name>contextConfigLocation</param-name>
          <param-value>classpath:spring/spring-*.xml</param-value>
      </init-param>
  </servlet>
  <servlet-mapping>
      <servlet-name>spring-dispatcher</servlet-name>
      <!-- Match all requests by default -->
      <url-pattern>/</url-pattern>
  </servlet-mapping>
As you can see, there are two files that need to be configured here, web.xml and spring-web.xml. Configuration can be said to be quite heavy.
Compared with this, it is very convenient to use spring boot out of the box. Let's talk about the principle of spring boot out of the box.
Start with pom.xml
Spring boot projects all have a parent dependency. Press Ctrl + left mouse button and click in.
<parent>
    <groupId>org.springframework.boot</groupId>
    <artifactId>spring-boot-starter-parent</artifactId>
    <version>2.2.1.RELEASE</version>
    <relativePath/> <!-- lookup parent from repository -->
</parent>
After clicking in, it is found that there is a dependency in addition to the format of some plug-ins and configuration files.
<parent>
    <groupId>org.springframework.boot</groupId>
    <artifactId>spring-boot-dependencies</artifactId>
    <version>2.2.1.RELEASE</version>
    <relativePath>../../spring-boot-dependencies</relativePath>
</parent>
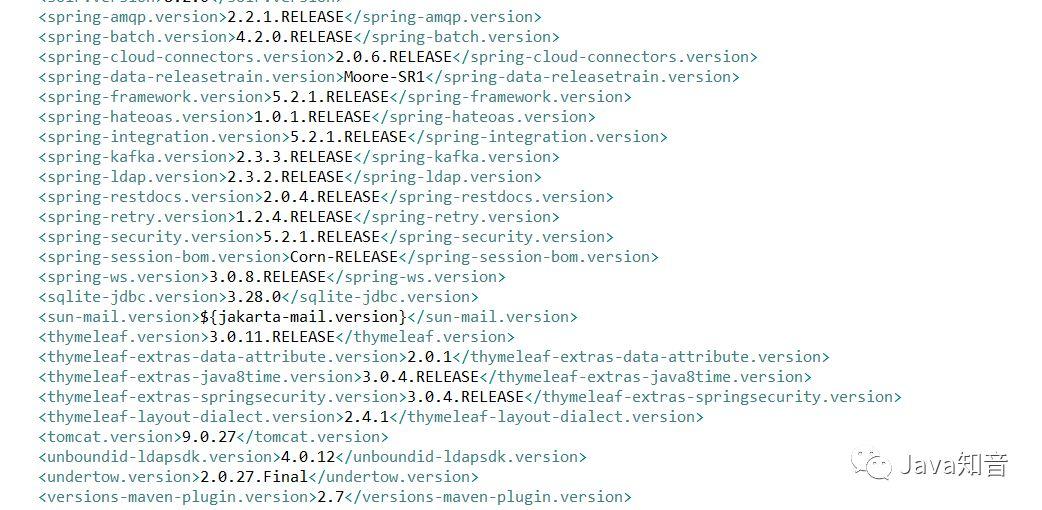
Then click in again, you can see that there are many dependency and dependent version numbers in it. Because this file is too long, it's just a part of it.
So we can draw the first conclusion:
Spring boot dependencies: as the parent project, it stores the core dependencies of spring boot. When we write or introduce some spring boot dependencies, we do not need to specify the version. It is precisely because the parent dependency of spring boot has helped us maintain a set of versions.
In addition, we can see that in the parent dependency, we have also written the resource pool for us, so we don't need to configure it ourselves.
<resources>
      <resource>
        <filtering>true</filtering>
        <directory>${basedir}/src/main/resources</directory>
        <includes>
            <!-- The configuration files that can be read are
                application.yml/application.yaml/application.properties
             -->
          <include>**/application*.yml</include>
          <include>**/application*.yaml</include>
          <include>**/application*.properties</include>
        </includes>
      </resource>
      <resource>
        <directory>${basedir}/src/main/resources</directory>
        <excludes>
          <exclude>**/application*.yml</exclude>
          <exclude>**/application*.yaml</exclude>
          <exclude>**/application*.properties</exclude>
        </excludes>
      </resource>
</resources>
starter
<dependency>
    <groupId>org.springframework.boot</groupId>
    <artifactId>spring-boot-starter</artifactId>
    <version>2.2.1.RELEASE</version>
</dependency>
The initiator is the start-up scenario of spring boot. For example, if we want to use web-related, we will directly introduce spring boot starter web, which will help us automatically import all the necessary dependencies in the web environment.
Let's see what's in the launcher:
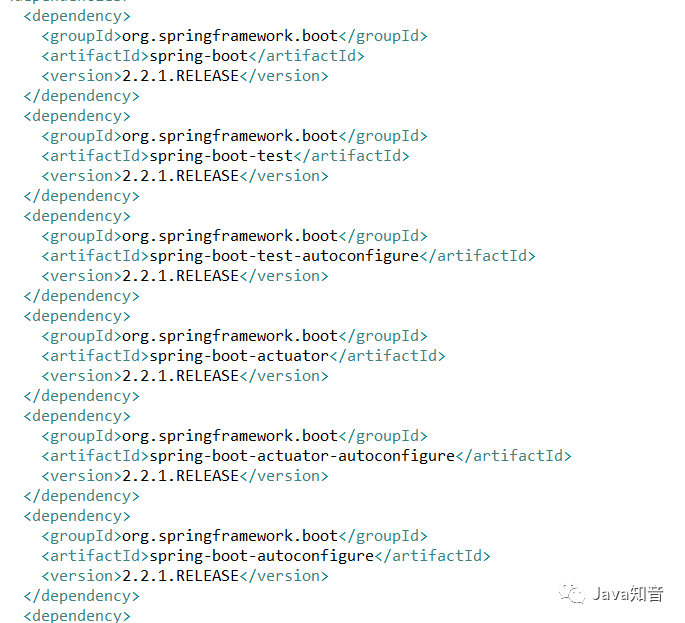
Take spring boot starter as an example:
<dependency>
      <groupId>org.springframework.boot</groupId>
      <artifactId>spring-boot</artifactId>
      <version>2.2.1.RELEASE</version>
      <scope>compile</scope>
    </dependency>
    <dependency>
      <groupId>org.springframework.boot</groupId>
      <artifactId>spring-boot-autoconfigure</artifactId>
      <version>2.2.1.RELEASE</version>
      <scope>compile</scope>
    </dependency>
    <dependency>
      <groupId>org.springframework.boot</groupId>
      <artifactId>spring-boot-starter-logging</artifactId>
      <version>2.2.1.RELEASE</version>
      <scope>compile</scope>
    </dependency>
    <dependency>
      <groupId>jakarta.annotation</groupId>
      <artifactId>jakarta.annotation-api</artifactId>
      <version>1.3.5</version>
      <scope>compile</scope>
    </dependency>
    <dependency>
      <groupId>org.springframework</groupId>
      <artifactId>spring-core</artifactId>
      <version>5.2.1.RELEASE</version>
      <scope>compile</scope>
    </dependency>
    <dependency>
      <groupId>org.yaml</groupId>
      <artifactId>snakeyaml</artifactId>
      <version>1.25</version>
      <scope>runtime</scope>
    </dependency>
There are auto configuration dependency, log dependency and spring core dependency. We only need to import one spring boor starter to import them all directly, instead of importing them one by one as before.
Spring boot encapsulates all functional scenarios into one initiator for developers to use.
When we use it, we can also directly go to the official website to find the starter we need and introduce it directly.
Get initiator documentation:
https://docs.spring.io/spring-boot/docs/2.2.1.RELEASE/reference/html/using-spring-boot.html#using-boot-starter
Main program (important)
//@SpringBootApplication Annotation, is a SpringBoot application
@SpringBootApplication
public class SpringbootdemoApplication {
    public static void main(String[] args) {
        SpringApplication.run(SpringbootdemoApplication.class, args);
    }
}
When writing the spring boot project again, always write such a main program. The main feature of this main program is that it places an @ SpringBootApplication annotation on its class. This is the core of the spring boot project and the focus of our research.
Note: later analysis may go deep into the source code. The source code is nested layer by layer, so it's difficult to understand just by text description. It's better to follow step by step in the IDE environment. Of course, we can bypass this part and look at the conclusion directly.
Click @ SpringBootApplication, and you can see that it is a composite annotation, mainly composed of these annotations.
@SpringBootConfiguration//core
@EnableAutoConfiguration//core
@ComponentScan(excludeFilters = { @Filter(type = FilterType.CUSTOM, classes = TypeExcludeFilter.class),
        @Filter(type = FilterType.CUSTOM, classes = AutoConfigurationExcludeFilter.class) })
The first thing we need to study is the two core annotations, @ SpringBootConfiguration and @ EnableAutoConfiguration, which are analyzed one by one.
@SpringBootConfiguration
@Target(ElementType.TYPE)
@Retention(RetentionPolicy.RUNTIME)
@Documented
@Configuration
public @interface SpringBootConfiguration {
}
You can see that Spring bootconfiguration actually carries a @ Configuration annotation, which we are all familiar with. It represents that it is a Spring Configuration class. So we can think: @ SpringBootConfiguration = @Configuration
@EnableAutoConfiguration
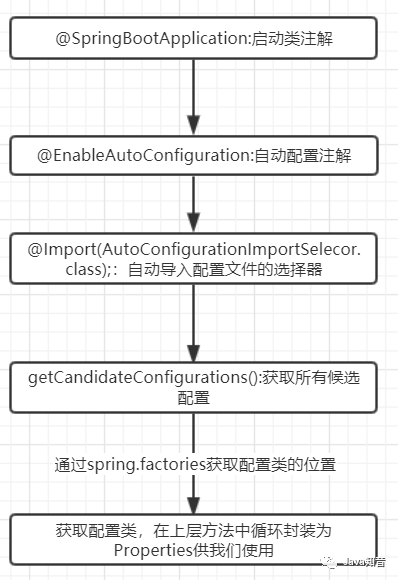
As the name implies, this annotation must be related to automatic configuration. After you click in the source code, you can see that there are two annotations in it.
@AutoConfigurationPackage //Auto configuration package
@Import(AutoConfigurationImportSelector.class)//Automatically configure import selection
Take a look at @ Import(AutoConfigurationImportSelector.class):
It helps us import AutoConfigurationImportSelector. There is a method in this class that can help us get all the configurations. The code is as follows.
/*
  All configurations are stored in configurations,
  These configurations are obtained from getCandidateConfiguration,
  This method is used to get the candidate configuration.
*/
List<String> configurations = getCandidateConfigurations(annotationMetadata, attributes);
getCandidateConfigurations():
This method can be used to obtain all candidate configurations. Where do these candidate configurations come from?
/*Get candidate configuration*/
protected List<String> getCandidateConfigurations(AnnotationMetadata metadata, AnnotationAttributes attributes) {
        List<String> configurations = SpringFactoriesLoader.loadFactoryNames(getSpringFactoriesLoaderFactoryClass(),
                getBeanClassLoader());
        Assert.notEmpty(configurations, "No auto configuration classes found in META-INF/spring.factories. If you "
                + "are using a custom packaging, make sure that file is correct.");
        return configurations;
    }
In fact, it returns a List, which is returned by the loadFactoryNames() method, in which a getspringfactoryesloaderfactory class () is passed in. Let's take a look at the contents of this method.
protected Class<?> getSpringFactoriesLoaderFactoryClass() {
    return EnableAutoConfiguration.class;
}
We see a familiar word - enable autoconfiguration, that is, it actually returns all the packages of this class. Isn't the package marked with this class @ SpringBootApplication?
So we can come to the conclusion that it goes around so many places to import all the resources needed to start the class.
Let's look down. There is another statement in it, which is an assertion:
Assert.notEmpty(configurations, "No auto configuration classes found in META-INF/spring.factories. If you "
                + "are using a custom packaging, make sure that file is correct.");
This assertion means that configurations must be non empty, otherwise a paragraph will be printed, No auto configuration classes found in META-INF/spring.factories. Let's reverse this logic. If the collection is not empty, does it mean that the spring.factories will be found and the contents of the file will be loaded?
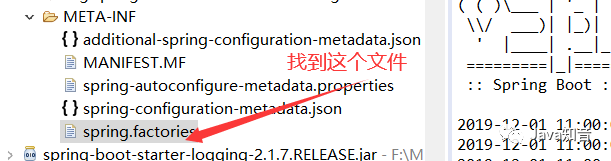
With this question in mind, let's first find the file spring.factories:
You can see that there are many auto configuration properties:
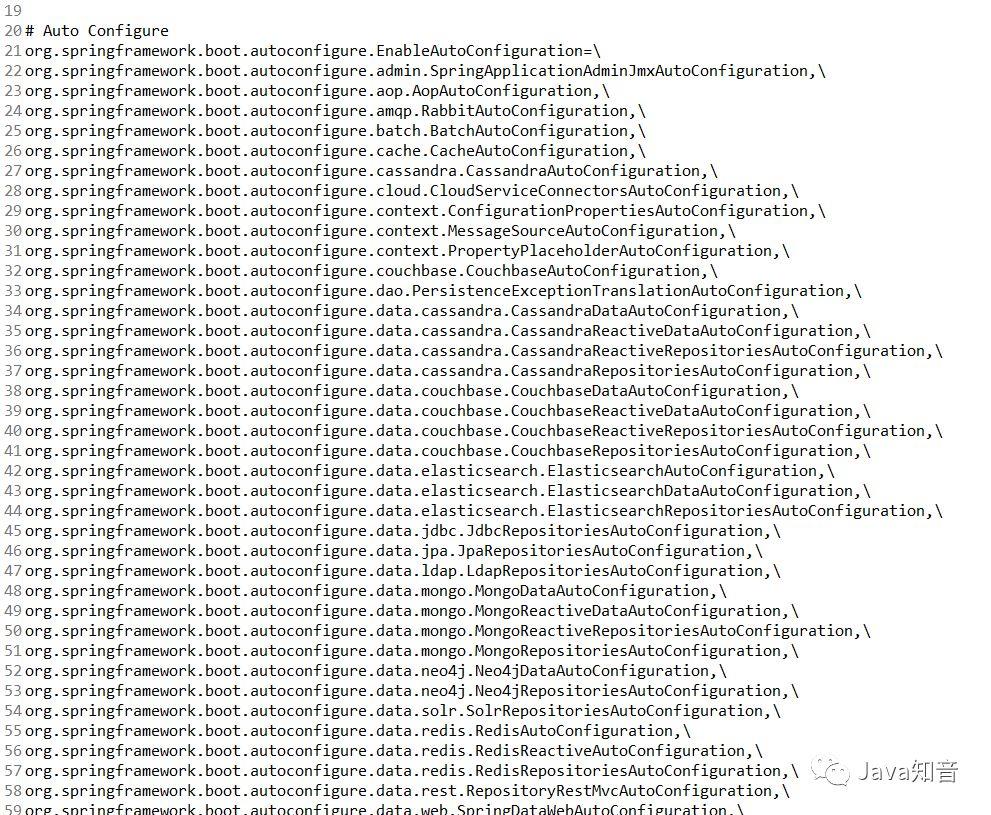
We can find any automatic configuration point, such as webmvcauautoconfiguration:
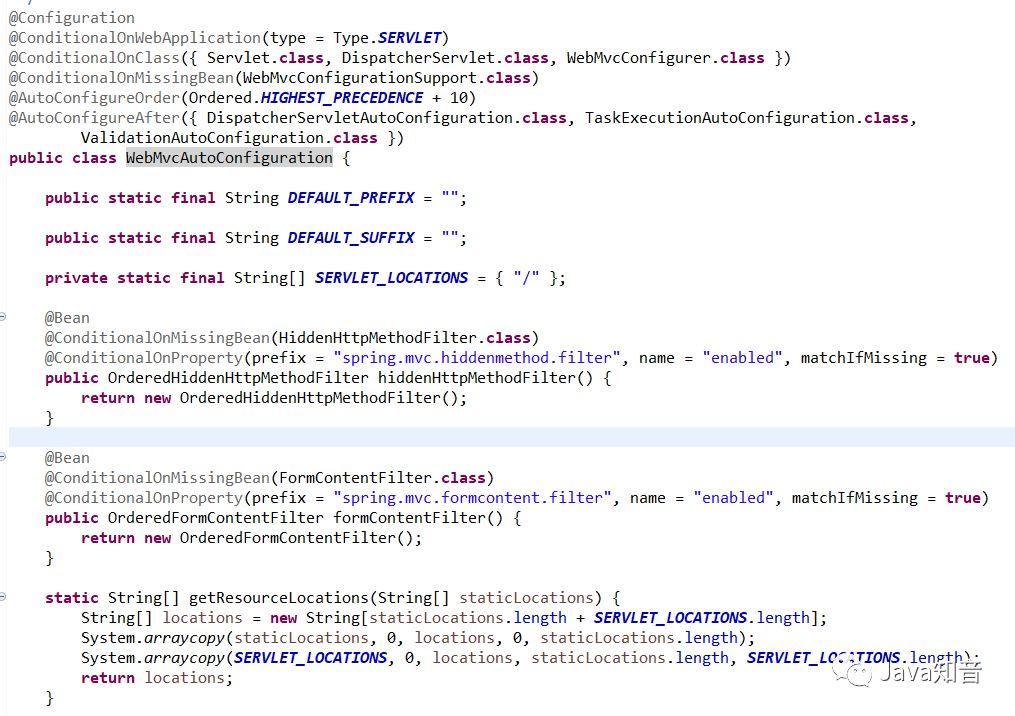
Here are all the configuration of WebMvc, such as view parser, internationalization and so on.
After analysis, we can draw a complete conclusion:
When our Spring boot project starts, we will import AutoConfigurationImportSelector first. This class will help us select all the candidate configurations. The configurations we need to import are one configuration class written by SpringBoot for us. Then the location of these configuration classes exists in the META-INF/spring.factories file. Through this file, Spring can find The location of these configuration classes, and the configuration is loaded.
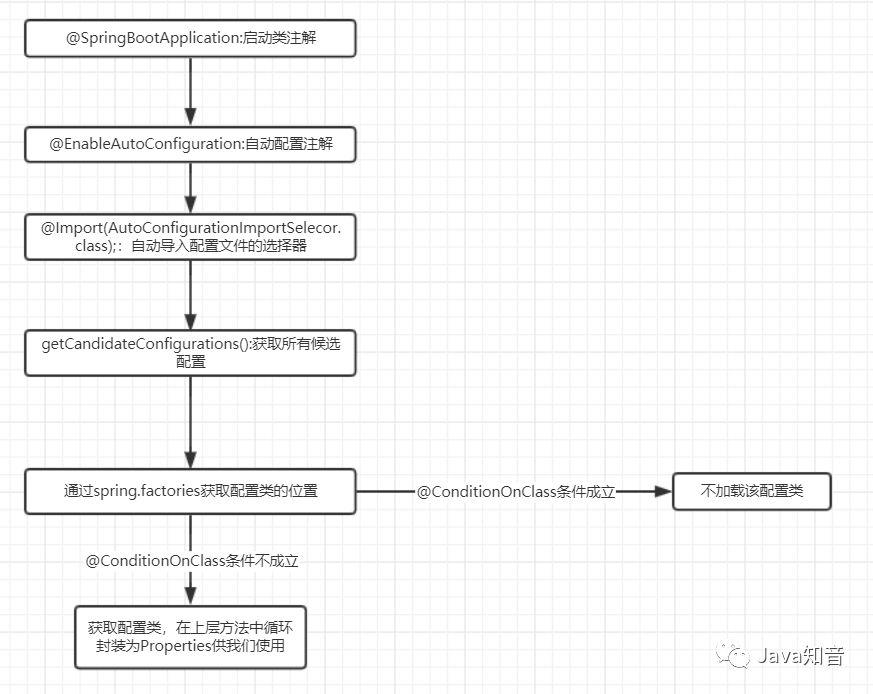
See here, some students may have questions. There are so many configurations in spring.factories. Do they load them in full every time they start? This is obviously unrealistic.
This is actually where I have doubts when I look at the source code, because one of the annotations is not commonly used. We can see it by clicking on a configuration class.

@ConditionalOnXXX: if all the conditions are met, the class will take effect.
Therefore, when loading the auto configuration class, it is not to load all the configuration of spring.factories, but through the judgment of this annotation, if all the classes in the annotation exist, it will be loaded.
So it's implemented: we add state starter in pom.xml file, and spring boot automatically configures it. Out of the box.
conclusion
Spring boot scans and loads all auto configuration classes at startup. You can find the path of auto configuration classes through spring.factories, but not all the configurations existing in spring and factories are loaded. Instead, you can judge whether the conditions are true by @ ConditionalOnClass annotation (as long as you import the corresponding state, the conditions are true). If the conditions If it is set up, the configuration class will be loaded; otherwise, the configuration class will not be loaded.
Here is a process that I think is easy to understand:
-
When SpringBoot starts, it gets the value specified by EnableAutoConfiguration from META-INF/spring.factories in the classpath
-
Import these values into the container as auto configuration classes, and the auto configuration classes will take effect to help us with auto configuration;
-
In the past, we needed to configure our own things, and auto configuration classes helped us to solve them
-
The whole J2EE solution and automatic configuration are in the jar package of springboot autoconfigure;
-
It returns all the components that need to be imported in the way of full class name, and these components will be added to the container;
-
It will import a lot of automatic configuration classes (xxxAutoConfiguration) into the container, that is, it will import all the components required by this scenario into the container, and configure these components;
-
With the automatic configuration class, we can write configuration injection function components manually;
From https://blog.kuangstudy.com/index.php/archives/630/
Convention is greater than configuration
The principle of out of the box use is finished. It's easy to understand that the Convention is larger than the configuration. In fact, convention is greater than configuration, which is the details of automatic configuration in out of the box use. The specific point is: which directory should our configuration file (. yml) be placed in, the naming specification of the configuration file, the Bean scanned when the project starts, the default configuration of the component (such as the view parser of spring MVC), and so on, can be called conventions. Let's talk about the "conventions" in spring boot .
The Convention of maven directory structure
We can go to Spring's official website to check the official documents and see what the directory structure described in the documents is like.
Config locations are searched in reverse order. By default, the configured locations are classpath:/,classpath:/config/,file:./,file:./config/. The resulting search order is the following:
-
file:./config/
-
file:./
-
classpath:/config/
-
classpath:/
In other words, the spring configuration file directory can be placed in the
-
/config
-
/ (root directory)
-
resource/config/
-
resource/
The four paths have priority relationship from top to bottom.
Spring boot default configuration file Convention
Spring boot can load the following three configuration files by default:
-
application.yml
-
application.yaml
-
application.properties
The first two are recommended as configuration files for your project.
Conventions for scanning package scope at project startup
The default rule for annotation scanning of SpringBoot is the package and its subpackages where the entry class of SpringBoot is located.
If the package where the entry class is located is cn.objectspace.demo, the scope of the auto scan package is cn.objectspace.demo package and its sub packages. If the service package and dao package are not in this scope, the auto scan will not be performed.
How to read yml configuration from SpringBoot auto configuration class
Understand autoconfiguration in more detail
In the above, we have explained some principles of spring boot auto configuration. We are looking at the whole process of auto configuration from a global perspective. For example, where to start the assembly process, how to find the assembly package, etc.
Now let's close our perspective to SpringBoot and talk about how the configuration in application.yml is configured into configuration classes one by one.
What can be configured in the yml configuration file
First of all, we need to know the answer to this question. We should get used to the configuration of springboot. In the above, we explained that springboot always presents all configurations in the form of JavaConfig, which can make the code more elegant.
So what is configured in YML must be related to this configuration mode. What we configure in application.yml is usually some attributes that exist in the auto configuration class. How are these auto configuration classes found when they are started?
If you remember the description above, you can know it very clearly: spring.factories! Yes, it is, so we seem to get the answer to this question - as long as it exists in spring.factories, we can configure it in application.yml.
Of course, this doesn't mean that we can't configure those configuration classes that don't exist. We can customize these configuration classes. As long as we write the configuration class, we can configure the property values we need in yml, and then read the configuration file directly in the configuration class to map it to the properties of the configuration class. So it involves our question: how does the configuration class read the information in the yml configuration file?
@ConfigurationProperties
Understand the problem. First of all, we need to understand the function of this annotation.
We can try to define some properties in application.yml by ourselves, as follows:
object:
  name: Object
  blogurl: blog.objectspace.cn
Now we define a class to read this file:
@Component
@ConfigurationProperties(prefix = "object")
public class TestConfig {
    private String name;
    private String blogUrl;
    public String getName() {
        return name;
    }
    public void setName(String name) {
        this.name = name;
    }
    public String getBlogUrl() {
        return blogUrl;
    }
    public void setBlogUrl(String blogUrl) {
        this.blogUrl = blogUrl;
    }
}
Then we output the following object in the test class:
@SpringBootTest
class SpringbootdemoApplicationTests {
    @Autowired
    TestConfig testConfig;
    @Test
    void contextLoads() {
        System.out.println(testConfig.getName());
        System.out.println(testConfig.getBlogUrl());
    }

}
Test results:
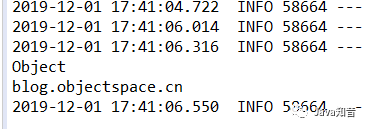
As we can see, the property values we configured in yml are output in the console, but these values are not injected explicitly into this object anywhere.
So @ ConfigurationProperties annotation can inject the values written in the yml file into the properties of our class.
If you understand its function, you can understand the working principle of auto configuration class.
We still choose the automatic configuration class of spring MVC. Let's see what's in it.
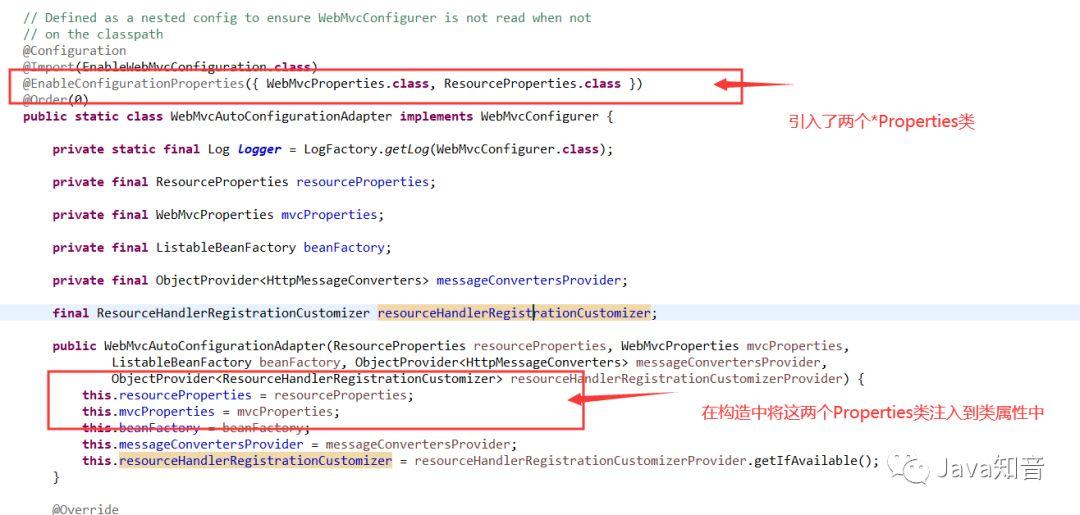
Click any * Properties class and look at the following:
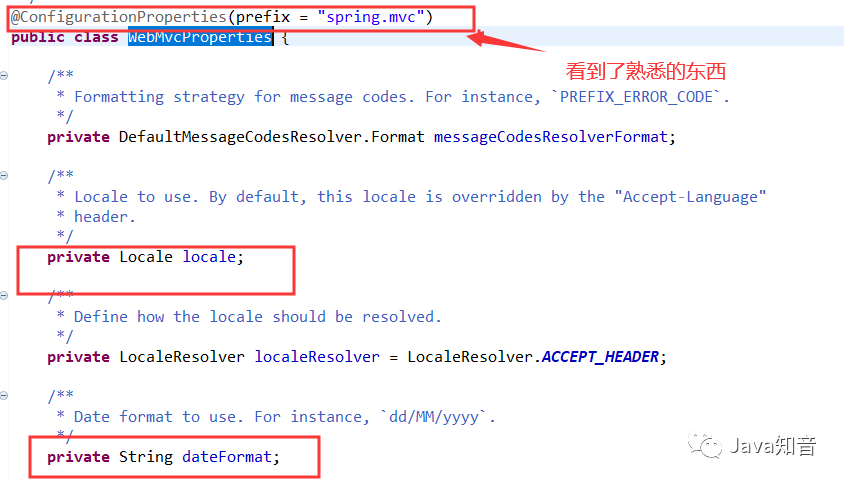
Seeing that everyone here understands, let's take mvc configuration as an example.
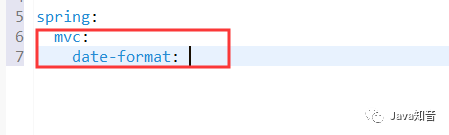
The date format we configured in yml can be mapped to the dateFormat in the class through @ ConfigurationProperties, and then these properties can be configured to the configuration class through automatic configuration of the class.
Finally, welcome to the blog:
http://blog.objectspace.cn/