@[toc]
Spring Boot sends emails. Brother song has written articles before, so I won't be wordy here. If you don't understand how Spring Boot sends email, turn to the second half of this article for an introduction.
Today, I want to talk to you about the port of SMTP server. This is also a question raised by a small partner. SMTP server has many ports: 25, 465 and 587. What is the difference between them? Can I use it at will? I hope today's article can give you an answer.
1. What is SMTP
SMTP stands for simple mail transfer protocol. In short, it is the process of sending e-mail through the Internet. Computer port is a way for personal computers to connect to the network and complete data transmission. An SMTP port is a combination of the two: a port designed to send e-mail to its recipients over the network.
The following figure shows the role of SMTP protocol in the mail sending process:
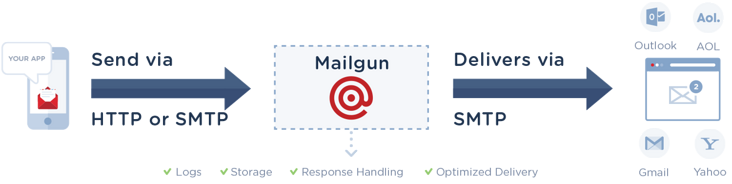
Of course, just as there are multiple computer ports, there are many SMTP ports that can be used.
2. SMTP Port
2.1 25
In 1982, the University of Southern California submitted a proposal to the Internet Engineering Task Force (IETF), Request For Comments (RFC) 821, which established port 25 as the default transmission channel of Internet e-mail. After 40 years, we can still use port 25 to transfer mail between two mail servers.
However, the initial design did not consider security issues. In December 1998, R. gelens and J. Klensin submitted RFC2476. In this specification, RFC proposed to separate the traditional message submission and message relay concepts. RFC defined that message submission should be carried out through port 587 (that is, when we submit mail through tools such as mail client, we should use port 587), To ensure that new policies and security requirements do not interfere with traditional relay traffic on message relay port 25.
In this split, port 25 is mainly used for SMTP relay, that is, to transfer mail from one e-mail server to another e-mail server.
In most cases, SMTP e-Mail clients (Foxmail, Microsoft Outlook, Mail, Thunderbird, etc.) should not use port 25 to curb the amount of spam, so this port has little to do with our personal use.
2.2 587
This is the default mail submission port. When users submit an email to the mail server, they can use this port. We can also use this port to send mail through Java code.
Port 587, combined with TLS encryption, ensures secure e-mail submission and follows IETF guidelines.
2.3 465
It's reasonable to say that we should use port 587 when sending mail. What's 465?
IETF has never published port 465 as an official SMTP transport or submission port, but IANA, which maintains most of the core Internet infrastructure, assigns port 465 to SMTPS. The purpose is to establish a port for SMTP to operate with secure socket layer (SSL), which makes mail sending more secure.
Therefore, both 465 and 587 are for e-mail security, but their ideas are different. 465 is SSL and 587 is TLS. What's the difference between SSL and TLS? This is a long story. In a simple sentence, TLS (Transport Layer Security) is a more secure upgraded version of SSL, and TLS is the product of SSL standardization.
It is reasonable to say that 465 should be revoked and everyone uses 587. However, since 465 has been recognized as valid by IANA, there may be legacy systems that can only use this port to connect, so this port has not been abandoned and can also be used.
2.4 summary
Well, that's the difference between these ports. Generally speaking, when we use Spring Boot to send email, 465 and 587 can be used, but 25 is not recommended. In addition, when using 465 or 587, some individual mailboxes, such as 139 mailbox, need to be configured with the following properties:
spring.mail.properties.mail.smtp.ssl.enable=true
3. Extra
There may be some friends who don't understand Spring Boot email sending. Let's review it again.
Email sending is actually a very common requirement. It is used in user registration, password retrieval and other places. The steps of sending email using JavaSE code are still very cumbersome. Spring Boot provides relevant automatic configuration classes for email sending, which makes email sending very easy. Next, let's find out! Take a look at the 5 poses for sending mail using Spring Boot.
3.1 email Foundation
We often hear all kinds of mail protocols, such as SMTP, POP3 and IMAP. What are the functions and differences of these protocols? Let's discuss this problem first.
SMTP is an application layer protocol based on TCP/IP. Its status is a bit similar to HTTP. The default listening port number of SMTP server is 25. Seeing this, my friends may think that since SMTP protocol is an application layer protocol based on TCP/IP, can I also send an email through Socket? The answer is yes.
In life, we have to go through the following steps to deliver an email:
- Xiao Wang from Shenzhen first delivered the mail to the post office in Shenzhen
- The post office in Shenzhen delivers mail to the post office in Shanghai
- Xiao Zhang from Shanghai came to the post office to pick up the mail
This is a reduced version of the email sending process in life. These three steps can correspond to our mail sending process respectively, assuming that aaa@qq.com Send mail to 111@163.com :
- aaa@qq.com First deliver the mail to Tencent's mail server
- Tencent's mail server delivers our mail to Netease's mail server
- 111@163.com Log in to Netease's mail server to view mail
Mail delivery is roughly this process, which involves multiple protocols. Let's take a look at them respectively.
The full name of SMTP protocol is Simple Mail Transfer Protocol, which is translated into Simple Mail Transfer Protocol. It defines the communication rules between mail client software and SMTP server, and between SMTP server and SMTP server.
in other words aaa@qq.com Users first deliver mail to Tencent's SMTP server, which uses the SMTP protocol. Then Tencent's SMTP server delivers mail to Netease's SMTP server, which still uses the SMTP protocol. The SMTP server is used to receive mail.
The full name of POP3 protocol is Post Office Protocol, which is translated into Post Office Protocol. It defines the communication rules between mail client and POP3 server. Under what scenario will this protocol be used? When the mail arrives at Netease's SMTP server, 111@163.com Users need to log in to the server to view the mail. This protocol is used at this time: the mail service provider will provide special mail storage space for each user. After receiving the mail, the SMTP server will save the mail to the mail storage space of the corresponding user. If users want to read the mail, they need to complete it through the POP3 mail server of the mail service provider.
Finally, some friends may have heard of IMAP protocol, which is an extension of POP3 protocol with stronger functions and similar functions. I won't repeat it here.
3.2 preparation
At present, most domestic email service providers are not allowed to directly use the user name / password to send email in the code. They all need to apply for the authorization code first. Here, take QQ email as an example to demonstrate the application process of the authorization code: first, we need to log in to the QQ email web page and click the setting button above:

Then click the Account tab:

Find the option to enable POP3/SMTP in the Account tab, as follows:
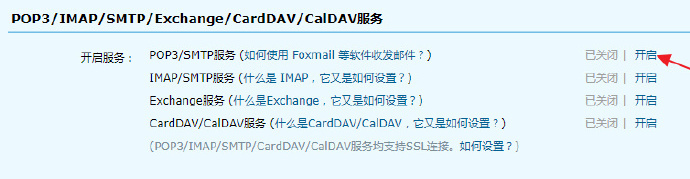
Click open to open the relevant functions. The opening process requires mobile phone number verification. You can operate according to the steps without repeating. After successful opening, you can obtain an authorization code and save the number for later use.
3.3 project creation
Next, we can create the project. In Spring Boot, an automatic configuration class is provided for mail sending. Developers only need to add relevant dependencies and configure the basic information of the mailbox to send mail.
- First, create a Spring Boot project and introduce mail sending dependency:
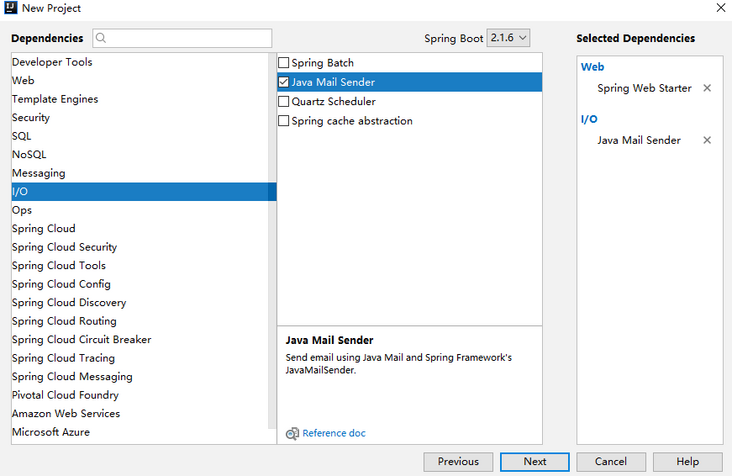
After creation, the project dependencies are as follows:
<dependency>
    <groupId>org.springframework.boot</groupId>
    <artifactId>spring-boot-starter-mail</artifactId>
</dependency>
<dependency>
    <groupId>org.springframework.boot</groupId>
    <artifactId>spring-boot-starter-web</artifactId>
</dependency>- Configure basic mailbox information
After the project is successfully created, the next step is in application Basic information of configuring mailbox in properties:
spring.mail.host=smtp.qq.com
spring.mail.port=587
spring.mail.username=1510161612@qq.com
spring.mail.password=ubknfzhjkhrbbabe
spring.mail.default-encoding=UTF-8
spring.mail.properties.mail.smtp.socketFactoryClass=javax.net.ssl.SSLSocketFactory
spring.mail.properties.mail.debug=true
The meanings of configuration are as follows:
- Configure SMTP server address
- Port of SMTP server
- Configure mailbox user name
- Configure the password. Note that it is not the real password, but the authorization code just applied for
- Default message code
- Accessories SSL encryption factory
- Indicates that the DEBUG mode is enabled. In this way, the log of mail sending process will be printed on the console to facilitate troubleshooting
If you don't know the port or address of the smtp server, you can refer to the email document of Tencent
After doing this, Spring Boot will automatically help us configure the mail sending class. The relevant configuration is at org springframework. boot. autoconfigure. mail. In the mailsenderautoconfiguration class, part of the source code is as follows:
@Configuration
@ConditionalOnClass({ MimeMessage.class, MimeType.class, MailSender.class })
@ConditionalOnMissingBean(MailSender.class)
@Conditional(MailSenderCondition.class)
@EnableConfigurationProperties(MailProperties.class)
@Import({ MailSenderJndiConfiguration.class, MailSenderPropertiesConfiguration.class })
public class MailSenderAutoConfiguration {
}
From this code, you can see that another configuration MailSenderPropertiesConfiguration class is imported, which provides tool classes related to mail sending:
@Configuration
@ConditionalOnProperty(prefix = "spring.mail", name = "host")
class MailSenderPropertiesConfiguration {
        private final MailProperties properties;
        MailSenderPropertiesConfiguration(MailProperties properties) {
                this.properties = properties;
        }
        @Bean
        @ConditionalOnMissingBean
        public JavaMailSenderImpl mailSender() {
                JavaMailSenderImpl sender = new JavaMailSenderImpl();
                applyProperties(sender);
                return sender;
        }
}
As you can see, an instance of JavaMailSenderImpl is created here. JavaMailSenderImpl is an implementation of JavaMailSender. We will use JavaMailSenderImpl to complete mail sending.
After the above two steps are completed, the preparation for e-mail sending is completed, and then you can send e-mail directly.
There are five different ways to send, let's look at them one by one.
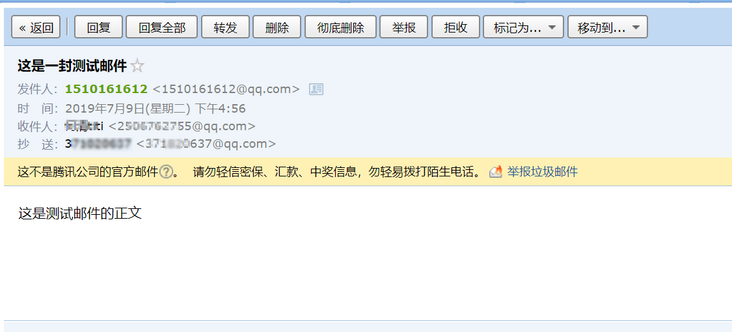
3.3.1 send simple email
Simple mail means that the mail content is an ordinary text document:
@Autowired
JavaMailSender javaMailSender;
@Test
public void sendSimpleMail() {
    SimpleMailMessage message = new SimpleMailMessage();
    message.setSubject("This is a test email");
    message.setFrom("1510161612@qq.com");
    message.setTo("25xxxxx755@qq.com");
    message.setCc("37xxxxx37@qq.com");
    message.setBcc("14xxxxx098@qq.com");
    message.setSentDate(new Date());
    message.setText("This is the body of the test message");
    javaMailSender.send(message);
}
From top to bottom, the code meanings are as follows:
- Build a mail object
- Set message subject
- Set mail sender
- Set mail recipients. You can have multiple recipients
- Set email CC person, and there can be multiple CC persons
- Set a secret CC person, which can have multiple
- Set mail sending date
- Set the body of the message
- Send mail
Finally, by executing this method, the mail can be sent. The sending effect diagram is as follows:
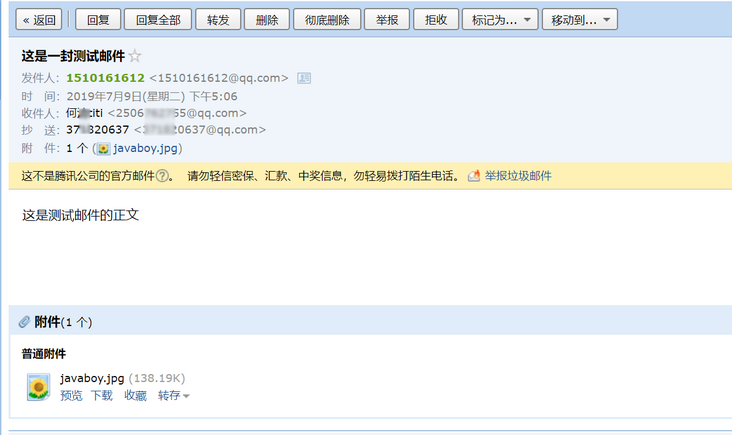
3.3.2 sending mail with attachments
Email attachments can be pictures or ordinary files, which are supported.
@Test
public void sendAttachFileMail() throws MessagingException {
    MimeMessage mimeMessage = javaMailSender.createMimeMessage();
    MimeMessageHelper helper = new MimeMessageHelper(mimeMessage,true);
    helper.setSubject("This is a test email");
    helper.setFrom("1510161612@qq.com");
    helper.setTo("25xxxxx755@qq.com");
    helper.setCc("37xxxxx37@qq.com");
    helper.setBcc("14xxxxx098@qq.com");
    helper.setSentDate(new Date());
    helper.setText("This is the body of the test message");
    helper.addAttachment("javaboy.jpg",new File("C:\\Users\\sang\\Downloads\\javaboy.png"));
    javaMailSender.send(mimeMessage);
}
Note that there are some differences between the construction of mail objects here and the previous text. Here is to obtain a complex mail object through javaMailSender, and then use MimeMessageHelper to configure the mail. MimeMessageHelper is an auxiliary tool class for mail configuration. When it is created, true means to build a multipart message type mail, After we have MimeMessageHelper, our mail configuration is done by MimeMessageHelper.
Finally, add an attachment through the addAttachment method.
Execute this method, and the email sending effect is as follows:
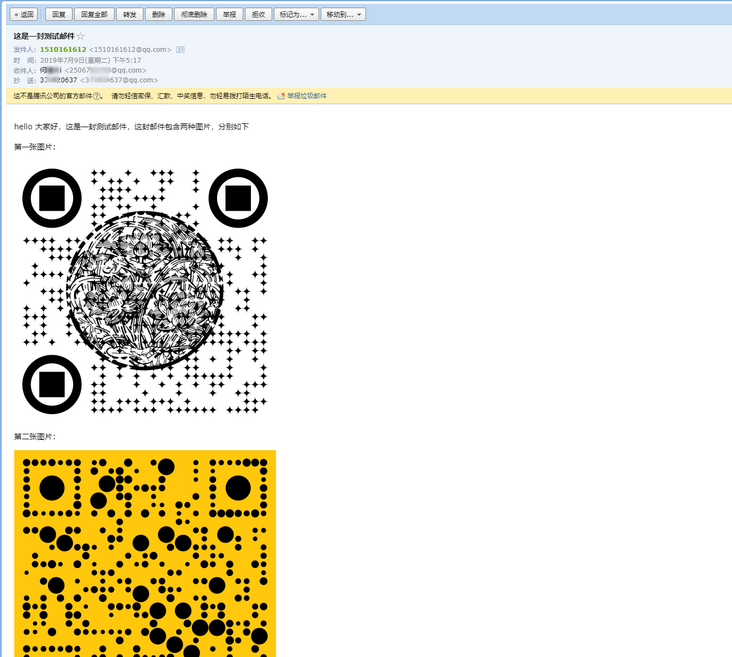
3.3.3 send email with picture resources
What's the difference between a picture and an attachment? Picture resources are placed in the body of the email, that is, as soon as you open the email, you can see the picture. However, generally speaking, this method is not recommended. Some companies will limit the size of email content (because this method sends pictures together).
@Test
public void sendImgResMail() throws MessagingException {
    MimeMessage mimeMessage = javaMailSender.createMimeMessage();
    MimeMessageHelper helper = new MimeMessageHelper(mimeMessage, true);
    helper.setSubject("This is a test email");
    helper.setFrom("1510161612@qq.com");
    helper.setTo("25xxxxx755@qq.com");
    helper.setCc("37xxxxx37@qq.com");
    helper.setBcc("14xxxxx098@qq.com");
    helper.setSentDate(new Date());
    helper.setText("<p>hello Hello everyone, this is a test email. This email contains two kinds of pictures, as follows:</p><p>First picture:</p><img src='cid:p01'/><p>Second picture:</p><img src='cid:p02'/>",true);
    helper.addInline("p01",new FileSystemResource(new File("C:\\Users\\sang\\Downloads\\javaboy.png")));
    helper.addInline("p02",new FileSystemResource(new File("C:\\Users\\sang\\Downloads\\javaboy2.png")));
    javaMailSender.send(mimeMessage);
}
The email text here is an HTML text. The image resources involved in it are first occupied by a placeholder. The second parameter true of the setText method means that the first parameter is an HTML text.
After setText, add image resources through the addInline method.
Finally, execute this method and send mail. The effect is as follows:
In the actual development of the company, neither the first nor the third is the most used email sending scheme. Because normally, the contents of e-mails are relatively rich, most e-mails are presented through HTML. If you directly splice HTML strings, it is difficult to maintain in the future. In order to solve this problem, generally, there will be corresponding e-mail templates when sending e-mails. The two most representative templates are Freemarker template and Thyemeleaf template.
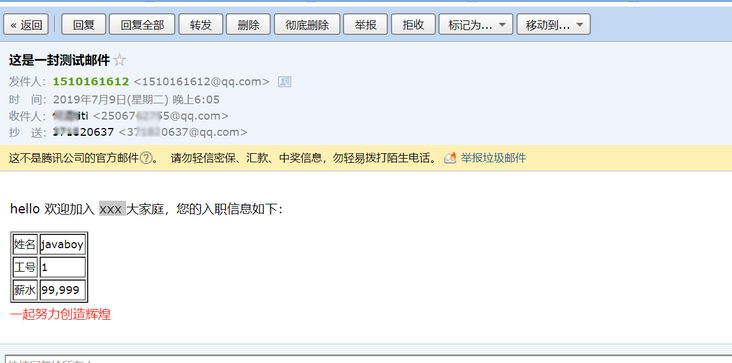
3.3.4 use Freemarker as email template
First, we need to introduce Freemarker dependency:
<dependency>
    <groupId>org.springframework.boot</groupId>
    <artifactId>spring-boot-starter-freemarker</artifactId>
</dependency>
Then create a mail in the resources/templates directory FTL as a mail sending template:
<!DOCTYPE html>
<html lang="en">
<head>
    <meta charset="UTF-8">
    <title>Title</title>
</head>
<body>
<p>hello Welcome to join xxx Big family, your entry information is as follows:</p>
<table border="1">
    <tr>
        <td>full name</td>
        <td>${username}</td>
    </tr>
    <tr>
        <td>Job number</td>
        <td>${num}</td>
    </tr>
    <tr>
        <td>salary</td>
        <td>${salary}</td>
    </tr>
</table>
<div style="color: #Ff1a0e "> work together to create brilliance < / div >
</body>
</html>
Next, render the mail template into HTML and send it.
@Test
public void sendFreemarkerMail() throws MessagingException, IOException, TemplateException {
    MimeMessage mimeMessage = javaMailSender.createMimeMessage();
    MimeMessageHelper helper = new MimeMessageHelper(mimeMessage, true);
    helper.setSubject("This is a test email");
    helper.setFrom("1510161612@qq.com");
    helper.setTo("25xxxxx755@qq.com");
    helper.setCc("37xxxxx37@qq.com");
    helper.setBcc("14xxxxx098@qq.com");
    helper.setSentDate(new Date());
    //Build the basic configuration of Freemarker
    Configuration configuration = new Configuration(Configuration.VERSION_2_3_0);
    // Configure template location
    ClassLoader loader = MailApplication.class.getClassLoader();
    configuration.setClassLoaderForTemplateLoading(loader, "templates");
    //Load template
    Template template = configuration.getTemplate("mail.ftl");
    User user = new User();
    user.setUsername("javaboy");
    user.setNum(1);
    user.setSalary((double) 99999);
    StringWriter out = new StringWriter();
    //Template rendering, the rendered result will be saved in out, and the html string in out can be sent
    template.process(user, out);
    helper.setText(out.toString(),true);
    javaMailSender.send(mimeMessage);
}
It should be noted that although the automatic configuration of Freemarker is introduced, we directly reconfigure Freemarker here with new Configuration, so the default configuration of Freemarker does not take effect here. Therefore, when filling in the template location, the value is templates.
Call this method to send mail. The effect diagram is as follows:
3.3.5 use Thymeleaf as email template
It is recommended to use Thymeleaf in Spring Boot to build mail templates. Because the automatic configuration of Thymeleaf provides a TemplateEngine, through which the Thymeleaf template can be easily rendered into HTML. At the same time, the automatic configuration of Thymeleaf continues to be effective here.
First, introduce Thymeleaf dependency:
<dependency>
    <groupId>org.springframework.boot</groupId>
    <artifactId>spring-boot-starter-thymeleaf</artifactId>
</dependency>
Then create a Thymeleaf mail template:
<!DOCTYPE html>
<html lang="en" xmlns:th="http://www.thymeleaf.org">
<head>
    <meta charset="UTF-8">
    <title>Title</title>
</head>
<body>
<p>hello Welcome to join xxx Big family, your entry information is as follows:</p>
<table border="1">
    <tr>
        <td>full name</td>
        <td th:text="${username}"></td>
    </tr>
    <tr>
        <td>Job number</td>
        <td th:text="${num}"></td>
    </tr>
    <tr>
        <td>salary</td>
        <td th:text="${salary}"></td>
    </tr>
</table>
<div style="color: #Ff1a0e "> work together to create brilliance < / div >
</body>
</html>
Next, send an email:
@Autowired
TemplateEngine templateEngine;

@Test
public void sendThymeleafMail() throws MessagingException {
    MimeMessage mimeMessage = javaMailSender.createMimeMessage();
    MimeMessageHelper helper = new MimeMessageHelper(mimeMessage, true);
    helper.setSubject("This is a test email");
    helper.setFrom("1510161612@qq.com");
    helper.setTo("25xxxxx755@qq.com");
    helper.setCc("37xxxxx37@qq.com");
    helper.setBcc("14xxxxx098@qq.com");
    helper.setSentDate(new Date());
    Context context = new Context();
    context.setVariable("username", "javaboy");
    context.setVariable("num","000001");
    context.setVariable("salary", "99999");
    String process = templateEngine.process("mail.html", context);
    helper.setText(process,true);
    javaMailSender.send(mimeMessage);
}
Call this method to send mail. The effect diagram is as follows:
Well, these are the five email sending postures we talked about today. I wonder if you have mastered them?
This case has been uploaded to GitHub: https://github.com/lenve/javaboy-code-samples.
If you have any questions, please leave a message for discussion.
reference material: