catalogue
3.1 backend springboot integration websocket
3.2 create a new configuration class and enable WebSocket support
3.3 create a new WebSocketServer server
3.5 write the access interface to imitate the message push of the server
3.6 object data pushed by the server (WebSocket sending object user defined Encoder)
1. Demand
The front and back ends realize real-time data transmission, and adopt the long connection mode websocket
Front end vue project, back-end Springboot
2. Principle
WebSocket is a protocol for full duplex communication over a single TCP connection. WebSocket communication protocol was defined as standard RFC 6455 by IETF in 2011 and supplemented by RFC7936. The WebSocket API is also standardized by W3C.
WebSocket makes the data exchange between the client and the server easier, and allows the server to actively push data to the client. In the WebSocket API, the browser and server only need to complete a handshake, and they can directly create a persistent connection and conduct two-way data transmission.
2.1 handshake agreement:
WebSocket is an independent protocol created on TCP.
Websocket handshakes through the 101 status code of HTTP/1.1 protocol.
In order to create a Websocket connection, you need to send a request through the browser, and then the server responds. This process is usually called "handshaking".
2.2 advantages
advantage:
- Less control overhead. After the connection is created, when data is exchanged between the server and the client, the header of the data packet used for protocol control is relatively small. Without extension, the header size of server to client content is only 2 to 10 bytes (related to the packet length); For client to server content, this header also needs to be masked with an additional 4 bytes. This overhead is significantly reduced compared to the fact that HTTP requests carry a complete header every time.
- More real-time. Because the protocol is full duplex, the server can actively send data to the client at any time. Compared with the HTTP request, the server needs to wait for the client to initiate the request before responding, and the delay is significantly less; Even compared with Comet and other similar long polling, it can transfer data more times in a short time.
- Keep connected. Unlike HTTP, Websocket needs to create a connection first, which makes it a stateful protocol. After that, some state information can be omitted during communication. HTTP requests may need to carry status information (such as identity authentication) in each request.
- Better binary support. Websocket defines binary frames, which can handle binary content more easily than HTTP.
- Can support extension. Websocket defines extensions. Users can extend the protocol and implement some customized sub protocols. For example, some browsers support compression.
- Better compression effect. Compared with HTTP compression, Websocket can use the context of previous content with appropriate extension support, and can significantly improve the compression rate when transmitting similar data.
3. Steps
3.1 backend springboot integration websocket
Integrating websocket into gradle
    implementation 'org.springframework.boot:spring-boot-starter-web'
    implementation 'org.springframework.boot:spring-boot-starter-websocket'
New socket configuration, enable web2.3
WebSocketConfig.java
package com.trgis.config;

import org.springframework.boot.autoconfigure.condition.ConditionalOnWebApplication;
import org.springframework.context.annotation.Bean;
import org.springframework.context.annotation.Configuration;
import org.springframework.web.socket.server.standard.ServerEndpointExporter;

/**
 * Enable WebSocket support
 **/
@Configuration
@ConditionalOnWebApplication
public class WebSocketConfig  {

    //This bean needs to be injected when using boot built-in tomcat
    @Bean
    public ServerEndpointExporter serverEndpointExporter() {
        return new ServerEndpointExporter();
    }

}
3.3 create a new WebSocketServer server
WebSocket.java
@ServerEndpoint("/websocket")
@Component
@Slf4j
public class WebSocket {
    //The connection session with a client needs to send data to the client through it
    private Session session;

    //The thread safe Set of concurrent package is used to store the WebSocket object corresponding to each client.
    private static  CopyOnWriteArraySet<WebSocket> webSocketSet=new CopyOnWriteArraySet<>();

    /**
     *  Connection established successfully
     * @param session
     */
    @OnOpen
    public void onOpen(Session session){
        this.session=session;
        webSocketSet.add(this);
      log.info("[websocket [message] new connections, total{}",webSocketSet.size());
    }

    /**
     * Connection closed
     */
    @OnClose
    public void onClose(){
        this.session=session;
        webSocketSet.remove(this);
        log.info("[websocket [message] disconnected, total{}",webSocketSet.size());
    }

    /**
     * Receive client messages
     * @param message
     */
    @OnMessage
    public void onMessage(String message){
        log.info("[websocket Message] received a message from the client:{}",message);
    }

    /**
     * send message
     * @param message
     */
    public void sendMessage(String message){
        log.info("[websocket [message] send message:{}",message);
        for (WebSocket webSocket:webSocketSet){
            try {
                webSocket.session.getBasicRemote().sendText(message);
            } catch (IOException e) {
                e.printStackTrace();
            }
        }
    }
}
@ServerEndpoint annotation is a class level annotation. Its main function is to define the current class as a websocket server. The value of the annotation will be used to listen to the access URL address of the terminal connected by the user.
The OnOpen and OnClose methods are annotated by @ OnOpen and @ OnClose, respectively. They define the methods that are called when a new user connects and disconnects.
The OnMessage method is annotated by @ OnMessage. This annotation defines the method called when the server receives the message sent by the client.
Use onMessage() to receive messages from front-end users.
Send a message to the front-end user with sendMessage().
Note that @ ServerEndpoint("/websocket") is the url when you connect. If the back end is 192.168.1.88:9997, the front end websocket connection url is written as: ws:http://192.168.1.88:9997/websocket
3.4 front end
<template>
<div class="Task">
<div class="" style="height: 100px;width: 100px;color: #fff;" >
<button @click="close()">Close connection</button>
<input type="text" id="name" v-model="message"/><button @click="send()">send message</button>
</div>
</div>
</template>
<script>
import {baseURL} from 'src/const/config'
export default {
name: "Task",
data(){
return{
baseURL,
websock: null,
message: "",
}
},
mounted() {
this.initWebSocket()
},
methods:{
initWebSocket(){ //Initialize weosocket
const wsuri = 'ws://192.168.1.88:9997/websocket';//ws address
this.websock = new WebSocket(wsuri);
this.websock.onopen = this.websocketonopen;
this.websock.onerror = this.websocketonerror;
this.websock.onmessage = this.websocketonmessage;
this.websock.onclose = this.websocketclose;
},
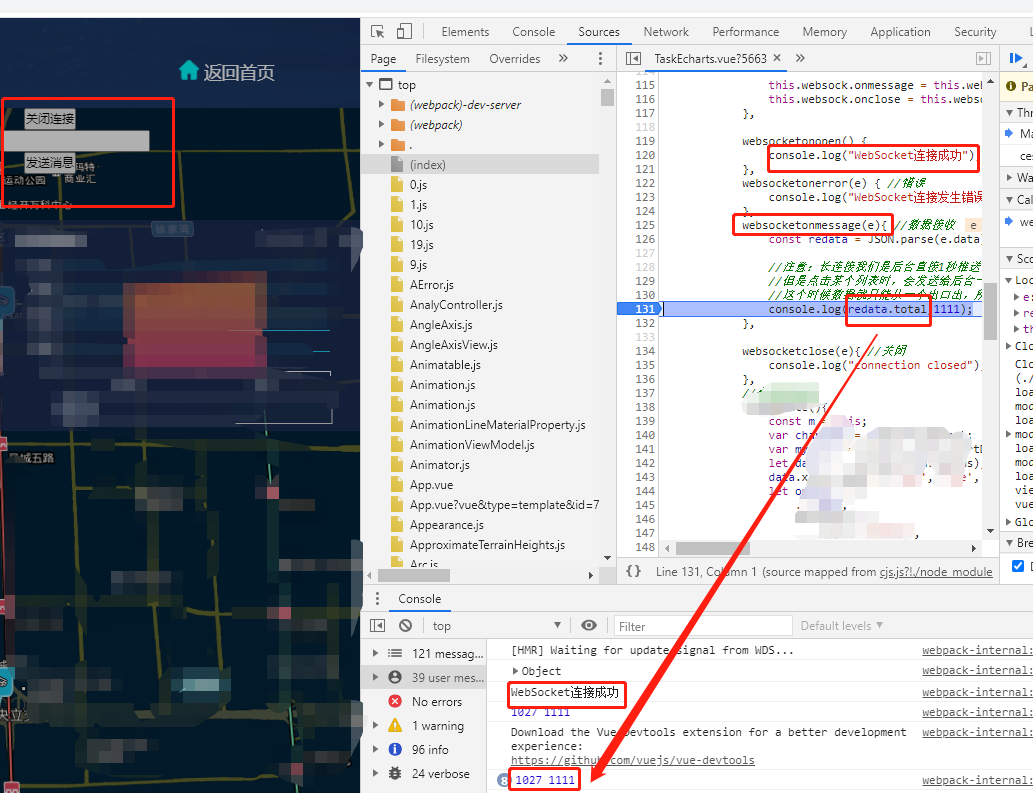
websocketonopen() {
console.log("WebSocket Connection successful");
websocket.send(""WebSocket Connection successful");//send message
},
websocketonerror(e) { //error
console.log("WebSocket Connection error");
},
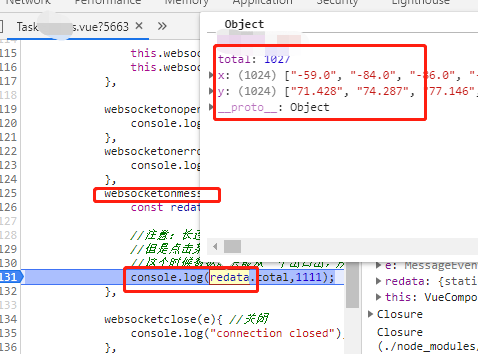
websocketonmessage(e){ //Data receiving
const redata = JSON.parse(e.data);//Receiving object
//Note: for long connection, we push a piece of data directly in one second in the background,
//However, when clicking a list, it will send an identification to the background, and the background will return the corresponding data according to this identification,
//At this time, the data can only be exported from one exit, so a key is added in the background. For example, when the key is 1, it is the data pushed every 1 second, and when it is 2, it is the data pushed after sending the identification for differentiation
console.log(redata.total,1111);
},
websocketclose(e){ //close
console.log("connection closed");
},
close(){
// this.websocketclose();
this.websock.onclose;
},
send(){
this.websock.send(message);
},
},
destroyed: function() {
//Close long connection when page is destroyed
this.websocketclose();
},
}
</script>
<style scoped lang="less">
</style>
3.5 write the access interface to imitate the message push of the server
/**
     * Send scene simulation
     * @param msg
     * @return
     */
    @GetMapping("/send")
    @ResponseBody
    public String sendMessage(String msg) {
        //If the msg parameter in the accessed address is not null, send the msg value to the front end
        if (!StringUtils.isEmpty(msg)) {
            webSocket.sendMessage(msg);
            return "Message sent by the server:" + msg;
        }
        return "Message not sent by the server:" + msg;
    }
3.6 object data pushed by the server (WebSocket sending object user defined Encoder)
The Websocket sends the object through the Encoder custom rules (converted to JSON string), and the front end receives it and then converts it to JSON object
3.6.1 custom Encoder
package com.trgis.config;
import com.alibaba.fastjson.JSON;
import com.trgis.vo.SocketVO;

import javax.websocket.Encoder;
import javax.websocket.EndpointConfig;
import java.util.Map;

public class WebSocketCustomEncoding implements Encoder.Text<SocketVO> {
    @Override
    public String encode(SocketVO vo) {
        assert vo!=null;
        return JSON.toJSONString(vo);
    }

    @Override
    public void init(EndpointConfig endpointConfig) {

    }
    @Override
    public void destroy() {

    }

}
3.6.2 SocketVo
package com.trgis.vo;

import io.swagger.annotations.ApiModelProperty;
import lombok.AllArgsConstructor;
import lombok.Data;
import lombok.NoArgsConstructor;

import java.util.ArrayList;

/**
 * @PackageName: com.trgis.vo
 * @ClassName: socketVO
 * @Author: zoe
 * @Date: 2021/4/9 0013 11:02
 * @Description:  socket Object passed to the front end
 */
@Data
@AllArgsConstructor
@NoArgsConstructor
public class SocketVO {
    @ApiModelProperty("name")
    private String name;

    @ApiModelProperty("Total number")
    private Integer total;

    @ApiModelProperty("x")
    private  ArrayList<String>  x;

    @ApiModelProperty("y")
    private ArrayList<String>  y;
}
3.6.3 sending custom objects via websocket
Specify endpoints at @ ServerEndpoint
Modify the WebSocket The @ ServerEndpoint in WebSocket in Java and the SendMessage (socketvo) method are added to represent the return object
@ServerEndpoint(value = "/websocket",encoders = WebSocketCustomEncoding.class)
@Component
@Slf4j
public class WebSocket {

    /**
     * Add send message object mode
     * @param vo
     */
    public void sendMessage(SocketVO vo){
        log.info("[websocket [message] send message:{}",vo);
        for (WebSocket webSocket:webSocketSet){
            try {
                webSocket.session.getBasicRemote().sendObject(vo);
            } catch (IOException | EncodeException e) {
                e.printStackTrace();
            }
        }
    }
}
If you do not specify endpoints in @ ServerEndpoint, send the object directly through sendObject(Object o),
Will report javax websocket. Encodeexception: no encoder specified for object of class XXXX exception
Call modification in 3.6.4Controll
/**
     * Send scene simulation
     * @param msg
     * @return
     */
    @GetMapping("/send")
    @ResponseBody
    public String sendMessage(String msg) {
        //If the msg parameter in the accessed address is not null, send the msg value to the front end
        if (!StringUtils.isEmpty(msg)) {
            //webSocket.sendMessage(msg);
          SocketVO vo = new SocketVO();
          vo.setX("x");
          vo.setY("y");
          vo.setName(msg);
          vo.setTotal(10);
          socket.sendMessage(vo);
            return "Message sent by the server:" + msg;
        }


        return "Message not sent by the server:" + msg;
    }
3.7 results
4 Abnormal
Possible errors and precautions:
Check the new # WebSocket("ws://localhost:9997/websocket"); Whether the path of is correct, whether it starts with ws: / /, and whether the port corresponds correctly
Whether the url is consistent with the back-end configuration, whether the words are spelled correctly, and whether the guide package is correct
Whether the front and rear ends are occupied repeatedly
Is the gradle Guide Package correct
Whether tomcat uses version 7 or above. It is recommended to use tomcat 8 and the newer spring boot version
Whether the backend configuration file is injected into spring
Are interceptors set