Principle: what predecessors said is ready
1. Transaction management
1.1 distributed transactions
For a separate SpringBoot project, the way to manage transactions is generally to add the annotation @ EnableTransactionManagement in the configuration class, start the transaction manager, and then add the annotation @ Transactional on the methods that operate on the database and need to add transactions, and use dynamic agents to enhance the code of the business class.
However, for distributed projects, when microservice A calls microservice B, when microservice B throws an exception and rolls back the transaction, microservice A cannot detect the exception of service B. therefore, service A can still succeed in the case of service B failure, which can not ensure the consistency of global transactions.
1.2 introduction to Seata
seata (Simple Extensible Autonomous Transaction Architecture) is a set of open-source micro service architecture distributed transaction solution of Alibaba, which has zero code intrusion and simple integration into the project.
1.3 distributed transaction lifecycle
- TM applies to TC to start a global transaction. TC generates a common XID and returns it to TM
- TM transfers XID once through the execution chain of the transaction, ensuring that the methods of the same XID are in one transaction
- The RM that gets XID registers with TC as a local transaction branch. The business of each branch executes normally and writes an undo message opposite to the current sql_ Log, used for rollback after exception
- After the current business is executed, RM will report the local transaction status to TC: commit / rollback
- When the call ends, the pointer returns to TM, and TM will inform TC that all branch transactions have been processed
- The TC sends instructions to each branch RM according to the status reported by the local branch under the communication XID
- When all RM S are submitted, the instruction is to delete undo_log
- When at least one RM reports rollback, all RMS execute undo_log operation, delete after completion
2. seata integration steps
2.1 download seata
Download address: https://github.com/seata/seata/releases
2.2 modify configuration
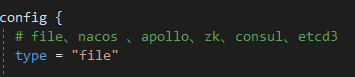
-
registry.conf file

- You can select a variety of registration methods. Select file to enter file for configuration, and select nacos to enter nacos for configuration
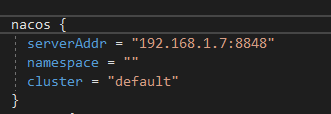
- Configuration, use file for local configuration
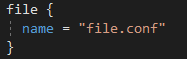
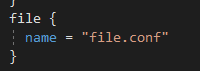
-
file.conf file
-
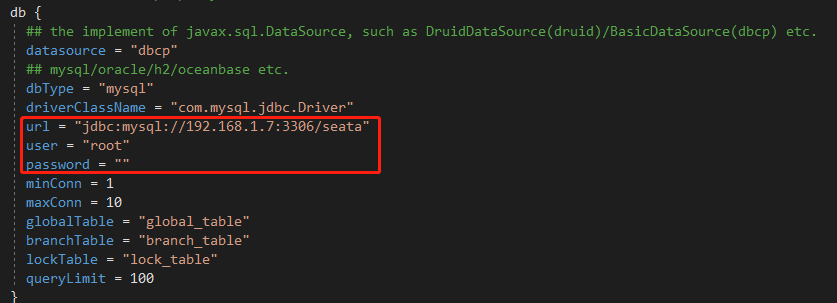
You can use either the file mode or the database mode. The file mode can be used directly, and the db mode needs to configure the database
![\[External chain picture transfer failed,The origin station may have anti-theft chain mechanism,It is recommended to save the picture and upload it directly(img-4YGV3KLK-1627546909734)(C:\Users\Administrator\AppData\Roaming\Typora\typora-user-images\image-20210729154302150.png)\]](https://img-blog.csdnimg.cn/0d9fc0c97229412588cd5fa7a0ea0472.png)
-
Using file configuration does not require changing settings
-
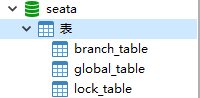
To use db configuration, you need to set the database address and add database tables_ store. Just import the database created by SQL
-
-
Start bin / seata service Bat, seata starts normally
2.3 transformation of spring cloud project
-
Introducing seata dependency
<dependency> <groupId>com.alibaba.cloud</groupId> <artifactId>spring-cloud-alibaba-seata</artifactId> <version>2.1.0.RELEASE</version> <exclusions> <exclusion> <artifactId>seata-all</artifactId> <groupId>io.seata</groupId> </exclusion> </exclusions> </dependency> <dependency> <groupId>io.seata</groupId> <artifactId>seata-all</artifactId> <!--This version and downloaded seata Version matching--> <version>1.1.0</version> </dependency> -
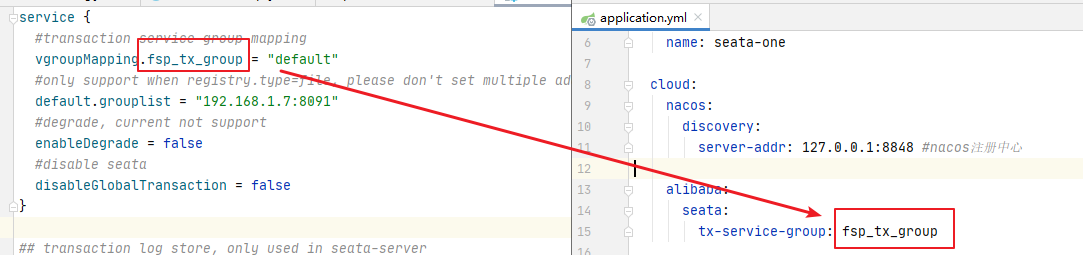
Modify yml configuration
server: port: 8085 spring: application: name: seata-one cloud: nacos: discovery: server-addr: 127.0.0.1:8848 alibaba: seata: tx-service-group: fsp_tx_group #Add tx transaction group name, and file Conf correspondence datasource: driver-class-name: com.mysql.jdbc.Driver url: jdbc:mysql://192.168.1.7:3306/seata-one?serverTimezone=GMT username: root password: type: com.alibaba.druid.pool.DruidDataSource mybatis-plus: mapper-locations: classpath:cn/qiuming/mapper/*Mapper.xml dubbo: scan: base-packages: cn.qiuming.dubbo.api protocol: name: dubbo port: 19991 cloud: subscribed-services: seata-two registry: address: spring-cloud://192.168.1.7 -
Copy file Conf and registry Conf file to the resources directory, and modify the file The transaction group name of the conf file is consistent with that in yml

-
Customize the configuration class of the DataSource, and give the DataSource to seata for management
import com.alibaba.druid.pool.DruidDataSource;
import com.baomidou.mybatisplus.plugins.OptimisticLockerInterceptor;
import com.baomidou.mybatisplus.plugins.PaginationInterceptor;
import com.baomidou.mybatisplus.spring.MybatisSqlSessionFactoryBean;
import io.seata.rm.datasource.DataSourceProxy;
import org.apache.ibatis.plugin.Interceptor;
import org.apache.ibatis.session.SqlSessionFactory;
import org.mybatis.spring.SqlSessionFactoryBean;
import org.mybatis.spring.transaction.SpringManagedTransactionFactory;
import org.springframework.beans.factory.annotation.Value;
import org.springframework.boot.context.properties.ConfigurationProperties;
import org.springframework.context.annotation.Bean;
import org.springframework.context.annotation.Configuration;
import org.springframework.context.annotation.Primary;
import org.springframework.core.io.support.PathMatchingResourcePatternResolver;

import javax.sql.DataSource;
import java.util.ArrayList;

@Configuration
public class DataSourceConfiguration {

    @Value("${mybatis-plus.mapper-locations}")
    //@Value("${mybatis.mapper-locations}")
    private String mapperLocations;

    @Bean
    @ConfigurationProperties("spring.datasource")
    public DataSource druidDataSource(){
        return new DruidDataSource();
    }

    @Bean
    public MybatisSqlSessionFactoryBean sqlSessionFactoryBean(DataSourceProxy dataSourceProxy) throws Exception {
        MybatisSqlSessionFactoryBean factory = new MybatisSqlSessionFactoryBean();
        //SqlSessionFactoryBean factory = new SqlSessionFactoryBean();
        factory.setDataSource(dataSourceProxy);
        factory.setMapperLocations(new PathMatchingResourcePatternResolver().getResources(mapperLocations));
        //Transaction management factory
        factory.setTransactionFactory(new SpringManagedTransactionFactory());
        return factory;
    }

    @Bean
    public DataSourceProxy dataSource() {
        return new DataSourceProxy(druidDataSource());
    }
}
Note: if you are using mybatis plus configured as above, if you are using mybatis, use the comment section
-
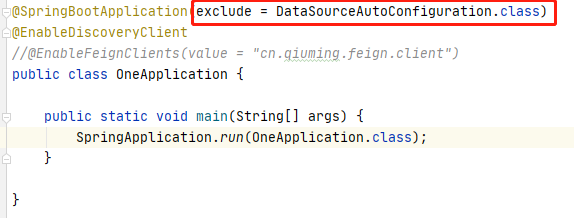
Exclude automatic assembly of datasource on startup class
-
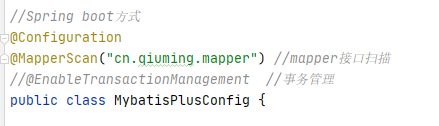
Comment out the transaction management annotation of the single service
-
Add undo to the database integrated with seata_ Log table. The sql of this table is in the seata/config folder
-
Add the annotation @ GlobalTransactional on the method that needs to open the global transaction. The called method does not need to
Note: this integration is required in all places where global transactions are used (except for seata installation)
2.4 testing the global transaction of seata
Three interfaces can be prepared in service A and service B respectively
- Service A success() service B success()
- Service A success() service B error()
- Service A error() service B success()
1 successfully added data, 2 and 3 failed to roll back, and the test was successful!