1, The architecture process is as follows:
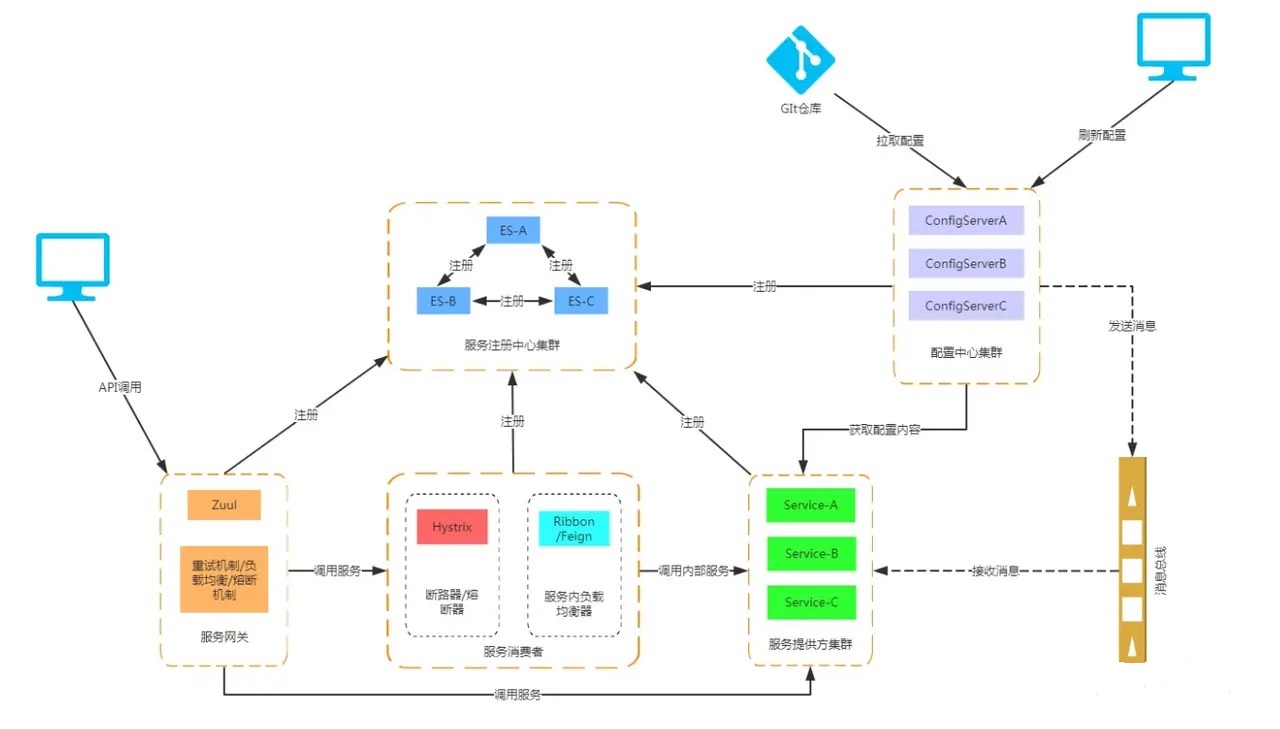
2, Create a service registry (server)
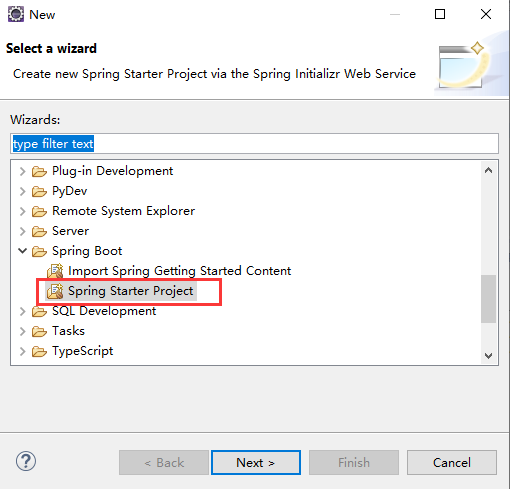
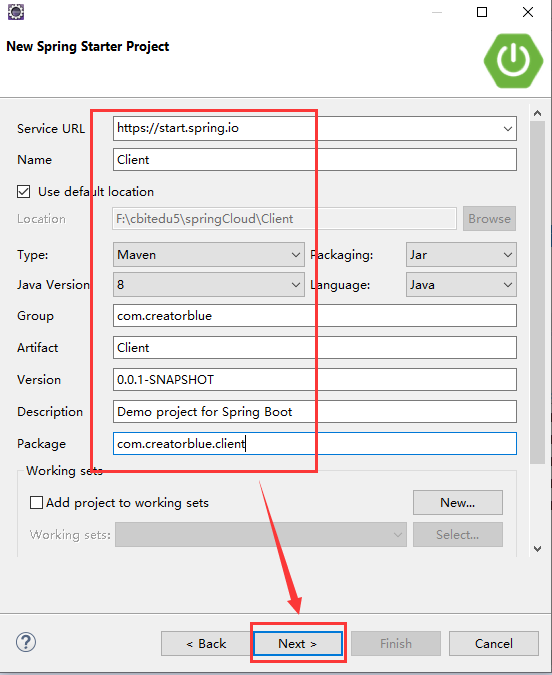
1. Select "New", select "Spring Boot" - "Spring Starter Project" in the dialog box, and click "Next"
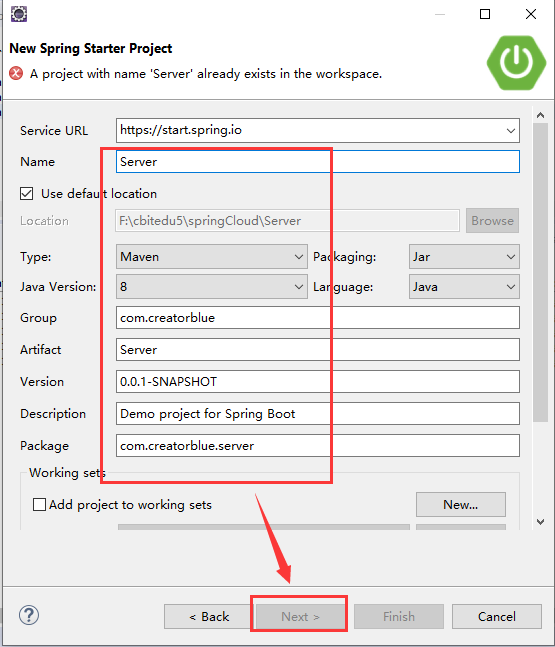
2. Fill in the following contents in the "New Spring Starter Project" dialog box and click "Next"
3. Check the "Eureka Server" plug-in
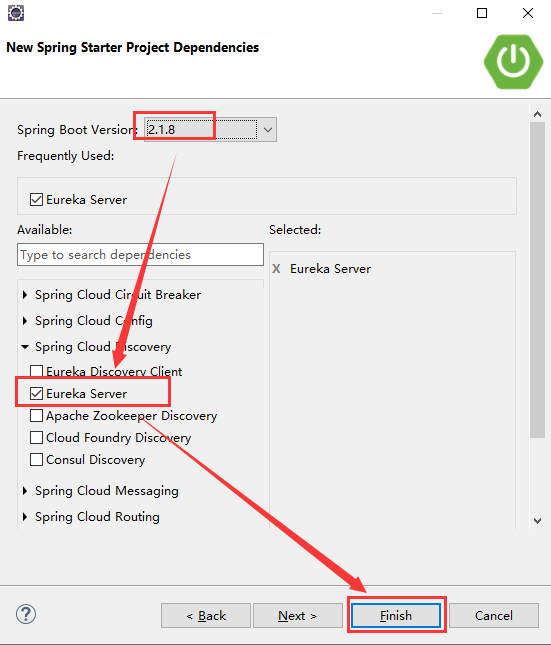
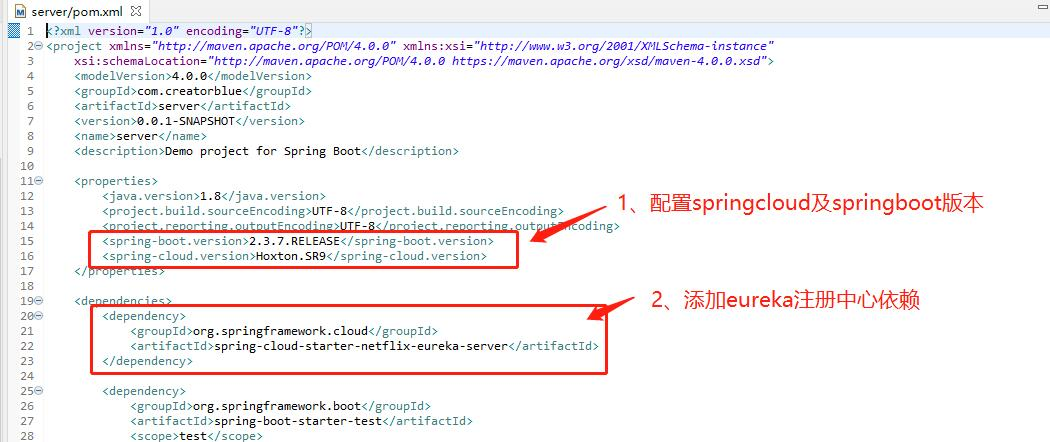
If it is not checked, it will be displayed in POM Add Eureka server dependency package to XML file
<properties>
        <java.version>1.8</java.version>
        <project.build.sourceEncoding>UTF-8</project.build.sourceEncoding>
        <project.reporting.outputEncoding>UTF-8</project.reporting.outputEncoding>
        <spring-boot.version>2.3.7.RELEASE</spring-boot.version>
        <spring-cloud.version>Hoxton.SR9</spring-cloud.version>
    </properties>

        <dependency>
            <groupId>org.springframework.cloud</groupId>
            <artifactId>spring-cloud-starter-netflix-eureka-server</artifactId>
        </dependency>
4. By default, the service registry will also try to register itself as a client, so we need to disable its client registration behavior, just in application Add the following configuration in properties:
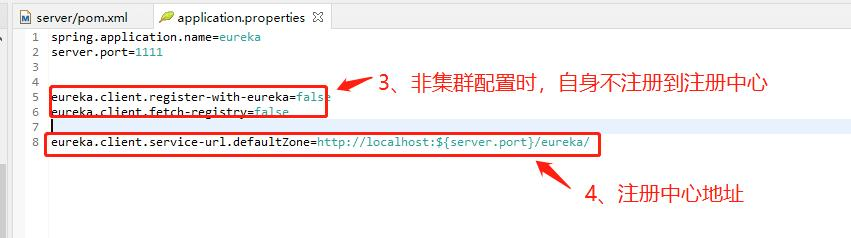
spring.application.name=server

server.port=1111

eureka.client.register-with-eureka=false
eureka.client.fetch-registry=false
eureka.client.serviceUrl.defaultZone=http://localhost:${server.port}/eureka/
5. Start a service registry through the @ EnableEurekaServer annotation and provide it to other applications for dialogue
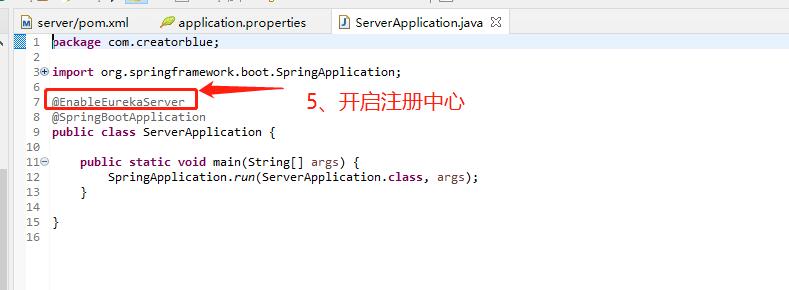
//Start switch
@EnableEurekaServer
6. After starting the project, visit: http://localhost:1111/ , you can see that there is no service on the page at this time

3, Create a service provider (Client)
1. Create a project named Client
2. Check Eureka Discovery Client and springWeb plug-ins
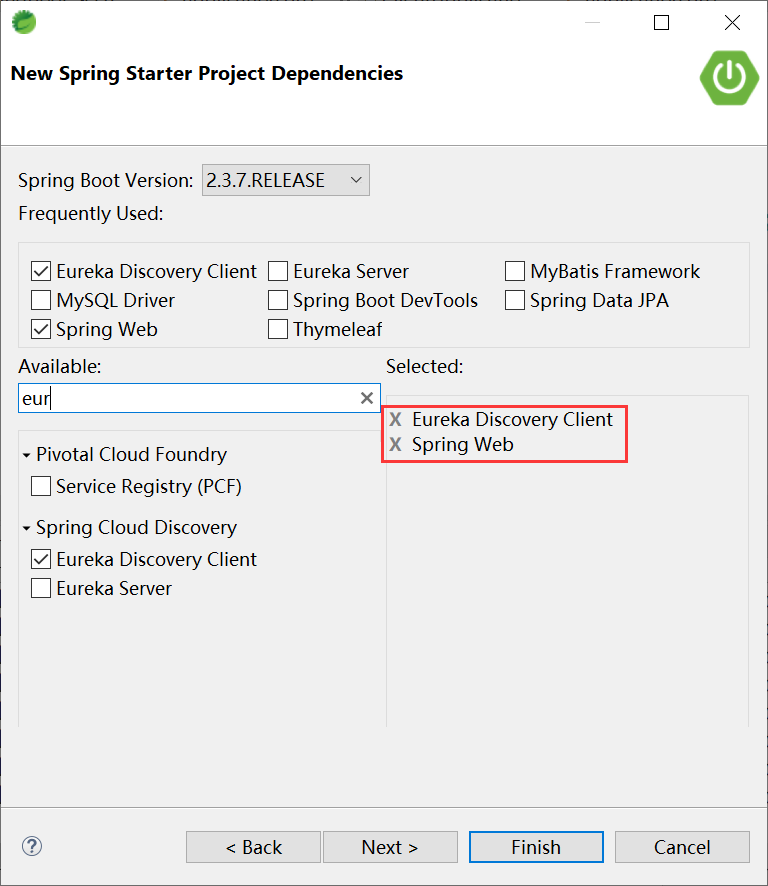
If it is not checked, it will be displayed in POM Add Eureka client dependency package to XML file
<properties>
        <java.version>1.8</java.version>
        <project.build.sourceEncoding>UTF-8</project.build.sourceEncoding>
        <project.reporting.outputEncoding>UTF-8</project.reporting.outputEncoding>
        <spring-boot.version>2.3.7.RELEASE</spring-boot.version>
        <spring-cloud.version>Hoxton.SR9</spring-cloud.version>
    </properties>

<dependency>
            <groupId>org.springframework.boot</groupId>
            <artifactId>spring-boot-starter-web</artifactId>
        </dependency>
        <dependency>
            <groupId>org.springframework.cloud</groupId>
            <artifactId>spring-cloud-starter-netflix-eureka-client</artifactId>
        </dependency>
Click fish to finish!
3. Create a Ctroller class, implement the / add request processing interface, and print the relevant contents of the service instance in the log through the DiscoveryClient object.
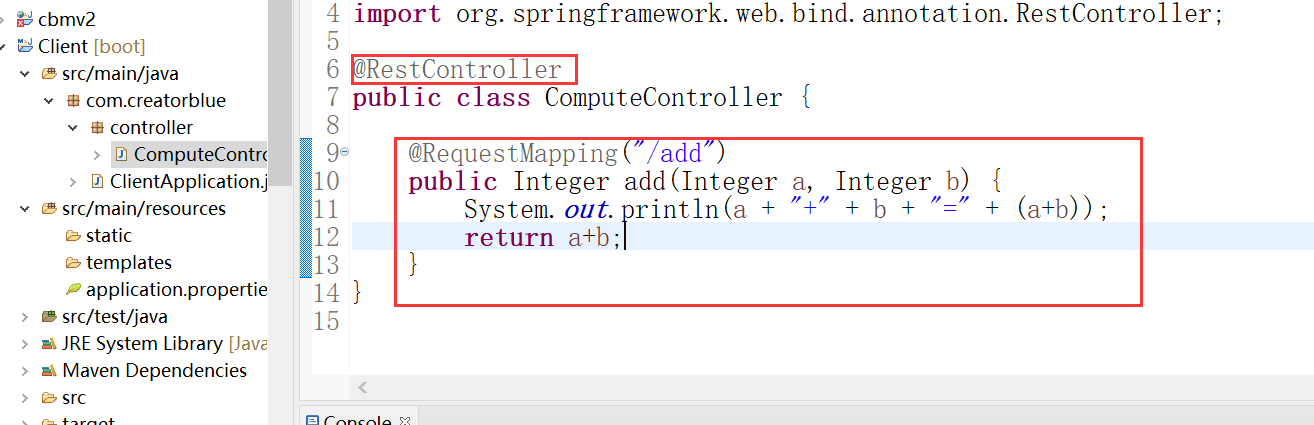
@RestController
public class ComputeController {

	@RequestMapping("/add")
	public Integer add(Integer a, Integer b) {
		System.out.println(a + "+" + b + "=" + (a+b));
		return a+b;
	}
}
4. Add the @ EnableDiscoveryClient annotation in the main class, which can activate the implementation of DiscoveryClient in Eureka, so as to realize the output of service information in the Controller.
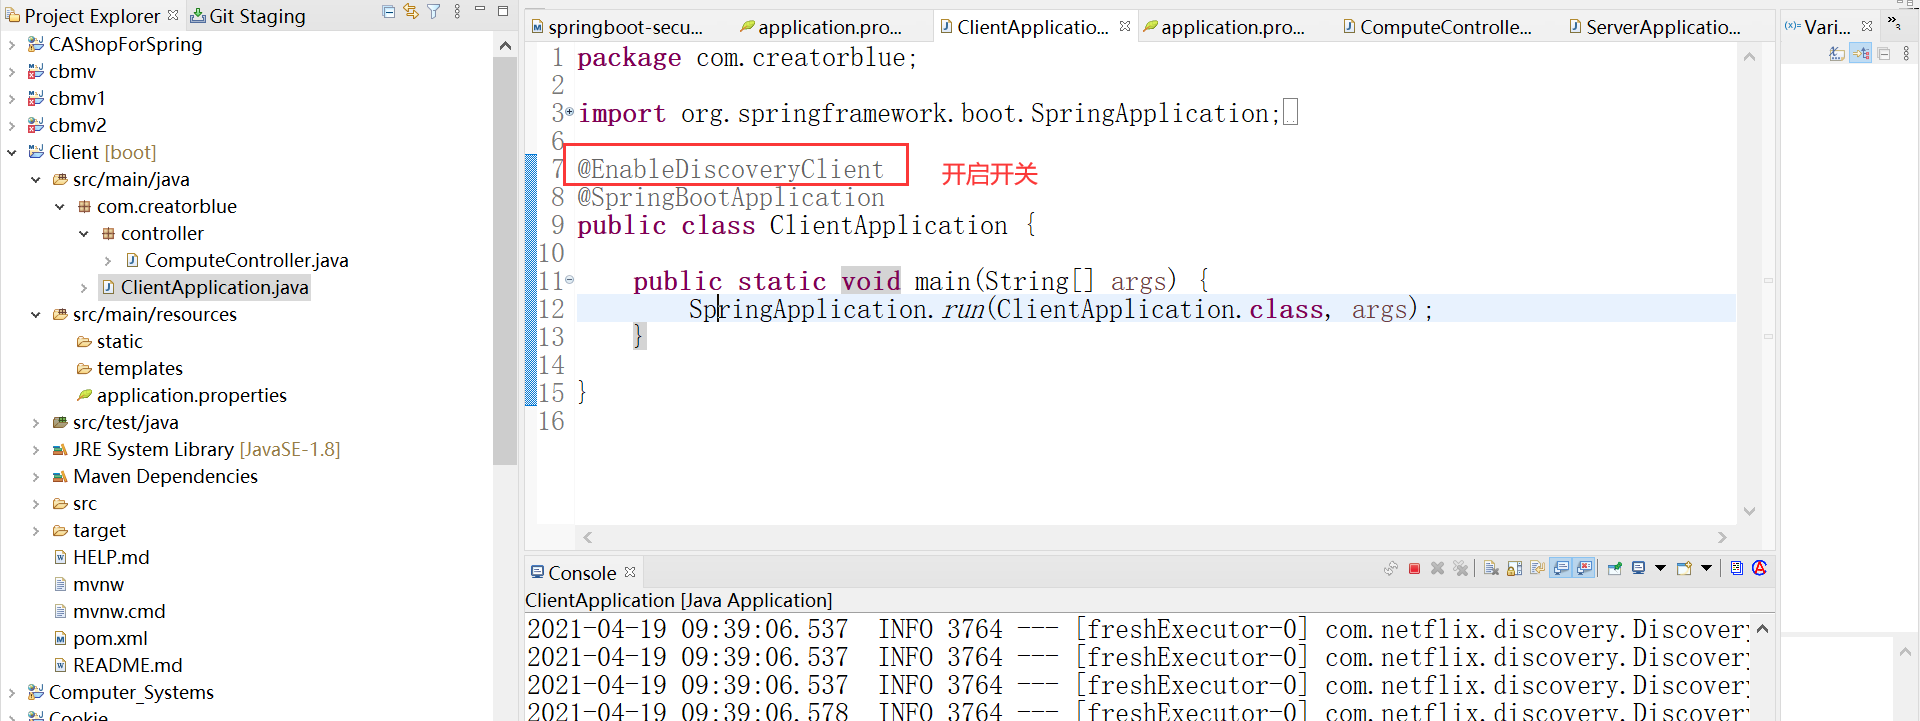
@EnableDiscoveryClient
@SpringBootApplication
public class ClientApplication {
    public static void main(String[] args) {
        SpringApplication.run(ClientApplication.class, args);
    }
}
5. After completing the implementation of the service content, continue with the application Properties do some configuration work, as follows:
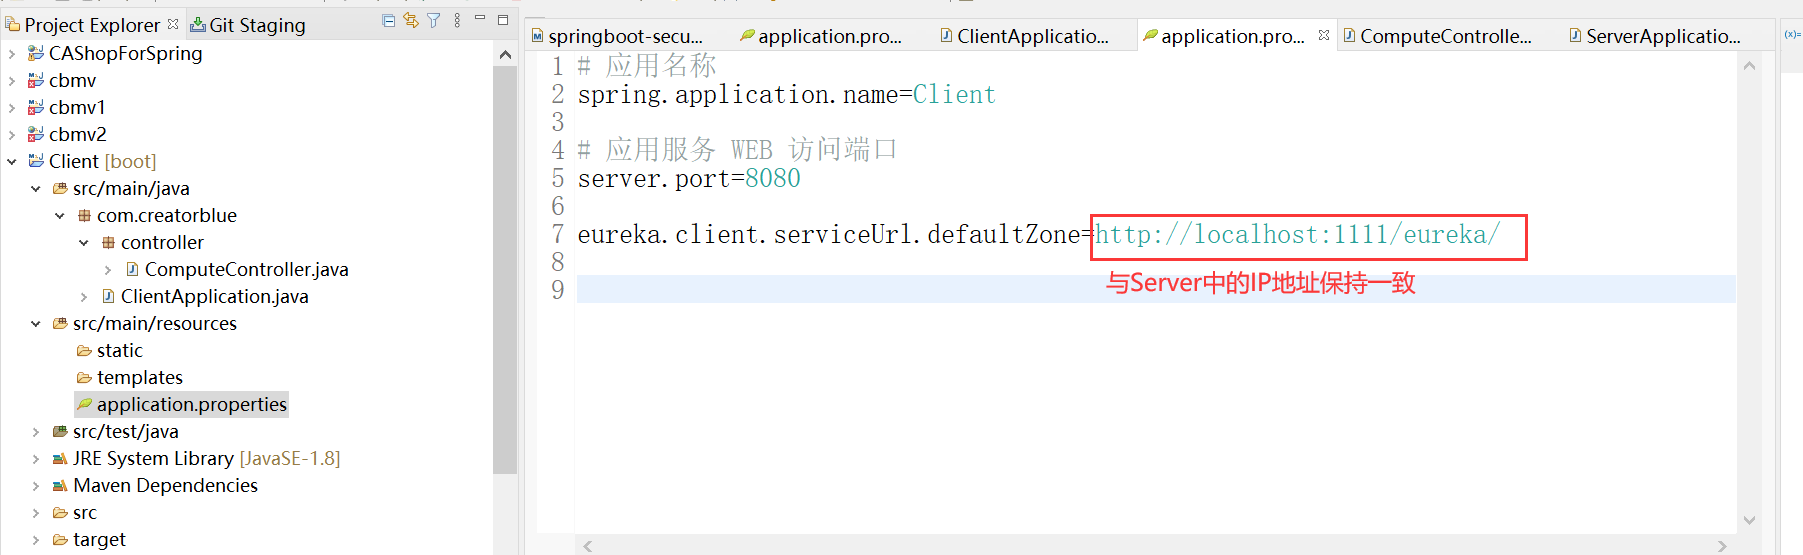
# apply name
spring.application.name=Client
# Application service WEB access port
server.port=8080

eureka.client.serviceUrl.defaultZone=http://localhost:1111/eureka/
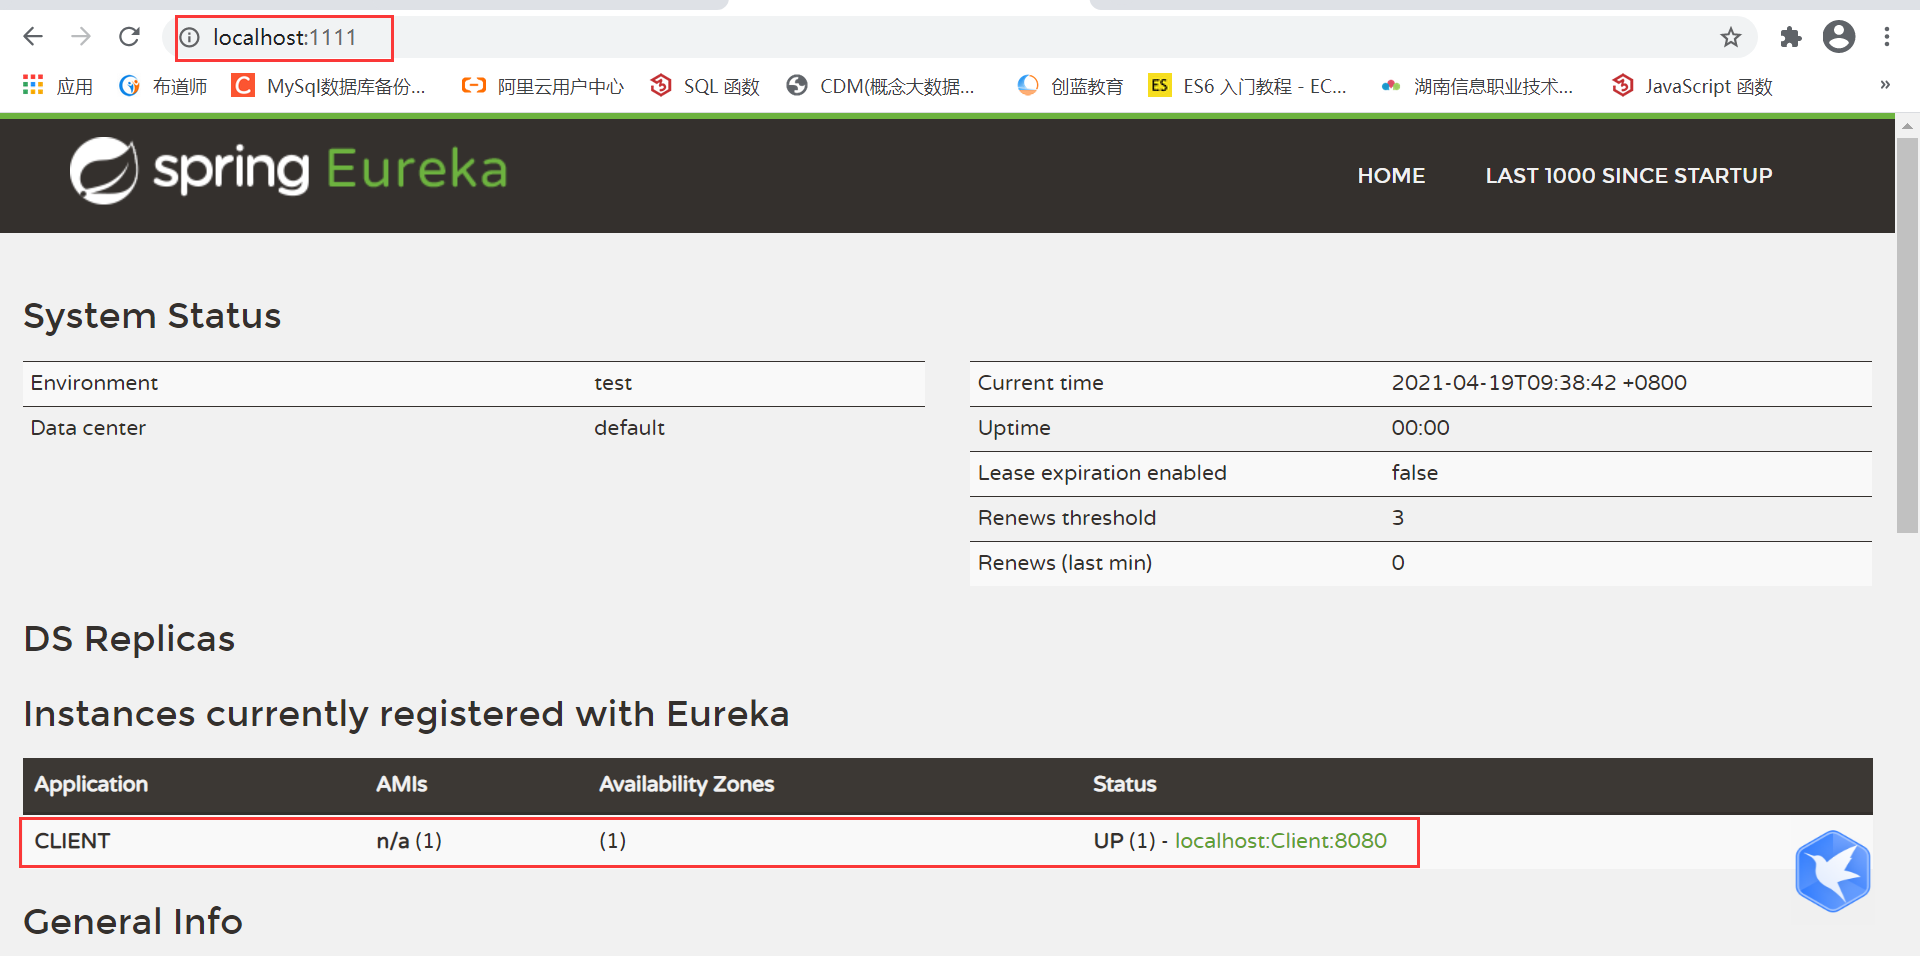
6. After starting the project, visit again: http://localhost:1111/ , the following interface is successful!
4, Consumers who use Ribbon(Ribbon is a load balancer based on HTTP and TCP clients) and Feign (Feign is a declarative Web Service client, which makes it easier to write a Web Service client) to achieve client load balancing
preparation:
Start service registry: server
Start the service provider: Client. At the same time, start the ports in the two clients. The server ports are 8081 and 8082
Access at this time: http://localhost:1111/
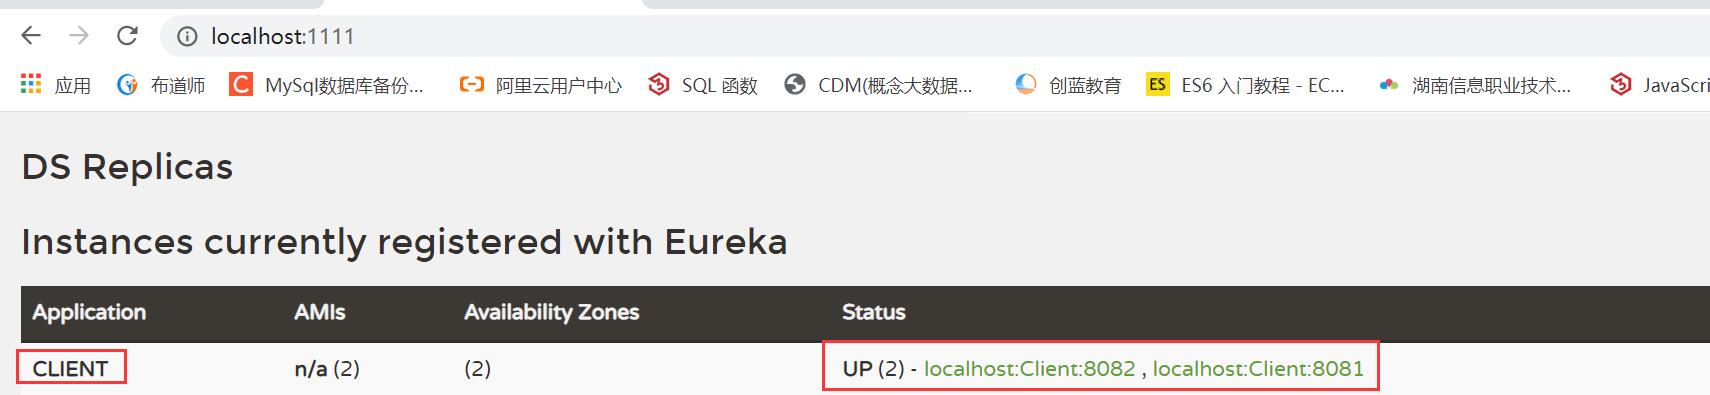
At this point, 2 ports are started
4.1. Use Ribbon to realize load balancing
1. Create a new Spring Starter Project
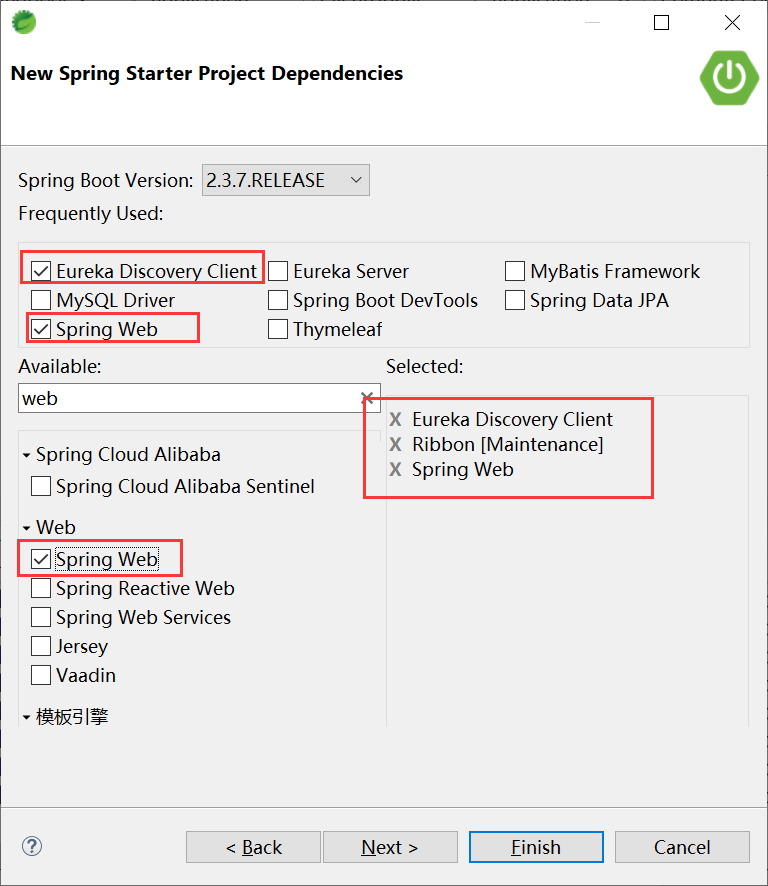
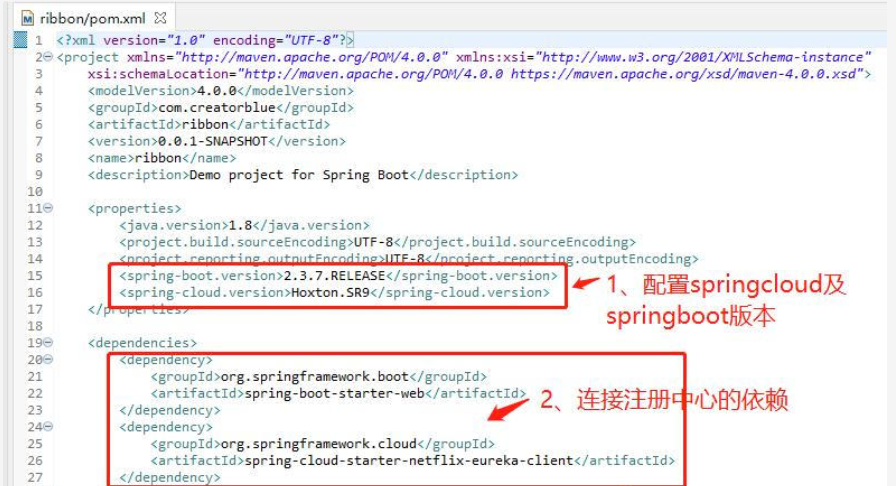
If it is not checked, it will be displayed in POM Add dependency package to XML file
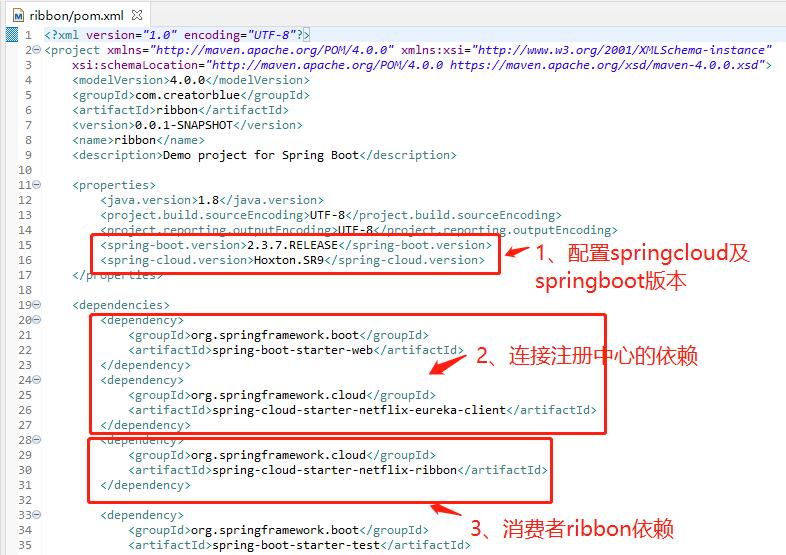
   <properties>
        <java.version>1.8</java.version>
        <project.build.sourceEncoding>UTF-8</project.build.sourceEncoding>
        <project.reporting.outputEncoding>UTF-8</project.reporting.outputEncoding>
        <spring-boot.version>2.3.7.RELEASE</spring-boot.version>
        <spring-cloud.version>Hoxton.SR9</spring-cloud.version>
    </properties>

       <dependency>
            <groupId>org.springframework.boot</groupId>
            <artifactId>spring-boot-starter-web</artifactId>
        </dependency>
        <dependency>
            <groupId>org.springframework.cloud</groupId>
            <artifactId>spring-cloud-starter-netflix-eureka-client</artifactId>
        </dependency>
        <dependency>
            <groupId>org.springframework.cloud</groupId>
            <artifactId>spring-cloud-starter-netflix-ribbon</artifactId>
        </dependency>
2. In the main application class, add the discovery service capability through the @ EnableDiscoveryClient annotation. Create a RestTemplate instance and enable load balancing through the @ LoadBalanced annotation.
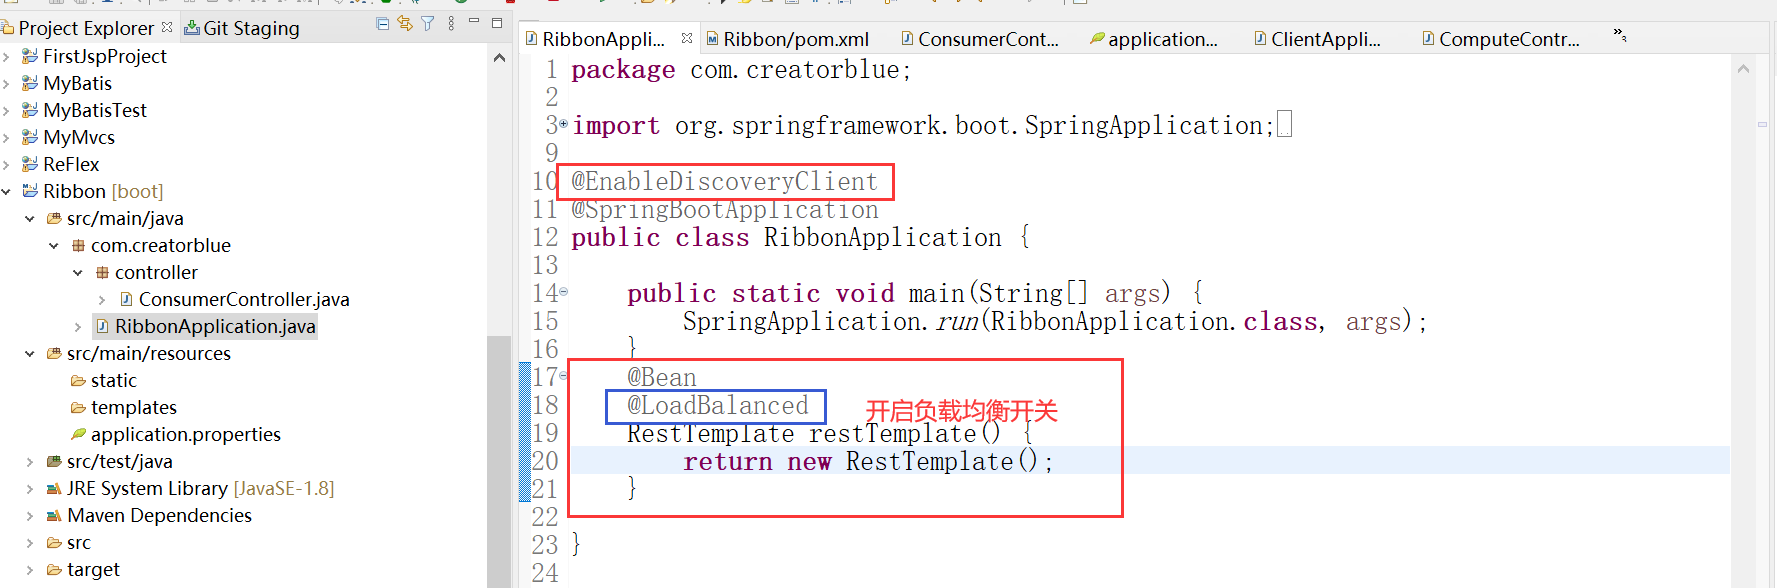
@Bean
    @LoadBalanced
    RestTemplate restTemplate() {
    	return new RestTemplate();
    }
3. Create a ConsumerController to consume the add service of the CLIENT. Call the service directly through RestTemplate and calculate the value of 10 + 20.
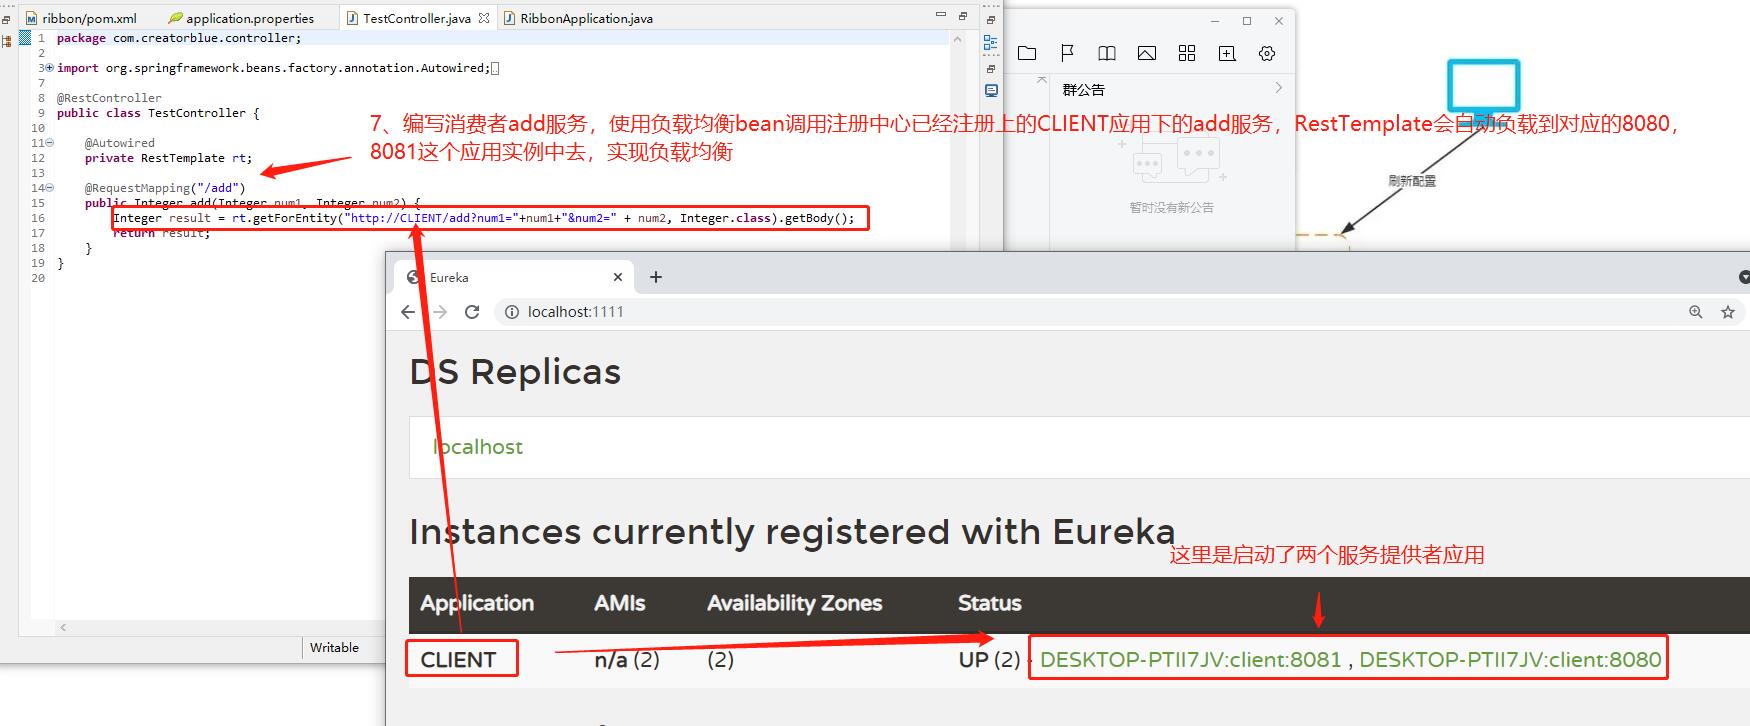
@RestController
public class ConsumerController {
    @Autowired
    RestTemplate restTemplate;

    @RequestMapping(value = "/add", method = RequestMethod.GET)
    public Integer add(Integer a,Integer b) {
         Integer result = rt.getForEntity("http://CLIENT/add?a="+ a + "&b=" + b , Integer.class).getBody();
    	return result;
    }
4,application. Configure eureka service registry in properties
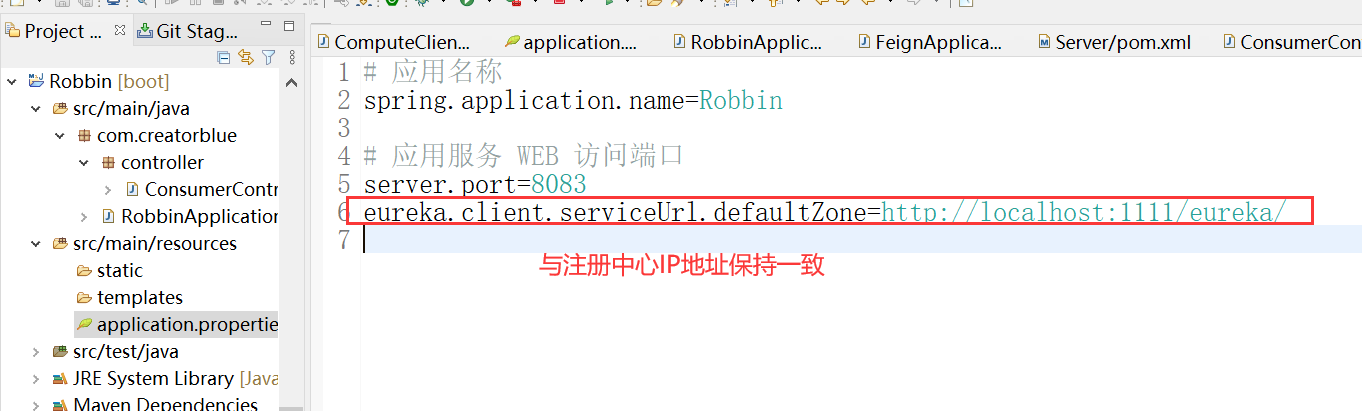
# apply name
spring.application.name=Ribbon

# Application service WEB access port
server.port=8083

eureka.client.serviceUrl.defaultZone=http://localhost:1111/eureka/
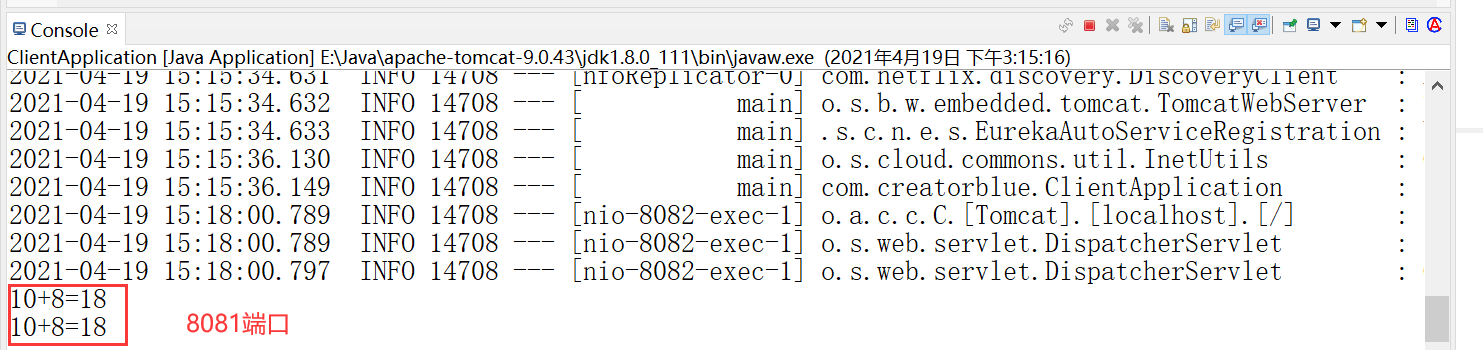
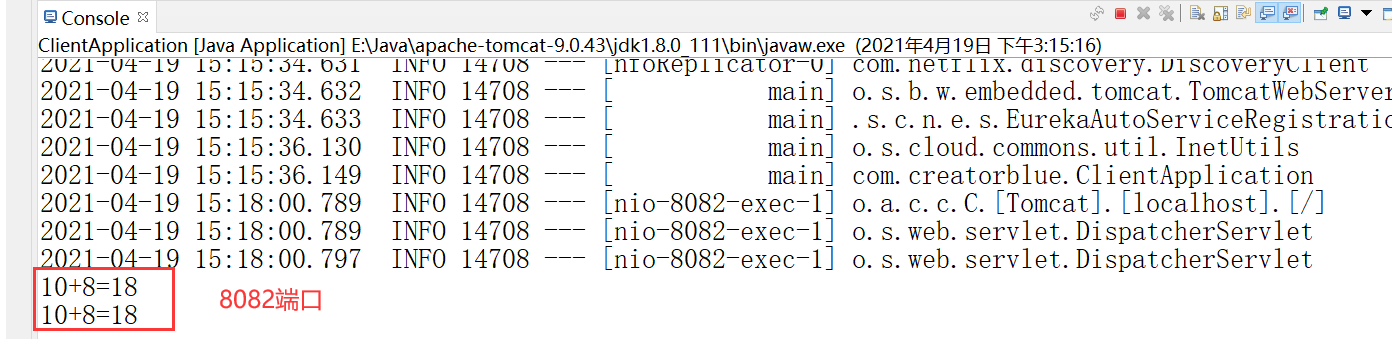
5. Start the application and visit it 4 times continuously: http://localhost:8083/add?a=10&b=8
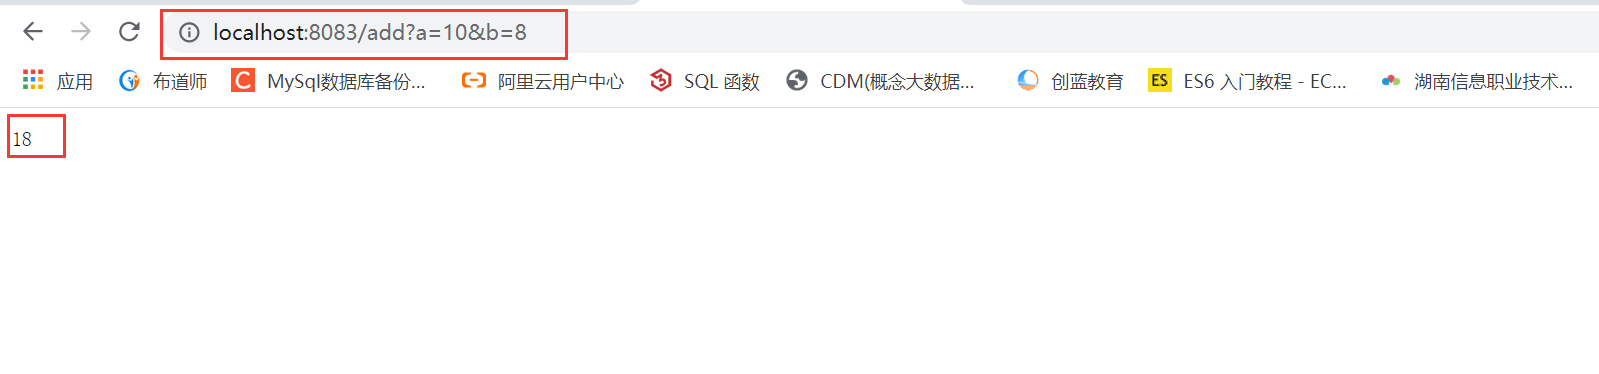
When accessed four times, it will be evenly divided into two ports, as shown in the following figure:
5, Circuit breaker
1. What is a circuit breaker?
"Circuit breaker" itself is a kind of switching device, which is used to protect the circuit from overload. When there is a short circuit in the circuit, "circuit breaker" can cut off the fault circuit in time to prevent serious consequences such as overload, heating and even fire.
2. Netflix Hystrix: Hystrix is used in Spring Cloud to realize the function of circuit breaker.
3. POM in Robin Introducing hystrix dependency into XML
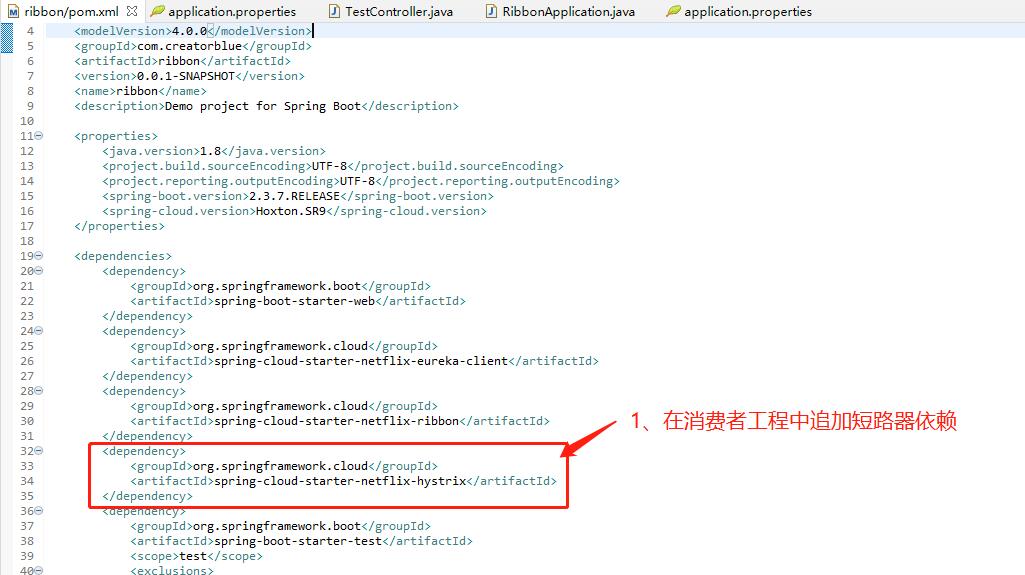
<dependency>
    <groupId>org.springframework.cloud</groupId>
    <artifactId>spring-cloud-starter-netflix-hystrix</artifactId>
</dependency>
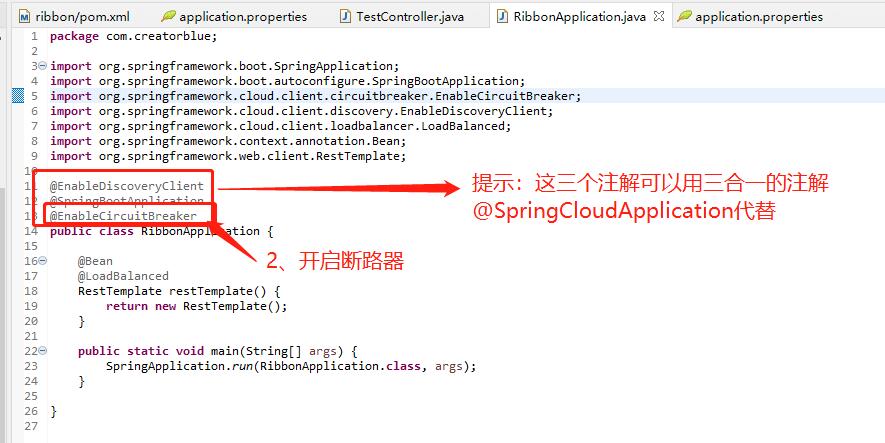
4. Use the @ enablercircuitbreaker annotation in Eureka ribbon's main class RibbonApplication to turn on the circuit breaker function:
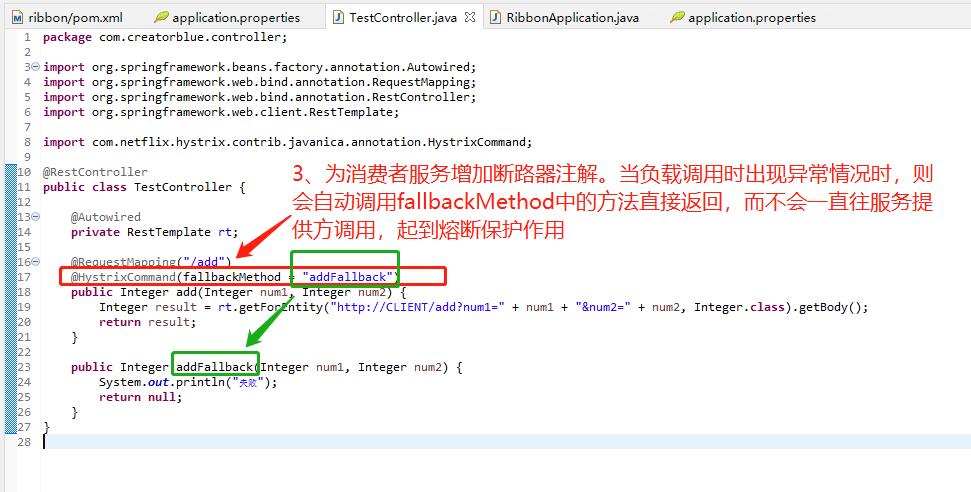
5. Add @ HystrixCommand annotation to the function using ribbon consumer service to specify the callback method.
6. Test (close two ports of the consumer and run Ribbon), and the results are as follows

6, Build Config Server
1, Create a new congfig project
1. Create a new Config project
2. In POM Add dependency to XML file
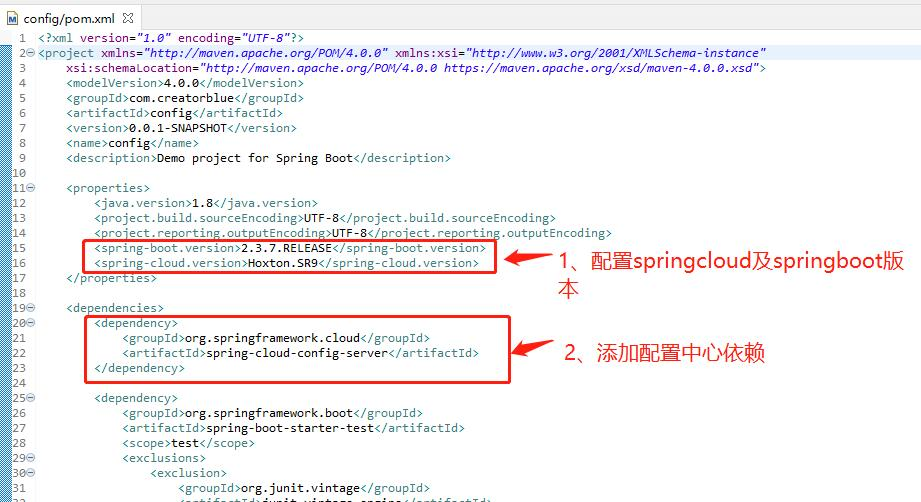
<dependency>
     <groupId>org.springframework.cloud</groupId>
     <artifactId>spring-cloud-config-server</artifactId>
</dependency>
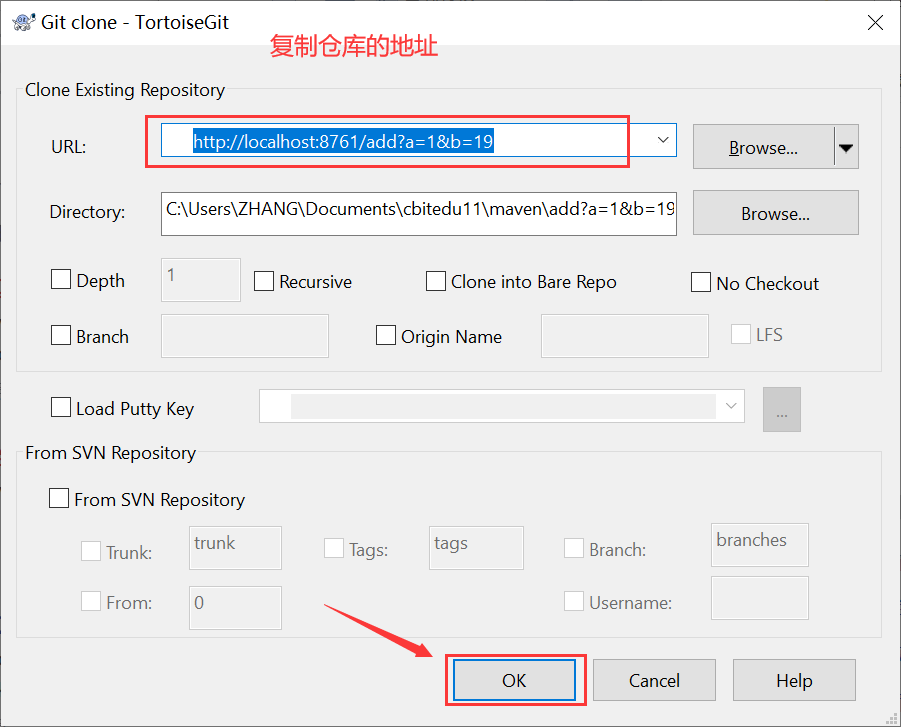
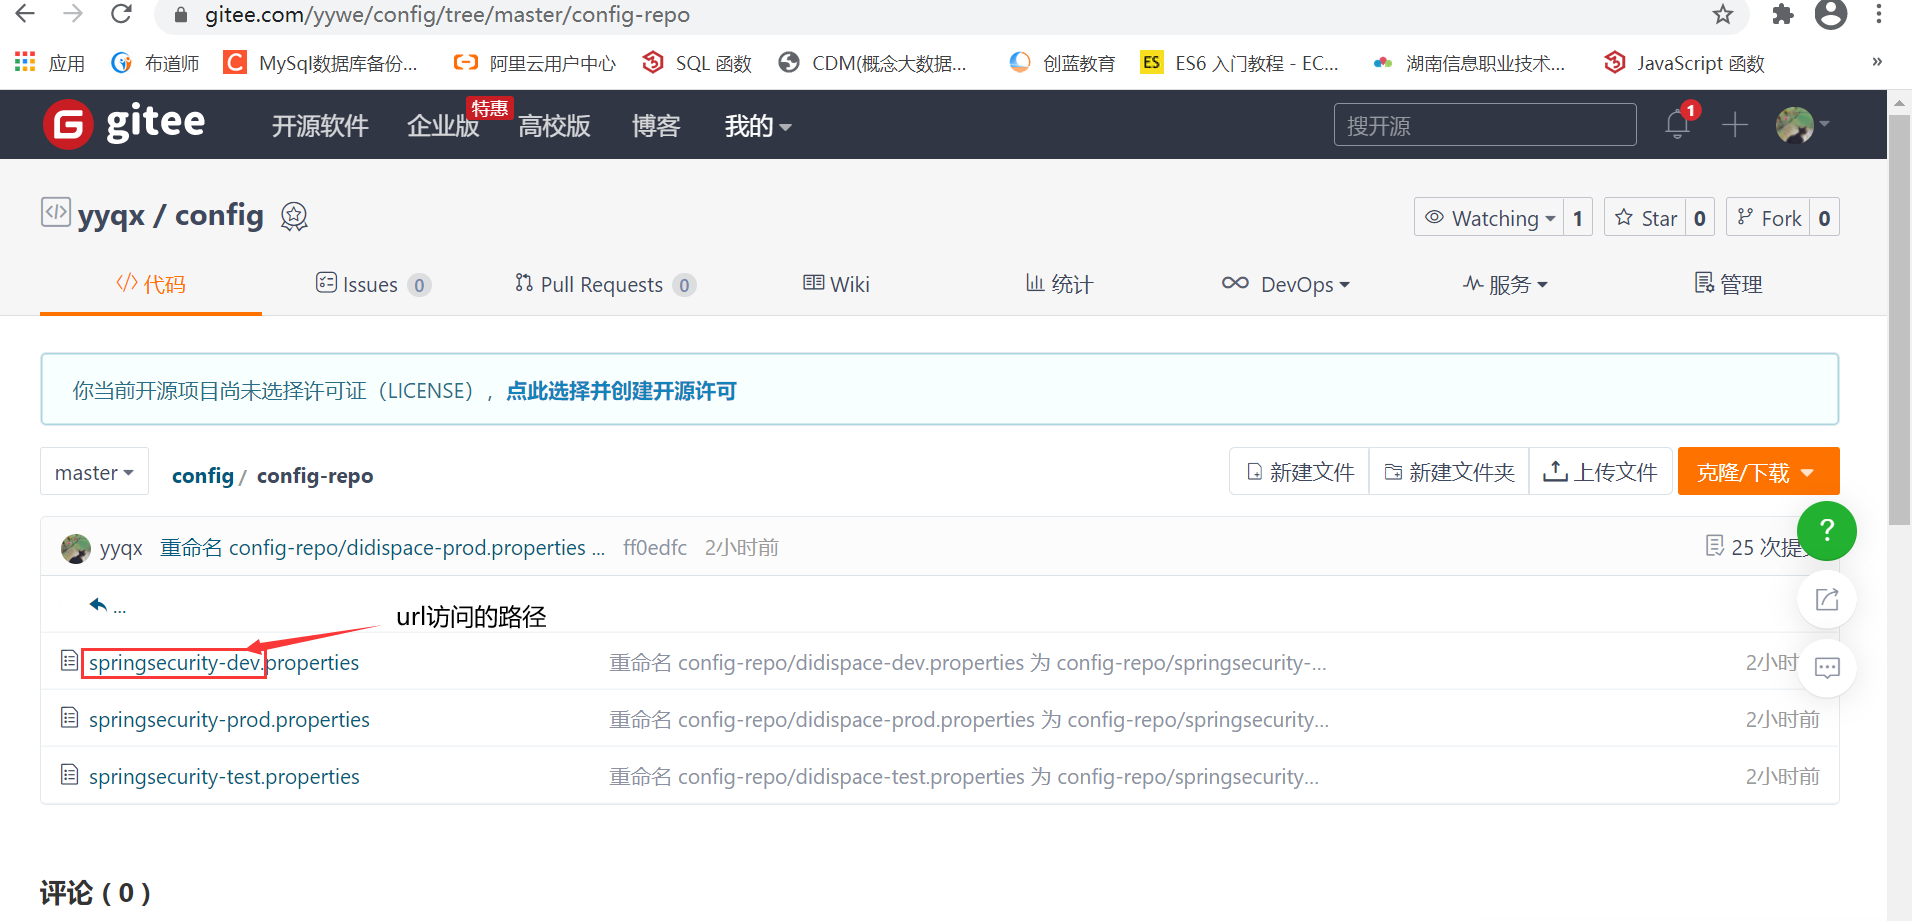
3. Create a new git repository and clone it locally
After completion, create a new config repo folder, which contains three environments
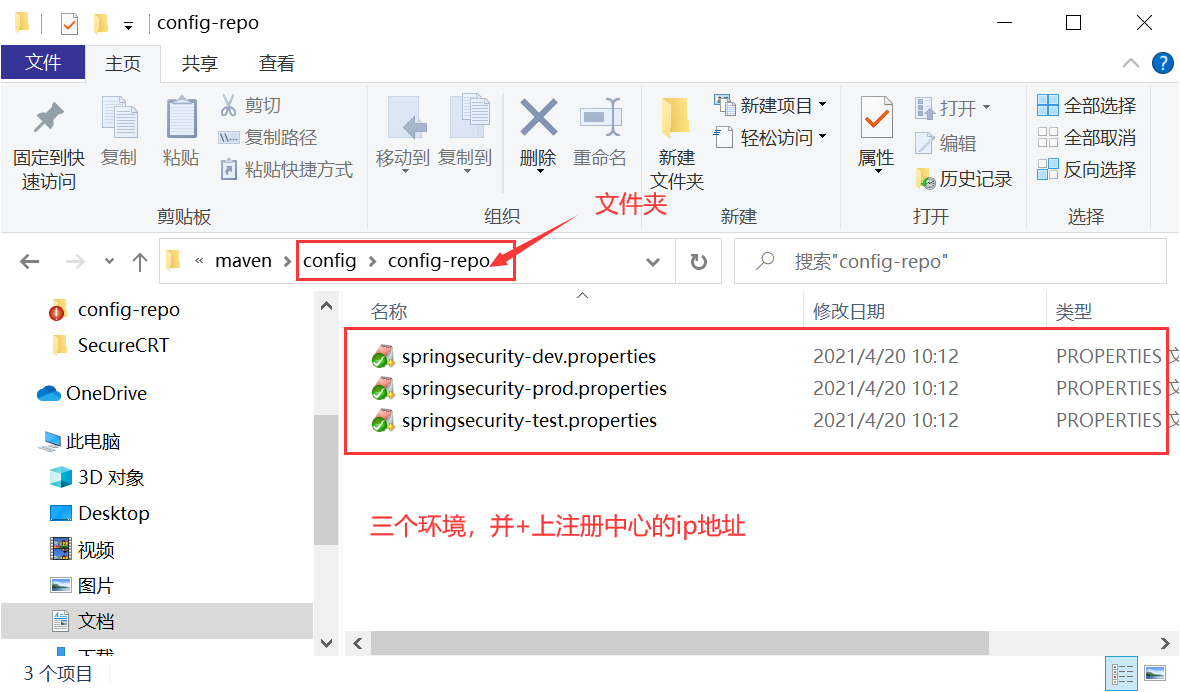
//Take dev as an example
msg=dev
eureka.client.serviceUrl.defaultZone=http://localhost:1111/eureka/
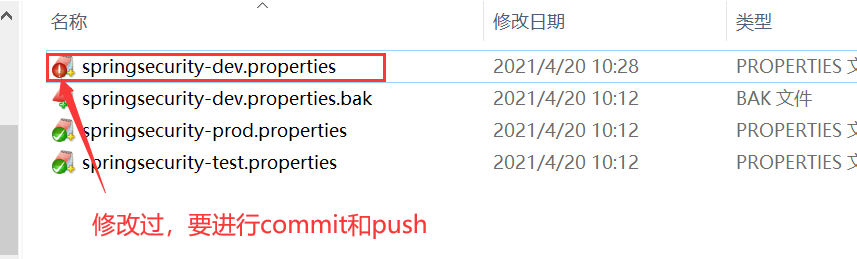
Don't forget commit and push!!!
4. In application Configure service information and git information in properties, for example:
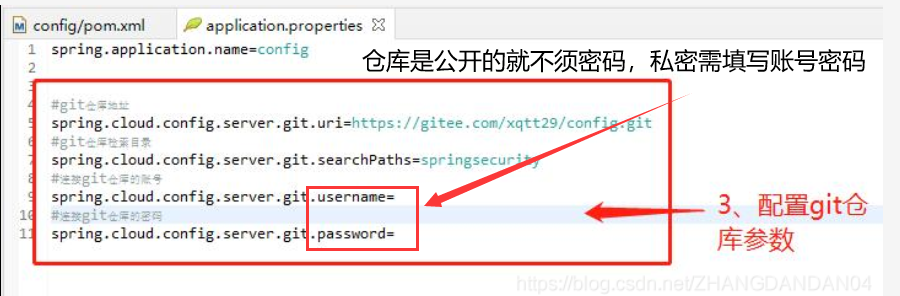
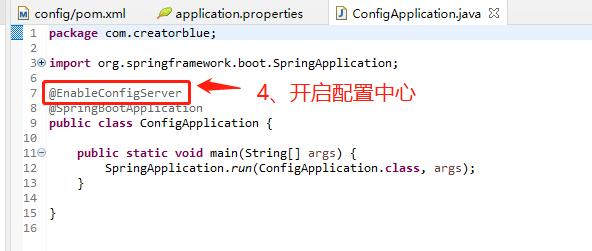
4. Open the annotation of the configuration center
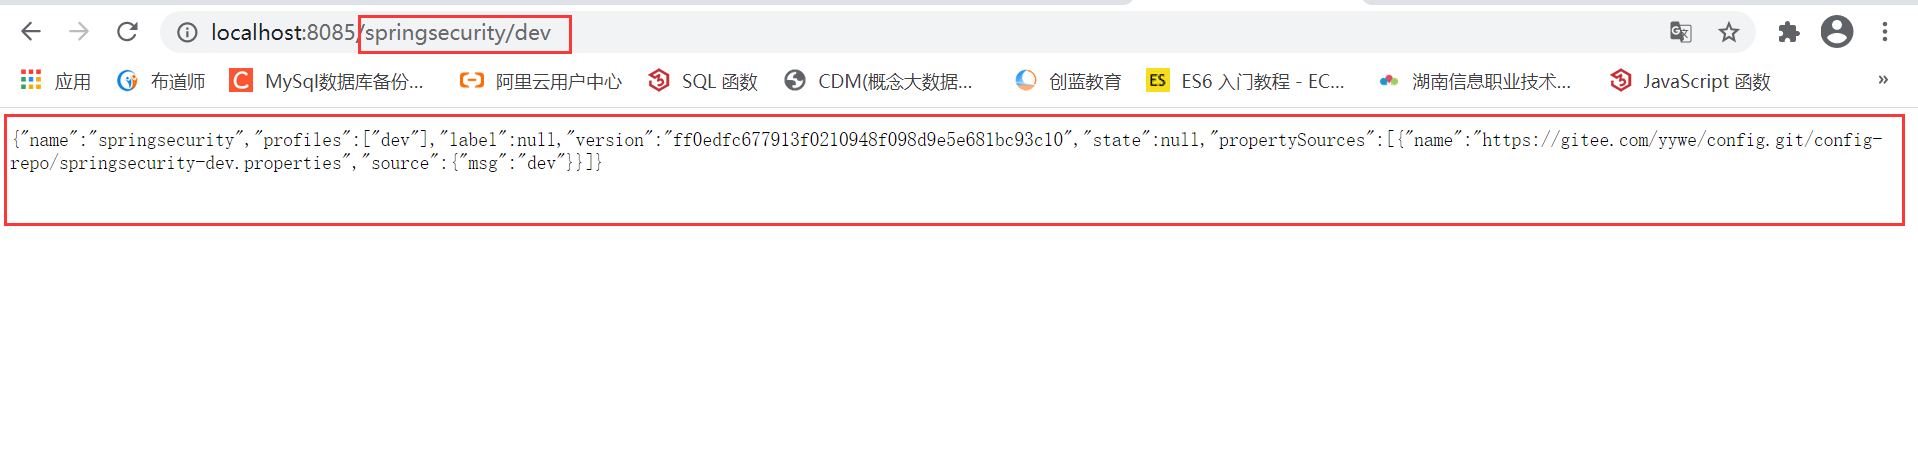
5. Test path: environment name in git warehouse http://localhost:8085/springsecurity/dev
2, In other projects, you need to use the configuration of the configuration center
1. In POM Adding dependencies to XML
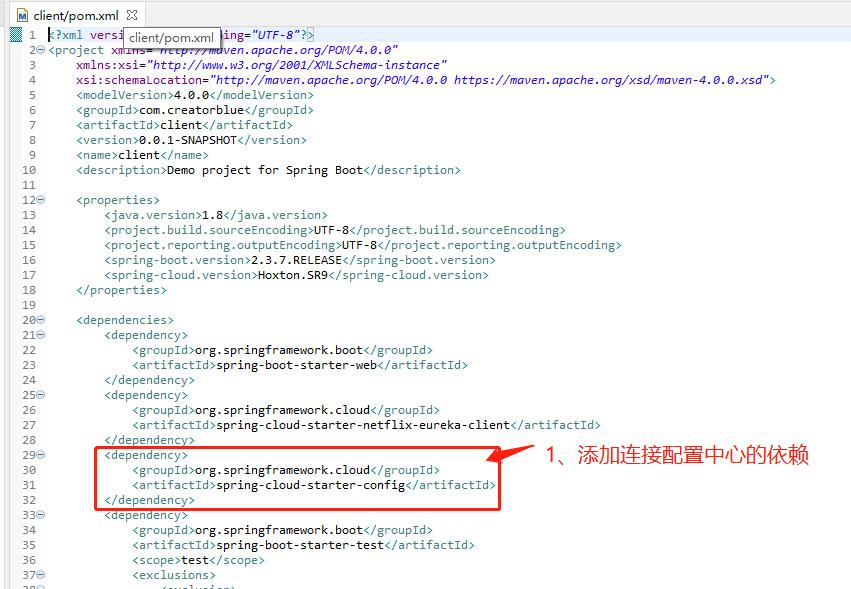
<dependency>
	  <groupId>org.springframework.cloud</groupId>
	  <artifactId>spring-cloud-starter-config</artifactId>
 </dependency>
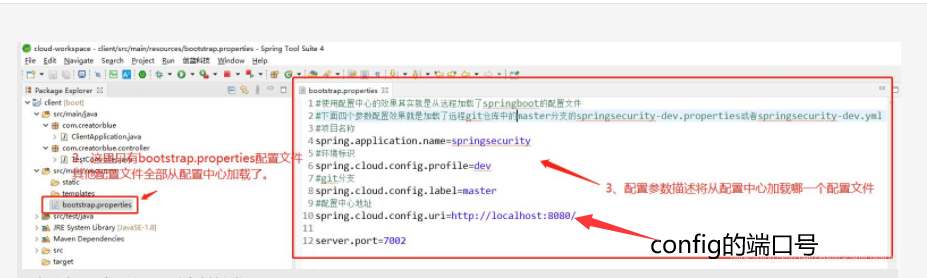
2. Create bootstrap Properties configuration to specify the config server, for example:
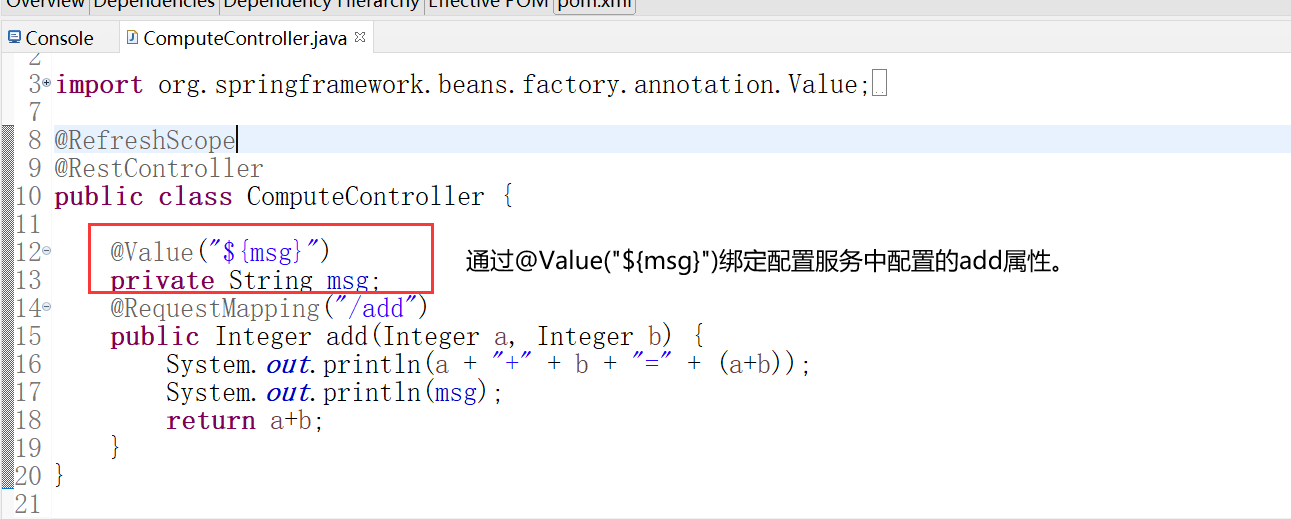
3. The controller layer is injected through the @ value reference file
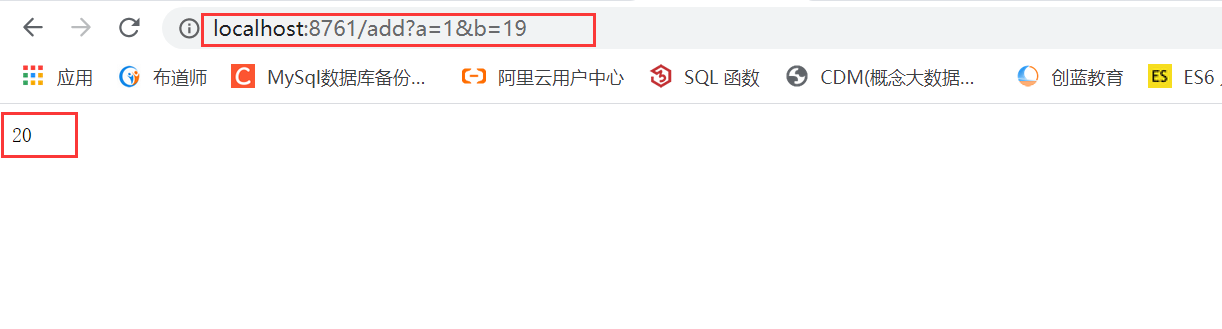
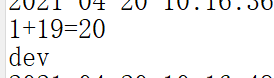
4. Test path: http://localhost:8761/add?a=1&b=19
And view the console output:
7, Configure service gateway
1. Preparation:
Start two ports in the service center, as shown in the figure
1, Start using Zuul
1. Build a new project as Zuul and build it in POM Add dependency to XML file
<dependency>
    <groupId>org.springframework.cloud</groupId>
    <artifactId>spring-cloud-starter-netflix-zuul</artifactId>
</dependency>

<dependency>
    <groupId>org.springframework.cloud</groupId>
    <artifactId>spring-cloud-starter-netflix-eureka-client</artifactId>
</dependency>
2. The application main class uses the @ EnableZuulProxy annotation to open Zuul
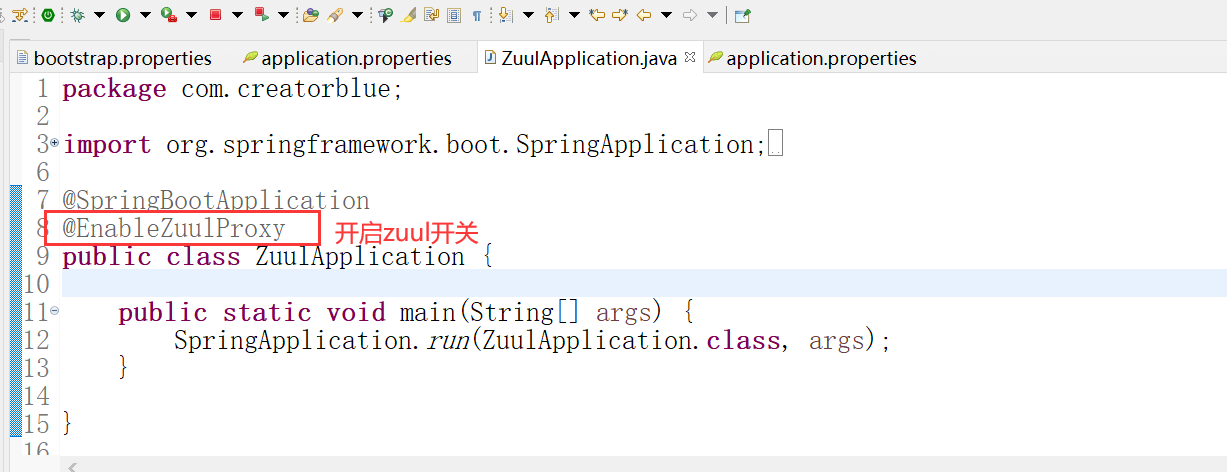
@EnableZuulProxy
@SpringCloudApplication
public class Application {

	public static void main(String[] args) {
		SpringApplication.run(Application.class, args);
	}

}
3. In application Configure the basic information of Zuul application in properties, such as application name, service port, etc.
spring.application.name=Zuul
server.port=8886
2, Zuul configuration
1. Service routing. Through the function of service routing, when we provide services externally, we only need to expose the call address configured in Zuul to enable the caller to access our services uniformly without knowing the specific host information of the service.
Two mapping methods are provided in Zuul:
1.1. Through url direct mapping, we can configure as follows:

#The configuration here means that access to / api-a-url / * * is redirected directly to http://localhost:8086/
# routes to url
zuul.routes.api-a-url.path=/api-a-url/**
zuul.routes.api-a-url.url=http://localhost:8086/
This configuration defines that all accesses to Zuul with the rule: / api-a-url / * * are mapped to http://localhost:8086/ In other words, when we visit http://localhost:8886/api -a-url/add? When a = 1 & B = 2, Zuul will route the request to: http://localhost:8086/add?a=1&b=2 Come on.
1.2. After Zuul registers with eureka server and finds other services, we can realize the mapping of serviceId. For example, we can configure as follows:
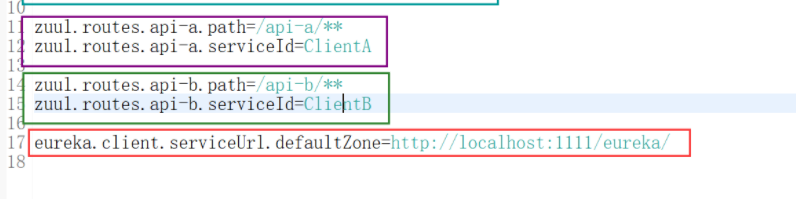
zuul.routes.api-a.path=/api-a/**
zuul.routes.api-a.serviceId=ClientA

zuul.routes.api-b.path=/api-b/**
zuul.routes.api-b.serviceId=ClientB

eureka.client.serviceUrl.defaultZone=http://localhost:1111/eureka/
The two microservices ClientA and ClientB implemented in the preparation work define two routing apis-a and api-b to map respectively. In addition, in order for Zuul to find ClientA and ClientB, eureka configuration is also added.
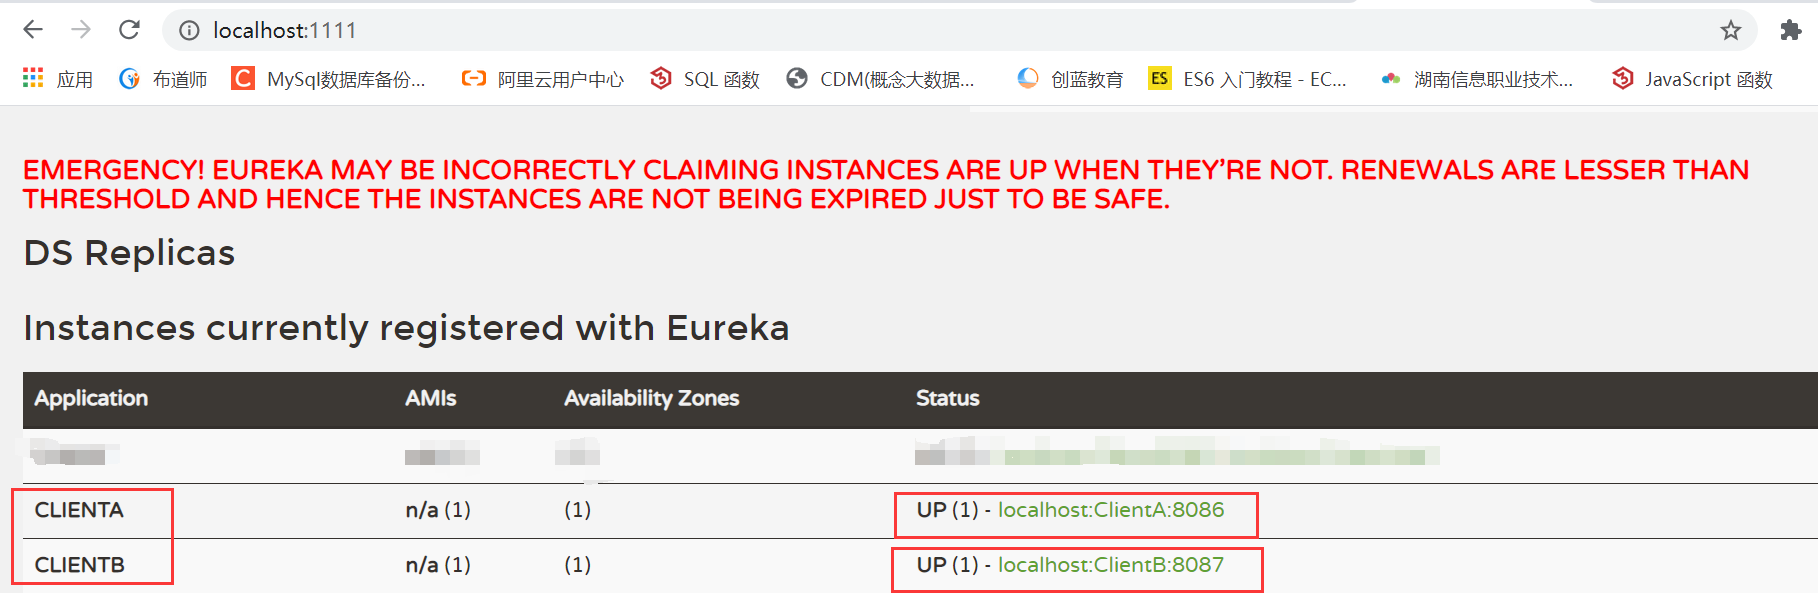
You can see the following figure, which shows that ClientA and ClientB are started successfully!

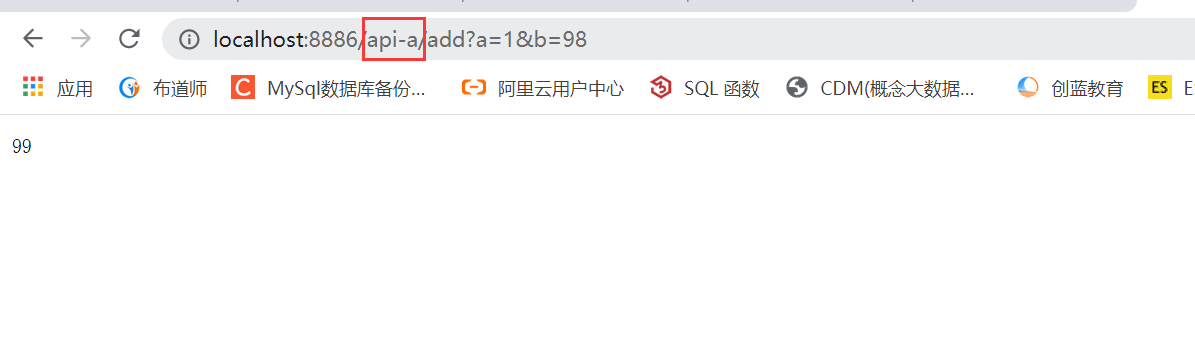
Try to access ClientA and ClientB through the service gateway, and access the following URLs respectively according to the configured mapping relationship:
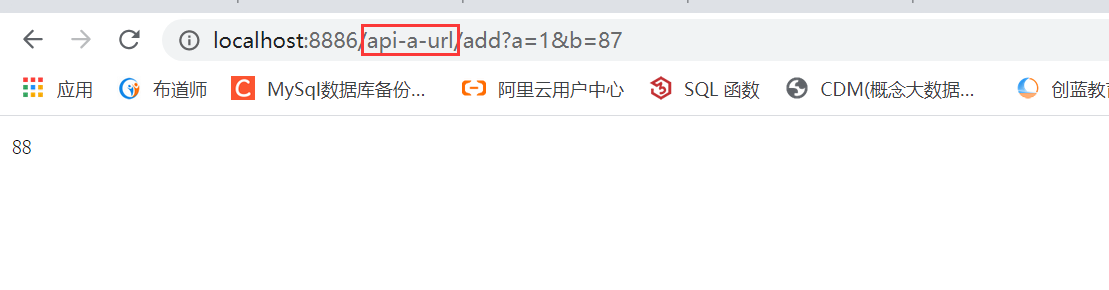
http://localhost:8886/api -a-url/add? A = 1 & B = 87: access the add service in ClientA through serviceId mapping, as shown in the following figure
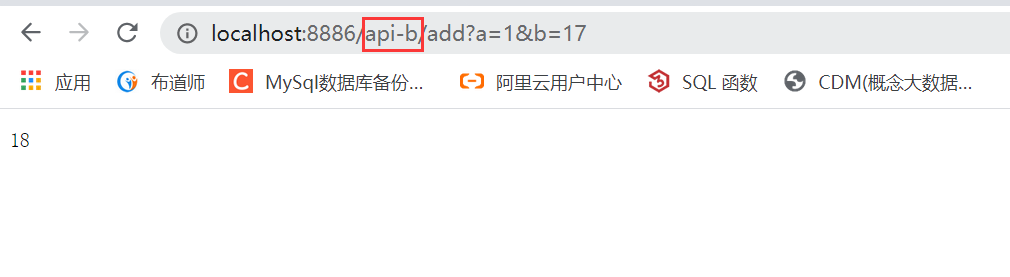
http://localhost:5555/api -b/add? A = 1 & B = 2: access the add service in ClientB through serviceId mapping, as shown in the following figure:
http://localhost:5555/api -a-url/add? A = 1 & B = 2: access the add service in ClientA through URL mapping, as shown in the following figure:
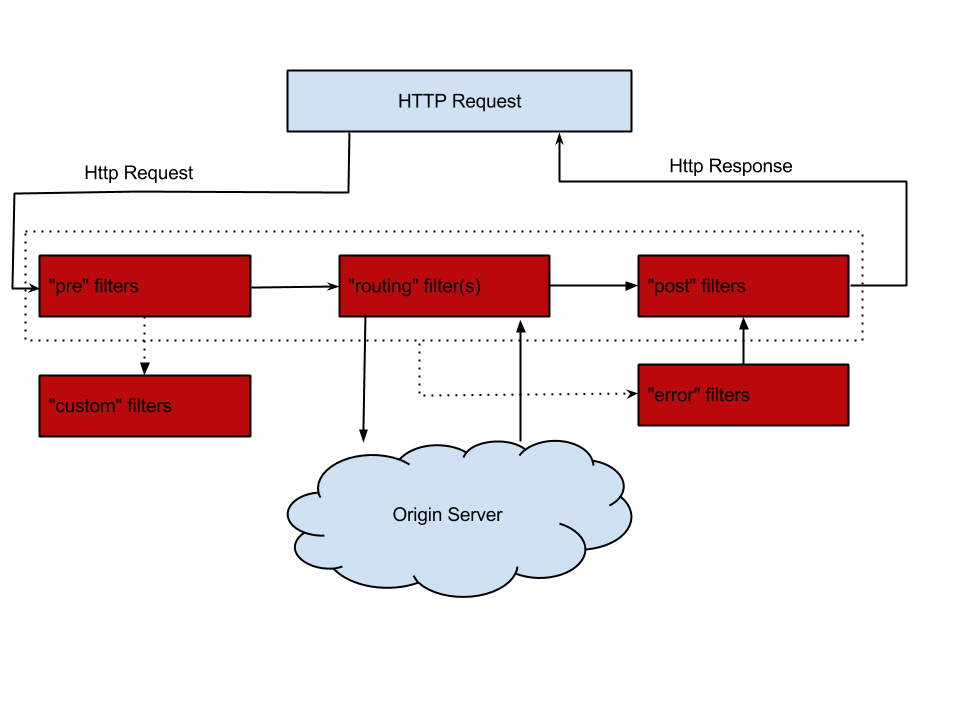
3, Filtering service
After completing the service routing, we also need some security measures to protect the client from accessing only the resources it should access. Therefore, we need to use Zuul's filter to realize the security control of our external services.
To define a filter in the service gateway, you only need to inherit the ZuulFilter abstract class and implement its four abstract functions to intercept and filter requests.
1. For example, the following example defines a Zuul filter to check whether there is an accessToken parameter in the request before the request is routed. If so, route it. If not, deny access and return 401 Unauthorized error.
public class AccessFilter extends ZuulFilter  {

    private static Logger log = LoggerFactory.getLogger(AccessFilter.class);

    @Override
    public String filterType() {
        return "pre";
    }

    @Override
    public int filterOrder() {
        return 0;
    }

    @Override
    public boolean shouldFilter() {
        return true;
    }

    @Override
    public Object run() {
        RequestContext ctx = RequestContext.getCurrentContext();
        HttpServletRequest request = ctx.getRequest();

        log.info(String.format("%s request to %s", request.getMethod(), request.getRequestURL().toString()));

        Object accessToken = request.getParameter("accessToken");
        if(accessToken == null) {
            log.warn("access token is empty");
            ctx.setSendZuulResponse(false);
            ctx.setResponseStatusCode(401);
            return null;
        }
        log.info("access token ok");
        return null;
    }

}
2. After the user-defined filter is implemented, it needs to be instantiated to take effect. We only need to add the following contents in the application main class:
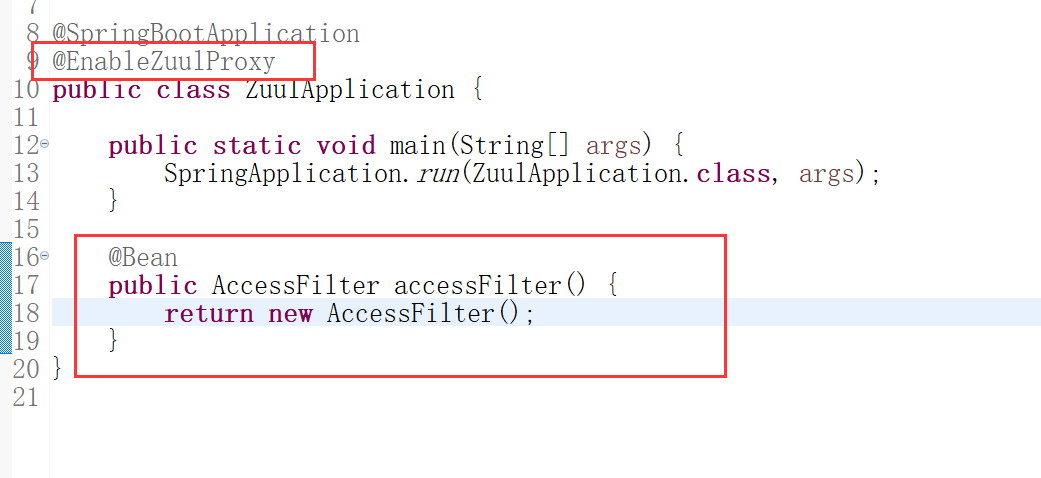
@EnableZuulProxy
@SpringCloudApplication
public class Application {

	public static void main(String[] args) {
		new SpringApplicationBuilder(Application.class).web(true).run(args);
	}

	@Bean
	public AccessFilter accessFilter() {
		return new AccessFilter();
	}

}
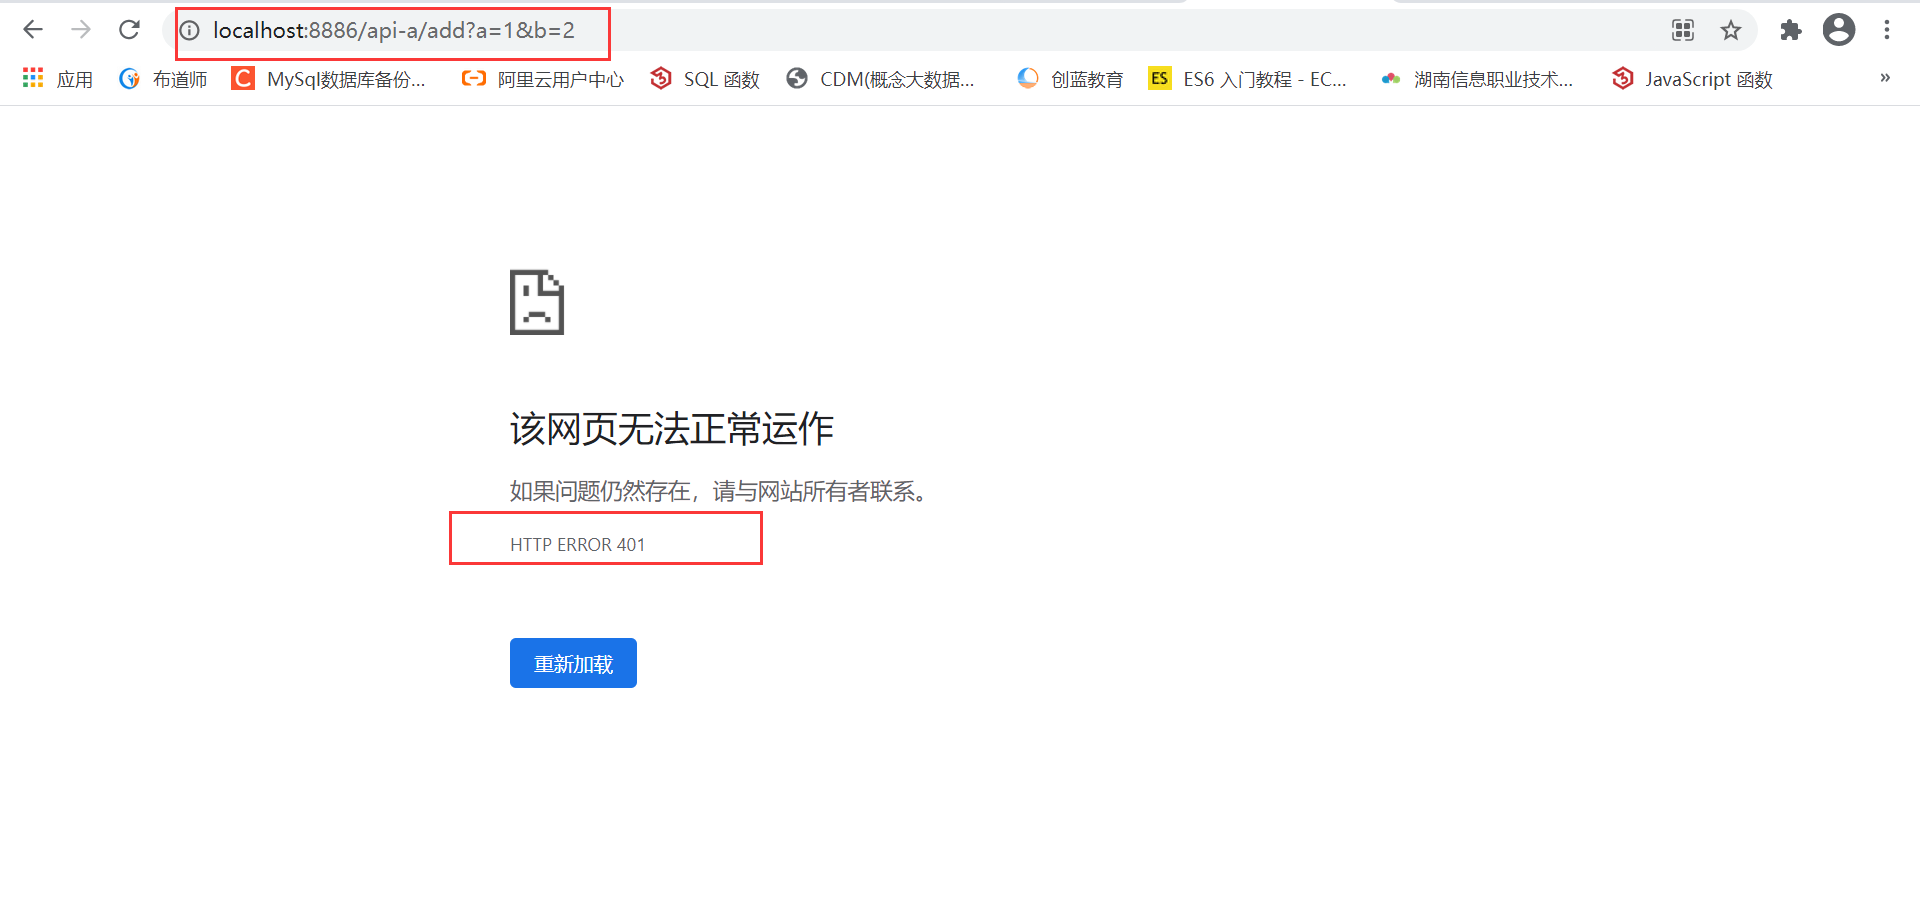
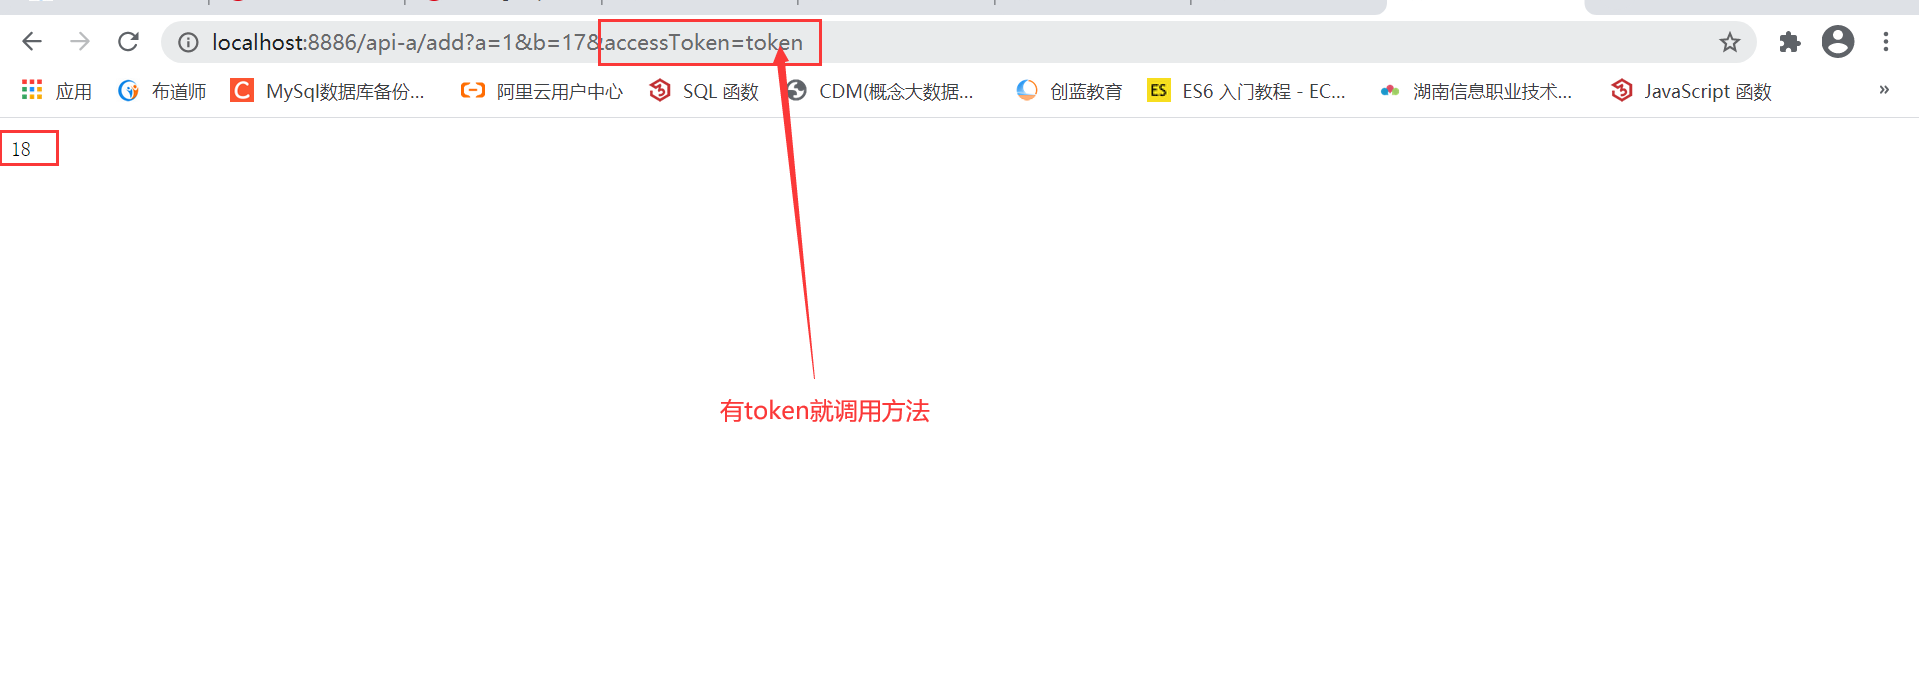
3. After startup, access address: http://localhost:8886/api -a/add? A = 1 & B = 2 return as shown in the figure below:
When accessing: http://localhost:5555/api -a/add? When a = 1 & B = 2 & accesstoken = token, see the following figure:
According to the previous introduction to the filterType life cycle, you can refer to the following figure to understand, and implement different types of filters in different life cycles according to your own needs.