I happen to have some research on spring source code. Combined with my practical work experience in recent years, I summarize the knowledge points I think are good in spring. I hope it will be helpful to you.
Seek attention
Welcome to pay attention to my B station account
Station B account number
If the content can help you, you are welcome to like, collect and pay attention
Learning communication group
Communication group
How to get the spring container object
1. Implement BeanFactoryAware interface
@Service
public class PersonService implements BeanFactoryAware {
    private BeanFactory beanFactory;

    @Override
    public void setBeanFactory(BeanFactory beanFactory) throws BeansException {
        this.beanFactory = beanFactory;
    }

    public void add() {
        Person person = (Person) beanFactory.getBean("person");
    }
}
Implement the BeanFactoryAware interface, and then override the setBeanFactory method to obtain the spring container object from this method.
2. Implement ApplicationContextAware interface
@Service
public class PersonService2 implements ApplicationContextAware {
    private ApplicationContext applicationContext;

    @Override
    public void setApplicationContext(ApplicationContext applicationContext) throws BeansException {
        this.applicationContext = applicationContext;
    }

    public void add() {
        Person person = (Person) applicationContext.getBean("person");
    }

}
Implement the ApplicationContextAware interface, and then override the setApplicationContext method. You can also get the spring container object from this method.
3. Implement the ApplicationListener interface
@Service
public class PersonService3 implements ApplicationListener<ContextRefreshedEvent> {
    private ApplicationContext applicationContext;


    @Override
    public void onApplicationEvent(ContextRefreshedEvent event) {
        applicationContext = event.getApplicationContext();
    }

    public void add() {
        Person person = (Person) applicationContext.getBean("person");
    }

}
Implement the ApplicationListener interface. It should be noted that the generic type received by the interface is the ContextRefreshedEvent class, and then override the onApplicationEvent method. You can also get the spring container object from this method.
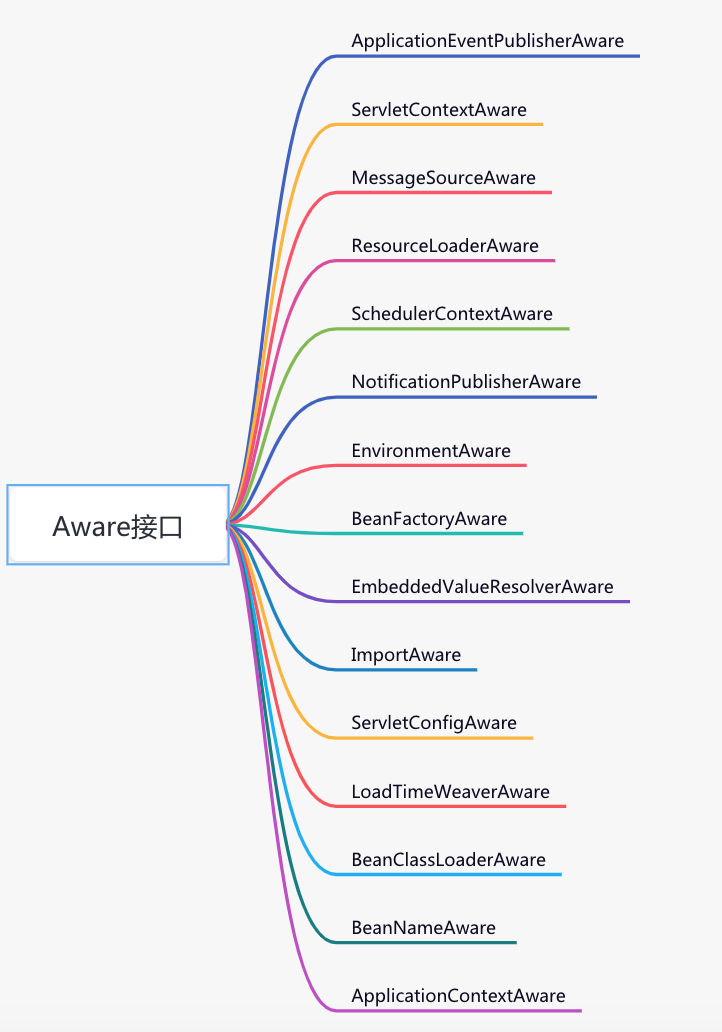
In addition, I have to mention the Aware interface, which is actually an empty interface without any methods.
It indicates the perceived meaning. The specified object can be obtained through this kind of interface, such as:
-
Obtain BeanFactory through BeanFactory aware
-
Get ApplicationContext through ApplicationContextAware
-
Obtain BeanName, etc. through beannaaware
Aware interface is a very common function. At present, it includes the following functions:
Second, how to initialize bean s
spring supports three methods of initializing bean s:
-
Specify init method method in xml
-
Use @ PostConstruct annotation
-
Implement InitializingBean interface
The first method is too old. There are not many people using it now. The specific usage will not be introduced.
1. Use @ PostConstruct annotation
@Service
public class AService {

    @PostConstruct
    public void init() {
        System.out.println("===initialization===");
    }
}
Add @ PostConstruct annotation to the method that needs initialization, so it has the ability of initialization.
2. Implement InitializingBean interface
@Service
public class BService implements InitializingBean {

    @Override
    public void afterPropertiesSet() throws Exception {
        System.out.println("===initialization===");
    }
}
Implement the InitializingBean interface and rewrite the afterpropertieset method, which can complete the initialization function.
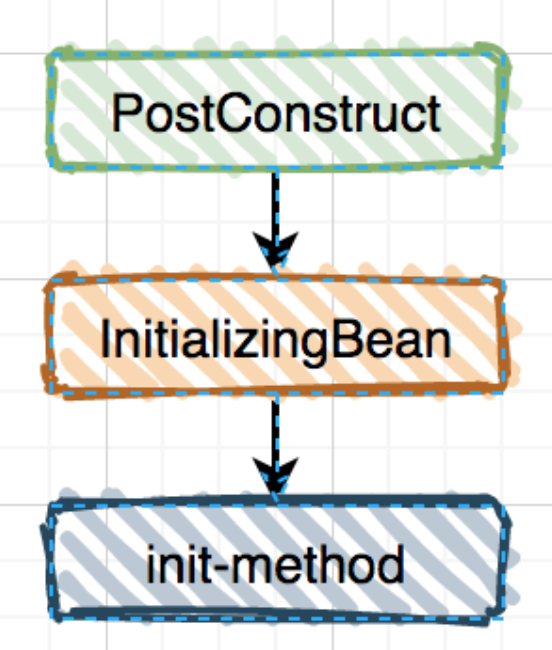
By the way, an interesting question is raised here: what is the execution order of init method, PostConstruct , and , InitializingBean ??
The key code that determines their call order is in the initializeBean method of the AbstractAutowireCapableBeanFactory class.
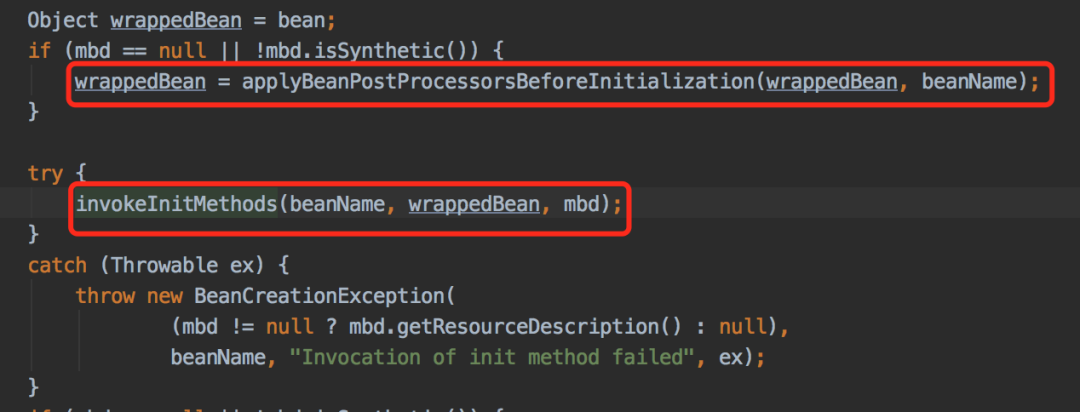
In this code, the postProcessBeforeInitialization method of BeanPostProcessor will be called first, and PostConstruct is implemented through InitDestroyAnnotationBeanPostProcessor. It is a BeanPostProcessor, so PostConstruct is executed first.
The code in the invokeinitialmethods method:
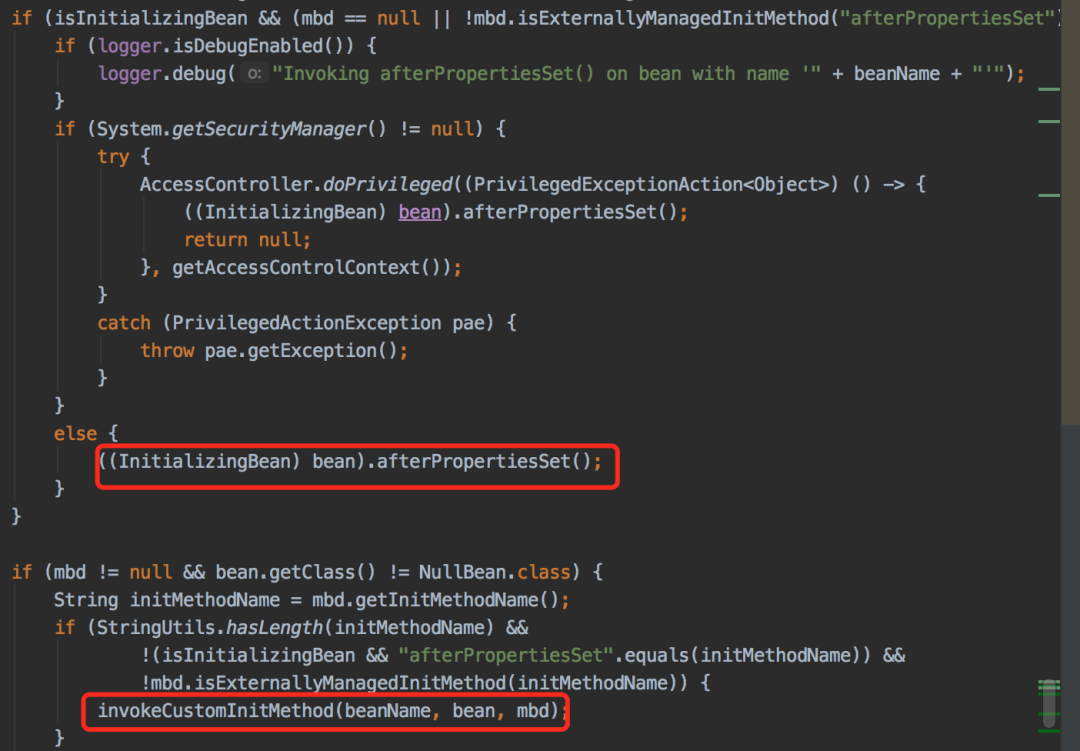
It is decided to call InitializingBean first and then init method.
Therefore, it is concluded that their calling order is:
III. customize your own Scope
We all know that spring supports only two scopes by default:
-
Singleton singleton: the bean obtained from the spring container is the same object every time.
-
There are multiple instances of prototype. Each time the bean obtained from the spring container is a different object.
spring web extends Scope by adding:
-
RequestScope all the bean s obtained from the spring container in the same request are the same object.
-
SessionScope all the bean s obtained from the spring container in the same session are the same object.
Even so, some scenes still can not meet our requirements.
For example, what should we do if we want all the bean s obtained from the spring container in the same thread to be the same object?
This requires a custom Scope.
The first step is to implement the Scope interface:
public class ThreadLocalScope implements Scope {

    private static final ThreadLocal THREAD_LOCAL_SCOPE = new ThreadLocal();

    @Override
    public Object get(String name, ObjectFactory<?> objectFactory) {
        Object value = THREAD_LOCAL_SCOPE.get();
        if (value != null) {
            return value;
        }

        Object object = objectFactory.getObject();
        THREAD_LOCAL_SCOPE.set(object);
        return object;
    }

    @Override
    public Object remove(String name) {
        THREAD_LOCAL_SCOPE.remove();
        return null;
    }

    @Override
    public void registerDestructionCallback(String name, Runnable callback) {

    }

    @Override
    public Object resolveContextualObject(String key) {
        return null;
    }

    @Override
    public String getConversationId() {
        return null;
    }
}
Step 2: inject the newly defined Scope into the spring container:
@Component
public class ThreadLocalBeanFactoryPostProcessor implements BeanFactoryPostProcessor {

    @Override
    public void postProcessBeanFactory(ConfigurableListableBeanFactory beanFactory) throws BeansException {
        beanFactory.registerScope("threadLocalScope", new ThreadLocalScope());
    }
}
Step 3: use the newly defined Scope:
@Scope("threadLocalScope")
@Service
public class CService {

    public void add() {
    }
}
Fourth, don't say FactoryBean is useless
Speaking of FactoryBean, I have to mention BeanFactory, because interviewers always like to ask about their differences.
-
BeanFactory: the top-level interface of spring container, which manages the factory of bean s.
-
FactoryBean: it is not an ordinary factory bean. It hides the details of instantiating some complex beans and brings convenience to upper layer applications.
If you look at the spring source code, you will find that it uses the FactoryBean interface in more than 70 places.
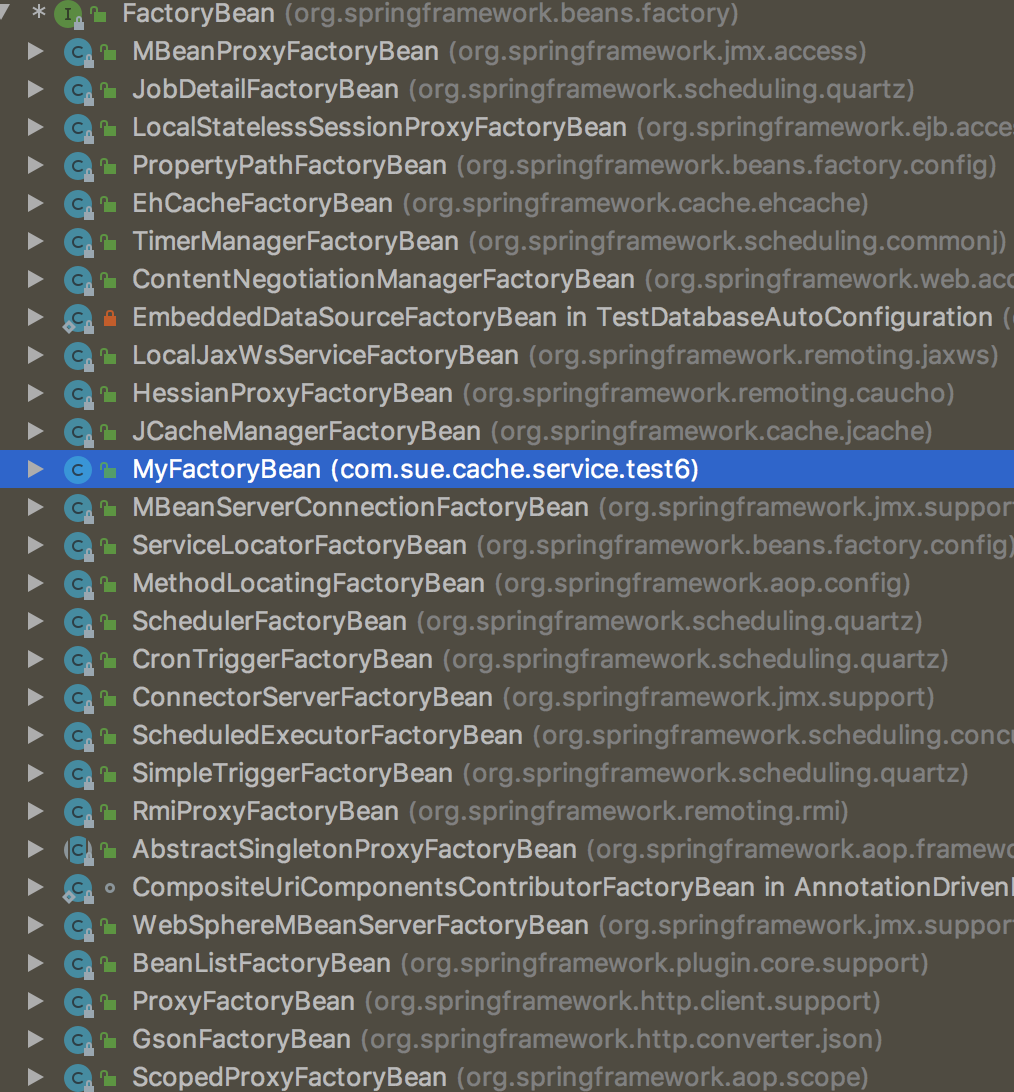
The above figure is enough to illustrate the importance of this interface. Do not ignore it, OK?
In particular, the SqlSessionFactory object of mybatis is created through the SqlSessionFactoryBean class.
Let's define our FactoryBean together:
@Component
public class MyFactoryBean implements FactoryBean {

    @Override
    public Object getObject() throws Exception {
        String data1 = buildData1();
        String data2 = buildData2();
        return buildData3(data1, data2);
    }

    private String buildData1() {
        return "data1";
    }

    private String buildData2() {
        return "data2";
    }

    private String buildData3(String data1, String data2) {
        return data1 + data2;
    }


    @Override
    public Class<?> getObjectType() {
        return null;
    }
}
Get FactoryBean instance object:
@Service
public class MyFactoryBeanService implements BeanFactoryAware {
    private BeanFactory beanFactory;

    @Override
    public void setBeanFactory(BeanFactory beanFactory) throws BeansException {
        this.beanFactory = beanFactory;
    }

    public void test() {
        Object myFactoryBean = beanFactory.getBean("myFactoryBean");
        System.out.println(myFactoryBean);
        Object myFactoryBean1 = beanFactory.getBean("&myFactoryBean");
        System.out.println(myFactoryBean1);
    }
}
-
getBean("myFactoryBean"); Gets the object returned by the getObject method in the MyFactoryBeanService class,
-
getBean("&MyFactoryBean"); Only the MyFactoryBean object is obtained.
V. easy custom type conversion
spring currently supports three types of converters:
-
Converter < s, t >: converts an S-type object to a T-type object
-
Converterfactory < s, R >: convert S-type objects to R-type and subclass objects
-
GenericConverter: it supports the conversion of multiple source and target types. At the same time, it also provides the context of source and target types. This context allows you to realize type conversion based on annotations or information on attributes.
These three types of converters use different scenarios. Let's take converter < s, t > as an example. If: in the entity object receiving parameters in the interface, the type of a field is Date, but the actual parameter is a string type: 2021-01-03 10:20:15, how to deal with it?
Step 1: define an entity User:
@Data
public class User {

    private Long id;
    private String name;
    private Date registerDate;
}
Step 2: implement the Converter interface:
public class DateConverter implements Converter<String, Date> {

    private SimpleDateFormat simpleDateFormat = new SimpleDateFormat("yyyy-MM-dd HH:mm:ss");

    @Override
    public Date convert(String source) {
        if (source != null && !"".equals(source)) {
            try {
                simpleDateFormat.parse(source);
            } catch (ParseException e) {
                e.printStackTrace();
            }
        }
        return null;
    }
}
Step 3: inject the newly defined type converter into the spring container:
@Configuration
public class WebConfig extends WebMvcConfigurerAdapter {

    @Override
    public void addFormatters(FormatterRegistry registry) {
        registry.addConverter(new DateConverter());
    }
}
Step 4: call the interface
@RequestMapping("/user")
@RestController
public class UserController {

    @RequestMapping("/save")
    public String save(@RequestBody User user) {
        return "success";
    }
}
When requesting an interface, the registerDate field in the User object will be automatically converted to Date type.
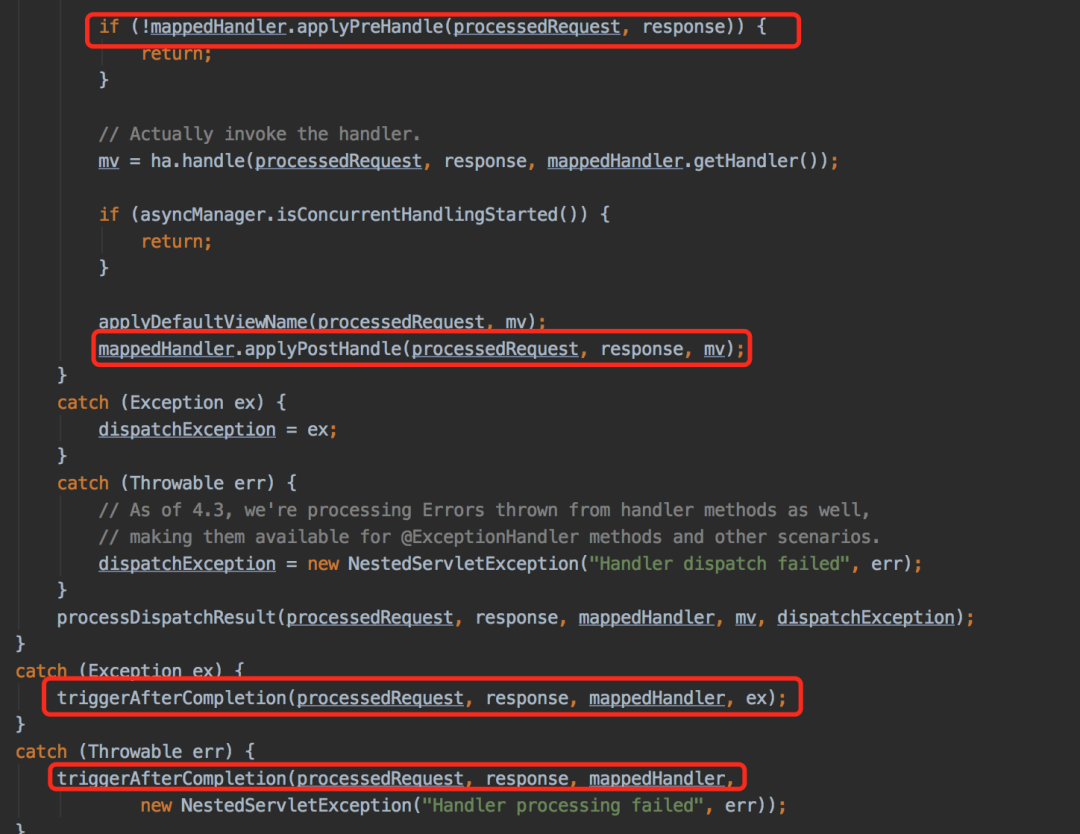
Six spring mvc interceptors, all of which have been used
Compared with the spring interceptor, the spring mvc interceptor can obtain web object instances such as HttpServletRequest and HttpServletResponse.
The top-level interface of spring mvc interceptor is HandlerInterceptor, which contains three methods:
-
preHandle - execute before the target method is executed
-
postHandle: execute after the target method is executed
-
After completion is executed when the request is completed
For convenience, we usually use the implementation class of HandlerInterceptor interface, HandlerInterceptorAdapter class.
If you have permission authentication, log and statistics scenarios, you can use this interceptor.
Step 1: inherit the HandlerInterceptorAdapter class and define the Interceptor:
public class AuthInterceptor extends HandlerInterceptorAdapter {

    @Override
    public boolean preHandle(HttpServletRequest request, HttpServletResponse response, Object handler)
            throws Exception {
        String requestUrl = request.getRequestURI();
        if (checkAuth(requestUrl)) {
            return true;
        }

        return false;
    }

    private boolean checkAuth(String requestUrl) {
        System.out.println("===Permission verification===");
        return true;
    }
}
Step 2: register the interceptor with the spring container:
@Configuration
public class WebAuthConfig extends WebMvcConfigurerAdapter {

    @Bean
    public AuthInterceptor getAuthInterceptor() {
        return new AuthInterceptor();
    }

    @Override
    public void addInterceptors(InterceptorRegistry registry) {
        registry.addInterceptor(new AuthInterceptor());
    }
}
Step 3: when requesting an interface, spring mvc can automatically intercept the interface and verify permissions through the interceptor.
In fact, the interceptor is relatively simple. You can see the calling process in the doDispatch method of the DispatcherServlet class:
By the way, I only talked about spring mvc interceptors, not spring interceptors, because I'm a little selfish. I'll know later.
Seven Enable switches are really fragrant
I don't know if you have ever used the annotations starting with Enable, such as EnableAsync, EnableCaching, EnableAspectJAutoProxy, etc. these annotations are like switches. As long as you add these annotations to the Configuration class defined by @ Configuration, you can turn on the relevant functions.
Isn't it cool?
Let's implement our own switch:
Step 1: define a LogFilter:
public class LogFilter implements Filter {
    @Override
    public void init(FilterConfig filterConfig) throws ServletException {

    }

    @Override
    public void doFilter(ServletRequest request, ServletResponse response, FilterChain chain) throws IOException, ServletException {
        System.out.println("Log requests");
        chain.doFilter(request, response);
        System.out.println("Record response log");
    }

    @Override
    public void destroy() {

    }
}
Step 2: register LogFilter:
@ConditionalOnWebApplication
public class LogFilterWebConfig {

    @Bean
    public LogFilter timeFilter() {
        return new LogFilter();
    }
}
Note that the @ ConditionalOnWebApplication annotation is used here instead of the @ Configuration annotation directly.
Step 3: define the switch @ EnableLog annotation:
@Target(ElementType.TYPE)
@Retention(RetentionPolicy.RUNTIME)
@Documented
@Import(LogFilterWebConfig.class)
public @interface EnableLog {

}
Step 4: simply add the @ EnableLog annotation to the springboot startup class to enable LogFilter to record request and response logs.
VIII. Spring of RestTemplate interceptor
When we use RestTemplate to call the remote interface, we sometimes need to pass information in the header, such as traceId, source, etc., so that we can connect a complete request link in series to quickly locate the problem when querying the log.
This business scenario can be implemented through the clienthttprequeinterceptor interface. The specific methods are as follows:
The first step is to implement the clienthttprequeinterceptor interface:
public class RestTemplateInterceptor implements ClientHttpRequestInterceptor {

    @Override
    public ClientHttpResponse intercept(HttpRequest request, byte[] body, ClientHttpRequestExecution execution) throws IOException {
        request.getHeaders().set("traceId", MdcUtil.get());
        return execution.execute(request, body);
    }
}
Step 2: define the configuration class:
@Configuration
public class RestTemplateConfiguration {

    @Bean
    public RestTemplate restTemplate() {
        RestTemplate restTemplate = new RestTemplate();
        restTemplate.setInterceptors(Collections.singletonList(restTemplateInterceptor()));
        return restTemplate;
    }

    @Bean
    public RestTemplateInterceptor restTemplateInterceptor() {
        return new RestTemplateInterceptor();
    }
}
MdcUtil actually uses MDC tools to store and obtain traceId in ThreadLocal
public class MdcUtil {

    private static final String TRACE_ID = "TRACE_ID";

    public static String get() {
        return MDC.get(TRACE_ID);
    }

    public static void add(String value) {
        MDC.put(TRACE_ID, value);
    }
}
Of course, this example does not demonstrate the specific calling of the add method of MdcUtil class. We can generate traceId before executing the interface method in filter, call the add method of MdcUtil class to add it to MDC, and then obtain the traceId in other places of the same request through the get method of MdcUtil class.
IX. unified exception handling
In the past, when we developed the interface, if there were exceptions, in order to give users a more friendly prompt, for example:
@RequestMapping("/test")
@RestController
public class TestController {

    @GetMapping("/add")
    public String add() {
        int a = 10 / 0;
        return "success";
    }
}
If no processing is required, the result of the add interface will directly report an error:

what? Can users directly see the error message?
This interaction mode gives users a very poor experience. In order to solve this problem, we usually catch exceptions in the interface:
@GetMapping("/add")
public String add() {
        String result = "success";
        try {
            int a = 10 / 0;
        } catch (Exception e) {
            result = "Data exception";
        }
        return result;
}
After the interface modification, when there is an exception, "data exception" will be prompted, which is more friendly to users.
It looks good, but there's a problem...
If only one interface is OK, but if there are hundreds of interfaces in the project, do you need to add exception capture code?
The answer is no, so global exception handling comes in handy: RestControllerAdvice.
@RestControllerAdvice
public class GlobalExceptionHandler {

    @ExceptionHandler(Exception.class)
    public String handleException(Exception e) {
        if (e instanceof ArithmeticException) {
            return "Data exception";
        }
        if (e instanceof Exception) {
            return "Server internal exception";
        }
        retur nnull;
    }
}
You only need to handle exceptions in the handleException method, which can be used safely in the business interface, and there is no need to catch exceptions (someone handled them uniformly). It's so refreshing.
Ten can be so elegant
In the past, when we used asynchronous function, there are usually three ways:
-
Inherit Thread class
-
Implement the Runable interface
-
Use thread pool
Let's review:
-
Inherit Thread class
public class MyThread extends Thread {

    @Override
    public void run() {
        System.out.println("===call MyThread===");
    }

    public static void main(String[] args) {
        new MyThread().start();
    }
}
-
Implement the Runable interface
public class MyWork implements Runnable {
    @Override
    public void run() {
        System.out.println("===call MyWork===");
    }

    public static void main(String[] args) {
        new Thread(new MyWork()).start();
    }
}
-
Thread pool usage
public class MyThreadPool {

    private static ExecutorService executorService = new ThreadPoolExecutor(1, 5, 60, TimeUnit.SECONDS, new ArrayBlockingQueue<>(200));

    static class Work implements Runnable {

        @Override
        public void run() {
            System.out.println("===call work===");
        }
    }

    public static void main(String[] args) {
        try {
            executorService.submit(new MyThreadPool.Work());
        } finally {
            executorService.shutdown();
        }

    }
}
These three methods of realizing asynchrony can't be said bad, but spring has helped us extract some common places. We don't need to inherit the Thread class or implement the Runable interface. It's all done.
How to spring asynchronous function?
The first step is to add @ EnableAsync annotation to the springboot project startup class.
@EnableAsync
@SpringBootApplication
public class Application {

    public static void main(String[] args) {
        new SpringApplicationBuilder(Application.class).web(WebApplicationType.SERVLET).run(args);
    }
}
Step 2: add @ Async annotation to the method that needs to use asynchrony:
@Service
public class PersonService {

    @Async
    public String get() {
        System.out.println("===add==");
        return "data";
    }
}
Then call it where you use it: personservice get(); It's amazing to have asynchronous function.
By default, spring will create a thread for our asynchronous method to execute. If the method is called many times, a large number of threads need to be created, which will lead to a waste of resources.
At this time, we can define a thread pool, and the asynchronous method will be automatically submitted to the thread pool for execution.
@Configuration
public class ThreadPoolConfig {

    @Value("${thread.pool.corePoolSize:5}")
    private int corePoolSize;

    @Value("${thread.pool.maxPoolSize:10}")
    private int maxPoolSize;

    @Value("${thread.pool.queueCapacity:200}")
    private int queueCapacity;

    @Value("${thread.pool.keepAliveSeconds:30}")
    private int keepAliveSeconds;

    @Value("${thread.pool.threadNamePrefix:ASYNC_}")
    private String threadNamePrefix;

    @Bean
    public Executor MessageExecutor() {
        ThreadPoolTaskExecutor executor = new ThreadPoolTaskExecutor();
        executor.setCorePoolSize(corePoolSize);
        executor.setMaxPoolSize(maxPoolSize);
        executor.setQueueCapacity(queueCapacity);
        executor.setKeepAliveSeconds(keepAliveSeconds);
        executor.setThreadNamePrefix(threadNamePrefix);
        executor.setRejectedExecutionHandler(new ThreadPoolExecutor.CallerRunsPolicy());
        executor.initialize();
        return executor;
    }
}
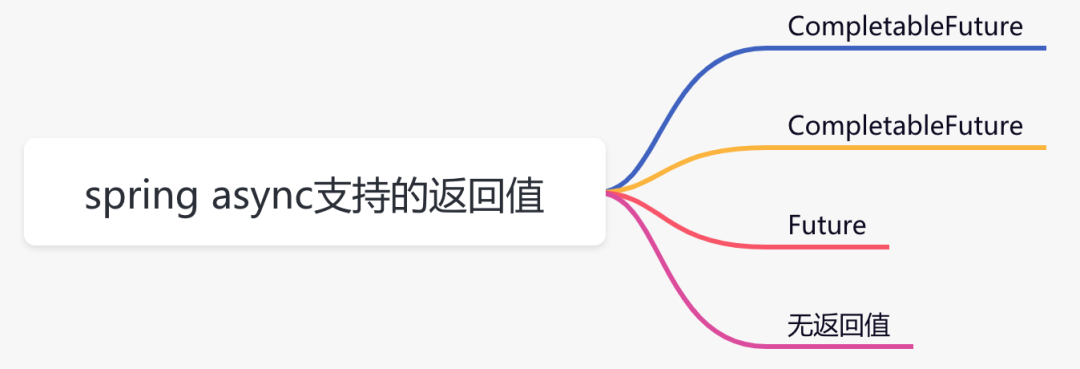
spring asynchronous core method:
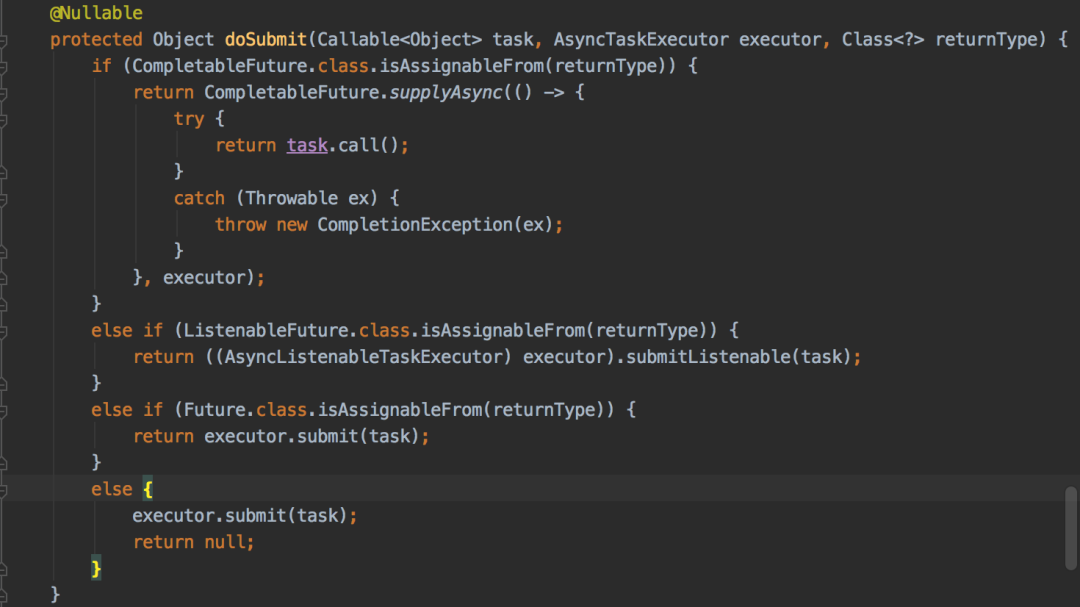
The processing conditions are different according to the return value, which can be divided into the following situations:
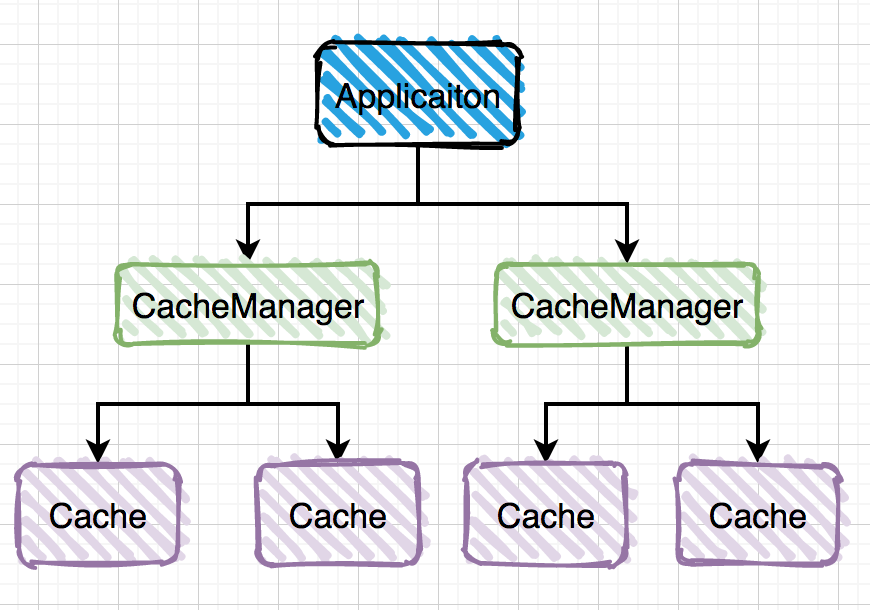
I heard that the cache is easy to use. I didn't expect it to be so easy to use
spring cache architecture diagram:
It currently supports multiple caches:
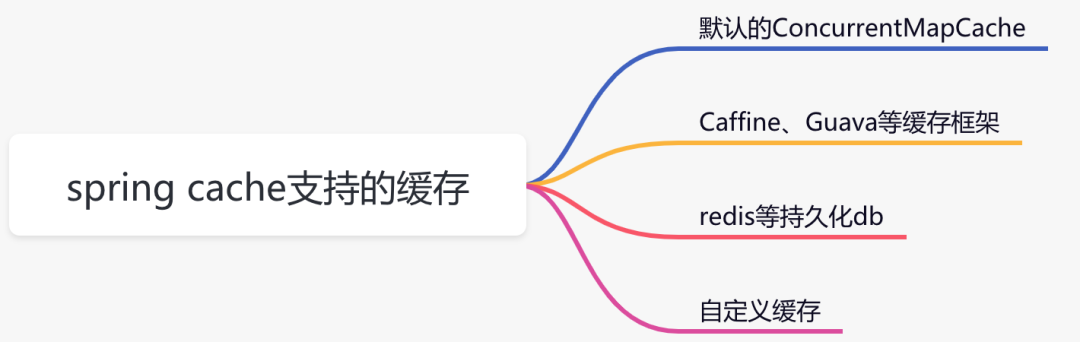
Here we take caffeine as an example, which is officially recommended by spring.
The first step is to introduce the relevant jar package of caffeine
<dependency>
    <groupId>org.springframework.boot</groupId>
    <artifactId>spring-boot-starter-cache</artifactId>
</dependency>
<dependency>
    <groupId>com.github.ben-manes.caffeine</groupId>
    <artifactId>caffeine</artifactId>
    <version>2.6.0</version>
</dependency>
Step 2: configure the CacheManager and enable EnableCaching
@Configuration
@EnableCaching
public class CacheConfig {
    @Bean
    public CacheManager cacheManager(){
        CaffeineCacheManager cacheManager = new CaffeineCacheManager();
        //Caffeine configuration
        Caffeine<Object, Object> caffeine = Caffeine.newBuilder()
                //Expires after a fixed time after the last write
                .expireAfterWrite(10, TimeUnit.SECONDS)
                //Maximum number of cache entries
                .maximumSize(1000);
        cacheManager.setCaffeine(caffeine);
        return cacheManager;
    }
}
Step 3: use the Cacheable annotation to get the data
@Service
public class CategoryService {

   //category is the cache name, #type is the specific key, and el expression is supported
   @Cacheable(value = "category", key = "#type")
   public CategoryModel getCategory(Integer type) {
       return getCategoryByType(type);
   }

   private CategoryModel getCategoryByType(Integer type) {
       System.out.println("According to different type:" + type + "Get different classification data");
       CategoryModel categoryModel = new CategoryModel();
       categoryModel.setId(1L);
       categoryModel.setParentId(0L);
       categoryModel.setName("an electric appliance");
       categoryModel.setLevel(3);
       return categoryModel;
   }
}
Call categoryservice When using the getcategory () method, first get the data from the cafe cache. If you can get the data, you will directly return the data without entering the method body. If you can't get the data, you can get the data directly from the code in the method body and put it into the cafe cache.
I often work overtime recently. I really don't have much time to write articles