Spring IOC container
IOC container:
- Spring container is a core component of spring framework. It will create objects, connect them, configure them, and manage their whole life cycle from creation to destruction. IOC container is a container with the function of dependency injection. It can create objects, instantiate, locate, configure and build dependencies among objects. Usually, we new a new instance, and the control right is in the hands of our programmers. "Control flipping" means that the instance work of new is no longer done by the programmers, but is handed over to the Spring container. In this section, we will learn the Spring container~

1, Spring BeanFactory container
1. Description:
- Spring BeanFactory container, which is the simplest container, provides basic support for DI. It is defined by org.springframework.beans.factory.BeanFactory interface. BeanFactory or related interfaces, such as BeanFactoryAware, InitializingBean and DisposableBean, still have a lot of purposes of backward compatibility with the third-party framework integrated with spring in spring.
- In Spring, there are many implementations of the BeanFactory interface, and the XmlBeanFactory class is most commonly used. The container reads configuration metadata from the XML file, which is used to generate a configured system or application.
2. Use of Spring BeanFactory:
- Step 1: create a project named SpringExample, create a new package named studio_day1 under the src folder, and create a new lib folder in the file path at the same level as the src file.
- Step 2: import all the relevant jar packages of Spring into the lib folder, right-click and select the Add External JARs option to import the Spring library files.
- Step 3: create a new class named HelloWorld and a new class named Main under studio ﹣ Day1.
- Step 4: create the Bean configuration file Spring-conf.xml under the src file
- Step 5: start to configure the Bean file.
HelloWorld.java file content:
package studio_day_1;

public class HelloWorld {

    private String name;

    public String getName() {
        return name;
    }

    public void setName(String name) {
        this.name = name;
    }

    public void sayhello(){
        System.out.println("hello !"+ name);
    }
}
Contents of Main.java file:
package studio_day_1;


import org.springframework.beans.factory.xml.XmlBeanFactory;
import org.springframework.context.ApplicationContext;
import org.springframework.context.support.ClassPathXmlApplicationContext;
import org.springframework.core.io.ClassPathResource;

public class Main {
    public static void main(String[] args) {
        //Create a spring ioc container
        XmlBeanFactory context=new XmlBeanFactory(new ClassPathResource("spring-conf.xml"));
        //FileSystemXmlApplicationContext must use absolute address or xml file will not be found
        HelloWorld helloWorld=(HelloWorld) context.getBean("helloworld");
        helloWorld.sayhello();
    }
}
In the Main function, we need to pay attention to:
- The first step is to use the XmlBeanFactory() API provided by the framework to generate the factory beans and the ClassPathResource() API to load the bean configuration files available under the path CLASSPATH. The XmlBeanFactory() API is responsible for creating and initializing all objects, the beans mentioned in the configuration file.
- The second step uses the getBean() method of the bean factory object generated in the first step to get the desired bean. This method returns a real object through the bean ID in the configuration file, which can finally be used for the actual object. Once you get this object, you can use this object to call any method, which is equivalent to a new object. You can call all the public functions and common properties of this class.
spring-conf.xml configuration file content:
<?xml version="1.0" encoding="UTF-8"?>
<beans xmlns="http://www.springframework.org/schema/beans"
       xmlns:xsi="http://www.w3.org/2001/XMLSchema-instance"
       xsi:schemaLocation="http://www.springframework.org/schema/beans http://www.springframework.org/schema/beans/spring-beans.xsd">

    <bean id="helloworld" class="studio_day_1.HelloWorld">
        <property name="name" value="Spring!"/>
    </bean>
</beans>
Note: in the xml configuration file, the bean id cannot be duplicate. The class must be the package name + class name of the class.
If all configurations are successful, the results are as follows:
2, Spring ApplicationContext container
Spring ApplicationContext container:
- Application Context is a sub interface of BeanFactory and also known as Spring context.
- Application Context is a higher level container in spring. Similar to BeanFactory, it can load the beans defined in the configuration file, gather all the beans together, and allocate the beans when there is a request. In addition, it adds the functions needed by the enterprise, such as parsing text information from the property file and passing events to the specified listener. This container is defined in the org.springframework.context.ApplicationContext interface interface.
- ApplicationContext contains all the functions of BeanFactory. In general, ApplicationContext is better than BeanFactory. Of course, BeanFactory can still be used in lightweight applications, such as mobile devices or applet based applications.
- The most commonly used ApplicationContext interface implementation:
- FileSystemXmlApplicationContext: this container loads defined bean s from an XML file. Here, you need to provide the full path to the constructor XML file.
- ClassPathXmlApplicationContext: this container loads defined beans from an XML file. Here, you do not need to provide the full path of the XML file, just configure the CLASSPATH environment variable correctly, because the container will search the bean configuration file from the CLASSPATH.
- WebXmlApplicationContext: this container will load the bean s defined in the XML file within the scope of a web application.
Next, we test the Spring ApplicationContext container:
The build process is similar to the Spring BeanFactory container, which will not be covered here.
HelloWorld.java file content:
package studio_day_1;

public class HelloWorld {

    private String name;

    public String getName() {
        return name;
    }

    public void setName(String name) {
        this.name = name;
    }

    public void sayhello(){
        System.out.println("hello !"+ name);
    }
}
Main.java file content:
package studio_day_1;


import org.springframework.context.ApplicationContext;
import org.springframework.context.support.ClassPathXmlApplicationContext;
import org.springframework.context.support.FileSystemXmlApplicationContext;

public class Main {
    public static void main(String[] args) {
        //Create a spring ioc container
        ApplicationContext context=new ClassPathXmlApplicationContext("spring-conf.xml");
        ApplicationContext context1=
                new FileSystemXmlApplicationContext("C:\\Users\\ouguangji\\Desktop\\Envs\\spring_stdio_1\\src\\spring-conf.xml");
        //FileSystemXmlApplicationContext must use absolute address or xml file will not be found
        HelloWorld helloWorld=(HelloWorld) context.getBean("helloworld");
        HelloWorld helloWorld1=(HelloWorld) context1.getBean("helloworld");
        helloWorld.sayhello();
        helloWorld1.sayhello();
    }
}
You can use ClassPathXmlApplicationContext from above. You can directly use xml files without absolute path. However, when using FileSystemXmlApplicationContext, you must write the xml files into the absolute path to run normally.
The contents of the xml file are as follows:
<?xml version="1.0" encoding="UTF-8"?>
<beans xmlns="http://www.springframework.org/schema/beans"
       xmlns:xsi="http://www.w3.org/2001/XMLSchema-instance"
       xsi:schemaLocation="http://www.springframework.org/schema/beans http://www.springframework.org/schema/beans/spring-beans.xsd">

    <bean id="helloworld" class="studio_day_1.HelloWorld">
        <property name="name" value="Spring!"/>
    </bean>
</beans>
3, Spring Bean postprocessor
Spring - Bean postprocessor Description:
-
The Bean postprocessor allows additional processing of the Bean before and after calling the initialization method.
-
The BeanPostProcessor interface defines a callback method, which you can implement to provide your own instantiation logic, dependency analysis logic, etc. You can also instantiate the Spring container by inserting the implementation of one or more beanpostprocessors, configure and initialize a bean, and then implement some custom logic callback methods.
-
You can configure multiple BeanPostProcessor interfaces to control the execution order of these BeanPostProcessor interfaces by setting the order property provided by the Ordered interface of the BeanPostProcessor implementation.
-
BeanPostProcessor can operate on bean (or object) instances, which means that the Spring IoC container instantiates a bean instance, and then the BeanPostProcessor interface does their work.
-
ApplicationContext will automatically detect the beans defined by the implementation of the BeanPostProcessor interface, register these beans as postprocessors, and then call them when appropriate by creating the beans in the container.
The implementation steps are as follows:
| step | describe |
|---|---|
| 1 | Create a project named SpringExample, and create a package com.tutorialspot in the src folder where you created the project. |
| 2 | Use the Add External JARs option to add the required Spring libraries. |
| 3 | Create Java classes HelloWorld, InitHelloWorld, and MainApp in the package. |
| 4 | Create the Beans configuration file spring-conf.xml in the src folder. |
| 5 | The final step is to create the contents of all the Java files and Bean configuration files and run the application, as explained below. |
Here is the contents of HelloWorld.java file:
package studio_day_1;

public class HelloWorld {
    private String message;
    public void setMessage(String message){
        this.message  = message;
    }
    public void getMessage(){
        System.out.println("Your Message : " + message);
    }
    public void init(){
        System.out.println("Bean is going through init.");
    }
    public void destroy(){
        System.out.println("Bean will destroy now.");
    }
}
This is the contents of InitHelloWorld.java file:
- This is a very simple example of implementing a bean processor that enters the name of any bean before and after its initialization. You can implement more complex logic before and after initializing the bean, because you have two ways to access the postprocessor of the built-in bean object.
package studio_day_1;

import org.springframework.beans.factory.config.BeanPostProcessor;
import org.springframework.beans.BeansException;
public class InitHelloWorld implements BeanPostProcessor {
    public Object postProcessBeforeInitialization(Object bean, String beanName) throws BeansException {
        System.out.println("BeforeInitialization : " + beanName);
        return bean;  // you can return any other object as well
    }
    public Object postProcessAfterInitialization(Object bean, String beanName) throws BeansException {
        System.out.println("AfterInitialization : " + beanName);
        return bean;  // you can return any other object as well
    }
}
This is the Main.java file content:
package studio_day_1;


import org.springframework.context.support.AbstractApplicationContext;
import org.springframework.context.support.ClassPathXmlApplicationContext;


public class Main {
    public static void main(String[] args) {
        AbstractApplicationContext context = new ClassPathXmlApplicationContext("spring-conf.xml");
        HelloWorld obj = (HelloWorld) context.getBean("helloworld");
        obj.getMessage();
        context.registerShutdownHook();
    }
}
This is the content of the spring-conf.xml file:
<?xml version="1.0" encoding="UTF-8"?>
<beans xmlns="http://www.springframework.org/schema/beans"
       xmlns:xsi="http://www.w3.org/2001/XMLSchema-instance"
       xsi:schemaLocation="http://www.springframework.org/schema/beans http://www.springframework.org/schema/beans/spring-beans.xsd">

    <bean id="helloworld" class="studio_day_1.HelloWorld"
    init-method="init" destroy-method="destroy">
        <property name="message" value="Hello World!"/>
    </bean>

    <bean class="studio_day_1.InitHelloWorld"/>
</beans>
The operation results after configuration are as follows: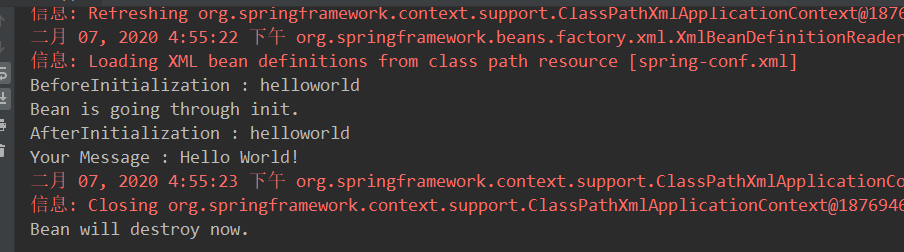
According to the mechanism of Spring Bean postprocessor, we can easily perform some operations before and after the creation of the object, which can be more flexible in the development process.

