Spring
Because the user's needs change, it is necessary to greatly modify the original code. Such a program is very low!
Chinese document: Chinese document: https://www.docs4dev.com/docs/zh/spring-framework/5.1.3.RELEASE/reference
Configuration dependency
<dependencies>
    <dependency>
        <groupId>org.springframework</groupId>
        <artifactId>spring-webmvc</artifactId>
        <version>5.3.8</version>
    </dependency>
    <dependency>
        <groupId>org.springframework</groupId>
        <artifactId>spring-jdbc</artifactId>
        <version>5.3.8</version>
    </dependency>
</dependencies>
Advantages of Spring
- Spring is an open source free framework (container)!
- Spring is a lightweight, non intrusive framework!
- Control flip (IOC), barely slice programming (AOP)!
- Support the processing of conference affairs and support the framework integration!
To sum up, Spring is a lightweight control flip (IOC) and slice oriented programming (AOP) framework
Composition of Spring (7 modules)

The premise of learning SpringBoot is to fully master Spring and Spring MVC
Disadvantages of Spring
Configure hell!
IOC theoretical derivation
- UserDao interface
- UserDaoImpl implementation class
- UserService business interface
- UserServiceImpI business implementation class
Each interface may have many implementation classes. At this time, in the face of different needs of different users, if we recode for each similar demand, it will undoubtedly be very time-consuming and thankless (it means that it will be very troublesome to maintain in the later stage, which is suspected to affect the whole body). We can improve these similar codes through design patterns
IOC (control flip) is a decoupling strategy referenced by Spring, which is a bit similar to the adapter mode (the difference is: the adapter is to realize functions, this is to understand coupling). Put two diagrams to help understand
Without IOC:
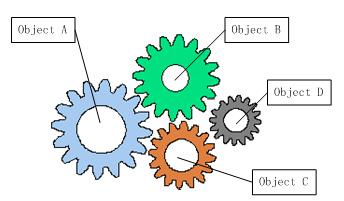
With IOC:
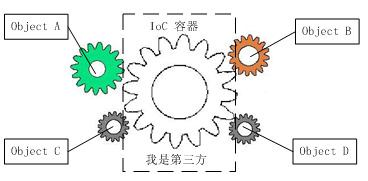
Suddenly remembered that crazy God once said: If direct contact seems very troublesome, add a layer between them as a transition! If you're still in trouble, just add another layer!
Let's specifically operate IOC:
Interface:
package com.zhang.dao;

public interface UserDao {
    void getUser();
}
Implementation class 1:
package com.zhang.dao;

public class UserDaoMysqlImpl implements UserDao{
    @Override
    public void getUser() {
        System.out.println("Mysql get user!");
    }
}
Implementation class 2:
package com.zhang.dao;

public class UserDaoSQLServerImpl implements UserDao{

    @Override
    public void getUser() {
        System.out.println("SQLServer get user!");
    }
}
Information:
package com.zhang.info;

public class User {
    String name;
    int id;

    public void setId(int id) {
        this.id = id;
    }

    public void setName(String name) {
        this.name = name;
    }

    @Override
    public String toString() {
        return "User{" +
                "name='" + name + '\'' +
                ", id=" + id +
                '}';
    }
}
IOC profile:
<?xml version="1.0" encoding="UTF-8"?>
<beans xmlns="http://www.springframework.org/schema/beans"
       xmlns:xsi="http://www.w3.org/2001/XMLSchema-instance"
       xsi:schemaLocation="http://www.springframework.org/schema/beans http://www.springframework.org/schema/beans/spring-beans.xsd">

    <bean id="mysql" class="com.zhang.dao.UserDaoMysqlImpl"/>
    <bean id="SQLServer" class="com.zhang.dao.UserDaoSQLServerImpl"/>
    <bean id="defaultUser" class="com.zhang.info.User">
        <property name="name" value="zhangSan"/>
        <property name="id" value="0"/>
    </bean>
</beans>
Pay attention here! The bean tag is equivalent to an object. The id is the exclusive name, and the class represents the type of the object. The word tag property means the attribute in the object, and the name is the attribute name. If the attribute is a basic type, we need to use value to assign. If it is a non basic type, we need to use ref to assign. The assignment content is the id value of the bean defined above
Test (call) method:
import com.zhang.info.User;
import org.junit.Test;
import org.springframework.context.ApplicationContext;
import org.springframework.context.support.ClassPathXmlApplicationContext;

public class MyTest {
    @Test
    public void test1(){
        ApplicationContext context = new ClassPathXmlApplicationContext("beans.xml");
        User defaultUser = (User) context.getBean("defaultUser");
        System.out.println(defaultUser);
    }
}
The relationship between ApplicationContext and ClassPathXmlApplicationContext is very complex (the difference is about 5 or 6 generations). We only need to know how to use it here... Find our configuration file through ClassPathXmlApplicationContext, and then index the objects we need through getBean method, You can get the objects that Spring "new" for us by strong conversion. In this way, we can get the objects through Spring, a third-party framework, and avoid a lot of coupling This is IOC. Objects are created, managed and assembled through Spring
How IOC creates objects
-
The default implementation creates objects using a parameterless construct
-
If we want to use a parametric construct
-
Use subscript assignment
<bean id="defaultUser" class="com.zhang.info.User"> <constructor-arg index="0" value="ZhangSan"/> <constructor-arg index="1" value="100"/> </bean> -
Type matching through parameters (not recommended):
<bean id="defaultUser" class="com.zhang.info.User"> <constructor-arg type="java.lang.String" value="zhangSan"/> <constructor-arg type="int" value="1000"/> </bean> -
Match by parameter name:
<bean id="defaultUser" class="com.zhang.info.User">
    <constructor-arg name="name" value="zhangSan"/>
    <constructor-arg name="id" value="1000"/>
</bean>
-
-
IOC uses singleton mode by default, and the getBean method gets the same object
Spring configuration
1. Alias
<alias name="defaultUser" alias="user1"/>
In the front is the name set by the original Bean class, followed by the alias
<bean id="defaultUser" class="com.zhang.info.User" name="user,u1">
name can also be used as an alias, and separators (spaces and commas) can be used
2.import
Many people develop different beans XML we need to merge all our beans into one. At this time, we need to import,
<import resource="file name"/>
Dependency injection
Constructor Injection
-
The default implementation creates objects using a parameterless construct
-
If we want to use a parametric construct
-
Use subscript assignment
<bean id="defaultUser" class="com.zhang.info.User"> <constructor-arg index="0" value="ZhangSan"/> <constructor-arg index="1" value="100"/> </bean> -
Type matching through parameters (not recommended):
<bean id="defaultUser" class="com.zhang.info.User"> <constructor-arg type="java.lang.String" value="zhangSan"/> <constructor-arg type="int" value="1000"/> </bean> -
Match by parameter name:
<bean id="defaultUser" class="com.zhang.info.User">
    <constructor-arg name="name" value="zhangSan"/>
    <constructor-arg name="id" value="1000"/>
</bean>
-
set injection [key]
- Dependency injection: Set injection!
- Dependency: the creation of bean objects depends on the container
- Inject all the attributes in the formation, and the container will inject them!
Remember to add the set method to the class!
[the external chain image transfer fails. The source station may have an anti-theft chain mechanism. It is recommended to save the image and upload it directly (img-uBQTLgTG-1625279450189)(C:\Users \ Zhang Bowen \ appdata \ roaming \ typora user images \ image-20210628080402934. PNG)]
[the external chain image transfer fails. The source station may have an anti-theft chain mechanism. It is recommended to save the image and upload it directly (img-x7WqYwkT-1625279450191)(C:\Users \ Zhang Bowen \ appdata \ roaming \ typora \ typora user images \ image-20210628081359289. PNG)]
Expansion mode injection
p injection and c Injection
You need to add a reference to the header
<beans xmlns="http://www.springframework.org/schema/beans"
       xmlns:xsi="http://www.w3.org/2001/XMLSchema-instance"
       xmlns:p="http://www.springframework.org/schema/p"
       xmlns:c="http://www.springframework.org/schema/c"
       xsi:schemaLocation="http://www.springframework.org/schema/beans http://www.springframework.org/schema/beans/spring-beans.xsd">
    <!--P injection-->
<bean id="defaultUser2" class="com.zhang.info.User" name="user2" p:id="12" p:name="LiSi"/>
    <!--C injection-->
<bean id="defaultUser3" class="com.zhang.info.User" c:id="13" c:name="wangWu"/>
Automatic assembly of Bean
There are three implementations of Bean automatic assembly: java automatic assembly, xml automatic assembly, hidden automatic assembly,
Test environment: a person has two pets: cat and dog
Resource class:
public class Cat {
    public void shout(){
        System.out.println("Meow~");
    }
}
public class Dog {
    public void shout(){
        System.out.println("Woof!");
    }
}
public class Person {
    private Cat cat;
    private Dog dog;
    String name;
    public void show(){
        cat.shout();
        dog.shout();
        System.out.println("person:"+name);
    }

    public void setCat(Cat cat) {
        this.cat = cat;
    }

    public void setDog(Dog dog) {
        this.dog = dog;
    }

    public void setName(String name) {
        this.name = name;
    }
}
Profile:
In this way, if there are multiple beans of the same type in the configuration file, an exception will occur
<bean id="cat" class="com.zhang.info.Cat"/>
<bean id="dog" class="com.zhang.info.Dog"/>
<bean id="person1" class="com.zhang.info.Person" autowire="byType" >
    <property name="name" value="ZhangSan"/>
</bean>
In this way, make sure that the configuration file contains a Bean with the same name as the object name, otherwise a null pointer exception will be reported
<bean id="cat" class="com.zhang.info.Cat"/>
<bean id="dog" class="com.zhang.info.Dog"/>
<bean id="person1" class="com.zhang.info.Person" autowire="byName" >
    <property name="name" value="ZhangSan"/>
</bean>
Do not forget to add the set method!!!
Automatic assembly using annotations
To use annotations:
- Import constraints
- Configuration annotation support
In fact, it is to add:
<beans xmlns="http://www.springframework.org/schema/beans"
       xmlns:xsi="http://www.w3.org/2001/XMLSchema-instance"
       xmlns:p="http://www.springframework.org/schema/p"
       xmlns:c="http://www.springframework.org/schema/c"
       xmlns:context="http://www.springframework.org/schema/context"
       xsi:schemaLocation="http://www.springframework.org/schema/beans
       http://www.springframework.org/schema/beans/spring-beans.xsd
       http://www.springframework.org/schema/context
       http://www.springframework.org/schema/context/spring-context.xsd">

<context:annotation-config/>
</beans>
@Autowired can be used on attributes or set methods
However, using @ Autowired, we can also not write the set method, provided that the automatically loaded attribute exists in IOC(Spring container) and the name is consistent with the attribute name (inconsistency is also OK, but we must ensure that there is only one Bean with this attribute, with bytype first and byname second)
If you really need more than one Bean of this type, but it is inconvenient to write, you can match @ Autowired with @ Qualifier(value = "Bean id name") to specify the Bean
Using annotation development
After spring 4, to develop using annotations, you must import AOP packages
Using annotations requires importing context constraints,
Preparation (just write an xml file, and zero configuration file can be realized through annotation):
<?xml version="1.0" encoding="UTF8"?>
<beans xmlns="http://www.springframework.org/schema/beans"
       xmlns:xsi="http://www.w3.org/2001/XMLSchema-instance"
       xmlns:p="http://www.springframework.org/schema/p"
       xmlns:c="http://www.springframework.org/schema/c"
       xmlns:context="http://www.springframework.org/schema/context"
       xsi:schemaLocation="http://www.springframework.org/schema/beans
       http://www.springframework.org/schema/beans/spring-beans.xsd
       http://www.springframework.org/schema/context
       http://www.springframework.org/schema/context/spring-context.xsd">
    <!--Scan the classes under this package,It's their notes that take effect-->
    <context:component-scan base-package="com.zhang.info"/>
    <context:annotation-config/>
</beans>
-
bean
-
@Component
//This annotation is equivalent to < bean id = "person" class = "com. Zhang. Info. Person" / >
//Use before class
-
-
How are attributes injected
-
//This annotation is equivalent to < property name = "name" value = "Zhangsan" / >
//Used before the underlying property or set method
@Value("ZhangSan")
-
-
Derived annotation
@Component has several derived annotations, which will be layered according to mvc three-tier architecture in web development
- dao [@Repository]
- service [@Service]
- controller [@Controller]
The functions of these four annotations are the same. They all add the policies of a class to the configuration file
-
Automatic assembly (already written)
-
Scope
//Set to singleton mode (default)
@Scope("singleton")
Equivalent to this
[the external chain image transfer fails. The source station may have an anti-theft chain mechanism. It is recommended to save the image and upload it directly (img-Bi7EQEh3-1625279450192)(C:\Users \ Zhang Bowen \ appdata \ roaming \ typora user images \ image-20210629073058457. PNG)]
-
Summary
xml is more versatile, can be used in any situation, and easy to maintain But it is very complex and inconvenient to write, which in turn is the advantage of annotation,
Therefore, we can combine xml and annotation, write bean definition in xml and injection in annotation
When we use it, we must pay attention to whether the annotation is effective!!!
Use Java to configure Spring
Now we don't need the xml configuration of Spring at all, and leave it all to java
JavaConfig is a subproject of Spring and has become a core function after Spring 4
The following is a simple application of javaconfig
<?xml version="1.0" encoding="UTF-8"?>
<beans xmlns="http://www.springframework.org/schema/beans"
    xmlns:xsi="http://www.w3.org/2001/XMLSchema-instance"
    xsi:schemaLocation="http://www.springframework.org/schema/beans
http://www.springframework.org/schema/beans/spring-beans-3.2.xsd">

    <bean id="button" class="javax.swing.JButton">
        <constructor-arg value="Hello World" />
    </bean>

    <bean id="anotherButton" class="javax.swing.JButton">
        <property name="icon" ref="icon" />
    </bean>

    <bean id="icon" class="javax.swing.ImageIcon">
        <constructor-arg>
            <bean class="java.net.URL">
              <constructor-arg value="http://morevaadin.com/assets/images/learning_vaadin_cover.png" />
            </bean>
        </constructor-arg>
    </bean>
</beans>
This xml file can be replaced by the following code:
import java.net.MalformedURLException;
import java.net.URL;
import javax.swing.Icon;
import javax.swing.ImageIcon;
import javax.swing.JButton;
import org.springframework.context.annotation.Bean;
import org.springframework.context.annotation.Configuration;

@Configuration
public class MigratedConfiguration {
    @Bean
    public JButton button() {
        return new JButton("Hello World");
    }

    @Bean
    public JButton anotherButton(Icon icon) {
        return new JButton(icon);
    }

    @Bean
    public Icon icon() throws MalformedURLException {
        URL url = new URL(
                "http://morevaadin.com/assets/images/learning_vaadin_cover.png");
        return new ImageIcon(url);
    }
}
The following is a detailed description of some notes:
@Configuration
Mark this label on the class to indicate that this class is a configuration class
@ComponentScan
xml equivalent
<context:componentscan basepakage=>
@Bean
The definition of bean is equivalent to that of xml
<bean id="objectMapper" class="org.codehaus.jackson.map.ObjectMapper" />
@Enablewebmvc (unimportant)
MVC equivalent to xml: annotation driven
@ImportResource
xml equivalent
<import resource="applicationContext-cache.xml">
@PropertySource
spring 3.1 was introduced. It is an annotation based on java config, which is used to read the properties file
AOP
1. What is AOP?
AOP means slice oriented programming, which realizes the same maintenance of program functions through pre compilation and runtime dynamic agent. AOP is the continuation of oop, a hot spot in software development and an important content in Spring framework. It is a derivative reflection of functional transformation. AOP can be used to isolate the older parts of business logic, Thus, the coupling between various parts of business logic is reduced, the reusability of program is improved, and the efficiency of development is improved
[the external chain image transfer fails. The source station may have an anti-theft chain mechanism. It is recommended to save the image and upload it directly (img-O91H2roY-1625279450193)(C:\Users \ Zhang Bowen \ appdata \ roaming \ typora user images \ image-20210701041505935. PNG)]
Using Spring to implement AOP
[key] using AOP implantation, you only need to import one package
<dependency>
        <groupId>org.aspectj</groupId>
        <artifactId>aspectjweaver</artifactId>
        <version>1.9.7</version>
</dependency>
Method 1: use the Spring API interface
[the external chain image transfer fails. The source station may have an anti-theft chain mechanism. It is recommended to save the image and upload it directly (img-G67hmk3g-1625279450194)(C:\Users \ Zhang Bowen \ appdata \ roaming \ typora user images \ image-20210701044021274. PNG)]
Five AOP interfaces of Spring
Example: for the added, deleted, modified, checked and added log function originally implemented, it is required that the source code cannot be modified!
Logs added after method execution:
public class AfterLog implements AfterReturningAdvice {
    @Override
    public void afterReturning(Object o, Method method, Object[] objects, Object o1) throws Throwable {
        System.out.println("Yes" + method.getName() + "Method returns the result" + o);
    }
}
Logs added before method execution:
public class log implements MethodBeforeAdvice {

    //This method is the same as the invoke of dynamic proxy
    @Override
    public void before(Method method, Object[] objects, Object o) throws Throwable {
        System.out.println(o.getClass().getName() + "of" + method.getName() + "Method was executed!");
    }
}
Add, delete, modify and query interface:
public interface UserService {
    public void add();
    public void delete();
    public void update();
    public void select();

}
Add, delete, modify and query implementation classes:
public class UserServiceImpl implements UserService{
    @Override
    public void add() {
        System.out.println("Added a user");
    }

    @Override
    public void delete() {
        System.out.println("A user was deleted");
    }

    @Override
    public void update() {
        System.out.println("A user has been updated");
    }

    @Override
    public void select() {
        System.out.println("A user was queried");
    }
}
Next, we will configure bean XML file:
<?xml version="1.0" encoding="UTF-8"?>
<beans xmlns="http://www.springframework.org/schema/beans"
       xmlns:xsi="http://www.w3.org/2001/XMLSchema-instance"
       xmlns:aop="http://www.springframework.org/schema/aop"
       xsi:schemaLocation="http://www.springframework.org/schema/beans
        http://www.springframework.org/schema/beans/spring-beans.xsd
        http://www.springframework.org/schema/aop
        http://www.springframework.org/schema/aop/spring-aop.xsd
">
    <bean id="log" class="com.zhang.log.log"/>
    <bean id="afterLog" class="com.zhang.log.AfterLog"/>
    <bean id="userService" class="com.zhang.service.UserServiceImpl"/>
    <!--to configure app:Need to substitute aop Constraints of-->
    <aop:config>
        <!--breakthrough point:expression:expression(Location to execute! The format is modified part of speech name.Method name(Parameter name))-->
        <aop:pointcut id="pointcut" expression="execution(* com.zhang.service.UserServiceImpl.*(..))"/>
        <!--Execute surround increase!-->
        <aop:advisor advice-ref="log" pointcut-ref="pointcut"/>
        <aop:advisor advice-ref="afterLog" pointcut-ref="pointcut"/>
    </aop:config>

</beans>
Here are a few points to note:
- To import aop dependencies!
- aop related configurations are in the aop config tag. Don't use them indiscriminately!!
- AOP pointcut is the proxy object, and aop:advisor is the proxy object
Finally, the call in the test class is good.
public class MyTest {
    @Test
    public void test1(){
        ApplicationContext context = new ClassPathXmlApplicationContext("Beans.xml");
        //The dynamic agent must be an interface. If it is written as an implementation class, an exception will be reported
        UserService userService = context.getBean("userService", UserService.class);
        userService.add();
    }
}
Method 2: custom class (facet)
Write a custom class:
public class DiyPointCut {
    public void before(){
        System.out.println("========Before method execution=======");
    }
    public void after(){
        System.out.println("========After method execution=======");
    }
}
Configure in xml file
<!--    Method 2:Custom class-->
<bean id="userService" class="com.zhang.service.UserServiceImpl"/>
    <bean id="diy" class="com.zhang.diy.DiyPointCut"/>
    <aop:config>
<!--        Define section-->
        <aop:aspect ref="diy">
            <!--Define pointcuts-->
            <aop:pointcut id="point" expression="execution(* com.zhang.service.UserServiceImpl.*(..))"/>
            <!--notice-->
            <aop:before method="before" pointcut-ref="point"/>
            <aop:after method="after" pointcut-ref="point"/>
        </aop:aspect>
    </aop:config>
The last call is good.
public class MyTest {
    @Test
    public void test1(){
        ApplicationContext context = new ClassPathXmlApplicationContext("Beans.xml");
        //A dynamic proxy must be an interface. If it is written as an implementation class, an exception will be reported
        UserService userService = context.getBean("userService", UserService.class);
        userService.add();
    }
}
Method 3: Annotation
Proxy class (not, just the additional code added here)
@Aspect
public class AnnotationPointCut {
    @Before("execution(* com.zhang.service.UserServiceImpl.*(..))")
    public void before(){
        System.out.println("=======Before method execution=======");
    }

}
be careful! Don't use this @ Before under junity... It's too white
xml configuration file:
<!--Method 3-->
<bean id="annotationPointCut" class="com.zhang.diy.AnnotationPointCut"/>
<!--Enable annotation support-->
<aop:aspectj-autoproxy/>
The last call is good.
public class MyTest {
    @Test
    public void test1(){
        ApplicationContext context = new ClassPathXmlApplicationContext("Beans.xml");
        //A dynamic proxy must be an interface. If it is written as an implementation class, an exception will be reported
        UserService userService = context.getBean("userService", UserService.class);
        userService.add();
    }
}
Expand the writing of surround annotations
@Around("execution(* com.zhang.service.UserServiceImpl.*(..))")
public void around(ProceedingJoinPoint jp){
    System.out.println("Surround front");
    System.out.println(jp.getSignature());
    try {
        jp.proceed();//Execution entry point
    } catch (Throwable throwable) {
        throwable.printStackTrace();
    }
    System.out.println("After surround");
}
This is the advantage of agent mode!
The function expansion can be realized without changing the calling function!!!
Integrate Mybatis
Dependency summary:
<dependencies>
    <!--    Spring   -->
    <dependency>
        <groupId>org.springframework</groupId>
        <artifactId>spring-webmvc</artifactId>
        <version>5.3.8</version>
    </dependency>
    <!--    mysql    -->
    <dependency>
        <groupId>mysql</groupId>
        <artifactId>mysql-connector-java</artifactId>
        <version>5.1.46</version>
    </dependency>
    <!--    mybatis    -->
    <dependency>
        <groupId>org.mybatis</groupId>
        <artifactId>mybatis</artifactId>
        <version>3.5.2</version>
    </dependency>
    <!--    junit    -->
    <dependency>
        <groupId>junit</groupId>
        <artifactId>junit</artifactId>
        <version>4.12</version>
    </dependency>
    <!--Spring and Mybatis Consolidation also requires-->
    <dependency>
        <groupId>org.springframework</groupId>
        <artifactId>spring-jdbc</artifactId>
        <version>5.3.8</version>
    </dependency>

    <!-- https://mvnrepository.com/artifact/org.aspectj/aspectjweaver -->
    <dependency>
        <groupId>org.aspectj</groupId>
        <artifactId>aspectjweaver</artifactId>
        <version>1.9.7</version>
    </dependency>
    <dependency>
            <groupId>org.mybatis</groupId>
            <artifactId>mybatis-spring</artifactId>
            <version>2.0.6</version>
        </dependency>
</dependencies>
Then there are a series of operations to configure Mybatis, which will not be described one by one here
mybatis -spring
Official documents: http://mybatis.org/spring/zh/index.html
Write the following Spring configuration file
<?xml version="1.0" encoding="UTF8"?>
<beans xmlns="http://www.springframework.org/schema/beans"
       xmlns:xsi="http://www.w3.org/2001/XMLSchema-instance"
       xmlns:aop="http://www.springframework.org/schema/aop"
       xsi:schemaLocation="http://www.springframework.org/schema/beans
        http://www.springframework.org/schema/beans/spring-beans.xsd
        http://www.springframework.org/schema/aop
        http://www.springframework.org/schema/aop/spring-aop.xsd
">


    <!--If you want to Spring Try it inside Mybatis We must have a data source and sqlSessionFactory-->
<!--DataSource:use Spring Data source replacement for Mybatis Configuration of
    We use it here Spring Self contained JDBC

-->

    <bean id="datasource" class="org.springframework.jdbc.datasource.DriverManagerDataSource">
        <property name="driverClassName" value="com.mysql.jdbc.Driver"/>
        <property name="url" value="jdbc:mysql://localhost:3306/justplay? useSSL=true& useUnicode=true& Characterencoding = UTF-8 "/ > <! -- database connection -- >
        <property name="username" value="root"/><!--user name-->
        <property name="password" value="zbw537680"/><!--password-->
    </bean>

<!--sqlSessionFactory-->
    <bean id="sqlSessionFactory" class="org.mybatis.spring.SqlSessionFactoryBean">
        <property name="dataSource" ref="datasource"/>
        <!--binding Mabatis configuration file-->
        <property name="configLocation" value="classpath:mybatis-config.xml"/>
        <!--use Spring To configure Mybatis Content in-->
        <property name="mapperLocations" value="classpath:com/zhang/mapper/UserMapper.xml"/>
    </bean>
    <bean id="sqlSession" class="org.mybatis.spring.SqlSessionTemplate">
        <constructor-arg ref="sqlSessionFactory"/>
    </bean>
    <bean id="userMapper" class="com.zhang.mapper.UserMapperImpl">
        <property name="sqlSession" ref="sqlSession"/>
    </bean>
</beans>
Then we can delete all the relevant configuration files in Mybatis, QAQ
In addition, we need to write an implementation class. The reason why we want to write an implementation class is that we don't send help to make sqlSession object obtain Mapper object directly through Spring, so we need to implement the class manually. The code is as follows:
public class UserMapperImpl implements UserMapper{

    //Originally, all our sql operations were executed with SqlSession. Now we use SqlSessionTemplate

    public SqlSessionTemplate sqlSession;

    public void setSqlSession(SqlSessionTemplate sqlSession) {
        this.sqlSession = sqlSession;
    }

    @Override
    public List<User> selectUser() {
        UserMapper mapper=sqlSession.getMapper(UserMapper.class);
        return mapper.selectUser();
    }
}
Finally, the test code:
public class MyTest {
    @Test
    public void test1() throws IOException {
        ApplicationContext context = new ClassPathXmlApplicationContext("spring-dao.xml");
        UserMapper userMapper = context.getBean("userMapper", UserMapper.class);
        List<User> users = userMapper.selectUser();
        for (User user : users) {
            System.out.println(user);
        }
    }
}
It is also mentioned here that SqlSessionTemplate is thread safe!