catalogue
c namespace injection (through constructor injection)
Singleton mode (spring is singleton by default)
Automatic assembly using annotations
AOP (aspect oriented programming)
Transaction management in Spring
Declarative transactions: AOP (common)
Programming transactions: the management of transactions needs to be declared in the code
Spring is a lightweight control inversion and aspect oriented programming framework
Most complete XML configuration
Introduction:
Spring: Spring ----- > brings spring to the software industry
The Spring framework is due to software development Created by the complexity of. Spring uses a basic JavaBean to do this. Previously, it could only be done by EJB Things done. However, the use of Spring is not limited to server-side development. In terms of simplicity, testability and loose coupling, most Java applications can benefit from Spring.
advantage:
- Open source free framework.
- Lightweight non intrusive framework.
- Inversion of control (IOC), aspect oriented programming (AOP).
- Support transaction processing and framework integration.
official:
In 2002, the prototype of Spring {interface21 was launched for the first time
Spring 1.0 was released in 2004 0 version
By Rod Johnson
SSH: Struct2 + Spring + Hibernate
SSM: SppringMVC + Spring + Mybatis
Spring Download:
Import package required by Maven
<!-- https://mvnrepository.com/artifact/org.springframework/spring-webmvc -->
<dependency>
    <groupId>org.springframework</groupId>
    <artifactId>spring-webmvc</artifactId>
    <version>5.3.9</version>
</dependency>


<dependency>
    <groupId>org.springframework</groupId>
    <artifactId>spring-jdbc</artifactId>
    <version>5.3.9</version>
</dependency>
form:
Seven modules
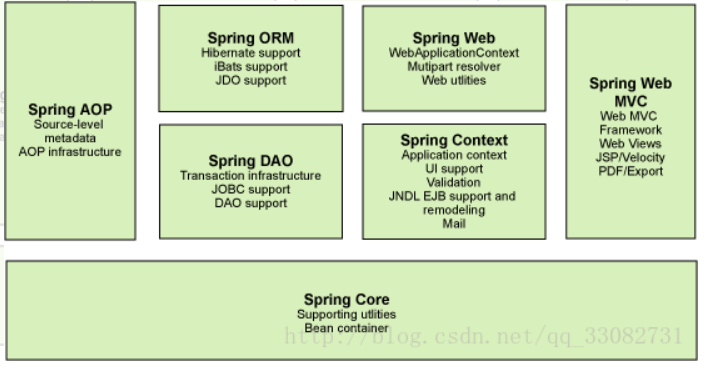
Blog https://blog.csdn.net/qq_33082731/article/details/75066956
expand:
SpringBoot:
A framework for rapid development of a single microservice.
Agreement is greater than configuration!
Spring Cloud:
Based on Spring Boot
Most companies are using springBoot for rapid development. The premise of learning Spring Boot is to fully master Spring and Spring MVC
Disadvantages: after development for too long, it violates the original concept! Configuration is cumbersome.
IOC theoretical derivation
Control inversion (IOC)
Using a Set interface
void getUserdao(UserDao  userdao){
    this.userdao=userdao;
}
This idea is just a prototype.
HelloSpring
1. Create entity class
public class Hello {
    private String name;

    public String getName() {
        return name;
    }

    public void setName(String name) {
        this.name = name;
    }
}
2. Create the configuration file ApplicationContext xml
<?xml version="1.0" encoding="UTF-8"?>
<beans xmlns="http://www.springframework.org/schema/beans"
       xmlns:xsi="http://www.w3.org/2001/XMLSchema-instance"
       xsi:schemaLocation="http://www.springframework.org/schema/beans
        https://www.springframework.org/schema/beans/spring-beans.xsd">
<!--use Spring To create an object, in Spring These have become bean
    Hello hello= new Hello();

    id=Instance name   property Assign values to parameters
    <bean id="hello" class="com.song.pojo.Hello">
        <property name="name" value="Spring"/>
    </bean>
    ref=quote spring Created object in container

-->
    <bean id="hello" class="com.song.pojo.Hello">
        <property name="name" value="Spring"/>
    </bean>

</beans>
3. Test
public static void main(String[] args) {
        //Gets the context object for spring
        ApplicationContext context= new ClassPathXmlApplicationContext("ApplicationContext.xml");
        //Our objects are now managed in spring. If we want to use them, we can get them directly
        Hello hello=(Hello) context.getBean("hello");
        System.out.println(hello.toString());
    }
How IOC creates objects
1. Create objects using parameterless construction (default)
<bean id="hello" class="com.song.pojo.Hello">
        <property name="name" value="Spring"/>
    </bean>
2. Creating with parametric constructs
<!--1.Use subscript assignment, the first parameter is 0, and so on-->
    <bean id="hello2" class="com.song.pojo.Hello">
        <constructor-arg index="0" value="songyi"/>
    </bean>
    <!--2.Type assignment(Not recommended)-->
    <bean id="hello3" class="com.song.pojo.Hello">
        <constructor-arg type="java.lang.String" value="songyi"/>
    </bean>
    <!--3.Set directly by parameter name-->
    <bean id="hello4" class="com.song.pojo.Hello">
        <constructor-arg name="name" value="songyi"/>
    </bean>
When the configuration file is loaded, all instances in it have been initialized
Spring configuration
Alias
<alias name="hello1" alias="h1"/>
    <bean id="hello1" class="com.song.pojo.Hello">
        <property name="name" value="Spring"/>
    </bean>
Bean configuration
<!--id:Unique identifier, i.e. object name
        class: Fully qualified name corresponding to the object: package name  +   Class name
        name: It is also an alias separator. It can be a space, comma, semicolon
        -->
    <bean id="hello1" class="com.song.pojo.Hello" name="user1   u2,u3;u4">
        <property name="name" value="Spring"/>
    </bean>
import
Suppose the project has multiple developers and multiple ApplicationContext XML file
<import resource="Beans2.xml"/>
When using, just use the total xml file directly
Dependency (DI) injection
Constructor Injection
That is, how the upper IOC creates objects
Set mode injection
Dependency injection: Set injection
Dependency: the creation of bean objects depends on the container
Injection: all attributes in the bean object are injected by the container
Environment construction
1. Complex type
public class Student {
    private String name;
    private Address address;
    private String[] books;
    private List<String> hobbys;
    private Map<String,String> card;
    private Set<String> games;
    private String wife;
    private Properties info;
}
2. Configuration implementation
 <bean id="address" class="com.song.pojo.Address">
        <property name="address" value="Zhengzhou"/>
    </bean>
    <bean id="student" class="com.song.pojo.Student">
        <!--Ordinary injection-->
        <property name="name" value="Song Yi"/>
        <!--Bean Injection, ref-->
        <property name="address" ref="address"/>
        <!--Array injection-->
        <property name="books">
            <array>
                <value>The Dream of Red Mansion</value>
                <value>The Plum in the Golden Vase</value>
                <value>Romance of the Three Kingdoms</value>
            </array>
        </property>
        <!--List-->
        <property name="hobbys">
            <list>
                <value>listen to the music</value>
                <value>Play games</value>
            </list>
        </property>
        <!--Map-->
        <property name="card">
            <map>
                <entry key="ID" value="657576575757565"/>
                <entry key="qq" value="687545768"/>
            </map>
        </property>
        <!--Set-->
        <property name="games" >
            <set>
                <value>LOL</value>
                <value>COC</value>
                <value>BOB</value>
            </set>
        </property>
        <!--Null-->
        <property name="wife">
            <null/>
        </property>
        <!--Properties-->
        <property name="info">
            <props>
                <prop key="Student number">201705050137</prop>
                <prop key="Gender">male</prop>
            </props>
        </property>
     </bean>
Expansion mode injection
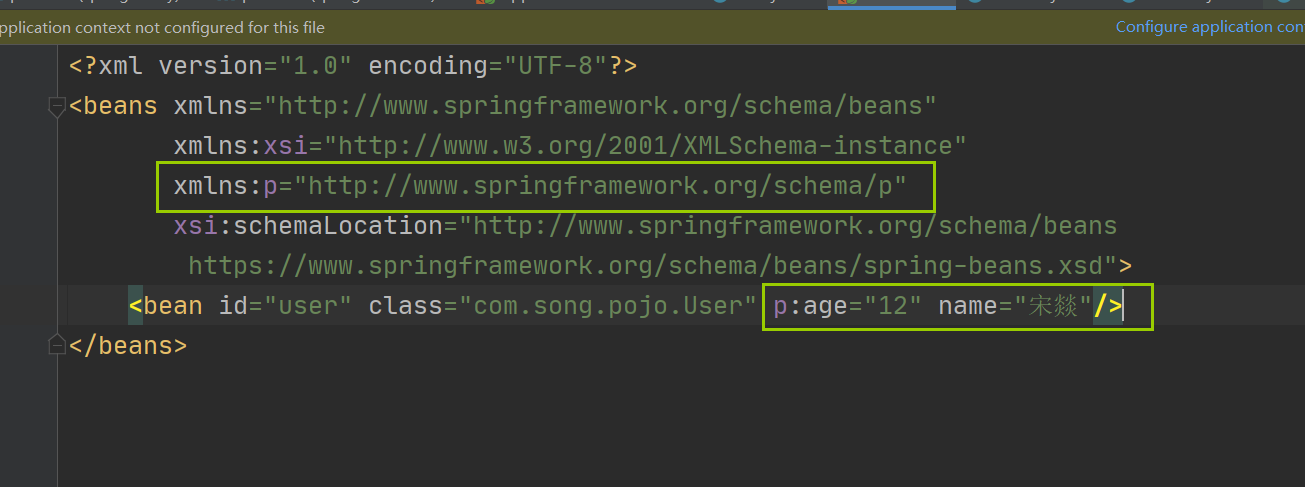
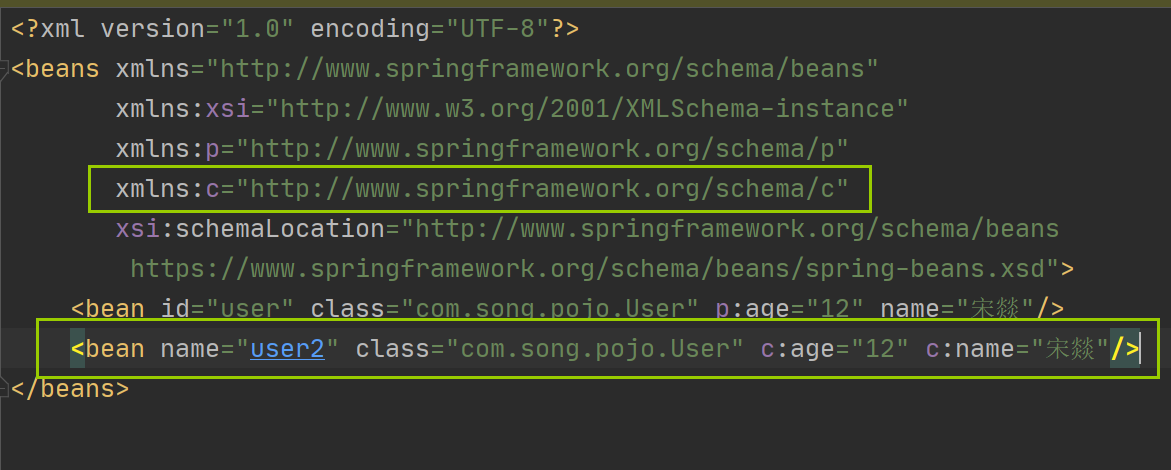
p and c naming need to import constraints in the configuration
       xmlns:p="http://www.springframework.org/schema/p"
       xmlns:c="http://www.springframework.org/schema/c"
p namespace injection
You can inject the value of an attribute directly (for simple attributes)
Use:
c namespace injection (through constructor injection)
c inputs constructor parameters
Bean Scopes
Singleton mode (spring is singleton by default)
scope='singleton'
<bean id="user" class="com.song.pojo.User" p:age="12" name="Song Yi" scope="singleton"/>
Prototype mode
Each time you go to get, a new object is generated
scope="prototype"
<bean id="user" class="com.song.pojo.User" p:age="12" name="Song Yi" scope="prototype"/>
Other request s, session s, and application s can only be used in web development
Automatic assembly of Bean
There are three assembly methods
1. Explicit configuration in xml
2. Explicit configuration in java
3. Implicitly auto assemble beans (important)
Test:
1. Manual explicit assembly
<bean id="cat" class="com.song.pojo.Cat"/>
<bean id="dog" class="com.song.pojo.Dog"/>
<bean id="people" class="com.song.pojo.People">
<property name="name" value="Song Yi"/>
<property name="dog" ref="dog"/>
<property name="cat" ref="cat"/>
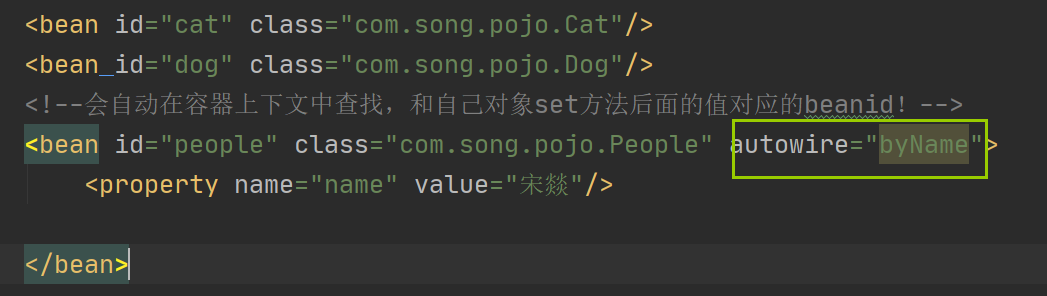
</bean>2. ByName auto assembly
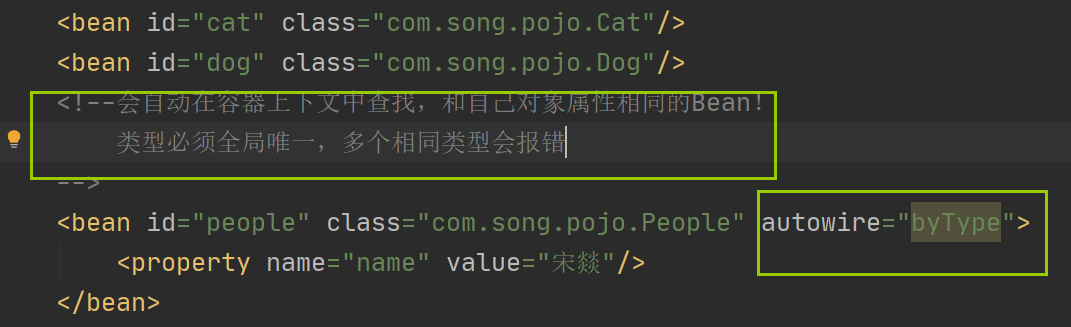
3. ByType auto assembly
Automatic assembly using annotations
jdk1.5 supported annotations, spring 2 5 supporting notes
xml development is too cumbersome, so annotation development is used
Notes for use:
1. Import constraints
2. Configuration annotation support
<?xml version="1.0" encoding="UTF-8"?>
<beans xmlns="http://www.springframework.org/schema/beans"
       xmlns:xsi="http://www.w3.org/2001/XMLSchema-instance"
       xmlns:context="http://www.springframework.org/schema/context"
       xsi:schemaLocation="http://www.springframework.org/schema/beans
        https://www.springframework.org/schema/beans/spring-beans.xsd
        http://www.springframework.org/schema/context
        https://www.springframework.org/schema/context/spring-context.xsd">
  <context:annotation-config/>
</beans>
3. Testing
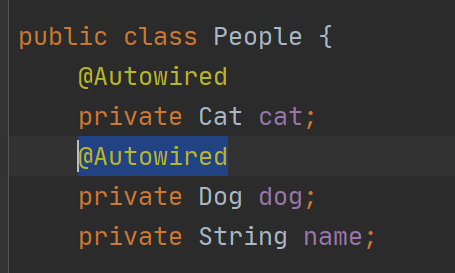
@Autowired The tag is on the upper side of the attribute, i.e. automatic search xml Relative attributes within the file (can be ignored) set,get Method (use)
id and field name must be consistent (i.e. ByType is used for automatic assembly by default)

The @ Nullable field marks this annotation, and the table name field can be null
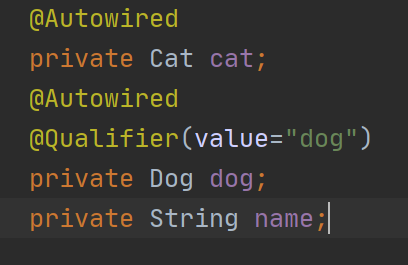
You can explicitly specify a value for this
Use @ Qualifier(value="id")
Another way
Use the java built-in annotation @ return
Parameters can be passed or not
Using annotation development
1,bean
2. How are attributes injected
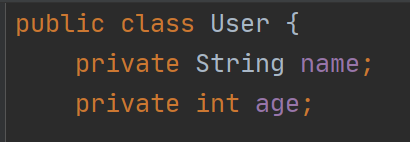
@Component
public class User {
    @Value("Song Yi")
    public String name;
}
3. Derived annotation
@Component has three derived annotations with the same functions, which are used in different layers (MVC layer 3)
- @Repository(dao)
- @Service(service)
- @Controller(controller)
These four annotation functions are the same, and they all represent assembling a class into the spring container
4. Automatic installation configuration
It's on top
5. Scope
@Scope
Notes:
@ Autowired: automatic assembly; Name by type
@Autowired(value="id")
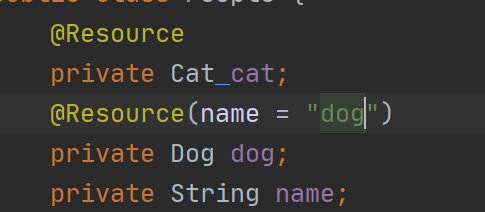
@Resource: automatic assembly; Retype by name
@Resource(name="id")
@Nullable: the field is marked with this annotation, indicating that the field can be null
@Component: Class, which is equivalent to xml Medium configuration bean,Lowercase name of default class user
@ Component has three derived annotations with the same functions, which are used in different layers (MVC layer 3)
- @Repository(dao)
- @Service(service)
- @Controller(controller)
@Value("character string"): Added to (or of) an attribute set Method) is equivalent to assigning a value to an attribute@Scope: set the scope and mark it on the class
@ Scope("singleton"): marked as singleton mode
@ Scope("prototype"): marked as prototype mode
Configuring Spring using Java
To avoid xml configuration at all, use java to implement it all
JavaConfig is a subproject of Spring. After Spring 4, it has become a core function
Configuration class
//Adding this annotation to a class is similar to the < beans > tag
//Configuration class, he and ApplicationContext The role of XML is the same
@Configuration
//Import another configuration class
@ComponentScan("com.song.pojo")
@Import(com.song.service.config2.class)
public class config {
    //This is equivalent to registering a bean
    //The method name is the id
    //The return value is class
    //Return is to return the object to be injected into the bean
    @Bean
    public User getuser(){
        return new User();
    }
}
test
public static void main(String[] args) {
              //If the configuration class is used completely, you need AnnotationConfig to get the container and load it through the configured class object
              ApplicationContext context=  new AnnotationConfigApplicationContext(config.class);
              //If yes, use the method name in the configuration
              User geruser = (User)context.getBean("getuser");
              System.out.println(geruser.toString());
    }
Pure Java configuration can be seen everywhere in Spring Boot
proxy pattern
Intermediary; The proxy pattern is the bottom layer of spring AOP
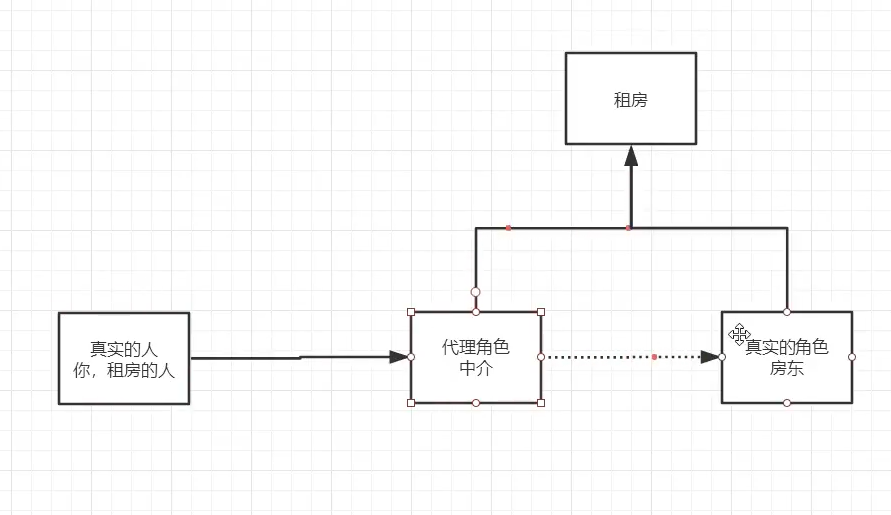
Static proxy
Abstract role: it is usually solved by using interfaces or abstract classes
Real role: the role represented
Agent role: represent the real role. After representing the real role, we usually do some ancillary operations
Client: the person who accesses the proxy object
Benefits of agent mode:
- It can make the operation of real characters more pure without doing anything else
- The public business is entrusted to the agent role, which realizes the division of business
- When the public business is expanded, it is convenient for centralized management
Disadvantages:
A real role will produce a proxy role, the amount of code will double, and the development efficiency will be low
Dynamic agent
Dynamic agent and static agent have the same role
Dynamic proxy classes are dynamically generated, not written directly
Dynamic agents are divided into two categories: 1 Interface based dynamic agent, 2 Class based dynamic proxy
Interface based -- jdk dynamic agent
Class based: cglib
java bytecode implementation: javasist
Two classes need to be understood: Proxy (dynamic Proxy class) and InvocationHandler (call handler)
InvocationHandler
Is an interface with an invoke method
Proxy
Provides static methods for creating dynamic proxy classes and instances

example:
Rent: Interface
Host: Landlord
Handler handles dynamic proxies
client: user
Rent:
public interface Rent {
    //Rent a house
    void rent();
}
Host:
package com.song.demo01;
//landlord or landlady
public class Host implements Rent{
    public void rent() {
        System.out.println("The landlord wants to rent the house");
    }
    //Rent a house

}
Hanlder:
package com.song.demo01;
//Use this class to automatically generate proxy classes

import java.lang.reflect.InvocationHandler;
import java.lang.reflect.Method;
import java.lang.reflect.Proxy;

public class Handler implements InvocationHandler {
    private Host host;

    public void setHost(Host host) {
        this.host = host;
    }

    public Object gerProxy() {
        return Proxy.newProxyInstance(this.getClass().getClassLoader(),host.getClass().getInterfaces(),this);
    }
    //Process the proxy instance and return the result
    public Object invoke(Object proxy, Method method, Object[] args) throws Throwable {
       Object result=method.invoke(host,args);

        return result;
    }
}
client:
public class Client {
    public static void main(String[] args) {
        //Generate proxy class
        //Real role
        Host host = new Host();
        //Agent role:
        Handler handler = new Handler();
        //Handle the interface object we want to call by calling the program processing role
        handler.setHost(host);
        Rent handler1 =(Rent) handler.gerProxy();
        handler1.rent();
    }
}
Universal agent class:
public class Handler implements InvocationHandler {
    private Object target;

    public void setHost(Object target) {
        this.target=target;
    }

    public Object gerProxy() {
        return Proxy.newProxyInstance(this.getClass().getClassLoader(),target.getClass().getInterfaces(),this);
    }
    //Process the proxy instance and return the result
    public Object invoke(Object proxy, Method method, Object[] args) throws Throwable {
       Object result=method.invoke(target,args);
        return result;
    }
}
AOP (aspect oriented programming)
aop: Aspect Oriented Programming
Guide Package:
<!-- https://mvnrepository.com/artifact/org.aspectj/aspectjweaver -->
<dependency>
<groupId>org.aspectj</groupId>
<artifactId>aspectjweaver</artifactId>
<version>1.9.6</version>
<scope>runtime</scope>
</dependency>
Mode 1:
Using spring's API interface to implement AOP
Profile:
 <bean id="userService" class="com.song.service.UserServiceImpl"/>
    <bean id="log" class="com.song.log.log"/>
    <bean id="afterLog" class="com.song.log.AfterLog"/>
    <!--Method 1: use native springAPI Interface-->
    <!--to configure AOP:Import aop constraint-->
    <aop:config>
        <!--Configure pointcuts (where to execute) expression(Location to execute:):expression-->
        <!--In this example, the method is to add logs to the system, so Log Method to be added to all methods, use*(..)express-->
        <aop:pointcut id="pointcut" expression="execution(* com.song.service.UserServiceImpl.*(..))"/>
        <!--Perform surround enhancement-->
        <aop:advisor advice-ref="log" pointcut-ref="pointcut"/>
        <aop:advisor advice-ref="afterLog" pointcut-ref="pointcut"/>
    </aop:config>
Test class:
public static void main(String[] args) {
        ApplicationContext context = new ClassPathXmlApplicationContext("ApplicationContext.xml");
        //The dynamic proxy is the interface
        UserService userService=(UserService)context.getBean("userService");
        userService.add();


    }
execution expression
https://www.cnblogs.com/gdwkong/p/8660027.html
Mode 2 (user defined implementation, mainly section definition):
<!--Mode 2:-->
    <bean id="diy" class="com.song.Diy"/>
    <aop:config>
        <!--Custom cut, ref Class to reference-->
        <aop:aspect ref="diy">
            <!--breakthrough point-->
            <aop:pointcut id="point" expression="execution(* com.song.service.UserServiceImpl.*(..))"/>
            <!--Notification (insert method)-->
            <aop:before method="before" pointcut-ref="point"/>
            <aop:after method="after" pointcut-ref="point"/>
        </aop:aspect>
    </aop:config>
Method 3: implement AOP with annotations
Guide Package
<dependency>
            <groupId>org.aspectj</groupId>
            <artifactId>aspectjweaver</artifactId>
            <version>1.9.6</version>
            <scope>runtime</scope>
        </dependency>

<dependency>
            <groupId>aspectj</groupId>
            <artifactId>aspectjrt</artifactId>
            <version>1.5.4</version>
        </dependency>
configuration file
<!--Mode III-->
    <bean id="zhujie" class="com.song.Zujie"/>
    <!--Enable annotation support-->
    <aop:aspectj-autoproxy/>
Class:
//Implementing AOP with annotations
@Aspect//Note that this is a cut plane
public class Zujie {
    @Before("execution(* com.song.service.UserServiceImpl.*(..))")//Before method execution
    public void  before(){
        System.out.println("front");
    }

@After("execution(* com.song.service.UserServiceImpl.*(..))")//After method execution
    public void an(){

}
//surround
@Around("execution(* com.song.service.UserServiceImpl.*(..))")
    public void around(ProceedingJoinPoint joinPoint) throws Throwable {
    System.out.println("Surround front");
    System.out.println(joinPoint.getSignature());//Get signature
    Object o=joinPoint.proceed();//Execution method
    System.out.println("After surround");
    System.out.println(o);
}
}
Integrate Mybatis
1. Import relevant jar packages
- junit
- mybatis
- mysql
- spring
- aop
- mybatis-spring
  <dependencies>
    <!-- https://mvnrepository.com/artifact/org.springframework/spring-webmvc -->
    <dependency>
        <groupId>org.springframework</groupId>
        <artifactId>spring-webmvc</artifactId>
        <version>5.3.9</version>
    </dependency>
        <!-- https://mvnrepository.com/artifact/junit/junit -->
        <dependency>
            <groupId>junit</groupId>
            <artifactId>junit</artifactId>
            <version>4.12</version>
            <scope>test</scope>
        </dependency>
        <dependency>
            <groupId>org.aspectj</groupId>
            <artifactId>aspectjweaver</artifactId>
            <version>1.9.6</version>
            <scope>runtime</scope>
        </dependency>
        <!-- https://mvnrepository.com/artifact/org.mybatis/mybatis-spring -->
        <dependency>
            <groupId>org.mybatis</groupId>
            <artifactId>mybatis-spring</artifactId>
            <version>2.0.6</version>
        </dependency>

    </dependencies>
2. Write configuration file
3. Test
mybatis
1. Write entity class
2. Prepare core configuration file
3. Write interface
4. Write mapper
5. Test
Mybatis-spring
Guide Package
<!-- https://mvnrepository.com/artifact/org.mybatis/mybatis-spring -->
<dependency>
    <groupId>org.mybatis</groupId>
    <artifactId>mybatis-spring</artifactId>
    <version>2.0.6</version>
</dependency>
1. Write data source configuration
2.sqlSessionFactory
3.sqlSessionTemplate
4. You need to add an implementation class to the interface
5. Inject the implementation class written by yourself into spring
xml
<?xml version="1.0" encoding="GBK"?>
<beans xmlns="http://www.springframework.org/schema/beans"
xmlns:xsi="http://www.w3.org/2001/XMLSchema-instance"
xmlns:context="http://www.springframework.org/schema/context"
xmlns:p="http://www.springframework.org/schema/p"
xmlns:c="http://www.springframework.org/schema/c"
xsi:schemaLocation="http://www.springframework.org/schema/beans
https://www.springframework.org/schema/beans/spring-beans.xsd
http://www.springframework.org/schema/context
https://www.springframework.org/schema/context/spring-context.xsd">
<!--DataSource: use Spring Data source replacement for Mybatis Configuration of c3p0 dbcp druid-->
<bean id="datasource" class="org.springframework.jdbc.datasource.DriverManagerDataSource">
<property name="driverClassName" value="com.mysql.cj.jdbc.Driver"/>
<property name="url" value="jdbc:mysql://localhost:3306/mybatis?useSSL=true&serverTimezone=UTC&useUnicode=true&characterEncoding=UTF8"/>
<property name="username" value="root"/>
<property name="password" value="root"/>
</bean>
<!--sqlSessionFactory-->
<bean id="sqlSessionFactory" class="org.mybatis.spring.SqlSessionFactoryBean">
<property name="dataSource" ref="datasource"/>
<!--binding Mybatis configuration file-->
<property name="configLocation" value="classpath:mybatis-config.xml"/>
<property name="mapperLocations" value="classpath:com/song/mapper/*.xml"/>
</bean>
<!--SqlSessionTemplate It's in the code sqlSession-->
<bean id="sqlSession" class="org.mybatis.spring.SqlSessionTemplate">
<!--Only constructor injection can be used because it does not set method-->
<constructor-arg index="0" ref="sqlSessionFactory"/>
</bean>
<bean id="userMapper" class="com.song.mapper.UserMapperImpl">
<property name="sqlsession" ref="sqlSession"/>
</bean>
</beans>mapper interface
public interface UserMapper {

    public List<User> selectUser();
}
mapper.xml
<?xml version="1.0" encoding="UTF-8" ?>
<!DOCTYPE mapper
        PUBLIC "-//mybatis.org//DTD Config 3.0//EN"
        "http://mybatis.org/dtd/mybatis-3-mapper.dtd">
<mapper namespace="com.song.mapper.UserMapper">
    <select id="selectUser" resultType="user">
        select * from `user`;
    </select>
</mapper>
mapperImpl
package com.song.mapper;

import com.song.pojo.User;
import org.mybatis.spring.SqlSessionTemplate;

import java.util.List;

public class UserMapperImpl implements UserMapper{
    //Previously, all operations were performed using sqlsession. Now, sqlsessionTemplate is used
    private SqlSessionTemplate sqlsession;

    public void setSqlsession(SqlSessionTemplate sqlsession) {
        this.sqlsession = sqlsession;
    }

    public List<User> selectUser() {
        UserMapper userMapper=sqlsession.getMapper(UserMapper.class);
        return userMapper.selectUser();
    }
}
The second mapperimpl2:
public class UserMapper2 extends SqlSessionDaoSupport implements UserMapper{

    public List<User> selectUser() {
        SqlSession sqlSession = getSqlSession();
        UserMapper mapper = sqlSession.getMapper(UserMapper.class);
        return mapper.selectUser();
    }
}
to configure:
<bean id="userMapper2" class="com.song.mapper.UserMapper2">
        <property name="sqlSessionFactory" ref="sqlSessionFactory"/>
    </bean>
Declarative transaction
Transaction:
Either all succeed or all fail
Transaction is very important in project development. It involves the problem of data consistency. It can't be careless
Ensure integrity and consistency
Transaction ACID principle:
A (atomicity): ensure both success and failure
C (consistency): ensure both success and failure
I (isolation): the same resources between multiple independent transactions are not affected by each other
D (persistence): the transaction is completed and the data exists for a long time
Transaction management in Spring
Declarative transactions: AOP (common)
    <!--Configure declarative transactions-->
    <bean id="transactionManager" class="org.springframework.jdbc.datasource.DataSourceTransactionManager">
        <constructor-arg ref="datasource"/>
    </bean>
    <!--combination AOP Weaving in transactions-->
    <!--Configure transaction notifications-->
    <tx:advice id="txAdvice" transaction-manager="transactionManager">
        <!--For which methods are transactions configured-->
        <tx:attributes>
            <tx:method name="add" propagation="REQUIRED"/>
            <tx:method name="delete" propagation="REQUIRED"/>
            <tx:method name="update" propagation="REQUIRED"/>
            <tx:method name="query" read-only="true"/>
            <tx:method name="*" propagation="REQUIRED"/>
        </tx:attributes>
    </tx:advice>

    <!--Configure transaction entry-->
    <aop:config>
        <aop:pointcut id="txPointCut" expression="execution(* com.song.mapper.*.*(..))"/>
        <aop:advisor advice-ref="txAdvice" pointcut-ref="txPointCut"/>
     </aop:config>