Article directory
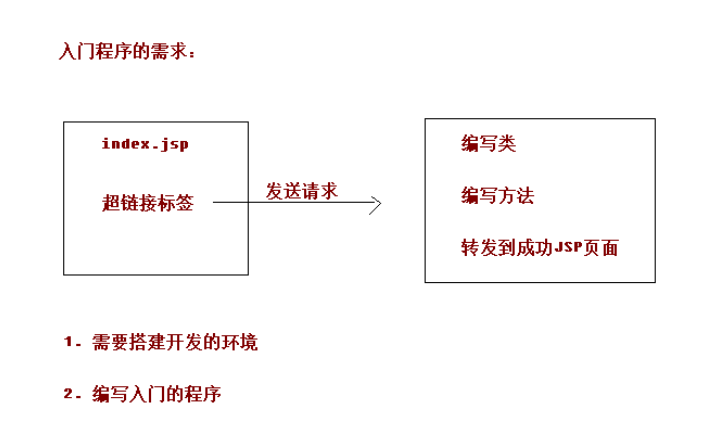
- Requirements for entry procedures
- 1. Create webapp project and introduce jar package: pom.xml
- 2. Configure the core controller (configure dispatcher servlet)
- 3. Write the configuration file of springmvc.xml
- 4. Write index.jsp and HelloController controller classes
- 5. Create the pages folder in the WEB-INF directory and write the success page of success.jsp
- Start the Tomcat server for testing
- process analysis
Requirements for entry procedures
1. Create webapp project and introduce jar package: pom.xml
 <properties>
    <project.build.sourceEncoding>UTF-8</project.build.sourceEncoding>
    <maven.compiler.source>1.8</maven.compiler.source>
    <maven.compiler.target>1.8</maven.compiler.target>
    <!--  spring Version lock for-->
    <spring.version>5.0.2.RELEASE</spring.version>
  </properties>


  <dependencies>

    <dependency>
      <groupId>org.springframework</groupId>
      <artifactId>spring-context</artifactId>
      <version>${spring.version}</version>
    </dependency>
    <dependency>
      <groupId>org.springframework</groupId>
      <artifactId>spring-web</artifactId>
      <version>${spring.version}</version>
    </dependency>
    <dependency>
      <groupId>org.springframework</groupId>
      <artifactId>spring-webmvc</artifactId>
      <version>${spring.version}</version>
    </dependency>
    <dependency>
      <groupId>javax.servlet</groupId>
      <artifactId>servlet-api</artifactId>
      <version>2.5</version>
      <scope>provided</scope>
    </dependency>
    <dependency>
      <groupId>javax.servlet.jsp</groupId>
      <artifactId>jsp-api</artifactId>
      <version>2.0</version>
      <scope>provided</scope>
    </dependency>

  </dependencies>
2. Configure the core controller (configure dispatcher servlet)
- In the web.xml configuration file, the core controller DispatcherServlet
<web-app>
  <display-name>Archetype Created Web Application</display-name>

  <servlet>
    <servlet-name>dispatcherServlet</servlet-name>
    <servlet-class>org.springframework.web.servlet.DispatcherServlet</servlet-class>

    <init-param>
      <param-name>contextConfigLocation</param-name>
      <param-value>classpath:springmvc.xml</param-value>
    </init-param>

    <load-on-startup>1</load-on-startup>
  </servlet>
  <servlet-mapping>
    <servlet-name>dispatcherServlet</servlet-name>
    <url-pattern>/</url-pattern>
  </servlet-mapping>


</web-app>
3. Write the configuration file of springmvc.xml
<?xml version="1.0" encoding="UTF-8"?>
<beans xmlns="http://www.springframework.org/schema/beans"
       xmlns:mvc="http://www.springframework.org/schema/mvc"
       xmlns:context="http://www.springframework.org/schema/context"
       xmlns:xsi="http://www.w3.org/2001/XMLSchema-instance"
       xsi:schemaLocation="
        http://www.springframework.org/schema/beans
        http://www.springframework.org/schema/beans/spring-beans.xsd
        http://www.springframework.org/schema/mvc
        http://www.springframework.org/schema/mvc/spring-mvc.xsd
        http://www.springframework.org/schema/context
        http://www.springframework.org/schema/context/spring-context.xsd">

<!--Enable annotation scanning-->
<context:component-scan base-package="code"></context:component-scan>

<!--    View parser object-->
<bean id="internalResourceViewResolver" class="org.springframework.web.servlet.view.InternalResourceViewResolver">
    <property name="prefix" value="/WEB-INF/pages/"></property>
    <property name="suffix" value=".jsp"></property>

</bean>


<!--    Open notes SpringMVC Framework annotation support-->
    <mvc:annotation-driven />
</beans
4. Write index.jsp and HelloController controller classes
<%@ page contentType="text/html;charset=UTF-8" language="java" %>
<html>
<head>
    <title>Introductory case</title>
</head>
<body>

<h3>Entry procedure</h3>
<a href="hello">Getting started: hello</a>
</body>
</html>
//Controller
@Controller
public class HelloController {

    //Request mapping
    @RequestMapping(path = "/hello")
    public String sayHello(){
        System.out.println("hello springMVC!");
        return "success";
    }
}
5. Create the pages folder in the WEB-INF directory and write the success page of success.jsp
<%@ page contentType="text/html;charset=UTF-8" language="java" %>
<html>
<head>
    <title>Success page</title>
</head>
<body>
<h3>Get started!</h3>
</body>
</html>
Start the Tomcat server for testing
process analysis
-
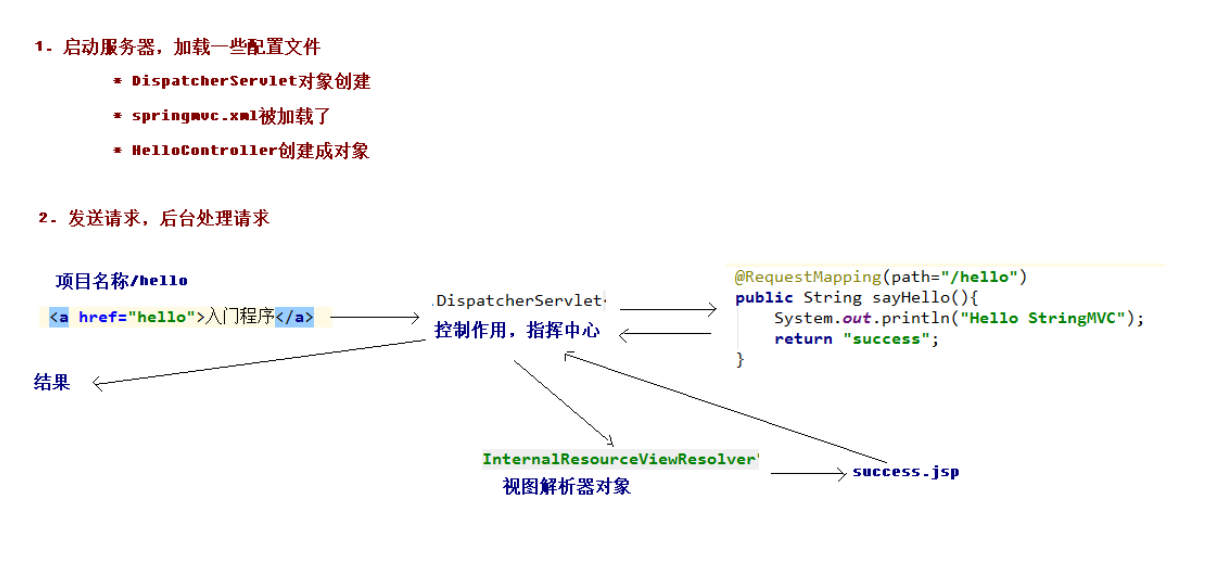
When starting the Tomcat server, the dispatcher servlet object is created because the load on startup tag is configured,
The springmvc.xml configuration file will be loaded -
When annotation scanning is enabled, the HelloController object will be created
-
Send the request from index.jsp, and the request will first arrive at the dispatcher servlet core controller, and then find the specific execution method according to the @ RequestMapping annotation
-
According to the return value of the execution method, and then according to the configured view parser, find the JSP file with the specified name in the specified directory
-
Tomcat server renders the page and responds


Published 36 original articles, won praise 3, visited 1213