springMVC ----HELLO word
1. Configure the development environment and import the spring MVC dependency
<dependencies>
    <dependency>
        <groupId>org.springframework</groupId>
        <artifactId>spring-webmvc</artifactId>
        <version>RELEASE</version>
    </dependency>
    <dependency>
        <groupId>javax.servlet</groupId>
        <artifactId>javax.servlet-api</artifactId>
        <version>4.0.1</version>
    </dependency>
    <dependency>
        <groupId>javax.servlet.jsp</groupId>
        <artifactId>javax.servlet.jsp-api</artifactId>
        <version>2.3.3</version>
    </dependency>
</dependencies>
2. Prepare a Controller, that is, an interface to handle browser requests
public class MyController implements Controller{
    /**
    *This is a request processing interface
    *@param rep This is a request from the front end
    *@param resp This is the response from the server to the front end
    *@return The return value is a modelaandview. The model is equivalent to the model of our data, and the View is our View
    *@throws Exception
    */
    public ModelAndViewhandleRequest(HttpServeletRequest req,HttpServletResponse resp)throws Exception {
        ModelAndView mv = new ModelAndView("hello");
        mv.addObject("name","wangze");
        return mv;
}
3. Create a view
Here, jsp is used as the view, and a jsp file named hello is created in the webapp directory
%@ page contentType="text/html;charset=UTF-8" language="java" %>
<html>
<head>
    <title>Title</title>
</head>
<body>
<h1>hello ${name}!</h1>
</body>
</html>
4. Create a spring servlet under the resources directory Spring MVC configuration file based on XML
<?xml version="1.0" encoding="UTF-8"?>
<beans xmlns="http://www.springframework.org/schema/beans"
       xmlns:xsi="http://www.w3.org/2001/XMLSchema-instance"
       xsi:schemaLocation="http://www.springframework.org/schema/beans http://www.springframework.org/schema/beans/spring-beans.xsd">

    <bean class="org.javaboy.helloworld.MyController" name="/hello"/>
    <!--This is the processor mapper. In this way, the request address is actually one Bean And then according to this bean Find the corresponding processor by its name-->
    <bean class="org.springframework.web.servlet.handler.BeanNameUrlHandlerMapping" id="handlerMapping">
        <property name="beanName" value="/hello"/>
    </bean>
    <bean class="org.springframework.web.servlet.mvc.SimpleControllerHandlerAdapter" id="handlerAdapter"/>

    <!--view resolver -->
    <bean class="org.springframework.web.servlet.view.InternalResourceViewResolver" id="viewResolver">
        <property name="prefix" value="/jsp/"/>
        <property name="suffix" value=".jsp"/>
    </bean>
</beans>
5. Load the configuration file of spring MVC
When the web project starts, load the spring MVC configuration file, which is in the web Completed in XML.
<?xml version="1.0" encoding="UTF-8"?>
<web-app xmlns="http://xmlns.jcp.org/xml/ns/javaee"
         xmlns:xsi="http://www.w3.org/2001/XMLSchema-instance"
         xsi:schemaLocation="http://xmlns.jcp.org/xml/ns/javaee http://xmlns.jcp.org/xml/ns/javaee/web-app_4_0.xsd"
         version="4.0">
    <servlet>
        <servlet-name>springmvc</servlet-name>
        <servlet-class>org.springframework.web.servlet.DispatcherServlet</servlet-class>
        <init-param>
            <param-name>contextConfigLocation</param-name>
            <param-value>classpath:spring-servlet.xml</param-value>
        </init-param>
    </servlet>
    <servlet-mapping>
        <servlet-name>springmvc</servlet-name>
        <url-pattern>/</url-pattern>
    </servlet-mapping>
</web-app>
Note:
All requests will be intercepted automatically. After intercepting, the request will be handed over to DispatcherServlet To process and load DispatcherServlet You also need to specify the configuration file path. Here is a default rule if the configuration file is placed in webapp/WEB-INF/ Directory, and the name of the configuration file is equal to DispatcherServlet Name of+ -servlet(That is, the configuration file path here is webapp/WEB-INF/springmvc-servlet.xml),If so, there is no need to add init-param Parameter, i.e. no manual configuration springmvc The framework will automatically load the configuration file.
6. Configure and start the project
7. Browser input http://localhost:8080/hello You can see the interface
hello wangze!
Spring MVC workflow
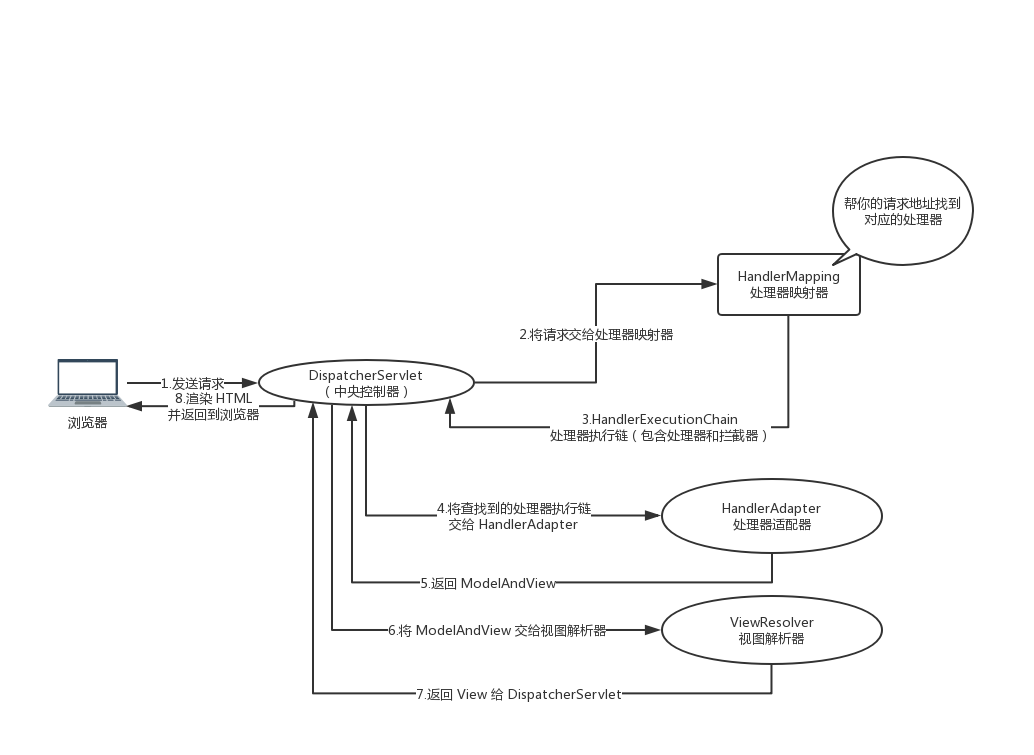
Components in spring MVC
-
Dispatcher servlet: front end controller
When the user requests to reach the front-end controller, it is equivalent to mvc In mode C,DispatcherServlet It is the center of the whole process control, which is equivalent to springmvc It calls other components to process the user's request, Dispatcher The existence of reduces the coupling between components.
-
HandlerMapping: processor mapper
HanderMapping Responsible for finding according to the user's request Handler(Processor) that is what we often say Controller,Springmvc It provides different mapping modes implemented by different mappers, such as configuration file mode, implementation interface mode, annotation mode, etc. in actual development, the commonly used mode is annotation mode.
-
Handler: processor
Handler Is following DispatherServlet Back end controller of front-end controller, in dispatherServlet Under the control of Handler Handle specific user requests. because Handler It involves specific user business requests, so generally programmers need to develop according to business requirements Handler. (there handler It means our Controller)
-
HandlAdapter: processor adapter
adopt HandlerAdapter Execute the processor, which is the application of adapter mode. By expanding the adapter, more types of processors can be executed.
-
ViewResolver: View resolver
ViewResolver Responsible for generating processing results View View, ViewResolver First, the logical view name is resolved into the physical view name (specific page address), and then generated View Image, last pair View Render and display the processing results to the user through the page. springMVC The framework provides a lot of View View types, including: jstView,freemarkerView,pdfView Wait. Generally, the model data needs to be displayed to the user through the page through the page label or page template technology, and the programmer needs to develop the specific page according to the business needs.
DispatcherServlet
The role of dispatcher Servlet
DispatcherServlet It is the realization of the design mode of the front-end controller and provides Spring Web MVC And is responsible for the assignment of responsibilities Spring IoC Containers are seamlessly integrated so that Spring All the benefits of. DispatcherServlet It is mainly used for responsibility scheduling, and it is mainly used to control the process. The main responsibilities are as follows:

1.File upload parsing, if the request type is multipart Will pass MultipartResolver Upload and analyze files;
2.adopt HandlerMapping,Map the request to the processor (return a HandlerExecutionChain,It includes one processor and multiple processors HandlerInterceptor Interceptor);
3.adopt HandlerAdapter Supports multiple types of processors(HandlerExecutionChain Processor in);
4.adopt ViewResolver Resolve the logical view name to the specific view implementation;
5.Localization analysis;
6.Rendering specific views, etc;
7.If an exception is encountered during execution, it will be handed over to HandlerExceptionResolver To analyze
Detailed explanation of dispatcher servlet configuration
<servlet>
    <servlet-name>springmvc</servlet-name>
    <servlet-class>org.springframework.web.servlet.DispatcherServlet</servlet-class>
    <init-param>
        <param-name>contextConfigLocation</param-name> <!--contextConfigLocation: express SpringMVC Path to configuration file-->
        <param-value>classpath:spring-servlet.xml</param-value>
    </init-param>
    <load-on-startup>1</load-on-startup>  <!-- load-on-startup: Indicates that the container is initialized when it is started Servlet;-->
</servlet>
<servlet-mapping>
    <servlet-name>springmvc</servlet-name>
    <url-pattern>/</url-pattern> <!-- url-pattern: Indicates which requests are submitted to Spring Web MVC Processing“/" Is used to define the default servlet Mapped. Can also be as *.html Means to intercept all html Request for extension -->
</servlet-mapping>
Other parameter configurations:
| parameter | describe |
|---|---|
| contextClass | The class that implements the WebApplicationContext interface, which is used by the current servlet to create the context. If this parameter is not specified, XmlWebApplicationContext is used by default. |
| contextConfigLocation | The string passed to the context instance (specified by contextClass) to specify the location of the context. This string can be divided into multiple strings (using commas as separators) to support multiple contexts (in the case of multiple contexts, if the same bean is defined twice, the latter takes precedence). |
| namespace | WebApplicationContext namespace. The default value is [server name] - servlet. |
Spring configuration
In the previous case, there was only spring MVC. Without spring, Web programs can run. However, in the actual development, spring and spring MVC are configured separately, so we continue to improve the above projects and add spring related configurations.
-
First, add a service package to the project to provide a helloService class:
@Service public class HelloService { public String hello(String name){ return "hello"+name; } } -
Now, suppose I need to inject helloservice into the spring container and use it. This is a bean belonging to the spring layer, so we generally register all beans except the controller in the spring container and the controller in the spring MVC container. Now, add ApplicationContext in the resources directory Configuration of spring as XML:
<?xml version="1.0" encoding="UTF-8"?> <beans xmlns="http://www.springframework.org/schema/beans" xmlns:xsi="http://www.w3.org/2001/XMLSchema-instance" xmlns:context="http://www.springframework.org/schema/context" xsi:schemaLocation="http://www.springframework.org/schema/beans http://www.springframework.org/schema/beans/spring-beans.xsd http://www.springframework.org/schema/context https://www.springframework.org/schema/context/spring-context.xsd"> <context:component-scan base-package="org.javaboy" use-default-filters="true"> <context:exclude-filter type="annotation" expression="org.springframework.stereotype.Controller"/> </context:component-scan> </beans> -
On the web Load in XML file
<context-param> <param-name>contextConfigLocation</param-name> <param-value>classpath:applicationContext.xml</param-value> </context-param> <listener> <listener-class>org.springframework.web.context.ContextLoaderListener</listener-class> </listener> <!--First pass context-param appoint Spring The location of the configuration file. This configuration file also has some default rules. Its configuration file name is called by default applicationContext.xml ,And if you put this configuration file in WEB-INF Directory, so you don't need to specify the location of the configuration file here, just specify the listener. This configuration is Spring integrate Web General configuration of environment; Generally used to load except Web Layered Bean(as DAO,Service Etc.) to facilitate communication with any other Web Framework integration. contextConfigLocation: Indicates for loading Bean Configuration file of; contextClass: Indicates for loading Bean of ApplicationContext Implementation class, default WebApplicationContext. --> -
After configuration, you also need to modify mycontroller and inject helloservice into mycontroller
@org.springframework.stereotype.Controller("/hello") public class MyController implements Controller { @Autowired HelloService helloService; /** * This is a request processing interface * @param req This is the request sent by the front end * @param resp This is the response from the server to the front end * @return The return value is a ModelAndView. The Model is equivalent to our data Model, and the View is our View * @throws Exception */ public ModelAndView handleRequest(HttpServletRequest req, HttpServletResponse resp) throws Exception { System.out.println(helloService.hello("javaboy")); ModelAndView mv = new ModelAndView("hello"); mv.addObject("name", "javaboy"); return mv; } } -
be careful:
In order to SpringMVC Can be scanned in the container MyController ,Here MyController Added @Controller At the same time, due to our current HandlerMapping yes BeanNameUrlHandlerMapping(This means that the request address is the processor Bean Therefore, you need to specify it manually MyController Your name.

Finally, modify SpringMVC The configuration file of the Bean Configure as scan form:
<context:component-scan base-package="org.javaboy.helloworld" use-default-filters="false">
    <context:include-filter type="annotation" expression="org.springframework.stereotype.Controller"/>
</context:component-scan>
<!--This is the processor mapper. In this way, the request address is actually one Bean And then according to this bean Find the corresponding processor by its name-->
<bean class="org.springframework.web.servlet.handler.BeanNameUrlHandlerMapping" id="handlerMapping">
    <property name="beanName" value="/hello"/>
</bean>
<bean class="org.springframework.web.servlet.mvc.SimpleControllerHandlerAdapter" id="handlerAdapter"/>
<!--view resolver -->
<bean class="org.springframework.web.servlet.view.InternalResourceViewResolver" id="viewResolver">
    <property name="prefix" value="/jsp/"/>
    <property name="suffix" value=".jsp"/>
</bean>
After the configuration is completed, start the project again, Spring Containers will also be created. visit /hello Interface, HelloService Medium hello Method will be called automatically.
Two containers
When Spring and SpringMVC At the same time, there will be two containers in our project, one is Spring Container, the other is SpringMVC Container, Spring Container pass ContextLoaderListener To load, SpringMVC The container passes through DispatcherServlet The two containers are different:
ContextLoaderListener Initialized context loaded Bean It is shared by the whole application, no matter what presentation layer technology is used, such as DAO Layer Service layer Bean;
DispatcherServlet Initialized context loaded Bean Yes, only right Spring Web MVC effective Bean,as Controller,HandlerMapping,HandlerAdapter Wait, the initialization context should only load Web Related components.
Why not Spring Scan all in container Bean?
This is impossible. Because after the request reaches the server, find DispatcherServlet To deal with, will only go SpringMVC In the container, which means Controller Must be SpringMVC Scan in container.

2.Why not SpringMVC Scan all in container Bean?

This is OK, you can SpringMVC Scan all in container Bean. There are two reasons why they are not written together:

To facilitate the management of configuration files
 stay Spring+SpringMVC+Hibernate In combination, this writing method is not actually supported