This note is to learn what madness said SpringMVC Created on.
Personal blog: Dexter
Spring MVC learning notes
1. What is spring MVC?
   + Spring MVC belong to SpringFrameWork The follow-up products of have been integrated in Spring Web Flow Inside.
   + Spring The framework provides building blocks [Web](https://baike.baidu.com/item/Web/150564) full function MVC module of application.
   + use Spring Pluggable MVC Architecture, thus in use Spring conduct WEB When developing, you can choose to use Spring of Spring MVC Framework or integration others MVC Development framework, such as Struts1(Not now),Struts 2(Generally used for old projects)wait.
2. Benefits of using spring MVC
- Lifecycle for overriding binding, validation, etc. it is easy to integrate seamlessly with other View frameworks (Tiles, etc.) IOC Easy to test* It is a typical textbook mvc architecture, not like struts And so on are variants or not entirely based on the mvc system framework.
3. Execution principle of spring MVC
The core of spring MVC is the dispatcher servlet central controller
Like many other MVC frameworks, the Spring MVC framework is request driven. It distributes requests and provides other functions around a central Servlet. The dispatcher Servlet is an actual Servlet (it inherits from the HttpServlet base class).
Spring MVC execution flow chart
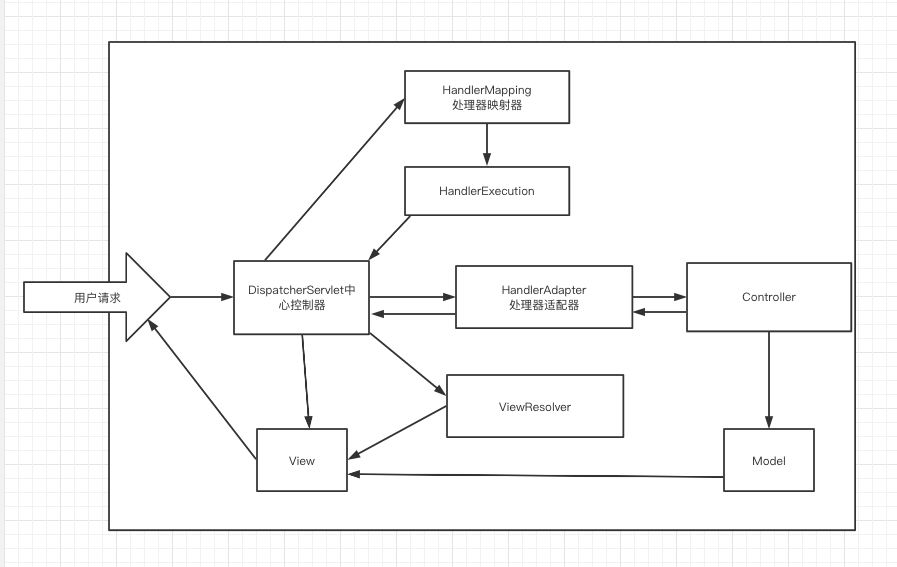
1. When the user initiates a request, the central controller receives the user request and calls the processor mapping to process the user request,
By calling HanderExecution Resolve user request lookup Handler,Finally, it returns to the central controller.
2. The central Controller obtains the Handler requested by the user, calls the processor adapter and finds the Controller requested by the user.
3. The controller returns the specific execution information to the HandlerAdapter, such as ModelAndView, and then returns to the central controller.
4. When calling ViewResolver, the central Controller generates a View according to the information returned by the Controller and returns it to the user.
1. The first spring MVC program
-
Build environment
-
Create Maven project
-
Add Web Framework Support
-
Spring MVC configuration
1. Add spring MVC dependency in pom
<dependencies>
       <dependency>
           <groupId>org.springframework</groupId>
           <artifactId>spring-webmvc</artifactId>
           <version>5.1.9.RELEASE</version>
       </dependency>
 </dependencies>
2. In wed XML
     <!-- register DispatcherServlet-->
      <servlet>
          <servlet-name>DispatcherServlet</servlet-name>
          <servlet-class>org.springframework.web.servlet.DispatcherServlet</servlet-class>
       <!-- Associate a springmvc Configuration file for-->
          <init-param>
              <param-name>contextConfigLocation</param-name>
              <param-value>classpath:SpringMVC-Servlet.xml</param-value>
          </init-param>
          <!--Startup level-1-->
          <load-on-startup>1</load-on-startup>
      </servlet>

<!--set configuration DispatcherServlet Match all requests-->
    <servlet-mapping>
        <servlet-name>DispatcherServlet</servlet-name>
        <url-pattern>/</url-pattern>
    </servlet-mapping>
3. Create an associated profile
<?xml version="1.0" encoding="UTF-8"?>
<beans xmlns="http://www.springframework.org/schema/beans"
       xmlns:xsi="http://www.w3.org/2001/XMLSchema-instance"
       xmlns:mvc="http://www.springframework.org/schema/mvc"
       xsi:schemaLocation="http://www.springframework.org/schema/beans http://www.springframework.org/schema/beans/spring-beans.xsd http://www.springframework.org/schema/mvc https://www.springframework.org/schema/mvc/spring-mvc.xsd">

</beans>
4. In the configuration file
<!--Add process mapper-->
    <bean class="org.springframework.web.servlet.handler.BeanNameUrlHandlerMapping"/>
    <!--Add processor adapter-->
    <bean class="org.springframework.web.servlet.mvc.SimpleControllerHandlerAdapter"/>
    <!--Add view parser-->
    <mvc:view-resolvers>
        <bean class="org.springframework.web.servlet.view.InternalResourceViewResolver"
              id="InternalResourceViewResolver">
        <!--prefix-->
        <property name="prefix" value="/WEB-INF/jsp/"/>
        <!--suffix-->
        <property name="suffix" value=".jsp"/>
        </bean>
    </mvc:view-resolvers>
5. Write Controller business code
import org.springframework.web.servlet.ModelAndView;
import org.springframework.web.servlet.mvc.Controller;

import javax.servlet.http.HttpServletRequest;
import javax.servlet.http.HttpServletResponse;

public class controller implements Controller {

    @Override
    public ModelAndView handleRequest(HttpServletRequest httpServletRequest, HttpServletResponse httpServletResponse) throws Exception {
        //ModelAndView models and views
        ModelAndView mv=new ModelAndView();
       //Encapsulate the object and put it in ModelAndView. Model
        mv.addObject("msg","SpringMVC-------");
        //Encapsulate the view to jump to and put it in ModelAndView
        mv.setViewName("hello");
        return mv;
    }
}
6. Register beans in Spring container
<bean id="/tets" class="com.chao.wed.controller"></bean>
7. Create a jsp that needs to jump
<%@ page contentType="text/html;charset=UTF-8" language="java" %>
<html>
<head>
    <title>Title</title>
</head>
<body>
  //Take out the value in the encapsulated object
   ${msg}
</body>
</html>
8. Configure tomcat to start the test and get the effect

2. Develop spring MVC with annotations
preparation:
-
Create a new Maven module
-
Add Web Framework Support
-
In wed Configuring spring MVC in XML
 <servlet>
        <servlet-name>DispatcherServlet</servlet-name>
        <servlet-class>org.springframework.web.servlet.DispatcherServlet</servlet-class>
        <!--         Associate a springmvc Configuration file for:[servlet-name]-servlet.xml-->
        <init-param>
            <param-name>contextConfigLocation</param-name>
            <param-value>classpath:SpringMVC-Servlet.xml</param-value>
        </init-param>
        <!--Startup level-1-->
        <load-on-startup>1</load-on-startup>
    </servlet>

    <servlet-mapping>
        <servlet-name>DispatcherServlet</servlet-name>
        <url-pattern>/</url-pattern>
    </servlet-mapping>
2. Create spring MVC configuration file
    <!-- Automatic scanning package -->
    <context:component-scan base-package="com.chao.controller"/>
    <!-- Do not process static resources -->
    <mvc:default-servlet-handler />
    <mvc:annotation-driven />

    <!-- view resolver  -->
    <bean class="org.springframework.web.servlet.view.InternalResourceViewResolver"
          id="internalResourceViewResolver">
        <!-- prefix -->
        <property name="prefix" value="/WEB-INF/jsp/" />
        <!-- suffix -->
        <property name="suffix" value=".jsp" />
    </bean>
3. Create controller
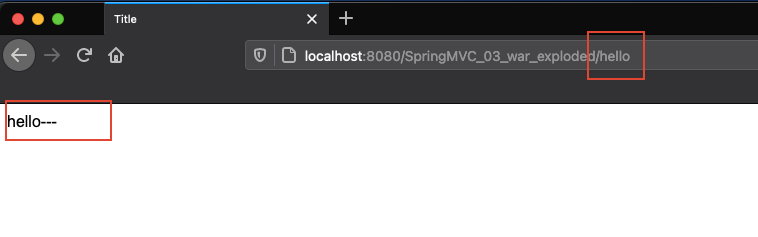
package com.chao.controller; import org.springframework.stereotype.Controller; import org.springframework.ui.Model; import org.springframework.web.bind.annotation.RequestMapping; //Use the annotation to define the class Controller @Controller public class controller { @RequestMapping("/hello") public String servlet(Model model) { model.addAttribute("msg","hello---"); return "hello"; } }-
@RequestMapping is to map the request path;
-
The purpose of declaring Model type parameters in the method is to bring the data in the Action to the view;
-
Method returns the name of the view hello;
-
4. Create jsp
<%@ page contentType="text/html;charset=UTF-8" language="java" %>
<html>
<head>
    <title>Title</title>
</head>
<body>
${msg}
</body>
</html>
5. Configure tomcat Startup Test

3.RequestMapping
@RequestMapping
-
@The RequestMapping annotation is used to map URLs to a controller class or a specific handler method.
@Controller
public class TestController {
   @RequestMapping("/hello")
   public String test(){
       return "hello";
  }
}
4.RestFul style
concept
Restful is a style of resource positioning and resource operation. It's not a standard or agreement, it's just a style.
function
Resources: all things on the Internet can be abstracted as resources
Resource operation: use POST, DELETE, PUT and GET to operate resources with different methods.
Add, delete, modify and query respectively.
test
-
Create a new class RestFulController
@Controller public class RestFulController { } -
Use the value of the @ PathVariable method to bind the parameter to the previous one.
package com.chao.controller; import org.springframework.stereotype.Controller; import org.springframework.ui.Model; import org.springframework.web.bind.annotation.RequestMapping; @Controller public class controller { @RequestMapping("/hello") public String servlet(Model model) { model.addAttribute("msg","hello---"); return "hello"; } } -
Let's test the request and check it out
Let's modify the corresponding parameter type and test again
package com.chao.controller;
import org.springframework.stereotype.Controller;
import org.springframework.ui.Model;
import org.springframework.web.bind.annotation.PathVariable;
import org.springframework.web.bind.annotation.RequestMapping;
@Controller
public class controller {
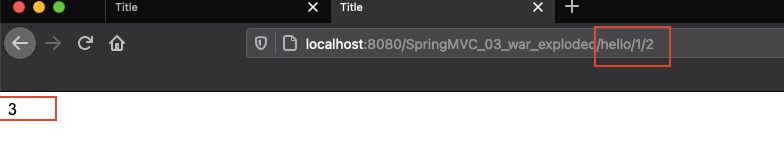
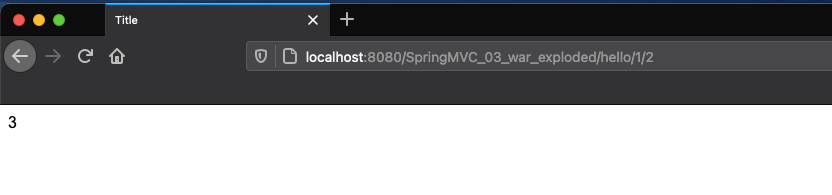
@RequestMapping("/hello/{a}/{b}")
public String servlet(@PathVariable int a,@PathVariable int b, Model model)
{
int res=a+b;
model.addAttribute("msg",res);
return "hello";
}
}
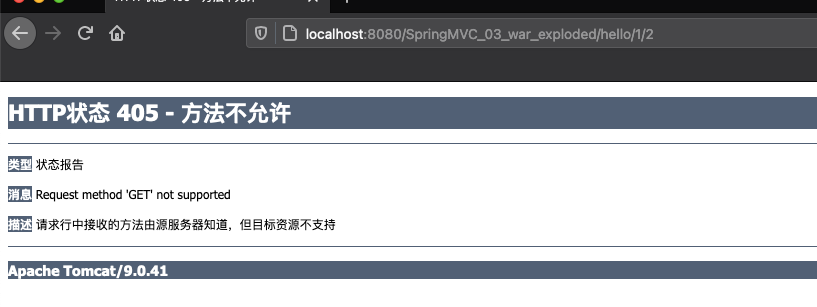
Use the method property to specify the request type
Specify the type of request, such as GET, POST, HEAD, OPTIONS, PUT, PATCH, DELETE, TRACE, etc
Let's test:
-
Add a method
@Controller public class controller { @RequestMapping(value = "/hello/{a}/{b}",method = RequestMethod.POST) public String servlet(@PathVariable int a,@PathVariable int b, Model model) { int res=a+b; model.addAttribute("msg",res); return "hello"; } } -
Use the browser address bar to access. By default, it is a Get request, and an error 405 will be reported:
Modify POST to GET;
@Controller
public class controller {

    @RequestMapping(value = "/hello/{a}/{b}",method = RequestMethod.GET)
    public String servlet(@PathVariable int a,@PathVariable int b, Model model)
    {
        int res=a+b;
        model.addAttribute("msg",res);

        return "hello";
    }
}

In addition, you can use combined annotations
@GetMapping
@PostMapping
@PutMapping
@DeleteMapping
@PatchMapping
@Controller
public class controller {

    @PostMapping("/hello/{a}/{b}")
    public String servlet(@PathVariable int a,@PathVariable int b, Model model)
    {
        int res=a+b;
        model.addAttribute("msg",res);

        return "hello";
    }
}
It's OK!
In the actual development, there are many combined annotations!!!