Spring MVC overview
1. Spring MVC overview
1) The excellent Web framework based on MVC design concept provided by Spring for the presentation layer is one of the most mainstream MVC frameworks at present
2)Spring3. After 0, it comprehensively surpassed struts 2 and became the best MVC framework.
3) Spring MVC uses a set of MVC annotations to make POJO s the controller for processing requests without implementing any interfaces.
4) Support REST style URL requests. Restful
5) The loose coupling pluggable component structure is adopted, which is more scalable and flexible than other MVC frameworks.
2. What is spring MVC
1) A lightweight Web layer application framework based on MVC. Front end rather than business logic layer. A successor product of the Spring framework.
2) Spring framework structure diagram (new version):

3. What can spring MVC do
1) Natural integration with Spring framework, such as: (IOC,AOP)
2) Support Restful style
3) More concise Web tier development
4) Support flexible URL to page controller mapping
5) It is very easy to integrate with other view technologies, such as Velocity, FreeMarker, etc
6) Because the Model data is not stored in a specific API, but in a Model (implemented by Map data structure, it is easy to be used by other frameworks)
7) Very flexible data validation, formatting and data binding mechanisms, and can use any object for data binding without implementing the API of a specific framework
8) Simpler and more powerful exception handling
9) Support for static resources
10) Support flexible localization, topic resolution, etc
4. How to use spring MVC
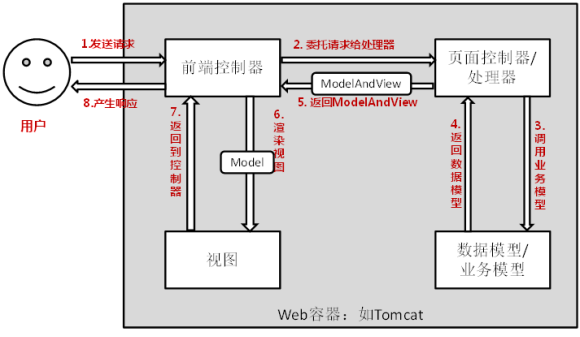
1) The responsibilities of the Web layer are decoupled based on the request response model
2) Common main components
① Dispatcher servlet: front end controller
② Controller: the processor / page controller does the work of C in MVC, but the control logic is transferred to the front-end controller to process requests
③ HandlerMapping: the request is mapped to the processor, and who is to handle it. If the mapping is successful, a HandlerExecutionChain object (including a Handler processor (page controller) object and multiple HandlerInterceptor interceptor objects) is returned
④ View Resolver: the View Resolver, who to find to process the returned page. The logical view is parsed into a specific view, and this strategy mode is easy to replace other view technologies;
For example, the InternalResourceViewResolver maps the logical view name to a JSP view
⑤ LocalResolver: localization and internationalization
⑥ MultipartResolver: file upload parser
⑦ HandlerExceptionResolver: exception handler
Build spring MVC
1) Create a new Web project and add a jar package
spring-aop-4.0.0.RELEASE.jar
spring-beans-4.0.0.RELEASE.jar
spring-context-4.0.0.RELEASE.jar
spring-core-4.0.0.RELEASE.jar
spring-expression-4.0.0.RELEASE.jar
commons-logging-1.1.3.jar
spring-web-4.0.0.RELEASE.jar
spring-webmvc-4.0.0.RELEASE.jar
2) On the web XML to configure the DispatcherServlet, the core (front-end) controller of spring MVC
Function: load the configuration file of spring MVC: DispatcherServlet automatically loads the configuration file. At this time, the configuration file has the default location and name:
Default location: under WEB-INF
Default name < servlet name > - servlet xml
When the configuration file is loaded, spring MVC will find the control layer according to the scanning components
<?xml version="1.0" encoding="UTF-8"?>
<web-app xmlns="http://xmlns.jcp.org/xml/ns/javaee"
         xmlns:xsi="http://www.w3.org/2001/XMLSchema-instance"
         xsi:schemaLocation="http://xmlns.jcp.org/xml/ns/javaee http://xmlns.jcp.org/xml/ns/javaee/web-app_4_0.xsd"
         version="4.0">
    <servlet>
        <servlet-name>springMVC</servlet-name>
        <servlet-class>org.springframework.web.servlet.DispatcherServlet</servlet-class>
    </servlet>

    <servlet-mapping>
        <servlet-name>springMVC</servlet-name>
        <url-pattern>/</url-pattern>
    </servlet-mapping>
</web-app>
3) Create profile
Next to the second step above, create and configure the file. Note: the default name of this file is: < servlet name > - servlet xml; To be consistent with the servletname in the web XML.
When the configuration file is loaded, spring MVC will find the control layer according to the scanning components
<?xml version="1.0" encoding="UTF-8"?>
<beans xmlns="http://www.springframework.org/schema/beans"
       xmlns:xsi="http://www.w3.org/2001/XMLSchema-instance"
       xmlns:context="http://www.springframework.org/schema/context"
       xsi:schemaLocation="http://www.springframework.org/schema/beans http://www.springframework.org/schema/beans/spring-beans.xsd http://www.springframework.org/schema/context http://www.springframework.org/schema/context/spring-context.xsd">


    <!-- Scan component, add@Controller Annotated classes as springMVC Control layer of -->
  <context:component-scan base-package="com.springMVC"></context:component-scan>
    <!--
		Configure view parser
		Function: will prefix + View name + suffix Determine the final page to jump to
		For example:/WEB-INF/view/success.jsp
	 -->
    <bean id="viewResolver" class="org.springframework.web.servlet.view.InternalResourceViewResolver">
        <property name="prefix" value="/WEB-INF/"></property>
        <property name="suffix" value=".jsp"></property>
    </bean>
</beans>
4) Create a POJO and add the @ Controller annotation to this class. Spring MVC will load this class as the control layer and let it handle the request response
In the control layer, you need to set @ RequestMapping(value = "xxx") on the method
Spring MVC uses this annotation to match the request path with the method in the control layer. At this time, the request path is localhost:8080/projectName/xxx
The method of processing the request will return a string, that is, the view name. Finally, the page Jump will be realized through the view parser configured in the configuration file
Method: prefix + view name + suffix, which is the page path of the final jump
package com.springMVC;
import org.springframework.stereotype.Controller;
import org.springframework.web.bind.annotation.RequestMapping;
@Controller
public class TestController {//POJO: ordinary java class
/**
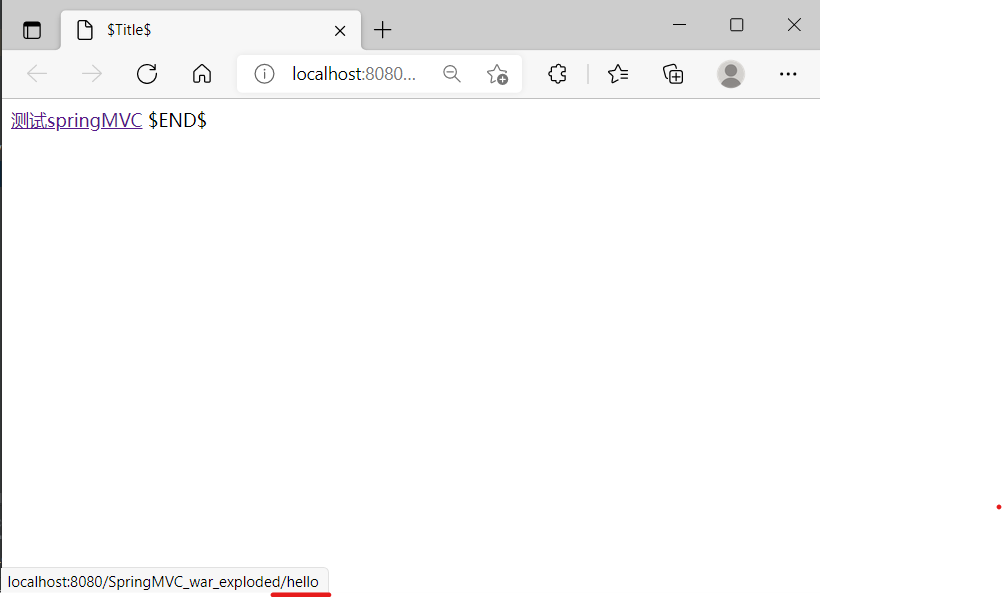
* Suppose you access: localhost:8080/springMVC/hello
*/
@RequestMapping("hello")
public String respondhello() {
System.out.println("success");
return "success";
}
}
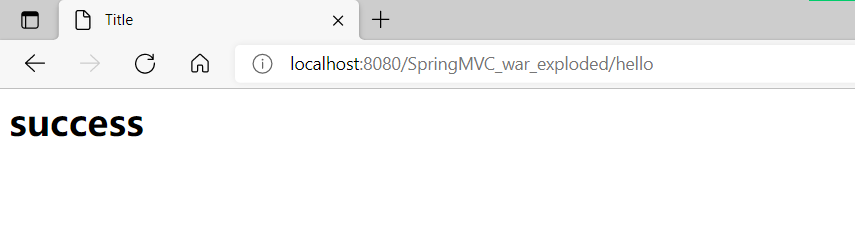
5) Create a corresponding jsp page:
<%--
  Created by IntelliJ IDEA.
  User: 86178
  Date: 2021/12/22
  Time: 17:02
  To change this template use File | Settings | File Templates.
--%>
<%@ page contentType="text/html;charset=UTF-8" language="java" %>
<html>
<head>
    <title>Title</title>
</head>
<body>
 <h1>success</h1>
</body>
</html>
Test:
HelloWorld depth resolution
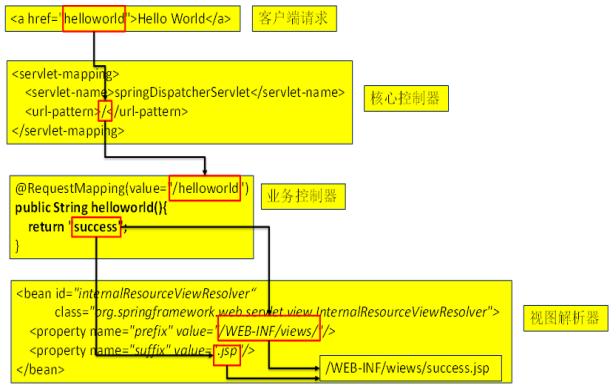
Process analysis:
Basic steps:
① Client requests are submitted to the dispatcher servlet
② The dispatcher servlet Controller queries one or more HandlerMapping to find the Controller that handles the request
③ The dispatcher servlet submits the request to the Controller (also known as the Handler)
④ After calling business logic processing, the Controller returns ModelAndView
⑤ Dispatcher servlet queries one or more viewresolver view parsers to find the view specified by ModelAndView
⑥ The view is responsible for displaying the results to the client
@RequestMapping annotation
RequestMapping mapping request annotation
1) Spring MVC uses the @ RequestMapping annotation to specify which URL requests the controller can handle
2) @ RequestMapping can be marked at the class definition and method definition of the controller
① Tag on class: provides preliminary request mapping information. Relative to the root directory of WEB application
② Tag in method: provide further subdivision mapping information. Relative to the URL marked on the class.
3) If @ RequestMapping is not marked on the class, the URL marked at the method is relative to the root directory of the WEB application
4) Function: after the dispatcher servlet intercepts the request, it determines the processing method corresponding to the request through the mapping information provided by @ RequestMapping on the controller.
RequestMapping mapping request method
Map request parameters, request methods, or request headers
1) @ RequestMapping in addition to mapping requests using request URL s, you can also map requests using request methods, request parameters, and request headers
2) The value, method, parameters and heads of @ RequestMapping respectively represent the mapping conditions of the request URL, request method, request parameter and request header. They are related to each other. The joint use of multiple conditions can make the request mapping more accurate.
3) params and headers support simple expressions:
param1: indicates that the request must contain a request parameter named param1
! param1: indicates that the request cannot contain a request parameter named param1
param1 != value1: indicates that the request contains a request parameter named Param1, but its value cannot be value1
{"param1=value1", "param2"}: the request must contain two request parameters named param1 and param2, and the value of param1 parameter must be value1
RequestMapping mapping request parameters & request headers
//Understand: you can use params and headers to map requests more accurately Params and headers support simple expressions
@RequestMapping(value="/testParamsAndHeaders",
params= {"username","age!=10"}, headers = { "Accept-Language=en-US,zh;q=0.8" })
public String testParamsAndHeaders(){
System.out.println("testParamsAndHeaders...");
return "success";
}
RequestMapping supports Ant path style
1) Ant style resource addresses support three matching characters: [understand]
?: Matches a character in the file name
*: Matches any character in the file name
**: ** Matching multi-layer paths
2) @ RequestMapping also supports Ant style URL s:
/user/*/createUser
 Match URL s such as / user/aaa/createUser, / user/bbb/createUser

/user/**/createUser
 matching /user/createUser,/user/aaa/bbb/createUser etc. URL

/user/createUser??
matching /user/createUseraa,/user/createUserbb etc. URL
RequestMapping mapping request placeholder PathVariable annotation
@PathVariable
The URL with placeholder is spring 3 0, which is a milestone in the development of spring MVC towards the goal of REST.
The @ PathVariable allows you to bind the placeholder parameter in the URL to the input parameter of the controller processing method:
The {xxx} placeholder in the URL can be bound to the input parameter of the operation method through @ PathVariable("xxx").
Test code
package com.springMVC;
import org.springframework.stereotype.Controller;
import org.springframework.web.bind.annotation.PathVariable;
import org.springframework.web.bind.annotation.RequestMapping;
import org.springframework.web.bind.annotation.RequestMethod;

@Controller
//@RequestMapping("/mvc")
public class TestController {//POJO: ordinary java class
    /**
     * Suppose you access: localhost:8080/springMVC/hello
     * @RequestMapping:Set the request mapping, and set the mapping relationship between the request and the method in the control layer
     *When the request path is consistent with the value attribute of @ RequestMapping, the method marked in the annotation is the method for processing the request
     *method:It is used to set the request mode. Requests can be processed only when the client sends the request in the same way as the method value
     *Request method: GET query POST add PUT modify DELETE delete
     *
     * @RequestMapping It can be added to classes or methods
     * If both classes and methods are added, they should be accessed layer by layer. The class should be accessed first and the methods in the class should be accessed
     *
     *params:It is used to set the data transmitted from the client to the server, and supports expressions
     *username !username username=admin username!=admin
     *headers:It is used to set the request header information. The request header information of the sent request must be consistent with that set in the headers property
     */
    @RequestMapping(value = "/hello",/*method=RequestMethod.POST,
			params= {"username","age!=12"}*/
            headers= {"Accept-Language=zh-CN,zh;q=0.8,zh-TW;q=0.7,zh-HK;q=0.5,en-US;q=0.3,en;q=0.2"} )
    public String respondhelloget() {
        System.out.println("success");
        return "success";
    }
    @RequestMapping(value = "/hello",method = RequestMethod.POST)
    public String respondhellopost() {
        System.out.println("success");
        return "success";
    }

    /**
     * springMVC Ant supported request path
     * In Ant, there are 3 matches
     * *:Any character
     * ?:Any character
     * **:Any multi tier directory
     */
    @RequestMapping(value="/*/ant??/**/testAnt")
    public String testAnt() {
        System.out.println("SUCCESS:testAnt");
        return "success";
    }

    /**
     * Previously: localhost: 8080 / springmvc02 / testrest? id=1001&username=admin
     * Now: localhost:8080/springMVC02/testREST/1001/admin
     */
    @RequestMapping("/testREST/{id}/{username}")
    public String testREST(@PathVariable("id")Integer id, @PathVariable("username")String username) {
        System.out.println("id:"+id+",username="+username);
        return "success";
    }
}
REST
What is REST?
1) REST: representative state transfer. (resource) presentation layer state transformation. It is the most popular Internet software architecture at present. It has clear structure, conforms to standards, is easy to understand and easy to expand, so it is being adopted by more and more websites
2) URL Style
Example:
/order/1 HTTP GET: get the order gerorder with id = 1? id=1
/order/1 HTTP DELETE: delete the order deleteorder with id = 1? id=1
/order HTTP PUT: update order
/order HTTP POST: new order
Extension: open platform payment function: what URL you should send, what parameters you need to pass, what validation you need, and what data you should respond to
3)HiddenHttpMethodFilter
Browser form only supports GET and POST requests, while DELETE, PUT and other method s do not
Support, spring 3 0 adds a filter that can convert these requests into standard http methods to make
GET, POST, PUT and DELETE requests are supported.
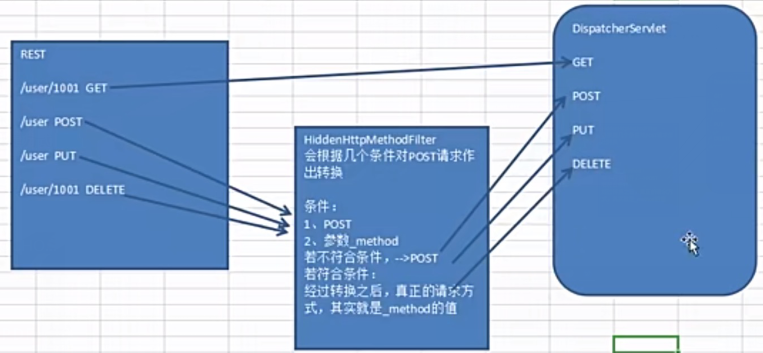
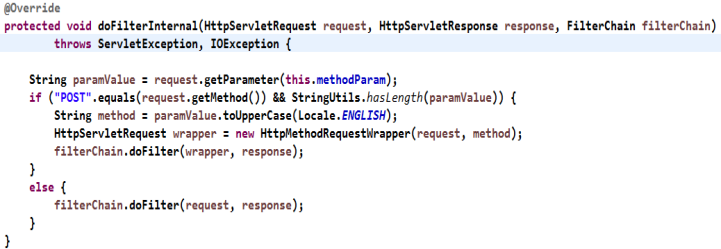
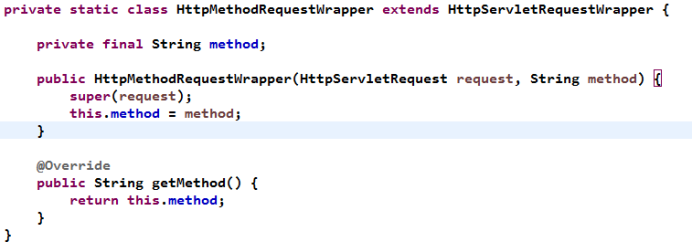
HiddenHttpMethodFilter source code analysis
1) Why does the request implied parameter name have to be called ''_ method”

2) Process of hiddenHttpMethodFilter
Test code:
1) Configure HiddenHttpMethodFilter filter
<!-- support REST Style filter: you can POST Request converted to PUT or DELETE request -->
<filter>
<filter-name>HiddenHttpMethodFilter</filter-name>
<filter-class>org.springframework.web.filter.HiddenHttpMethodFilter</filter-class>
</filter>
<filter-mapping>
<filter-name>HiddenHttpMethodFilter</filter-name>
<url-pattern>/*</url-pattern>
</filter-mapping>
2) Code
/**
 * 1.Test REST style get, post, put and delete operations
 * Take CRUD as an example:
 * Add: / order POST
 * Modify: / order / 1 put update? id=1
 * Get: / order / 1 get? id=1
 * Delete: / order / 1 delete delete? id=1

 * 2.How do I send a PUT request or a DELETE request?
 * ①.Configure HiddenHttpMethodFilter
 * ②.POST request needs to be sent
 * ③.When sending a POST request, you need to carry an implicit field with name="_method", and the value is PUT or DELETE

 * 3.How to get the id value in the target method of spring MVC?
 *   Use @ PathVariable annotation
 */
@RequestMapping(value="/testRESTGet/{id}",method=RequestMethod.GET)
public String testRESTGet(@PathVariable(value="id") Integer id){
System.out.println("testRESTGet id="+id);
return "success";
}

@RequestMapping(value="/testRESTPost",method=RequestMethod.POST)
public String testRESTPost(){
System.out.println("testRESTPost");
return "success";
}

@RequestMapping(value="/testRESTPut/{id}",method=RequestMethod.PUT)
public String testRESTPut(@PathVariable("id") Integer id){
System.out.println("testRESTPut id="+id);
return "success";
}

@RequestMapping(value="/testRESTDelete/{id}",method=RequestMethod.DELETE)
public String testRESTDelete(@PathVariable("id") Integer id){
System.out.println("testRESTDelete id="+id);
return "success";
}
3) Request link
<!-- Experiment 1 test REST style GET request -->
<a href="springmvc/testRESTGet/1">testREST GET</a><br/><br/>

<!-- Experiment 2 test REST style POST request -->
<form action="springmvc/testRESTPost" method="POST">
<input type="submit" value="testRESTPost">
</form>

<!-- Experiment 3 test REST style PUT request -->
<form action="springmvc/testRESTPut/1" method="POST">
<input type="hidden" name="_method" value="PUT">
<input type="submit" value="testRESTPut">
</form>

<!-- Experiment 4 test REST style DELETE request -->
<form action="springmvc/testRESTDelete/1" method="POST">
<input type="hidden" name="_method" value="DELETE">
<input type="submit" value="testRESTDelete">
</form>
Processing request data (the back end receives the data sent by the front end page)
@RequestParam annotation
1) Use @ RequestParam at the processing method input parameter to pass the request parameter to the request method
2) value: parameter name
3) Required: required. The default is true, which means that the request parameters must contain the corresponding parameters. If they do not exist, an exception will be thrown
4) defaultValue: the default value, which is used when no parameters are passed
Experimental code
1) Method of adding controller
/**
 * @RequestParam Annotations are used to map request parameters
 *         value Name of the parameter used to map the request
 *         required Used to set whether request parameters are required
 *         defaultValue Sets the default value, which is used when no parameters are passed
 */
@RequestMapping(value="/testRequestParam")
public String testRequestParam(
@RequestParam(value="username") String username,
@RequestParam(value="age",required=false,defaultValue="0") int age){
System.out.println("testRequestParam - username="+username +",age="+age);
return "success";
}
2) Add page link
<!--Test request parameters @RequestParam Annotation usage -->
<a href="springmvc/testRequestParam?username=atguigu&age=10">testRequestParam</a>
@RequestHeader annotation
1) Use @ RequestHeader to bind the property value of the request header
2) The request header contains several attributes. The server can get the information of the client based on this. The attribute value in the request header can be bound to the input parameter of the processing method through @ RequestHeader

Experimental code
//Understand: the usage of mapping request header information is the same as @ RequestParam
@RequestMapping(value="/testRequestHeader")
public String testRequestHeader(@RequestHeader(value="Accept-Language") String al){
System.out.println("testRequestHeader - Accept-Language: "+al);
return "success";
}
<!-- Test request header@RequestHeader Annotation usage -->
<a href="springmvc/testRequestHeader">testRequestHeader</a>
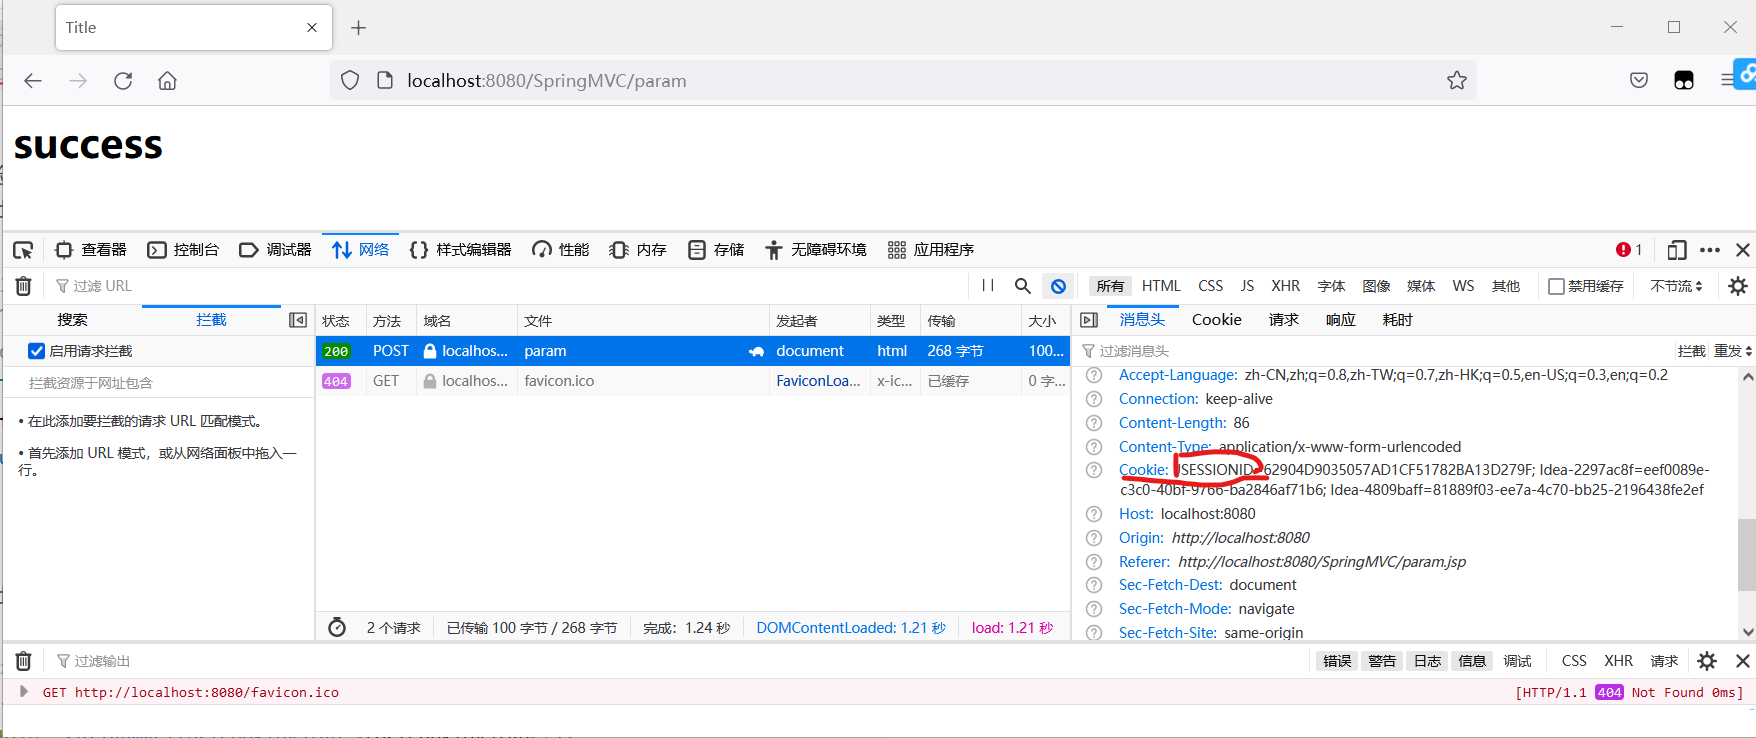
@CookieValue annotation
1) Use @ Cookie value to bind the Cookie value in the request
2) @ Cookie value allows the processing method input parameter to bind a Cookie value

Experimental code
1) Method of adding controller
//Understand: @ Cookie value: map a Cookie value The property is the same as @ RequestParam
@RequestMapping("/testCookieValue")
public String testCookieValue(@CookieValue("JSESSIONID") String sessionId) {
System.out.println("testCookieValue: sessionId: " + sessionId);
return "success";
}
2) Add page link
<!--Test request Cookie @CookieValue Annotation usage -->
<a href="springmvc/testCookieValue">testCookieValue</a>
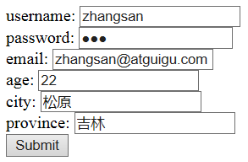
Use POJO as parameter
1) Binding request parameter values using POJO objects
2) Spring MVC will automatically match the request parameter name and POJO attribute name, and automatically fill in the attribute value for the object. Cascading properties are supported. For example: dept.deptId, dept.address Tel et al
Experiment code:
1) Add controller method, form page
/**
 * Spring MVC It will automatically match the request parameter name and POJO attribute name, and automatically fill in the attribute value for the object.
 * Cascading properties are supported
 *   For example: dept.deptId, dept.address Tel et al
 */
@RequestMapping("/testPOJO")
public String testPojo(User user) {
System.out.println("testPojo: " + user);
return "success";
}
<!-- test POJO Object passes parameters and supports cascading attributes -->
<form action=" testPOJO" method="POST">
username: <input type="text" name="username"/><br>
password: <input type="password" name="password"/><br>
email: <input type="text" name="email"/><br>
age: <input type="text" name="age"/><br>
city: <input type="text" name="address.city"/><br>
province: <input type="text" name="address.province"/>
<input type="submit" value="Submit"/>
</form>
2) Add entity class
package com.atguigu.springmvc.entities;
public class Address {
private String province;
private String city;
//get/set
}
package com.atguigu.springmvc.entities;
public class User {
private Integer id ;
private String username;
private String password;
private String email;
private int age;
private Address address;
//get/set
}
3) Execution results:

4) If Chinese is garbled, you need to configure a character encoding filter, and before configuring other filters,
For example (HiddenHttpMethodFilter), otherwise it will not work. (think about how to solve the garbled code problem of method = "get" request)
<!-- Configure character set -->
	<filter>
		<filter-name>encodingFilter</filter-name>
		<filter-class>org.springframework.web.filter.CharacterEncodingFilter</filter-class>
		<init-param>
			<param-name>encoding</param-name>
			<param-value>UTF-8</param-value>
		</init-param>
		<init-param>
			<param-name>forceEncoding</param-name>
			<param-value>true</param-value>
		</init-param>
	</filter>
	<filter-mapping>
		<filter-name>encodingFilter</filter-name>
		<url-pattern>/*</url-pattern>
	</filter-mapping>
Use the Servlet native API as a parameter
1. What servlet API type parameters can MVC's Handler method accept
1)HttpServletRequest
2)HttpServletResponse
3)HttpSession
4)java.security.Principal
5)Locale
6)InputStream
7)OutputStream
8)Reader
9)Writer
Experiment code:
/**
 * You can use the native API of servlet as the parameter of the target method. The following types are supported:
 *
 * HttpServletRequest
 * HttpServletResponse
 * HttpSession
 * java.security.Principal
 * Locale InputStream
 * OutputStream
 * Reader
 * Writer
 * @throws IOException
 */
@RequestMapping("/testServletAPI")
public void testServletAPI(HttpServletRequest request,HttpServletResponse response, Writer out) throws IOException {
System.out.println("testServletAPI, " + request + ", " + response);
out.write("hello springmvc");
//return "success";
}
<!-- test Servlet API As a processing request parameter -->
<a href="springmvc/testServletAPI">testServletAPI</a>
Processing response data (back-end processing setting front-end page data)
javaWEB: request.setAttribute(xxx) request.getRequestDispatcher("address") forward(req,resp);
Spring MVC output model data overview
The following ways to output model data are provided
1) ModelAndView: when the return value type of the processing method is ModelAndView, the method body can add model data through this object
2) Map or model: the input parameter is org springframework. ui. Model,
org.springframework.ui.ModelMap or Java uti. When the processing method returns, the data in the Map will be automatically added to the model.
ModelAndView for processing model data
1. ModelAndView introduction
If the return value of the controller processing method is ModelAndView, it contains both view information and model number
According to the information.
1) Two important member variables:
private Object view; View information
private ModelMap model; model data
3) Add model data:
MoelAndView addObject(String attributeName, Object attributeValue) sets the model data
ModelAndView addAllObject(Map<String, ?> modelMap)
4) Set view:
void setView(View view) sets the view object
void setViewName(String viewName) sets the view name
5) Get model data
Protected map < string, Object > getmodelinternal() get model data
public ModelMap getModelMap()
public Map<String, Object> getModel()
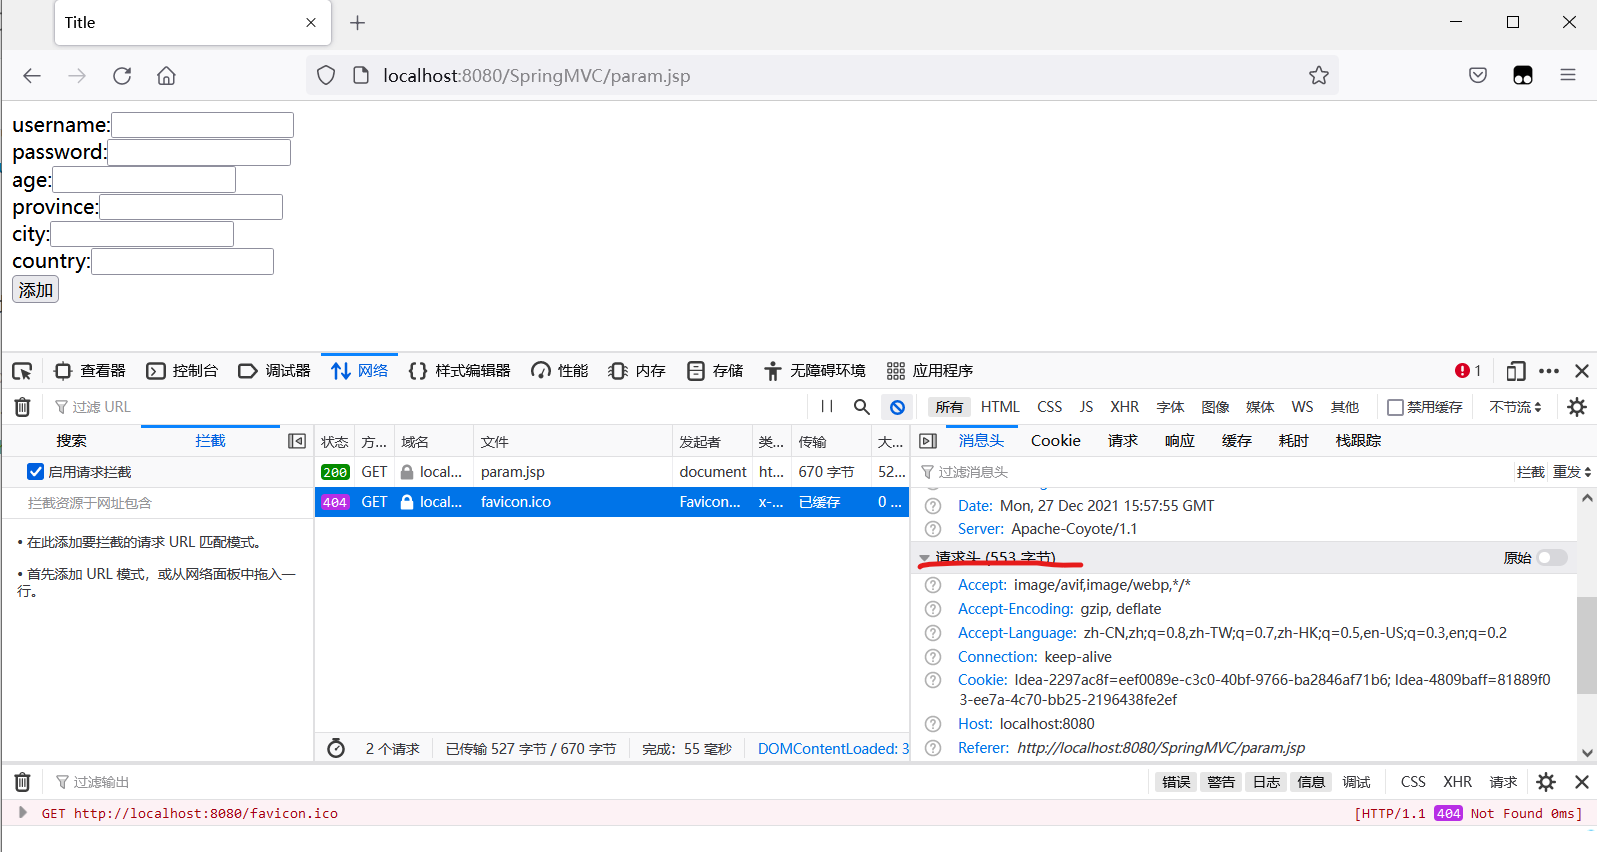
Experiment code:
@RequestMapping(value="/param", method=RequestMethod.POST)
	public ModelAndView param() {
		ModelAndView mav = new ModelAndView();
		mav.addObject("username", "root");//Put value into request scope
		mav.setViewName("success");//Set the view name to realize page Jump
		return mav;
	}
success.jsp
<body>
	<h1>success</h1>
	<br />
	${requestScope.username }
</body>
Map Model for processing model data
1. Map introduction
1) Spring MVC internally uses an org springframework. ui. The model interface stores model data
Specific use steps
2) Spring MVC will create an implicit model object as the storage container of model data before calling the method.
3) If the input parameters of the method are of type Map or Model, Spring MVC will pass the reference of the implicit Model to these input parameters.
4) In the method body, developers can access all the data in the model through this parameter object, or add new attribute data to the model
Experiment code:
@RequestMapping(value="/param", method=RequestMethod.POST)
	public String param(Map<String, Object> map) {
		map.put("username", "admin");//Put value into scope
		return "success";//Return view name
	}
	@RequestMapping(value="/param", method=RequestMethod.POST)
	public String param(Model model, String username) {
		System.out.println(username);
		model.addAttribute("username", "Zhang San");//Put value into scope
		return "success";//Return view name
	}
Summary: according to the ModelAndView source code debugging, no matter which of the following methods is used, the model data and view data will eventually be encapsulated in a ModelAndView