spring security Learning Notes
1. Introduction to spring security
The core functions of spring security mainly include
- Certification (who are you)
- Authorization (what can you do)
- Attack protection (against identity forgery)
Its core is a set of filter chains, which will be automatically configured after the project is started. The core is the Basic Authentication Filter, which is used to authenticate the user's identity. A filter in spring security handles an authentication method.
2. spring security Web permission scheme
When the user name and password for logging in to the system are not set, the default account is user. When the project is started, the system will send a password to the console. You can log in to the system with this account and password
//Password sent by the system to the console
Using generated security password: dae47545-7130-4fa1-aacf-aa8b8c76f40a
2.1. Set the account and password to log in to the system
Method 1: modify the login account and password in the configuration file (application.properties)
# Configure the user name and password of security through the configuration file
spring.security.user.name=atguigu   #user name
spring.security.user.password=atguigu   #password
Method 2: through configuration class
Note: when using password encryption, you must add the BCryptPasswordEncoder object to the container, otherwise an error will be reported
package com.atguigu.config;

import org.springframework.context.annotation.Bean;
import org.springframework.context.annotation.Configuration;
import org.springframework.security.config.annotation.authentication.builders.AuthenticationManagerBuilder;
import org.springframework.security.config.annotation.web.configuration.WebSecurityConfigurerAdapter;
import org.springframework.security.crypto.bcrypt.BCryptPasswordEncoder;
import org.springframework.security.crypto.password.PasswordEncoder;

@Configuration//Declare that this class is a configuration class
public class SecurityConfig extends WebSecurityConfigurerAdapter {
    //Override the configure method
    @Override
    protected void configure(AuthenticationManagerBuilder auth) throws Exception{
        //Password encryption object, BCrypt strong hash method, the result of each encryption is different.
        BCryptPasswordEncoder passwordEncoder=new BCryptPasswordEncoder();
        //Encrypt password
        String passwprd = passwordEncoder.encode("123");
        //Set user name, password, and role
        auth.inMemoryAuthentication().withUser("root").password(passwprd).roles("admin");
    }

    //If password encryption is used, the BCryptPasswordEncoder object must be added to the container
    @Bean
    PasswordEncoder passwordEncoder(){
        return new BCryptPasswordEncoder();
    }
}
Method 3: customize the implementation class
- 1. Create a configuration class and set which userDetailsService implementation class to use
package com.atguigu.config;

import org.springframework.beans.factory.annotation.Autowired;
import org.springframework.context.annotation.Bean;
import org.springframework.context.annotation.Configuration;
import org.springframework.security.config.annotation.authentication.builders.AuthenticationManagerBuilder;
import org.springframework.security.config.annotation.web.configuration.WebSecurityConfigurerAdapter;
import org.springframework.security.core.userdetails.UserDetailsService;
import org.springframework.security.crypto.bcrypt.BCryptPasswordEncoder;
import org.springframework.security.crypto.password.PasswordEncoder;

@Configuration//Declare that this class is a configuration class
public class SecurityConfigTest extends WebSecurityConfigurerAdapter {

    @Autowired
    private UserDetailsService userDetailsService;

    //Override the configure method
    @Override
    protected void configure(AuthenticationManagerBuilder auth) throws Exception{
        //Set to your own implementation class
        auth.userDetailsService(userDetailsService).passwordEncoder(passwordEncoder());
    }

    //If password encryption is used, the BCryptPasswordEncoder object must be added to the container
    @Bean
    PasswordEncoder passwordEncoder(){
        return new BCryptPasswordEncoder();
    }
}
- 2. Write the implementation class and return the User object. The User object has User name, password and operation permission
package com.atguigu.service;

import org.springframework.security.core.GrantedAuthority;
import org.springframework.security.core.authority.AuthorityUtils;
import org.springframework.security.core.userdetails.User;
import org.springframework.security.core.userdetails.UserDetails;
import org.springframework.security.core.userdetails.UserDetailsService;
import org.springframework.security.core.userdetails.UsernameNotFoundException;
import org.springframework.security.crypto.bcrypt.BCryptPasswordEncoder;
import org.springframework.stereotype.Service;

import java.util.List;

@Service("userDetailsService")//The name here should be the same as the name of the injected object in the configuration class
public class MyUserDetailsService implements UserDetailsService {


    @Override
    public UserDetails loadUserByUsername(String s) throws UsernameNotFoundException {

        List<GrantedAuthority> auths= AuthorityUtils.commaSeparatedStringToAuthorityList("role");
        return new User("mary",new BCryptPasswordEncoder().encode("123"),auths);
    }
}
3. Query database to complete user authentication
Integrate mybatisPlus to complete database operation
Step 1: introduce related dependencies
	    <!--mybitisplus rely on-->
        <dependency>
            <groupId>com.baomidou</groupId>
            <artifactId>mybatis-plus-boot-starter</artifactId>
            <version>3.0.5</version>
        </dependency>

        <!--mysql rely on-->
        <dependency>
            <groupId>mysql</groupId>
            <artifactId>mysql-connector-java</artifactId>
        </dependency>

        <!--Lombok rely on-->
        <dependency>
            <groupId>org.projectlombok</groupId>
            <artifactId>lombok</artifactId>
            <optional>true</optional>
        </dependency>
Step 2: create database table
user table:
[the external chain image transfer fails. The source station may have an anti-theft chain mechanism. It is recommended to save the image and upload it directly (img-i6ifpm1j-1631511850127) (C: \ users \ Fei \ appdata \ roaming \ typora \ typora user images \ image-20210910193046775. PNG)]
Step 3: create the entity class corresponding to the user table
package com.atguigu.entity;

import lombok.Data;

@Data
public class User {
    private Integer id;
    private String username;
    private String password;

}
Step 4: integrate mybatisPlus, create an interface, and inherit the interface of mybatisPlus
package com.atguigu.mapper;

import com.atguigu.entity.User;
import com.baomidou.mybatisplus.core.mapper.BaseMapper;

@Repository//Prevent the red flag of UserMapper object injected into MyUserDetailsService, and the red flag can also be used normally
public interface UserMapper extends BaseMapper<User> {
}
The fifth step is to call the mapper in MyUserDetailsService to query the database for user authentication.
package com.atguigu.service;

import com.atguigu.mapper.UserMapper;
import com.baomidou.mybatisplus.core.conditions.query.QueryWrapper;
import org.springframework.beans.factory.annotation.Autowired;
import org.springframework.security.core.GrantedAuthority;
import org.springframework.security.core.authority.AuthorityUtils;
import org.springframework.security.core.userdetails.User;
import org.springframework.security.core.userdetails.UserDetails;
import org.springframework.security.core.userdetails.UserDetailsService;
import org.springframework.security.core.userdetails.UsernameNotFoundException;
import org.springframework.security.crypto.bcrypt.BCryptPasswordEncoder;
import org.springframework.stereotype.Service;

import java.util.List;

@Service("userDetailsService")
public class MyUserDetailsService implements UserDetailsService {

    @Autowired
    private UserMapper userMapper;

    @Override
    public UserDetails loadUserByUsername(String username) throws UsernameNotFoundException {

        //Create a condition constructor
        QueryWrapper<com.atguigu.entity.User> wrapper=new QueryWrapper();
        //Query database according to user name = = where username =?
        wrapper.eq("username",username);
        //selectOne(): get a record
        com.atguigu.entity.User user = userMapper.selectOne(wrapper);
        //judge
        if (user==null){//There is no user name in the database. Authentication failed
            throw new UsernameNotFoundException("User name does not exist, authentication failed");
        }

        //The user object is returned from the query database, and the user name and password are returned
        List<GrantedAuthority> auths= AuthorityUtils.commaSeparatedStringToAuthorityList("role");
        return new User(user.getUsername(),new BCryptPasswordEncoder().encode(user.getPassword()),auths);
    }
}
Step 6: add MapperScan annotation on the startup class
package com.atguigu;

import org.mybatis.spring.annotation.MapperScan;
import org.springframework.boot.SpringApplication;
import org.springframework.boot.autoconfigure.SpringBootApplication;

@SpringBootApplication
@MapperScan("com.atguigu.mapper")
public class Springbootweb1Application {

    public static void main(String[] args) {
        SpringApplication.run(Springbootweb1Application.class, args);
    }

}
Step 7: configure database information
# Configure database connection information
spring.datasource.driver-class-name=com.mysql.cj.jdbc.Driver
spring.datasource.url=jdbc:mysql://localhost:3306/student?serverTimezone=GMT%2B8
spring.datasource.username=root
spring.datasource.password=123456
4. Customize the login page, which can be accessed without authentication
Step 1: implement relevant configuration in the configuration class (SecurityConfigTest)
Override the following method in the SecurityConfigTest configuration class
    @Override
    protected void configure(HttpSecurity http) throws Exception{
        //Customize your own login page
        http.formLogin()
                .loginPage("/login.html")  //Jump to login page setup
                .loginProcessingUrl("/user/login") //Login access path
                .defaultSuccessUrl("/test/index").permitAll()  //Access path after successful login
                .and().authorizeRequests()
                .antMatchers("/","/user/login,/static/**").permitAll() //Set which paths can be accessed directly without authentication
                .anyRequest().authenticated()
                .and().csrf().disable();    //Turn off csrf protection
    }
Step 2: create a related page (login.html) and Controller
Note: the name of the user name in the form must be username, the name of the password in the form must be password, and the submission method must be post, otherwise it cannot be recognized
<!DOCTYPE html>
<html lang="en">
<head>
    <meta charset="UTF-8">
    <title>Title</title>
</head>
<body>
    <form action="/user/login" method="post">
        user name:<input type="text" name="username">
        <br>
        password:<input type="password" name="password">
        <br>
        <input type="submit" value="Sign in">
    </form>
</body>
</html>
Create Controller
package com.atguigu.controller;

import com.atguigu.entity.User;
import com.atguigu.service.MyUserDetailsService;
import org.springframework.beans.factory.annotation.Autowired;
import org.springframework.context.ApplicationContext;
import org.springframework.web.bind.annotation.GetMapping;
import org.springframework.web.bind.annotation.RequestMapping;
import org.springframework.web.bind.annotation.RestController;

@RestController
@RequestMapping("/test")
public class testController {

    @Autowired
    ApplicationContext applicationContext;

    @GetMapping("hello")
    public String hello(){
        return "hello security";
    }

    @GetMapping("aaa")
    public String hello1(){
        return "hello aaa";
    }

    @GetMapping("index")
    public Object index(){
        System.out.println(applicationContext.getBean("userBean").toString());
        return applicationContext.getBean("userBean");
    }
}
5. Access control based on roles or permissions
5.1. hasAuthority method and hasAnyAuthority method
Returns true if the current principal has the specified permission; otherwise, returns false
Step 1: set the permissions of the current access address in the configuration class
//Set that the current logged in user can access this path only with a certain permission, such as admins permission
.antMatchers("/test/index").hasAuthority("admins")
Step 2: in UserDetailsService, set the permission to return the User object
1. Set single
        //Create a user permission object and set the permissions of the object
        List<GrantedAuthority> auths= AuthorityUtils.commaSeparatedStringToAuthorityList("admins");
2. Set multiple object permissions, separated by commas
         //Set multiple user permissions separated by commas
         .antMatchers("/test/index").hasAnyAuthority("admin,admins")
5.2. hasRole method
If the user has the given role, access is allowed, otherwise 403 appears
Returns true if the current principal has the specified role
1. Set role permissions
//hasRole method
.antMatchers("/test/index").hasRole("sale")
2. Manually add ROLE permissions to UserDetailsService. Note that adding ROLE permissions must be prefixed with ROLE_
//Create a user permission object and set the permission s
List<GrantedAuthority> auths= AuthorityUtils.commaSeparatedStringToAuthorityList("admins,ROLE_sale");
5.3,hasAnyRole
It means that the user can access any condition
1. To add roles to users, you can set multiple roles, separated by commas
//Create a user permission object and set the permission s
List<GrantedAuthority> auths= AuthorityUtils.commaSeparatedStringToAuthorityList("admins,ROLE_sale,ROLE_admin");
2. Set user permissions
//hasAnyRole method
.antMatchers("/test/index").hasAnyRole("sale")
6. Custom 403 page
6.1. Modify access configuration class
 //No permission to jump to custom 403 page
 http.exceptionHandling().accessDeniedPage("/unauth.html");
7. Use of certification authorization notes
7.1,@Secured
Judge whether there is a ROLE. In addition, it should be noted that the matching string here needs to be prefixed with "ROLE_"
Step 1: start the annotation function before using annotations
@The EnableGlobalMethodSecurity(securedEnabled = true) annotation can be placed on the configuration class or on the startup class
@EnableGlobalMethodSecurity(securedEnabled = true)
public class Springbootweb1Application {
Step 2: use annotations on the Controller method to set roles
@One or more permissions can be written in Secured, which are enclosed in curly braces and separated by commas, and the permissions must be set with the prefix "ROLE_"
	@GetMapping("update")
    @Secured({"ROLE_role","ROLE_manager"})
    public String update(){
        return "hello update";
    }
Step 3: set the user role in userDetailsService
List<GrantedAuthority> auths= AuthorityUtils.commaSeparatedStringToAuthorityList("admins,ROLE_role");
7.2,@PreAuthorize
@PreAuthorize annotation is suitable for permission verification before entering the method, @ PreAuthorize can transfer the roles/permissions parameter of the login user to the method
Step 1: start the annotation function before using annotations
@The EnableGlobalMethodSecurity(securedEnabled = true) annotation can be placed on the configuration class or on the startup class
@EnableGlobalMethodSecurity(securedEnabled = true,prePostEnabled = true)
public class Springbootweb1Application {
Step 2: use annotations on the Controller method to set roles
The logged in user has admins permission to access
    @GetMapping("a")
    @PreAuthorize("hasAnyAuthority('admins')")
    public String update1(){
        return "hello PreAuthorize";
    }
Step 3: set the user role in userDetailsService
List<GrantedAuthority> auths= AuthorityUtils.commaSeparatedStringToAuthorityList("admins,ROLE_role");
7.3,@PostAuthorize
@The PostAuthorize annotation is rarely used. Permission verification is performed after the method is executed. It is suitable for verifying permissions with return values
Step 1: start the annotation function before using annotations
@The EnableGlobalMethodSecurity(securedEnabled = true) annotation can be placed on the configuration class or on the startup class
@EnableGlobalMethodSecurity(securedEnabled = true,prePostEnabled = true)
public class Springbootweb1Application {
Step 2: use annotations on the Controller method to set roles
The logged in user can also enter the method, run the method and judge the advanced method without admin permission
    @GetMapping("b")
    @PostAuthorize("hasAnyAuthority('admin')")
    public String update2(){
        System.out.println("Method is running.......");
        return "hello PreAuthorize";
    }
Step 3: set the user role in userDetailsService
List<GrantedAuthority> auths= AuthorityUtils.commaSeparatedStringToAuthorityList("admins,ROLE_role");
7.4,@PostFilter
This annotation is not commonly used. It filters the data returned by the method
use:
    @GetMapping("c")
    @PostAuthorize("hasAnyAuthority('admins')")
    @PostFilter("filterObject.username=='admin1'")//Only the data of admin1 is returned
    public List<User> update3(){
        List<User> list=new ArrayList<>();
        list.add(new User(11,"admin1","123"));
        list.add(new User(12,"admin2","456"));
        System.out.println(list);
        return list;
    }
7.5,@PreFilter
This annotation is not commonly used to filter the data passed into the method
use:
    @GetMapping("d")
    @PostAuthorize("hasAnyAuthority('admins')")
    @PreFilter(value = "filterObject.id%2==0")//Only the data transmitted by the user whose id can be divided by 2 is accepted
    public List<User> update4(@RequestBody List<User> list){
        return list;
    }
8. User logout
Configure in the configuration class
logoutUrl: set an exit address
logoutSuccessUrl: the address to jump after exiting
http.logout().logoutUrl("/logout").logoutSuccessUrl("/index").permitAll();
User logout test
Step 1: modify the configuration class. After successful login, jump to the success page
- Modify the login successful access address in the configuration class
.defaultSuccessUrl("/success.html").permitAll() //Access path after successful login
Step 2: add a hyperlink on the success page and write out the launch path address
Create a new success.html page in the static folder, that is, the success page
<!DOCTYPE html>
<html lang="en">
<head>
    <meta charset="UTF-8">
    <title>Title</title>
</head>
<body>
    <h1>This is the login success page</h1>
    <a href="/logout">sign out</a>
</body>
</html>
Step 3: after successful login, click exit on the success page. You cannot access other controllers
9. Automatic login
9.1 principle of automatic login
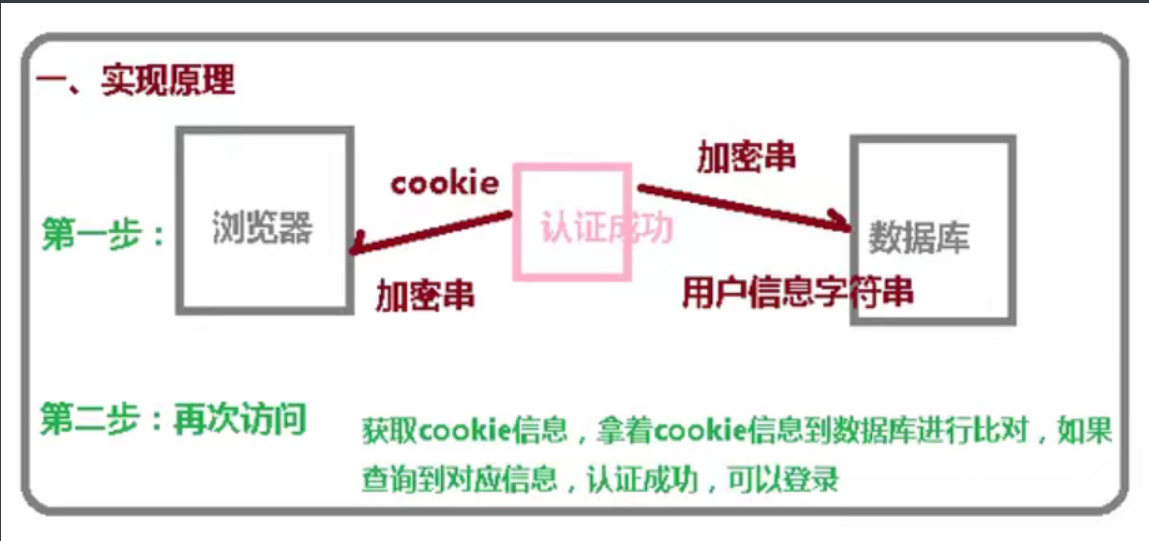
9.2 specific implementation
Step 1: create a database table
Use the auto create table to configure in the configuration class
jdbcTokenRepository.setCreateTableOnStartup(true);//Automatically generate database tables
Step 2: configure the class, inject the data source, and configure the operation database object
//Injection data source
    @Autowired
    private DataSource dataSource;
    //Configuration object
    @Bean
    public PersistentTokenRepository persistentTokenRepository(){
        JdbcTokenRepositoryImpl jdbcTokenRepository=new JdbcTokenRepositoryImpl();
        jdbcTokenRepository.setDataSource(dataSource);
        jdbcTokenRepository.setCreateTableOnStartup(true);//Automatically generate database tables
        return jdbcTokenRepository;

    }
Step 3: configure automatic login in the configuration class
.and().rememberMe().tokenRepository(persistentTokenRepository())//Set automatic login
.tokenValiditySeconds(60)//Set the effective duration of automatic login, in seconds
.userDetailsService(userDetailsService)//Set query database object
Step 4: add a check box on the login page
Add a check box in login.html
Note: the value of the name attribute here must be * * "remember me" * *, and cannot be changed to other values
   <input type="checkbox" name="remember-me">automatic logon
   <br>