SpringBoot 2.3 integrates the latest ShardingJdbc + Druid + MyBatis
Today, the project is not busy. I want to have a look at the sharding JDBC sub database and sub table. I want to achieve the following:
- Discard the xml configuration and use. yml or. properties file + java to configure spring.
- Use Druid as database connection pool, open monitoring interface at the same time, and support monitoring multiple data sources.
- Independent com.dangdang The sharding JDBC core package of. This package is too old, last updated in 2016. Visual inspection only encapsulates one layer, which is of little significance. I don't think it's necessary to use this package if it's not developed by Dangdang company. (and my actual measurement cannot be used with the latest Druid package, and the insert statement reports an error.)
After a long time, most of the examples on the Internet didn't work. Directly start from scratch, and all components will go directly to the latest version.
SpringBoot: 2.3.0
mybatis: 2.1.3
druid: 1.1.22
sharding-jdbc: 4.1.1
Note: because you are configuring while looking at the source code (the example on the sharding official website may be that the version problem is basically useless, and the network in GitHub can't be opened), most of the data sources and sharding are configured in java code. Part of the configuration should be simplified to the. YML /. Properties file. If you are interested in optimization, you can send a demo to 116269651@qq.com , thank you.
Introduction to sharding JDBC
Apache ShardingSphere is an open-source ecosystem of distributed database middleware solutions. It consists of JDBC, Proxy and Sidecar (in planning), which are independent of each other, but can be used in a mixed deployment.
Sharding JDBC is positioned as a lightweight Java framework, providing additional services in the JDBC layer of Java. It uses the client-side direct connection database to provide services in the form of jar package, without additional deployment and dependence. It can be understood as an enhanced version of jdbc driver, fully compatible with JDBC and various ORM frameworks.
- It is applicable to any ORM framework based on JDBC, such as JPA, Hibernate, Mybatis, Spring JDBC Template or using JDBC directly.
- Support any third-party database connection pool, such as DBCP, C3P0, BoneCP, Druid, HikariCP, etc.
- Support any database that implements JDBC specification. At present, it supports MySQL, Oracle, SQL server, PostgreSQL and any database complying with SQL92 standard.
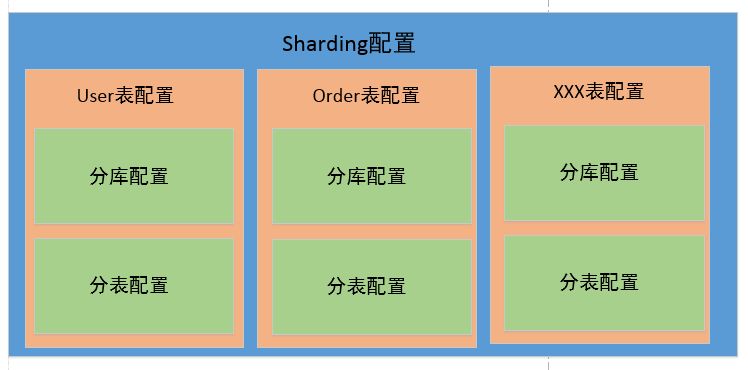
Sharding configuration diagram
A simple understanding is shown in the figure below. To configure sharding JDBC is to configure all tables that need to be fragmented. The configuration of tables is mainly the configuration of sub databases and sub tables. Here, you can only divide the database without dividing the tables, or only divide the tables without dividing the databases, or include both the database and the table splitting logic.
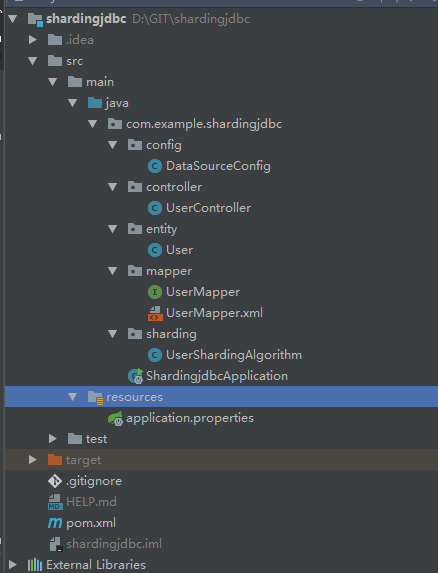
Let's take a look at my project directory structure as follows:
1, POM dependency configuration
The complete pom table is as follows, which mainly depends on MySQL connector Java, mybatis spring boot starter, Druid spring boot starter, sharding JDBC core.
Note: sharding JDBC core version 4.0 + has been promoted to the top project of Apache foundation, and its groupId has changed to org.apache.shardingsphere , before io.shardingsphere .


<?xml version="1.0" encoding="UTF-8"?>
<project xmlns="http://maven.apache.org/POM/4.0.0" xmlns:xsi="http://www.w3.org/2001/XMLSchema-instance"
         xsi:schemaLocation="http://maven.apache.org/POM/4.0.0 https://maven.apache.org/xsd/maven-4.0.0.xsd">
    <modelVersion>4.0.0</modelVersion>
    <parent>
        <groupId>org.springframework.boot</groupId>
        <artifactId>spring-boot-starter-parent</artifactId>
        <version>2.3.0.RELEASE</version>
        <relativePath/> <!-- lookup parent from repository -->
    </parent>
    <groupId>com.example</groupId>
    <artifactId>shardingjdbc</artifactId>
    <version>0.0.1-SNAPSHOT</version>
    <name>shardingjdbc</name>
    <description>Demo project for Spring Boot</description>

    <properties>
        <!--<sharding.jdbc.version>3.0.0</sharding.jdbc.version>-->
        <java.version>1.8</java.version>
    </properties>

    <dependencies>
        <dependency>
            <groupId>org.springframework.boot</groupId>
            <artifactId>spring-boot-starter-web</artifactId>
        </dependency>
        <dependency>
            <groupId>org.springframework</groupId>
            <artifactId>spring-tx</artifactId>
        </dependency>
        <dependency>
            <groupId>mysql</groupId>
            <artifactId>mysql-connector-java</artifactId>
            <scope>runtime</scope>
        </dependency>
        <dependency>
            <groupId>org.mybatis.spring.boot</groupId>
            <artifactId>mybatis-spring-boot-starter</artifactId>
            <version>2.1.3</version>
        </dependency>
        <dependency>
            <groupId>com.alibaba</groupId>
            <artifactId>druid-spring-boot-starter</artifactId>
            <version>1.1.22</version>
        </dependency>
        <dependency>
            <groupId>org.apache.shardingsphere</groupId>
            <artifactId>sharding-jdbc-core</artifactId>
            <version>4.1.1</version>
        </dependency>
        <dependency>
            <groupId>org.projectlombok</groupId>
            <artifactId>lombok</artifactId>
            <optional>true</optional>
        </dependency>
        <dependency>
            <groupId>org.springframework.boot</groupId>
            <artifactId>spring-boot-starter-test</artifactId>
            <scope>test</scope>
            <exclusions>
                <exclusion>
                    <groupId>org.junit.vintage</groupId>
                    <artifactId>junit-vintage-engine</artifactId>
                </exclusion>
            </exclusions>
        </dependency>
        <dependency>
            <groupId>log4j</groupId>
            <artifactId>log4j</artifactId>
            <version>1.2.16</version>
        </dependency>
        <dependency>
            <groupId>org.slf4j</groupId>
            <artifactId>slf4j-log4j12</artifactId>
            <version>1.7.5</version>
        </dependency>
    </dependencies>

    <build>
        <resources>
            <resource>
                <directory>src/main/java</directory>
                <includes>
                    <include>**/*.xml</include>
                </includes>
            </resource>
        </resources>
        <plugins>
            <plugin>
                <groupId>org.apache.maven.plugins</groupId>
                <artifactId>maven-compiler-plugin</artifactId>
                <configuration>
                    <source>1.8</source>
                    <target>1.8</target>
                    <encoding>UTF-8</encoding>
                </configuration>
            </plugin>
            <plugin>
                <groupId>org.springframework.boot</groupId>
                <artifactId>spring-boot-maven-plugin</artifactId>
            </plugin>
        </plugins>
    </build>

</project>
pom.xml
II application.properties
There are two data sources configured here. At present, we haven't tried to automatically assemble multiple data sources. To avoid the problem of automatic equipment, attribute prefix should be distinguished from automatic equipment scanning. Here I use datasource0 and datasource1.
Below spring.datasource.druid The configuration at the beginning will be automatically scanned and assembled by Druid's code.
#################################### common config : ####################################
spring.application.name=shardingjdbc
# application service web Access port
server.port=8080

# mybatis to configure
mybatis.mapper-locations=classpath:com/example/shardingjdbc/mapper/*.xml
mybatis.type-aliases-package=com.example.shardingjdbc.**.entity

datasource0.url=jdbc:mysql://localhost:3306/test0?useUnicode=true&characterEncoding=utf-8&useSSL=false&serverTimezone=Asia/Shanghai
datasource0.driver-class-name=com.mysql.cj.jdbc.Driver
datasource0.type=com.alibaba.druid.pool.DruidDataSource
datasource0.username=root
datasource0.password=852278

datasource1.url=jdbc:mysql://localhost:3306/test1?useUnicode=true&characterEncoding=utf-8&useSSL=false&serverTimezone=Asia/Shanghai
datasource1.driver-class-name=com.mysql.cj.jdbc.Driver
datasource1.type=com.alibaba.druid.pool.DruidDataSource
datasource1.username=root
datasource1.password=852278

#
##### Connection pool configuration #######
# Filter settings (first stat It's very important. If it doesn't, it won't be monitored SQL)
spring.datasource.druid.filters=stat,wall,log4j2

##### WebStatFilter to configure #######
#Enable StatFilter
spring.datasource.druid.web-stat-filter.enabled=true
#Add filter rule
spring.datasource.druid.web-stat-filter.url-pattern=/*
#Eliminate some unnecessary url
spring.datasource.druid.web-stat-filter.exclusions=*.js,*.gif,*.jpg,*.png,*.css,*.ico,/druid/*
#open session Statistical function
spring.datasource.druid.web-stat-filter.session-stat-enable=true
#default sessionStatMaxCount It's 1000
spring.datasource.druid.web-stat-filter.session-stat-max-count=1000
#spring.datasource.druid.web-stat-filter.principal-session-name=
#spring.datasource.druid.web-stat-filter.principal-cookie-name=
#spring.datasource.druid.web-stat-filter.profile-enable=

##### StatViewServlet to configure #######
#Enable built-in monitoring page
spring.datasource.druid.stat-view-servlet.enabled=true
#Address of built-in monitoring page
spring.datasource.druid.stat-view-servlet.url-pattern=/druid/*
#close Reset All function
spring.datasource.druid.stat-view-servlet.reset-enable=false
#Set login user name
spring.datasource.druid.stat-view-servlet.login-username=admin
#Set login password
spring.datasource.druid.stat-view-servlet.login-password=123
#White list (if allow Not configured or empty, all accesses are allowed)
spring.datasource.druid.stat-view-servlet.allow=127.0.0.1
#Blacklist( deny Prior to allow,If deny In the list, even in allow In the list, it will also be rejected)
spring.datasource.druid.stat-view-servlet.deny=
3, Data source and fragment configuration
The following code first reads the required properties of the data source from the configuration file, and then generates the Druid data source. Note the setFilters in the configuration statement here. If you do not add filters, the Duird monitoring interface cannot monitor the sql. In addition, other properties such as the maximum number of connections are not configured here. You can configure them on demand. After the data source is created, it is added to the dataSourceMap collection.
It's more clear to note down and construct t_ Partition rules of user table (including database rule + table rule), and then assemble the partition rules of all tables into shardingrule configuration.
Finally, the data source map and shardingrule configuration configured in the first two steps are handed to shardingdata source factory to construct the data source.
So far, the configuration codes of sharding and druid have been written. The rest is basically business code.
package com.example.shardingjdbc.config;

import com.alibaba.druid.pool.DruidDataSource;
import com.example.shardingjdbc.sharding.UserShardingAlgorithm;
import org.apache.shardingsphere.api.config.sharding.ShardingRuleConfiguration;
import org.apache.shardingsphere.api.config.sharding.TableRuleConfiguration;
import org.apache.shardingsphere.api.config.sharding.strategy.StandardShardingStrategyConfiguration;
import org.apache.shardingsphere.shardingjdbc.api.ShardingDataSourceFactory;
import org.springframework.beans.factory.annotation.Value;
import org.springframework.context.annotation.Bean;
import org.springframework.context.annotation.Configuration;

import javax.sql.DataSource;
import java.util.HashMap;
import java.util.Map;
import java.util.Properties;

@Configuration
public class DataSourceConfig {
    @Value("${datasource0.url}")
    private String url0;
    @Value("${datasource0.username}")
    private String username0;
    @Value("${datasource0.password}")
    private String password0;
    @Value("${datasource0.driver-class-name}")
    private String driverClassName0;

    @Value("${datasource1.url}")
    private String url1;
    @Value("${datasource1.username}")
    private String username1;
    @Value("${datasource1.password}")
    private String password1;
    @Value("${datasource1.driver-class-name}")
    private String driverClassName1;

    @Value(("${spring.datasource.druid.filters}"))
    private String filters;

    @Bean("dataSource")
    public DataSource dataSource() {
        try {
            DruidDataSource dataSource0 = new DruidDataSource();
            dataSource0.setDriverClassName(this.driverClassName0);
            dataSource0.setUrl(this.url0);
            dataSource0.setUsername(this.username0);
            dataSource0.setPassword(this.password0);
            dataSource0.setFilters(this.filters);

            DruidDataSource dataSource1 = new DruidDataSource();
            dataSource1.setDriverClassName(this.driverClassName1);
            dataSource1.setUrl(this.url1);
            dataSource1.setUsername(this.username1);
            dataSource1.setPassword(this.password1);
            dataSource1.setFilters(this.filters);

            //Sub base setting
            Map<String, DataSource> dataSourceMap = new HashMap<>(2);
            //Add two databases database0 and database1
            dataSourceMap.put("ds0", dataSource0);
            dataSourceMap.put("ds1", dataSource1);

            // to configure t_user Table rules
            TableRuleConfiguration userRuleConfiguration = new TableRuleConfiguration("t_user", "ds${0..1}.t_user${0..1}");
            // Configure table splitting rules
            userRuleConfiguration.setTableShardingStrategyConfig(new StandardShardingStrategyConfiguration("id", UserShardingAlgorithm.tableShardingAlgorithm));
            // Configure sub base rules
            userRuleConfiguration.setDatabaseShardingStrategyConfig(new StandardShardingStrategyConfiguration("id", UserShardingAlgorithm.databaseShardingAlgorithm));
            // Sharding Global configuration
            ShardingRuleConfiguration shardingRuleConfiguration = new ShardingRuleConfiguration();
            shardingRuleConfiguration.getTableRuleConfigs().add(userRuleConfiguration);
            // create data source
            DataSource dataSource = ShardingDataSourceFactory.createDataSource(dataSourceMap, shardingRuleConfiguration, new Properties());
            return dataSource;
        } catch (Exception ex) {
            ex.printStackTrace();
            return null;
        }
    }
}
DataSourceConfig.java
When constructing the sharding rule above, I defined the sharding algorithm class UserShardingAlgorithm of User table, and defined two internal classes to implement the logic of database sharding and table sharding respectively. The code is as follows:
package com.example.shardingjdbc.sharding;

import org.apache.shardingsphere.api.sharding.standard.PreciseShardingAlgorithm;
import org.apache.shardingsphere.api.sharding.standard.PreciseShardingValue;

import java.util.Collection;

public class UserShardingAlgorithm {
    public static final DatabaseShardingAlgorithm databaseShardingAlgorithm = new DatabaseShardingAlgorithm();
    public static final TableShardingAlgorithm tableShardingAlgorithm = new TableShardingAlgorithm();

    static class DatabaseShardingAlgorithm implements PreciseShardingAlgorithm<Long> {
        @Override
        public String doSharding(Collection<String> databaseNames, PreciseShardingValue<Long> shardingValue) {
            for (String database : databaseNames) {
                if (database.endsWith(String.valueOf(shardingValue.getValue() % 2))) {
                    return database;
                }
            }

            return "";
        }
    }

    static class TableShardingAlgorithm implements PreciseShardingAlgorithm<Long> {
        @Override
        public String doSharding(Collection<String> tableNames, PreciseShardingValue<Long> shardingValue) {
            for (String table : tableNames) {
                if (table.endsWith(String.valueOf(shardingValue.getValue() % 2))) {
                    return table;
                }
            }

            return "";
        }
    }
}
UserShardingAlgorithm.java
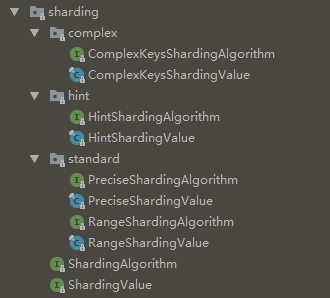
When implementing the sharding rule, the implemented interface is precise sharding algorithm, that is, accurate sharding, which maps the specified key value records to a specified table (at most one table). This interface can basically meet 80% of the requirements.
Other rules include Range, ComplexKey, and Hint fragmentation rules, which can map eligible key value records to multiple tables, that is, record A can be inserted into multiple tables A, B or B, C at the same time.
Among them,
Range is the range filter fragment. I personally understand that, for example, the id mantissa 1-5 is inserted into table A, and the id mantissa 6-0 is inserted into table B. in this case, it is more convenient to use range as the filter condition. It can also be divided according to the time range. (please correct if there is any mistake).
The name of ComplexKey is the combination of keys. You can make mapping rules based on multiple keys at the same time.
Hint didn't understand the name, but the source code is actually a combination of key fragments, but only supports the precise selection of combination keys.
ComplexKey supports range filtering of key combinations. So it can be understood that ComplexKey is an advanced version of Hint.
No matter which sharding algorithm is implemented, ensure that the algorithm covers all possible key values.
4, Use row expression to configure fragmentation strategy (skip step 3 Optimization)
In the third step above, we define the fragmentation algorithm by implementing the PreciseShardingValue interface. In this way, every table needs to be partitioned and a class needs to be redefined. It's too troublesome.
Sharding provides a way to configure row expressions. For simple sharding logic, you can define a row expression directly. (this method is actually to configure the parsing method of fragmentation policy directly in the. yml file.)
Similar to the above code, 6 or 8 lines have been changed here to directly new an InlineShardingStrategyConfiguration, which saves the tedious steps of defining fragmentation algorithm classes.
 1              // .....Omit other codes
 2
 3             // to configure t_user Table rules
 4             TableRuleConfiguration userRuleConfiguration = new TableRuleConfiguration("t_user", "ds${0..1}.t_user${0..1}");
 5             // Row expression table splitting rule
 6             userRuleConfiguration.setTableShardingStrategyConfig(new InlineShardingStrategyConfiguration("id", "t_user${id % 2}"));
 7             // Row expression sub base rule
 8             userRuleConfiguration.setDatabaseShardingStrategyConfig(new InlineShardingStrategyConfiguration("id", "ds${id % 2}"));
 9
10             // Sharding Global configuration
11             ShardingRuleConfiguration shardingRuleConfiguration = new ShardingRuleConfiguration();
12             shardingRuleConfiguration.getTableRuleConfigs().add(userRuleConfiguration);
13             // create data source
14             DataSource dataSource = ShardingDataSourceFactory.createDataSource(dataSourceMap, shardingRuleConfiguration, new Properties());
15             return dataSource;
5, Distributed primary key (snowflake algorithm)
After the database is partitioned, you can no longer use mysql's auto added primary key, otherwise duplicate primary keys will be generated. There are two main problems to be solved in customizing the primary key:
- Unique primary key (required)
- Monotonically increasing primary key (optional) (improve index efficiency and reduce space fragmentation caused by index rearrangement)
There are two primary key generators in Sharding, one is snow flake shardingkeygenerator, and the other is UUID (considering Article 2 above, so UUID is not used).
The main principle of snowflake algorithm: use a 64 bit long number as the primary key. Among them,
The first bit, 1 bit as the sign bit is always 0, which means it is a positive number.
Bit 2 - 42, 41 bit time stamp.
bit 43 - 52, 10 bits to fill the unique id of the machine. For example, the first four digits can be used to identify the machine room number, and the last six digits can be used to identify the machine number.
53 - 64 bit, 12 bits are filled with id sequence number. The range is 0 - 4095, which means that each machine can generate up to 4096 different primary key IDS every 1 millisecond.
The main implementation code of snowflake algorithm is as follows:
- First determine whether the clock callback. The default tolerance callback time is 0. If there is a callback, an exception will be generated. Can be configured by max.tolerate.time.difference.milliseconds Property to spin and wait for the clock to return to the last execution time.
- The id sequence number is incremented according to the current milliseconds. If the clock enters the next millisecond, the id sequence number is regenerated from 0.
- Assemble the time stamp + machine serial number + ID serial number into the primary key ID. Here, the machine serial number is 0 by default. You can use the worker.id Property. Different servers need to be configured with different numbers, ranging from 0 - 1023.
EPOCH is the clock benchmark, and sharding is set on November 1, 2016, so the 41 bit timestamp can be used for almost 70 years, until 2086.
    public synchronized Comparable<?> generateKey() {
        long currentMilliseconds = timeService.getCurrentMillis();
        if (this.waitTolerateTimeDifferenceIfNeed(currentMilliseconds)) {
            currentMilliseconds = timeService.getCurrentMillis();
        }

        if (this.lastMilliseconds == currentMilliseconds) {
            if (0L == (this.sequence = this.sequence + 1L & 4095L)) {
                currentMilliseconds = this.waitUntilNextTime(currentMilliseconds);
            }
        } else {
            this.vibrateSequenceOffset();
            this.sequence = (long)this.sequenceOffset;
        }

        this.lastMilliseconds = currentMilliseconds;
        return currentMilliseconds - EPOCH << 22 | this.getWorkerId() << 12 | this.sequence;
    }
6, Business code
To use the distributed primary key ID generator, you need to inject different ID generators into different tables, and add a KeyIdConfig class under the config package, as follows:
Here, in order to keep the clock uniform, you can find a special machine as the clock service, and then configure the clock service for all the primary key generators.
@Configuration
public class KeyIdConfig {
    @Bean("userKeyGenerator")
    public SnowflakeShardingKeyGenerator userKeyGenerator() {
        return new SnowflakeShardingKeyGenerator();
    }

    @Bean("orderKeyGenerator")
    public SnowflakeShardingKeyGenerator orderKeyGenerator() {
        return new SnowflakeShardingKeyGenerator();
    }
}
Other business codes are as follows:
package com.example.shardingjdbc.entity;

import lombok.Data;

import java.io.Serializable;
import java.util.Date;

@Data
public class User implements Serializable {
    private Long id;
    private String name;
    private String phone;
    private String email;
    private String password;
    private Integer cityId;
    private Date createTime;
    private Integer sex;
}
User.java
package com.example.shardingjdbc.mapper;

import com.example.shardingjdbc.entity.User;
import org.apache.ibatis.annotations.Mapper;

import java.util.List;

public interface UserMapper {
    /**
     * preservation
     */
    void save(User user);

    /**
     * query
     * @param id
     * @return
     */
    User get(Long id);
}
UserMapper.java
<?xml version="1.0" encoding="UTF-8" ?>
<!DOCTYPE mapper PUBLIC "-//mybatis.org//DTD Mapper 3.0//EN" "http://mybatis.org/dtd/mybatis-3-mapper.dtd">
<mapper namespace="com.example.shardingjdbc.mapper.UserMapper">
    <resultMap id="resultMap" type="com.example.shardingjdbc.entity.User">
        <id column="id" property="id" />
        <result column="name" property="name" />
        <result column="phone" property="phone"  />
        <result column="email" property="email"  />
        <result column="password" property="password"  />
        <result column="city_id" property="cityId"  />
        <result column="create_time" property="createTime"  />
        <result column="sex" property="sex"  />
    </resultMap>

    <insert id="save">
        insert into t_user (id, name, phone, email, password, city_id, create_time, sex)
        values (#{id}, #{name}, #{phone}, #{email}, #{password}, #{cityId}, #{createTime}, #{sex})
    </insert>

    <select id="get" resultMap="resultMap">
        select *
        from t_user
        where id = #{id}
    </select>
</mapper>
UserMapper.xml
 1 package com.example.shardingjdbc.controller;
 2
 3 import com.example.shardingjdbc.entity.User;
 4 import com.example.shardingjdbc.mapper.UserMapper;
 5 import org.apache.shardingsphere.core.strategy.keygen.SnowflakeShardingKeyGenerator;
 6 import org.springframework.beans.factory.annotation.Autowired;
 7 import org.springframework.stereotype.Controller;
 8 import org.springframework.web.bind.annotation.PathVariable;
 9 import org.springframework.web.bind.annotation.RequestMapping;
10 import org.springframework.web.bind.annotation.ResponseBody;
11
12 import javax.annotation.Resource;
13 import java.util.Date;
14
15 @Controller
16 public class UserController {
17     @Autowired
18     private UserMapper userMapper;
19
20     @Resource
21     SnowflakeShardingKeyGenerator userKeyGenerator;
22
23     @RequestMapping("/user/save")
24     @ResponseBody
25     public String save() {
26         for (int i = 0; i < 50; i++) {
27             Long id = (Long)userKeyGenerator.generateKey();
28             User user = new User();
29             user.setId(id);
30             user.setName("test" + i);
31             user.setCityId(i);
32             user.setCreateTime(new Date());
33             user.setSex(i % 2 == 0 ? 1 : 2);
34             user.setPhone("11111111" + i);
35             user.setEmail("xxxxx");
36             user.setCreateTime(new Date());
37             user.setPassword("eeeeeeeeeeee");
38             userMapper.save(user);
39         }
40
41         return "success";
42     }
43
44     @RequestMapping("/user/get/{id}")
45     @ResponseBody
46     public User get(@PathVariable Long id) {
47         User user = userMapper.get(id);
48         return user;
49     }
50 }
UserController.java
 1 CREATE TABLE `t_user` (
 2   `id` bigint(20) NOT NULL,
 3   `name` varchar(64) DEFAULT NULL COMMENT 'name',
 4   `city_id` int(12) DEFAULT NULL COMMENT 'city',
 5   `sex` tinyint(1) DEFAULT NULL COMMENT 'Gender',
 6   `phone` varchar(32) DEFAULT NULL COMMENT 'Telephone',
 7   `email` varchar(32) DEFAULT NULL COMMENT 'mailbox',
 8   `create_time` timestamp NOT NULL DEFAULT CURRENT_TIMESTAMP ON UPDATE CURRENT_TIMESTAMP COMMENT 'Creation time',
 9   `password` varchar(32) DEFAULT NULL COMMENT 'password',
10   PRIMARY KEY (`id`)
11 ) ENGINE=InnoDB DEFAULT CHARSET=utf8;
t_user.sql
The startup class is as follows:
 1 package com.example.shardingjdbc;
 2
 3 import org.mybatis.spring.annotation.MapperScan;
 4 import org.springframework.boot.SpringApplication;
 5 import org.springframework.boot.autoconfigure.SpringBootApplication;
 6
 7 @MapperScan("com.example.shardingjdbc.mapper")
 8 @SpringBootApplication
 9 public class ShardingjdbcApplication {
10     public static void main(String[] args) {
11         SpringApplication.run(ShardingjdbcApplication.class, args);
12     }
13 }
ShardingjdbcApplication .java
Note that here I add the @ MapperScan annotation to the startup class. Maybe it's because of the problem of reference dependency. The mybatis package configured by. properties scans the directory and doesn't work. I will study it later.
7, Others
In addition to the basic database and table rules, there are other configurations, such as binding tables. Let's not give examples one by one here, just match them with the official documents.
For example: now there is order, order_ Two tables, 1:1 relationship.
When configuring, you should set the same order_ Order record and order of ID_ The detail record is mapped to a table with the same tail number. This makes it easy to connect queries. For example, it's all inserted into order 0, order_ In detail0.
If the binding relationship is configured, only one query will be generated, select * from order0 as o join order_detail0 as d on o.order_id = d.order_id.
Otherwise, a Cartesian product query will be generated
select * from order0 as o join order_detail0 as d on o.order_id = d.order_id.
select * from order0 as o join order_detail1 as d on o.order_id = d.order_id.
select * from order1 as o join order_detail0 as d on o.order_id = d.order_id.
select * from order1 as o join order_detail1 as d on o.order_id = d.order_id.
8, Summary
Before starting the project, create the database Test0 and test1, and then create the tables t respectively_ user0, t_ user1. It can all be on the same machine.
After project launch, visit http://localhost:8080/user/save, even id are inserted into the T of test0 Library_ In the user0 table, odd numbers are inserted into the T in the test1 library_ User1 table.
Druid's background monitoring page address: http://localhost:8080/druid/.
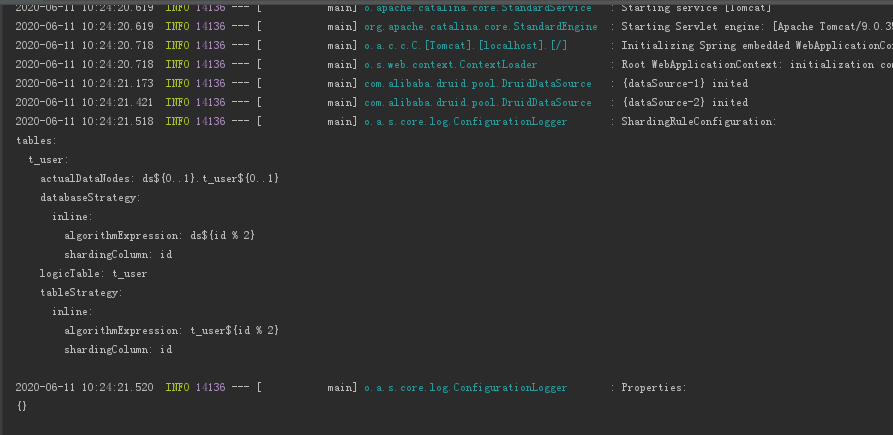
After the project is started, the sharding log will print out the configuration in the form of yml format, or it can save the java configuration and optimize it to the. yml configuration file, as shown in the following figure:
Original address: https://www.cnblogs.com/lyosaki88/p/springboot_shardingjdbc_druid_mybatis.html
Source download address: https://474b.com/file/14960372-448059323
Author QQ: 116269651
Keywords:
Java
Druid
Spring
JDBC
Added by htcilt on Thu, 11 Jun 2020 06:47:20 +0300