Spring 3.1 starts to support caching. The core idea is to cache methods. When we call a method, we cache the method parameters and return values as key/value. When we call the method again, if there is data in the cache, we will get it directly from the cache, otherwise we will execute the method.
Spring does not provide the implementation of cache. We can freely choose the implementation of cache. At present, the caches supported by Spring Boot include JCache and ehcache 2 x,Redis…. However, no matter which cache implementation is used, the only difference is the cache configuration, and the cache annotations used by developers are the same.
1, Use ehche 2 X cache
1. Add dependency
First edit the project's POM XML file, add spring boot starter cache dependency and Ehcache dependency:
<dependency>
    <groupId>org.springframework.boot</groupId>
    <artifactId>spring-boot-starter-cache</artifactId>
</dependency>
<dependency>
    <groupId>net.sf.ehcache</groupId>
    <artifactId>ehcache</artifactId>
</dependency>
2. Add cache configuration file
Create the Ehcache.exe in the resources directory The XML file is used as the configuration file of Ehcache cache. The contents are as follows:
(1)If Ehcache The dependency exists, and classpath The next one is called encache.xml of Ehcache Configuration file, then EhCacheManager Will be automatically implemented as a cache.
(2)This is a routine Ehcache The configuration file provides two caching policies, one is the default and the other is named book_cache. The specific parameters are as follows:
name: Cache name
maxElementsInMemory: Maximum number of caches
eternal: Whether the cache object is permanently valid. Once it is set to be permanently valid, timeout Will not work.
timeToIdleSeconds: The allowed idle time (in seconds) of the cache object before it expires. Only if eternal=false This property takes effect only when the object is not permanently valid. The default value is 0, which means that the idle time is infinite.
timeToLiveSeconds: The allowed lifetime (in seconds) of a cache object before it expires. Only if eternal=false This property takes effect only when the object is not permanently valid. The default value is 0, which means the survival time is infinite.
overflowToDisk: Indicates that the number in memory has reached maxElementsInMemory When, Ehcache Whether to write objects to disk.
diskPersistent: Whether to cache virtual machine restart data.
diskExpiryThreadIntervalSeconds: The running time interval of disk failure thread is 120 seconds by default.
(3)If we want to make our own decisions Ehcache The name and location of the configuration file can be application.properties Add the following configuration:
spring.cache.ehcache.config=classpath:config/another-config.xml
<ehcache>
    <diskStore path="java.io.tmpdir/cache"/>
    <defaultCache
            maxElementsInMemory="10000"
            eternal="false"
            timeToIdleSeconds="120"
            timeToLiveSeconds="120"
            overflowToDisk="false"
            diskPersistent="false"
            diskExpiryThreadIntervalSeconds="120"
    />
    <cache name="book_cache"
           maxElementsInMemory="10000"
           eternal="true"
           timeToIdleSeconds="120"
           timeToLiveSeconds="120"
           overflowToDisk="true"
           diskPersistent="true"
           diskExpiryThreadIntervalSeconds="10"/>
</ehcache>
3. Enable cache
Add the @ EnableCaching annotation on the entry class of the project to enable caching. The code is as follows:
@SpringBootApplication
@EnableCaching
public class DemoApplication {
    public static void main(String[] args) {
        ConfigurableApplicationContext context
                = SpringApplication.run(DemoApplication.class, args);
    }
}
4. Start the test
(1) First, we create a Book entity class:
@Setter
@Getter
@NoArgsConstructor
public class Book implements Serializable {
    private Integer id;
    private String name;
    private String author;
}
(2) Then create a BookDao and add relevant cache annotations:
(1)stay BookDao Add on @CacheConfig Annotation specifies the name of the cache to use. This configuration is optional. If not used @CacheConfig Comments, directly in @Cacheable The cache name is indicated in the annotation.
(2)Add on method @Cacheable The annotation indicates that the method is cached:
By default,Cached key Is a parameter of the method, cached value Is the return value of the method.
When a developer invokes the method in other classes, he first checks whether there is any relevant data in the cache according to the call parameters, and if so, uses the cached data directly.,This method does not execute.
Otherwise, if the method is executed successfully, the return value will be cached.
However, if the method is invoked in the current class, the cache will not take effect.
(3)@Cacheable There is also an attribute in the annotation condition Used to describe the execution timing of the cache, for example:
@Cacheable(condition="#id%2-0 ") indicates that the cache will be performed only when the modulus of id 2 is 0, otherwise it will not be cached.
(4)If developers don't want to use the default key,It can also be customized like lines 15 and 22 key:
Line 15 indicates the of the cache key As parameter book Object id Value of.
Line 22 indicates the of the cache key As parameter id.
(5)In addition to the above, use parameter definitions key In addition to the way, Spring An example is also provided root Object is used to generate key. Here are some usage examples:
#root.methodName: current method name
#root.method.name: current method object
#root.caches[0].name: the cache used by the current method
#root.target: the currently called object
#root.targetClass: the class of the currently called object
#root.args[0]: current method parameter array
(6)@Cacheput Notes are generally used for data update methods:
And @Cacheable Different comments, added @Cacheput Each time the annotated method executes, it does not check whether there is data in the cache, but directly executes the method, and then caches the execution results of the method.
If key If the corresponding data has been cached, the previous data will be overwritten, so as to avoid getting dirty data when loading data again.
At the same time,@Cacheput Have and @Cacheable Similar properties will not be repeated here.
(7)@CacheEvict Annotations are generally used on deletion methods to remove a key Corresponding cache.@CacheEvict Annotations have two special properties allEntries and beforelnvocation:
allEntries Indicates whether to remove all cached data. The default value is false.
beforelnvocation Indicates whether to remove the data in the cache before the method is executed. The default is false,That is, the data in the cache is removed after the method is executed
@Repository
@CacheConfig(cacheNames = "book_cache")
public class BookDao {

    @Cacheable
    public Book getBookById(Integer id) {
        System.out.println("getBookById");
        Book book = new Book();
        book.setId(id);
        book.setName("Romance of the Three Kingdoms");
        book.setAuthor("Luo Guanzhong");
        return book;
    }

    @CachePut(key = "#book.id")
    public Book updateBookById(Book book) {
        System.out.println("updateBookById");
        book.setName("Romance of the Three Kingdoms 2");
        return book;
    }

    @CacheEvict(key = "#id")
    public void deleteBookById(Integer id) {
        System.out.println("deleteBookById");
    }
}
(3) Create a test Controller to test the methods in BookDao:
@RestController
public class HelloController {

    @Autowired
    BookDao bookDao;

    @GetMapping("/test")
    public void test() {
        // Obtain data twice in a row
        bookDao.getBookById(1);
        bookDao.getBookById(1);

        // Get data again after deletion
        bookDao.deleteBookById(1);
        Book b3 = bookDao.getBookById(1);
        System.out.println("b3: "+b3);

        // Get data again after update
        Book b = new Book();
        b.setName("Ordinary world");
        b.setAuthor("Rotel ");
        b.setId(1);
        bookDao.updateBookById(b);
        Book b4 = bookDao.getBookById(1);
        System.out.println("b4: "+b4);
    }
}
(4) Accessing this interface, you can see the console print log as follows:
- Two queries were executed at the beginning, but the query method was printed only once because the cache was used the second time.
- Next, the delete method is executed. After the delete method is executed, the query method is executed again, because the cache has been deleted in the delete method.
- Next, the update method is executed. In the update method, not only the data but also the cache is updated. Therefore, in the final query method, the query method log is not printed, indicating that the method is not executed, but the data in the cache is used, and the data in the cache has been updated.
Attachment: KeyGenerator of custom cache key
According to the previous introduction, by default, the cached key is the parameter of the method. If you don't want to use the default key, you can use a custom key (using parameters to define the key, or using the root object to generate the key)
If these keys cannot meet the development requirements, we can also customize the generator KeyGenerator for caching keys
1. Create a custom KeyGenerator
The custom MyKeyGenerator implements the KeyGenerator interface, and then implements the generate method in the interface.
The three parameters of the generate method are: the current object, the currently requested method, and the parameters of the method. The developer can create a new key based on this information and return it. The return value is the cached key.
@Component
public class MyKeyGenerator implements KeyGenerator {
    @Override
    public Object generate(Object target, Method method, Object... params) {
        return Arrays.toString(params);
    }
}
2. Use the customized KeyGenerator
When using, we only need to reference the MyKeyGenermor instance in the @ Cacheable annotation.
@Repository
@CacheConfig(cacheNames = "book_cache")
public class BookDao {

    @Autowired
    MyKeyGenerator myKeyGenerator;

    @Cacheable(keyGenerator = "myKeyGenerator")
    public Book getBookById(Integer id) {
        System.out.println("getBookById");
        Book book = new Book();
        book.setId(id);
        book.setName("Romance of the Three Kingdoms");
        book.setAuthor("Luo Guanzhong");
        return book;
    }
}
Redis of stand-alone version is used as the implementation of cache. Like Ehcache, if redis exists in the classpath and redis has been configured, RedisCacheManager will be used as the cache provider by default. The following demonstrates the specific use steps.
2, Using Redis stand-alone cache
1. Add dependency
First edit the project's POM XML file, add spring boot starter cache dependency and Redis dependency:
<dependency>
    <groupId>org.springframework.boot</groupId>
    <artifactId>spring-boot-starter-cache</artifactId>
</dependency>
<dependency>
    <groupId>org.springframework.boot</groupId>
    <artifactId>spring-boot-starter-data-redis</artifactId>
    <exclusions>
        <exclusion>
            <groupId>io.lettuce</groupId>
            <artifactId>lettuce-core</artifactId>
        </exclusion>
    </exclusions>
</dependency>
<dependency>
    <groupId>redis.clients</groupId>
    <artifactId>jedis</artifactId>
</dependency>
2. Cache configuration
Redis stand-alone cache only needs developers to be in application Add redis configuration and cache configuration in properties. The code is as follows:
(1) Line 2 configures the cache validity period, that is, the expiration time of the key in Redis.
(2) Others are the basic configurations of Redis. For more details, please refer to the previous article:
# Cache configuration
spring.cache.redis.time-to-live=1800s
# Basic connection information configuration
spring.redis.database=0
spring.redis.host=192.168.60.133
spring.redis.port=6379
spring.redis.password=123
# Connection pool information configuration
spring.redis.jedis.pool.max-active=8
spring.redis.jedis.pool.max-idle=8
spring.redis.jedis.pool.max-wait=-1ms
spring.redis.jedis.pool.min-idle=0
3. Enable cache
Add the @ EnableCaching annotation on the entry class of the project to enable caching. The code is as follows:
@SpringBootApplication
@EnableCaching
public class DemoApplication {
    public static void main(String[] args) {
        ConfigurableApplicationContext context
                = SpringApplication.run(DemoApplication.class, args);
    }
}
4. Start the test
(1) First, we create a Book entity class:
@Setter
@Getter
@NoArgsConstructor
public class Book implements Serializable {
    private Integer id;
    private String name;
    private String author;
}
(2) Then create a BookDao and add relevant cache annotations:
(1)stay BookDao Add on @CacheConfig Annotation specifies the name of the cache to use. This configuration is optional. If not used @CacheConfig Comments, directly in @Cacheable The cache name is indicated in the annotation.
(2)Add on method @Cacheable The annotation indicates that the method is cached:
By default,Cached key Is a parameter of the method, cached value Is the return value of the method.
When a developer invokes the method in other classes, he first checks whether there is any relevant data in the cache according to the call parameters, and if so, uses the cached data directly.,This method does not execute.
Otherwise, if the method is executed successfully, the return value will be cached.
However, if the method is invoked in the current class, the cache will not take effect.
(3)@Cacheable There is also an attribute in the annotation condition Used to describe the execution timing of the cache, for example:
@Cacheable(condition="#id%2-0 ") indicates that the cache will be performed only when the modulus of id 2 is 0, otherwise it will not be cached.
(4)If developers don't want to use the default key,It can also be customized like lines 15 and 22 key:
Line 15 indicates the of the cache key As parameter book Object id Value of.
Line 22 indicates the of the cache key As parameter id.
(5)In addition to the above, use parameter definitions key In addition to the way, Spring An example is also provided root Object is used to generate key. Here are some usage examples:
#root.methodName: current method name
#root.method.name: current method object
#root.caches[0].name: the cache used by the current method
#root.target: the currently called object
#root.targetClass: the class of the currently called object
#root.args[0]: current method parameter array
(6)@Cacheput Notes are generally used for data update methods:
And @Cacheable Different comments, added @Cacheput Each time the annotated method executes, it does not check whether there is data in the cache, but directly executes the method, and then caches the execution results of the method.
If key If the corresponding data has been cached, the previous data will be overwritten, so as to avoid getting dirty data when loading data again.
At the same time,@Cacheput Have and @Cacheable Similar properties will not be repeated here.
(7)@CacheEvict Annotations are generally used on deletion methods to remove a key Corresponding cache.@CacheEvict Annotations have two special properties allEntries and beforelnvocation:
allEntries Indicates whether to remove all cached data. The default value is false.
beforelnvocation Indicates whether to remove the data in the cache before the method is executed. The default is false,That is, the data in the cache is removed after the method is executed.
@Repository
@CacheConfig(cacheNames = "book_cache")
public class BookDao {

    @Cacheable
    public Book getBookById(Integer id) {
        System.out.println("getBookById");
        Book book = new Book();
        book.setId(id);
        book.setName("Romance of the Three Kingdoms");
        book.setAuthor("Luo Guanzhong");
        return book;
    }

    @CachePut(key = "#book.id")
    public Book updateBookById(Book book) {
        System.out.println("updateBookById");
        book.setName("Romance of the Three Kingdoms 2");
        return book;
    }

    @CacheEvict(key = "#id")
    public void deleteBookById(Integer id) {
        System.out.println("deleteBookById");
    }
}
(3) Create a test Controller to test the methods in BookDao:
@RestController
public class HelloController {

    @Autowired
    BookDao bookDao;

    @GetMapping("/test")
    public void test() {
        // Obtain data twice in a row
        System.out.println("--- Obtain data twice in a row ---");
        bookDao.getBookById(1);
        bookDao.getBookById(1);

        // Get data again after deletion
        System.out.println("--- Get data again after deletion ---");
        bookDao.deleteBookById(1);
        Book b3 = bookDao.getBookById(1);
        System.out.println("b3: "+b3);

        // Get data again after update
        System.out.println("--- Get data again after update ---");
        Book b = new Book();
        b.setName("Ordinary world");
        b.setAuthor("Rotel ");
        b.setId(1);
        bookDao.updateBookById(b);
        Book b4 = bookDao.getBookById(1);
        System.out.println("b4: "+b4);
    }
}
(4) Accessing this interface, you can see the console print log as follows:
- Two queries were executed at the beginning, but the query method was printed only once because the cache was used the second time.
- Next, the delete method is executed. After the delete method is executed, the query method is executed again, because the cache has been deleted in the delete method.
- Next, the update method is executed. In the update method, not only the data but also the cache is updated. Therefore, in the final query method, the query method log is not printed, indicating that the method is not executed, but the data in the cache is used, and the data in the cache has been updated.
(2) Viewing the cache results of Redis server, you can find that all key s in Redis have a prefix, and the default prefix is "cache name::"
Attachment: KeyGenerator of custom cache key
According to the previous introduction, by default, the cached key is the parameter of the method. If you don't want to use the default key, you can use a custom key (using parameters to define the key, or using the root object to generate the key)
If these keys cannot meet the development requirements, we can also customize the generator KeyGenerator for caching keys
1. Create a custom KeyGenerator
The custom MyKeyGenerator implements the KeyGenerator interface, and then implements the generate method in the interface.
The three parameters of the generate method are the current object, the currently requested method and the parameters of the method. The developer can create a new key based on this information and return it. The return value is the cached key.
@Component
public class MyKeyGenerator implements KeyGenerator {
    @Override
    public Object generate(Object target, Method method, Object... params) {
        return Arrays.toString(params);
    }
}
2. Use the customized KeyGenerator
When using, we only need to reference the MyKeyGenermor instance in the @ Cacheable annotation.
@Repository
@CacheConfig(cacheNames = "book_cache")
public class BookDao {

    @Autowired
    MyKeyGenerator myKeyGenerator;

    @Cacheable(keyGenerator = "myKeyGenerator")
    public Book getBookById(Integer id) {
        System.out.println("getBookById");
        Book book = new Book();
        book.setId(id);
        book.setName("Romance of the Three Kingdoms");
        book.setAuthor("Luo Guanzhong");
        return book;
    }
}
Compared with Redis stand-alone cache, the configuration of Redis cluster cache is more complex (the use of cache is the same), but it has good scalability and security. The following is an example to demonstrate the specific operation steps.
3, Using Redis cluster cache
1. Build Redis cluster
The Redis cluster used in this case consists of 8 Redis instances, 4 master and 4 slave, and ports from 8001 to 8008
2. Add dependency
First edit the project's POM XML file, add spring boot starter cache dependency and Redis dependency:
<dependency>
    <groupId>org.springframework.boot</groupId>
    <artifactId>spring-boot-starter-cache</artifactId>
</dependency>
<dependency>
    <groupId>redis.clients</groupId>
    <artifactId>jedis</artifactId>
</dependency>
<dependency>
    <groupId>org.springframework.data</groupId>
    <artifactId>spring-data-redis</artifactId>
</dependency>
<dependency>
    <groupId>org.apache.commons</groupId>
    <artifactId>commons-pool2</artifactId>
</dependency>
3. Configure cluster
Next, configure Redis connection information in Spring Boot project and RedisConfig to complete Redis configuration (enabling successful access through RedisTemplate in Spring Boot). For specific steps, refer to the article written earlier:
4. Cache configuration
After the cluster is built successfully and the Redis cluster can be accessed from the Spring Boot project, you only need to configure the Redis cache. The code is as follows:
(1)Configure before Redis When the cluster is, it has been sent to Spring A is registered in the container JedisConnectionFactory An example of, which is injected into RedisCacheConfig Used in( RedisConnectionFactory yes JedisConnectionFactory Parent class of).
(2)RedisCacheConfig Mainly provided in RedisCacheManager The construction of this instance requires three parameters:
The first parameter is a cacheWriter,Directly through nonLockingRedisCacheWriter Method can be constructed.
The second parameter is the default cache configuration. The default cache expiration time is 0 (never expire),And start automatically key The default prefix is cache name::")
The third parameter is the cache configuration defined in advance. It's a Map Parameter of type, the Map Medium key That is, the cache name, value This is the cache configuration corresponding to the cache with this name. For example key Prefix, cache expiration time, etc. (if a cache name does not exist) configMap , the default cache policy is used.)
@Configuration
public class RedisCacheConfig {
    @Autowired
    @Qualifier("jedisConnectionFactory")
    RedisConnectionFactory conFactory;

    @Bean
    RedisCacheManager redisCacheManager() {
        // Define cache configuration parameters
        Map<String, RedisCacheConfiguration> configMap = new HashMap<>();
        // Set the cache configuration parameter with cache name c1
        RedisCacheConfiguration redisCacheConfig =
                RedisCacheConfiguration.defaultCacheConfig()
                        .prefixKeysWith("hangge:") // Prefix of key
                        .disableCachingNullValues() // Disable caching a null
                        .entryTtl(Duration.ofMinutes(30)); // Cache expiration time (30 minutes)
        configMap.put("c1", redisCacheConfig);

        // Create a cacheWriter
        RedisCacheWriter cacheWriter =
                RedisCacheWriter.nonLockingRedisCacheWriter(conFactory);

        // Create a redisCacheManager and return
        RedisCacheManager redisCacheManager =
                new RedisCacheManager(
                        cacheWriter,
                        RedisCacheConfiguration.defaultCacheConfig(), // Default cache configuration
                        configMap);
        return redisCacheManager;
    }
}
5. Enable cache
Add the @ EnableCaching annotation on the entry class of the project to enable caching. The code is as follows:
@SpringBootApplication
@EnableCaching
public class DemoApplication {
    public static void main(String[] args) {
        ConfigurableApplicationContext context
                = SpringApplication.run(DemoApplication.class, args);
    }
}
6. Start the test
(1) First, we create a BookDao and use the cache:
@Repository
public class BookDao {

    @Cacheable(value = "c1")
    public String getBookById(Integer id) {
        System.out.println("getBookById");
        return "Romance of the Three Kingdoms";
    }

    @CachePut(value = "c1")
    public String updateBookById(Integer id) {
        System.out.println("updateBookById");
        return "New romance of the Three Kingdoms";
    }

    @CacheEvict(value = "c1")
    public void deleteBookById(Integer id) {
        System.out.println("deleteBookById");
    }

    @Cacheable(value = "c2")
    public String getBookById2(Integer id) {
        System.out.println("getBookById2");
        return "Journey to the West";
    }
}
(3) Create a test Controller to test the methods in BookDao:
@RestController
public class HelloController {

    @Autowired
    BookDao bookDao;

    @GetMapping("/test")
    public void test() {
        // Obtain data twice in a row
        System.out.println("-- Obtain data twice in a row --");
        bookDao.getBookById(100);
        String book1 = bookDao.getBookById(100);
        System.out.println(book1);

        // Get data again after update
        System.out.println("-- Get data again after update --");
        bookDao.updateBookById(100);
        String book2 = bookDao.getBookById(100);
        System.out.println(book2);

        // Get data again after deletion
        System.out.println("-- Get data again after deletion --");
        bookDao.deleteBookById(100);
        String book3 = bookDao.getBookById(100);
        System.out.println(book3);

        // Get another cached data
        System.out.println("-- Get another cached data --");
        String book4 = bookDao.getBookById2(200);
        System.out.println(book4);
    }
}
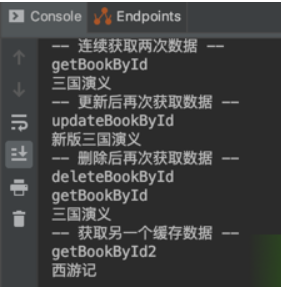
(4) Accessing this interface, you can see the console print log as follows:
- Two queries were executed at the beginning, but the query method was printed only once because the cache was used the second time.
- Next, the update method is executed. In the update method, not only the data but also the cache is updated. Therefore, in the final query method, the query method log is not printed, indicating that the method is not executed, but the data in the cache is used, and the data in the cache has been updated.
- Next, the delete method is executed. After the delete method is executed, the query method is executed again, because the cache has been deleted in the delete method.
- Finally, query a data with other cache names. Since there is no corresponding cache data, the query method will be executed.
(2) Viewing the cache results of Redis server, you can find:
- c1 cache because the cache configuration has been customized previously, the prefix becomes a custom "hangge:"
- c2 since there is no corresponding custom setting, the default prefix, cache name::, is used

Attachment: KeyGenerator of custom cache key
According to the previous introduction, by default, the cached key is the parameter of the method. If you don't want to use the default key, you can use a custom key (using parameters to define the key, or using the root object to generate the key).
If these keys cannot meet the development requirements, we can also customize the generator KeyGenerator for caching keys
1. Create a custom KeyGenerator
The custom MyKeyGenerator implements the KeyGenerator interface, and then implements the generate method in the interface.
The three parameters of the generate method are the current object, the currently requested method and the parameters of the method. The developer can create a new key based on this information and return it. The return value is the cached key.
@Component
public class MyKeyGenerator implements KeyGenerator {
    @Override
    public Object generate(Object target, Method method, Object... params) {
        return Arrays.toString(params);
    }
}
2. Use the customized KeyGenerator
(1) When using, we only need to reference the MyKeyGenermor instance in the @ Cacheable annotation.
@Repository
public class BookDao {

    @Autowired
    MyKeyGenerator myKeyGenerator;

    @Cacheable(value = "c1", keyGenerator = "myKeyGenerator")
    public String getBookById(Integer id) {
        System.out.println("getBookById");
        return "Romance of the Three Kingdoms";
    }
}
(2) After calling this cache method, you can see that the corresponding key changes into the following form: