Actual combat: can you use SpringBoot to integrate JWT to realize token verification?
Yesterday
Author: stream of consciousness
Source: www.jianshu.com com/p/e88d3f8151db
JWT official website: https://jwt.io
GitHub address of JWT(Java version): https://github.com/jwtk/jjwt
#What is JWT
Json web token (JWT) is a JSON based open standard (RFC 7519) implemented to transfer declarations between network application environments A concise and self-contained method is defined to safely transfer information between communication parties in the form of JSON objects. Because of the existence of digital signature, this information is trusted. JWT can use HMAC algorithm or RSA public-private secret key to sign.
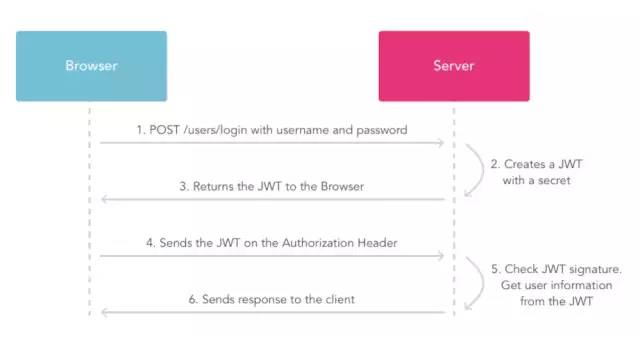
#JWT request process
-
The user sends a post request using the account and face;
-
The server uses the private key to create a jwt;
-
The server returns this jwt to the browser;
-
The browser sends the jwt string in the request header to the server like a request;
-
The server verifies the jwt;
-
Return the response resource to the browser.
#Main application scenarios of JWT
Identity authentication in this scenario, once the user completes the login, JWT is included in each subsequent request, which can be used to verify the user's identity and the access rights to routes, services and resources. Because its cost is very small, it can be easily transmitted in systems with different domain names. At present, this technology is widely used in single sign on (SSO).
Information exchange using JWT to encode data between the two sides of communication is a very secure way. Because its information is signed, it can ensure that the information sent by the sender is not forged.
advantage
-
Compact: it can be sent through URL, POST parameter or HTTP header, because the amount of data is small and the transmission speed is fast
-
Self contained: the load contains the information required by all users, avoiding multiple queries to the database
-
Because tokens are stored on the client in the form of JSON encryption, JWT is cross language and is supported in any web form in principle.
-
There is no need to save session information on the server, which is especially suitable for distributed microservices.
#Structure of JWT
JWT is composed of three pieces of information, which are used as text Join together to form a JWT string.
Like this:
eyJhbGciOiJIUzI1NiIsInR5cCI6IkpXVCJ9.eyJzdWIiOiIxMjM0NTY3ODkwIiwibmFtZSI6IkpvaG4gRG9lIiwiYWRtaW4iOnRydWV9.TJVA95OrM7E2cBab30RMHrHDcEfxjoYZgeFONFh7HgQ
JWT consists of three parts:
-
Header header (the header contains the metadata of the token and contains the type of signature and / or encryption algorithm)
-
Payload load (similar to items carried on an aircraft)
-
Signature signature / visa
Header
The header of JWT carries two parts of information: token type and encryption algorithm.
{ "alg": "HS256", "typ": "JWT"} Here is the jwt declaration type
Algorithm for declaring encryption: HMAC SHA256 is usually used directly
Encryption algorithm is a one-way function hash algorithm. Common algorithms include MD5, SHA and HAMC.
MD5 (message digest algorithm 5) abbreviation, widely used in encryption and decryption technology, commonly used in file verification. Check? No matter how large the file is, a unique MD5 value can be generated after MD5
SHA (Secure Hash Algorithm), an important tool in cryptography applications such as digital signature, has higher security than MD5
HMAC (Hash Message Authentication Code), Hash message authentication code, authentication protocol of Hash algorithm based on key. The public function and key are used to generate a fixed length value as the authentication identifier, which is used to identify the integrity of the message. Commonly used for interface signature verification
Payload
Payload is the place where valid information is stored.
Valid information consists of three parts
-
Declaration registered in the standard
-
Public statement
-
Private declaration
Declaration registered in the standard (recommended but not mandatory):
-
iss: jwt issuer
-
sub: user oriented (jwt user oriented)
-
aud: party receiving jwt
-
exp: expiration time stamp (the expiration time of jwt, which must be greater than the issuing time)
-
nbf: define the time before which the jwt is unavailable
-
IAT: issuing time of JWT
-
JTI: the unique identity of JWT, which is mainly used as a one-time token to avoid replay attacks.
Public statement:
Any information can be added to the public statement. Generally, the user's relevant information or other necessary information required by the business can be added However, it is not recommended to add sensitive information because this part can be decrypted on the client
Private declaration:
Private declaration is a declaration jointly defined by providers and consumers. It is generally not recommended to store sensitive information, because base64 is symmetrically decrypted, which means that this part of information can be classified as plaintext information.
Signature
The third part of jwt is a visa information
This part needs base64 encrypted header and base64 encrypted payload The string formed by connection is then encrypted by salt secret combination through the encryption method declared in the header, and then constitutes the third part of jwt.
The secret key is stored in the server. The server will generate and verify the token based on this key, so it needs to be protected.
Let's integrate SpringBoot and JWT
JWT dependency is introduced. Since it is based on Java, Java JWT is required
<dependency> <groupId>com.auth0</groupId> <artifactId>java-jwt</artifactId> <version>3.4.0</version></dependency>
Two annotations need to be customized
PassToken used to skip authentication
@Target({ElementType.METHOD, ElementType.TYPE})@Retention(RetentionPolicy.RUNTIME)public @interface PassToken { boolean required() default true;}Annotation UserLoginToken that requires login to operate
@Target({ElementType.METHOD, ElementType.TYPE})@Retention(RetentionPolicy.RUNTIME)public @interface UserLoginToken { boolean required() default true;}@Action Target of Target annotation
@Target(ElementType.TYPE)-Interface, class, enumeration, annotation@Target(ElementType.FIELD)-Constant of field and enumeration@Target(ElementType.METHOD)-method@Target(ElementType.PARAMETER)-Method parameters@Target(ElementType.CONSTRUCTOR) -Constructor@Target(ElementType.LOCAL_VARIABLE)-local variable@Target(ElementType.ANNOTATION_TYPE)-annotation@Target(ElementType.PACKAGE)-package
@Retention position of annotation
-
RetentionPolicy.SOURCE: this type of Annotations is reserved only at the source code level and will be ignored during compilation. It is not included in the class bytecode file.
-
RetentionPolicy.CLASS: this type of Annotations is reserved during compilation. The default retention policy exists in the class file, but will be ignored by the JVM and cannot be obtained at runtime.
-
RetentionPolicy.RUNTIME: this type of Annotations will be reserved by the JVM, so they can be read and used by the JVM or other code using reflection mechanism at runtime.
-
@Document: note that the annotation will be included in javadoc
-
@Inherited: indicates that the subclass can inherit the annotation in the parent class
Simply customize an entity class User, and use lombok to simplify the preparation of entity classes
@Data@AllArgsConstructor@NoArgsConstructorpublic class User { String Id; String username; String password;}
The generation method of token needs to be written
public String getToken(User user) { String token=""; token= JWT.create().withAudience(user.getId()) .sign(Algorithm.HMAC256(user.getPassword())); return token; }}Algorithm.HMAC256(): use HS256 to generate a token, and the key is the user's password. The unique key can be saved on the server.
withAudience() stores the information that needs to be saved in the token. Here, I store the user ID in the token
Next, you need to write an interceptor to get the token and verify it
public class AuthenticationInterceptor implements HandlerInterceptor {    @Autowired    UserService userService;    @Override    public boolean preHandle(HttpServletRequest httpServletRequest, HttpServletResponse httpServletResponse, Object object) throws Exception {        String token = httpServletRequest.getHeader("token");// Take the token from the http request header / / if it is not mapped to a method, directly use if (! (object instanceof handlermethod)) {return true;} HandlerMethod handlerMethod=(HandlerMethod)object;         Method method=handlerMethod. getMethod();        // Check whether there is a passtoken comment. If yes, skip authentication if (method.isannotationpresent (passtoken. Class)) {passtoken passtoken = method.getannotation (passtoken. Class); if (passtoken. Required()) {return true;}}// Check whether there is an annotation requiring user permission if (method. Isannotationpresent (userlogintoken. Class)) {userlogintoken userlogintoken = method.getannotation (userlogintoken. Class); if (userlogintoken. Required()) {/ / execute authentication if (token = = null) {throw new runtimeException ("no token, please login again");}// Get the user ID string userid in the token; try {                    userId = JWT.decode(token).getAudience().get(0);                }  catch (JWTDecodeException j) {                    throw new RuntimeException("401");                }                 User user = userService. findUserById(userId);                 If (user = = null) {throw new runtimeException ("user does not exist, please login again");}// Verify token jwtverifier jwtverifier = JWT require(Algorithm.HMAC256(user.getPassword())). build();                 try {                    jwtVerifier.verify(token);                }  catch (JWTVerificationException e) {                    throw new RuntimeException("401");                }                 return true;            }        }         return true;    }
    @Override    public void postHandle(HttpServletRequest httpServletRequest,                                   HttpServletResponse httpServletResponse,                             Object o, ModelAndView modelAndView) throws Exception {
    }    @Override    public void afterCompletion(HttpServletRequest httpServletRequest,                                           HttpServletResponse httpServletResponse,                                           Object o, Exception e) throws Exception {    }
To implement an interceptor, you need to implement the HandlerInterceptor interface
The HandlerInterceptor interface mainly defines three methods
1.boolean preHandle ():
The preprocessing callback method realizes the preprocessing of the processor. The third parameter is the response processor and user-defined Controller. The return value is true, which means to continue the process (such as calling the next interceptor or or processor) or execute postHandle() and afterCompletion(); false indicates that the process is interrupted and will not continue to call other interceptors or processors to interrupt execution.
2.void postHandle():
The post-processing callback method realizes the post-processing of the processor (called before the view is returned and rendered by the dispatcher servlet). At this time, we can process the model data or view through modelAndView (model and view object), and modelAndView can also be null.
3.void afterCompletion():
The callback method after the entire request is processed. This method will be executed only when the return value of the current corresponding Interceptor's preHandle() is true, that is, after the dispatcher servlet renders the corresponding view. Used for resource cleanup.
Callback method after the whole request is processed. For example, in performance monitoring, we can record the end time and output the consumption time here. We can also clean up some resources, similar to finally in try catch finally, but only call the processor in the execution chain
Main process:
-
Take the token from the http request header,
-
Determine whether to map to method
-
Check whether there is a passtoken comment. If so, skip authentication
-
Check whether there is any annotation that requires user login. If there is, it needs to be taken out and verified
-
If you pass the authentication, you can access it. If you fail, you will report relevant error information
#Configure interceptor
The annotation @ Configuration is added to the Configuration class, indicating that this class is a Configuration class, and this class will be added to the IOC container as a SpringBean.
@Configurationpublic class InterceptorConfig extends WebMvcConfigurerAdapter { @Override public void addInterceptors(InterceptorRegistry registry) { registry.addInterceptor(authenticationInterceptor()) .addPathPatterns("/**"); // Intercept all requests and decide whether to log in to} @ bean public authenticationinterceptor authenticationinterceptor() {return new authenticationinterceptor();}}WebMvcConfigurerAdapter this abstract class does not actually have any method implementation, but empty implementation of the interface
All the methods in WebMvcConfigurer do not give any business logic processing. This design is just right so that we don't have to implement those methods we don't use. They are implemented by the abstract class space of WebMvcConfigurerAdapter. If we need to make logic processing for a specific method, You only need to set the corresponding method of @ Override in the subclass of WebMvcConfigurerAdapter.
Note:
In springboot 2 WebMvcConfigurerAdapter in 0 and Spring 5.0 has been discarded
It is said on the Internet to inherit WebMvcConfigurationSupport instead, but after a try, it still expires
resolvent:
Directly implement WebMvcConfigurer (official recommendation)
@Configurationpublic class InterceptorConfig implements WebMvcConfigurer { @Override public void addInterceptors(InterceptorRegistry registry) { registry.addInterceptor(authenticationInterceptor()) .addPathPatterns("/**"); } @Bean public AuthenticationInterceptor authenticationInterceptor() { return new AuthenticationInterceptor(); }}addInterceptor in InterceptorRegistry needs an interceptor instance that implements the HandlerInterceptor interface. The addPathPatterns method is used to set the filter path rules of the interceptor.
Here, I intercept all requests and decide whether to log in by judging whether there is @ LoginRequired annotation
Add the login operation annotation in the data access interface
@RestController@RequestMapping("api")public class UserApi { @Autowired UserService userService; @Autowired TokenService tokenService; //Log in to @ postmapping ("/ login") public object login (@ requestbody user) {jsonobject jsonobject = new jsonobject(); user userforbase = userservice. Findbyusername (user); if (userforbase = = null) {jsonobject. Put ("message", "login failed, user does not exist"); return jsonobject;} Else {if (! Userforbase. Getpassword(). Equals (user. Getpassword())) {jsonobject. Put ("message", "login failed, password error"); return jsonobject;} else { String token = tokenService.getToken(userForBase); jsonObject.put("token", token); jsonObject.put("user", userForBase); return jsonObject; } } } @ Userlogintoken @ getmapping ("/ GetMessage") public string getmessage() {return "you have passed verification";}}If it is not annotated, it is not verified by default, and the login interface is generally not verified. In getMessage(), I added the login annotation to explain that the interface must log in and obtain the token, add the token in the request header and pass the verification before it can be accessed
Now test, start the project and use postman to test the interface
Access api/getMessage interface without token
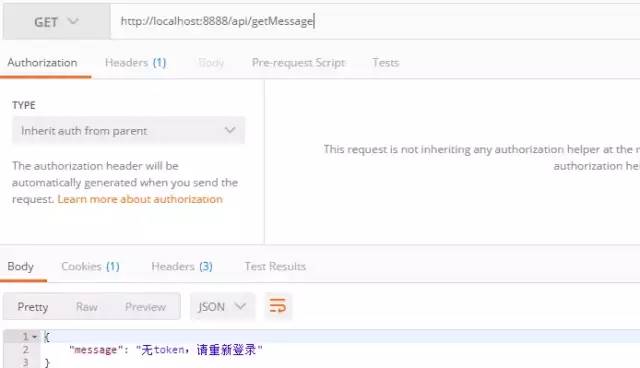
I use unified exception handling here, so I only see the error message
Now log in to get the token
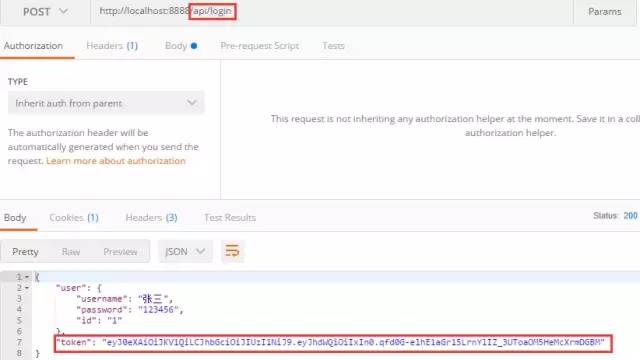
I didn't add verification comments to the login operation, so I can access it directly
Add the token to the request header and access the api/getMessage interface again
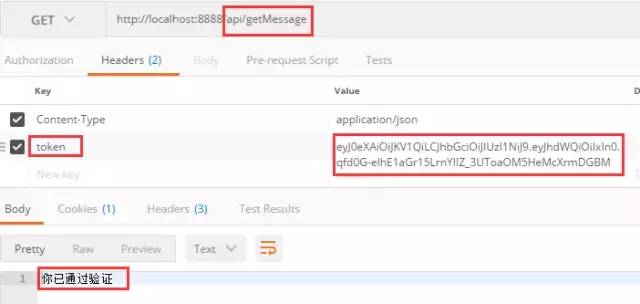
Note: the key here must not be wrong, because the interceptor takes the value of the keyword token string token = HttpServletRequest getHeader("token");
After adding token, you can successfully pass the verification and interface access
GitHub project source address: https://github.com/JinBinPeng/springboot-jwt