4.1 writing of yml and properties
As mentioned above, there are two commonly used configuration files in spring: yml and properties. Both are named after application and are usually placed in the resources folder. yml uses indentation to reflect hierarchical management, while properties uses indentation In the form of. There is no difference between the two. You can choose according to your personal usage habits. At present, the yml form is used more. Why? Because properties may have a lot of redundant writing, which is not concise compared with yml. Let's have a concrete experience.
For example, we need to configure two variables, server port=9090 server. name=management
properties:
server.port=9090
server.name=management
yml writing method:
server:
  port: 9090
  name: management
In contrast, yaml is more concise. The hierarchical relationship of properties is not obvious. More time, it will appear more chaotic.
4.2 location of configuration file
We only mentioned the location under the Resources folder, which is actually under the corresponding classPath, because after the final packaging, all files under java and resources are under the classPath. In fact, the springBoot configuration file can be placed in four places. The priorities are as follows:
- In the config directory under the project root directory
- Project root directory
- In the config directory under classPath
- classpath directory
The priority is from top to bottom. In case of multiple, the one with higher priority shall prevail. We put it in the resources directory. In fact, it is equivalent to using the above-mentioned 4
Then we can verify it. We create a config folder under resources and an application YML's configuration file, by configuring the port number to see who is effective, you can know whose priority is high.
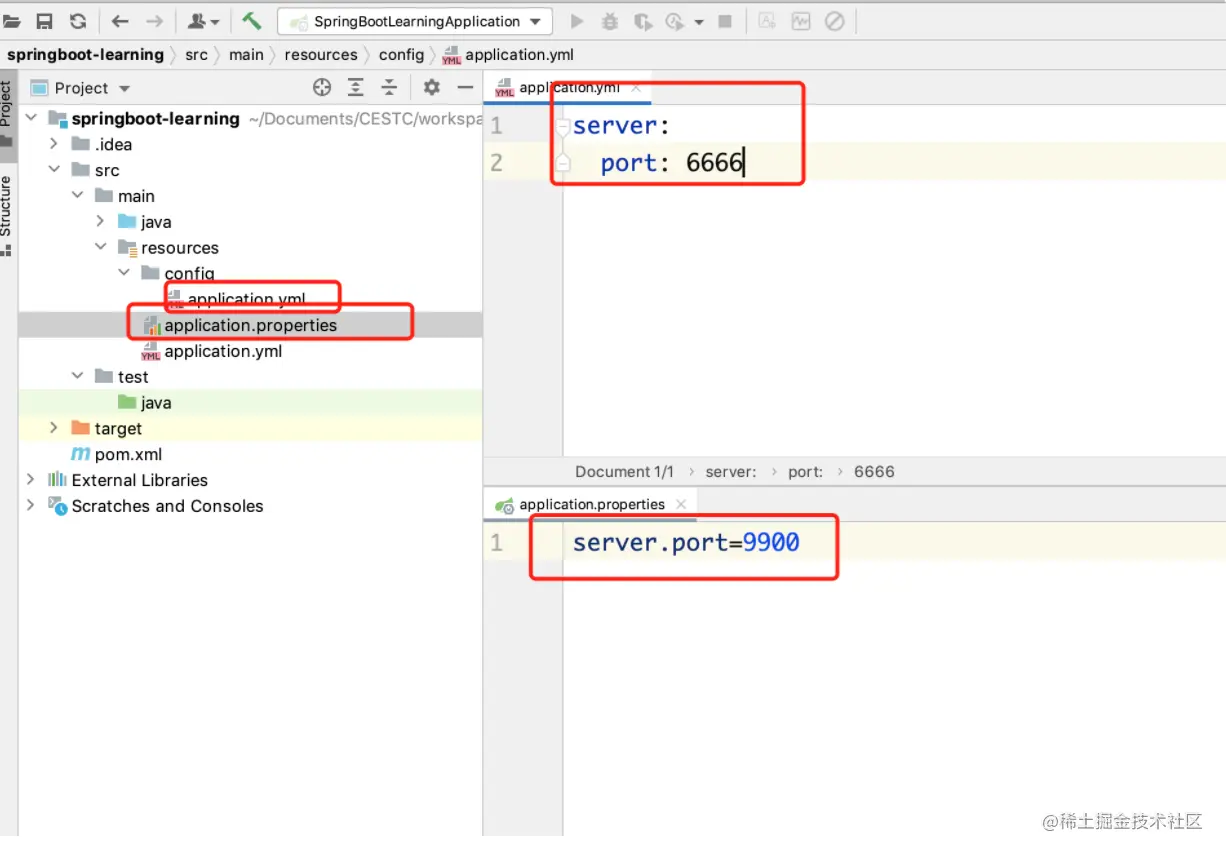
Finally, it is found that port 6666 is started, which means that the priority of 3 is higher than that of 4. (the problem of properties and yml priority at the same level was mentioned yesterday)
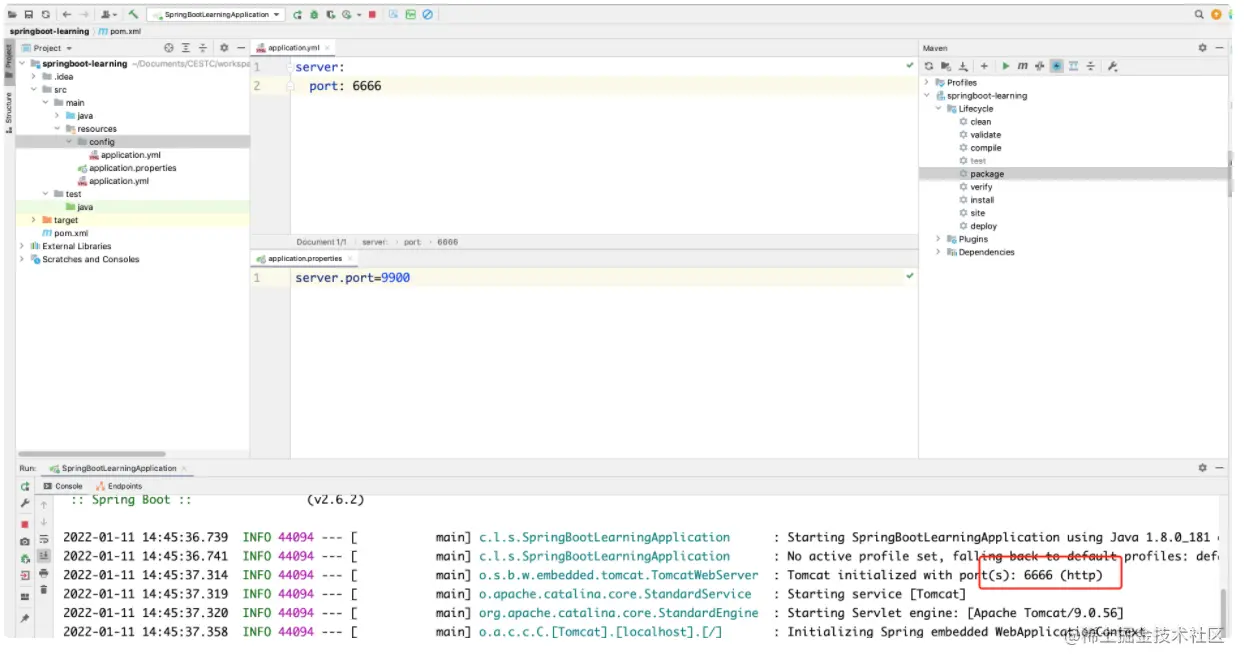
In the same way, we can also verify 1 and 2 We won't take you to verify it here.
The 1 and 2 methods are actually useful in our operation and maintenance. Let's mention it here.
Usually, when we deploy the springBoot project, we make it into a jar package, then put it on the corresponding machine and start it through Java jar. As the jar package is made, all the corresponding configuration files are also made to the jar package. At this time, it is very difficult for us to modify the configuration inside, especially when the source code is not available. So what should we do? We can copy the package to the local environment, extract the configuration file, modify the configuration that needs to be modified, create a config folder under the path of the jar package on the server, put the modified configuration file in this folder, and restart the project. At this time, The modified configuration file can replace the original configuration file and take effect. Here is the case where the priority of configuration files in different locations is different.
4.3 solutions for different environments and configurations
We have finished the basic usage of the configuration file, that is, application YML or application Properties, we can configure the information we need in the configuration file, such as the connection to the database. However, in actual development, we often encounter such a situation that we may have multiple sets of environments, such as development environment, test environment and production environment. Each set of environment must have a set of configuration, and the configuration contents between them are different, such as the database address of development environment and the database address of production environment. So when our program is released to different environments, do we have to modify the content in the configuration file every time? In this case, it must be too troublesome, and springBoot provides us with a reasonable solution.
How to solve this problem is to use multiple sets of configuration files. For example, in the development environment, we create an application-dev.yml, and in the test environment, we create an application-test.yml yml. In the production environment, we create a file of application-prod.yml. Of course, we can also use a file of type properties. For dev. test The name prod can be determined by ourselves and can be taken according to our actual situation. So now that we have multiple sets of configuration files, how can we make them effective. Application is definitely the priority loaded by springBoot YML, we just need to specify who will take effect in this configuration file.
application-dev.yml
spring:
  datasource:
      url: jdbc:mysql://localhost:3306/test?useSSL=false&characterEncoding=utf8&serverTimezone=Asia/Shanghai
application-test.yml
spring:
  datasource:
      url: jdbc:mysql://192.168.1.1:3306/test?useSSL=false&characterEncoding=utf8&serverTimezone=Asia/Shanghai
How to specify it? Use spring profiles. active
application.yml
spring:
    profiles:
        active: dev
If dev is specified to take effect, the contents in the application-dev.yml configuration file will be loaded. If you want application test When the YML file takes effect, just change dev to test.
But the problem is that I can't modify the application every time YML ah, when I release dev, this configuration is changed to dev packaging. When I release the test environment, it is changed to test packaging. Although it is simpler than before, it is still very troublesome. What to do? In general, we don't need to modify this value. For example, this value is now configured as dev. when I publish the test environment, I have the same jar package. Just specify it in the startup command:
java -jar xxx.jar --spring.profiles.active=test
 Copy code
This is because the priority of the parameters in the startup command is higher than that of the configuration file in the project, so everything is fine.
In addition to this method, we can also solve this problem through the configuration center. Of course, this will be discussed later.
4.4 reading the value in the configuration file
In addition to the above spring preset configurations, sometimes we also put some frequently modified values into the configuration file for our convenience. So how should we get the value in the configuration file in the program? Let's study it.
Method 1: @ Value annotation
The @ Value annotation in Spring can help us read the values in the configuration file.
application.yml
server:
  port: 9090

third:
  weather:
    url: http://www.baidu.com
    port: 8080
    username: test
For example, we configure a third-party address to get the weather into the configuration file. How do we write this Value in the program? Usually, we can use the @ Value annotation in the classes that can be managed by spring (that is, beans). The so-called spring managed beans refer to the annotations that are first located in the scanned package and have spring identification, Such as @ Controller,@Service,@Component, etc.
We tested it in the FirstController we wrote earlier:
package com.lsqingfeng.springboot.controller;

import org.springframework.beans.factory.annotation.Value;
import org.springframework.web.bind.annotation.RequestMapping;
import org.springframework.web.bind.annotation.RestController;

/**
 * @className: FirstController
 * @description: First Controller
 * @author: sh.Liu
 * @date: 2022-01-10 15:21
 */
@RestController
public class FirstController {

    @Value("${third.weather.url}")
    private String weatherUrl;

    @RequestMapping("/hello")
    public String helloWorld(){
        System.out.println("The obtained weather address is:" + weatherUrl);
        return "hello world";
    }
}
In this way, when we access this interface, we will print the obtained value.
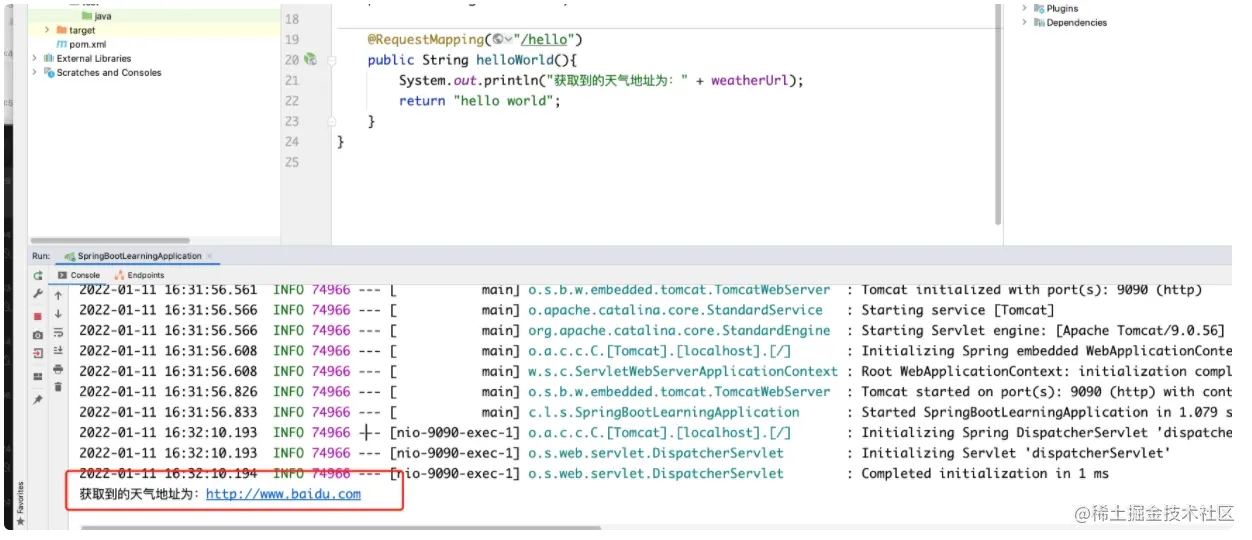
Get success.
Method 2: use Environment
Environment class is a variable provided in Spring to encapsulate environment information data. We can also get the contents of the configuration file from this file. The usage is as follows.
package com.lsqingfeng.springboot.controller;

import org.springframework.beans.factory.annotation.Autowired;
import org.springframework.beans.factory.annotation.Value;
import org.springframework.core.env.Environment;
import org.springframework.web.bind.annotation.RequestMapping;
import org.springframework.web.bind.annotation.RestController;

import java.util.Arrays;
import java.util.List;
import java.util.stream.Stream;

/**
 * @className: FirstController
 * @description: First Controller
 * @author: sh.Liu
 * @date: 2022-01-10 15:21
 */
@RestController
public class FirstController {

    @Autowired
    private Environment env;

    @RequestMapping("/hello")
    public String helloWorld(){
        // Use the env object to get the value in the configuration file
        String weatherUrl = env.getProperty("third.weather.url");
        System.out.println("The obtained weather address is:" + weatherUrl);
        return "hello world";
    }
}
Inject the Environment class, call getProperty, and pass in the corresponding key to obtain the corresponding result.
Method 3: encapsulate the content in the configuration file into a javaBean
We create a class under the config folder to receive these contents in the configuration file. Class is written as follows
package com.lsqingfeng.springboot.config;

import org.springframework.boot.context.properties.ConfigurationProperties;
import org.springframework.context.annotation.Configuration;

/**
 * @className: ThirdWeatherConfig
 * @description: Third party weather variable encapsulation
 * @author: sh.Liu
 * @date: 2022-01-12 10:33
 */

@Configuration
@ConfigurationProperties(prefix = "third.weather")
public class ThirdWeatherConfig {

    private String url;
    private Integer port;
    private String username;

    public void setUrl(String url) {
        this.url = url;
    }

    public void setPort(Integer port) {
        this.port = port;
    }

    public void setUsername(String username) {
        this.username = username;
    }

    public String getUrl() {
        return url;
    }

    public Integer getPort() {
        return port;
    }

    public String getUsername() {
        return username;
    }
}
Note that the attribute name in the class should be consistent with the name in the configuration file after removing the prefix.
Also, at present, we do not specify the name of the configuration file, because it reads the application by default The content in YML, if we do not configure the content in application In YML, you need to specify the location of the file on the class: use the following annotation:
@PropertySource("classpath:config/my.yml")
This means that the data in this class should be the same as config / my The configuration contents in YML correspond.
How to use it after packaging, and the use method is similar.
package com.lsqingfeng.springboot.controller;

import com.lsqingfeng.springboot.config.ThirdWeatherConfig;
import org.springframework.beans.factory.annotation.Autowired;
import org.springframework.beans.factory.annotation.Value;
import org.springframework.core.env.Environment;
import org.springframework.web.bind.annotation.RequestMapping;
import org.springframework.web.bind.annotation.RestController;

/**
 * @className: FirstController
 * @description: First Controller
 * @author: sh.Liu
 * @date: 2022-01-10 15:21
 */
@RestController
public class FirstController {

    @Value("${third.weather.url}")
    private String weatherUrl;

    @Autowired
    private Environment env;

    @Autowired
    private ThirdWeatherConfig thirdWeatherConfig;

    @RequestMapping("/hello")
    public String helloWorld(){
        // Get content using encapsulated objects
        String weatherUrl = thirdWeatherConfig.getUrl();
        System.out.println("The obtained weather address is:" + weatherUrl);
        return "hello world";
    }
}
In addition, this method can also be used to obtain arrays or collections. We add content directly to the configuration file:
third:
  weather:
    url: http://www.baidu.com
    port: 8080
    username: test
    cities:
      - Beijing
      - Shanghai
      - Guangzhou
    list[0]: aaa
    list[1]: bbb
    list[2]: ccc
Add the properties of arrays and collections to the configuration class
package com.lsqingfeng.springboot.config;

import org.springframework.boot.context.properties.ConfigurationProperties;
import org.springframework.context.annotation.Configuration;

import java.util.List;

/**
 * @className: ThirdWeatherConfig
 * @description: Third party weather variable encapsulation
 * @author: sh.Liu
 * @date: 2022-01-12 10:33
 */

@Configuration
@ConfigurationProperties(prefix = "third.weather")
public class ThirdWeatherConfig {

    private String url;
    private Integer port;
    private String username;

    private String[] cities;

    private List<String> list;

    public void setUrl(String url) {
        this.url = url;
    }

    public void setPort(Integer port) {
        this.port = port;
    }

    public void setUsername(String username) {
        this.username = username;
    }

    public String getUrl() {
        return url;
    }

    public Integer getPort() {
        return port;
    }

    public String getUsername() {
        return username;
    }

    public String[] getCities() {
        return cities;
    }

    public void setCities(String[] cities) {
        this.cities = cities;
    }

    public List<String> getList() {
        return list;
    }

    public void setList(List<String> list) {
        this.list = list;
    }
}
Get value:
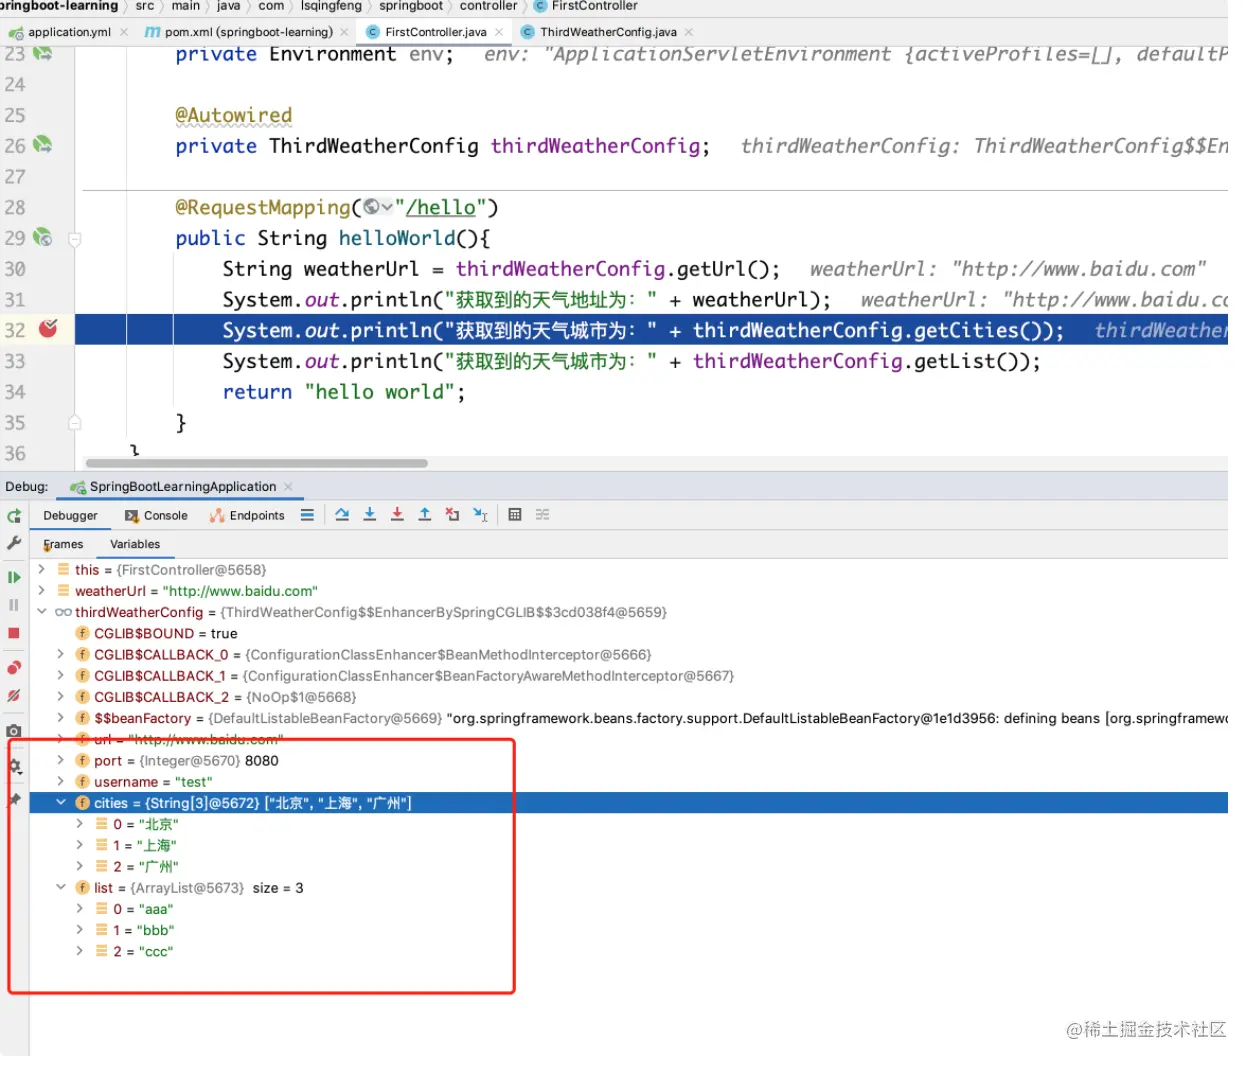
Another little knowledge point. There is a warning on the javaBean we use to receive annotations:
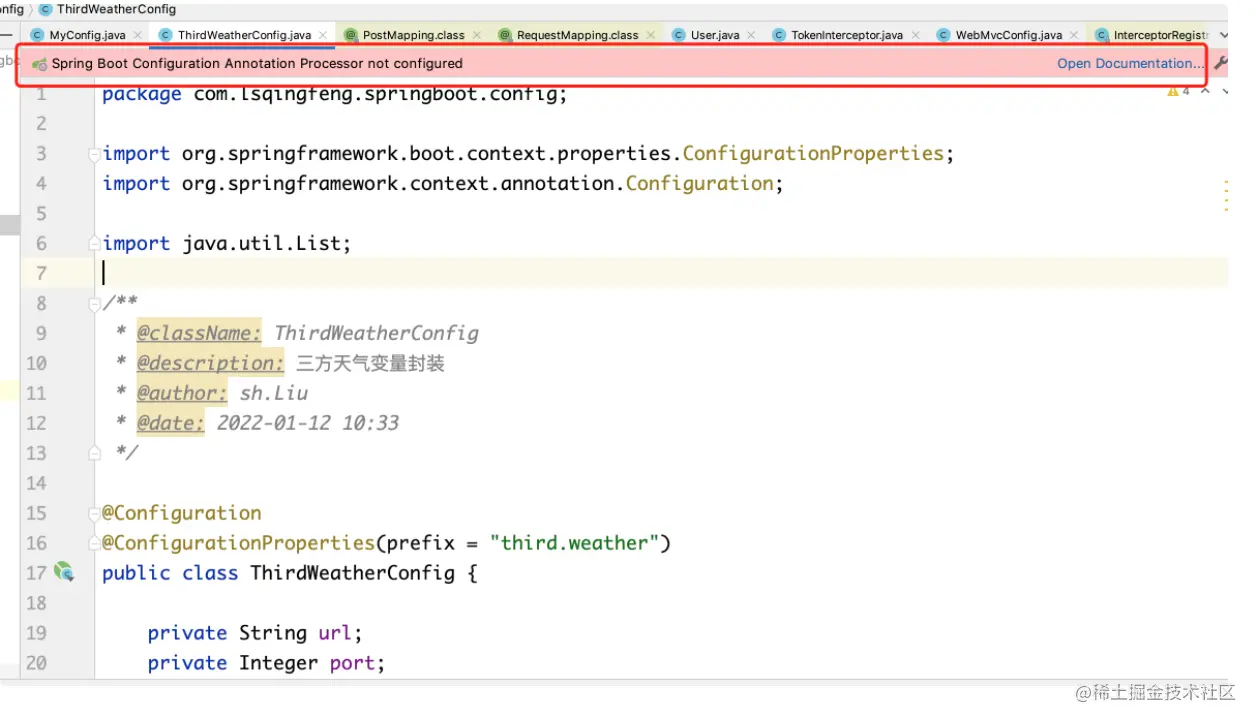
How to solve this problem is that SpringBoot actually prompts us to add a dependency.
<dependency>
    <groupId>org.springframework.boot</groupId>
    <artifactId>spring-boot-configuration-processor</artifactId>
    <optional>true</optional>
</dependency>
After adding, you can refresh. After adding this dependency, you can pop up a prompt. For details, see: Spring Boot Configuration Annotation Processor not configured problem solving_ Liang Jiabao's blog - CSDN blog
OK, so much about the configuration file first. It should be enough for use.