preface
This article records the process of learning the SpringBoot framework.
Official website: Spring | Home
edition:
- Maven: 3.6.1
- JDK: 1.8
- SpringBoot: 2.3.4
Project construction:
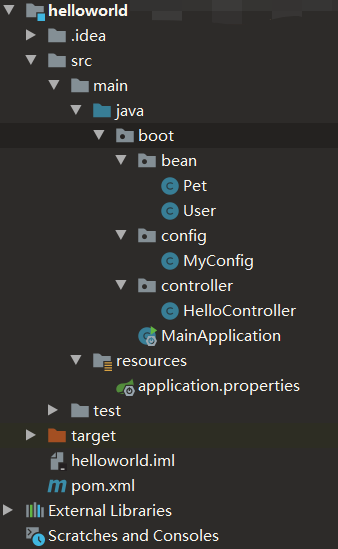
Create a maven project:

pom.xml configuration file:
<?xml version="1.0" encoding="UTF-8"?>
<project xmlns="http://maven.apache.org/POM/4.0.0"
         xmlns:xsi="http://www.w3.org/2001/XMLSchema-instance"
         xsi:schemaLocation="http://maven.apache.org/POM/4.0.0 http://maven.apache.org/xsd/maven-4.0.0.xsd">
    <modelVersion>4.0.0</modelVersion>

    <groupId>org.example</groupId>
    <artifactId>helloworld</artifactId>
    <version>1.0-SNAPSHOT</version>

    <parent>
        <groupId>org.springframework.boot</groupId>
        <artifactId>spring-boot-starter-parent</artifactId>
        <version>2.3.4.RELEASE</version>
    </parent>

    <dependencies>
        <dependency>
            <groupId>org.springframework.boot</groupId>
            <artifactId>spring-boot-starter-web</artifactId>
        </dependency>
    </dependencies>

    <build>
        <plugins>
            <plugin>
                <groupId>org.springframework.boot</groupId>
                <artifactId>spring-boot-maven-plugin</artifactId>
            </plugin>
        </plugins>
    </build>

</project>
MainApplication main program class:
import org.springframework.boot.SpringApplication;
import org.springframework.boot.autoconfigure.SpringBootApplication;
import org.springframework.context.ConfigurableApplicationContext;

@SpringBootApplication
public class MainApplication {

    public static void main(String[] args) {
        ConfigurableApplicationContext run = SpringApplication.run(MainApplication.class,args);
    }
}
Pet class:
public class Pet {

    private String name;

    public Pet() {
    }

    public Pet(String name) {
        this.name = name;
    }

    public String getName() {
        return name;
    }

    public void setName(String name) {
        this.name = name;
    }

    @Override
    public String toString() {
        return "Pet{" +
                "name='" + name + '\'' +
                '}';
    }
}
User class:
public class User {

    private String name;
    private Integer age;

    public User() {
    }

    public User(String name, Integer age) {
        this.name = name;
        this.age = age;
    }

    public String getName() {
        return name;
    }

    public void setName(String name) {
        this.name = name;
    }

    public Integer getAge() {
        return age;
    }

    public void setAge(Integer age) {
        this.age = age;
    }

    @Override
    public String toString() {
        return "User{" +
                "name='" + name + '\'' +
                ", age=" + age +
                '}';
    }
}
Bottom annotation
@Configuration
Used to configure class declarations.
Create the configuration class MyConfig in src/main/java/boot/config Directory:
import org.springframework.context.annotation.Configuration;

//@Configuration / / tell SpringBoot that this is a configuration class
@Configuration(proxyBeanMethods = true)
public class MyConfig {

}
explain:
- Full(proxyBeanMethods = true): how many times each @ Bean method is called and the returned component is guaranteed to be single instance (true by default if not written)
- Lite(proxyBeanMethods = false): how many times each @ Bean method is called, and the returned component is newly created
@Bean
Register components in the container
Write configuration class MyConfig:
import boot.bean.Pet;
import boot.bean.User;
import org.springframework.context.annotation.Bean;
import org.springframework.context.annotation.Configuration;

@Configuration
public class MyConfig {

    @Bean  //Add components to the container. Take the method name as the id of the component, the return type is the component type, and the returned object is the instance of the component in the container
    public User user01() {
        return new User("zhangsan",18);
    }

    @Bean("tom")  //Specify component id
    public Pet tomcatPet() {
        return new Pet("tomcat");
    }
}
explain:
- @Bean is written in front of the method to add components to the container (single instance by default). Take the method name as the id of the component; The return type is the component type; The returned object is the instance of the component in the container
- @Bean("xxx") can specify the component id
MainApplication, main test program:
import boot.bean.Pet;
import boot.bean.User;
import boot.config.MyConfig;
import org.springframework.boot.SpringApplication;
import org.springframework.boot.autoconfigure.SpringBootApplication;
import org.springframework.context.ConfigurableApplicationContext;

@SpringBootApplication
public class MainApplication {

    public static void main(String[] args) {
        //1. Return to IOC container
        ConfigurableApplicationContext run = SpringApplication.run(MainApplication.class,args);

        //2. View the components in the container
        String[] names = run.getBeanDefinitionNames();
        for (String name : names) {
            System.out.println(name);
        }

        //3. Get components from container
        User user01 = run.getBean("user01", User.class);
        Pet tom01 = run.getBean("tom", Pet.class);
        Pet tom02 = run.getBean("tom", Pet.class);

        System.out.println("Components:" + user01);
        System.out.println("Components:" + tom01);
        System.out.println("Components:" + tom02);
        System.out.println("Components:" + (tom01 == tom02));
    }
}
The results are as follows:

The configuration class itself is also a component
Write the main program MainApplication:
import boot.config.MyConfig;
import org.springframework.boot.SpringApplication;
import org.springframework.boot.autoconfigure.SpringBootApplication;
import org.springframework.context.ConfigurableApplicationContext;

@SpringBootApplication
public class MainApplication {

    public static void main(String[] args) {
        //Return to IOC container
        ConfigurableApplicationContext run = SpringApplication.run(MainApplication.class,args);

        //Get component from container
        MyConfig bean = run.getBean(MyConfig.class);
        System.out.println(bean);
    }
}
The results are as follows:

Component dependency
@The proxyBeanMethods parameter in the Configuration annotation is mainly used in the scenario of component dependency.
Modify the User class, add the Pet variable, and override the getter(), setter() and toString() methods:
public class User {

    private String name;
    private Integer age;
    private Pet pet;

    public User() {
    }

    public User(String name, Integer age) {
        this.name = name;
        this.age = age;
    }

    public String getName() {
        return name;
    }

    public void setName(String name) {
        this.name = name;
    }

    public Integer getAge() {
        return age;
    }

    public void setAge(Integer age) {
        this.age = age;
    }

    public Pet getPet() {
        return pet;
    }

    public void setPet(Pet pet) {
        this.pet = pet;
    }

    @Override
    public String toString() {
        return "User{" +
                "name='" + name + '\'' +
                ", age=" + age +
                ", pet=" + pet +
                '}';
    }
}
Write configuration class MyConfig:
import boot.bean.Pet;
import boot.bean.User;
import org.springframework.context.annotation.Bean;
import org.springframework.context.annotation.Configuration;

@Configuration(proxyBeanMethods = true)
public class MyConfig {

    @Bean
    public User user01() {
        User zhangsan = new User("zhangsan",18);
        zhangsan.setPet(tomcatPet());  //Call tomcatPet() component
        return zhangsan;
    }

    @Bean("tom")
    public Pet tomcatPet() {
        return new Pet("tomcat");
    }
}
Write the main program MainApplication:
import boot.bean.Pet;
import boot.bean.User;
import boot.config.MyConfig;
import org.springframework.boot.SpringApplication;
import org.springframework.boot.autoconfigure.SpringBootApplication;
import org.springframework.context.ConfigurableApplicationContext;

@SpringBootApplication
public class MainApplication {

    public static void main(String[] args) {
        //Return to IOC container
        ConfigurableApplicationContext run = SpringApplication.run(MainApplication.class,args);

        User user01 = run.getBean("user01", User.class);
        Pet tom = run.getBean("tom", Pet.class);

        System.out.println("User's pet:" + (user01.getPet() == tom));

    }
}
Run the main program. If proxyBeanMethods = true, the results are as follows:
User's pet: true
If proxyBeanMethods = false, the result is as follows:
User's pet: false
explain:
- The difference between single case mode and multi case mode
- If true, the component will directly create an instance in the container, and other components can directly use the instance
- false is recommended if one component does not depend on another. Component dependencies will not be scanned at startup, which is faster
Original annotation
annotation | explain |
|---|---|
@Component | Used on classes to instantiate beans |
@Controller | Used on web tier classes to instantiate beans |
@Service | Used on the service layer class to instantiate beans |
@Repository | Used on dao layer classes to instantiate beans |
@ComponentScan | Used to specify the package that Spring will scan when initializing the container |
The original annotations shown in the above table can also be used.
@Import
Add this annotation on the class of any component to import the specified component (the parameter is an array, and multiple components can be imported)
Write configuration class MyConfig:
import boot.bean.Pet;
import boot.bean.User;
import org.springframework.context.annotation.Bean;
import org.springframework.context.annotation.Configuration;
import org.springframework.context.annotation.Import;

@Import({User.class})  //Import User component
@Configuration(proxyBeanMethods = true)
public class MyConfig {

    @Bean
    public User user01() {
        User zhangsan = new User("zhangsan",18);
        zhangsan.setPet(tomcatPet());
        return zhangsan;
    }

    @Bean("tom")
    public Pet tomcatPet() {
        return new Pet("tomcat");
    }
}
Write the main program MainApplication:
package boot;

import boot.bean.Pet;
import boot.bean.User;
import boot.config.MyConfig;
import org.springframework.boot.SpringApplication;
import org.springframework.boot.autoconfigure.SpringBootApplication;
import org.springframework.context.ConfigurableApplicationContext;

// Main program class
// @Springboot application: This is a springboot application
@SpringBootApplication
public class MainApplication {

    public static void main(String[] args) {

        ConfigurableApplicationContext run = SpringApplication.run(MainApplication.class,args);

        String[] beanNamesForType = run.getBeanNamesForType(User.class);
        System.out.println("====");
        for (String s : beanNamesForType) {
            System.out.println(s);
        }
    }
}
The results are as follows:

Note: the default component name is the full class name
@Conditional
Only when the conditions specified in Conditional are met can component injection be carried out.
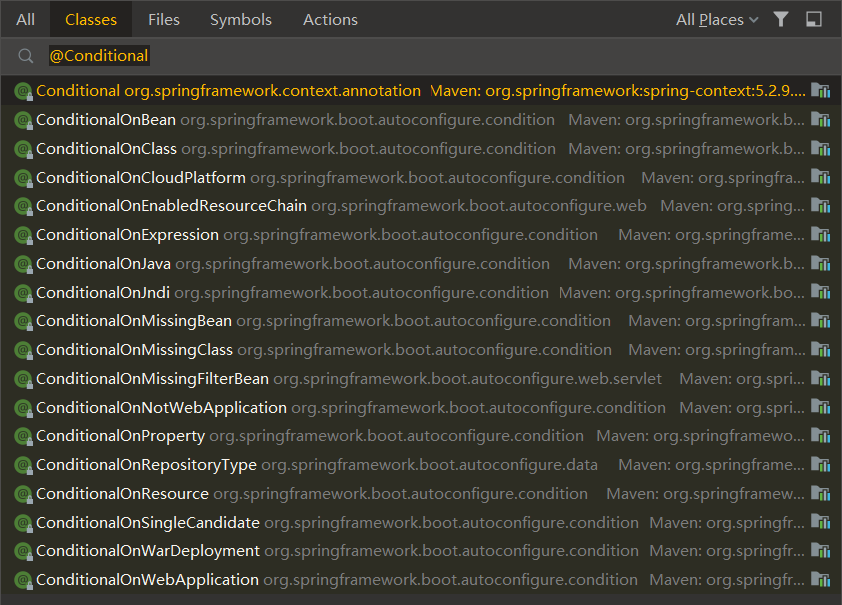
Conditional also derives many annotations, as shown in the following figure:

Take @ ConditionalOnBean as an example:
Write configuration class MyConfig:
import boot.bean.Pet;
import boot.bean.User;
import org.springframework.boot.autoconfigure.condition.ConditionalOnBean;
import org.springframework.context.annotation.Bean;
import org.springframework.context.annotation.Configuration;
import org.springframework.context.annotation.Import;

@Import({User.class})
@Configuration(proxyBeanMethods = true)
public class MyConfig {

    @Bean
    public User user01() {
        User zhangsan = new User("zhangsan",18);
        zhangsan.setPet(tomcatPet());
        return zhangsan;
    }

    @ConditionalOnBean(name = "user01")  //If the component named user01 is used, the tom component can be registered
    @Bean("tom")
    public Pet tomcatPet() {
        return new Pet("tomcat");
    }
}
Write the main program MainApplication:
import boot.bean.Pet;
import boot.bean.User;
import boot.config.MyConfig;
import org.springframework.boot.SpringApplication;
import org.springframework.boot.autoconfigure.SpringBootApplication;
import org.springframework.context.ConfigurableApplicationContext;

@SpringBootApplication
public class MainApplication {

    public static void main(String[] args) {

        ConfigurableApplicationContext run = SpringApplication.run(MainApplication.class,args);

        boolean tom = run.containsBean("tom");
        System.out.println("In container tom Components:" + tom);

        boolean user01 = run.containsBean("user01");
        System.out.println("In container user01 Components:" + user01);

    }
}
The test results are as follows:

If the user01 component will not be registered, the user component will not be registered
import boot.bean.Pet;
import boot.bean.User;
import org.springframework.boot.autoconfigure.condition.ConditionalOnBean;
import org.springframework.context.annotation.Bean;
import org.springframework.context.annotation.Configuration;
import org.springframework.context.annotation.Import;

@Import({User.class})
@Configuration(proxyBeanMethods = true)
public class MyConfig {

    //@Bean
    public User user01() {
        User zhangsan = new User("zhangsan",18);
        zhangsan.setPet(tomcatPet());
        return zhangsan;
    }

    @ConditionalOnBean(name = "user01")  //If the component named user01 is used, the tom component can be registered
    @Bean("tom")
    public Pet tomcatPet() {
        return new Pet("tomcat");
    }
}
Note: pay attention to the registration sequence of components, otherwise it may become invalid
@ImportResource
Native xml configuration files can be introduced. Add this annotation on the configuration class:
@ImportResource("classpath:xxx")
Configure binding
Use Java to read the content in the properties file and package it into JavaBean s (bind the content of the configuration file to the component). You can use the annotation @ ConfigurationProperties.
There are two binding methods:
Postscript
Dig a hole and remind to see the source code.