In Nacos, service invocation is mainly realized through RestTemplate + Ribbon. RestTemplate is the Restful request implementation class provided by Spring, and Ribbon is the client load balancer. Through the Ribbon, you can obtain the specific information (IP and port number) of the service instance, After that, you can complete a service call by adding the specific information of the service instance through RestTemplate.
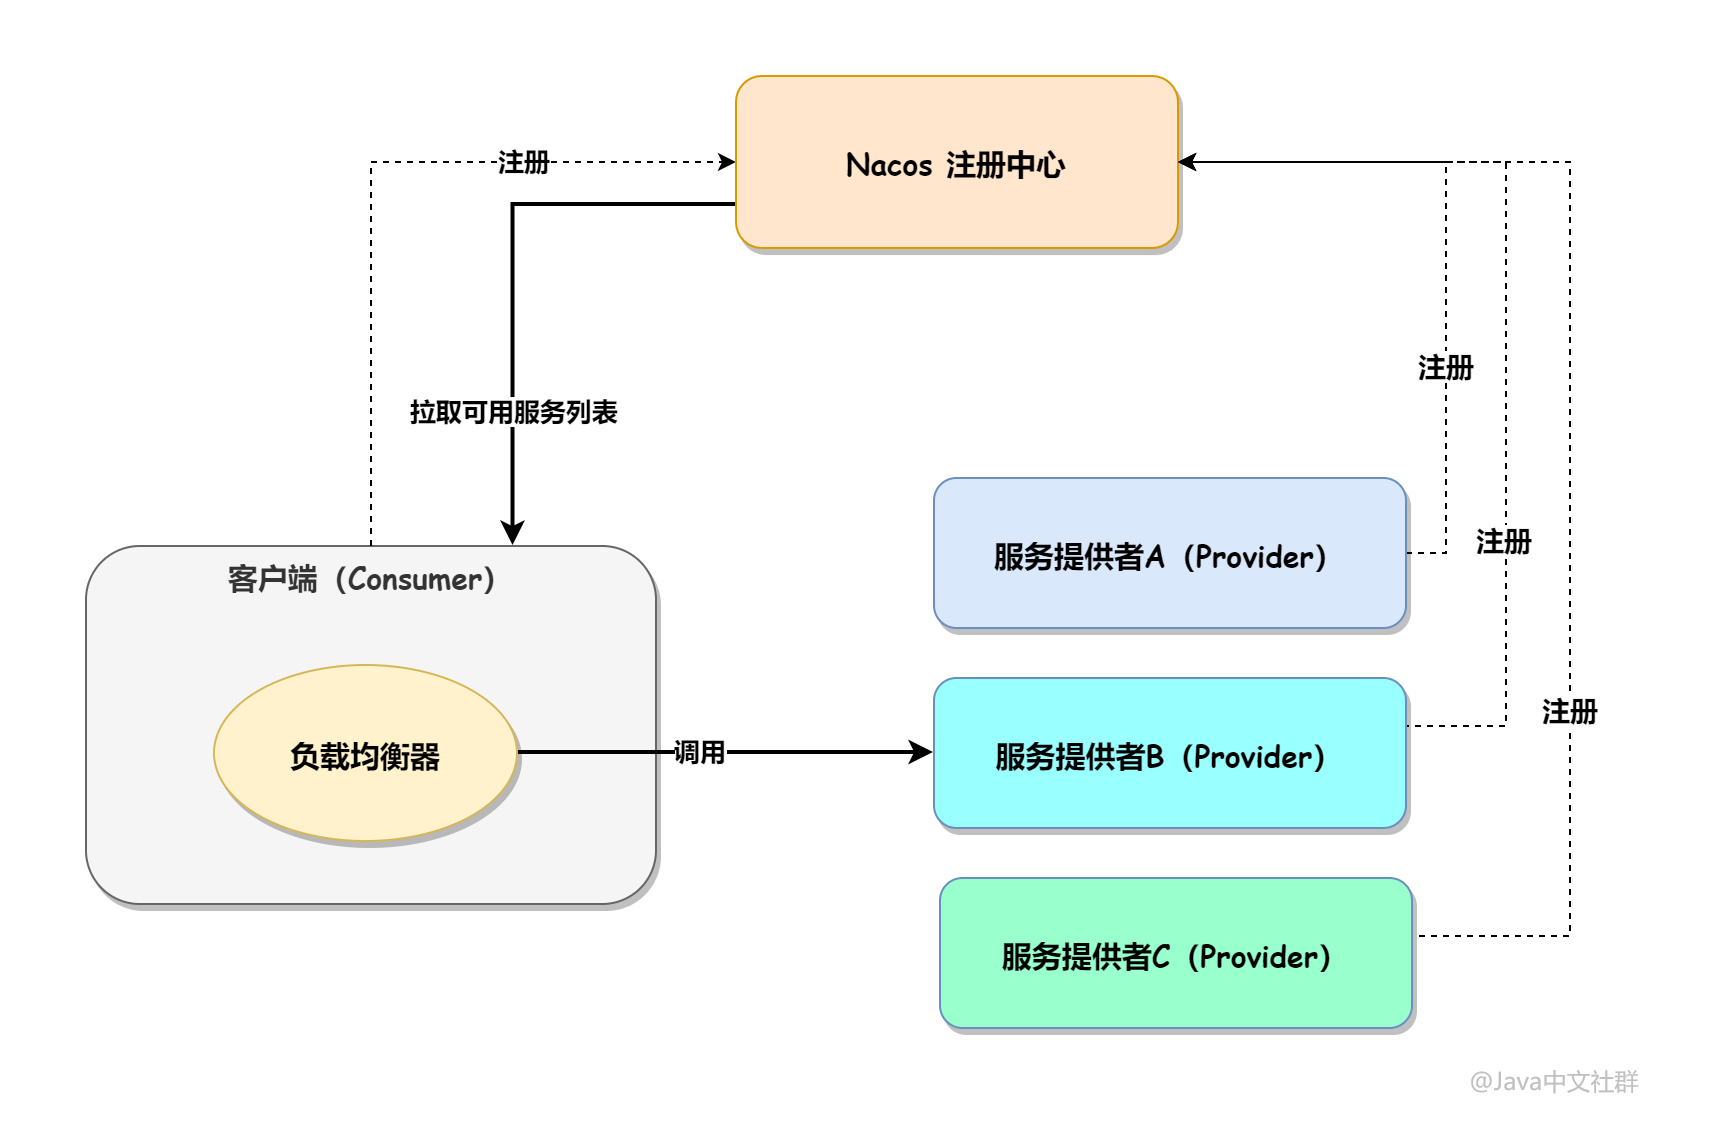
RestTemplate + Ribbon calls services in two ways: calling services through code and calling services through annotation. However, the principle of the two implementation methods is the same: pull the list of available services to the local (client) through the registration center, get the specific information of a server through the client load balancer, and then request the server, as shown in the following figure:
1. Code mode call
Calling services through code is not commonly used in practical work, mainly because the writing method is too cumbersome, but understanding it is very helpful for understanding the annotation calling method later, so let's focus on it here.
Service invocation requires two roles: one is the service Provider and the other is the service caller. Next, let's create these two roles.
1.1 create a service provider: Provider
Step 1: first create a Spring Boot project (Spring Cloud project is based on Spring Boot) and add spring web and Nacos discovery dependencies. The specific dependency information is as follows:
<dependency>
  <groupId>org.springframework.boot</groupId>
  <artifactId>spring-boot-starter-web</artifactId>
</dependency>
<!-- add to Nacos support -->
<dependency>
  <groupId>com.alibaba.cloud</groupId>
  <artifactId>spring-cloud-starter-alibaba-nacos-discovery</artifactId>
</dependency>
Step 2: set Nacos related configuration in application Add the following configuration to YML:
spring:
  application:
    name: springcloud-nacos-provider # Project name (service name registered by nacos)
  cloud:
    nacos:
      discovery:
        username: nacos # nacos login user name
        password: nacos666 # nacos password
        server-addr: 127.0.0.1:8848 # nacos server address
server:
  port: 8081 # Project startup port number
Step 3: add a service method, as shown in the following code:
import org.springframework.boot.SpringApplication;
import org.springframework.boot.autoconfigure.SpringBootApplication;
import org.springframework.web.bind.annotation.PathVariable;
import org.springframework.web.bind.annotation.RequestMapping;
import org.springframework.web.bind.annotation.RestController;

@SpringBootApplication
@RestController
public class HttpProviderApplication {

    public static void main(String[] args) {
        SpringApplication.run(HttpProviderApplication.class, args);
    }

    /**
     * Provide callable interfaces for clients
     */
    @RequestMapping("/call/{name}")
    public String call(@PathVariable String name) {
        return "I'm Provider. Received a message from: " + name;
    }
}
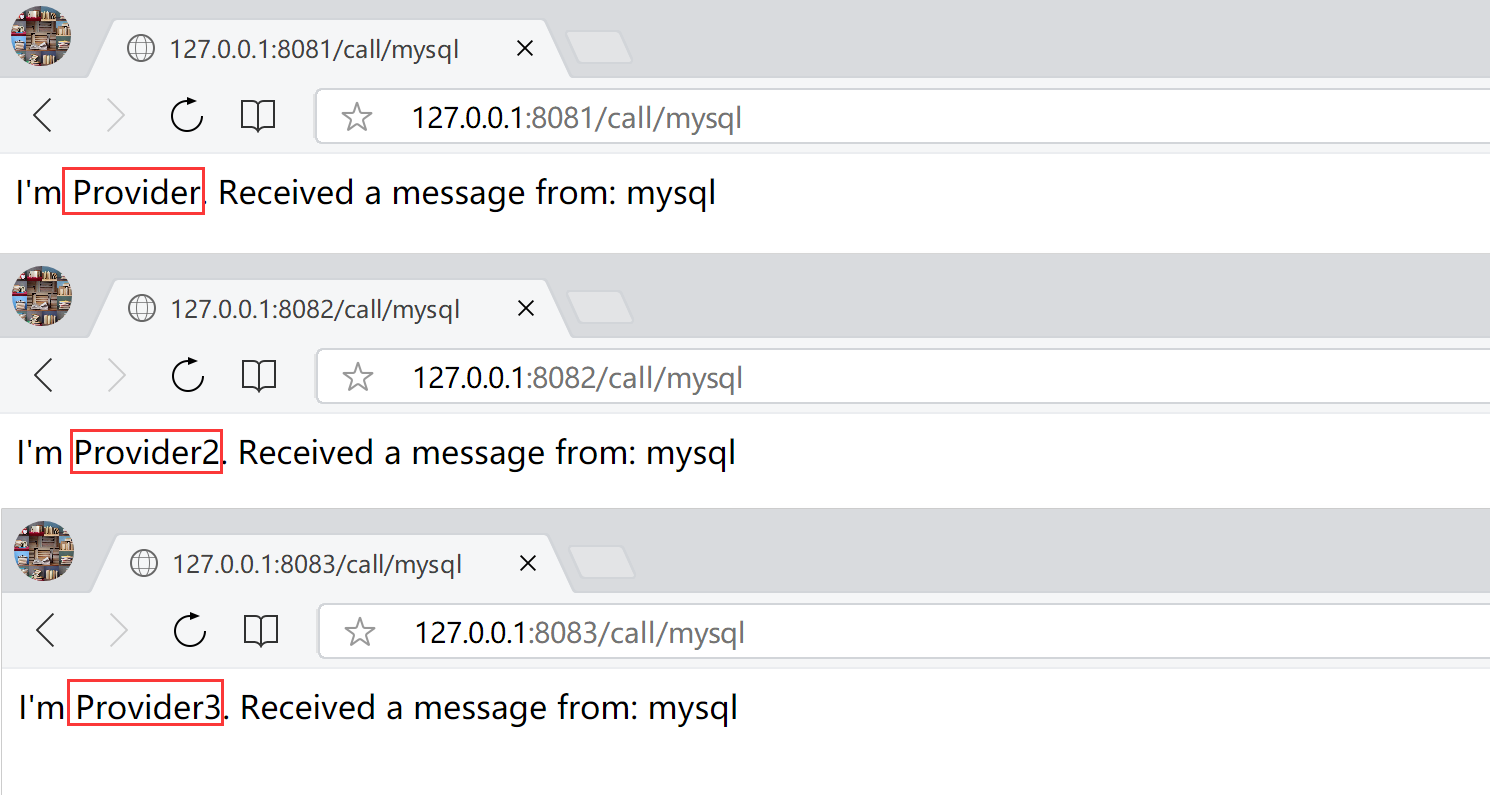
Then use the same method to create two more service providers, and the final corresponding port numbers are:
127.0.0.1:8081
127.0.0.1:8082
127.0.0.1:8083
The contents printed by the three service providers are "I'm provider..." “I'm Provider2...”, “I'm Provider3...”, As shown in the figure below:
1.2 create service Caller: Consumer
The core of this article is the implementation code of the service caller, which is created in a way similar to that of the service provider.
Step 1: create a Spring Boot project and add spring web and Nacos discovery dependencies. The specific dependencies are as follows:
<dependency>
  <groupId>org.springframework.boot</groupId>
  <artifactId>spring-boot-starter-web</artifactId>
</dependency>
<!-- add to Nacos support -->
<dependency>
  <groupId>com.alibaba.cloud</groupId>
  <artifactId>spring-cloud-starter-alibaba-nacos-discovery</artifactId>
</dependency>
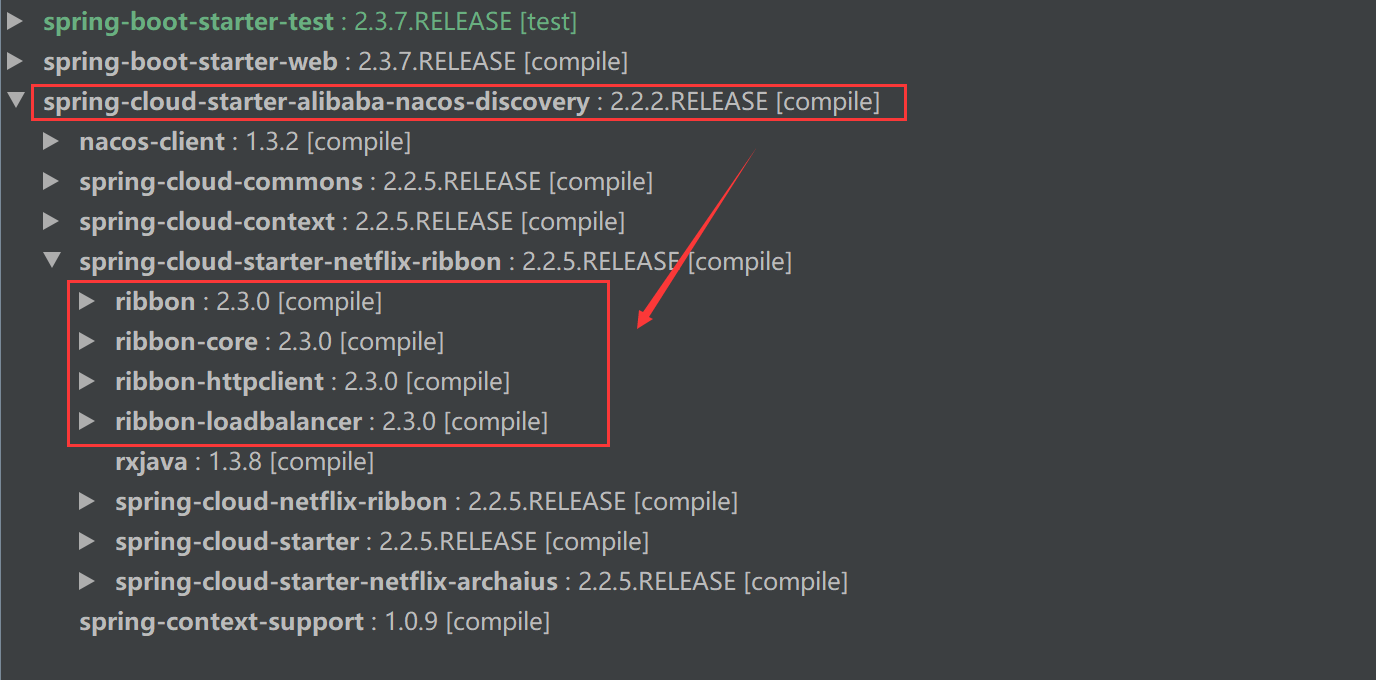
Some people may have questions. The title of this article is Spring Cloud Alibaba Nacos + Ribbon. Why not add Ribbon dependencies?
This is because the Ribbon framework has been built in Spring Cloud Alibaba Nacos. You can see it clearly by opening the dependency tree of the project, as shown in the following figure:
Step 2: set Nacos related configuration in application Add the following configuration to YML:
spring:
  application:
    name: springcloud-nacos-consumer # Project name (service name registered by nacos)
  cloud:
    nacos:
      discovery:
        username: nacos # nacos login user name
        password: nacos666 # nacos password
        server-addr: 127.0.0.1:8848 # nacos server address
server:
  port: 8091 # Project startup port number
Step 3: in the project startup class, use Spring Java Config to declare the RestTemplate object, as shown in the following code:
import org.springframework.boot.SpringApplication;
import org.springframework.boot.autoconfigure.SpringBootApplication;
import org.springframework.context.annotation.Bean;
import org.springframework.web.client.RestTemplate;

@SpringBootApplication
public class RibbonCodeConsumerApplication {

    public static void main(String[] args) {
        SpringApplication.run(RibbonCodeConsumerApplication.class, args);
    }

    /**
     * Declare RestTemplate in Spring Java Config mode
     */
    @Bean
    RestTemplate restTemplate() {
        return new RestTemplate();
    }
}
Step 4: use RestTemplate + Ribbon code to call the service. First, use the choose method of LoadBalancerClient object provided by Ribbon to obtain a healthy service instance according to the service id in Nacos. The service instance contains the IP address and port number of the service, and then use RestTemplate to access the service according to the obtained IP and port number, The specific implementation code is as follows:
import org.springframework.cloud.client.ServiceInstance;
import org.springframework.cloud.client.loadbalancer.LoadBalancerClient;
import org.springframework.web.bind.annotation.GetMapping;
import org.springframework.web.bind.annotation.RequestParam;
import org.springframework.web.bind.annotation.RestController;
import org.springframework.web.client.RestTemplate;
import javax.annotation.Resource;

@RestController
public class ConsumerController {
    // Load balancing objects provided by Ribbon
    @Resource
    private LoadBalancerClient loadBalancerClient;

    // Spring provides Restful request objects
    @Resource
    private RestTemplate restTemplate;

    @GetMapping("/consumer")
    public String consumer(@RequestParam String name) {
        // Get the service provided by the instance of the object based on the service id + Ribbon
        ServiceInstance serviceInstance = loadBalancerClient.choose("springcloud-nacos-provider");
        // Get the ip address in the service instance
        String ip = serviceInstance.getHost();
        // Gets the port number in the service instance
        int port = serviceInstance.getPort();
        // Use restTemplate to request and get the result
        String result = restTemplate.getForObject("http://" + ip + ":" + port + "/call/" + name,String.class);
        return result;
    }
}
The execution results of the above procedures are shown in the figure below:
2. Annotation mode call
It's much easier to call a service with annotation. The creation method of the service provider is the same as that above. I won't repeat it here. Next, let's create a service caller Consumer with annotation.
Step 1: create a Spring Boot project and add spring web and Nacos discovery dependencies. The specific dependencies are as follows:
<dependency>
  <groupId>org.springframework.boot</groupId>
  <artifactId>spring-boot-starter-web</artifactId>
</dependency>
<!-- add to Nacos support -->
<dependency>
  <groupId>com.alibaba.cloud</groupId>
  <artifactId>spring-cloud-starter-alibaba-nacos-discovery</artifactId>
</dependency>
Step 2: set Nacos related configuration in application Add the following configuration to YML:
spring:
  application:
    name: springcloud-nacos-consumer # Project name (service name registered by nacos)
  cloud:
    nacos:
      discovery:
        username: nacos # nacos login user name
        password: nacos666 # nacos password
        server-addr: 127.0.0.1:8848 # nacos server address
server:
  port: 8092 # Project startup port number
Step 3: in the project startup class, use Spring Java Config to declare the RestTemplate object. In this step, you need to add @ LoadBalanced annotation on the RestTemplate object. After adding this annotation, the RestTemplate object can automatically support load balancing, as shown in the following code:
import org.springframework.boot.SpringApplication;
import org.springframework.boot.autoconfigure.SpringBootApplication;
import org.springframework.cloud.client.loadbalancer.LoadBalanced;
import org.springframework.context.annotation.Bean;
import org.springframework.web.client.RestTemplate;

@SpringBootApplication
public class RibbonAnnotationConsumerApplication {

    public static void main(String[] args) {
        SpringApplication.run(RibbonAnnotationConsumerApplication.class, args);
    }

    @LoadBalanced // Make RestTemplate automatically support Ribbon load balancing
    @Bean
    public RestTemplate restTemplate() {
        return new RestTemplate();
    }
}
Step 4: create a client request method. The specific implementation code is as follows:
import org.springframework.web.bind.annotation.GetMapping;
import org.springframework.web.bind.annotation.RequestParam;
import org.springframework.web.bind.annotation.RestController;
import org.springframework.web.client.RestTemplate;

import javax.annotation.Resource;

@RestController
public class ConsumerController {
    @Resource
    private RestTemplate restTemplate;

    @GetMapping("/consumer")
    public String consumer(@RequestParam String name) {
        // Request and obtain the result (springcloud Nacos provider is the Nacos service id)
        String result = restTemplate.getForObject("http://springcloud-nacos-provider/call/" + name, String.class);
        return result;
    }
}
The execution results of the above procedures are shown in the figure below:

Analysis of annotation implementation principle
The key to load balancing is how to call @ balancedbrestemplate to realize the load balancing of the service?
To know the answer to this question, you have to read the source code of loadbalancer autoconfiguration. Loadbalancenautoconfiguration is an automatic assembly class that implements the client-side load balancer. It starts with the start of Spring. Its source code has a lot of content. Let's intercept some core methods here:
@Bean
public SmartInitializingSingleton loadBalancedRestTemplateInitializerDeprecated(final ObjectProvider<List<RestTemplateCustomizer>> restTemplateCustomizers) {
    return () -> {
        restTemplateCustomizers.ifAvailable((customizers) -> {
            Iterator var2 = this.restTemplates.iterator();

            while(var2.hasNext()) {
                RestTemplate restTemplate = (RestTemplate)var2.next();
                Iterator var4 = customizers.iterator();

                while(var4.hasNext()) {
                    RestTemplateCustomizer customizer = (RestTemplateCustomizer)var4.next();
                    customizer.customize(restTemplate);
                }
            }

        });
    };
}
Here's this restTemplates. Iterator () refers to all RestTemplate objects modified by @ LoadBalanced annotation. All RestTemplate objects modified by @ LoadBalanced will be forcibly transformed into RestTemplateCustomizer objects. The implementation source code of this object is as follows:
@Bean
@ConditionalOnMissingBean
public RestTemplateCustomizer restTemplateCustomizer(final LoadBalancerInterceptor loadBalancerInterceptor) {
    return (restTemplate) -> {
        List<ClientHttpRequestInterceptor> list = new ArrayList(restTemplate.getInterceptors());
        list.add(loadBalancerInterceptor);
        restTemplate.setInterceptors(list);
    };
}
That is, all RestTemplate objects modified by the @ LoadBalanced annotation will be added with an interceptor of loadBalancerInterceptor. The implementation source code of the interceptor is as follows:
public class LoadBalancerInterceptor implements ClientHttpRequestInterceptor {
    private LoadBalancerClient loadBalancer;
    private LoadBalancerRequestFactory requestFactory;

    public LoadBalancerInterceptor(LoadBalancerClient loadBalancer, LoadBalancerRequestFactory requestFactory) {
        this.loadBalancer = loadBalancer;
        this.requestFactory = requestFactory;
    }

    public LoadBalancerInterceptor(LoadBalancerClient loadBalancer) {
        this(loadBalancer, new LoadBalancerRequestFactory(loadBalancer));
    }

    public ClientHttpResponse intercept(final HttpRequest request, final byte[] body, final ClientHttpRequestExecution execution) throws IOException {
        URI originalUri = request.getURI();
        String serviceName = originalUri.getHost();
        Assert.state(serviceName != null, "Request URI does not contain a valid hostname: " + originalUri);
        return (ClientHttpResponse)this.loadBalancer.execute(serviceName, this.requestFactory.createRequest(request, body, execution));
    }
}
It can be seen from the above source code that the execution process of @ LoadBalanced is that the RestTemplate object modified by the @ LoadBalanced annotation will be intercepted by the LoadBalancerInterceptor interceptor. After interception, use the LoadBalancerClient object to obtain a healthy service instance according to the load balancing strategy, and then call the instance method through the IP and port of the service instance, This completes the service request.
summary
Nacos calls Restful service through the built-in Ribbon framework. It has two calling methods, which can be completed by code or annotation. The annotation method is relatively simple to use. You only need to add an @ LoadBalanced annotation on the RestTemplate object to give the request object the ability of load balancing.
Right and wrong are judged by ourselves, bad reputation is heard by others, and the number of gains and losses is safe.
Official account: Java Chinese community
Java interview collection: https://gitee.com/mydb/interview