1. What is micro service
1.1 origin of microservices:
Microservices were first proposed by Martin Fowler and James Lewis in 2014. Microservice architecture style is a way to use a set of small services to develop a single application. Each service runs in its own process and uses lightweight mechanisms to communicate, usually HTTP API s. These services are built based on business capabilities, These services can be deployed independently through automatic deployment mechanism. These services are implemented in different programming languages and different data storage technologies, and maintain the minimum centralized management.
1.2 advantages of microservices:
(1) Each module of microservice is equivalent to a separate project, the amount of code is significantly reduced, and the problems encountered are relatively easy to solve.
(2) Each module of microservice can use different storage methods (for example, some use redis, some use mysql, etc.), and the database is also a database corresponding to a single module.
(3) Each module of microservice can use different development technologies, and the development mode is more flexible.
1.3 essence of micro service:
(1) In fact, the key to microservices is not just the microservices themselves, but the system should provide a set of basic architecture, which enables microservices to be deployed, run and upgraded independently. Moreover, this system architecture also makes microservices and microservices "loosely coupled" in structure and unified in function. This so-called "unified whole" shows a unified style interface, unified authority management, unified security policy, unified online process, unified log and audit methods, unified scheduling mode, unified access entrance and so on.
(2) The purpose of microservices is to effectively split applications and realize agile development and deployment.
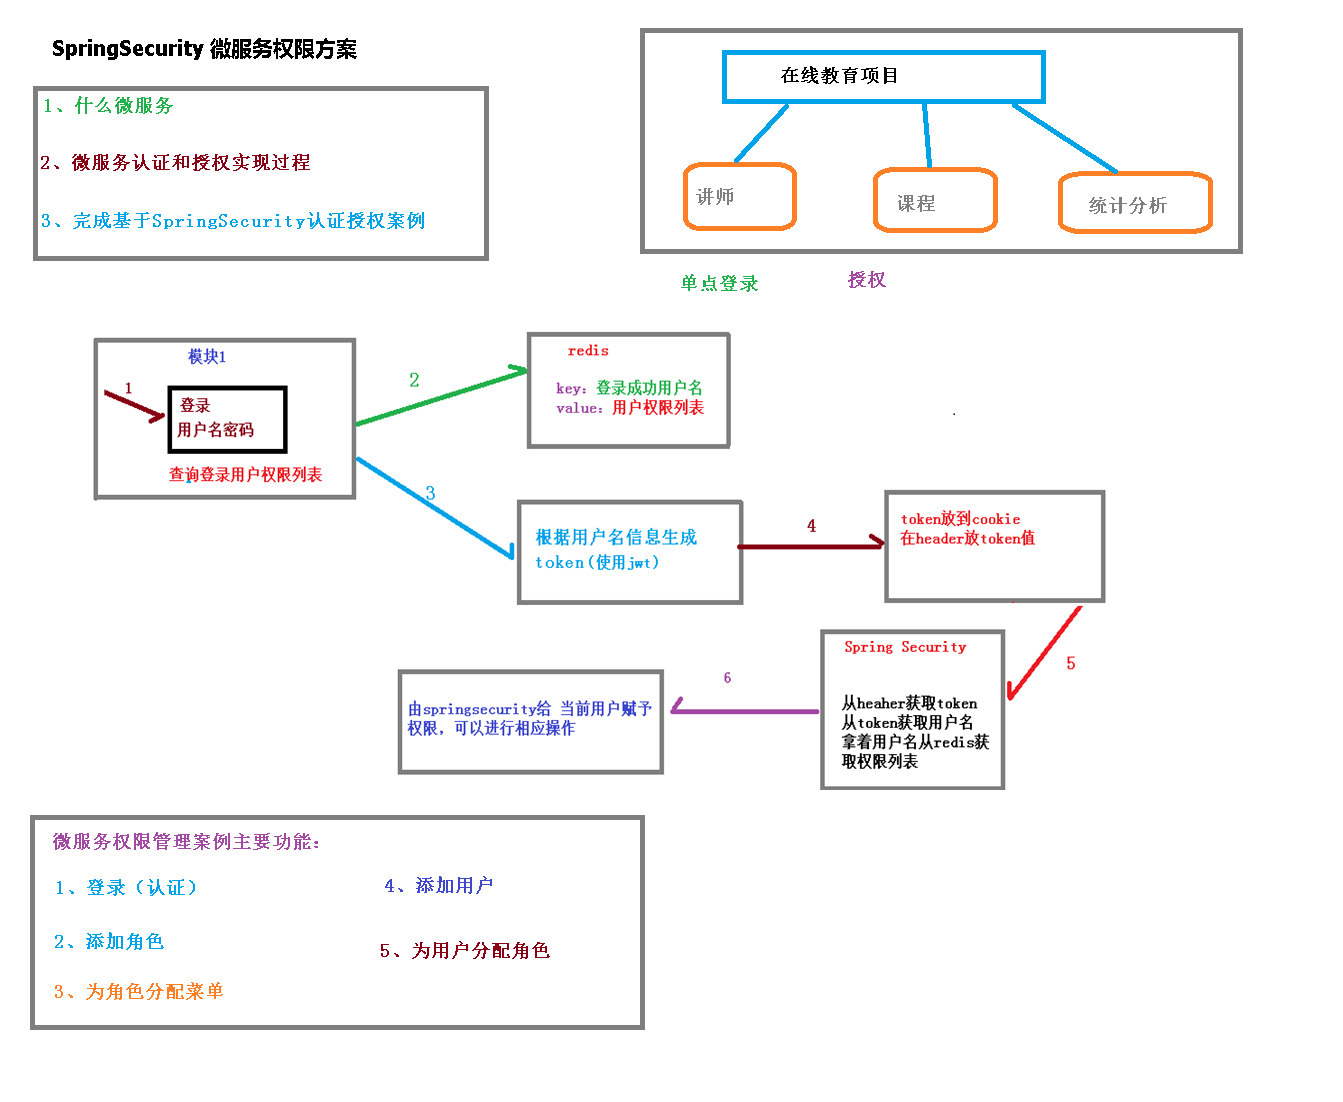
2. Implementation ideas of micro service authentication and authorization
2.1 analysis of certification and authorization process:
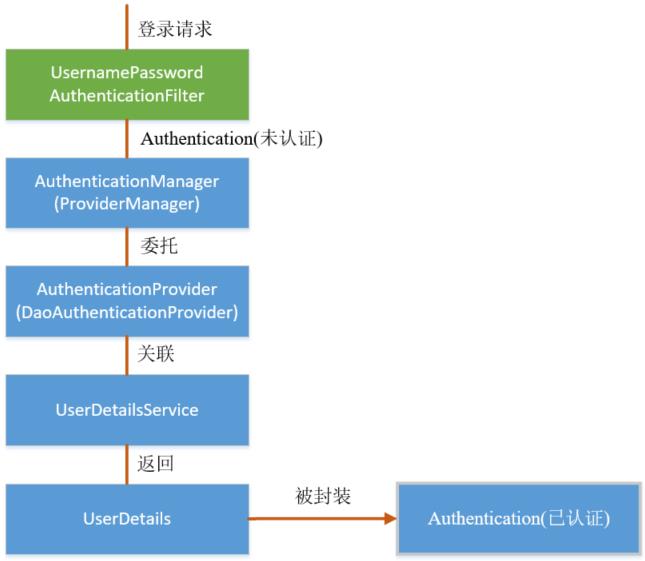
(1) If it is based on session, spring security will parse the session ID in the cookie, find the session information stored by the server, and then judge whether the current user meets the requirements of the request.
(2) If it is a token, the token is parsed, and then the current request is added to the permission information managed by spring security.

If there are many modules in the system, each module needs authorization and authentication, so we choose the form of token based authorization and authentication. The user successfully authenticates according to the user name and password, then obtains a series of permission values of the current user role, and stores them in the redis cache in the form of user name as key and permission list as value, A token return is generated according to the user name related information. The browser records the token in the cookie. Each time the api interface is called, the token is carried into the header request header by default. Spring security parses the header header to obtain the token information, parses the token to obtain the current user name, and obtains the permission list from redis according to the user name, In this way, spring security can determine whether the current request has access permission.
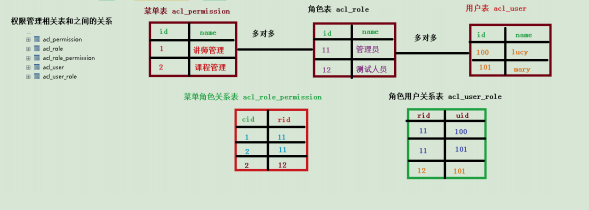
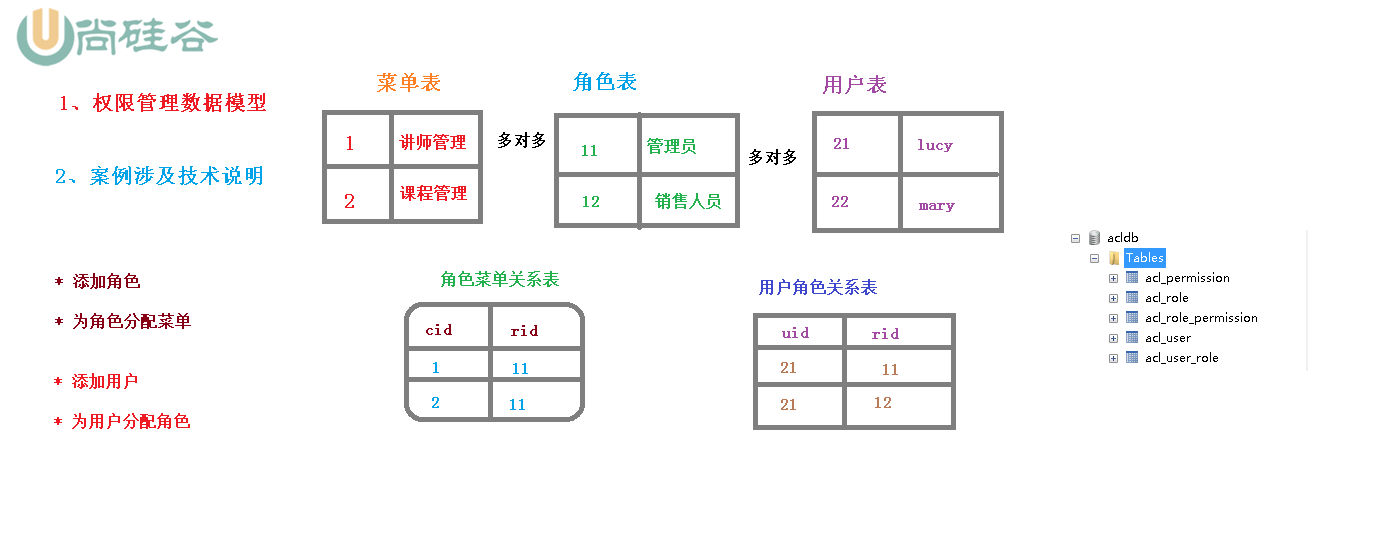
2.2 permission management data model:
2.3JWT introduction:
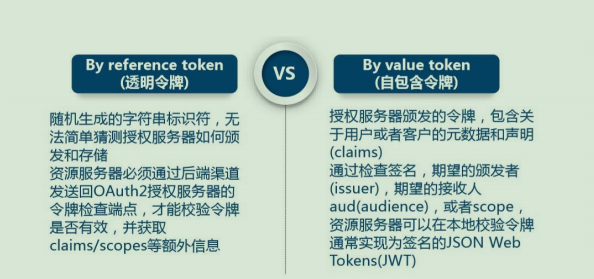
1. Type of access token:
2.JWT composition:
Typically, a JWT looks like the following figure:
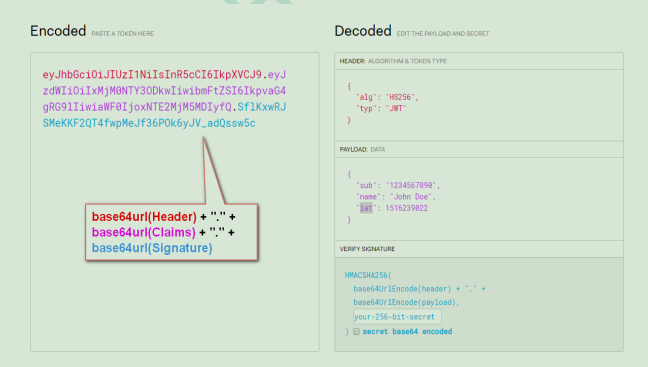
The object is a very long string, and the characters are divided into three substrings by the "." separator.
Each substring represents a function block, which has the following three parts: JWT header, payload and signature.
JWT head
The JWT header is a JSON object that describes JWT metadata, usually as shown below.
{
	"alg": "HS256",
	"typ": "JWT"
}
In the above code, the alg attribute indicates the algorithm used for signature, and the default is HMAC SHA256 (written as HS256);
The typ attribute indicates the type of token. JWT tokens are uniformly written as JWT. Finally, use the Base64 URL algorithm to
The JSON object is converted to a string and saved.
Payload
The payload part is the main content part of JWT. It is also a JSON object that contains the data to be passed. JWT specifies seven default fields to choose from.
iss: issuer
exp: expiration time
sub: subject
aud: user
nbf: not available before
iat: release time
jti: JWT ID is used to identify the JWT
In addition to the above default fields, we can also customize private fields, as shown in the following example:
{
	"sub": "1234567890",
	"name": "Helen",
	"admin": true
}
Note that JWT is unencrypted by default and anyone can interpret its content, so don't build private information
Field to store confidential information to prevent information disclosure.
JSON objects are also saved as strings using the Base64 URL algorithm.
Signature hash
The signature hash part is to sign the above two parts of data and generate hash through the specified algorithm to ensure that the data will not be tampered with.
First, you need to specify a password (secret). The password is only stored in the server and cannot be disclosed to the user. Then, the signature is generated according to the following formula using the signature algorithm specified in the header (HMAC SHA256 by default).
HMACSHA256(base64UrlEncode(header) + ".. + base64UrlEncode(claims), secret) after calculating the signature hash, the JWT header, payload and signature hash are combined into a string, and each part is separated by". "To form the whole JWT object.
Base64URL algorithm
As mentioned earlier, Base64URL is used in both JWT header and payload serialization algorithms. The algorithm is similar to the common Base64 algorithm with slight difference.
JWT as a token can be placed in the URL (for example, api.example/?token=xxx). The three characters used in Base64 are "+", "/" and "=". Because they have special meanings in the URL, they are replaced in Base64URL: "=" remove, "+" use "-" replace, "/" use "", which is the Base64URL algorithm.
2.4 specific code implementation:
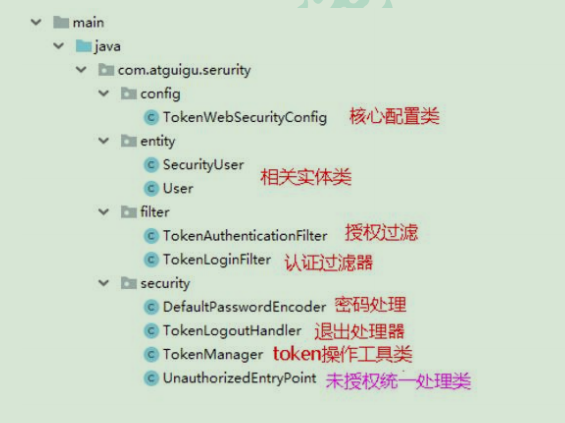
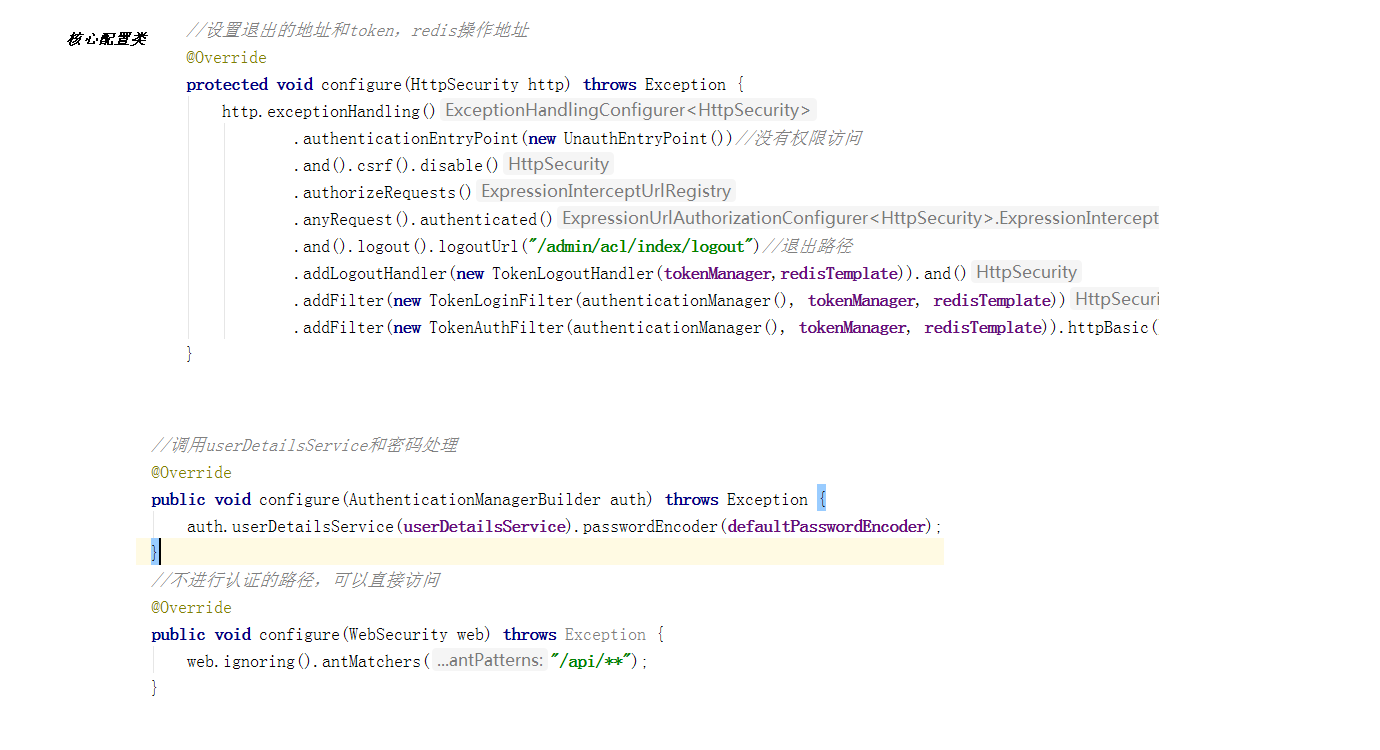
1. Write core configuration class
The core configuration of Spring Security is the configuration that inherits WebSecurityConfigurerAdapter and annotates * * @ EnableWebSecurity * *. This configuration indicates the user name and password processing method, request path, login and logout control and other security related configurations;
@Configuration
@EnableWebSecurity
@EnableGlobalMethodSecurity(prePostEnabled = true)
public class TokenWebSecurityConfig extends WebSecurityConfigurerAdapter {
	 //Custom query database user name, password and permission information
	 private UserDetailsService userDetailsService;
	 //Token management tool class (generate token)
	 private TokenManager tokenManager;
	 //Password management tool class
	 private DefaultPasswordEncoder defaultPasswordEncoder;
	 //redis operation tool class
	 private RedisTemplate redisTemplate;
	 @Autowired
	 public TokenWebSecurityConfig(UserDetailsService userDetailsService,
	 DefaultPasswordEncoder defaultPasswordEncoder,TokenManager tokenManager, RedisTemplate  redisTemplate) {
		 this.userDetailsService = userDetailsService;
		 this.defaultPasswordEncoder = defaultPasswordEncoder;
		 this.tokenManager = tokenManager;
		 this.redisTemplate = redisTemplate;
	 }
	 /**
	 * configuration setting
	 */
	 //Set the exit address, token and redis operation address
	 @Override
	 protected void configure(HttpSecurity http) throws Exception {
		 http.exceptionHandling()
		 .authenticationEntryPoint(new UnauthorizedEntryPoint())
		 .and().csrf().disable()
		 .authorizeRequests()
		 .anyRequest().authenticated()
		 .and().logout().logoutUrl("/admin/acl/index/logout")
		 .addLogoutHandler(new
		 TokenLogoutHandler(tokenManager,redisTemplate)).and()
		 .addFilter(new TokenLoginFilter(authenticationManager(),
		 tokenManager, redisTemplate))
		 .addFilter(new  TokenAuthenticationFilter(authenticationManager(), tokenManager,  redisTemplate)).httpBasic();
	 }
	 /**
	 * Password processing
	 */
	 @Override
	 public void configure(AuthenticationManagerBuilder auth) throws Exception {
		auth.userDetailsService(userDetailsService).passwordEncoder(defaultPasswordEncoder);
	 }
	 /**
	 * Configure which requests are not intercepted
	 */
	 @Override
	 public void configure(WebSecurity web) throws Exception {
		 web.ignoring().antMatchers("/api/**" , "/swagger-ui.html/**);
	 }
}
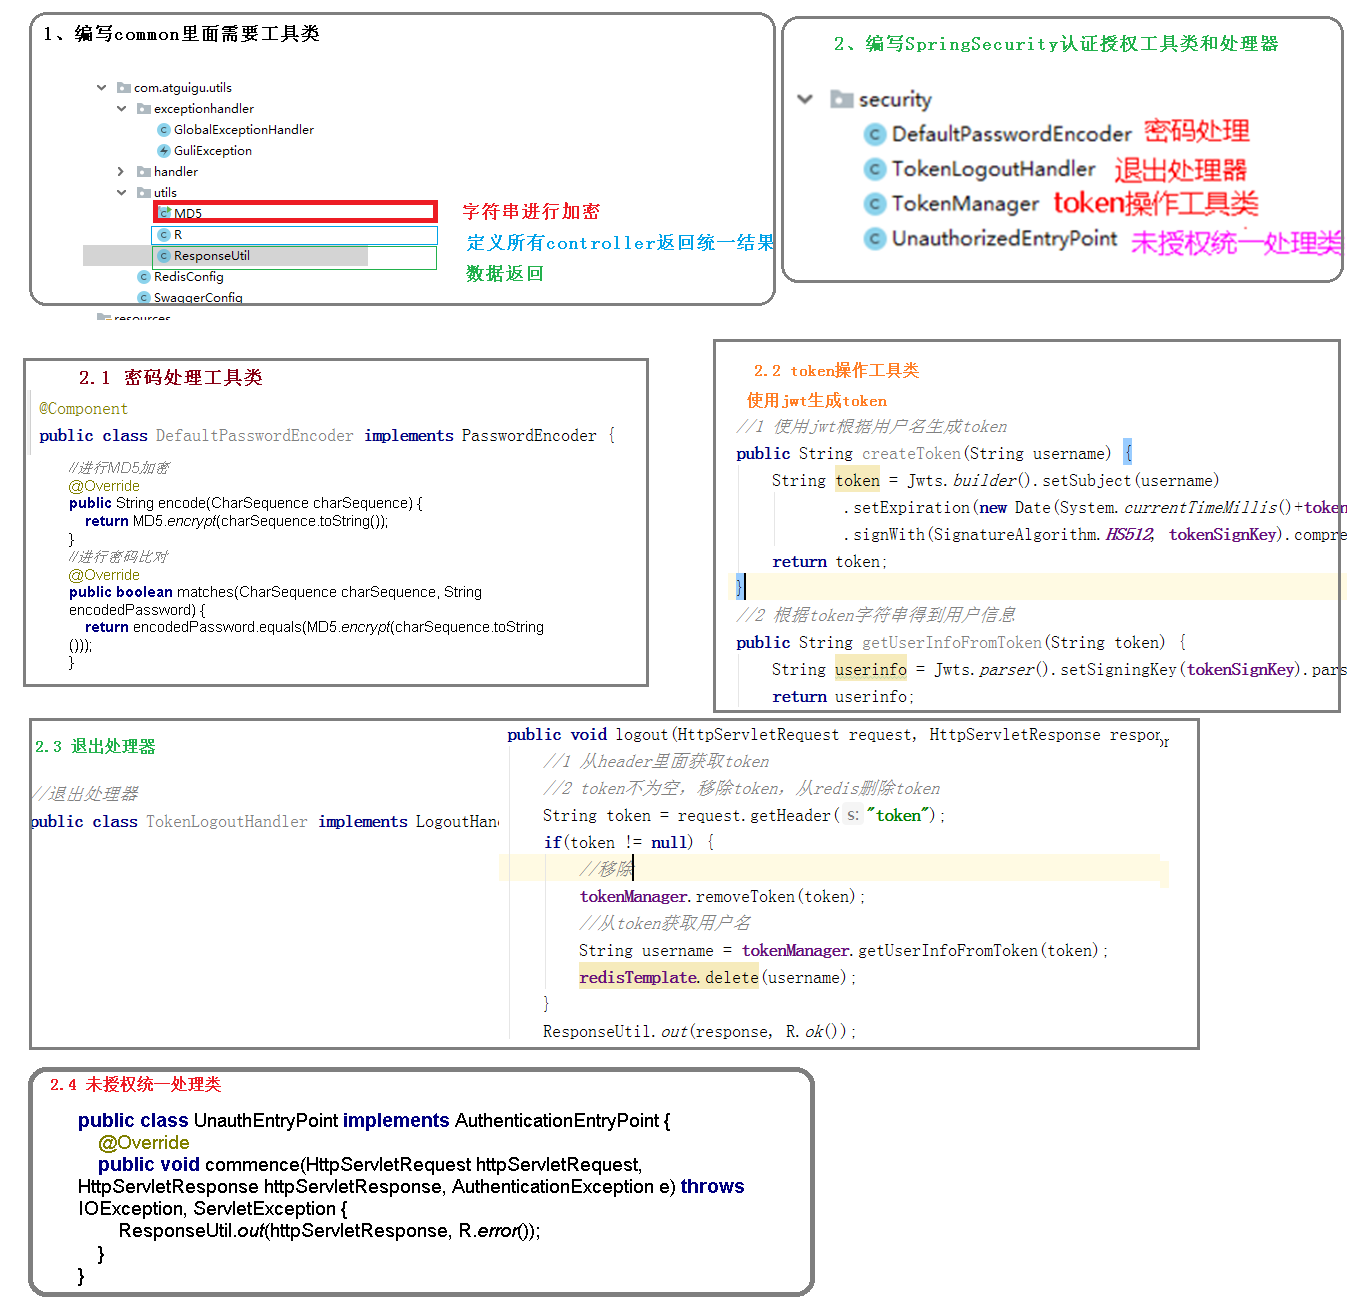
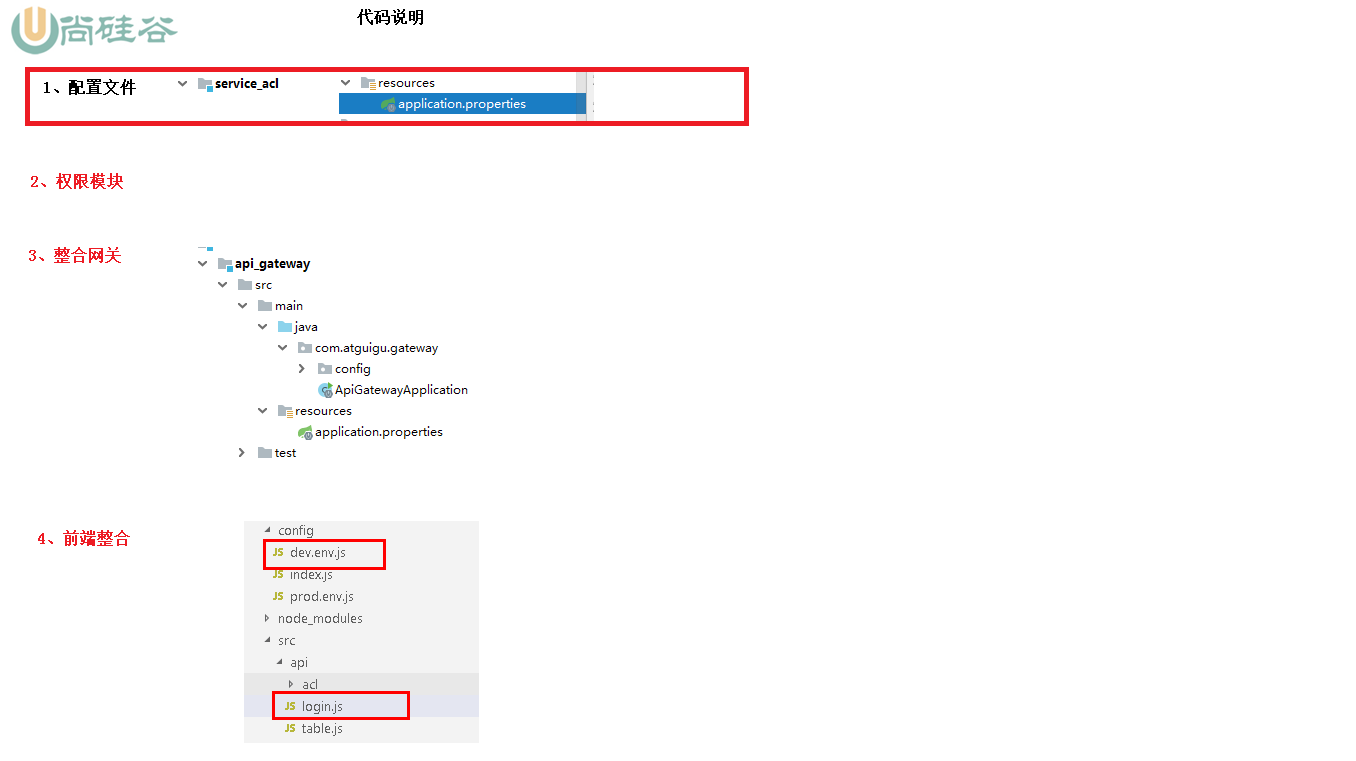
2. Create tool classes related to authentication and authorization
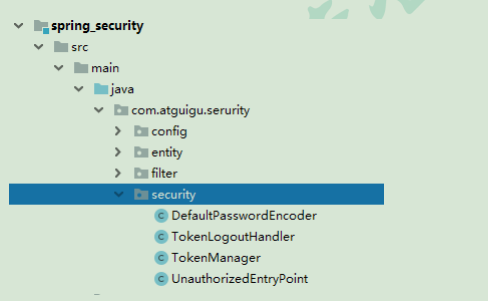
(1) DefaultPasswordEncoder: password processing method
@Component
public class DefaultPasswordEncoder implements PasswordEncoder {
	 public DefaultPasswordEncoder() {
	 	this(-1);
	 }
	 /**
	 * @param strength
	 * the log rounds to use, between 4 and 31
	 */
	 public DefaultPasswordEncoder(int strength) {
	 }
	 public String encode(CharSequence rawPassword) {
		 return MD5.encrypt(rawPassword.toString());
	 }
	 public boolean matches(CharSequence rawPassword, String encodedPassword) {
	 	 return encodedPassword.equals(MD5.encrypt(rawPassword.toString()));
	 }
}
(2) TokenManager: tool class of token operation
@Component
public class TokenManager {
	 private long tokenExpiration = 24*60*60*1000;
	 private String tokenSignKey = "123456";
	 public String createToken(String username) {
		 String token = Jwts.builder().setSubject(username)
		 .setExpiration(new Date(System.currentTimeMillis() + tokenExpiration))
	 	 .signWith(SignatureAlgorithm.HS512, tokenSignKey).compressWith(CompressionCodecs.GZIP).compact();
	 	 return token;
	 }
	 public String getUserFromToken(String token) {
	 	String user = Jwts.parser().setSigningKey(tokenSignKey).parseClaimsJws(token).getBody().getSubject();
	 	return user;
	 }
	 public void removeToken(String token) {
	 	//jwttoken does not need to be deleted, and the client can throw it away.
	 }
}
(3) TokenLogoutHandler: exit the implementation
public class TokenLogoutHandler implements LogoutHandler {
	 private TokenManager tokenManager;
	 private RedisTemplate redisTemplate;
	 public TokenLogoutHandler(TokenManager tokenManager, RedisTemplate redisTemplate) {
		 this.tokenManager = tokenManager;
		 this.redisTemplate = redisTemplate;
	 }
	 @Override
	 public void logout(HttpServletRequest request, HttpServletResponse response, Authentication authentication) {
		 String token = request.getHeader("token");
		 if (token != null) {
			 tokenManager.removeToken(token);
			 //Clear the permission data in the current user cache
			 String userName = tokenManager.getUserFromToken(token);
			 redisTemplate.delete(userName);
		 }
		 ResponseUtil.out(response, R.ok());
	}
}
(4) Unauthorized entrypoint: unified processing is not authorized
public class UnauthorizedEntryPoint implements AuthenticationEntryPoint {
	 @Override
	 public void commence(HttpServletRequest request, HttpServletResponse response,AuthenticationException authException) throws IOException, ServletException {
	 	ResponseUtil.out(response, R.error());
	 }
}
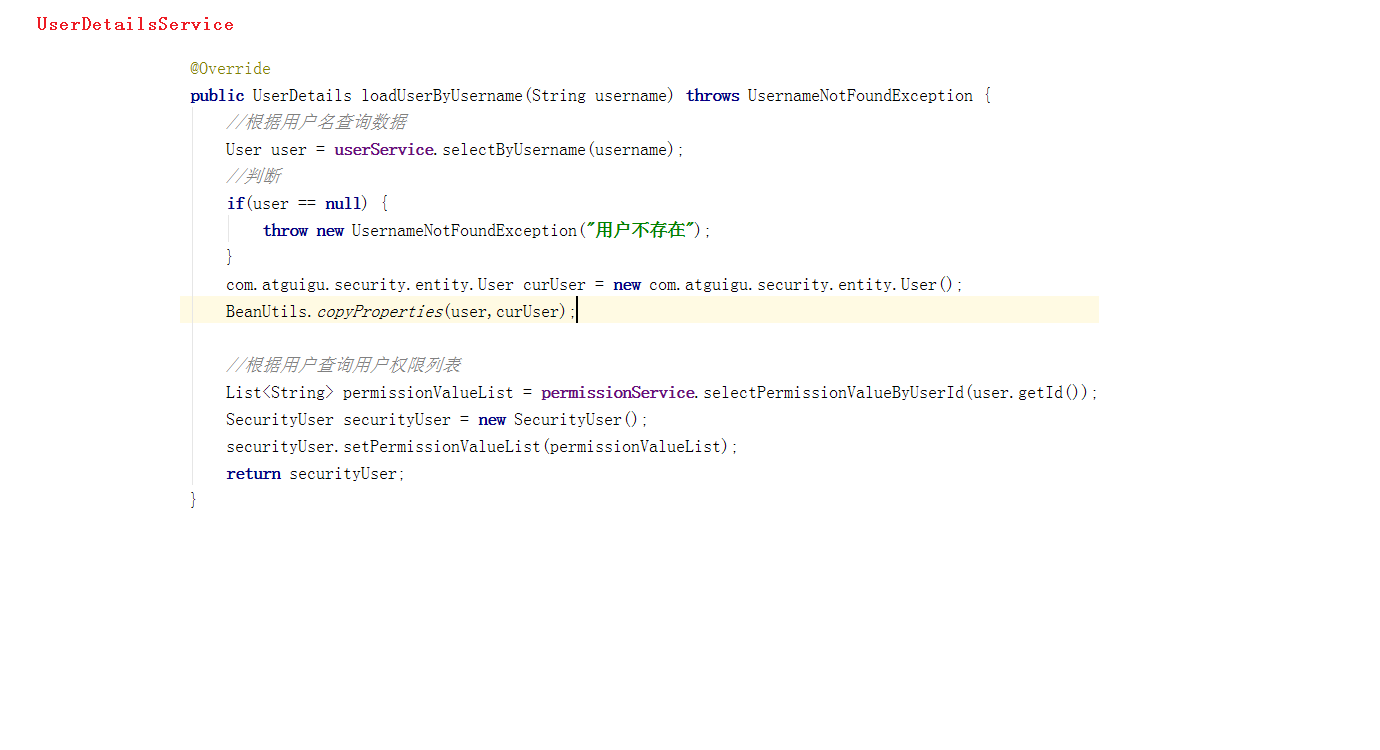
2. Create authentication authorization entity class
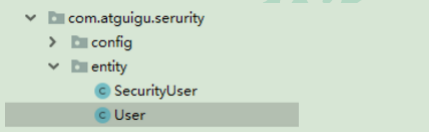
(1) SecutityUser
@Data
@Slf4j
public class SecurityUser implements UserDetails {
	 //Current login user
	 private transient User currentUserInfo;
	 //Current permissions
	 private List<String> permissionValueList;
	 public SecurityUser() {
	 }
	 public SecurityUser(User user) {
		 if (user != null) {
		 	this.currentUserInfo = user;
	 	}
	 }
	 @Override
	 public Collection<? extends GrantedAuthority> getAuthorities() {
	 Collection<GrantedAuthority> authorities = new ArrayList<>();
	 for(String permissionValue : permissionValueList) {
		 if(StringUtils.isEmpty(permissionValue)) continue;
		 SimpleGrantedAuthority authority = new SimpleGrantedAuthority(permissionValue);
		 authorities.add(authority);
		 }
	 	return authorities;
	 }
	 @Override
	 public String getPassword() {
		 return currentUserInfo.getPassword();
	 }
	 @Override
	 public String getUsername() {
	 	return currentUserInfo.getUsername();
	 }
	 @Override
	 public boolean isAccountNonExpired() {
	 	return true;
	 }
	 @Override
	 public boolean isAccountNonLocked() {
		 return true;
	 }
	 @Override
	 public boolean isCredentialsNonExpired() {
		 return true;
	 }
	 @Override
	 public boolean isEnabled() {
	 	return true;
	 }
}
(2)User
@Data
@ApiModel(description = "User entity class")
public class User implements Serializable {
	 private String username;
	 private String password;
	 private String nickName;
	 private String salt;
	 private String token;
}
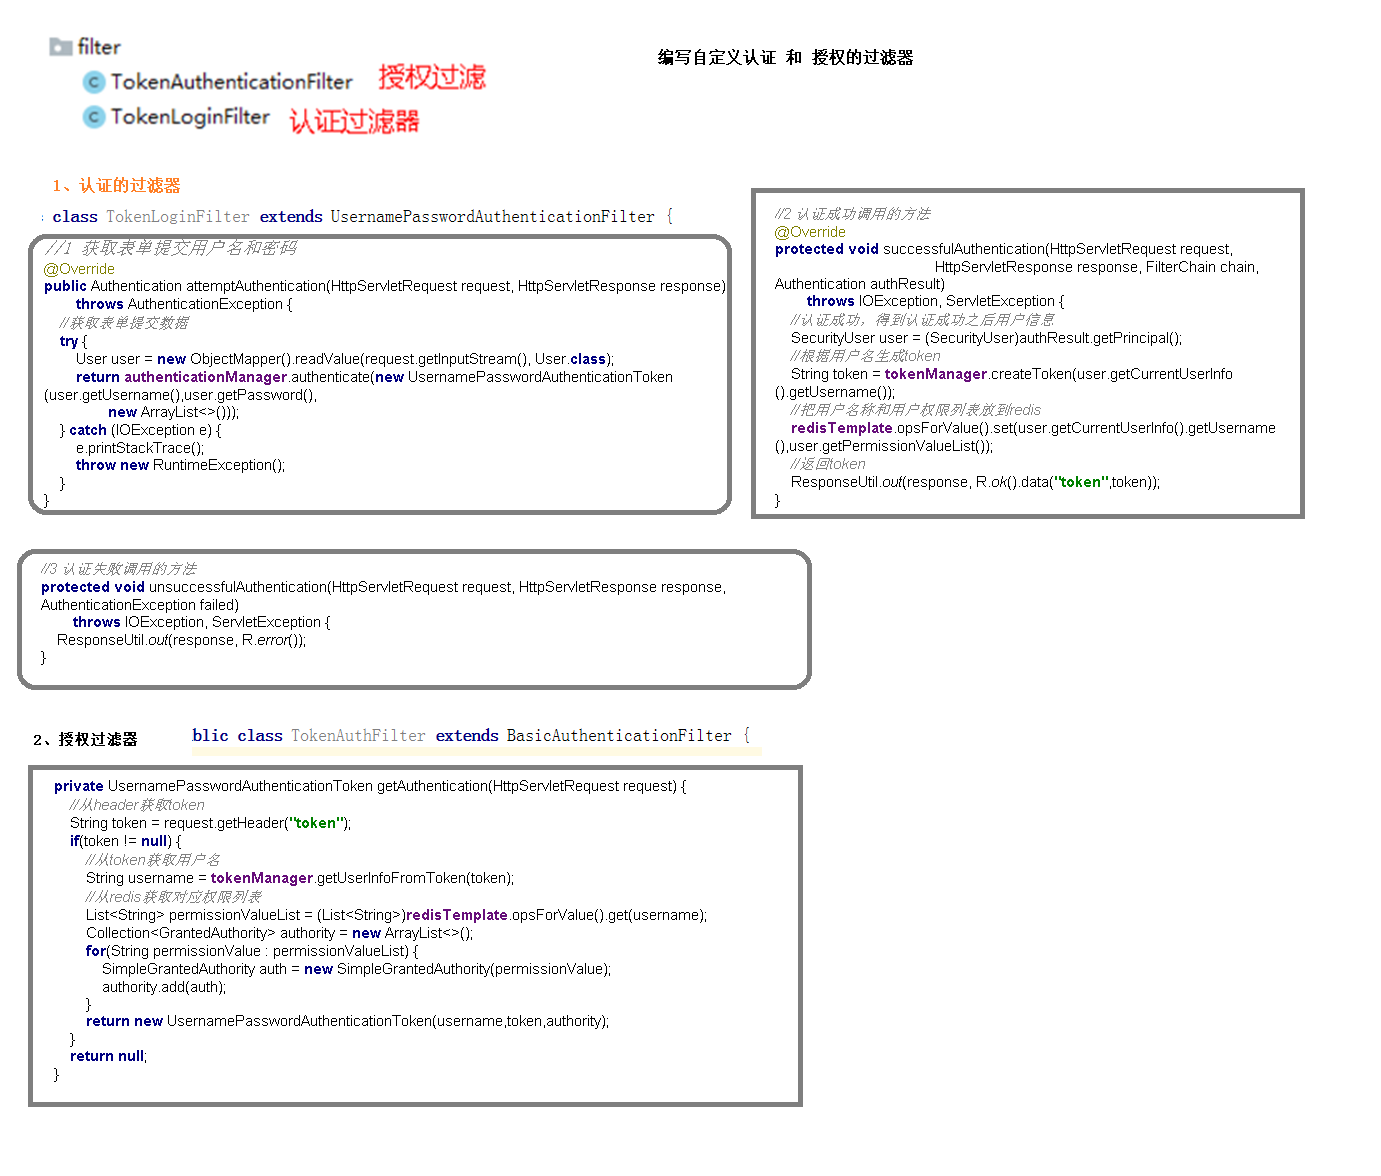
3. Create a filter for authentication and authorization

(1) TokenLoginFilter: an authenticated filter
public class TokenLoginFilter extends UsernamePasswordAuthenticationFilter {
	 private AuthenticationManager authenticationManager;
	 private TokenManager tokenManager;
	 private RedisTemplate redisTemplate;
	 public TokenLoginFilter(AuthenticationManager authenticationManager, TokenManager tokenManager, RedisTemplate redisTemplate) {
		 this.authenticationManager = authenticationManager;
		 this.tokenManager = tokenManager;
		 this.redisTemplate = redisTemplate;
		 this.setPostOnly(false);
		 this.setRequiresAuthenticationRequestMatcher(new AntPathRequestMatcher("/admin/acl/login","POST"));
	 }
	 @Override
	 public Authentication attemptAuthentication(HttpServletRequest req, HttpServletResponse res) throws AuthenticationException {
		 try {
			 User user = new ObjectMapper().readValue(req.getInputStream(), User.class);
			 return authenticationManager.authenticate(new UsernamePasswordAuthenticationToken(user.getUsername(), user.getPassword(), new ArrayList<>()));
		 } catch (IOException e) {
			 throw new RuntimeException(e);
		 }
	 }
	 /**
	 * Login succeeded
	 */
	 @Override
	 protected void successfulAuthentication(HttpServletRequest req, HttpServletResponse res, FilterChain chain, Authentication auth) throws IOException, ServletException {
		 SecurityUser user = (SecurityUser) auth.getPrincipal();
		 String token;
		 tokenManager.createToken(user.getCurrentUserInfo().getUsername());

		 redisTemplate.opsForValue().set(user.getCurrentUserInfo().getUsername(),
		 user.getPermissionValueList());
		 ResponseUtil.out(res, R.ok().data("token", token));
	 }
	 /**
	 * Login failed
	 */
	 @Override
	 protected void unsuccessfulAuthentication(HttpServletRequest request, HttpServletResponse response, AuthenticationException e) throws
	 IOException, ServletException {
	 	ResponseUtil.out(response, R.error());
	 }
}
(2) TokenAuthenticationFilter: authorization filter
public class TokenAuthenticationFilter extends BasicAuthenticationFilter {
	 private TokenManager tokenManager;
	 private RedisTemplate redisTemplate;
	 public TokenAuthenticationFilter(AuthenticationManager authManager, TokenManager tokenManager,RedisTemplate redisTemplate) {
		 super(authManager);
		 this.tokenManager = tokenManager;
		 this.redisTemplate = redisTemplate;
	 }
	 @Override
	 protected void doFilterInternal(HttpServletRequest req,HttpServletResponse res, FilterChain chain) throws IOException, ServletException {
			logger.info("================="+req.getRequestURI());
			 if(req.getRequestURI().indexOf("admin") == -1) {
			 	chain.doFilter(req, res);
				 return;
		 	}
		 	UsernamePasswordAuthenticationToken authentication = null;
		    try {
		 		authentication = getAuthentication(req);
		 	} catch (Exception e) {
		 		ResponseUtil.out(res, R.error());
		 	}
			 if (authentication != null) {
				SecurityContextHolder.getContext().setAuthentication(authentication);
			 } else {
		 		ResponseUtil.out(res, R.error());
		 	}
	 		chain.doFilter(req, res);
	 	}
	 private UsernamePasswordAuthenticationToken getAuthentication(HttpServletRequest request) {
	 // Put the token in the header
	 String token = request.getHeader("token");
	 if (token != null && !"".equals(token.trim())) {
	 	 String userName = tokenManager.getUserFromToken(token);
		 List<String> permissionValueList = (List<String>)
		 redisTemplate.opsForValue().get(userName);
		 Collection<GrantedAuthority> authorities = new ArrayList<>();
	 	for(String permissionValue : permissionValueList) {
	 		if(StringUtils.isEmpty(permissionValue)) continue;
			 SimpleGrantedAuthority authority = new SimpleGrantedAuthority(permissionValue);
			 authorities.add(authority);
		 }
	 	if (!StringUtils.isEmpty(userName)) {
		 return new UsernamePasswordAuthenticationToken(userName, token, authorities);
	 	}
	 	return null;
	 	}
	 	return null;
	 }
}
3. Complete flow chart


4. Summary of spring security principles
1 Introduction to spring security filters
Spring security adopts the design pattern of responsibility chain, which has a long filter chain. Now describe the 15 filters in this filter chain:
(1) WebAsyncManager integration filter: integrates the Security context with the WebAsyncManager used in spring web to handle asynchronous request mapping.
(2) SecurityContextPersistenceFilter: load the security context information related to the request into the SecurityContextHolder before each request is processed. After the request is processed, store the information about the request in the SecurityContextHolder into a "warehouse", and then clear the information in the SecurityContextHolder, For example, maintaining a user's security information in a Session is handled by this filter.
(3) HeaderWriterFilter: used to add header information to the response.
(4) CsrfFilter: used to handle cross site request forgery.
(5) LogoutFilter: used to process logout.
(6) UsernamePasswordAuthenticationFilter: used to process form based login requests and obtain user names and passwords from forms. Requests from / login are processed by default. When obtaining the user name and password from the form, the default form name values are username and password. These two values can be modified by setting the values of the usernameParameter and passwordParameter parameters of this filter.
(7) Defaultloginpagegenerating filter: if the login page is not configured, this filter will be configured during system initialization and used to generate a login form page when login is required.
(8) Basic authentication filter: detects and processes http basic authentication.
(9) Requestcachewarefilter: the cache used to process requests.
(10) Securitycontextholderawarererequestfilter: mainly used to wrap the request object request.
(11) AnonymousAuthenticationFilter: check whether an Authentication object exists in the SecurityContextHolder. If it does not exist, provide an anonymous Authentication for it.
(12) SessionManagementFilter: the filter that manages the session
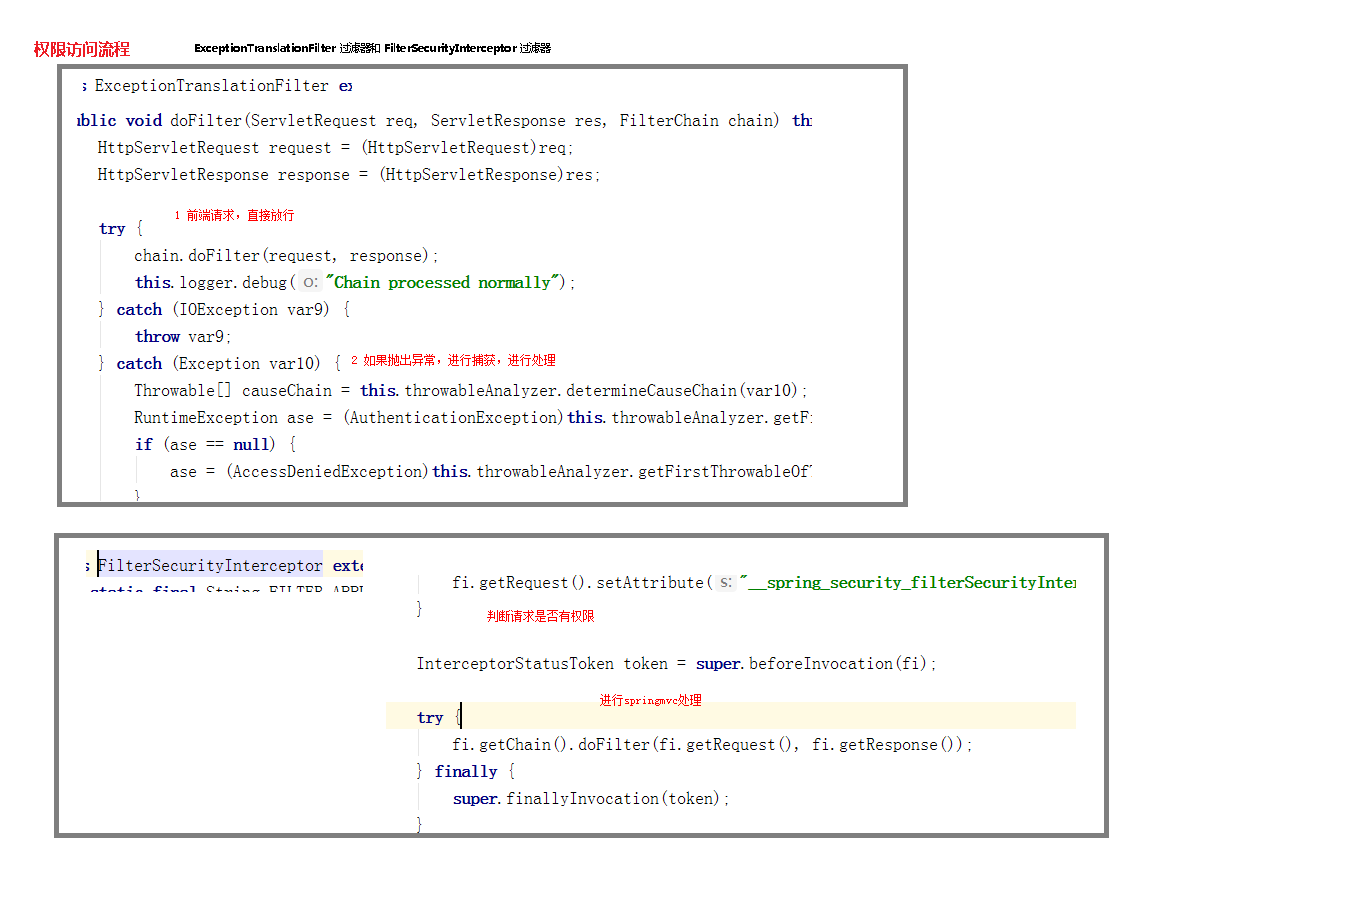
(13) ExceptionTranslationFilter: handles AccessDeniedException and AuthenticationException exceptions.
(14) FilterSecurityInterceptor: it can be regarded as the exit of the filter chain.
(15) RememberMeAuthenticationFilter: when a user directly accesses resources without logging in, find out the user's information from the cookie. If Spring Security can recognize the remember me cookie provided by the user, the user will not have to fill in the user name and password, but directly log in to the system. This filter is not enabled by default.
2. Basic process of spring security
Spring Security adopts a filter chain to realize authentication and authorization. Only when the current filter passes can it enter the next filter:
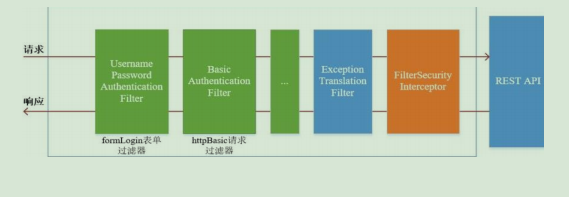
The green part is the authentication filter, which needs to be configured by ourselves. Multiple authentication filters can be configured. The authentication filter can use the authentication filter provided by Spring Security or customize the filter (for example, SMS authentication). The authentication filter should be configured in the configure(HttpSecurity http) method. If it is not configured, it will not take effect. The following three filters will be highlighted:
UsernamePasswordAuthenticationFilter: this filter will intercept the POST login form request submitted by the front end and authenticate the identity.
ExceptionTranslationFilter: this filter does not need to be configured by us. The requests submitted by the front end will be released directly, and the subsequent exceptions thrown will be caught and processed (for example, permission access restrictions).
FilterSecurityInterceptor filter: this filter is the last filter in the filter chain. It determines whether the current request has permission to access the corresponding resources according to the resource permission configuration. If access is restricted, relevant exceptions will be thrown and caught and processed by the ExceptionTranslationFilter filter.