( • ̀ ω •́ ) ✧ spring security intermediate
1, Expression based access control ⭐
access() can be used to realize the same functions as the permission control learned before.. antMatchers.access("expression or method") has a wide range of expressions, such as:. anyRequest.access(@ class name. Method): determine where to access through the url, and determine whether there is permission in combination with the obtained permission set (suitable for project development).
Custom method Demo:
1. Custom method
① Write SecurityAccess.java for the service layer
@Service
public class SecurityAccess {
	//Custom method
    public boolean authority(HttpServletRequest request, Authentication authentication){
        //Get permission list
        Collection<? extends GrantedAuthority> authorities = authentication.getAuthorities();
        if(!CollectionUtils.isEmpty(authorities)){
            //Get uri
            String uri=request.getRequestURI();
            //Get permission code through uri
            SimpleGrantedAuthority simple=new SimpleGrantedAuthority(uri);
            if(authorities.contains(simple)){
                return true;
            }
        }
        return false;
    }
}
2. Modify the configuration file SpringSecurityConfig.java
@SpringBootConfiguration
/*Expression and method permission control*/
public class SpringSecurityConfig4 extends WebSecurityConfigurerAdapter {
//Introduce handle
@Autowired
SecuritySuccessHandle securitySuccessHandle;
@Autowired
SecurityFailHandle securityFailHandle;
@Autowired
SecurityAccessDeniedHandler securityAccessDeniedHandler;
@Autowired
SecurityAccess securityAccess;
//Configure the implementation class of passwordEncode
@Bean
public PasswordEncoder passwordEncoder(){
return new BCryptPasswordEncoder();
}
//Override method configuration
@Override
protected void configure(HttpSecurity http) throws Exception {
//Turn off csrf
http.csrf().disable();
//Configure login page
http.formLogin()
.loginPage("/login.html")
.loginProcessingUrl("/login")
//Login succeeded handle
.successHandler(securitySuccessHandle)//Post request
//Login failed handle
.failureHandler(securityFailHandle)
//Configure login parameters
.usernameParameter("userName")
.passwordParameter("passWord");
//Permission configuration
http.authorizeRequests()
//Please allow access
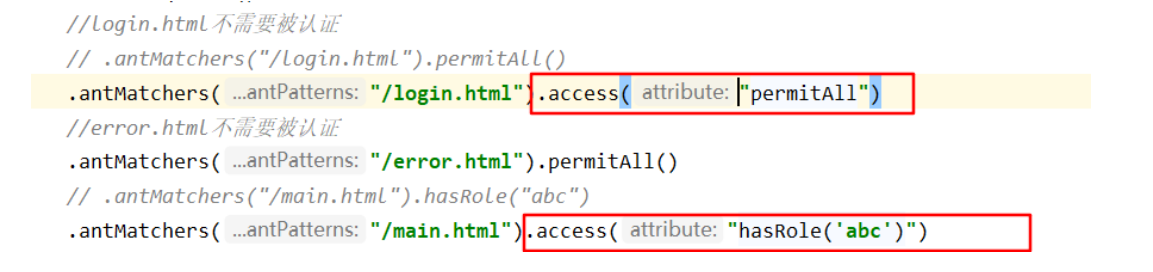
.antMatchers("/login.html","/login").permitAll()
//The resource is not accessed by anyone
.antMatchers("/denyall.html").denyAll()
//access() judged by Uri
.anyRequest().access("@securityAccess.authority(request,authentication)");
// Handling of 403 cases
http.exceptionHandling()
.accessDeniedHandler(securityAccessDeniedHandler);
}
}
3. Configure user permissions
@Service
/*Custom user*/
public class SpringSecurityService implements UserDetailsService {
    @Autowired
    private PasswordEncoder passwordEncoder;

    @Override
    public UserDetails loadUserByUsername(String s) throws UsernameNotFoundException {
        //Judge user name
        if(StringUtils.isEmpty(s)||!("admin".equals(s))){
            throw new UsernameNotFoundException("This user does not exist!");
        }
        //Password encryption
        String pw=passwordEncoder.encode("123456");
        //Return a user
        return new User(s,pw, AuthorityUtils.commaSeparatedStringToAuthorityList("/tomain"));
    }
}
//=========================================================
//The Controller sets a process for accessing / tomain
@GetMapping("/tomain")
    public String main(){
        return "Welcome to login";
    }
Through the above configuration, it can be concluded that only / tomain can be accessed. The following is the test


2, Annotation based access control ⭐
- First, you need to add comments on startup: @ EnableGlobalMethodSecurity(securedEnabled = true,prePostEnabled = true), where @ Secured: is specifically used to judge whether it has a ROLE. It can be written on a method or class. The parameters should start with ROLE. Second, both @ PreAuthorize and @ PostAuthorize are method or class level comments. Here, @ PreAuthorize is resolved
1. @ Secured and @ PreAuthorize small cases
Springsecurityconfig5. Java file:
@SpringBootConfiguration
/*Annotation permission control*/
public class SpringSecurityConfig5 extends WebSecurityConfigurerAdapter {
    //Introduce handle
    @Autowired
    SecuritySuccessHandle securitySuccessHandle;
    @Autowired
    SecurityFailHandle securityFailHandle;
    @Autowired
    SecurityAccessDeniedHandler securityAccessDeniedHandler;

    //Configure the implementation class of passwordEncode
    @Bean
    public PasswordEncoder passwordEncoder(){
        return new BCryptPasswordEncoder();
    }

    //Override method configuration
    @Override
    protected void configure(HttpSecurity http) throws Exception {
        //Turn off csrf
        http.csrf().disable();
        //Configure login page
        http.formLogin()
                .loginPage("/login.html")
                .loginProcessingUrl("/login")
                //Login succeeded handle
                .successHandler(securitySuccessHandle)//Post request
                //Login failed handle
                .failureHandler(securityFailHandle)
                //Configure login parameters
                .usernameParameter("userName")
                .passwordParameter("passWord");

        //Permission configuration
        http.authorizeRequests()
                //Please allow access
                .antMatchers("/login.html","/login").permitAll()
                //The resource is not accessed by anyone
                .antMatchers("/denyall.html").denyAll()
                //Configure other resources. You must be logged in to access them
                .anyRequest().authenticated();//Put last

                //Handling of 403 cases
                http.exceptionHandling()
                        .accessDeniedHandler(securityAccessDeniedHandler);

    }
}
//Nothing has changed
MainController .java:
@RestController
public class MainController {
@GetMapping("/tomain")
public String main(){
return "Welcome to login";
}
@PostMapping("/toagain")
public String toagain(){
return "Login failed, please try again<a href=\"/login.html\">Sign in</a>";
}
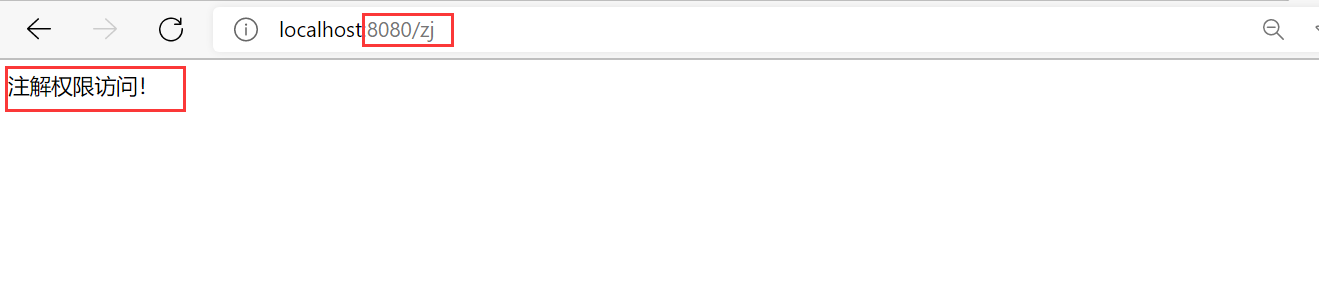
/*Annotation role access*/
@Secured({"ROLE_PP"})
@GetMapping("zj")
public String tozj(){
return "Annotation permission access!";
}
/*Annotation permission code access*/
@PreAuthorize("hasAuthority('1000')")
@GetMapping("ma")
public String toma(){
return "Annotation permission code access!";
}
Finally, add @ EnableGlobalMethodSecurity(securedEnabled = true,prePostEnabled = true) to the startup class
The above directly sets the annotation role control and permission code control, / zj and / ma can only be accessed by users whose role is ROLE_PP and permission code is 1000. The user permissions are set as follows:


Next level 🏓
3, Implementation of login free memberme function
- Introducing dependency mysql,mybatis(jdbc)
- Configure data source application.yml
- Configure persistence layer and designated user login free
1. Introduce dependency
 <parent>
    <groupId>org.springframework.boot</groupId>
    <artifactId>spring-boot-starter-parent</artifactId>
    <version>2.2.2.RELEASE</version>
    <relativePath/>
    <!-- lookup parent from repository -->
  </parent>

  <dependencies>
    <!--spring security assembly-->
    <dependency>
      <groupId>org.springframework.boot</groupId>
      <artifactId>spring-boot-starter-security</artifactId>
    </dependency>
    <!--web assembly-->
    <dependency>
      <groupId>org.springframework.boot</groupId>
      <artifactId>spring-boot-starter-web</artifactId>
    </dependency>
    <!-- test assembly-->
    <dependency>
      <groupId>org.springframework.boot</groupId>
      <artifactId>spring-boot-starter-test</artifactId>
      <scope>test</scope>
      <exclusions>
        <exclusion>
          <groupId>org.junit.vintage</groupId>
          <artifactId>junit-vintage-engine</artifactId>
        </exclusion>
      </exclusions>
    </dependency>
    <dependency>
      <groupId>org.springframework.security</groupId>
      <artifactId>spring-security-test</artifactId>
      <scope>test</scope>
    </dependency>

    <!-- mybatis rely on -->
    <dependency>
      <groupId>org.mybatis.spring.boot</groupId>
      <artifactId>mybatis-spring-boot-starter</artifactId>
      <version>2.1.1</version>
    </dependency>
    <!-- mysql Database dependency -->
    <dependency>
      <groupId>mysql</groupId>
      <artifactId>mysql-connector-java</artifactId>
      <version>8.0.18</version>
    </dependency>
  </dependencies>

   <plugins>
      <plugin>
        <groupId>org.springframework.boot</groupId>
        <artifactId>spring-boot-maven-plugin</artifactId>
      </plugin>
    </plugins>
2. Configure data sources
application.yml:
spring:
  datasource:
    driver-class-name: com.mysql.cj.jdbc.Driver
    url: jdbc:mysql://localhost:3306/security? useUnicode=true&characterEncoding=UTF-8&serverTimezone=Asia/Shanghai
    username: root
    password: root
3. Login free specific configuration remmberconfig. Java
Remember to comment out the table creation statement when re executing to avoid creating the table for the second time
/*Configure persistence layer objects*/
@Configuration
    public class RemmberConfig {
        @Autowired
        private DataSource dataSource;
        @Bean
        public PersistentTokenRepository getPersistentTokenRepository(){
            JdbcTokenRepositoryImpl jdbcTokenRepository = new JdbcTokenRepositoryImpl();
            jdbcTokenRepository.setDataSource(dataSource);
            //Automatic table creation is required for the first startup and commented out for the second startup
            jdbcTokenRepository.setCreateTableOnStartup(true);
            //Returns a persistence layer object
            return jdbcTokenRepository;
        }
    }
5. Configuration and static page addition
SpringSecurityConfig.java
// Remember me
        http.rememberMe()
                //Failure time in seconds
                .tokenValiditySeconds(60*60*24*7)
                //Which object does the login logic give to
                .userDetailsService(springSecurityService)
                // Persistent layer object
                .tokenRepository(remmberConfig.getPersistentTokenRepository());
login.html
<!DOCTYPE html>
<html lang="en">
<head><meta charset="UTF-8">
    <title>Title</title>
</head>
<body>
<form action="/login" method="post">
    user name:<input type="text" name="userName" /><br/>
    password:<input type="password" name="passWord" /><br/>
    <input type="checkbox" name="remember-me" value="true"/><br/>
    <input type="submit" value="Sign in" />
</form>
</body>
</html>
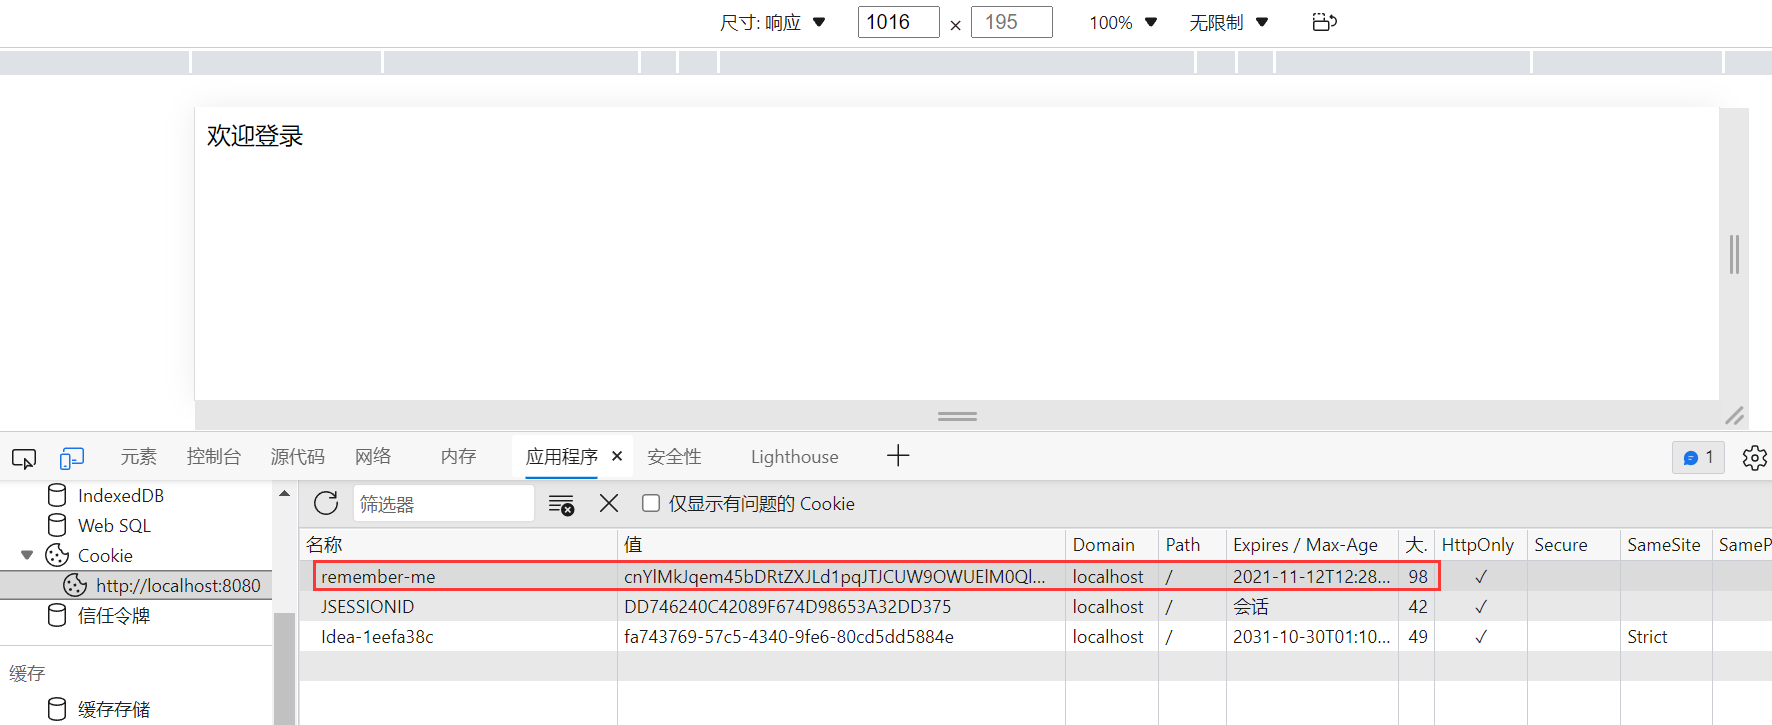
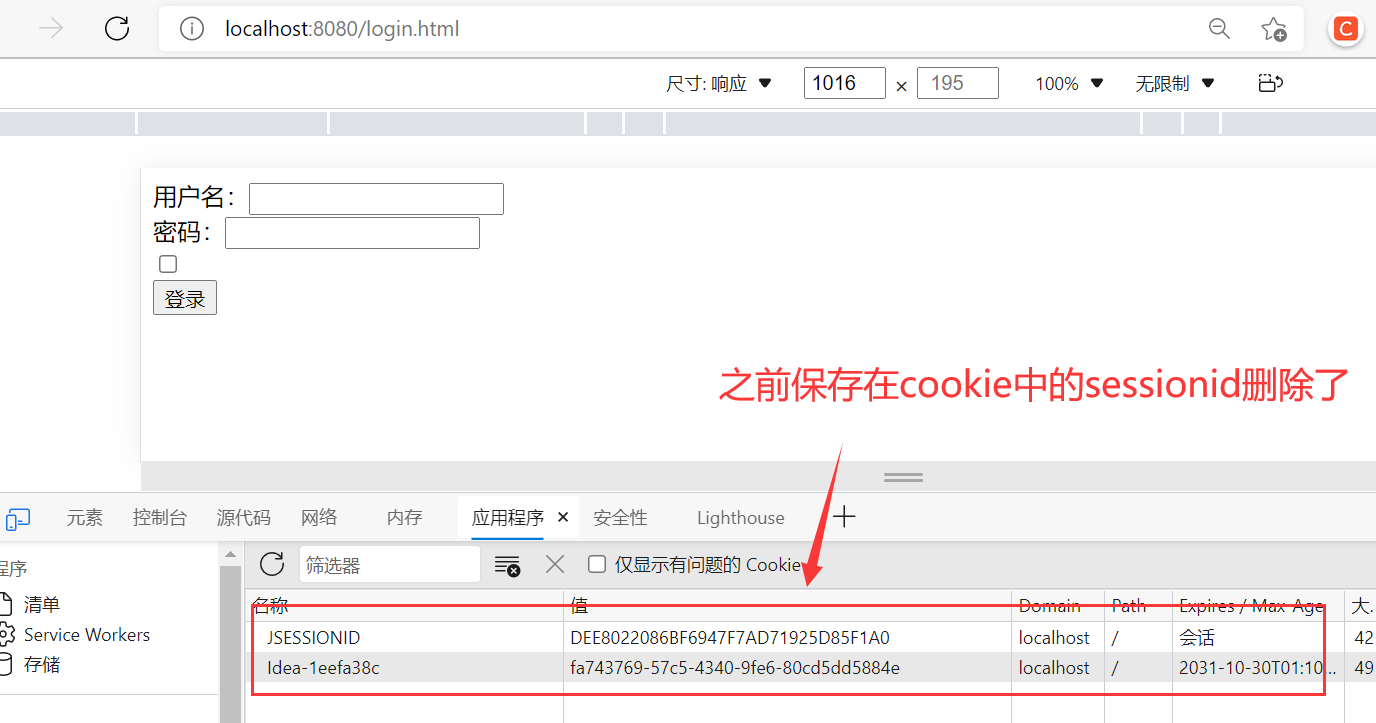
This means success. You don't have to log in next time
4, Integration of spring security in Thymeleaf
1. Introduce dependency
 <!--thymeleaf springsecurity5 rely on-->
    <dependency>
      <groupId>org.thymeleaf.extras</groupId>
      <artifactId>thymeleaf-extras-springsecurity5</artifactId>
    </dependency>
    <!--thymeleaf rely on-->
    <dependency>
      <groupId>org.springframework.boot</groupId>
      <artifactId>spring-boot-starter-thymeleaf</artifactId>
    </dependency>
Bring in namespace:
<html xmlns="http://www.w3.org/1999/xhtml"
      xmlns:th="http://www.thymeleaf.org" >
2. Small Demo implementation

Create a new Templates folder in project resources and a new demo.html page in templates
<!DOCTYPE html>
<html xmlns="http://www.w3.org/1999/xhtml"
xmlns:sec="http://www.thymeleaf.org/thymeleaf-extras- springsecurity5">
<head>
<meta charset="UTF-8">
<title>Title</title>
</head>
<body>
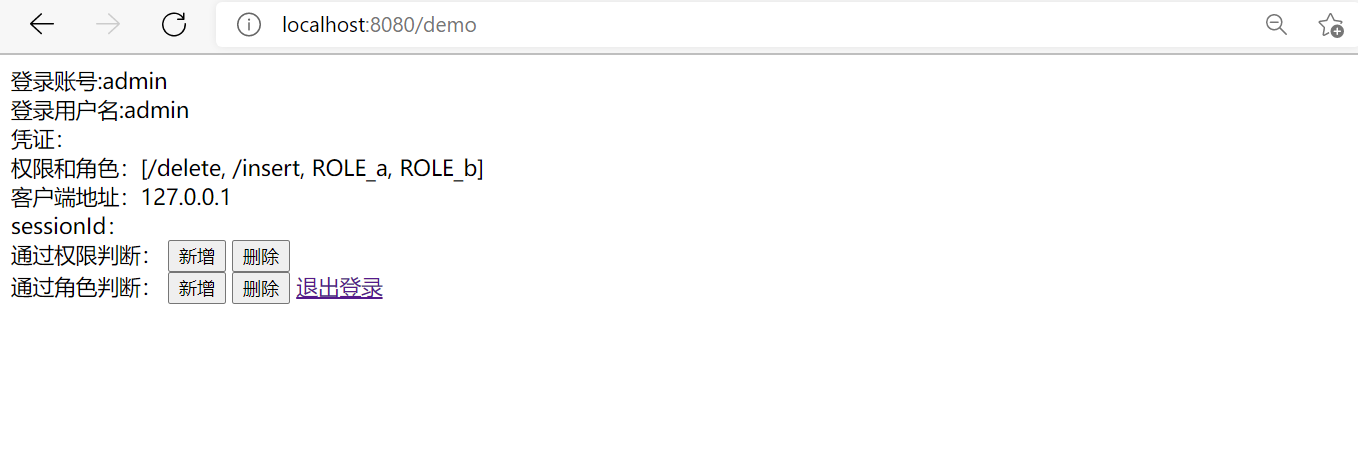
Login account:<span sec:authentication="name"></span><br/>
Login user name:<span sec:authentication="principal.username"></span><br/>
Voucher:<span sec:authentication="credentials"></span><br/>
Permissions and roles:<span sec:authentication="authorities"></span><br/>
Client address:<span sec:authentication="details.remoteAddress"></span> <br/>
sessionId: <span sec:authentication="details.sessionId"></span><br/>
Judging by authority:
<button sec:authorize="hasAuthority('/insert')">newly added</button>
<button sec:authorize="hasAuthority('/delete')">delete</button>
<button sec:authorize="hasAuthority('/update')">modify</button>
<button sec:authorize="hasAuthority('/select')">see</button> <br/>
Judging by role:
<button sec:authorize="hasRole('a')">newly added</button>
<button sec:authorize="hasRole('b')">delete</button>
<button sec:authorize="hasRole('c')">modify</button>
<button sec:authorize="hasRole('d')">see</button>
<a href="/logout">Log out</a>
</body>
</html>
Write the Controller layer to jump the page
@Controller
public class TestController {
    /*thyemleaf*/
    @RequestMapping("demo")
    public String todemo(){
        return "demo";
    }
}
Set role permissions. thymeleaf displays different contents through different permissions of roles!
 //Return a user
 return new User(s,pw, AuthorityUtils.commaSeparatedStringToAuthorityList("ROLE_b,ROLE_a,/insert ,/delete"));
result:
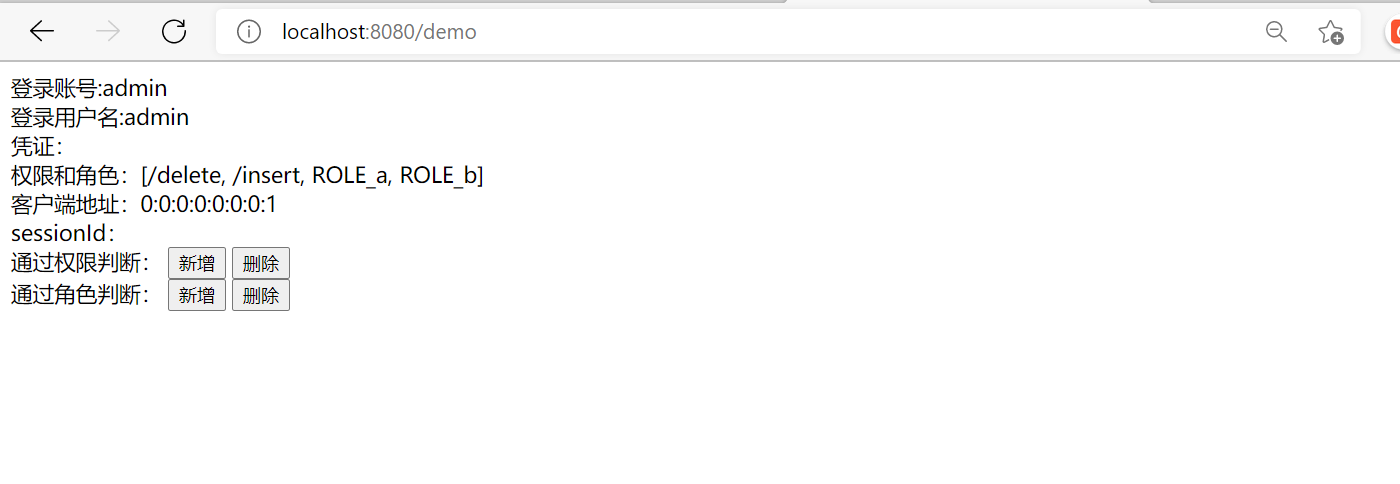
Summary: it can be seen from the above that only the addition, deletion and user information are displayed through different roles and allowed URIs. These are not displayed through modification. Different permissions and different contents are realized through view settings
5, Log out
It's very simple. You just need to send a / loginOut request to the project. Just add a hyperlink to / logout in the page. Implement it below (add hyperlink).
<!DOCTYPE html>
<html xmlns="http://www.w3.org/1999/xhtml"
      xmlns:sec="http://www.thymeleaf.org/thymeleaf-extras- springsecurity5">
<head>
    <meta charset="UTF-8">
    <title>Title</title>
</head>
<body>
Login account:<span sec:authentication="name"></span><br/>
Login user name:<span sec:authentication="principal.username"></span><br/>
Voucher:<span sec:authentication="credentials"></span><br/>
Permissions and roles:<span sec:authentication="authorities"></span><br/>
Client address:<span sec:authentication="details.remoteAddress"></span> <br/>
sessionId: <span sec:authentication="details.sessionId"></span><br/>

Judging by authority:
<button sec:authorize="hasAuthority('/insert')">newly added</button>
<button sec:authorize="hasAuthority('/delete')">delete</button>
<button sec:authorize="hasAuthority('/update')">modify</button>
<button sec:authorize="hasAuthority('/select')">see</button> <br/>
Judging by role:
<button sec:authorize="hasRole('a')">newly added</button>
<button sec:authorize="hasRole('b')">delete</button>
<button sec:authorize="hasRole('c')">modify</button>
<button sec:authorize="hasRole('d')">see</button>
<a href="/logout">Log out</a>
</body>
</html>
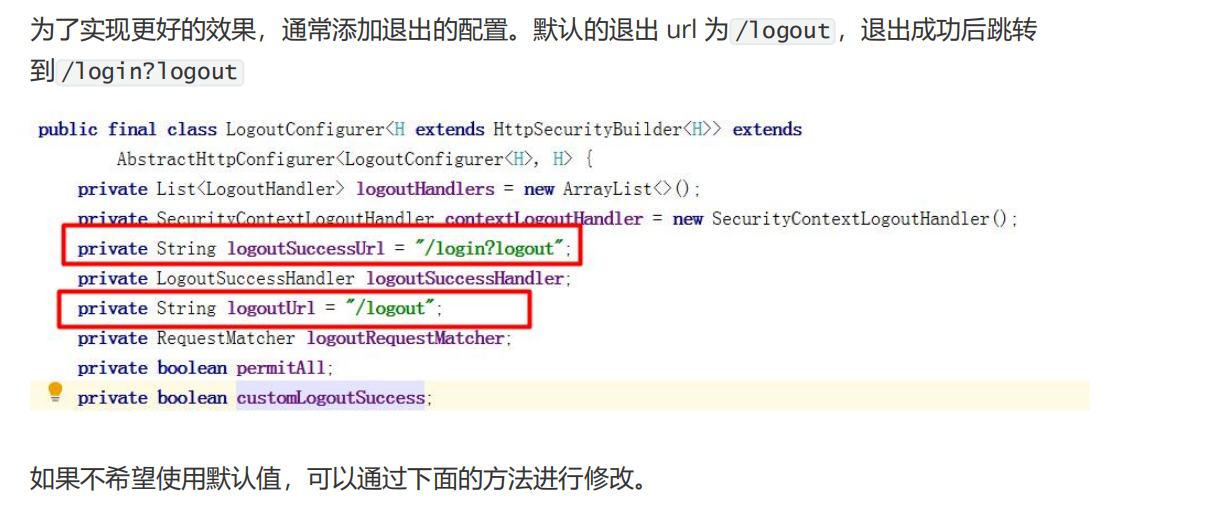
Add SpringSecurityConfig.java
http.logout()
                //Exit access path
                .logoutUrl("/logout")
                .logoutSuccessUrl("/login.html");
6, CSRF in spring security
1. What is CSRF?
- CSRF (Cross Site Request Forgery) cross site request forgery, also known as "OneClick Attack" or
- Session Riding. An illegal request to access a trusted site by forging a user's request.
Cross domain: as long as the network protocol, ip address and port are different, it is a cross domain request. - When the client interacts with the service, because the http protocol itself is a stateless protocol, a cookie is introduced to record the client's identity. The session id is stored in the cookie to identify the client's identity. In the case of cross domain, the session id may be maliciously hijacked by a third party. When a request is made to the server through this session id, the server will consider the request It is legal and many unexpected things may happen.
2. Small Demo case
The front-end page uses the thymeleaf template and creates new templates/login.html
<!DOCTYPE html>
<html xmlns="http://www.w3.org/1999/xhtml"
      xmlns:th="http://www.thymeleaf.org" >
<head>
    <meta charset="UTF-8">
    <title>Title</title>
</head>
<body>
<form action="/login" method="post">
    <input type="hidden" th:value="${_csrf.token}" name="_csrf" th:if="${_csrf}"/>
    user name:<input type="text" name="userName" /><br/>
    password:<input type="password" name="passWord" /><br/>
    <input type="submit" value="Sign in" />
</form>
</body>
</html>
Jump when the Controller layer accesses showLogin:
/*showLogin Jump*/
    @RequestMapping("showLogin")
    public String tologin(){
        return "login";
    }
Remember to comment out the following in ServiecSecurityConfig: / / http.csrf().disable(); test results:
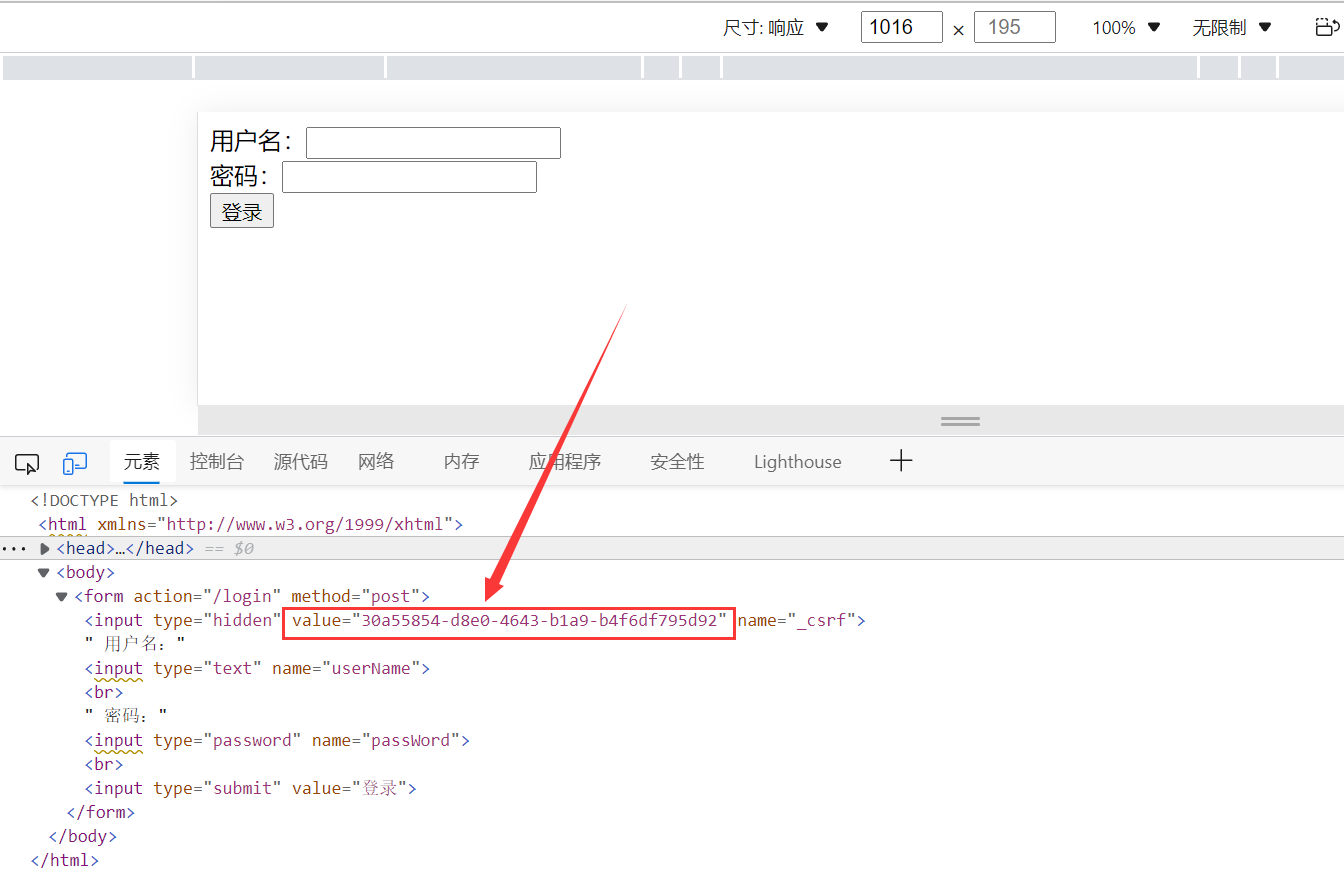
In this way, the token. Pass token is obtained
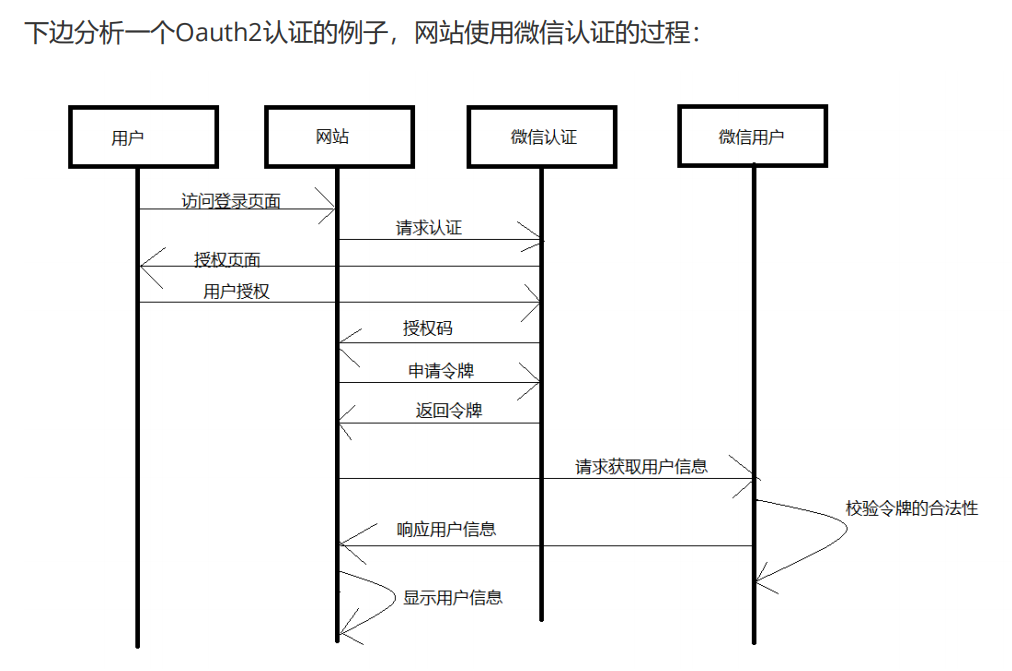
7, Oauth2 certification ⭐
Introduction: the third-party authentication technical scheme mainly solves the general standard problem of authentication protocol, because in order to realize cross system authentication, certain interface protocols must be followed between systems. OAUTH protocol provides a safe, open and simple standard for user resource authorization, which greatly saves programmer's time and provides convenience and efficiency.
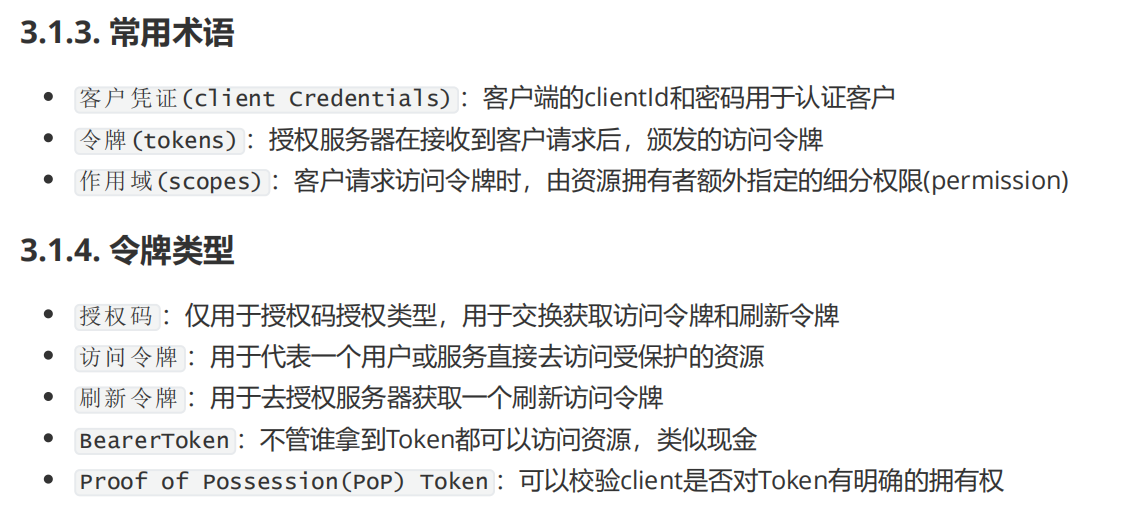
1. Common language
2. Characteristics
- advantage:
More secure, the client does not contact the user password, and the server is easier to be centrally protected
Widely disseminated and continuously adopted
Short life and encapsulated token
Resource server and authorization server are decoupled
Centralized authorization, simplified client
HTTP/JSON is friendly and easy to request and pass token s
Consider a variety of client architecture scenarios
Customers can have different levels of trust - Disadvantages:
The protocol framework is too broad, resulting in poor compatibility and interoperability of various implementations
It's not an authentication protocol. It doesn't tell you any user information by itself.
3. Authorization mode
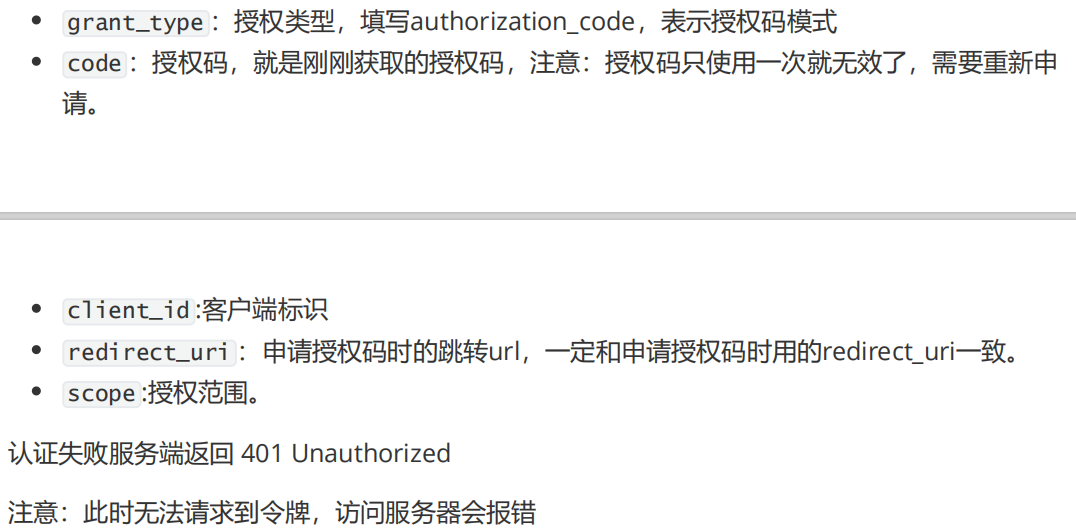
- Authorization code mode
- Password mode
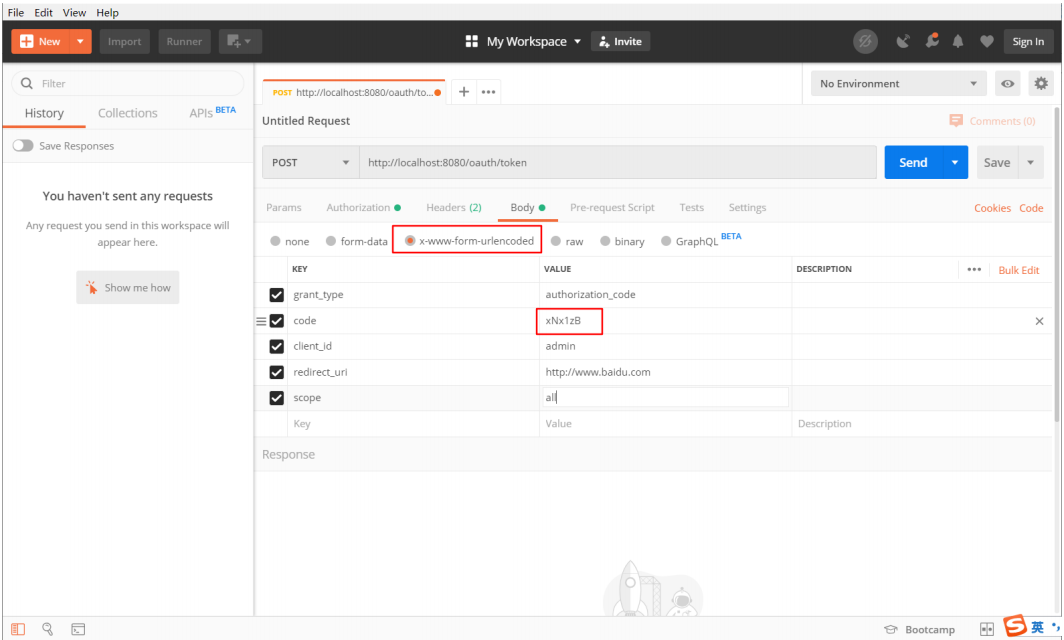
① . authorization code mode ⭐
The user logs in and accesses the specified authorization server by configuring the user. The authorization server will return an authorization code to the user. At this time, the user takes the authorization code and accesses oauth/token to exchange the token. After obtaining the token, he accesses the resource server again and takes the resource.
(1) Introduction of dependency
<parent>
    <groupId>org.springframework.boot</groupId>
    <artifactId>spring-boot-starter-parent</artifactId>
    <version>2.2.2.RELEASE</version>
    <relativePath/>
    <!-- lookup parent from repository -->
  </parent>

<dependency>
      <groupId>org.springframework.cloud</groupId>
      <artifactId>spring-cloud-starter-oauth2</artifactId>
    </dependency>
    <dependency>
      <groupId>org.springframework.cloud</groupId>
      <artifactId>spring-cloud-starter-security</artifactId>
    </dependency>
    <dependency>
      <groupId>org.springframework.boot</groupId>
      <artifactId>spring-boot-starter-web</artifactId>
    </dependency>
    <dependency>
      <groupId>org.springframework.boot</groupId>
      <artifactId>spring-boot-starter-test</artifactId>
      <scope>test</scope>
    </dependency>

<dependencyManagement>
    <dependencies>
      <dependency>
        <groupId>org.springframework.cloud</groupId>
        <artifactId>spring-cloud-dependencies</artifactId>
        <version>${spring-cloud.version}</version>
        <type>pom</type>
        <scope>import</scope>
      </dependency>
    </dependencies>
  </dependencyManagement>

	  <plugin>
        <groupId>org.springframework.boot</groupId>
        <artifactId>spring-boot-maven-plugin</artifactId>
      </plugin>
(2) Write entity class User.java
public class User implements UserDetails {

    private String username;
    private String password;
    private List<GrantedAuthority> authorities;

    public User(String username, String password, List<GrantedAuthority> authorities) {
        this.username = username;
        this.password = password;
        this.authorities = authorities;
    }

    @Override
    public Collection<? extends GrantedAuthority> getAuthorities() {
        return authorities;
    }

    @Override
    public String getPassword() {
        return password;
    }

    @Override
    public String getUsername() {
        return username;
    }

    @Override
    public boolean isAccountNonExpired() {
        return true;
    }

    @Override
    public boolean isAccountNonLocked() {
        return true;
    }

    @Override
    public boolean isCredentialsNonExpired() {
        return true;
    }

    @Override
    public boolean isEnabled() {
        return true;
    }
}
(3) Write UserService.java
Configure user account and password
@Service
public class UserService implements UserDetailsService {
    @Autowired
    private PasswordEncoder passwordEncoder;

    @Override
    public UserDetails loadUserByUsername(String username) throws UsernameNotFoundException {
    String password = passwordEncoder.encode("123456");
    return new User("admin",password, AuthorityUtils.commaSeparatedStringToAuthorityList("admin"));
    }
}
(4) Write UserController.java
@Controller
@RequestMapping("user")
public class UserController {
    @RequestMapping("/getCurrentUser")
    @ResponseBody
    public Object getCurrentUser(Authentication authentication) {
        return authentication.getPrincipal();
    }
}
(5) Write the configuration class oauth2config. Java
Spring Security configuration class
@SpringBootConfiguration
@EnableWebSecurity
public class Oauth2Config extends WebSecurityConfigurerAdapter {

    //Configure the implementation class object of passwordEncode
    @Bean
    public PasswordEncoder getPE(){
        return new BCryptPasswordEncoder();
    }

    //Configure permissions

    @Override
    protected void configure(HttpSecurity http) throws Exception {
        //Turn off csrf
        http.csrf() .disable()
                //Release request
                .authorizeRequests()
                .antMatchers("/oauth/**", "/login/**", "/logout/**")
                .permitAll()
                //All requests except the above are blocked
                .anyRequest() .authenticated()
                .and()
                //Release login interface
                .formLogin() .permitAll();
    }
}
Authorization server configuration AuthorizationServerConfig.java
@Configuration
@EnableAuthorizationServer
public class AuthorizationServerConfig extends AuthorizationServerConfigurerAdapter {
@Autowired
private PasswordEncoder passwordEncoder;
@Override
public void configure(ClientDetailsServiceConfigurer clients) throws Exception {
clients.inMemory()
//Configure client_id
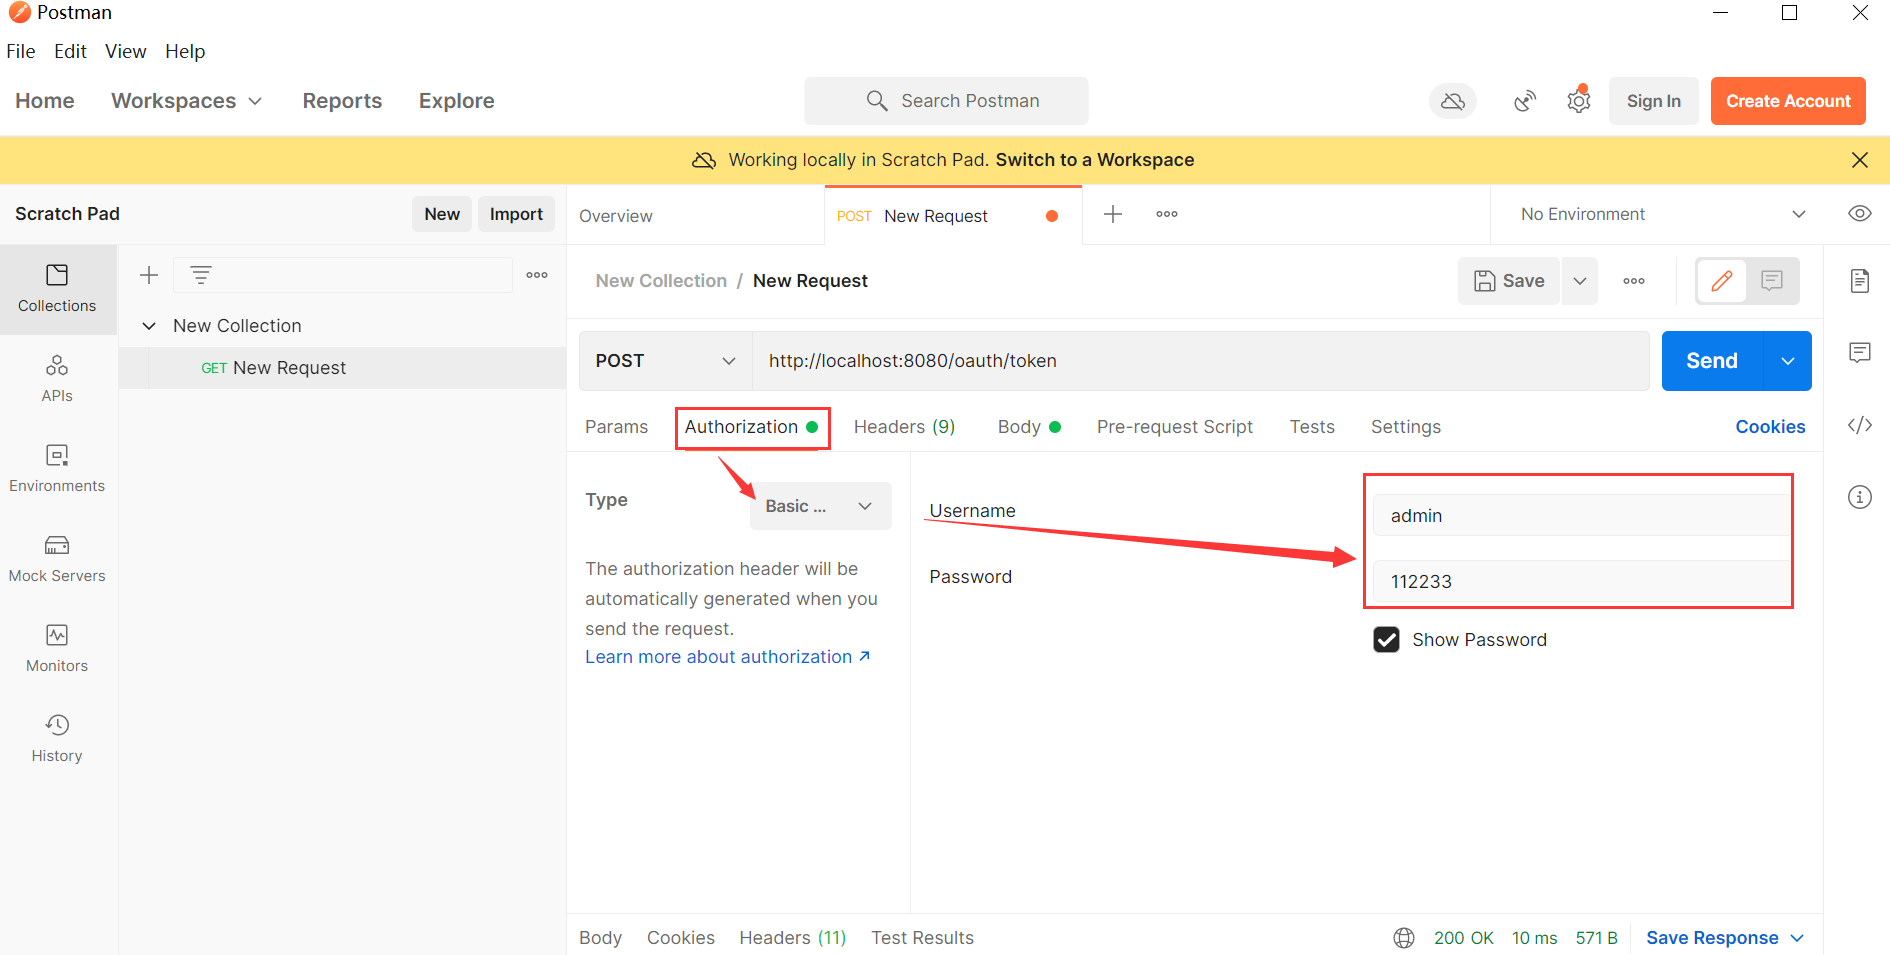
.withClient("admin")
//Configure client secret
.secret(passwordEncoder.encode("112233"))
//Configure redirect_uri, used to jump after successful authorization
.redirectUris("http://www.baidu.com")
//Configure the requested permission range
.scopes("all")
//Configure grant_type indicates the authorization type
.authorizedGrantTypes("authorization_code","password");
}
}
Resource server configuration ResourceServerConfig.java
@Configuration
@EnableResourceServer
public class ResourceServerConfig extends ResourceServerConfigurerAdapter {

    @Override
    public void configure(HttpSecurity http) throws Exception {
        http.authorizeRequests()
                .anyRequest()
                .authenticated()
                .and()
                .requestMatchers()
                .antMatchers("/user/**");//Configure the resource path to be protected
    }
}
test result
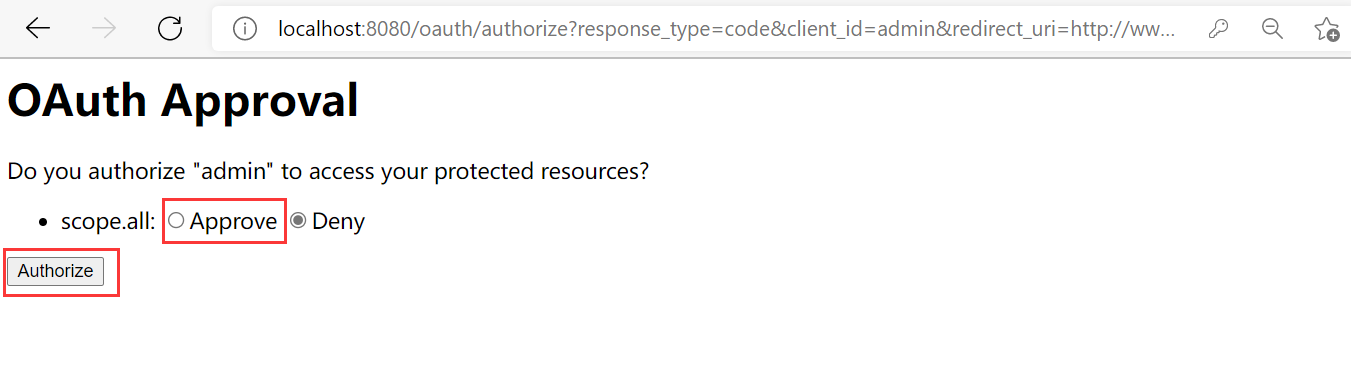
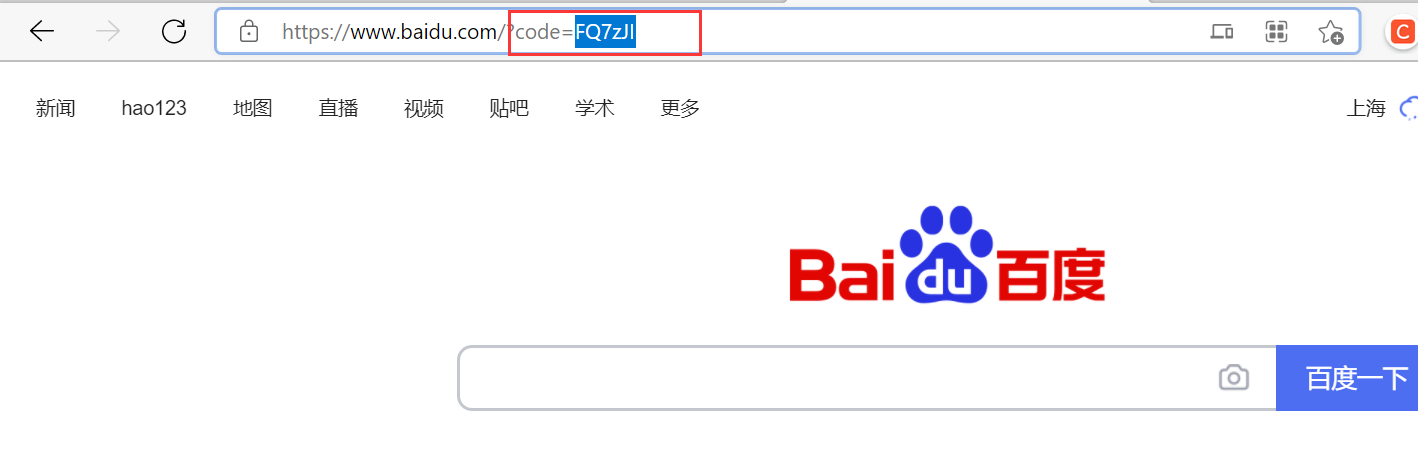
Obtain authorization code:
http://localhost:8080/oauth/authorize?response_type=code&client_id=admin&redirect_uri=http://www.baidu.com&scope=all
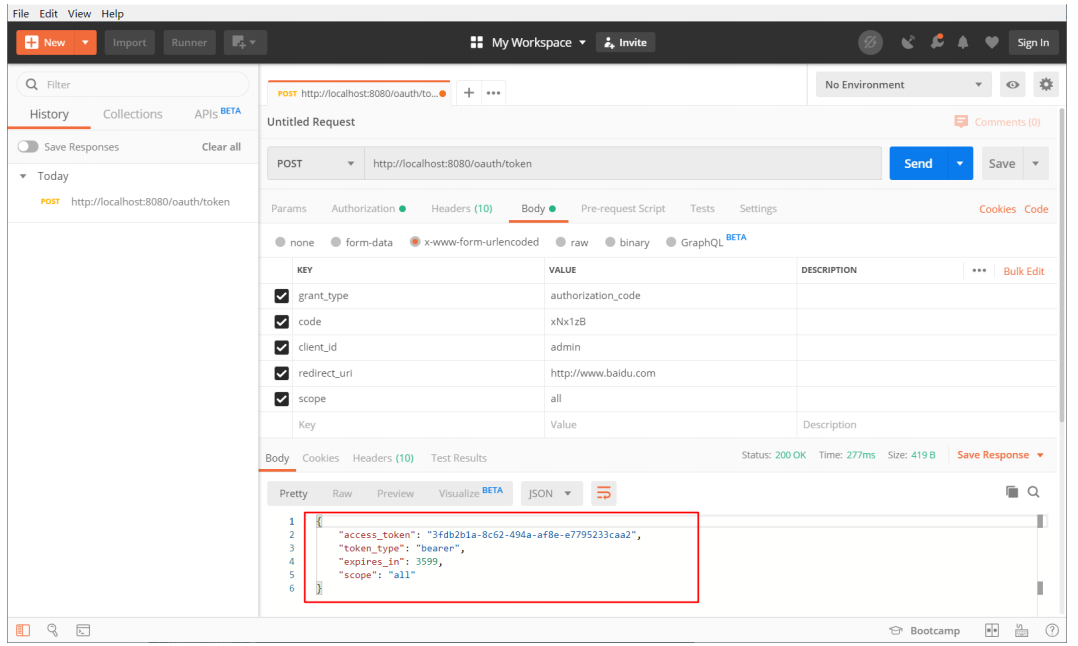
After obtaining the authorization code, use PostMan software to http://localhost:8080/oauth/token Access and configure:
Get token after sending request ---------
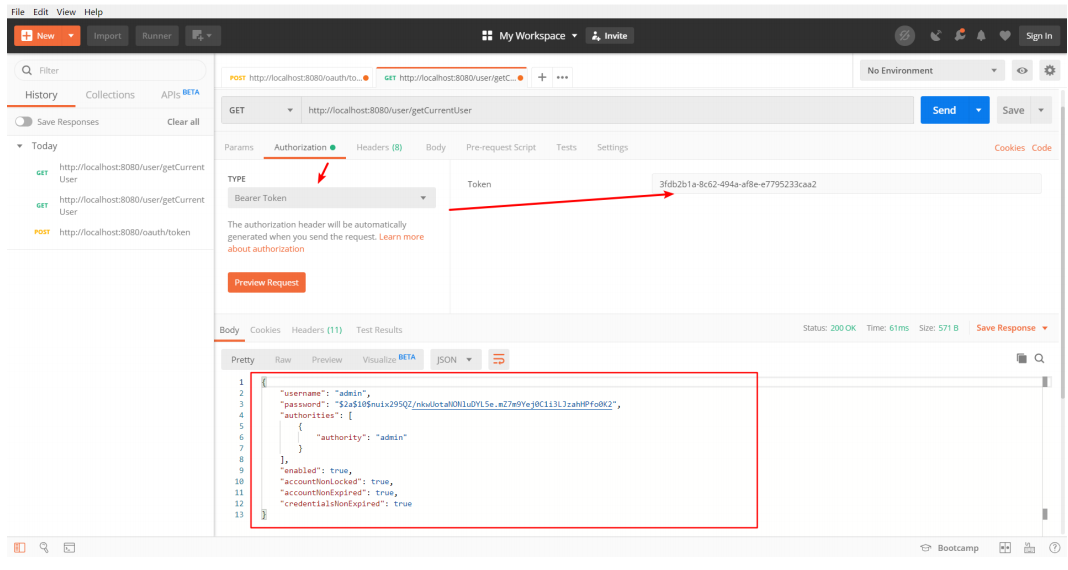
Configure tokens for access on: http://localhost:8080/user/getCurrentUser , get resources through tokens
If the token token is modified, an error will be reported
② . password mode
Unfinished to be continued