Main points:
1. Introduction to Squid
2. Cache Agent
3. Compile, install and optimize Squid manually
4. Establishing Traditional Agents
5. Setting up transparent agents
1. Introduction to Squid
(1) Squid is a high performance proxy cache server that supports FTP, gopher, HTTPS and HTTP protocols.Unlike general proxy caching software, Squid handles all client requests in a separate, non-modular, I/O-driven process.
(2) On what system does Squid run?
Squid runs on most Unix and OS/2 versions of the system and is known to work on Windows,AIX, Digital Unix, FreeBSD, HP-UX, Irix, Linux, NetBSD, Nextstep, SCO, Solaris
(3) Download and acquire Squid:
Squid has software libraries available on many unix like systems, such as installing with apt install squid in ubuntu or downloading binary compiled packages directly from squid's official website.
2. Cache Agent
The web proxy works by caching web page objects and reducing duplicate requests.
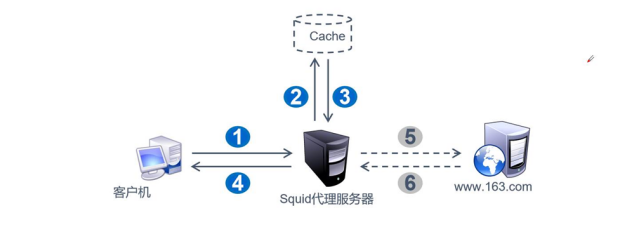
1. When a client accesses a web page through a squid proxy, the specified proxy server first checks its cache. If there are pages in the cache that our client needs, the squid server will directly return the cached page content to the client. If there are no pages requested by the client in the cache, the squid proxy server will send access to the internet.Request that, once the returned web page is obtained, the data of the web page is saved in the cache and sent to the client.
2. Because the client's web access request is actually fulfilled by squid proxy server instead, it hides the user's true IP address, thus playing a protective role.
On the other hand, squid can also have filtering control over the target to be accessed, the address of the client, and the time period of access.
(1) Basic types of agents:
1. Traditional proxy: also known as ordinary proxy service, requires our clients to set the address and port of the proxy server in some programs such as browsers, chat tools, etc. before they can use the proxy to access the network. This method is more cumbersome than others, because clients also need to specify the proxy server manually, so it is generally used in the Internet environment.
2. Transparent proxy: The same functionality as traditional proxy implements, except that the client does not need to specify the address and port of the proxy server manually, but redirects web access through default routing and firewall policies, which are still handled by the proxy server. The redirection process is entirely performed by the squid server, so for the client, evenI don't know I'm using squid proxy service, so we call it transparent mode.
Transparent proxies are often used in LAN environments, such as enabling transparent proxies in Linux gateways, so that LAN hosts can enjoy better Internet speed without additional settings.
(2) Benefits of using agents:
1. Improve the speed of web access;
2. Hide the client's true IP address
3. Compile, install and optimize Squid manually
(1) Decompression package:
tar zxvf squid-3.4.6.tar.gz -C /opt/
(2) Install compilation tools:
yum install gcc gcc-c++ make -y
(3) Compilation:
./configure --prefix=/usr/local/squid \
--sysconfdir=/etc \
--enable-arp-acl \
--enable-linux-netfilter \
--enable-linux-tproxy \
--enable-async-io=100 \
--enable-err-language="Simplify_Chinese" \
--enable-underscore \
--enable-poll \
--enable-gnuregex
(4) Installation
install && make install
(5) Easy to manage and can create soft connections
ln -s /usr/local/squid/sbin/* /usr/local/sbin/
(6) Create user squid, configure permissions
useradd -M -s /sbin/nologin squid
chown -R squid.squid /usr/local/squid/var/
//To grant authorization
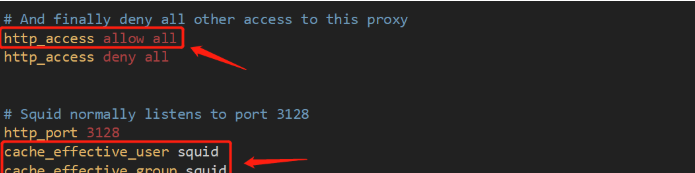
(7) Modify the configuration file
vim /etc/squid.conf
//Add the following code:
http_access allow all
cache_effective_user squid       //Add Specified Program User
cache_effective_group squid      //Add Specified Account Base Group
(8) Inspection
squid -k parse    //Check profile syntax
squid -z          //Initialize Cache Directory
squid             //Start Services
Check the port to see if the service is open properly:

(9) Write startup scripts:
1. Write a script directory: /etc/init.d/
vim squid
#!/bin/bash
#chkconfig: 2345 90 25
PID="/usr/local/squid/var/run/squid.pid"
CONF="/etc/squid.conf"
CMD="/usr/local/squid/sbin/squid"
case "$1" in
start)
      netstat -natp | grep squid &> /dev/null
      if [ $? -eq 0 ]
        then
        echo "squid is running"
        else
        echo "Starting squid...."
        $CMD
        fi
        ;;
stop)
        $CMD -k kill &> /dev/null
        rm -rf $PID &> /dev/null
        ;;
status)
         [ -f $PID ] &> /dev/null
           if [ $? -eq 0 ]
             then
              netstat -natp | grep squid
             else
              echo "squid is not running"
           fi
          ;;
restart)
          $0 stop &> /dev/null
           echo "Closing squid..."
          $0 start &> /dev/null
           echo "Starting squid..."
          ;;
reload)
          $CMD -k reconfigure
          ;;
check)
          $CMD -k parse
        ;;
        *)
            echo "Usage: $0{start|stop|status|reload|check|restart}"
        ;;
esac
2. Add Execution Rights
chmod +x squid    //Add Execution Rights

chkconfig --add squid     //Easy service identification

chkconfig --level 35 squid on   //Set boot-up self-start
3. Close and turn on services
service squid stop
service squid start
4. Establishing Traditional Agents
| role | IP Address |
| Web server | 192.168.220.136 |
| proxy server | 192.168.220.131 |
| Client | 192.168.220.129 |
Step 1: Edit the configuration file/etc/squid.conf
cache_mem 64 MB       //Specify the size of memory space used for caching

reply_body_max_size 10 MB    //Maximum file size allowed for user download

maximum_object_size 4096 KB    //Maximum object size allowed to be saved to cache space
Step 2: Develop firewall rules
iptables -F    //Clear all rules to temporarily stop the firewall
setenforce 0
iptables -I INPUT -p tcp --dport 3128 -j ACCEPT    //Allow destination port 3128 to forward
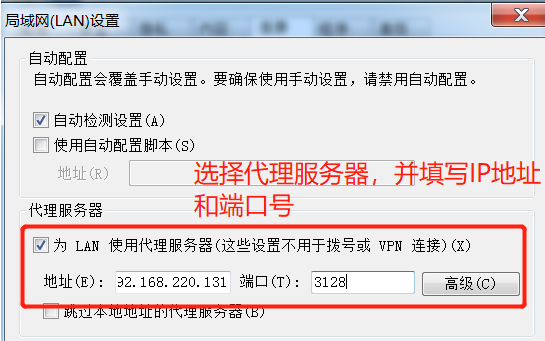
Step 3: Client Browser Setup Proxy Service
(1) Open Browser_Tools_Internet Options_Connection_LAN Settings
(2) The browser accesses the IP address of the web server several times, refresh it. Because we set up the proxy service, in fact, the proxy server helps us to access the web site. In order to verify, you can check the log file of the web server to know whether the IP address you are accessing is a client or a proxy server.
View the log file in /etc/httpd/logs, access_log, here is a partial screenshot:

It can be seen that the proxy server visits the web page instead of the client, which also serves to hide the true IP address of the client.
5. Setting up transparent agents
| role | IP Address |
| squid proxy server | Intranet: 192.168.100.1; External: 12.0.0.1 |
| web server | 12.0.0.12 |
| Client | 192.168.100.50 |
Step 1: User browser cancels LAN settings
Step 2: Configure the proxy server squid
(1) Turn on routing forwarding:
echo "1" > /proc/sys/net/ipv4/ip_forward
(2) Edit the configuration file/etc/squid.conf
Modify the listening address:
http_port 192.168.100.1:3128 transparent
(3) Add firewall policy:
iptables -F
iptables -t nat -F    //Reset Firewall
iptables -t nat -I PREROUTING -i ens33 -s 192.168.100.0/24 -p tcp --dport 80 -j REDIRECT --to 3128
//Port redirection to 328
iptables -t nat -I PREROUTING -i ens33 -s 192.168.100.0/24 -p tcp --dport 443 -j REDIRECT --to 3128
iptables -I INPUT -p tcp --dport 3128 -j ACCEPT   //Develop port 3128
(4) Restart the service:
service squid restart
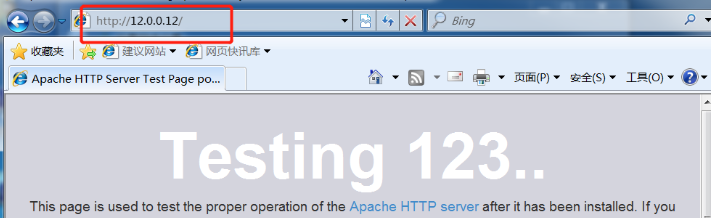
Step 3: Validation
1. Access the web server site on the client browser
2. In the log file of the web server, check which IP address was visited:
vim /etc/httpd/logs/access_log
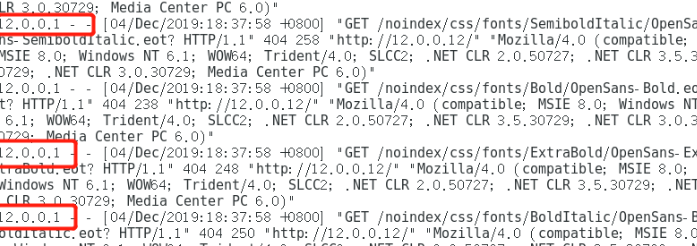
You can see the ip address of the external network card of the squid proxy server.
Transparent proxy setup succeeded.