Spring notes
1, Spring understand
Spring concept: make the existing technology easier to use, integrate the existing technical framework, and simplify enterprise application development;
advantage:
Spring is a free and open source framework
Spring is a lightweight, non intrusive framework that has no impact after adding the spring framework to the original code
Support transaction processing and framework integration
Disadvantages:
Cumbersome configuration
Core:
Inversion of control (IOC), aspect oriented programming (AOP)
Summary:
Spring is a lightweight inversion of control (IOC) and aspect oriented programming framework;

2, Spring core 1: inversion of control (IOC) theory
Conceptual understanding:
-
Baidu Encyclopedia:
Inversion of Control (IoC) is a design principle in object-oriented programming, which can be used to reduce the coupling between computer codes. The most common method is called Dependency Injection (DI) and the other is called Dependency Lookup. Through control inversion, when an object is created, the external entities of all objects in a control system pass the references of the objects it depends on to it. In other words, dependencies are injected into objects.
-
Data collection:
Inversion of control is a design idea, that is, the creation, assignment and management of objects are entrusted to containers outside the code (which can be simply understood as Spring containers), that is, the creation of objects is completed by other external resources (here, the external resources are Spring)
Control: create objects, assign attributes to objects, and manage the relationship between objects;
Reverse: transfer the permission of the original developer to manage and create objects to the container (Spring) implementation outside the code; Instead of developers, containers manage objects, create objects, and assign values to attributes. -
Self summary:
Inversion of control (IOC): transfer the control power of creating objects to a third party, which obtains objects through configuration files or annotations;
In Spring, the IOC container implements control inversion;
The main implementation of IOC is dependency injection (DI);
IOC is simply put here: objects are created, managed and assembled by Spring, and there is no need for their own new objects;
In fact, the servlet learned earlier also involves the IOC principle. When configuring a servlet implementation class to the WEB XML file, the work of creating servlet objects no longer needs us, but is handed over to the WEB server (Tomcat) for creation and management. The Tomcat container controls the instantiation, initialization, execution method, destruction and so on, including Filter and Listener;
Spring container is a super factory, which is responsible for creating and managing all Java objects, which are called beans; Spring container manages the dependencies between beans in the container. Spring uses "dependency injection" to manage the dependencies between beans, and uses IOC to realize decoupling and between objects;
Purpose of using IOC:
Opening and closing principle (open to expansion and close to modification); Realize the decoupling of code;
Create objects through IOC:
1. First, you need an XML configuration file (generally named: applicationContext.xml)
The basic structure of the document:
<?xml version="1.0" encoding="UTF-8"?>
<beans xmlns="http://www.springframework.org/schema/beans"
    xmlns:xsi="http://www.w3.org/2001/XMLSchema-instance"
    xsi:schemaLocation="http://www.springframework.org/schema/beans
        https://www.springframework.org/schema/beans/spring-beans.xsd">

    <bean id="..." class="...">
        <!-- collaborators and configuration for this bean go here -->
    </bean>

    <bean id="..." class="...">
        <!-- collaborators and configuration for this bean go here -->
    </bean>

    <!-- more bean definitions go here -->

</beans>
You can see that there are many < beans > tags under the < beans > tag, which represent objects in the Spring container;
My own understanding: the Spring container is like a box for processing coffee beans. I can give it the required objects (beans) to process and configure; In this way, there are all kinds of coffee beans in the box. When I need which coffee bean, I can take it out of the box directly;
A label corresponds to an object
2. Suppose a Hello class is defined:
public class Hello {
    private String name;

    Hello() {
        System.out.println("Hello Nonparametric construction method of");
    }
    // Parametric structure
    Hello(String str) {
        this.name = str;
        System.out.println("Hello Parametric construction method of");
    }
    // set and get methods
    public void setName(String name) {
        this.name = name;
    }

    public String getName() {
        return name;
    }
    // sayHello method
    public void sayHello() {
        System.out.println("Hello " + name);
    }
}
Note: if the class defined here wants to create an object through the Spring container, it must write the set method of all the attributes (the get method should also be written, anyway, the idea is automatically generated without waste). Only in this way can the Spring container set the attribute value of the corresponding object through the information of the configuration file;
3. In ApplicationContext Configure this class to create objects in the XML file
Use default constructor:
<bean id="hello" class="com.yang.service.Hello">
        <property name="name" value="Spring"/>
</bean>
This already represents a Hello object, which is equivalent to java code:
Hello hello = new Hello();
hello.setName("Spring");
Explain the elements in the tag by comparing it with the actual java code:
- id: the name of the created object, that is, the variable name, is user-defined. The program accesses the bean through the id attribute, and the dependency between the bean and the bean is also associated through the id attribute.
- Class: the type of object created (using the fully qualified name). Here, it can only be a class, not an interface.
The < property > tag has the following functions:
-
Property: assign a value to the corresponding property in the object
- Name: the name of the assigned attribute
- Value: the assigned value
When there are multiple attributes, you can write multiple < property > tags. One tag corresponds to one attribute;
If you are using a parametric construct:
<bean id="hello" class="com.yang.service.Hello">
        <constructor-arg name="str" value="Java"/>
        <property name="name" value="Spring"/>
</bean>
Then it is equivalent to java code:
Hello hello = new Hello("Java");
hello.setName("Spring");
It can be seen that:
< constructor Arg > tag functions:
-
Constructor Arg: assign a value to the corresponding formal parameter when using the parameterized construction of the object
- Name: the name of the formal parameter in the corresponding parameter constructor
- vaule: the value assigned to the corresponding formal parameter
When the construction method has multiple parameters, you can write multiple < constructor Arg > tags. One tag corresponds to one formal parameter
4. Test code
In the third step, I have actually created the Hello object I need and stored it in the Spring container. Next, I need to get the corresponding object from the container during the test;
@Test
public void springTest01() {
    // Navigate to the xml file of the object required for configuration
    ApplicationContext context = new ClassPathXmlApplicationContext("applicationContext.xml");
    // Get the configured Hello object from the Spring container. The hello in getBean("hello") is the id value of the configured bean
    Hello hello = (Hello) context.getBean("hello");
    hello.sayHello(); // Call method test
}
Here's an extra point: Hello Hello = (Hello) context getBean("hello"); This code is equivalent to the following code:
Hello hello = context.getBean("hello", Hello.class); This is only an overloaded version of the getBean() method. Which one to use depends on the actual situation;
To sum up with this example:
- The Hello object is automatically created by Spring. We don't need to manage it. We just need to configure the object we want to create into the xml file;
- A series of operations such as initialization and assignment of the created Hello object are also completed by Spring. We only need to configure it;
3, Dependency injection
Dependency: the creation of bean objects depends on the container
Injection: all attribute values in the bean object are injected by the container
Constructor injection (Master):
Here is the example of Hello above:
In fact, the < constructor Arg > tag is used, which is not shown here;
Set mode injection (Master):
1. Suppose you have defined two classes: Student class and Adress class
Adress class:
public class Address {
    private String address;
    // There are also set and get methods corresponding to a series of properties, which are not written here
}
Student class:
public class Student {
    private String name;
    private Address address;
    private String[] books;
    private List<String> hobbies;
    private Set<String> games;
    private Map<String,String> card;
    private String wife;
    private Properties info;
    // There are also set and get methods corresponding to a series of properties, which are not written here
}
2. Now you need to give the corresponding ApplicationContext XML configuration file configuration information;
Pay attention to the configuration of various types of attributes in the Student object;
<?xml version="1.0" encoding="UTF-8"?>
<beans xmlns="http://www.springframework.org/schema/beans"
       xmlns:xsi="http://www.w3.org/2001/XMLSchema-instance"
       xsi:schemaLocation="http://www.springframework.org/schema/beans
        https://www.springframework.org/schema/beans/spring-beans.xsd">

    <!--Reference type object (one) Address Object)-->
    <bean name="addressBean" class="com.yang.pojo.Address">
        <property name="address" value="Beijing"/>
    </bean>

    <!--One Student object-->
    <bean name="student" class="com.yang.pojo.Student">

        <!--The first: normal value injection, value-->
        <property name="name" value="Zhang San"/>

        <!--The second is reference type injection, ref-->
        <property name="address" ref="addressBean"/>

        <!--Third: array type injection-->
        <property name="books">
            <array>
                <value>Romance of the Three Kingdoms</value>
                <value>Water Margin</value>
                <value>Journey to the West</value>
                <value>The Dream of Red Mansion</value>
            </array>
        </property>

        <!--Fourth: list Set injection-->
        <property name="hobbies">
            <list>
                <value>Basketball</value>
                <value>Football</value>
                <value>badminton</value>
                <value>Table Tennis</value>
            </list>
        </property>

        <!--Fifth: set Set injection-->
        <property name="games">
            <set>
                <value>LOL</value>
                <value>CF</value>
                <value>CS</value>
                <value>BOB</value>
            </set>
        </property>

        <!--Sixth: map Injection set-->
        <property name="card">
            <map>
                <entry key="ID" value="666666666"/>
                <entry key="Student ID card" value="000000000"/>
                <entry key="bank card" value="111111111"/>
            </map>
        </property>

        <!--Seventh: empty string injection-->
        <property name="wife">
            <null/>
        </property>

        <!--Eighth: properties Type injection-->
        <property name="info">
            <props>
                <prop key="driver">Driver</prop>
                <prop key="url">mysql</prop>
                <prop key="root">root</prop>
                <prop key="password">020216</prop>
            </props>
        </property>
    </bean>

</beans>
There are eight forms in total. If you have nothing to do, you can look familiar. Among them, there are several new labels. Just look at them and know how to use them. idea has syntax tips, so you must have an impression;
Expansion mode injection (understanding):
It's OK to understand this. If you know this way, it won't work in practice; (can skip)
There's no more explanation here. Just borrow the official documents:
XML Shortcut with the p-namespace
p-namespace is to assign a value to an attribute, and p represents the effect of < property > tag;
Before use, you need to add this sentence to the xml file:
xmlns:p="http://www.springframework.org/schema/p"
Look at the official configuration:
<beans xmlns="http://www.springframework.org/schema/beans"
    xmlns:xsi="http://www.w3.org/2001/XMLSchema-instance"
    xmlns:p="http://www.springframework.org/schema/p"
    xsi:schemaLocation="http://www.springframework.org/schema/beans
        https://www.springframework.org/schema/beans/spring-beans.xsd">

    <bean name="classic" class="com.example.ExampleBean">
        <property name="email" value="someone@somewhere.com"/>
    </bean>

    <bean name="p-namespace" class="com.example.ExampleBean" p:email="someone@somewhere.com"/>
</beans>
p:email="someone@somewhere.com "This sentence is equivalent to
<property name="email" value="someone@somewhere.com"/>
And pay attention to P: email=“ someone@somewhere.com "This code is written in < bean >;
XML Shortcut with the c-namespace
If the < c-struct > attribute in the constructor has an assignment, it is equivalent to the effect of the < c-struct > attribute in the constructor;
Before use, you need to add this sentence to the xml file:
xmlns:c="http://www.springframework.org/schema/c"
Official configuration:
<beans xmlns="http://www.springframework.org/schema/beans"
    xmlns:xsi="http://www.w3.org/2001/XMLSchema-instance"
    xmlns:c="http://www.springframework.org/schema/c"
    xsi:schemaLocation="http://www.springframework.org/schema/beans
        https://www.springframework.org/schema/beans/spring-beans.xsd">

    <bean id="beanTwo" class="x.y.ThingTwo"/>
    <bean id="beanThree" class="x.y.ThingThree"/>

    <!-- traditional declaration with optional argument names -->
    <bean id="beanOne" class="x.y.ThingOne">
        <constructor-arg name="thingTwo" ref="beanTwo"/>
        <constructor-arg name="thingThree" ref="beanThree"/>
        <constructor-arg name="email" value="something@somewhere.com"/>
    </bean>

    <!-- c-namespace declaration with argument names -->
    <bean id="beanOne" class="x.y.ThingOne" c:thingTwo-ref="beanTwo"
        c:thingThree-ref="beanThree" c:email="something@somewhere.com"/>

</beans>
You can see that the formal parameters in the constructor are thingTwo, thingThree and email,
<constructor-arg name="thingTwo" ref="beanTwo"/>
<constructor-arg name="thingThree" ref="beanThree"/>
<constructor-arg name="email" value="something@somewhere.com"/>

<!--The above three sentences are equivalent to the following:-->
c:thingTwo-ref="beanTwo" c:thingThree-ref="beanThree" c:email="something@somewhere.com"
<!--Of course, this code is also placed in bean In label-->
4, Spring configuration
Spring has some configurations, such as aliasing; Here is only one important point:
Import import other xml configuration files
Because the actual development process is team collaborative development, everyone will be responsible for a module, and everyone has an xml configuration file, and different classes are registered in different xml files; Finally, combine all modules together, and these configuration files also need to be combined, which requires import to synthesize all configuration files into one;
Merged configuration file name: ApplicationContext xml
Merge six profiles into this file:
applicationContext.xml
<!--stay`applicationContext.xml`Import these configuration files into the file-->
<import resource="bean01.xml"/>
<import resource="bean02.xml"/>
<import resource="bean03.xml"/>
<import resource="bean04.xml"/>
<import resource="bean05.xml"/>
<import resource="bean06.xml"/>
5, Scope of Bean
There are six official ones. Let's start with two: singleton and prototype
Singleton Scope
This is the singleton pattern. An object will be used many times after it is created in Spring; It is also a default mode for Spring to create objects;
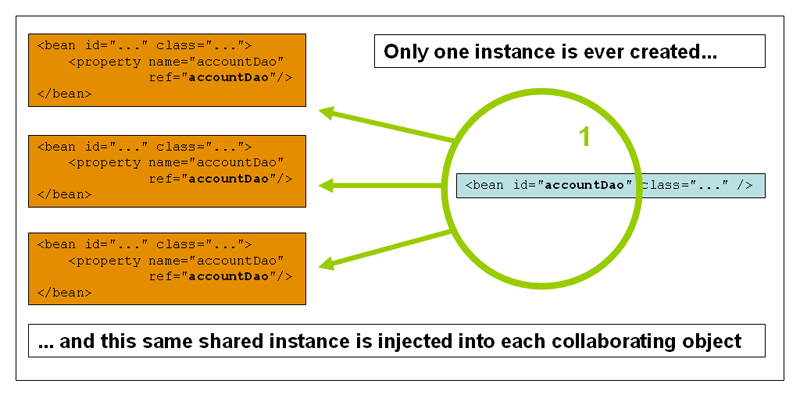
It can be clearly seen from the figure that an object instance will only be created once and used in multiple places;
To declare the scope, you only need to add the scope element in the bean tag;
Official example:
<bean id="accountService" class="com.something.DefaultAccountService"/>

<!-- the following is equivalent, though redundant (singleton scope is the default) -->
<bean id="accountService" class="com.something.DefaultAccountService" scope="singleton"/>
Because the singleton mode is the default, the declarations of the upper and lower bean s are the same;
You can do a small test: (or the Hello sample used above)
Here, I added the scope element to the bean. If not, the default singleton is the same;
<bean id="hello" class="com.yang.service.Hello" scope="singleton">
     <constructor-arg name="str" value="Java"/>
     <property name="name" value="Spring"/>
</bean>
java test code:
@Test
public void springTest01() {
    ApplicationContext context = new ClassPathXmlApplicationContext("bean.xml");
    Hello hello01 = (Hello) context.getBean("hello");
    Hello hello02 = (Hello) context.getBean("hello");
    System.out.println(hello01 == hello02);
}
Because it is a singleton mode, hello01 and hello02 must take the same object from Spring;
The result is true
Prototype Scope
This is the prototype pattern. Every time you get it from Spring, a new object will be created, as shown in the figure:
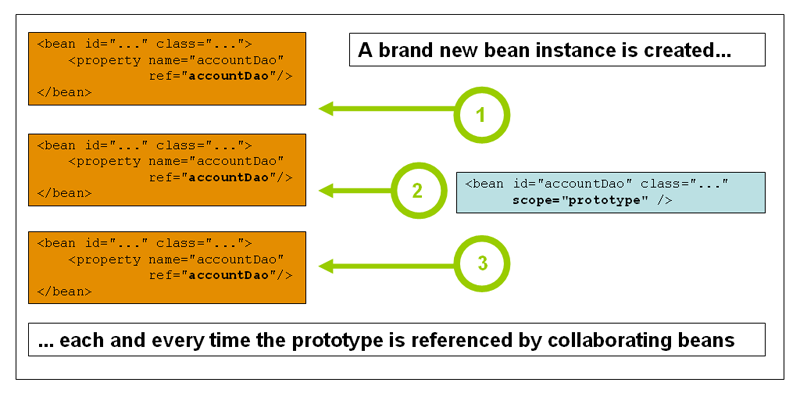
Official example:
<bean id="accountService" class="com.something.DefaultAccountService" scope="prototype"/>
Just write it as prototype in scope;
The following is a small example of hello:
bean declaration:
<bean id="hello" class="com.yang.service.Hello" scope="prototype">
    <constructor-arg name="str" value="Java"/>
    <property name="name" value="Spring"/>
</bean>
java test code (same as above):
@Test
public void springTest01() {
    ApplicationContext context = new ClassPathXmlApplicationContext("bean.xml");
    Hello hello01 = (Hello) context.getBean("hello");
    Hello hello02 = (Hello) context.getBean("hello");
    System.out.println(hello01 == hello02);
}
The result is contrary to the singleton mode, and the output value is false, which indicates that although hello01 and hello02 are objects obtained through one id, each acquisition creates a new object, which is the characteristic of the prototype mode;
Summary
In practice, we mainly use the default case, that is, the singleton mode, because using the prototype mode to create an object every time, which also takes up a lot of memory; So don't worry about the scope without any special circumstances;
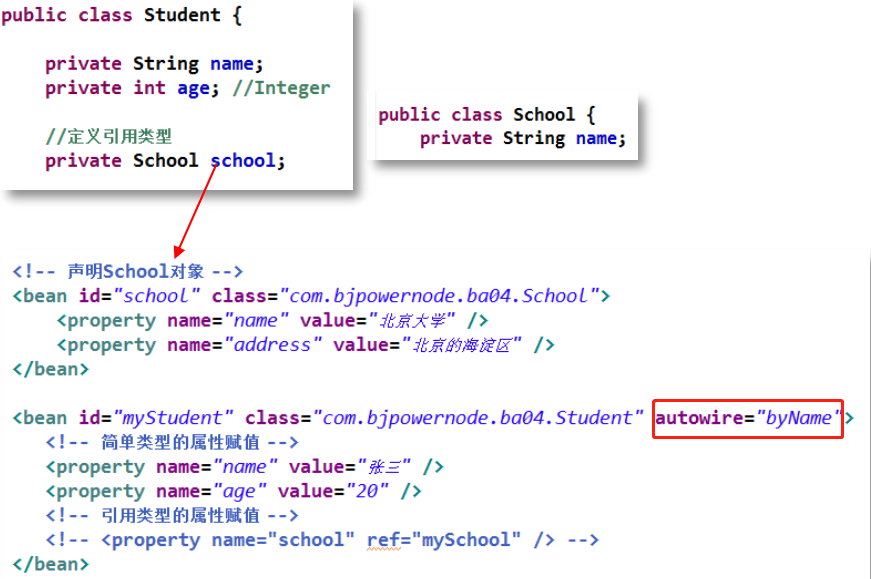
6, Reference type auto injection
For the injection of reference type attributes, the injection displayed in the configuration file may not be used; Instead, set the autowire attribute value for the label to implicitly automatically inject the reference type attribute (the default is not to automatically inject the reference type attribute);
According to the different judgment criteria of automatic injection, it can be divided into two types:
- byName: automatically inject by name
- byType: automatically inject according to the type
To put it simply, it is not recommended to use in practice, and the readability is not high;
There is no more explanation here. You can directly use the information found on the Internet;
ByName auto injection
byName: it will automatically find the bean id corresponding to the parameter value of the set method of its own object in the container context
ByType auto injection
byType: the bean with the same property type as its own object will be automatically found in the container context

Summary
These two methods have their own advantages and disadvantages, but it is not recommended to use them in practice. Learn about them and recognize others' projects if they have this one;
- ByName: it is necessary to ensure that the IDs of all beans are unique, and this bean must be consistent with the formal parameter value of the set method of the automatically injected attribute
- ByType: it is necessary to ensure that the class of all beans is unique (if there are multiple beans with duplicate types, it will not work), and this bean needs to be consistent with the type of the automatically injected attribute
7, Annotation based DI
Spring2.5 began to support annotation, further simplifying the configuration;;
It needs to be in ApplicationContext Add something to the basic structure of XML to support annotation
<?xml version="1.0" encoding="UTF-8"?>
<beans xmlns="http://www.springframework.org/schema/beans"
    xmlns:xsi="http://www.w3.org/2001/XMLSchema-instance"
    xmlns:context="http://www.springframework.org/schema/context"
    xsi:schemaLocation="http://www.springframework.org/schema/beans
        https://www.springframework.org/schema/beans/spring-beans.xsd
        http://www.springframework.org/schema/context
        https://www.springframework.org/schema/context/spring-context.xsd">

    <context:annotation-config/>

</beans>
@Autowired implements byType automatic injection
Use the annotation @ Autowired on the reference attribute. By default, the annotation uses the method of ByType Bean;
When using this annotation to complete attribute injection, some set methods are no longer required in the class, but it is recommended to write them;
@Autowired can be written on attributes or methods;
Example:
Student class and Address class (set and get are still recommended, not so much here):
public class Address {
    private String address;
}
public class Student {
    @Autowired
    private Address addressName;
}
applicationContext.xml file:
<?xml version="1.0" encoding="UTF-8"?>
<beans xmlns="http://www.springframework.org/schema/beans"
       xmlns:xsi="http://www.w3.org/2001/XMLSchema-instance"
       xmlns:context="http://www.springframework.org/schema/context"
       xsi:schemaLocation="http://www.springframework.org/schema/beans
        https://www.springframework.org/schema/beans/spring-beans.xsd
        http://www.springframework.org/schema/context
        https://www.springframework.org/schema/context/spring-context.xsd">
    <context:annotation-config/>

    <bean id="student" class="com.yang.pojo.Student"/>

    <bean id="address" class="com.yang.pojo.Address">
        <property name="address" value="Zhengzhou"/>
    </bean>

</beans>
It can be found from the configuration file that the instance student of the student class does not assign a value to the addressName attribute, but @ Autowired is used in the student class, which means that addressName will be assigned by the instance of address type in the xml file by default, that is, the address object in the xml file will be automatically assigned to addressName;
Of course, @ Autowired is automatically assembled by type. The disadvantages of automatic assembly by type are also mentioned above: when there are multiple bean s with duplicate types, it can be automatically assembled by id;
@Autowired and @ Qualifier realize byName automatic injection
If you use ByName, you only need to use the annotation @ Autowired and @ Qualifier together;
@The value attribute of Qualifier can be used to specify the id of the matching bean;
Example:
Or the above example, here we only write out the differences;
public class Student {
    @Autowired
    @Qualifier(value = "address")
    private Address addressName;
}
In this way, you can specify a unique bean object injection;
Here is another last point:
@Autowired also has an attribute required, and the default value is true, which means that the program will be terminated after matching fails; If the value is set to false, the matching fails, will be ignored, and the unmatched attribute value is null;
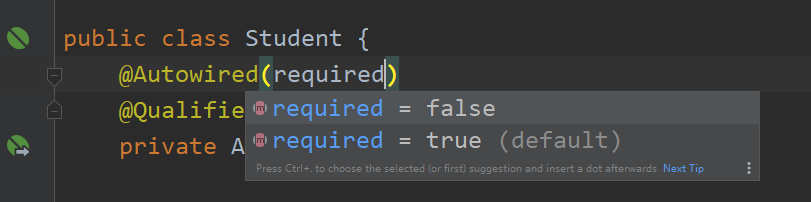
Just have an impression;
JDK annotation @ Resource auto injection
Spring provides support for @ resource annotation in JDK@ Resource annotations can match beans by name or type; By default, it is injected by name (ByName); Using this annotation requires that the JDK must be version 6 or above@ The resource can be on the attribute or set method;
Let's revise the example just now:
public class Student {
    @Resource
    private Address addressName;
}
If this is the default, you will find out whether there is a bean with id addressName from the Spring container, from the above ApplicationContext In the XML file, you can see that there is no bean with id as addressName, but only one with id as address, so an error will be reported; However, if there is a bean with the corresponding id, it can be automatically injected successfully;
What about bean s without corresponding IDS@ A Resource also has a name attribute that can specify an id
It can be written as follows:
public class Student {
    @Resource(name = "address")
    private Address addressName;
}
In this way, we can inject success;
@Problems that cannot be introduced by Resource annotation
When using @ Resource, I encountered a problem that cannot be introduced. After checking the data, I found that the javax extension was removed after JDK11, so @ Resource annotation cannot be used;
The solution is also very simple. Just add a corresponding maven dependency directly;
<dependency>
    <groupId>javax.annotation</groupId>
    <artifactId>javax.annotation-api</artifactId>
    <version>1.3.2</version>
</dependency>
Annotation @ Value injects simple data types
For simple data types such as String and Integer, the value attribute of @ value annotation can be used for injection, which is simpler;
However, for complex data types such as list and Map, it is best to use property injection;
Example:
import org.springframework.beans.factory.annotation.Value;

public class User {
    // Inject with @ Value
    @Value(value = "Zhang San")
    private String name;
}
The above is equivalent to ApplicationContext In XML:
<property name="name" value="Zhang San"/>
Annotation @ Component definition bean
Since attributes can be automatically injected through annotations, is there any annotation that can realize the function of defining bean s?
Annotation @ Component can realize the function of defining beans. In this way, through the cooperation of annotation @ Value, it is no longer necessary to write < bean > label to the configuration file in some simple situations;
@The Component annotation indicates that a class will be used as a component class and tells Spring to create bean s for this class;
First, before using it, you need to enter ApplicationContext Add configuration to XML
<context:component-scan base-package="Scanned package path"/>
This is in ApplicationContext XML is configured with a scanner, which can scan all annotations under the corresponding package;
Suppose I have a com Yang package, scan it for the following comments:
applicationContext.xml
<?xml version="1.0" encoding="UTF-8"?>
<beans xmlns="http://www.springframework.org/schema/beans"
       xmlns:xsi="http://www.w3.org/2001/XMLSchema-instance"
       xmlns:context="http://www.springframework.org/schema/context"
       xsi:schemaLocation="http://www.springframework.org/schema/beans
        https://www.springframework.org/schema/beans/spring-beans.xsd
        http://www.springframework.org/schema/context
        https://www.springframework.org/schema/context/spring-context.xsd">
    <!--scanning com.yang All comments under the package-->
    <context:component-scan base-package="com.yang"/>
    <context:annotation-config/>
</beans>
After the configuration file is written, if the @ Component annotation is used, you will no longer need to configure in this configuration file
See how the @ Component annotation is used in the code:
User.java
package com.yang.pojo;

import org.springframework.beans.factory.annotation.Value;
import org.springframework.stereotype.Component;

@Component // The default id value is user
public class User {
    @Value(value = "Zhang San")
    private String name;
    @Value(value = "18")
    private Integer age;
}
Annotated with @ Component annotation means that user is a component class, so Spring will automatically create a user object. By default, the id of this object is the initial lowercase of the class name: user
(if you don't want to use the default id, @ Component has a value attribute. You can set the id value @ Component(value = "custom id value"))
Therefore, the effect of the above annotation is equivalent to that in ApplicationContext The XML file is configured as follows:
<bean id="user" class="com.yang.pojo.User">
	<property name="name" value="Zhang San"/>
	<property name="age" value="18"/>
</bean>
The following can be tested with test code:
@Test
public void annotationTest01() {
    ApplicationContext context = new ClassPathXmlApplicationContext("applicationContext.xml");
    User user = context.getBean("user", User.class);
    System.out.println(user);
}
Spring also provides three annotations for creating objects:
-
@Repository is used to annotate DAO implementation classes (data access layer)
-
@Service is used to annotate the service implementation class (business logic layer)
-
@Controller is used to annotate the controller implementation class (interface layer)
What is the difference between these three and @ Component?
In fact, as like as two peas in function, the usage is exactly the same.
Then why do you have to do so many tricks? It can be guessed from the names that they are only used in three different architectures of mvc in order to distinguish them by different names;
Comparison between annotation and XML configuration
The advantages of annotation are: convenient, intuitive and efficient (less code and less complex than writing configuration files);
The disadvantages are also obvious: if it is written into Java code by hard coding, the modification needs to recompile the code;
The advantages of xml are: configuration and code are separated; Make changes in xml without compiling code. Just restart the server to load the new configuration.;
The disadvantages of xml are: the writing is troublesome, the efficiency is low, and the large-scale project is too complex;
Extension: configuration using pure Java programs
JavaConfig was originally a sub project of Spring, but it became the core function after Spring 4;
This is a new way to use Spring, which completely uses annotations to configure all content;
However, in practice, using Spring development does not completely abandon XML configuration, which is generally mixed. Why do you mention this here?
Because this method can be seen everywhere in Springboot, learn in advance to lay the foundation for future Springboot;
Annotation @ Configuration
If the class marked by @ Configuration annotation means that it is a Configuration class, then this class is equivalent to ApplicationContext XML Configuration file;
The class annotated with @ Configuration annotation will also be managed and registered in the Spring container, because it is a @ Component. You can see its source code:
//
// Source code recreated from a .class file by IntelliJ IDEA
// (powered by FernFlower decompiler)
//

package org.springframework.context.annotation;

import java.lang.annotation.Documented;
import java.lang.annotation.ElementType;
import java.lang.annotation.Retention;
import java.lang.annotation.RetentionPolicy;
import java.lang.annotation.Target;
import org.springframework.core.annotation.AliasFor;
import org.springframework.stereotype.Component;

@Target({ElementType.TYPE})
@Retention(RetentionPolicy.RUNTIME)
@Documented
@Component
public @interface Configuration {
    @AliasFor(
        annotation = Component.class
    )
    String value() default "";

    boolean proxyBeanMethods() default true;
}
Example Demo:
Let's demonstrate how to use it;
1. On COM yang. Create a User class under POJO package:
package com.yang.pojo;

import org.springframework.beans.factory.annotation.Value;
import org.springframework.stereotype.Component;

import java.util.Objects;

@Component
public class User {
    @Value(value = "Zhang San")
    private String name;
    @Value(value = "10")
    private Integer age;
    // The toString and other methods rewritten below will not be released
}
2. Create a configuration class MyConfig
package com.yang.config;

import com.yang.pojo.User;
import org.springframework.context.annotation.Bean;
import org.springframework.context.annotation.ComponentScan;
import org.springframework.context.annotation.Configuration;

@Configuration // Declare this class as a configuration class
public class MyConfig {

    // Registering a bean is equivalent to a bean tag
    // The name of the method is equivalent to the id attribute in the bean tag
    // The return value of the method is equivalent to the class attribute in the bean tag
    @Bean // Configure the bean for the User class. The default id is the method name: getUser
    public User getUser() {
        return new User();
    }
}
Once the @ Configuration annotation is added to this class, it is the Configuration class. All XML Configuration files can be implemented through annotation;
@Bean is used to register a bean. At present, I don't know much about it, and I only know how to write it. I can imitate and try it;
@Bean has a value attribute, which can specify the id value, so you don't need to use the default method name. The usage of value is the same as other annotations;
3. Test:
@Test
public void annotationTest01() {
    ApplicationContext applicationContext = new AnnotationConfigApplicationContext(MyConfig.class);
    User user01 = applicationContext.getBean("getUser", User.class);
    System.out.println(user01 + " Hash value:" + user01.hashCode());
    User user02 = applicationContext.getBean("user", User.class);
    System.out.println(user02 + " Hash value:" + user02.hashCode());
}
Here is a little different from using the configuration file:
The configuration file uses ClassPathXmlApplicationContext("configuration file name") when generating ApplicationContext objects
When the configuration Class is used to generate the ApplicationContext object, the following is used: annotationconfigapplicationcontext (the Class object of the configuration Class)
It is the same to obtain bean objects, which are obtained through getBean method;
Here, this method is only for understanding and will be applied in Springboot;
Supplement (about @ Bean and @ Component):
@Both bean and @ Component can inject beans into the spring container, so what's the difference?
For example, in the above example, it can be found that beans are registered through @ bean and @ Component, so there are actually two User objects in the spring container. In the following test, I also use the method of outputting hash value to prove this (you can try it. The hash value is different, provided that the hashCode method is not rewritten);
Here are the differences:
@Component is used to automatically detect and use classpath scanning to automatically configure beans. There is an implicit one-to-one mapping between annotation classes and beans (that is, one bean for each class); This method has very limited control over logical processing, because it is purely declarative;
@Bean is used to explicitly declare a single bean instead of letting Spring execute it automatically as above. It separates the bean declaration from the class definition and allows you to accurately create and configure beans;
If you want to turn a third-party class into a Component without source code, you can't use @ Component for automatic configuration. At this time, it's more appropriate to use @ Bean (which can also be defined in xml)
In addition, the method return value of @ Bean annotation is an object, and you can set properties for the object in the method;
8, AOP aspect oriented programming
Basic concepts
Baidu Encyclopedia:
In the software industry, AOP is the abbreviation of Aspect Oriented Programming, which means: Aspect Oriented Programming, a technology that realizes the unified maintenance of program functions through precompiled mode and dynamic agent during operation. AOP is the continuation of OOP, a hot spot in software development, an important content of Spring framework and a derivative paradigm of functional programming. AOP can isolate all parts of business logic, so as to reduce the coupling between all parts of business logic, improve the reusability of programs, and improve the efficiency of development.
Brief description: AOP can add new functions to the core code without changing the source code;
Underlying principle:
The underlying principle of AOP is dynamic programming (not much introduced here, but this must be understood if you want to understand it deeply)
term
join point
Which methods in the class can be enhanced, then these methods are connection points;
point cut
The method actually enhanced in the class is called the pointcut;
Pointcut expression
The pointcut expression will be used when writing the code below. Now let's know what it means when we see the code;
Function: indicates which method in which class is enhanced;
Syntax structure:
execution(Permission modifier returns the full path of the type class.Method name(parameter list))

Suppose in com.yang.dao There's one next User You want to enhance the public void add()method
execution(public void com.yang.dao.User.add())

However, this can only specify the corresponding method in one class. If you want to use it flexibly, you should learn wildcards'*'Usage of
 In fact, the access modifier can be omitted, and the return value uses wildcards'*'
execution(* com.yang.dao.User.*(..))
Written in the parameter list'..'It indicates whether there are parameters or not. When there are parameters, it can be any type
 This expression means: enhance com.yang.dao.User All methods in the class

Cut in point expressions should be used flexibly. If you are not clear, you can try it by yourself
advice
The logical part (function, generally an enhancement method) actually used for enhancement is called notification;
There are many types of notifications:
- Before advice
- Post notification
- Around Advice
- Exception notification
- Return notification (final notification)
aspect
The implementation of common functions (log aspect, transaction aspect, etc.) is a Java class, which is designated as the aspect in the configuration; Aspect is essentially the combination of notification and entry point;
The notice specifies what functions to add and when to add them;
The entry point specifies where to add functions;
introduction
The introduction allows us to add new methods or properties to existing classes;
weaving
The process of applying the slice to the target object and creating a new proxy object. The slice is woven into the target object at the specified connection point; In the life cycle of the target object, there are many points that can be woven: compilation period, class loading period and running period;
These concepts focus on understanding the entry point, notification and aspect. In code operation, only the concepts of attributes can know what they are doing at each step;
AOP operation demonstration
No matter what method is used, you must first import the jar package corresponding to AOP. The corresponding maven dependency:
<!-- https://mvnrepository.com/artifact/org.aspectj/aspectjweaver -->
<dependency>
    <groupId>org.aspectj</groupId>
    <artifactId>aspectjweaver</artifactId>
    <version>Version number</version>
</dependency>
In ApplicationContext XML file needs to add:
xmlns:aop="http://www.springframework.org/schema/aop"
http://www.springframework.org/schema/aop
https://www.springframework.org/schema/aop/spring-aop.xsd
Create a user package, create a UserService interface and corresponding implementation classes
UserService.java
package com.yang.user;

public interface UserService {
    // increase
    void add();
    // Delete
    void delete();
    // change
    void update();
    // check
    void select();
}
UserServiceImp.java
package com.yang.user;

public class UserServiceImp implements UserService{
    @Override
    public void add() {
        System.out.println("Added a piece of data");
    }

    @Override
    public void delete() {
        System.out.println("Deleted a piece of data");
    }

    @Override
    public void update() {
        System.out.println("Updated a piece of data");
    }

    @Override
    public void select() {
        System.out.println("A piece of data was queried");
    }
}
The following three methods are based on these two classes;
The first method
The enhanced class implements the built-in interface of java;
Enhancement part (I feel this is the notice):
In the front enhancement part of the target method, the MethodBeforeAdvice interface is implemented. This interface means pre notification and the before method is implemented. This method is the enhanced content, and this class is an aspect
package com.yang.log;

import org.springframework.aop.MethodBeforeAdvice;

import java.lang.reflect.Method;

public class BeforeLog implements MethodBeforeAdvice {
    // Target: target object (proxied object)
    // args: parameters of the target method
    // Method: target method
    @Override
    public void before(Method method, Object[] args, Object target) throws Throwable {
        System.out.println(target.getClass().getName() + " Object called:" + method.getName() + "method");
    }
}
In the post enhancement part of the target method, the AfterReturningAdvice interface is implemented
package com.yang.log;

import org.springframework.aop.AfterReturningAdvice;

import java.lang.reflect.Method;

public class AfterLog implements AfterReturningAdvice {
    //returnValue: return value
    @Override
    public void afterReturning(Object returnValue, Method method, Object[] args, Object target) throws Throwable {
        System.out.println("Yes" + method.getName() + "Method, the return value is:" + returnValue);
    }
}
With the enhancement method, the following is the weaving process, which is completed in the configuration file:
<!--Target class, in which the method is the join point-->
<bean id="userServiceImp" class="com.yang.user.UserServiceImp"/>
<!--Enhancement class-->
<bean id="before" class="com.yang.log.BeforeLog"/>
<bean id="after" class="com.yang.log.AfterLog"/>

<!--The first method: implement the internal interface to cut in-->
<aop:config>
	<!--Set pointcuts (methods that need to be enhanced)-->
	<aop:pointcut id="pointcut" expression="execution(* com.yang.user.UserServiceImp.*(..))"/>

	<!--The enhancement (notification) is configured on the corresponding entry point (method)-->
	<!--Surround enhancement-->
	<aop:advisor advice-ref="before" pointcut-ref="pointcut"/>
	<aop:advisor advice-ref="after" pointcut-ref="pointcut"/>
</aop:config>
The entry point set here is userserviceimp All methods in Java, so the corresponding pointcut expression is: execution(* com.yang.user.UserServiceImp. * (..))
※ note: the target class must be configured with the corresponding bean, because you need to take some of its internal methods as the entry point. You can find the corresponding method only after configuring it in spring and setting the entry point in the < AOP: pointcut / > tag;
Test code:
@Test
public void springTest01() {
    ApplicationContext context = new ClassPathXmlApplicationContext("applicationContext.xml");
    // At present, it is speculated that the userService created here is a proxy class, so it should be declared as an interface type
    UserService userService = context.getBean("userServiceImp", UserService.class);
    userService.select(); // The proxy class executes the target class method
}
Because the next method also uses this test method, the test code will not be written below;
Output result:
com.yang.user.UserServiceImp Object called: select method
 A piece of data was queried
 Yes select Method, the return value is: null
The advantage of this method is that it can rewrite the corresponding method by implementing the built-in class, and the parameters in the corresponding method can be called, so that the corresponding information can be obtained;
But just because it needs to implement the built-in method, this has also become its disadvantage;
The second method
The main difference between the second method and the first method is that the enhanced part of the first method is the implementation interface, but the second method uses the methods in the self-defined class as the aspect;
Custom cut:
package com.yang.secondmethod;

public class MyDefinition {
    // This method is used as a pre notification
    public void before() {
        System.out.println("=====before=====");
    }
    // This method acts as a post notification
    public void after() {
        System.out.println("=====after=====");
    }
}
In the xml configuration file:
<!--The second method: use custom classes to cut in-->
<bean id="definition" class="com.yang.secondmethod.MyDefinition"/>
<aop:config>
	<!--Custom section-->
	<aop:aspect ref="definition">
    	<!--breakthrough point-->
    	<aop:pointcut id="pointcut" expression="execution(* com.yang.user.UserServiceImp.*(..))"/>
    	<!--The enhancement (notification) is configured on the corresponding entry point (method)-->
    	<aop:before method="before" pointcut-ref="pointcut"/>
    	<aop:after method="after" pointcut-ref="pointcut"/>
	</aop:aspect>
</aop:config>
Test output:
=====before=====
A piece of data was queried
=====after=====
The biggest advantage of this method is that you can realize the functions you want to achieve through custom aspects, which is more extensible, and if you need a variety of enhancement methods, it is not as complex as the first enhancement method to implement an interface;
However, the same second is that the first channel to obtain internal information has been lost, so it should be used according to the actual situation; Generally, the second kind is used more;
The third method
This method is implemented using annotations;
Of course, annotations and configuration files can be mixed, but here I will use pure annotations for demonstration;
Configuration class:
package com.yang.annotation;

import com.yang.service.UserServiceImp;
import org.aspectj.lang.ProceedingJoinPoint;
import org.aspectj.lang.annotation.After;
import org.aspectj.lang.annotation.Around;
import org.aspectj.lang.annotation.Aspect;
import org.aspectj.lang.annotation.Before;
import org.springframework.context.annotation.Bean;
import org.springframework.context.annotation.Configuration;
import org.springframework.context.annotation.EnableAspectJAutoProxy;

@Configuration // Declared as configuration class
@EnableAspectJAutoProxy // Enable AOP annotation support
@Aspect // Use annotations to declare the class as a facet
public class MyAnnotation {
    // Register bean
    @Bean(value = "userService")
    public UserServiceImp userServiceImp() {
        return new UserServiceImp();
    }

    @Before("execution(* com.yang.service.UserServiceImp.add(..))")
    public void before() {
        System.out.println("==========before==========");
    }

    @After("execution(* com.yang.service.UserServiceImp.delete(..))")
    public void after() {
        System.out.println("==========after==========");
    }

    @Around("execution(* com.yang.service.UserServiceImp.update(..))")
    public void around(ProceedingJoinPoint joinPoint) throws Throwable {
        System.out.println("------Before surround notification------");
        joinPoint.proceed();
        System.out.println("------After surround notification------");
    }
}
This class is declared as a configuration class and used as a facet. Various enhancement methods and notifications are defined internally;
Pay attention to distinguish the different notification types of different methods in the pointcut expression;
Then test directly:
@Test
public void springTest01() {
    ApplicationContext context = new AnnotationConfigApplicationContext(MyAnnotation.class);
    UserService userService = context.getBean("userService", UserService.class);
    userService.add();
    System.out.println("\n");
    userService.delete();
    System.out.println("\n");
    userService.update();
}
Output result:
==========before==========
Added a piece of data


Deleted a piece of data
==========after==========


------Before surround notification------
Updated a piece of data
------After surround notification------
Now it's OK to master these three methods, especially the second one. It's easy to get confused at the first contact, and each concept is unclear, so we must first understand those terms, and then bring them into the code to understand;
AOP still needs to experience its magic in actual projects. These small cases will only make people feel very troublesome, so we must do a small project after learning ssm;
Mybatis spring integration
Learning spring framework is definitely not used alone. Spring framework is mainly used for business logic layer and mybatis framework is used for data access layer. In a project, there will be intersection between them. So how to integrate the two? Let me demonstrate the integration steps below;
Preparatory work (mybatis review)
First, import the corresponding jar package. Here, use maven to add the corresponding dependencies:
Because spring has many corresponding dependencies, I'll show some current POM All contents of the XML file will be marked if they need to be added;
<?xml version="1.0" encoding="UTF-8"?>
<project xmlns="http://maven.apache.org/POM/4.0.0"
         xmlns:xsi="http://www.w3.org/2001/XMLSchema-instance"
         xsi:schemaLocation="http://maven.apache.org/POM/4.0.0 http://maven.apache.org/xsd/maven-4.0.0.xsd">
    <modelVersion>4.0.0</modelVersion>

    <groupId>com.yang</groupId>
    <artifactId>spring-learning</artifactId>
    <packaging>pom</packaging>
    <version>1.0-SNAPSHOT</version>

    <properties>
        <maven.compiler.source>16</maven.compiler.source>
        <maven.compiler.target>16</maven.compiler.target>
    </properties>
    <dependencies>
        <!--Here's how to use spring Dependencies to import-->
        <!-- https://mvnrepository.com/artifact/org.springframework/spring-webmvc -->
        <dependency>
            <groupId>org.springframework</groupId>
            <artifactId>spring-webmvc</artifactId>
            <version>5.3.15</version>
        </dependency>
        <!-- https://mvnrepository.com/artifact/org.aspectj/aspectjweaver -->
        <dependency>
            <groupId>org.aspectj</groupId>
            <artifactId>aspectjweaver</artifactId>
            <version>1.9.7</version>
        </dependency>

        <!--Here's how to use mybatis Additional dependencies added-->
        <!-- https://mvnrepository.com/artifact/org.mybatis/mybatis-spring -->
        <dependency>
            <groupId>org.mybatis</groupId>
            <artifactId>mybatis-spring</artifactId>
            <version>2.0.6</version>
        </dependency>
        <!-- https://mvnrepository.com/artifact/org.springframework/spring-jdbc -->
        <dependency>
            <groupId>org.springframework</groupId>
            <artifactId>spring-jdbc</artifactId>
            <version>5.3.14</version>
        </dependency>
        <!-- https://mvnrepository.com/artifact/org.mybatis/mybatis -->
        <dependency>
            <groupId>org.mybatis</groupId>
            <artifactId>mybatis</artifactId>
            <version>3.5.7</version>
        </dependency>
        <!-- https://mvnrepository.com/artifact/mysql/mysql-connector-java -->
        <dependency>
            <groupId>mysql</groupId>
            <artifactId>mysql-connector-java</artifactId>
            <version>8.0.27</version>
        </dependency>
        <!-- https://mvnrepository.com/artifact/org.projectlombok/lombok -->
        <dependency>
            <groupId>org.projectlombok</groupId>
            <artifactId>lombok</artifactId>
            <version>1.18.22</version>
        </dependency>
    </dependencies>
    <build>
        <resources>
            <resource>
                <!--Directory of-->
                <directory>src/main/java</directory>
                <!--Including the.properties,.xml The files will be scanned-->
                <includes>
                    <include>**/*.properties</include>
                    <include>**/*.xml</include>
                </includes>
                <filtering>false</filtering>
            </resource>
        </resources>
    </build>
</project>
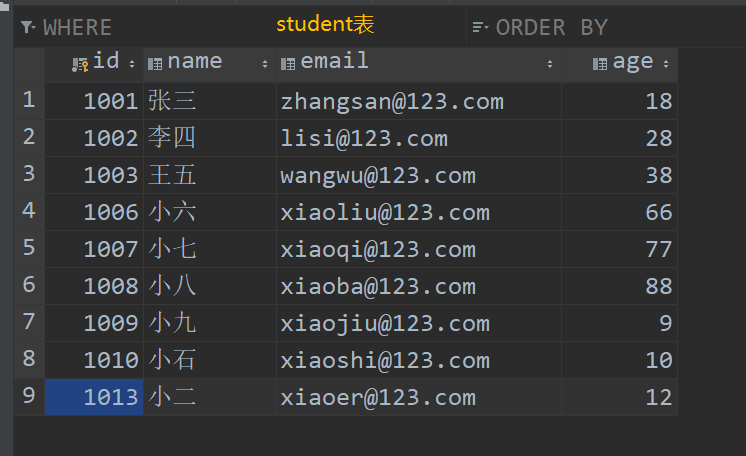
After importing the corresponding jar package, you need a database table to operate, or use the table learned from mybatis before:
The following are the fixed steps of mybatis:
Create a student class, the attribute name corresponds to the field name of the table, and provide the corresponding set, get and other methods;
student.java
package com.yang.pojo;

import java.util.Objects;

public class Student {
    private int id;
    private String name;
    private String email;
    private int age;

    public Student() {
    }

    public Student(int id, String name, String email, int age) {
        this.id = id;
        this.name = name;
        this.email = email;
        this.age = age;
    }

    public int getId() {
        return id;
    }

    public void setId(int id) {
        this.id = id;
    }

    public String getName() {
        return name;
    }

    public void setName(String name) {
        this.name = name;
    }

    public String getEmail() {
        return email;
    }

    public void setEmail(String email) {
        this.email = email;
    }

    public int getAge() {
        return age;
    }

    public void setAge(int age) {
        this.age = age;
    }

    @Override
    public String toString() {
        return "Student{" +
                "id=" + id +
                ", name='" + name + '\'' +
                ", email='" + email + '\'' +
                ", age=" + age +
                '}';
    }

    @Override
    public boolean equals(Object o) {
        if (this == o) return true;
        if (!(o instanceof Student)) return false;
        Student student = (Student) o;
        return id == student.id && age == student.age && Objects.equals(name, student.name) && Objects.equals(email, student.email);
    }

    @Override
    public int hashCode() {
        return Objects.hash(id, name, email, age);
    }
}
Take a simple query as an example. You also need a StudentDao interface and a corresponding mapper file: StudentDao xml
StudentDao.java
package com.yang.dao;

import com.yang.pojo.Student;

import java.util.List;

public interface StudentDao {
    // Query method
    List<Student> selectStudent();
}
StudentDao.xml
<?xml version="1.0" encoding="UTF-8" ?>
<!DOCTYPE mapper
        PUBLIC "-//mybatis.org//DTD Mapper 3.0//EN"
        "http://mybatis.org/dtd/mybatis-3-mapper.dtd">
<mapper namespace="com.yang.dao.StudentDao">
    <select id="selectStudent" resultType="com.yang.pojo.Student">
        select * from student
    </select>
</mapper>
The last step is to configure the main configuration file config xml
<?xml version="1.0" encoding="UTF-8" ?>
<!DOCTYPE configuration
PUBLIC "-//mybatis.org//DTD Config 3.0//EN"
"http://mybatis.org/dtd/mybatis-3-config.dtd">
<configuration>
<!-- <properties resource="jdbc.properties"/>-->
<!--settings: control mybatis Global behavior-->
<settings>
<!--set up mybatis Output log-->
<setting name="logImpl" value="STDOUT_LOGGING"/>
</settings>
<!-- <environments default="test">-->
<!-- <environment id="test">-->
<!-- <transactionManager type="JDBC"/>-->
<!-- <dataSource type="POOLED">-->
<!-- <!–Driver class name of the database–>-->
<!-- <property name="driver" value="${jdbc.driver}"/>-->
<!-- <!–Connection to database url character string–>-->
<!-- <property name="url" value="${jdbc.url}"/>-->
<!-- <!–User name to access the database–>-->
<!-- <property name="username" value="${jdbc.username}"/>-->
<!-- <!–password–>-->
<!-- <property name="password" value="${jdbc.password}"/>-->
<!-- </dataSource>-->
<!-- </environment>-->
<!-- </environments>-->
<!-- sql mapper(sql Mapping file)Location of-->
<!-- <mappers>-->
<!-- <mapper resource="com/yang/dao/StudentDao.xml"/>-->
<!-- </mappers>-->
</configuration>
Corresponding JDBC The properties file is:
jdbc.driver=com.mysql.cj.jdbc.Driver
jdbc.url=jdbc:mysql://localhost:3306/ssm_learning?serverTimezone=UTC
jdbc.username=root
jdbc.password=020216
You may find that many parts of my config configuration file are commented out. Why? Because next, I will use spring to configure this part of the content, so that I can compare and see what I have extracted;
Note: let's say in advance: in fact, this config configuration file is not necessary at all, because spring can configure everything completely; However, in order to reflect the use of mybatis, you can add this file and only declare the alias and set relevant contents in this file;
Implementation code
The first difference is that there needs to be an additional implementation of the StudentDao interface. Although it seems troublesome, the actual use of the final test can be much simpler;
StudentDaoImp.java
package com.yang.dao;

import com.yang.pojo.Student;
import org.mybatis.spring.SqlSessionTemplate;

import java.util.List;

public class StudentDaoImp implements StudentDao{

    private SqlSessionTemplate session;

    // This session will be configured in the spring configuration file, so a set method is provided
    public void setSession(SqlSessionTemplate session) {
        this.session = session;
    }

    @Override
    public List<Student> selectStudent() {
        // Call session directly
        StudentDao studentDao = session.getMapper(StudentDao.class);
        return studentDao.selectStudent();
    }
}
Configure the configuration file corresponding to spring:
spring-mybatis.xml
<?xml version="1.0" encoding="UTF-8"?>
<beans xmlns="http://www.springframework.org/schema/beans"
       xmlns:xsi="http://www.w3.org/2001/XMLSchema-instance"
       xmlns:context="http://www.springframework.org/schema/context"
       xmlns:aop="http://www.springframework.org/schema/aop"
       xsi:schemaLocation="http://www.springframework.org/schema/beans
        https://www.springframework.org/schema/beans/spring-beans.xsd
        http://www.springframework.org/schema/context
        https://www.springframework.org/schema/context/spring-context.xsd
        http://www.springframework.org/schema/aop
        https://www.springframework.org/schema/aop/spring-aop.xsd">
    <context:annotation-config/>
    <!--read jdbc.properties Profile support-->
    <context:property-placeholder location="classpath:jdbc.properties"/>

    <!--DataSource: use Spring Data source replacement Mybatis Configuration of-->
    <bean id="dataSource" class="org.springframework.jdbc.datasource.DriverManagerDataSource">
        <property name="driverClassName" value="${jdbc.driver}"/>
        <property name="url" value="${jdbc.url}"/>
        <property name="username" value="${jdbc.username}"/>
        <property name="password" value="${jdbc.password}"/>
    </bean>

    <!--SqlSessionFactory-->
    <bean id="sqlSessionFactory" class="org.mybatis.spring.SqlSessionFactoryBean">
        <!--Load data source dataSource-->
        <property name="dataSource" ref="dataSource"/>
        <!--binding mybatis of config Master profile-->
        <property name="configLocation" value="classpath:mybatis.xml"/>
        <!--binding mybatis of mapper configuration file-->
        <property name="mapperLocations" value="classpath:com/yang/dao/*.xml"/>
    </bean>

    <!--If used SqlSessionDaoSupport Then you don't need this step-->
    <!--SqlSessionTemplate-->
    <bean id="sqlSessionTemplate" class="org.mybatis.spring.SqlSessionTemplate">
        <!--Using constructor injection sqlSessionFactory,because SqlSessionTemplate No, set method-->
        <constructor-arg ref="sqlSessionFactory"/>
    </bean>

    <!--StudentDaoImp of bean Configuration of-->
    <bean id="studentDaoImp" class="com.yang.dao.StudentDaoImp">
        <!--Directly call the above configured SqlSessionTemplate That's it-->
        <property name="session" ref="sqlSessionTemplate"/>
    </bean>
</beans>
Let me explain the configuration file:
-
Part I: get the DataSource of the data source, which replaces the < environments > tag in the main config file in mybatis. The class used is the DriverManagerDataSource class built in java. You can call it directly on the premise of importing the corresponding jar package; The attributes are those, and there is nothing to introduce;
-
Part 2: get the SqlSessionFactory object. During the execution of mybatis project, we need the SqlSessionFactory object to create the SqlSession object. Generally, we will write it in a tool class, where we only need to configure the corresponding bean;
The first attribute is the data source, which can be directly used as declared above; The second is bound to the main configuration file of mybatis, which is bound through java code:
String config = "mybatis.xml";
InputStream in = Resources.getResourceAsStream(config);
SqlSessionFactory factory = new SqlSessionFactoryBuilder().build(in);
Therefore, we must compare Lenovo learning here, otherwise it will become more and more chaotic;
The third parameter is the mapper file. In mybatis, the mapper file is configured into the main configuration file; It is recommended to directly bind the mapper files under one package, because the attribute tags cannot be duplicated. If there are multiple mapper files, you cannot configure multiple mapper files with the < mapper > tag in the main configuration file in mybatis;
-
Part 3: get SqlSessionTemplate object. What is this? In fact, it is the same as the SqlSession object, but it becomes so in spring, so it can be used according to the SqlSession object;
Constructor injection is used here. You can take a look at the source code of SqlSessionTemplate. You will find that there is no set method, so you can only use constructor injection;
-
Part 4: configure the bean of StudentDaoImp. There's nothing to say about this. Configure it in spring and directly obtain the corresponding bean object and call the method during the final test;
Test code:
@Test
public void selectStudent02() {
    ApplicationContext context = new ClassPathXmlApplicationContext("spring-mybatis.xml");
    // Create proxy class
    StudentDao studentDao = context.getBean("studentDaoImp", StudentDao.class);
    List<Student> students = studentDao.selectStudent();
    students.forEach(stu-> System.out.println(stu));
}
This is a complete integration step, which seems very troublesome (indeed a little...), but many steps have been saved in the actual development project;
Supplement: do not write dao interface implementation class mode
As mentioned above, you can register dao interface bean s without writing dao interface implementation classes. In fact, it's very simple. You only need to register in the main configuration file config. Of mybatis Add the following code to XML;
<!--
    New actions: configuring dao Interface scanning package, dynamic implementation Dao Interface is automatically injected into Spring in
    Before:
    <bean id="sqlSessionTemplate" class="org.mybatis.spring.SqlSessionTemplate">
        <constructor-arg ref="sqlSessionFactory"/>
    </bean>
    Implementation class of corresponding interface
    <bean id="BooksDaoImp" class="com.yang.dao.BooksDaoImp">
        <property name="session" ref="sqlSessionTemplate"/>
    </bean>
    Need in dao Interface writes additional implementation classes because the interface cannot be injected into Spring Class injection can only be implemented through additional classes,
    However, the following operations can be implemented without writing the implementation class
    -->
    <bean class="org.mybatis.spring.mapper.MapperScannerConfigurer">
        <!--Why use it here value And? Because this attribute name The injected parameter is a String Type,
        You can turn it on sqlSessionFactoryBeanName Look at the parameters of the source code-->
        <property name="sqlSessionFactoryBeanName" value="sqlSessionFactory"/>
        <!--To scan dao Bag, will dao All under the package mapper.xml The file is scanned, so there is no need to write on it-->
        <property name="basePackage" value="com.yang.dao"/>
    </bean>
In this way, there is no need to write implementation classes, and there is no need to care about the injection of dao interface. Everything is completed by mappercannerconfigurer;
Transaction management in Spring
Transaction is a concept of database contact. For the operation of database modification, the transaction processing needs to be considered, either successful or failed; The handling of things is very important in development!
Similarly, if a method defined in spring will perform two operations at the same time: delete first and then add. If there is no transaction processing, it is assumed that after the delete operation is successfully executed, the add operation is not executed due to sql statement errors. The consequences are like that the method is only half executed; This is absolutely impossible;
It is conceivable that if you go to the bank to withdraw money and the balance does not decrease after withdrawing the money, the bank will soon lose money;
That's why I hope to consider transaction management when writing code about database modification in the future;
Practical operation
Programming transaction management
Embed transaction management code into business methods to control transaction submission and rollback
Disadvantages: additional transaction management code must be included in each transaction operation business logic
Declarative transaction management
Generally, it works better than programmatic transactions
Separate the transaction management code from the business method and realize the transaction management in a declarative way
Taking transaction management as a crosscutting concern and modularizing through aop methods, Spring supports declarative transaction management through the Spring AOP framework
We can easily realize transaction weaving through AOP;
The following is a demonstration of the specific operation;
Or the student table above. This is just a demonstration of where transactions are added;
First, here's studentdaoimp The selectStudent method in Java is somewhat different:
@Override
public List<Student> selectStudent() {
    // Call session directly
    StudentDao studentDao = session.getMapper(StudentDao.class);
    studentDao.insertStudent(new Student(1013, "waiter", "xiaoer@123.com", 12));
    studentDao.deleteStudent(1012);
    return studentDao.selectStudent();
}
Here, in my query method, I need to execute insertStudent method first to insert students, and then execute deleteStudent method to delete students. In order to ensure that both methods succeed or fail, transaction management is required;
spring-mybatis.xml
Add the constraint of header file to the configuration file:
xmlns:tx="http://www.springframework.org/schema/tx"

http://www.springframework.org/schema/tx
http://www.springframework.org/schema/tx/spring-tx.xsd">
<!--Configure declarative transactions-->
<!--JDBC affair-->
<bean id="transactionManager" class="org.springframework.jdbc.datasource.DataSourceTransactionManager">
<property name="dataSource" ref="dataSource"/>
</bean>

<!--use AOP Implement transaction weaving-->
<!--Configure transaction notifications-->
<tx:advice id="txAdvice" transaction-manager="transactionManager">
	<!--Which methods are configured with transactions-->
	<!--Configure propagation properties of transactions-->
	<!--method Medium name Is corresponding sql Method name of the statement-->
	<tx:attributes>
    	<tx:method name="insertStudent" propagation="REQUIRED"/>
    	<tx:method name="deleteStudent" propagation="REQUIRED"/>
    	<tx:method name="selectStudent" propagation="REQUIRED"/>
    	<!--The following line can cover all cases-->
    	<!--            <tx:method name="*" propagation="REQUIRED"/>-->
	</tx:attributes>
</tx:advice>
<!--Configure transaction entry-->
<aop:config>
    <!--dao All methods of all classes under the package are used as pointcuts-->
	<aop:pointcut id="txPointcut" expression="execution(* com.yang.dao.*.*(..))"/>
	<aop:advisor advice-ref="txAdvice" pointcut-ref="txPointcut"/>
</aop:config>
First, configure a bean of DataSourceTransactionManager;
Then weave transaction processing through AOP;
spring transaction propagation features:
Transaction propagation behavior is how transactions propagate among multiple transaction methods when they call each other. spring supports seven transaction propagation behaviors:
-
propagation_requierd: if there is no transaction currently, create a new transaction. If there is already a transaction, join it. This is the most common choice;
-
propagation_supports: supports the current transaction. If there is no current transaction, it will be executed in a non transaction method;
-
propagation_ If the current transaction is not many, an exception will be thrown;
-
propagation_required_new: create a new transaction. If there is a current transaction, suspend the current transaction;
-
propagation_not_supported: perform operations in a non transactional manner. If there is a current transaction, suspend the current transaction;
-
propagation_never: execute the operation in a non transactional manner. If the current transaction exists, an exception will be thrown;
-
propagation_nested: if a transaction currently exists, it will be executed within a nested transaction. If there is no transaction at present, execute and propagate_ Required similar operations;
The default behavior for propagation of Spring transactions is PROPAGATION_REQUIRED, which is suitable for most situations;
Again, why transactions are needed?
- If transactions are not configured, there may be inconsistent data submission;
- If we do not configure declarative transactions in Spring, we need to manually configure transactions in the code;
- Transaction is very important in the development of the project, which involves the consistency and integrity of data. Data processing needs to be extremely cautious;
If there are new knowledge points, they will continue to supplement...
reference resources: Spring official documentation