SSM framework integration ideas (personal view)
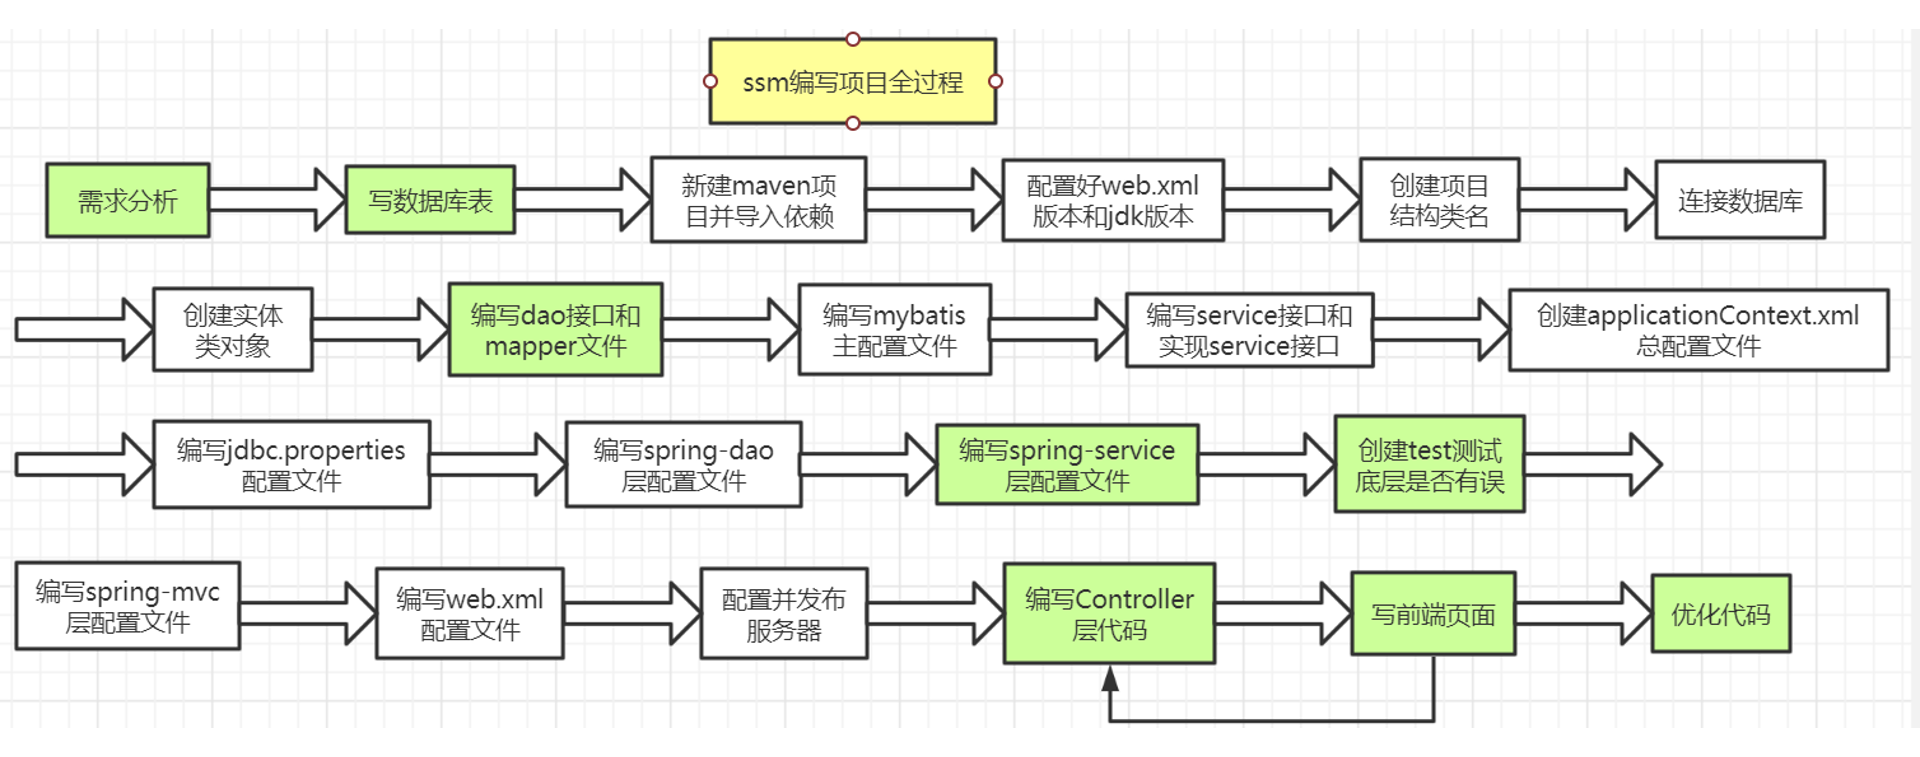
The ssm framework is frequently used in projects. In order to focus on the business code in the project, I sorted out the steps to be used by the ssm framework. The following figure is the result of the sorting. (the green box in the figure is the key point of the process, and the changes in each project are flexible and difficult)
Next, take the book CRUD as an example to explain the steps:
1. Demand analysis
Before each project, the needs of the project should be analyzed thoroughly, otherwise there will be many places to be modified later in the project, which will be a waste of time. Therefore, if the needs of the project are analyzed well, it will be handy to start the project later. Since the CRUD operation of books to be realized in this project is relatively simple, I will not repeat it here.
2. Prepare database tables
If the requirements analysis in the first step is in place, this step will operate quickly. However, attention should be paid to individual fields of the project, so as not to go back and modify the database table when the later projects are almost done.
The following code is the database table to be created:
/*
SQLyog Ultimate v12.09 (64 bit)
MySQL - 5.7.19 : Database - ssmtest
*********************************************************************
*/


/*!40101 SET NAMES utf8 */;

/*!40101 SET SQL_MODE=''*/;

/*!40014 SET @OLD_UNIQUE_CHECKS=@@UNIQUE_CHECKS, UNIQUE_CHECKS=0 */;
/*!40014 SET @OLD_FOREIGN_KEY_CHECKS=@@FOREIGN_KEY_CHECKS, FOREIGN_KEY_CHECKS=0 */;
/*!40101 SET @OLD_SQL_MODE=@@SQL_MODE, SQL_MODE='NO_AUTO_VALUE_ON_ZERO' */;
/*!40111 SET @OLD_SQL_NOTES=@@SQL_NOTES, SQL_NOTES=0 */;
CREATE DATABASE /*!32312 IF NOT EXISTS*/`ssmtest` /*!40100 DEFAULT CHARACTER SET utf8 */;

USE `ssmtest`;

/*Table structure for table `bookshop` */

DROP TABLE IF EXISTS `bookshop`;

CREATE TABLE `bookshop` (
  `id` int(11) NOT NULL AUTO_INCREMENT,
  `bookname` varchar(100) DEFAULT NULL,
  `bookdetail` varchar(100) DEFAULT NULL,
  `bookcounts` int(11) DEFAULT NULL,
  PRIMARY KEY (`id`)
) ENGINE=InnoDB AUTO_INCREMENT=6 DEFAULT CHARSET=utf8;

/*Data for the table `bookshop` */

insert  into `bookshop`(`id`,`bookname`,`bookdetail`,`bookcounts`) values (1,'JAVA','From getting started to giving up',11),(2,'Python','From entry to earth',12),(3,'C++','From work to military',13),(4,'MySQL','From deleting the library to running away',14),(5,'Linux','From learning to giving up',15);

/*!40101 SET SQL_MODE=@OLD_SQL_MODE */;
/*!40014 SET FOREIGN_KEY_CHECKS=@OLD_FOREIGN_KEY_CHECKS */;
/*!40014 SET UNIQUE_CHECKS=@OLD_UNIQUE_CHECKS */;
/*!40111 SET SQL_NOTES=@OLD_SQL_NOTES */;
3. Create maven and import dependency
This step is a simple operation. Just follow the steps.
The following are the common dependencies of the ssm framework:
 <dependencies>
       <!--Junit-->
       <dependency>
         <groupId>junit</groupId>
         <artifactId>junit</artifactId>
         <version>4.12</version>
       </dependency>
       <!--Database driven-->
       <dependency>
         <groupId>mysql</groupId>
         <artifactId>mysql-connector-java</artifactId>
         <version>5.1.47</version>
       </dependency>
       <!-- Database connection pool -->
       <dependency>
         <groupId>com.mchange</groupId>
         <artifactId>c3p0</artifactId>
         <version>0.9.5.2</version>
       </dependency>

       <!--Servlet - JSP -->
       <dependency>
         <groupId>javax.servlet</groupId>
         <artifactId>servlet-api</artifactId>
         <version>2.5</version>
       </dependency>
       <dependency>
         <groupId>javax.servlet.jsp</groupId>
         <artifactId>jsp-api</artifactId>
         <version>2.2</version>
       </dependency>
       <dependency>
         <groupId>javax.servlet</groupId>
         <artifactId>jstl</artifactId>
         <version>1.2</version>
       </dependency>

       <!--Mybatis-->
       <dependency>
         <groupId>org.mybatis</groupId>
         <artifactId>mybatis</artifactId>
         <version>3.5.2</version>
       </dependency>
       <dependency>
         <groupId>org.mybatis</groupId>
         <artifactId>mybatis-spring</artifactId>
         <version>2.0.2</version>
       </dependency>

       <!--Spring-->
       <dependency>
         <groupId>org.springframework</groupId>
         <artifactId>spring-webmvc</artifactId>
         <version>5.1.9.RELEASE</version>
       </dependency>
       <dependency>
         <groupId>org.springframework</groupId>
         <artifactId>spring-jdbc</artifactId>
         <version>5.1.9.RELEASE</version>
       </dependency>


     <!--    Lombok-->
       <dependency>
         <groupId>org.projectlombok</groupId>
         <artifactId>lombok</artifactId>
         <version>1.16.10</version>
       </dependency>

     </dependencies>

     <!--stay build Medium configuration resources,To prevent the failure of resource export-->
     <build>
       <resources>
         <resource>
           <directory>src/main/resources</directory>
           <includes>
             <include>**/*.properties</include>
             <include>**/*.xml</include>
           </includes>
           <filtering>true</filtering>
         </resource>
         <resource>
           <directory>src/main/java</directory>
           <includes>
             <include>**/*.properties</include>
             <include>**/*.xml</include>
           </includes>
           <filtering>true</filtering>
         </resource>
       </resources>
         <plugins>
         <plugin>
           <artifactId>maven-compiler-plugin</artifactId>
           <version>3.1</version>
           <configuration>
             <source>1.8</source>
             <target>1.8</target>
           </configuration>
         </plugin>
       </plugins>
     </build>
   </project>
4. Configure web XML and jdk versions
Need to cause important things, web XML files should be above version 4.0, otherwise running the project may encounter some bug s; jdk version can be configured in idea software.
5. Create project structure class name
For a new project, you need to create the project structure class name in advance, identify the relevant folders, and create the dao, service, controller and other folders to be used later. The hierarchical relationship of the project will be very clear.
6. Connect to the database
This step is not necessary. You connect to the database in the idea software. When you write sql statements, the idea will have corresponding association prompts, which can reduce the errors of our sql statements.
7. Create entity class object
This step is based on the database table.
The following code is used to create the book object:
package com.itfeng.pojo;

import lombok.AllArgsConstructor;
import lombok.Data;
import lombok.NoArgsConstructor;

@Data
@AllArgsConstructor
@NoArgsConstructor
public class Bookshop {
    private int id;
    private String bookname;
    private String bookdetail;
    private int bookcounts;
}
8. Prepare dao interface and mapper files
The function of the project is simple CURD, so the files of dao layer can also be generated by code generator.
The following is the code I wrote after watching the crazy God Video:
dao interface code:
package com.itfeng.dao;

import com.itfeng.pojo.Bookshop;
import org.apache.ibatis.annotations.Param;

import java.util.List;

public interface BookshopMapper {
    //New books
    int insertBookshop(Bookshop bookshop);
    //Revise books
    int updateBookshop(Bookshop bookshop);
    //Delete books
    int deleteBookshopById(@Param("id") int id);
    //Query books
    Bookshop queryBookshopById(@Param("id")int id);
    //Query all books
    List<Bookshop> queryAll();
}
Corresponding mapper file code:
<?xml version="1.0" encoding="UTF-8" ?>
<!DOCTYPE mapper
        PUBLIC "-//mybatis.org//DTD Mapper 3.0//EN"
        "http://mybatis.org/dtd/mybatis-3-mapper.dtd">
<mapper namespace="com.itfeng.dao.BookshopMapper">
<insert id="insertBookshop">
    insert into ssmtest.bookshop
    (bookname, bookdetail, bookcounts) values
    (#{bookname},#{bookdetail},#{bookcounts})
</insert>

    <update id="updateBookshop">
        update ssmtest.bookshop set
        bookname=#{bookname},bookdetail=#{bookdetail},bookcounts=#{bookcounts}
        where id=#{id}
    </update>

    <delete id="deleteBookshopById">
        delete from ssmtest.bookshop
        where id=#{id}
    </delete>

    <select id="queryBookshopById" resultType="Bookshop">
        select id,bookname,bookdetail,bookcounts
        from ssmtest.bookshop
        where id=#{id}
    </select>

    <select id="queryAll" resultType="Bookshop">
        select id,bookname,bookdetail,bookcounts
        from ssmtest.bookshop
    </select>
9. Write mybatis master configuration file
This step mainly sets the output log of mybatis, the package name of the entity class and the location of sql mapping.
This step is also relatively fixed. The following code is basically common when I do projects:
<?xml version="1.0" encoding="UTF-8" ?>
<!DOCTYPE configuration
        PUBLIC "-//mybatis.org//DTD Config 3.0//EN"
        "http://mybatis.org/dtd/mybatis-3-config.dtd">
<configuration>
    <!--settings: control mybatis Global behavior-->
    <settings>
        <!--set up mybatis Output log-->
        <setting name="logImpl" value="STDOUT_LOGGING"/>
    </settings>
    <!--Set alias-->
    <typeAliases>
        <!--name:Package name of entity class
            express com.bjpowernode.domain The column names in the package are aliases
            You can use Student express com.itfeng.pojo.Student
        -->
        <package name="com.itfeng.pojo"/>
    </typeAliases>
    <!-- sql mapper(sql Mapping file)Location of-->
    <mappers>
        <!--
          name: Is the name of the package. All the files in this package mapper.xml It can be loaded at one time
        -->
        <package name="com.itfeng.dao"/>
    </mappers>
</configuration>
10. Write and implement the service interface
Since the project implementation function is relatively simple and does not involve aop aspect oriented programming, the code of the service interface is basically similar to that of the dao layer interface. The implementation of the service interface is completed through the call of the dao layer, which also completes the connection between the service layer and the dao layer. The following is the service interface and the code implementing the service interface taking the book as an example:
service interface code:
package com.itfeng.service;

import com.itfeng.pojo.Bookshop;

import java.util.List;

public interface BookshopService {
    //New books
    int insertBookshop(Bookshop bookshop);
    //Revise books
    int updateBookshop(Bookshop bookshop);
    //Delete books
    int deleteBookshopById(int id);
    //Query books
    Bookshop queryBookshopById(int id);
    //Query all books
    List<Bookshop> queryAll();
}
Code for implementing service interface:
package com.itfeng.service;

import com.itfeng.dao.BookshopMapper;
import com.itfeng.pojo.Bookshop;
import org.springframework.beans.factory.annotation.Autowired;
import org.springframework.stereotype.Service;

import java.util.List;
@Service
public class BookshopServiceImpl implements BookshopService {
    private BookshopMapper bookshopMapper;
    @Autowired
    public void setBookshopMapper(BookshopMapper bookshopMapper) {
        this.bookshopMapper = bookshopMapper;
    }

    @Override
    public int insertBookshop(Bookshop bookshop) {
        return bookshopMapper.insertBookshop(bookshop);
    }

    @Override
    public int updateBookshop(Bookshop bookshop) {
        return bookshopMapper.updateBookshop(bookshop);
    }

    @Override
    public int deleteBookshopById(int id) {
        return bookshopMapper.deleteBookshopById(id);
    }

    @Override
    public Bookshop queryBookshopById(int id) {
        return bookshopMapper.queryBookshopById(id);
    }

    @Override
    public List<Bookshop> queryAll() {
        return bookshopMapper.queryAll();
    }
}
11. Create ApplicationContext XML general configuration file
The general configuration file is used to manage the code of three configuration files: spring service layer, spring Dao layer and spring MVC layer, so as to make the project structure clearer.
This step is also relatively fixed, and the following code is also common:
<?xml version="1.0" encoding="UTF-8"?>
<beans xmlns="http://www.springframework.org/schema/beans"
       xmlns:xsi="http://www.w3.org/2001/XMLSchema-instance"
       xsi:schemaLocation="http://www.springframework.org/schema/beans
        http://www.springframework.org/schema/beans/spring-beans.xsd">
    <import resource="classpath:spring-service.xml"/>
    <import resource="classpath:spring-dao.xml"/>
    <import resource="classpath:spring-mvc.xml"/>
</beans>
12. Write JDBC Properties configuration file
In this step, you only need to modify the database, user name and password. The following is the code used in the book project:
jdbc.driver=com.mysql.jdbc.Driver
jdbc.url=jdbc:mysql://localhost:3306/ssmtest?serverTimezone=UTC&useUnicode=true&characterEncoding=UTF-8&useSSL=false
jdbc.username=root
jdbc.password=123456
13. Write spring Dao layer configuration file
The main operations in this step are to associate database files, connect database connection pool, configure SqlSessionFactory object and configure scanning Dao interface package, and dynamically inject Dao interface into spring container.
This step is to connect spring and dao layer and manage their relationship through a file. The code of this step is generally fixed. The following is the code of spring dao layer configuration file:
<?xml version="1.0" encoding="UTF-8"?>
<beans xmlns="http://www.springframework.org/schema/beans"
       xmlns:xsi="http://www.w3.org/2001/XMLSchema-instance"
       xmlns:context="http://www.springframework.org/schema/context"
       xsi:schemaLocation="http://www.springframework.org/schema/beans
        http://www.springframework.org/schema/beans/spring-beans.xsd
        http://www.springframework.org/schema/context
         https://www.springframework.org/schema/context/spring-context.xsd">
    <!-- Configuration integration mybatis -->
    <!-- 1.Associated database file -->
    <context:property-placeholder location="classpath:jdbc.properties"/>
    <!-- 2.Database connection pool -->
    <!--Database connection pool
        dbcp Semi automatic operation cannot be connected automatically
        c3p0 Automatic operation (automatically load the configuration file and set it into the object)
    -->
    <bean id="dataSource" class="com.mchange.v2.c3p0.ComboPooledDataSource">
        <!-- Configure connection pool properties -->
        <property name="driverClass" value="${jdbc.driver}"/>
        <property name="jdbcUrl" value="${jdbc.url}"/>
        <property name="user" value="${jdbc.username}"/>
        <property name="password" value="${jdbc.password}"/>
        <!-- c3p0 Private properties of connection pool -->
        <property name="maxPoolSize" value="30"/>
        <property name="minPoolSize" value="10"/>
        <!-- Not automatically after closing the connection commit -->
        <property name="autoCommitOnClose" value="false"/>
        <!-- Get connection timeout -->
        <property name="checkoutTimeout" value="10000"/>
        <!-- Number of retries when getting connection failed -->
        <property name="acquireRetryAttempts" value="2"/>
    </bean>
    <!-- 3.to configure SqlSessionFactory object -->
    <bean id="sqlSessionFactory" class="org.mybatis.spring.SqlSessionFactoryBean">
        <!-- Inject database connection pool -->
        <property name="dataSource" ref="dataSource"/>
        <!-- to configure MyBaties Global profile:mybatis-config.xml -->
        <property name="configLocation" value="classpath:mybatis.xml"/>
    </bean>
    <!-- 4.Configure scan Dao Interface package, dynamic implementation Dao Interface injection into spring In container -->
    <!--Explanation: https://www.cnblogs.com/jpfss/p/7799806.html-->
    <bean class="org.mybatis.spring.mapper.MapperScannerConfigurer">
        <!-- injection sqlSessionFactory -->
        <property name="sqlSessionFactoryBeanName" value="sqlSessionFactory"/>
        <!-- Given the need to scan Dao Interface package -->
        <property name="basePackage" value="com.itfeng.dao"/>
    </bean>
</beans>
14. Write spring service layer configuration file
The main operations in this step are to scan the bean s related to the service and configure the transaction manager.
The so-called spring service layer configuration file is also the same as the dao layer. It makes a certain connection between the spring and service layer code through a configuration file.
The operation of this step is also relatively fixed. This step does not involve aop operation, so the following code is not written.
<?xml version="1.0" encoding="UTF-8"?>
<beans xmlns="http://www.springframework.org/schema/beans"
       xmlns:xsi="http://www.w3.org/2001/XMLSchema-instance"
       xmlns:context="http://www.springframework.org/schema/context"
       xsi:schemaLocation="http://www.springframework.org/schema/beans
        http://www.springframework.org/schema/beans/spring-beans.xsd http://www.springframework.org/schema/context
        https:/ 	/www.springframework.org/schema/context/spring-context.xsd">
    <!-- scanning service dependent bean -->
    <context:component-scan base-package="com.itfeng.service" />
    <!-- Configure transaction manager -->
    <bean id="transactionManager" class="org.springframework.jdbc.datasource.DataSourceTransactionManager">
        <!-- Inject database connection pool -->
        <property name="dataSource" ref="dataSource" />
    </bean>
</beans>
15.test whether the bottom layer is wrong
When the code is written in this step, the underlying code is basically the same. At this time, we should not be anxious to write the code of the Controller layer. Instead, we can use @ Test to conduct simple tests, mainly to Test whether the previous sql statements are written incorrectly. The following is the Test code of my book project:
package com.itfeng;

import com.itfeng.pojo.Bookshop;
import com.itfeng.service.BookshopService;
import org.junit.Test;
import org.springframework.context.ApplicationContext;
import org.springframework.context.support.ClassPathXmlApplicationContext;

import java.util.List;

public class MyTest {

//Test new data
    @Test
    public void inserttest(){
        ApplicationContext applicationContext=new ClassPathXmlApplicationContext("applicationContext.xml");
        BookshopService bookServiceImpl = (BookshopService) applicationContext.getBean("BookshopServiceImpl");
        Bookshop bookshop=new Bookshop();
        bookshop.setBookname("JavaWeb");
        bookshop.setBookdetail("From getting started to giving up");
        bookshop.setBookcounts(50);
        int i = bookServiceImpl.insertBookshop(bookshop);
        System.out.println(i);
    }
    //Test update data
    @Test
    public void updatetest(){
        ApplicationContext applicationContext=new ClassPathXmlApplicationContext("applicationContext.xml");
        BookshopService bookServiceImpl = (BookshopService) applicationContext.getBean("BookshopServiceImpl");
        Bookshop bookshop=new Bookshop();
        bookshop.setId(6);
        bookshop.setBookname("JavaWeb");
        bookshop.setBookdetail("From getting started to giving up");
        bookshop.setBookcounts(51);
        int i = bookServiceImpl.updateBookshop(bookshop);
        System.out.println(i);
    }
    //Test query a piece of data
    @Test
    public void querytest(){
        ApplicationContext applicationContext=new ClassPathXmlApplicationContext("applicationContext.xml");
        BookshopService bookServiceImpl = (BookshopService) applicationContext.getBean("BookshopServiceImpl");
        Bookshop bookshop=new Bookshop();
        bookshop.setId(6);
        bookshop.setBookname("JavaWeb");
        bookshop.setBookdetail("From getting started to giving up");
        bookshop.setBookcounts(51);
        Bookshop b = bookServiceImpl.queryBookshopById(6);
        System.out.println(b);
    }
    //Test query all
    @Test
    public void queryAlltest(){
        ApplicationContext applicationContext=new ClassPathXmlApplicationContext("applicationContext.xml");
        BookshopService bookServiceImpl = (BookshopService) applicationContext.getBean("BookshopServiceImpl");
        List<Bookshop> bookshops = bookServiceImpl.queryAll();
        for (Bookshop b:bookshops
        ) {
            System.out.println(b);
        }
    }
//Test delete
    @Test
    public void deleteAlltest(){
        ApplicationContext applicationContext=new ClassPathXmlApplicationContext("applicationContext.xml");
        BookshopService bookServiceImpl = (BookshopService) applicationContext.getBean("BookshopServiceImpl");
        int bookshops = bookServiceImpl.deleteBookshopById(6);
        System.out.println(bookshops);

    }
}
16. Write spring MVC layer configuration file
Spring MVC is also similar to the previous code, which makes a certain connection between spring and Controller code. This step is also relatively fixed.
This step is to open the spring MVC annotation driver, configure the static resource default servlet, configure the view parser and scan the @ Controller annotation.
The following is the code implementation:
<?xml version="1.0" encoding="UTF-8"?>
<beans xmlns="http://www.springframework.org/schema/beans"
       xmlns:xsi="http://www.w3.org/2001/XMLSchema-instance"
       xmlns:context="http://www.springframework.org/schema/context"
       xmlns:mvc="http://www.springframework.org/schema/mvc"
       xsi:schemaLocation="http://www.springframework.org/schema/beans
    http://www.springframework.org/schema/beans/spring-beans.xsd
    http://www.springframework.org/schema/context
    http://www.springframework.org/schema/context/spring-context.xsd
    http://www.springframework.org/schema/mvc
    https://www.springframework.org/schema/mvc/spring-mvc.xsd">
    <!-- to configure SpringMVC -->
    <!-- 1.open SpringMVC Annotation driven -->
    <mvc:annotation-driven />
    <!-- 2.Static resource default servlet to configure-->
    <mvc:default-servlet-handler/>
    <!-- 3.to configure jsp display ViewResolver view resolver  -->
    <bean class="org.springframework.web.servlet.view.InternalResourceViewResolver">
        <property name="viewClass" value="org.springframework.web.servlet.view.JstlView" />
        <property name="prefix" value="/WEB-INF/jsp/" />
        <property name="suffix" value=".jsp" />
    </bean>
    <!-- 4.scanning web dependent bean -->
    <context:component-scan base-package="com.itfeng.controller" />
</beans>
17. Write web XML configuration file
This step is mainly to create the dispatcher servlet and use the filter to encode the character set of the front-end page. This step is also relatively fixed.
The following is the code implementation:
<?xml version="1.0" encoding="UTF-8"?>
<web-app xmlns="http://xmlns.jcp.org/xml/ns/javaee"
         xmlns:xsi="http://www.w3.org/2001/XMLSchema-instance"
         xsi:schemaLocation="http://xmlns.jcp.org/xml/ns/javaee http://xmlns.jcp.org/xml/ns/javaee/web-app_4_0.xsd"
         version="4.0">
    <!--DispatcherServlet-->
    <servlet>
        <servlet-name>dispatcherServlet</servlet-name>
        <servlet-class>org.springframework.web.servlet.DispatcherServlet</servlet-class>
        <init-param>
            <param-name>contextConfigLocation</param-name>
            <!--Be careful:What we load here is the total configuration file, which was damaged here before!-->
            <param-value>classpath:applicationContext.xml</param-value>
        </init-param>
        <load-on-startup>1</load-on-startup>
    </servlet>
    <servlet-mapping>
        <servlet-name>dispatcherServlet</servlet-name>
        <url-pattern>/</url-pattern>
    </servlet-mapping>
    <!--encodingFilter-->
    <filter>
        <filter-name>encodingFilter</filter-name>
        <filter-class>
            org.springframework.web.filter.CharacterEncodingFilter
        </filter-class>
        <init-param>
            <param-name>encoding</param-name>
            <param-value>utf-8</param-value>
        </init-param>
    </filter>
    <filter-mapping>
        <filter-name>encodingFilter</filter-name>
        <url-pattern>/*</url-pattern>
    </filter-mapping>
    <!--Session Expiration time-->
    <session-config>
        <session-timeout>15</session-timeout>
    </session-config>
</web-app>
18. Configure and the server
Here, first configure the server in the idea so that you can focus more on the Controller layer and front-end code later.
19. Write Controller layer code
If there is no problem with the previous bottom layer, this step is almost the step of realizing the requirements. This step and the next step are flexible, which is also the difficulty of the whole process. Therefore, it may take most of the time in these two steps.
The following is a book as an example to write the Controller layer code:
package com.itfeng.controller;

import com.itfeng.pojo.Bookshop;
import com.itfeng.service.BookshopService;
import org.springframework.beans.factory.annotation.Autowired;
import org.springframework.beans.factory.annotation.Qualifier;
import org.springframework.stereotype.Controller;
import org.springframework.ui.Model;
import org.springframework.web.bind.annotation.PathVariable;
import org.springframework.web.bind.annotation.RequestMapping;

import java.util.List;

@Controller
@RequestMapping("bookshop")
public class BookshopController {
    //Automatic injection
    @Autowired
    @Qualifier("BookshopServiceImpl")
    private BookshopService bookshopService;
    //Query all books
    @RequestMapping("/allBookshop")
    public String list(Model model){
        List<Bookshop> list = bookshopService.queryAll();
        model.addAttribute("list",list);
        return "allBookshop";
    }
    //Delete books
    @RequestMapping("/deleteBookshop")
    public String deleteBookshop( int id){
        int i = bookshopService.deleteBookshopById(id);
        System.out.println(i);
        return "redirect:/bookshop/allBookshop";
    }
    //To update page
    @RequestMapping("/toupdateBookshop/{id}")
    public String toupdateBookshop(@PathVariable("id")int id,Model model){
        Bookshop bookshop = bookshopService.queryBookshopById(id);
      model.addAttribute("bookshop",bookshop);
        return "updateBookshop";
    }
    //Update books
    @RequestMapping("/updateBookshop")
    public String updateBookshop(Bookshop bookshop,Model model){
        bookshopService.updateBookshop(bookshop);
        Bookshop bookshops = bookshopService.queryBookshopById(bookshop.getId());
        model.addAttribute("bookshops",bookshops);
        return "redirect:/bookshop/allBookshop";
    }
    //New books
    @RequestMapping("/insertBookshop")
    public String insertBookshop(Bookshop bookshop){
        bookshopService.insertBookshop(bookshop);
        return "redirect:/bookshop/allBookshop";
    }
    //Go to the new book page
    @RequestMapping("/toinsertBookshop")
    public String toinsertBookshop(){
        return "insertBookshop";
    }

}
20. Write front page
This step should be coordinated with the preparation of the Controller layer code in the previous step. Write a function and realize a function at the front end. If there is no problem with the previous sql statement or the logic of the database table, the next time will code back and forth between the Controller layer and the front end code, and the preparation will be tested.
Here are some front-end page codes written with books as an example:
index.jsp
```jsp
<%@ page contentType="text/html;charset=UTF-8" language="java" %>
<html>
<head>
<title>home page</title>
</head>
<body>
<a href="${pageContext.request.contextPath}/bookshop/allBookshop">Enter the book page</a>
</body>
</html>
```
allBookshop.jsp
```jsp
<%@ taglib prefix="c" uri="http://java.sun.com/jsp/jstl/core" %>
<%@ page contentType="text/html;charset=UTF-8" language="java" %>
<html>
<head>
<title>Book display</title>
</head>
<body>
<div>
<form action="allBookshop.jsp" method="post">
<table class="table table-hover table-striped">
<thead>
<tr>
<td>Book name</td>
<td>Book details</td>
<td>Number of books</td>
<td>operation</td>
</tr>
</thead>
<tbody>
<c:forEach var="bookshop" items="${list}">
<tr>
<td>${bookshop.bookname}</td>
<td>${bookshop.bookdetail}</td>
<td>${bookshop.bookcounts}</td>
<td>
<a href="${pageContext.request.contextPath}/bookshop/toinsertBookshop">newly added</a> ||
<a href="${pageContext.request.contextPath}/bookshop/toupdateBookshop/${bookshop.id}">modify</a> ||
<a href="${pageContext.request.contextPath}/bookshop/deleteBookshop?id=${bookshop.id}">delete</a>
</td>
</tr>
</c:forEach>
</tbody>
</table>
</form>
</div>
</body>
</html>
```
insertBookshop.jsp
```jsp
<%@ page contentType="text/html;charset=UTF-8" language="java" %>
<html>
<head>
<title>New books</title>
</head>
<body>
<form action="${pageContext.request.contextPath}/bookshop/insertBookshop" method="post">
Book Name:<input type="text" name="bookname"/>
Book details:<input type="text" name="bookdetail"/>
Number of books:<input type="text" name="bookcounts"/>
<input type="submit" value="Submit"/>
</form>
</body>
</html>
```
updateBookshop.jsp
```jsp
<%@ page contentType="text/html;charset=UTF-8" language="java" %>
<html>
<head>
<title>Modify page</title>
</head>
<body>
<form action="${pageContext.request.contextPath}/bookshop/updateBookshop" method="post">
<input type="hidden" name="id" value="${bookshop.id}"/>
Book Name:<input type="text" name="bookname" value="${bookshop.bookname}"/>
Book details:<input type="text" name="bookdetail" value="${bookshop.bookdetail }"/>
Number of books:<input type="text" name="bookcounts" value="${bookshop.bookcounts}"/>
<input type="submit" value="Submit"/>
</form>
</body>
</html>
```
21. Optimize code
At this stage, the requirements of the whole project are basically realized. If you want to further improve the project, you can optimize the code in the project. For code optimization, it will be the time to test the technical level, so the realization of this step is also the difficulty of the whole project.
Write at the end
Through the study of ssm framework, I have a deeper understanding of the word focus. There are many trivial things to do in a project. In order to reduce the operation of repetitive things and focus on the realization of project functions, ssm framework has helped us complete many functions, which is also the embodiment of the encapsulation idea of java language. In a word, I can focus more efficiently.
This paper is the author's summary of some steps and experiences in learning ssm framework. There may be some deficiencies in this paper, which we hope the readers will actively point out.