Framework overview
The so-called framework is actually the framework of the program. In this framework, the basic framework of the program is built, and convenient solutions are given for the general problems of the program, which can enable developers to quickly develop specific applications based on the framework.
Common framework
-
SSH: struts 2 (web layer) / Spring (Service layer) / Hibernate (DAO layer)
-
SSM: Spring MVC (web layer) / Spring (Service layer) / MyBatis (DAO layer)
Spring framework overview
-
Spring is a Service layer framework that can integrate many other frameworks to work.
-
The main technology of Spring is IOC (DI) & AOP
- IoC (DI) - control inversion (dependency injection)
- AoP - aspect oriented programming
Spring IoC
IoC (DI) - control inversion (dependency injection)
-
IoC calls it inversion of control. In short, it refers to handing over the rights of object creation and the management process of object life cycle to the Spring framework
-
In the development process, we no longer need to pay attention to object creation and life cycle management, but are provided by the spring framework when necessary. This mechanism for managing object creation and life cycle by the spring framework is called control inversion
-
Through the IoC + interface, the coupling can be extracted into the Spring container for management in the practice of software layering. In this way, the goal of "high cohesion and low coupling" in software layering can be realized
- In the process of creating an object, Spring can set the properties of the object according to the configuration. This is called dependency injection, or DI.
Introductory case presentation:
-
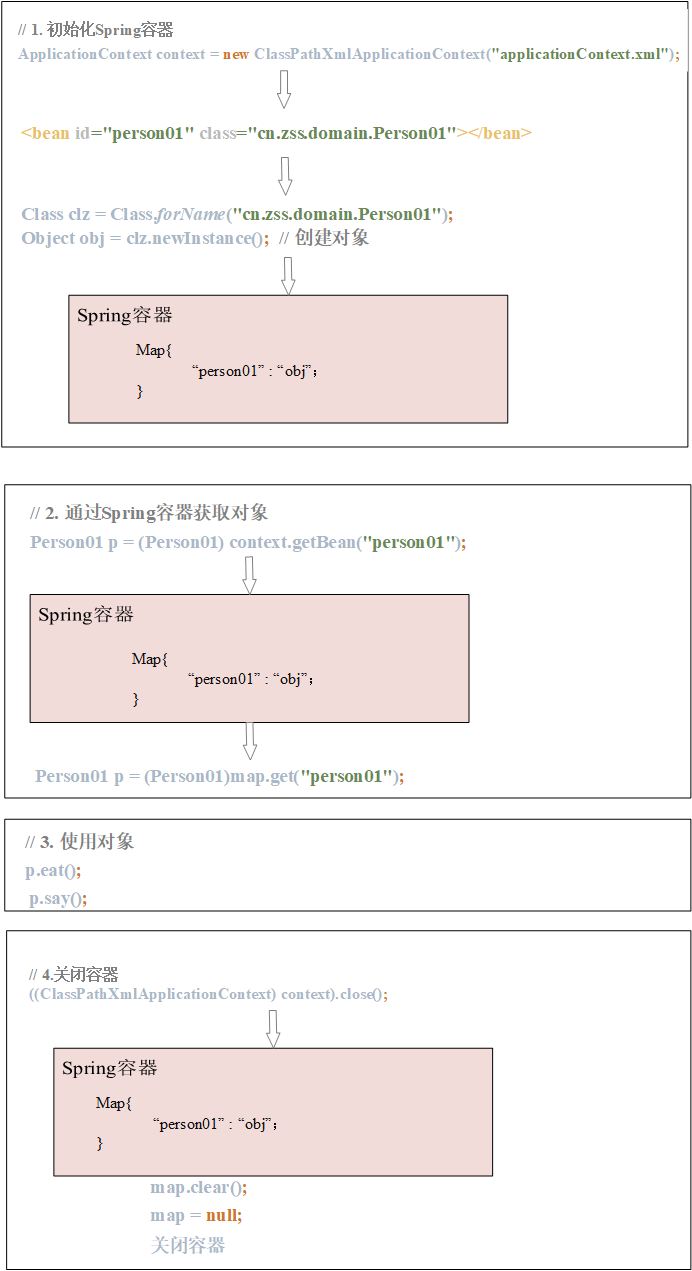
Create project: create a basic java project
-
Import related jar packages (6 + 1)
-
Create configuration file - ApplicationContext XML is placed in the source directory
<?xml version="1.0" encoding="UTF-8"?>
<beans xmlns="http://www.springframework.org/schema/beans"
       xmlns:xsi="http://www.w3.org/2001/XMLSchema-instance"
       xsi:schemaLocation="http://www.springframework.org/schema/beans http://www.springframework.org/schema/beans/spring-beans.xsd">
</beans>
In Idea: right click in src Directory - > New - > XML configuration file - > spring config
-
Development code
Create a class:
public class Person01 {
    public void eat(){
        System.out.println("eat ... ");
    }

    public  void say(){
        System.out.println("say ... ");
    }
}
Configuration bean:
<?xml version="1.0" encoding="UTF-8"?>
<beans xmlns="http://www.springframework.org/schema/beans"
       xmlns:xsi="http://www.w3.org/2001/XMLSchema-instance"
       xsi:schemaLocation="http://www.springframework.org/schema/beans http://www.springframework.org/schema/beans/spring-beans.xsd">
    <!--to configure bean-->
    <bean id="person01" class="cn.zss.domain.Person01"></bean>
</beans>
Get the object through the Spring container in the program and use:
public class Test01 {

    /*
    * Create objects using normal methods
    * */
    @Test
    public void test01(){
        Person01 person01 = new Person01();
        person01.say();
        person01.eat();
    }

    /*
     * Spring Frame creation object
     * */
    @Test
    public void test02(){
        // 1. Initialize Spring container
        ApplicationContext context = new ClassPathXmlApplicationContext("applicationContext.xml");
        // 2. Get objects through Spring container
        Person01 p = (Person01) context.getBean("person01");
        // 3. Applicable objects
        p.eat();
        p.say();
        // 4. Close the container
        ((ClassPathXmlApplicationContext) context).close();
    }
}
Implementation principle of IoC
- Initialize the Spring container, load the specified configuration file, and initialize the Spring container based on the configuration file
- When parsing to the < bean > tag in the configuration file, the Spring container creates the object of the class through reflection according to the full pathname of the class specified by the class attribute in the tag, and stores the object in the built-in Map for management. The key is the id value of the tag, and the value is the object.
- When getting objects from the container through the getBean method, it is actually to find out whether there is a matching key value in the built-in Map according to the incoming conditions. If there is, the object saved in the key value pair will be returned. If there is no matching, an exception will be thrown.
Inference:
-
By default, if you get a bean with the same id multiple times, you will get the same object.
-
Multiple bean s with the same id cannot be configured
-
You can configure multiple bean s with different IDS but the same class
    /*
    * SpringIOC Corollary 1:
    *   By default, the same object is obtained from a bean with the same id from the Spring container multiple times
    *   The reason is that the process of getting bean s from the Spring container is essentially to find the return value of the specified key from the internal map of the container
    *   No matter how many times you get it, you will get the object corresponding to the key in the map, which is naturally the same object
    * */

    /*
     * SpringIOC Corollary 2:
     *   You cannot configure multiple bean s with the same id in the spring container
     *   The reason is that the bean registered in the spring container essentially needs to form a key value pair with the specified id and the object created by reflection and store it in the map
     *   The key of the map is not allowed to be repeated, so configuring multiple bean s with the same id cannot be stored in the internal map at the same time, so an exception will be thrown
     * */

    @Test
    public  void test03(){
        // Initialize container
        ApplicationContext context = new ClassPathXmlApplicationContext("applicationContext.xml");
        // Get bean
        Person01 p1 = (Person01) context.getBean("person01");
        // Get person01 for the second time
        Person01 p2 = (Person01) context.getBean("person01");
        System.out.println(p1 == p2);  // true
    }

    /*
     * SpringIOC Inference 3:
     *   You can configure multiple bean s with different IDS but the same class in the container
     *   The reason is that multiple beans with the same class can use their own IDs to store them in the map in the spring container after creating objects. Therefore, multiple beans with the same class but different IDS can be configured in spring
     * */

    @Test
    public  void test04(){
        // Initialize container
        ApplicationContext context = new ClassPathXmlApplicationContext("applicationContext.xml");
        // Get bean
        Person01 p1 = (Person01) context.getBean("person01");
        // Get the second bean
        Person01 p2 = (Person01) context.getBean("person01x");
        System.out.println(p1 == p2);  // false
    }
How IoC gets objects
Through context When getBean () method obtains bean s, it can be obtained in the following two ways:
-
Incoming id value
/* * Spring Method 1 for container to obtain object: obtain by id * If not found: throw an exception [NoSuchBeanDefinitionException] * If the only one is found: return the found object * If more than one is found (inference 2): an exception [beandefinitionparsengexception] is thrown when the container is initialized * */ @Test public void test01(){ // 1. Initialize Spring container ApplicationContext context = new ClassPathXmlApplicationContext("applicationContext.xml"); // 2. Get bean through container Person01 p1 = (Person01) context.getBean("person01"); // 3. Use bean p1.eat(); p1.say(); // 4. Close the spring container ((ClassPathXmlApplicationContext) context).close(); } -
Incoming class type
<beans xmlns="http://www.springframework.org/schema/beans"
       xmlns:xsi="http://www.w3.org/2001/XMLSchema-instance"
       xsi:schemaLocation="http://www.springframework.org/schema/beans http://www.springframework.org/schema/beans/spring-beans.xsd">
    <!-- Configure multiple id Different but class same bean-->
    <bean id="person01" class="cn.zss.domain.Person01"></bean>
    <bean id="person02" class="cn.zss.domain.Person01"></bean>
</beans>
/* * Spring Method 2 for container to get object: get through class * If not found: throw an exception [NoSuchBeanDefinitionException] * If the only one is found: return the found object * If more than one is found: throw an exception [NoUniqueBeanDefinitionException] when getting the bean * */ @Test public void test02(){ // 1. Initialize Spring container ApplicationContext context = new ClassPathXmlApplicationContext("applicationContext.xml"); // 2. Get bean through container Person01 p1 = context.getBean(Person01.class); // 3. Use bean p1.say(); p1.eat(); // 4. Close the spring container ((ClassPathXmlApplicationContext) context).close(); }
-
When obtaining beans through class, if the same class is configured with too many beans, an exception will be thrown because it is unable to determine which bean to obtain.
-
When spring IOC obtains beans through class, if it cannot find beans of this type, it will also check whether there are descendants of this type. If there are, it will return. If it cannot find or find more than one, it will throw an exception. This is in line with the polymorphism in java object-oriented thought.
Alias Tag
The alias tag < alias > is provided in Spring. You can alias the configured < bean >. Note that this is only an additional name for the specified < bean >, and no additional objects will be created and stored in the map
<?xml version="1.0" encoding="UTF-8"?>
<beans xmlns="http://www.springframework.org/schema/beans"
       xmlns:xsi="http://www.w3.org/2001/XMLSchema-instance"
       xsi:schemaLocation="http://www.springframework.org/schema/beans http://www.springframework.org/schema/beans/spring-beans.xsd">
    <bean id="person01" class="cn.zss.domain.Person01"></bean>
    <!-- Alias-->
    <alias name="person01" alias="per01"></alias>
</beans>
public class Test01 {
    @Test
    public void  test01(){
        // 1. Initialize Spring container
        ApplicationContext context = new ClassPathXmlApplicationContext("applicationContext.xml");
        // 2. Get bean through container
        Person01 p1 = (Person01) context.getBean("person01");
        // Get bean s by alias
        Person01 p2 = (Person01) context.getBean("per01");
        // 3. Use bean
        System.out.println(p1 == p2);  // true
        // 4. Close the spring container
        ((ClassPathXmlApplicationContext) context).close();
    }
}
How Spring creates objects
Create objects through the parameterless construction method of the class
-
When a < bean > is configured in the most common way, the default is to create an object using the nonparametric construction of the class.
-
When the Spring container is initialized, the bytecode object is reflected through the class attribute configured on < bean >, and the object is created through newInstance()
-
In this way, when spring creates an object, it requires that the class must have a parameterless structure, otherwise it cannot create an object through reflection, and an exception will be thrown.
public class Person01 {
    private int age;
    Person01(int age){
        this.age = age;
    }
    public void eat(){
        System.out.println("eat ... ");
    }
}
public class Test01 {

    @Test
    /*
    * Create objects using normal methods
    * */
    public void  test01(){
        Person01 person01 = new Person01(5);
        person01.eat();
    }

    /*
    * Create objects by reflection
    *   newInstance()Method essentially creates an object by calling the parameterless constructor of the current class
    *   If the class does not have a parameterless constructor, this method cannot execute normally and an exception will be thrown
    * */
    @Test
    public void  test02() throws ClassNotFoundException, IllegalAccessException, InstantiationException {
        Class clz = Class.forName("cn.zss.domain.Person01");
        // Premise: the class must have a parameterless constructor
        Person01 p = (Person01) clz.newInstance();
        p.eat();
    }

    /*
    * If the bean has no parameterless construction, spring cannot manage the bean through the default mechanism
    * */
    @Test
    public void test03() {
        ApplicationContext context = new ClassPathXmlApplicationContext("applicationContext.xml");
        Person01 p = (Person01)context.getBean("person01");
        p.eat();
        ((ClassPathXmlApplicationContext)context).close();
    }
}
Creating objects through static factories
Factory pattern
- By hiding the details of the created object through the factory, users do not need to pay attention to the details of the created object. As long as they find the factory and call the corresponding production method, they can directly get the available object
In many cases, the class we face cannot be created through nonparametric construction. For example, the class has no nonparametric construction, is an abstract class, etc. at this time, spring cannot be required to create objects through nonparametric construction. At this time, we can use static factory to create objects.
-
Define the Person class
public class Person01 { private String name; private int age; private char gender; public Person01(String name, int age, char gender) { this.name = name; this.age = age; this.gender = gender; } } -
Defines a static factory for the Person class
/* * Static factory * */ public class Person01StaticFactory { // Privatize the construction method to ensure that the static factory class cannot be instantiated private Person01StaticFactory(){} // Provide public static methods to produce target objects public static Person01 getInstance(){ return new Person01("lili",20,'female'); } } -
Write configuration file
<!-- Static factory configuration-->
<bean id="person01" class="cn.zss.domain.Person01StaticFactory" factory-method="getInstance"></bean>
-
create object
public class Test01 {

    @Test
    public void test01(){
        // 1. Initialize the container
        ApplicationContext context = new ClassPathXmlApplicationContext("applicationContext.xml");
        // 2. Get bean
        Person01 p = (Person01) context.getBean("person01");
        // 3. Use bean
        System.out.println(p);
        // 4. Close the container
        ((ClassPathXmlApplicationContext)context).close();
    }

}
Instance factory create object
Instance factories can also solve the problem that classes cannot be created through parameterless construction. The solution is similar to static factories, but the methods provided by instance factories are not static.
Spring needs to create the object of the instance factory first, and then call the ordinary method specified on the instance factory object to create the object. So you need to configure spring instance management.
-
Defines the instance factory of the Person class
public class Person01InstanceFactory { public Person01 getInstance(){ return new Person01("Tom",20,'male'); } } -
Write configuration file
<!--Example factory-->
<bean id = "pif" class="cn.zss.domain.Person01InstanceFactory"></bean>
<bean id = "person01" factory-bean="pif" factory-method="getInstance"></bean>
-
create object
@Test
public void test02(){
    // 1. Initialize the container
    ApplicationContext context = new ClassPathXmlApplicationContext("application2Context.xml");
    // 2. Get bean
    Person01 p = (Person01) context.getBean("person01");
    // 3. Use bean
    System.out.println(p);
    // 4. Close the container
    ((ClassPathXmlApplicationContext)context).close();
}
Spring factory creates objects
-
Defines the Spring factory for the Person class
/*Spring factory*/ public class Person01SpringFactory implements FactoryBean<Person01> { /* * Method of production object * */ @Override public Person01 getObject() throws Exception { return new Person01("Potter",20,'male'); } /* * Method to obtain the object type produced by the current factory * */ @Override public Class<?> getObjectType() { return Person01.class; } /* * Is the current object a singleton * */ @Override public boolean isSingleton() { return true; } } -
Write configuration file
<!--Spring factory-->
<bean id = "person01" class="cn.zss.domain.Person01SpringFactory"></bean>
-
create object
@Test
public void test02(){
    // 1. Initialize the container
    ApplicationContext context = new ClassPathXmlApplicationContext("application3Context.xml");
    // 2. Get bean
    Person01 p = (Person01) context.getBean("person01");
    // 3. Use bean
    System.out.println(p);
    // 4. Close the container
    ((ClassPathXmlApplicationContext)context).close();
}
Single case and multiple cases
-
The beans managed by Spring container are singleton (commonly used) by default, that is, a bean will only create one object and store it in the built-in map. After that, the same object will be returned no matter how many times the bean is obtained.
-
Spring adopts the singleton method by default, which reduces the creation of objects and memory consumption.
-
In the actual development, there is a need for multiple instances, and Spring also provides the option to set the bean to the multi instance mode.
Configure single instance mode / multi instance mode:
<?xml version="1.0" encoding="UTF-8"?>
<beans xmlns="http://www.springframework.org/schema/beans"
       xmlns:xsi="http://www.w3.org/2001/XMLSchema-instance"
       xsi:schemaLocation="http://www.springframework.org/schema/beans http://www.springframework.org/schema/beans/spring-beans.xsd">
    <!--to configure bean-->
    <!--
                scope Property controls the current bean Creation mode of:
                        singleton:Then current bean In singleton mode,This mode is the default
                        prototype:Then current bean In multi instance mode
     -->
    <bean id="cart" class="cn.zss.domain.Cart" scope="prototype"></bean>
</beans>
Life cycle of bean in singleton mode:
- In the singleton mode of bean, when the spring container starts, it parses the xml and finds the bean tag, and then directly creates the object of the bean and saves it in the internal map
- No matter how many times you get it, the same bean will be returned
- Until the container is destroyed, spring closes and the internal bean is destroyed
Life cycle of bean in multi instance mode:
- Bean in multi instance mode, when the spring container starts, it parses the xml. After discovering the bean tag, it only manages the bean and does not create an object
- After that, every time you use getBean() to get the bean, spring will recreate the object and return a new object every time
- This object will not be held by the spring container. What to destroy depends on when the user who uses the object destroys the object (even if the container is closed, the object can continue to be used).
Lazy loading mechanism
-
By default, Spring parses the xml during container initialization, and creates and saves the singleton bean into the map
-
Such a mechanism is not a problem when there are few beans, but once there are many beans, spring needs to spend a lot of time in the process of starting to create beans and spend a lot of space to store beans, but these beans may not be used for a long time, and the waste of time and space is not worth it.
-
So Spring provides lazy loading mechanism. The so-called lazy loading mechanism can specify that the specified bean is not created immediately at startup, but only when it is used for the first time, so as to reduce the consumption of time and memory during startup.
-
Lazy loading mechanism only works for single instance beans, and setting lazy loading for multiple instance beans is meaningless.
Configuration method of lazy loading:
<?xml version="1.0" encoding="UTF-8"?>
<beans xmlns="http://www.springframework.org/schema/beans"
       xmlns:xsi="http://www.w3.org/2001/XMLSchema-instance"
       xsi:schemaLocation="http://www.springframework.org/schema/beans http://www.springframework.org/schema/beans/spring-beans.xsd"
       default-lazy-init="true"><!--Configure parent label defaults (Lazy loading for global configuration)-->
    <!--to configure bean-->
    <!-- Configure lazy loading
            lazy-init = "default" Use the default values configured in the parent label
            lazy-init = "true" Enable lazy loading
            lazy-init = "false" Turn off lazy loading

            ** Setting lazy loading in multi case mode makes no sense
     -->
    <!--Specify for bean Configure lazy loading-->
    <bean id="person" class="cn.zss.domain.Person" lazy-init="true"></bean>
</beans>
If the lazy loading mechanism of global and specified beans is set at the same time, and the configuration is different, the local configuration of the bean overrides the global configuration.
Configure initialization and destruction methods
In Spring, if a bean needs to do some additional operations after initialization or before destruction, you can configure initialization and destruction methods for the bean, and complete the functions in these methods.
Configuration mode (example):
-
Define class
public class JDBCUtils { /* * Initialization method * */ public void init(){ System.out.println("Connect database"); } /* * Destruction method * */ public void destroy(){ System.out.println("Destroy database connection"); } /* * Common method * */ public void getConn(){ System.out.println("Get connection"); } } -
Write configuration file
<?xml version="1.0" encoding="UTF-8"?> <beans xmlns="http://www.springframework.org/schema/beans" xmlns:xsi="http://www.w3.org/2001/XMLSchema-instance" xsi:schemaLocation="http://www.springframework.org/schema/beans http://www.springframework.org/schema/beans/spring-beans.xsd"> <bean id="jdbcUtils" class="cn.zss.domain.JDBCUtils" init-method="init" destroy-method="destroy"> </bean> </beans> -
test
public class Test01 {

    /*
    * Initialization and destruction method test
    * */
    @Test
    public void test01(){
        ApplicationContext context = new ClassPathXmlApplicationContext("applicationContext.xml");
        JDBCUtils jdbcUtils = (JDBCUtils) context.getBean("jdbcUtils");
        jdbcUtils.getConn();
        /*
        * Print results:
        *   Connect to database get connection destroy database connection
        * */
        ((ClassPathXmlApplicationContext)context).close();
    }
}
Execution sequence of key methods in Spring:
- When Spring creates a bean object, it first creates the object (through a parameterless construct or factory)
- The init method is then called to perform the initialization operation
- After that, the bean can call other ordinary methods
- Before the object is destroyed, the spring container calls its destruction method to perform the destruction operation.
Spring DI
In the process of creating an object, Spring can set the properties of the object according to the configuration. This is called dependency injection, or DI
Injection based on Set method
Generally, javabean properties will be privatized and Getter and Setter methods will be exposed. At this time, spring can inject the value of the property into the object through the Setter method.
-
Common attribute injection:
a. Define class
public class Hero {
    private String name;
    private int age;
    private List<String> job;
    private Set<String> set;
    private Map<String, String> map;
    private Properties props;

    public Hero() {
    }

    public String getName() {
        return name;
    }

    public void setName(String name) {
        this.name = name;
    }

    public int getAge() {
        return age;
    }

    public void setAge(int age) {
        this.age = age;
    }

    public List<String> getJob() {
        return job;
    }

    public void setJob(List<String> job) {
        this.job = job;
    }

    public Set<String> getSet() {
        return set;
    }

    public void setSet(Set<String> set) {
        this.set = set;
    }

    public Map<String, String> getMap() {
        return map;
    }

    public void setMap(Map<String, String> map) {
        this.map = map;
    }

    public Properties getProps() {
        return props;
    }

    public void setProps(Properties props) {
        this.props = props;
    }

    @Override
    public String toString() {
        return "Hero{" +
                "name='" + name + '\'' +
                ", age=" + age +
                ", job=" + job +
                ", set=" + set +
                ", map=" + map +
                ", props=" + props +
                '}';
    }
}
b. Write configuration file
<?xml version="1.0" encoding="UTF-8"?> <beans xmlns="http://www.springframework.org/schema/beans" xmlns:xsi="http://www.w3.org/2001/XMLSchema-instance" xsi:schemaLocation="http://www.springframework.org/schema/beans http://www.springframework.org/schema/beans/spring-beans.xsd"> <!--to configure bean--> <bean id="hero" class="cn.zss.domain.Hero"> <!--The configuration is bean The name of the property(from Set Method decision),Not class properties--> <!--Basic attribute configuration--> <property name="name" value="Di Renjie"> </property> <property name="age" value="18"></property> <!--Collection property configuration--> <!--job Attribute configuration--> <property name="job"> <list> <value>Detective</value> <value>official</value> </list> </property> <!--set Attribute configuration--> <property name="set"> <set> <value>s1</value> <value>s2</value> </set> </property> <!--map Attribute configuration--> <property name="map"> <map> <entry key="k1" value="v1"></entry> <entry key="k2" value="v2"></entry> <!--Repeat the key and save the last key value pair--> <entry key="k2" value="v4"></entry> </map> </property> <!--properties Attribute configuration--> <property name="props"> <props> <prop key="p1">v1</prop> <prop key="p2">v2</prop> </props> </property> </bean> </beans> -
Injection of custom bean s:
a. Custom class
public class Enemy {
    private String name;
    private int age;

    public String getName() {
        return name;
    }

    public void setName(String name) {
        this.name = name;
    }

    public int getAge() {
        return age;
    }

    public void setAge(int age) {
        this.age = age;
    }

    @Override
    public String toString() {
        return "Enemy{" +
                "name='" + name + '\'' +
                ", age=" + age +
                '}';
    }
}
b. Define properties in the Hero class and provide get and set methods
public class Hero {
    private Enemy enemy;
    // ...  Other properties

    public Enemy getEnemy() {
        return enemy;
    }

    public void setEnemy(Enemy enemy) {
        this.enemy = enemy;
    }
	// ...  Other get and set methods

    @Override
    public String toString() {
        return "enemy=" + enemy;
    }
}
c. Write configuration file
<?xml version="1.0" encoding="UTF-8"?> <beans xmlns="http://www.springframework.org/schema/beans" xmlns:xsi="http://www.w3.org/2001/XMLSchema-instance" xsi:schemaLocation="http://www.springframework.org/schema/beans http://www.springframework.org/schema/beans/spring-beans.xsd"> <!--to configure bean--> <bean id="hero" class="cn.zss.domain.Hero"> <!--custom bean injection--> <!--adopt ref Specify configured bean of id--> <property name="enemy" ref="enemy"> </property> </bean> <bean id = "enemy" class="cn.zss.domain.Enemy"> <property name="name" value="Yuan Tiangang"> </property> <property name="age" value="20"> </property> </bean> </beans> -
automatic assembly
Turn on auto assembly for the specified < bean >:
?xml version="1.0" encoding="UTF-8"?>
<beans xmlns="http://www.springframework.org/schema/beans"
       xmlns:xsi="http://www.w3.org/2001/XMLSchema-instance"
       xsi:schemaLocation="http://www.springframework.org/schema/beans http://www.springframework.org/schema/beans/spring-beans.xsd">
    <!--to configure bean-->
    <!--Automatic assembly:
            autowire="byName"
                According to the customization to be injected bean Corresponding attribute name found id of bean,Inject when you find it. Inject when you can't find it
            autowire="byType":
                According to the customization to be injected bean of Class Type found corresponding Class of bean,If the only one is found, it will be injected. If it is not found, it will not be injected. Multiple exceptions will be thrown
    -->
    <bean id="hero" class="cn.zss.domain.Hero" autowire="byName">
    <bean id = "enemy" class="cn.zss.domain.Enemy">
        <property name="name" value="Yuan Tiangang">
        </property>
        <property name="age" value="20">
        </property>
    </bean>
</beans>
Injection based on construction method
Another way to set object properties is to pass in and set object properties through construction methods during object creation; Spring can also implement attribute injection through such a construction method
a. Define class
public class Hero {
    String name;
    private int age;
    private Enemy enemy;

    public Hero() {
    }

    public Hero(String name, int age, Enemy enemy) {
        this.name = name;
        this.age = age;
        this.enemy = enemy;
    }

    @Override
    public String toString() {
        return "Hero{" +
                "name='" + name + '\'' +
                ", age=" + age +
                ", enemy=" + enemy +
                '}';
    }
}
public class Enemy {
    private String name;
    private int age;

    public String getName() {
        return name;
    }

    public void setName(String name) {
        this.name = name;
    }

    public int getAge() {
        return age;
    }

    public void setAge(int age) {
        this.age = age;
    }

    @Override
    public String toString() {
        return "Enemy{" +
                "name='" + name + '\'' +
                ", age=" + age +
                '}';
    }
}
b. Write configuration file
<?xml version="1.0" encoding="UTF-8"?>
<beans xmlns="http://www.springframework.org/schema/beans"
       xmlns:xsi="http://www.w3.org/2001/XMLSchema-instance"
       xsi:schemaLocation="http://www.springframework.org/schema/beans http://www.springframework.org/schema/beans/spring-beans.xsd">
    <!--to configure bean-->
    <bean id="hero" class="cn.zss.domain.Hero" >
        <!--
            index: How many parameters are set
            name: Parameter setting for which name
            type: For which type of parameter setting
            One of the first three parameters must be selected
            value: What value do you want to set(Direct assignment)
            ref: What value do you want to set (Reference assignment)
            The latter two parameters must be selected according to the type
        -->
        <constructor-arg index="0" value ="Di Renjie" type="java.lang.String"></constructor-arg>
        <constructor-arg index="1" value ="45" type="int"></constructor-arg>
        <constructor-arg index="2" type="cn.zss.domain.Enemy" ref="enemy"></constructor-arg>

    </bean>
    <bean id ="enemy" class="cn.zss.domain.Enemy">
        <property name="name" value="Yuan Tiangang"></property>
        <property name="age" value="66"></property>
    </bean>
</beans>
c. Write test class
ublic class Test01 {

    @Test
    public void test01(){
        // Initialize container
        ApplicationContext context = new ClassPathXmlApplicationContext("applicationContext.xml");
        // Get bean
        Hero hero = (Hero)context.getBean("hero");
        // Using bean s
        System.out.println(hero);
        // Destroy bean
        ((ClassPathXmlApplicationContext)context).close();
    }
}
Configure Spring IoC based on annotation
annotation
-
Comments: the format of comments in java: / /, / * * /, / * **/
-
Notes:
- sun in jdk5 New features from 0
- For the prompt information shown to the program, the program can execute different logic according to whether there are annotations and different configurations of attributes on annotations.
- Format of annotation in java: @ AnnoName(key=value,...)
-
Annotation can be used as lightweight configuration in development. It is more portable and easy to use than using xml as configuration file, and is widely used in java development.
java built-in annotation
-
@Override - declare the annotation of overriding the parent method and ask the compiler to help us check whether the override is successful. If the parent method is not successfully overridden, the compiler will give an error prompt.
-
@Deprecated - declares that the method is obsolete and is no longer recommended. The compiler is required to warn the call of such method during compilation to prompt that the method is obsolete.
-
@SuppressWarnings - suppress warnings and prompt the compiler. Warnings of the specified type will not be prompted during compilation
Annotations can control the program to run in different ways based on different annotated / non annotated or annotation attributes
Annotations are often used as lightweight configuration to replace some functions of the configuration file
Annotation is convenient for configuration and change in the development stage, and the configuration file can still be easily modified after release. Therefore, annotation and configuration file need to be used together in actual development
Custom annotation
Develop an annotation class
- The process of developing an annotation class is very similar to developing an interface, but it needs to be declared through the @ interface keyword
A declaration that uses meta annotations to decorate annotations
- The so-called meta annotation is the annotation used to modify the annotation declaration, which can control the characteristics of the modified annotation.
-
@Target: used to declare where the modified annotation can be used.
You can set an array of ElementType type in the property of @ Target to specify the location that can be used. If this meta annotation is not used, the default annotation can be used anywhere.
@Target({ElementType.FIELD, ElementType.METHOD}) public @interface FirstAnno { // Custom annotations can be applied to properties and methods } -
@Retention: used to declare the stage to which the modified annotation will be retained.
java - > compile - > Class - > classloader - > bytecode
You can specify when the annotation is retained through the value of RetentionPolicy type in the attribute of the annotation.
-
RetentionPolicy.SOURCE: this annotation will be retained until the source phase java; Deleted during compilation. This type of annotation is usually for the compiler.
-
RetentionPolicy.CLASS: this annotation will be retained in the source phase and compilation phase java and Class; Deleted during class loading. This type of annotation is usually for class loaders.
-
RetentionPolicy.RUNTIME: this annotation will be retained in the source phase, compilation phase and run phase java .class and bytecode in memory. This type of annotation is usually used to reflect during the running phase and control the running process of the program.
-
Only RUNTIME level annotations can be reflected through reflection technology.
-
-
@Documented: used to declare whether the modified annotation should be extracted into the document by the document extraction tool; The javadoc command can be used to generate documents
No extraction by default.
-
@Inherited: used to declare whether the modified annotation is inherited
No inheritance by default
Add attributes to annotations
- Attributes can also be declared in annotation classes.
- The process of declaring attributes for an annotation class is very similar to defining methods for an interface.
- However, it is required that all attributes in the annotation must be public, which can be explicitly declared or not declared. If not declared, it is public by default.
- The attributes in the annotation can only be eight basic data types, String type, Class type, enumeration type, other annotation types, and one-dimensional arrays of the above types.
- Once the attribute is declared, the attribute must be assigned value during the use of annotation. The way to assign value is to specify the value of the attribute after annotation (attribute name = attribute value)
- You can also declare the default value of the attribute after the attribute of the annotation through the default keyword when declaring the annotation. The attribute with the default value declared adopts the default value by default, or you can assign a value manually to override the default value
- If the attribute is a one-dimensional array type and there is only one value in the passed in array, the braces including the array can be omitted
- If only one attribute of the annotation needs to be assigned, and the name of the attribute is called value, the 'value =' in value = "xxx" may not be written when using the annotation
@Target({ElementType.FIELD, ElementType.METHOD})
@Retention(RetentionPolicy.RUNTIME)
public @interface FirstAnno {
    public String name();
    public int age() default 0;
    String[] addrs();
}
public class Person {
    String name;
    int age;

    @FirstAnno(name="lili",age=18, addrs={"china","beijing"})
    public void eat(String food1, String food2){
		System.out.println("eat...");
    }
}
Reflection annotation
- Only RUNNTIME level annotations can be reflected
- Class method, field package... All provide methods to obtain annotation information
| Return value | method |
|---|---|
| Annotation[] | getAnnotations (): returns all comments that exist on this element. |
| A | Getannotation (class annotation class): if there are comments of the specified type of the element, these comments will be returned; otherwise, null will be returned. |
| boolean | Isannotationpresent (class <? Extends annotation > annotationclass): returns true if the annotation of the specified type exists on this element; otherwise, returns false |
Implementing IOC & Di with Spring annotation
Basic implementation process:
a. Import development package

b. Write the configuration file and import the context constraint
<?xml version="1.0" encoding="UTF-8"?>
<!--
    Constraint Technology: Code prompt can be carried out through constraint technology
    xmlns: An abbreviation used to declare a namespace. Labels that begin with an abbreviation are managed by the namespace
           The namespace must be unique
           http://www.springframework.org/schema/beans/spring-beans.xsd: the address of the real file for the namespace
-->
<beans xmlns="http://www.springframework.org/schema/beans"
       xmlns:xsi="http://www.w3.org/2001/XMLSchema-instance"
       xmlns:context="http://www.springframework.org/schema/context"
       xsi:schemaLocation="
            http://www.springframework.org/schema/beans
            http://www.springframework.org/schema/beans/spring-beans.xsd
            http://www.springframework.org/schema/context
            http://www.springframework.org/schema/context/spring-context.xsd
       ">

</beans>
Idea can set the configuration file as a template for later use
File - > Settings - > editor - > file and code template - > click the plus sign on the left to create a new template
c. Turn on packet scanning
In the configuration file, turn on package scanning and specify which classes under packages Spring will automatically scan; Only the IOC annotation on the class under the specified scanning package will take effect.
<?xml version="1.0" encoding="UTF-8"?>
<beans xmlns="http://www.springframework.org/schema/beans"
       xmlns:xsi="http://www.w3.org/2001/XMLSchema-instance"
       xmlns:context="http://www.springframework.org/schema/context"
       xsi:schemaLocation="
            http://www.springframework.org/schema/beans
            http://www.springframework.org/schema/beans/spring-beans.xsd
            http://www.springframework.org/schema/context
            http://www.springframework.org/schema/context/spring-context.xsd
       ">
    <!-- Specify which packages to scan-->
    <!--Spring The container automatically scans the specified packages and their descendants at startup-->
    <context:component-scan base-package="cn.zss.domain"></context:component-scan>
</beans>
d. Register bean s with annotations
-
If the @ Component annotation is used on the class in the configured package, the class will be automatically registered as a bean
-
Use the class whose class of the current class is. Generally, use the id whose initial letter is lowercase
-
If the second letter of the class name is capitalized, the first letter remains the same, such as class name: Pearson - > ID Name: Pearson
-
You can also explicitly specify the bean id by configuring the value attribute in @ Component
package cn.zss.domain;

import org.springframework.stereotype.Component;

@Component  // <bean id="person" class="cn.zss.domain.Person"></bean>
/*@Component(value="per") Equivalent to @ Component("per")
        <bean id="per" class="cn.zss.domain.Person"></bean>*/
public class Person {
}
e. Test class
public class Test01 {
    @Test
    public void test01(){
        ApplicationContext context = new ClassPathXmlApplicationContext("applicationContext.xml");
        Person p = (Person)context.getBean("person");
        System.out.println(p);
        ((ClassPathXmlApplicationContext)context).close();
    }
}
Implement factory registered bean s in annotation mode
- Spring creates beans through reflection by default. If some beans do not have a parameterless constructor or the creation process is very complex, they cannot be created through simple reflection
- At this point, you can create a bean factory and make SpringIoC create beans through the factory for registration.
- bean factories can be configured through configuration files or annotations.
Configure factory class
- The factory class must be placed in the package scanning directory and modified by the @ Component annotation
Method for configuring production bean s in factory class
-
The method of producing beans in the factory should be modified by @ Bean
-
This method will be called by SpringIOC and the returned object will be registered as a Spring bean
-
By default, the id is automatically inferred (not commonly used according to the method name). In the old version, the id is specified through @ Bean(name = "xxx"); In the new version, the id is specified through the value attribute.
Case demonstration:
a. Define Dog class
package cn.zss.domain;

public class Dog {
    public Dog (String name){
    }
}
b. Defines the factory class of the Dog class
package cn.zss.domain;

import org.springframework.context.annotation.Bean;
import org.springframework.stereotype.Component;

/*
* Example factory
* */
@Component
public class DogFactory {
    // <bean id = "fogFactory" class="cn.zss.domain.DogFactory"></bean>
    @Bean(name = "dog")
    // <bean id = "dog" class="cn.zss.domain.Dog"></bean>
    public Dog getInstance(){
        return new Dog("Tom");
    }
}
c. Testing
@Test
public void test02(){
    ApplicationContext context = new ClassPathXmlApplicationContext("applicationContext.xml");
    Dog dog = (Dog)context.getBean("dog");
    System.out.println(dog);
    ((ClassPathXmlApplicationContext)context).close();
}
Implementing DI with Spring annotation
- It is implemented through the underlying reflection mechanism (which can break through the private control permission), and does not rely on the constructor or Set method
a. Import development package
b. Write configuration file
<?xml version="1.0" encoding="UTF-8"?>
<!--
    Constraint Technology: Code prompt can be carried out through constraint technology
    xmlns: An abbreviation used to declare a namespace. Labels that begin with an abbreviation are managed by the namespace
           The namespace must be unique
           http://www.springframework.org/schema/beans/spring-beans.xsd: the address of the real file for the namespace
-->
<beans xmlns="http://www.springframework.org/schema/beans"
       xmlns:xsi="http://www.w3.org/2001/XMLSchema-instance"
       xmlns:context="http://www.springframework.org/schema/context"
       xsi:schemaLocation="
            http://www.springframework.org/schema/beans
            http://www.springframework.org/schema/beans/spring-beans.xsd
            http://www.springframework.org/schema/context
            http://www.springframework.org/schema/context/spring-context.xsd
       ">
    <!-- Specify which packages to scan-->
    <!--Spring The container automatically scans the specified packages and their descendants at startup-->
    <context:component-scan base-package="cn.zss.domain"/>
    <!--Open annotation mode DI-->
    <context:annotation-config/>
</beans>
c. Inject spring's built-in supported type data in annotation mode - non collection type
- In spring, the @ Value annotation can be used to inject the attributes of spring's built-in supported types.
package cn.zss.domain;

@Component
public class Hero {
    @Value("Captain America")
    private String name;
    @Value("40")
    private int age;
    private List<String> list;
    private Set<String> set;
    private Map<String, String> map;
    private Properties props;

    @Override
    public String toString() {
        return "Hero{" +
                "name='" + name + '\'' +
                ", age=" + age +
                ", list=" + list +
                ", set=" + set +
                ", map=" + map +
                ", props=" + props +
                '}';
    }
}
- This method can realize the injection of Spring built-in support types, but the injected value is written in the code. If you want to change the injected value later, you must modify the source code
- These values can be configured into a properties configuration file and then introduced in Spring.
d. Write the properties configuration file (my.properties) and load it
myname = Captain America
myage = 40
<?xml version="1.0" encoding="UTF-8"?>
<beans xmlns="http://www.springframework.org/schema/beans"
       xmlns:xsi="http://www.w3.org/2001/XMLSchema-instance"
       xmlns:context="http://www.springframework.org/schema/context"
       xsi:schemaLocation="
            http://www.springframework.org/schema/beans
            http://www.springframework.org/schema/beans/spring-beans.xsd
            http://www.springframework.org/schema/context
            http://www.springframework.org/schema/context/spring-context.xsd
       ">
    <!-- Specify which packages to scan-->
    <!--Spring The container automatically scans the specified packages and their descendants at startup-->
    <context:component-scan base-package="cn.zss.domain">
    </context:component-scan>
    <!--Open annotation mode DI-->
    <context:annotation-config></context:annotation-config>
    <!--Load properties file-->
    <context:property-placeholder location="my.properties" />
</beans>
e. Add @ Value annotation
@Component
public class Hero {
    @Value("${myname}")
    private String name;
    @Value("${myage}")
    private int age;
    private List<String> list;
    private Set<String> set;
    private Map<String, String> map;
    private Properties props;

    @Override
    public String toString() {
        return "Hero{" +
                "name='" + name + '\'' +
                ", age=" + age +
                ", list=" + list +
                ", set=" + set +
                ", map=" + map +
                ", props=" + props +
                '}';
    }
}
f. The annotation method injects the type data supported by spring
Introduce the util namespace and register the data through the appropriate util tag
<?xml version="1.0" encoding="UTF-8"?>
<beans xmlns="http://www.springframework.org/schema/beans"
       xmlns:xsi="http://www.w3.org/2001/XMLSchema-instance"
       xmlns:context="http://www.springframework.org/schema/context"
       xmlns:util="http://www.springframework.org/schema/util"
       xsi:schemaLocation="
            http://www.springframework.org/schema/beans
            http://www.springframework.org/schema/beans/spring-beans.xsd
            http://www.springframework.org/schema/context
            http://www.springframework.org/schema/context/spring-context.xsd
            http://www.springframework.org/schema/util
            http://www.springframework.org/schema/util/spring-util.xsd
       ">
    <!-- Specify which packages to scan-->
    <!--Spring The container automatically scans the specified packages and their descendants at startup-->
    <context:component-scan base-package="cn.zss.domain">
    </context:component-scan>
    <!--Open annotation mode DI-->
    <context:annotation-config>
    </context:annotation-config>
    <!--Load properties file-->
    <context:property-placeholder location="my.properties" />

    <!--Define set data-->
    <util:list id="l1">
        <value>l1</value>
        <value>l2</value>
    </util:list>
    <util:set id="s1">
        <value>s1</value>
        <value>s2</value>
    </util:set>
    <util:map id="m1">
        <entry key="k1" value="v1"></entry>
        <entry key="k2" value="v2"></entry>
    </util:map>
    <util:properties id ="p1">
        <prop key="p1">v1</prop>
        <prop key="p2">v2</prop>
    </util:properties>
</beans>
Then inject the assignment through @ Value in the attribute of the class
@Component
public class Hero {
    @Value("${myname}")
    private String name;
    @Value("${myage}")
    private int age;
    @Value("#{@l1}")
    private List<String> list;
    @Value("#{@s1}")
    private Set<String> set;
    @Value("#{@m1}")
    private Map<String, String> map;
    @Value("#{@p1}")
    private Properties props;

    @Override
    public String toString() {
        return "Hero{" +
                "name='" + name + '\'' +
                ", age=" + age +
                ", list=" + list +
                ", set=" + set +
                ", map=" + map +
                ", props=" + props +
                '}';
    }
}
g. Injecting custom bean type data with annotations
Implement attribute injection of custom bean type through @ Autowired on the attributes in the bean
-
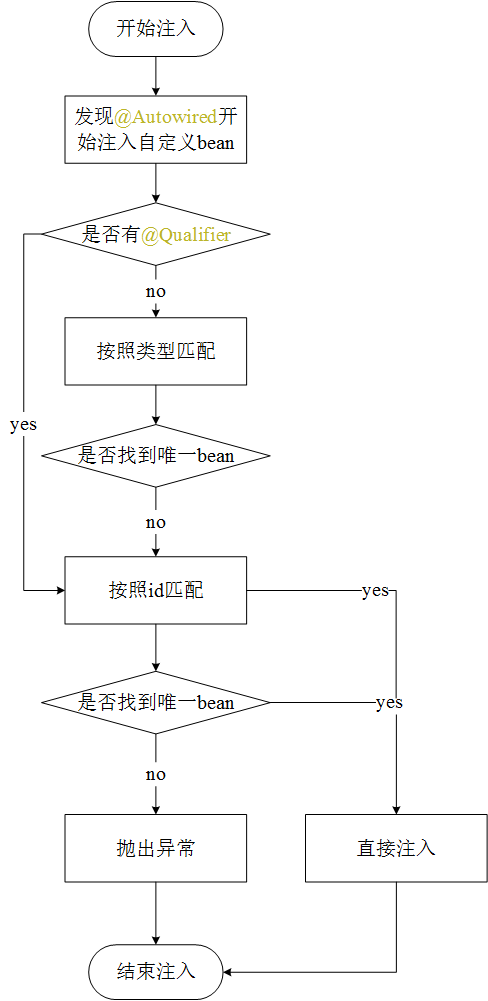
When the Spring container resolves to the @ Component annotation, the bean that created the current class is managed in the Spring container. If the @ Autowired annotation is found in the process of creating the bean, it will find out whether there are beans of this type in Spring according to the current bean type and find the direct injection. If not, it will also check whether there are descendant classes and implementation classes, If there is a unique bean, it will be injected automatically. If there are still no or multiple beans that cannot be injected, it will also find the corresponding bean according to the corresponding id of the property name. If there is, it will be injected. If it is still not found, an exception will be thrown.
-
You can also configure the @ Qualifier(value = "xxx") annotation to force the bean to be found by id. at this time, the bean will be found directly with the given id without type based matching.
package cn.zss.domain;
@Component
public class Hero {
    @Value("Captain America")
    private String name;
    @Value("100")
    private int age;

    /*First, inject by type,
    * If you find the only one, inject it,
    * If it cannot be found or more than one is found, start injection according to the id
    * Find out whether the id of the bean is the same as the property name of the current property. If it exists, inject it, and throw an exception if it does not exist
    */
    @Autowired  // Find Enemy and newEnemy by type, and then find Enemy by id(enemy)
    // @Qualifier ("new enemy") --- > hero {name = 'Captain America', age=100, enemy=Enemy{name = 'kill bully', age=150}}
    // Once @ Qualifier is configured, the working mechanism of @ Autowired will change and inject directly according to the specified id,
    // If the only one is found, it will be injected. If it is not found, or multiple exceptions will be thrown directly
    private Enemy enemy;

    @Override
    public String toString() {
        return "Hero{" +
                "name='" + name + '\'' +
                ", age=" + age +
                ", enemy=" + enemy +
                '}';
    }
}
package cn.zss.domain;
@Component
public class Enemy {
    @Value("Hydra ")
    private String name;
    @Value("100")
    private int age;

    @Override
    public String toString() {
        return "Enemy{" +
                "name='" + name + '\'' +
                ", age=" + age +
                '}';
    }
}
package cn.zss.domain;
@Component
public class NewEnemy extends Enemy{
    @Value("Thanos ")
    private String name;
    @Value("150")
    private int age;

    @Override
    public String toString() {
        return "Enemy{" +
                "name='" + name + '\'' +
                ", age=" + age +
                '}';
    }
}
Other notes
a. @Scope(value = "prototype"): configure whether the bean of the modified class is a single instance or multiple instances. If it is not configured, it is a single instance by default
@Component
@Scope("prototype")
public class Person {

}
b. @Lazy: the bean of the modified class is configured by lazy loading mechanism
@Component
@Lazy
public class Person02 {
    public Person02(){
        System.out.println("init...");
    }
}
c. @PostConstruct: in the class corresponding to the bean, modify a method, declare the method as an initialization method, and execute it immediately after the object is created
d. @PreDestroy: in a corresponding class of bean, modify a method, declare the method as destruction method, and call the method before the object is destroyed.
@Component
public class JDBCUtils {
    /*
     * Initialization method
     * */
    @PostConstruct
    public void initConn(){
        System.out.println("Connect database");
    }
    /*
     * Destruction method
     * */
     @PreDestroy
    public void destroyConn(){
        System.out.println("Destroy database connection");
    }
    /*
     * Common method
     * */
    public void insert(){
        System.out.println("insert");
    }
    /*
     * Common method
     * */
    public void delete(){
        System.out.println("delete");
    }

}
e. @Controller @Service @Repository @Component:
- The functions of these four annotations are exactly the same. They are all used to modify the class and declare the class as a Spring managed bean.
- Among them, @ Component is generally considered as a general annotation
- The @ Controller is used in the control layer of software layering, which is generally used in the Web layer
- While @ Service is used in the business access layer of software layering, it is generally used in the Service layer
- While @ Repository is used in the data access layer of software layering, it is generally used in the DAO layer
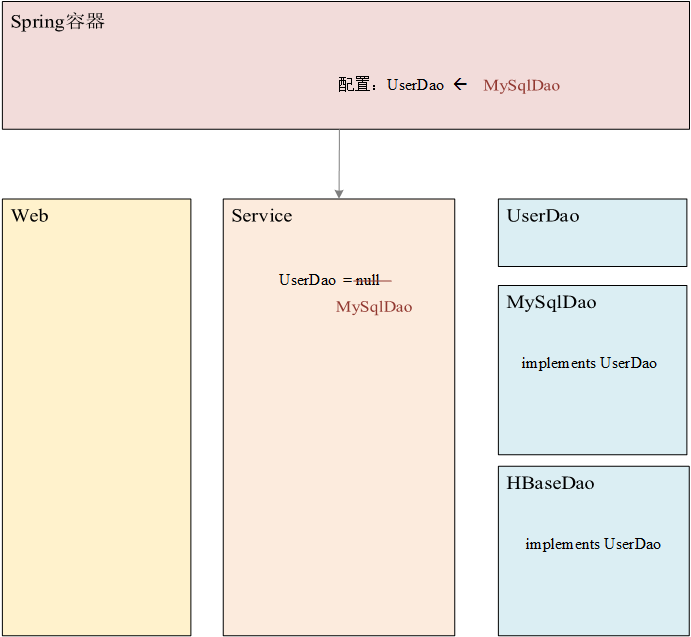
Using spring IOC & Di to realize software layered decoupling
Design interfaces between layers (interface oriented programming) and register objects through Spring
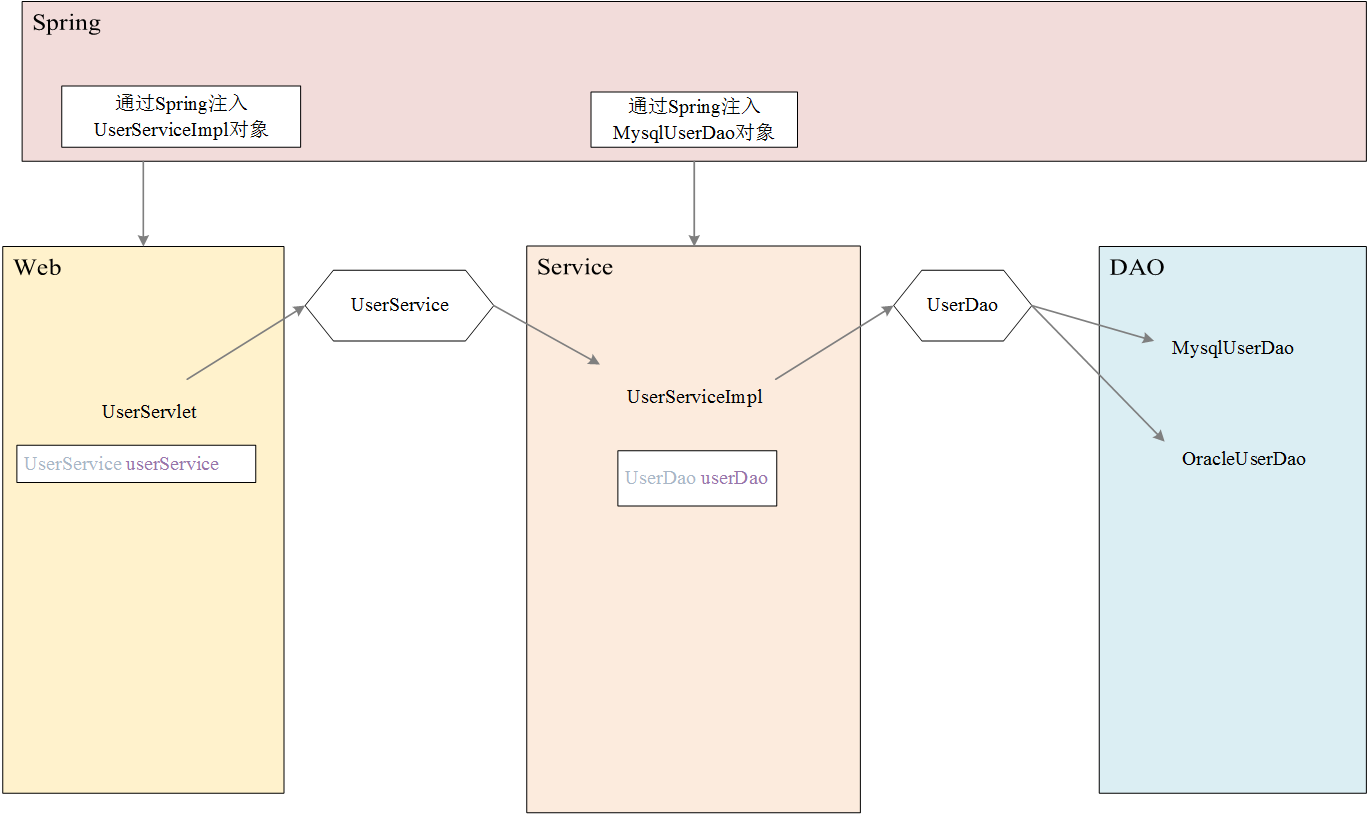
Web tier:
package cn.zss.web;
@Controller
public class UserServlet {

    @Autowired
    private UserService userService = null;

    public void regist(){
        System.out.println("userServlet ... regist ...");
        userService.regist();
    }
}
Service layer:
a. Interface UserService
package cn.zss.service;

public interface UserService {
    public void regist();
}
b. Interface implementation class UserServiceImpl
package cn.zss.service;
@Service
public class UserServiceImpl implements UserService {

    @Autowired
    @Qualifier("userDao")
    private UserDao userDao = null;
    @Override
    public void regist() {
        System.out.println("userService ... regist");
        userDao.insert();
    }
}
DAO layer:
a. Interface
package cn.zss.dao;

public interface UserDao {
    void insert();
}
b. The first implementation class of the interface
package cn.zss.dao;

import org.springframework.stereotype.Repository;

@Repository("userDao")
public class MySqlUserDao implements UserDao{
    @Override
    public void insert() {
        System.out.println("Mysql ... insert ...");
    }
}
c. The second implementation class of the interface
package cn.zss.dao;

import org.springframework.stereotype.Repository;

@Repository
public class OracleUserDao implements UserDao {
    @Override
    public void insert() {
        System.out.println("Oracle ... insert ...");
    }
}