
Last article Start developing iOS 10 - 21 with Swift using WK WebView and SFSafariViewController Learn how to open a web page. This article learns to use CloudKit.
iCloud was originally released by Jobs in WWDC 2011 to allow Apps and games to store data in the cloud and automatically synchronize data between Mac and iOS.
In recent years, it has gradually grown to serve the cloud. If you want to create apps that share data between users, you can consider using iCloud, so you don't need to build a back-end APIs yourself. Although the practical application of iCloud may not work well due to the domestic network environment, it is still necessary to learn something about it.
If you develop a Web application, you can also access the data in iCloud of an iOS application. Apple provides CloudKit JS and CloudKit libraries, respectively.

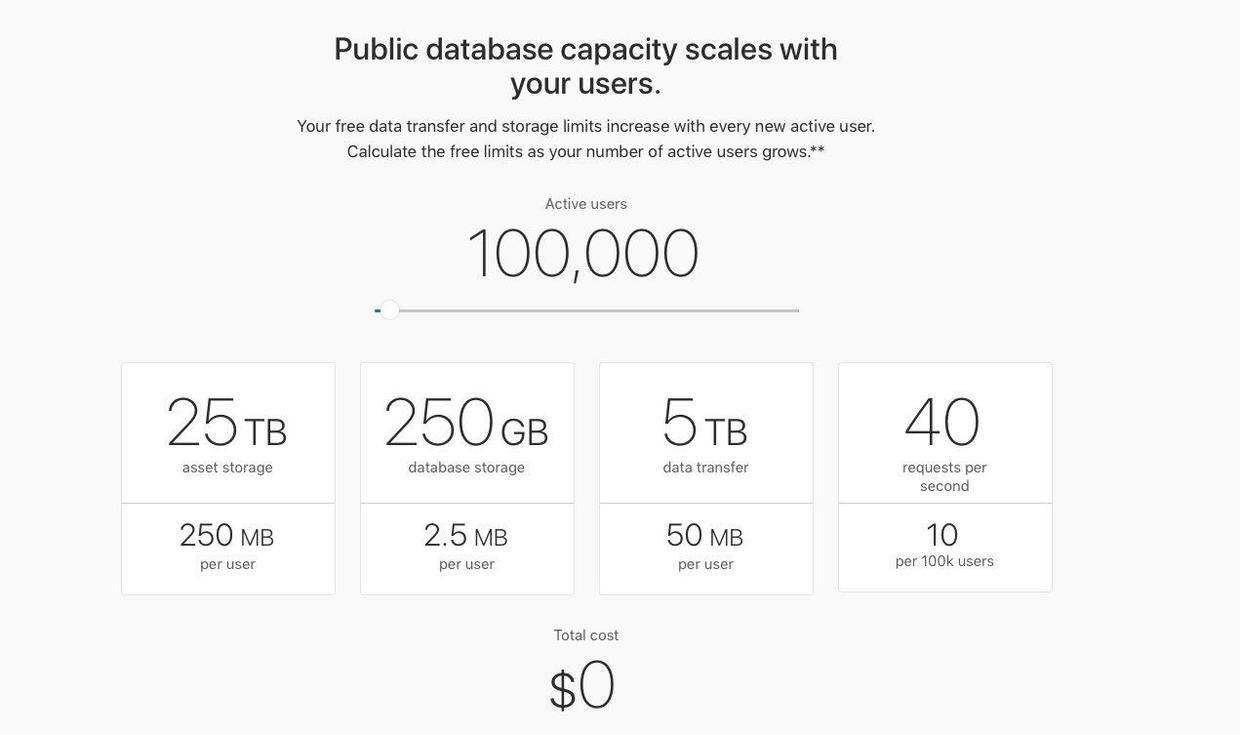
CloudKit defaults to providing free space for our app:

As the number of active app users increases, the free space will also increase. Introduction to Official Website.
Understanding the CloudKit framework
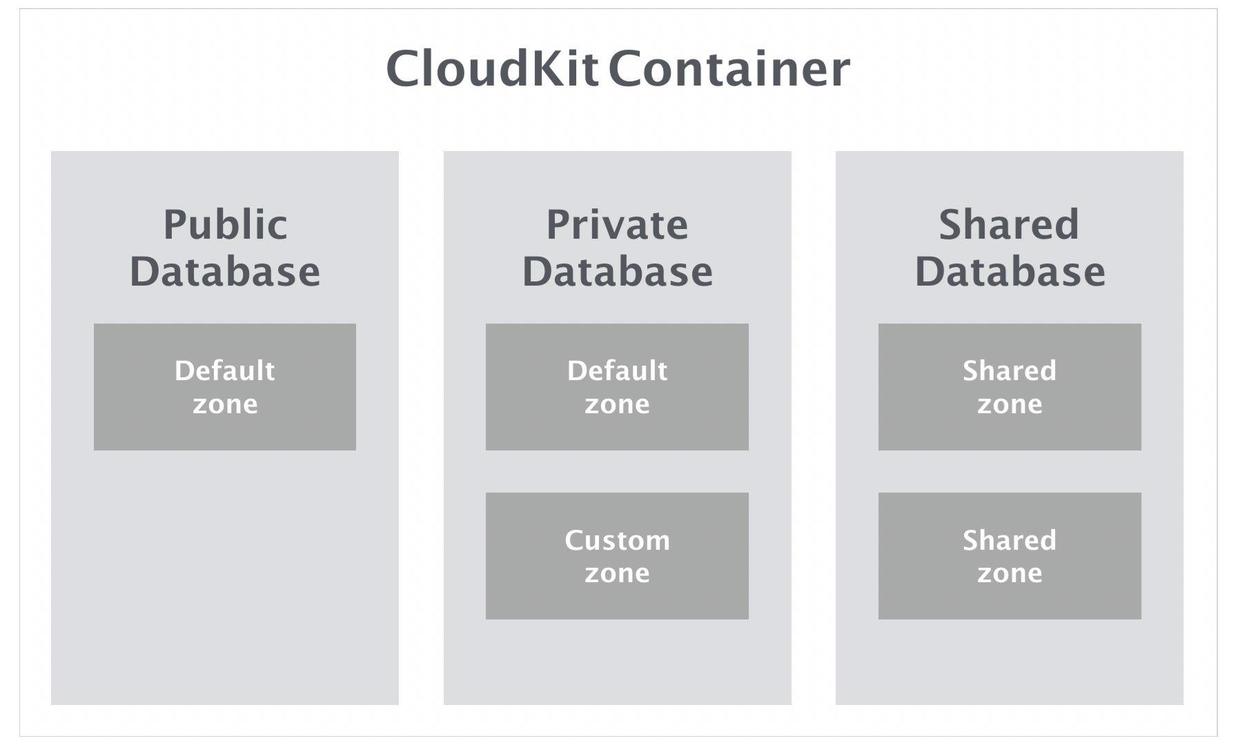
The CloudKit framework provides not only storage capabilities, but also various interactions between developers and iCloud. Containers and database are the basic elements of the CloudKit framework.
- By default, an app is a container, the code is CKContainer, and a container contains three databases (CKDatabase):
- A public database: All users in app can view it
- A shared database: A group of users in app can view (iOS 10)
- A private database: Viewed by a single user in app
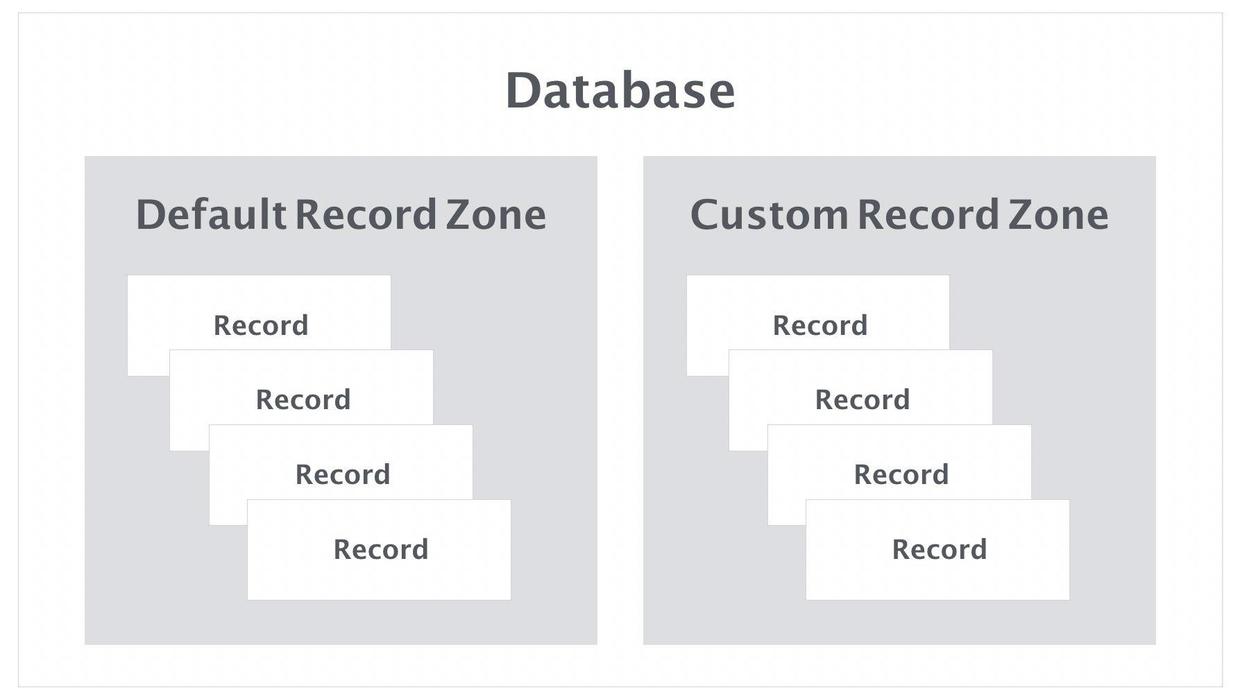
Add CloudKit to the application
First, you need a developer account.
Then open iCloud in Capabilities.
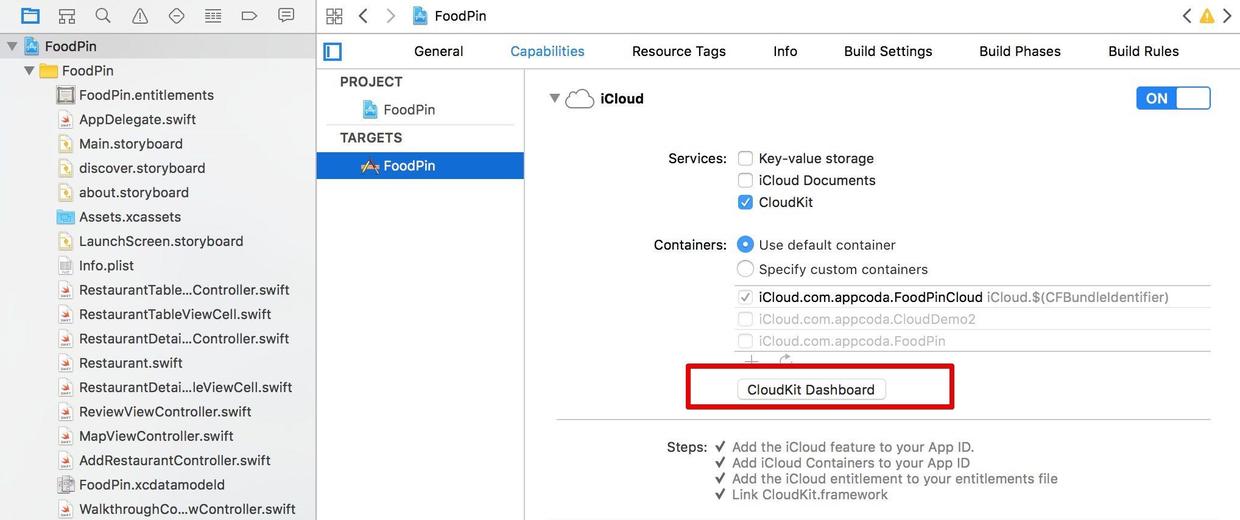
Managing Record s in CloudKit Dashboard
- Click Cloud Kit Dashboard in the image above, or visit it directly https://icloud.developer.apple.com/dashboard/ . The latest CloudKit Dashboard page has changed a bit. The first entry is the application list (that is, the container list). Click on one to go to the following page:
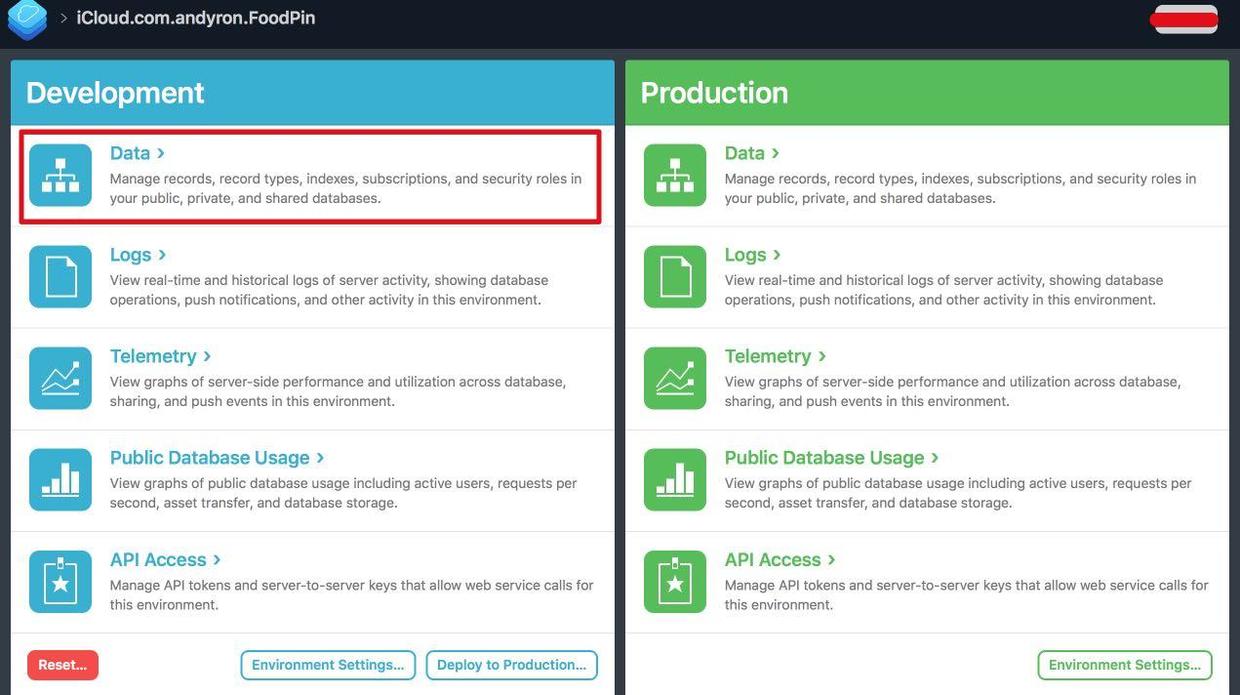
- Click on Development data, similar to the following
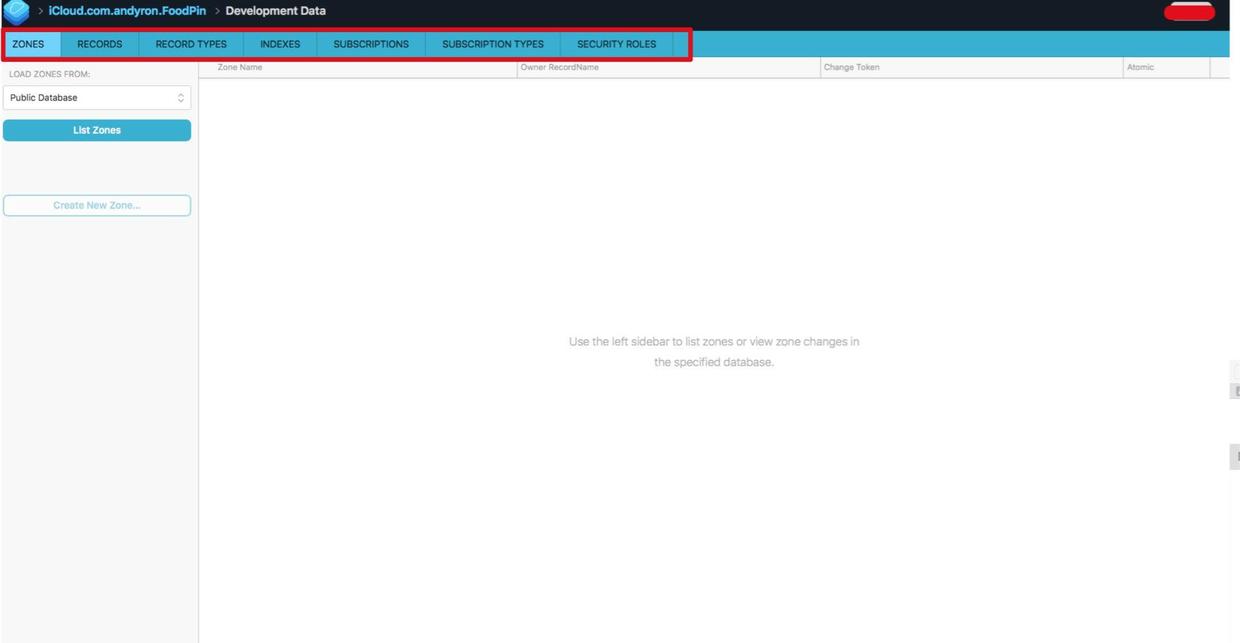
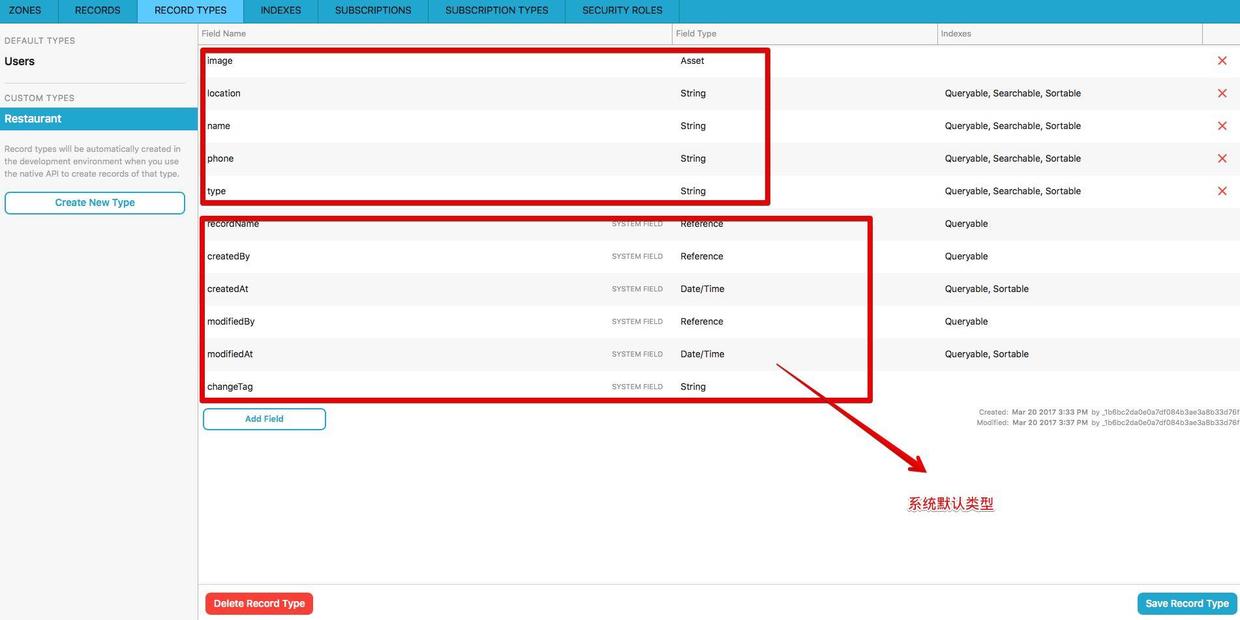
- Select Record Types (a bit like tables in relational data), create a new type Restaurant, and add several Field's.
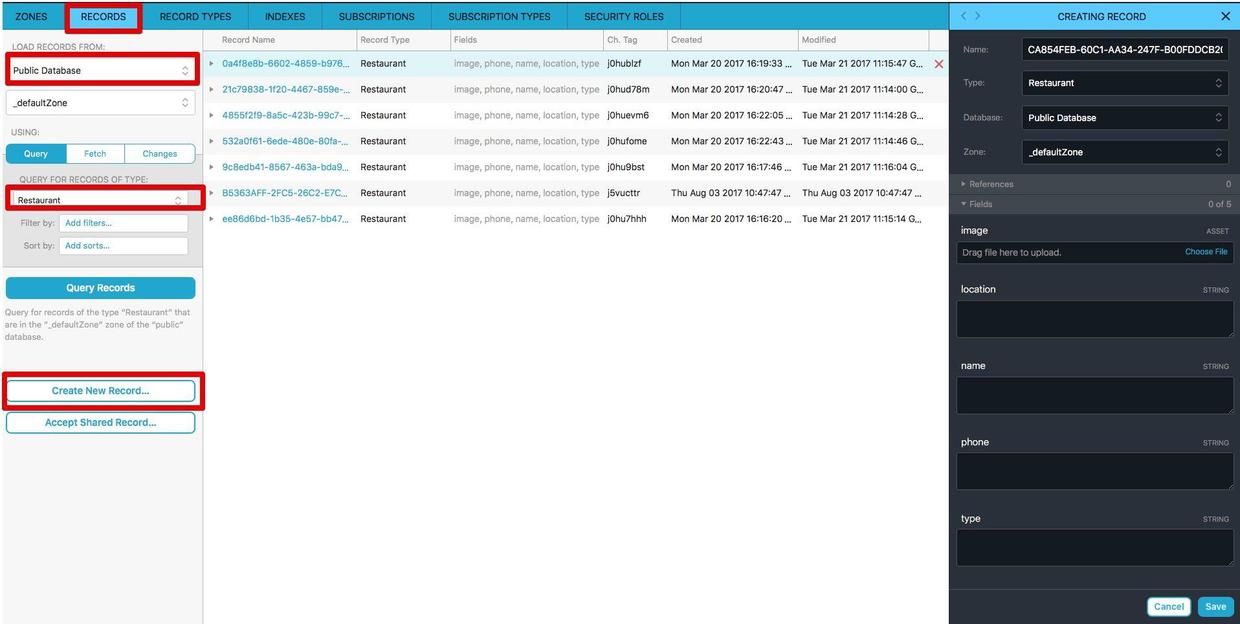
- Select Records (data in the type table), add several pieces of data, and pay attention to selecting public database.
Using Convenience API to obtain public Database
CloudKit provides two APIs for development to interact with iCloud: the convenience API and the operational API.
-
The Convenience API is commonly invoked in the following way:
let cloudContainer = CKContainer.default() let publicDatabase = cloudContainer.publicCloudDatabase let predicate = NSPredicate(value: true) let query = CKQuery(recordType: "Restaurant", predicate: predicate) publicDatabase.perform(query, inZoneWith: nil, completionHandler: { (results, error) -> Void in // Process the records })- CKContainer.default() Gets the Container of the application.
- Public Cloud Database represents the default public database.
- NSPredicate and CKQuery are search conditions
Create a new DiscoverTableViewController, inherit it to UITableViewController, associate the table view controller in discover.storyboard, and modify its prototype cell identifier to Cell.
-
Add import CloudKit to DiscoverTableViewController.swift and define an array variable of CKRecord:
var restaurants:[CKRecord] = [] -
Add a function to get Records:
  func fetchRecordsFromCloud() {

      let cloudContainer = CKContainer.default()
      let publicDatabase = cloudContainer.publicCloudDatabase
      let predicate = NSPredicate(value: true)
      let query = CKQuery(recordType: "Restaurant", predicate: predicate)
      publicDatabase.perform(query, inZoneWith: nil, completionHandler: {
          (results, error) -> Void in

          if error != nil {
              print(error)
              return
          }

          if let results = results {
              print("Completed the download of Restaurant data")
              self.restaurants = results

              OperationQueue.main.addOperation {
                  self.spinner.stopAnimating()
                  self.tableView.reloadData()
              }
          }
      })
  }
In perform ance, when it is determined that the data is obtained, it is assigned to restaurants and the table is refreshed.
Add: fetchRecords FromCloud () in viewDidLoad.
Add table view related proxy method:
override func numberOfSections(in tableView: UITableView) -> Int {
    return 1
}

override func tableView(_ tableView: UITableView, numberOfRowsInSection section: Int) -> Int {
    return restaurants.count
}

override func tableView(_ tableView: UITableView, cellForRowAt indexPath: IndexPath) -> UITableViewCell {
    let cell = tableView.dequeueReusableCell(withIdentifier: "Cell", for:
indexPath)
    // Configure the cell...
    let restaurant = restaurants[indexPath.row]
    cell.textLabel?.text = restaurant.object(forKey: "name") as? String
    if let image = restaurant.object(forKey: "image") {
        let imageAsset = image as! CKAsset
        if let imageData = try? Data.init(contentsOf: imageAsset.fileURL) {
            cell.imageView?.image = UIImage(data: imageData)
        }
    }
    return cell
}
- object(forKey:) is the method of obtaining Record Field value in CKRecord.
- Picture objects are converted to CKAsset.
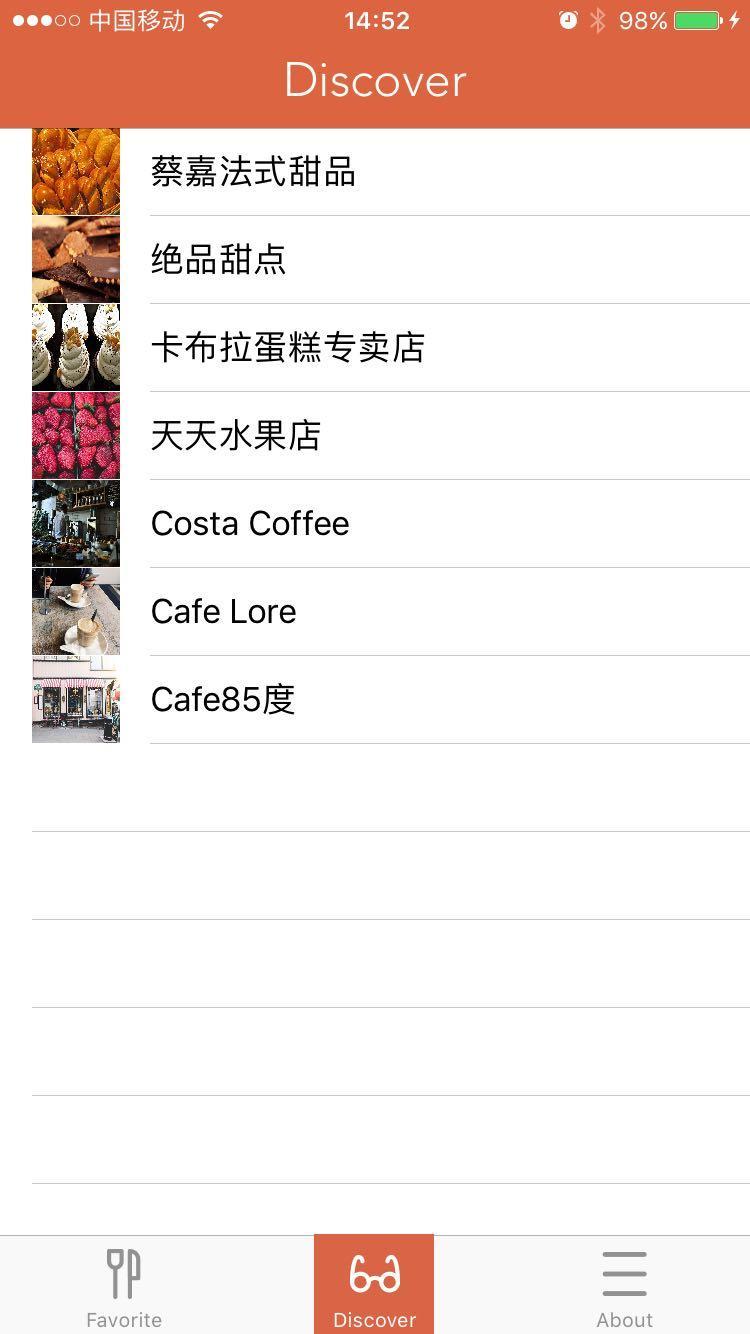
Why slow?
Testing the above code, we found that the print information "Completed the download of Restaurant data" in the fetchRecords FromCloud function has been displayed on the console, but it will take a while for App to display, that is to say, it will take some time to get the data from iCloud to start preparing table view loading.
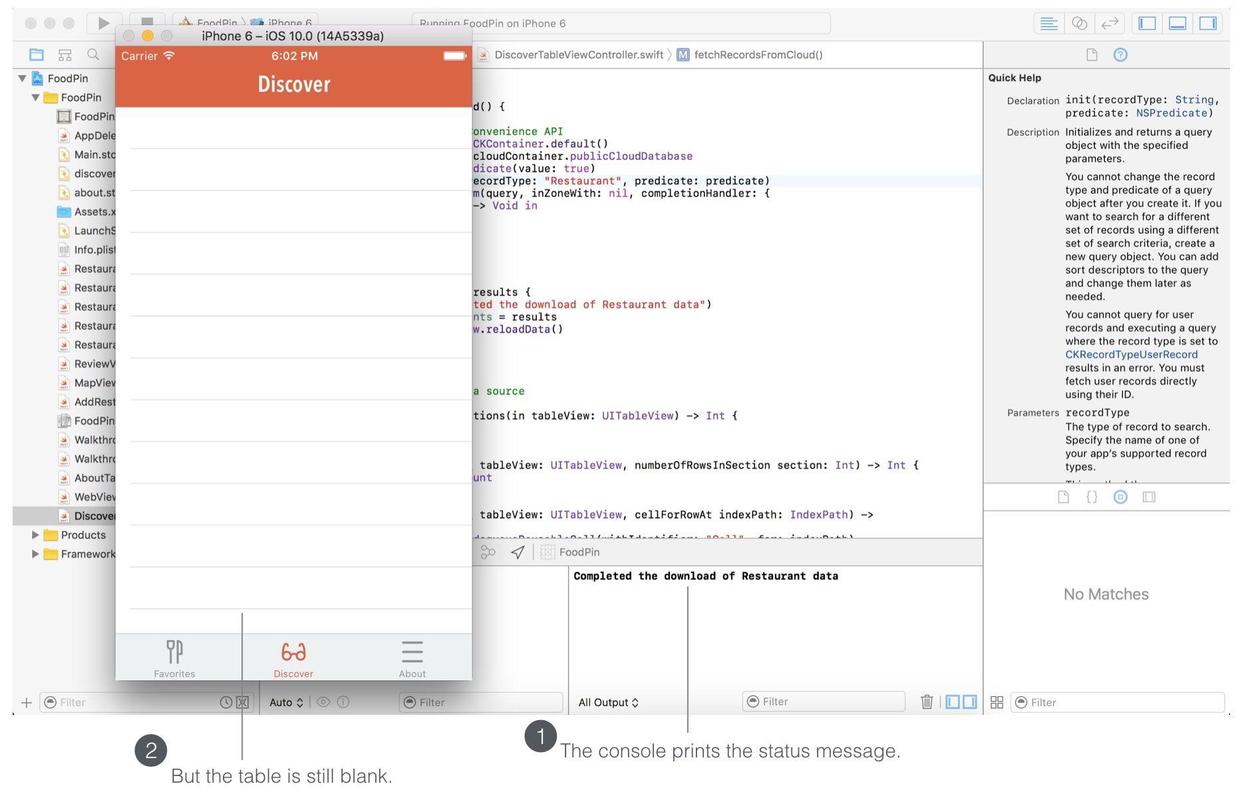
This requires the use of the concept of multithreading. In iOS, UI updates (like table reloads) must be performed in the main thread. In this way, UI updates are synchronized when threads that get iCloud data are in progress.
OperationQueue.main.addOperation {
    self.tableView.reloadData()
}
Using the operational API to obtain public Database
** Convenience API** is only suitable for simple and small queries.
- Update the fetchRecordsFromCloud method:
func fetchRecordsFromCloud() { let cloudContainer = CKContainer.default() let publicDatabase = cloudContainer.publicCloudDatabase let predicate = NSPredicate(value: true) let query = CKQuery(recordType: "Restaurant", predicate: predicate) // Create the query operation with the query let queryOperation = CKQueryOperation(query: query) queryOperation.desiredKeys = ["name", "image"] queryOperation.queuePriority = .veryHigh queryOperation.resultsLimit = 50 queryOperation.recordFetchedBlock = { (record) -> Void in self.restaurants.append(record) } queryOperation.queryCompletionBlock = { (cursor, error) -> Void in if let error = error { print("Failed to get data from iCloud - \(error.localizedDescription)") return } print("Successfully retrieve the data from iCloud") OperationQueue.main.addOperation { self.tableView.reloadData() } } // Execute the query publicDatabase.add(queryOperation) }- By replacing the perform ance method with CKQueryOperation, it provides many query options.
- desiredKeys represent fields that need to be queried.
- resultsLimit represents the maximum number of records queried in turn
Loading instructions (chrysanthemum turn)
- You can add the following types of code in viewDidLoad:
let spinner:UIActivityIndicatorView = UIActivityIndicatorView() spinner.activityIndicatorViewStyle = .gray spinner.center = view.center spinner.hidesWhenStopped = true view.addSubview(spinner) spinner.startAnimating() - You can also add:
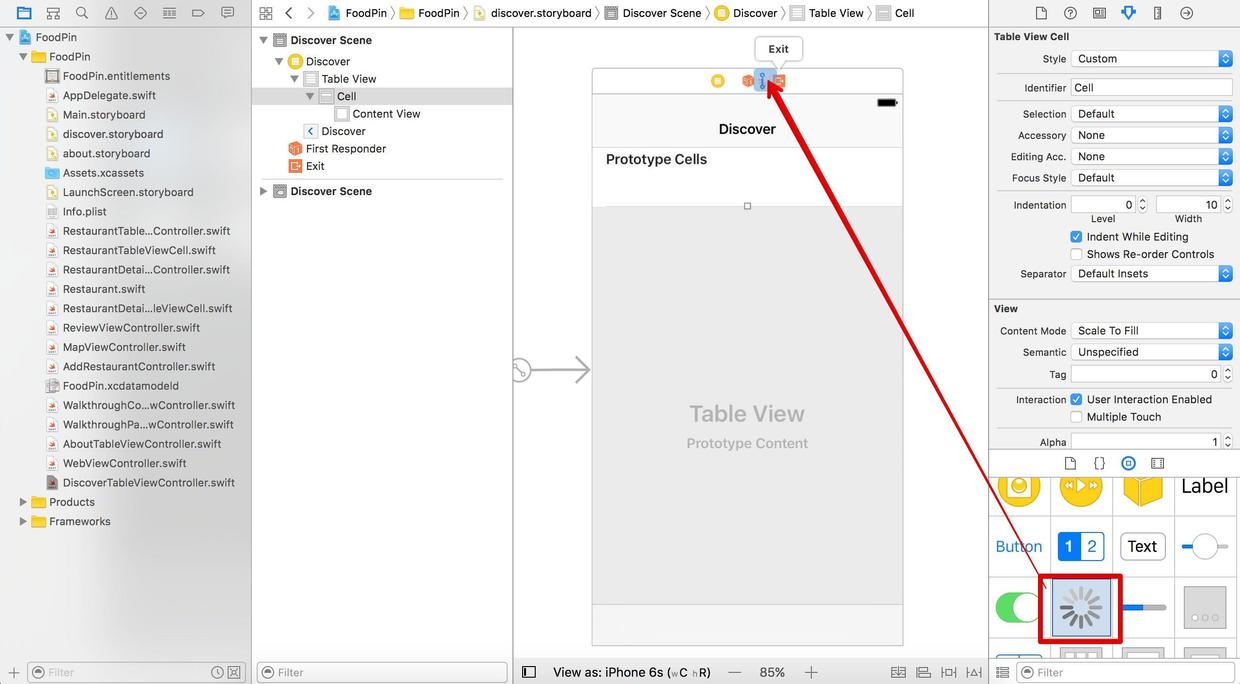
After adding the discovery ** activity indicator view on the controller, which is called The Extra Views ** in Xcode

Add interfaces to DiscoverTableViewController and associate them.
@IBOutlet var spinner: UIActivityIndicatorView!
Add code in viewDidLoad:
  spinner.hidesWhenStopped = true
  spinner.center = view.center
  tableView.addSubview(spinner)
  spinner.startAnimating()
- Hide the loading prompt when the data is loaded:
OperationQueue.main.addOperation {
  self.spinner.stopAnimating()
  self.tableView.reloadData()
 }
Lazy loading pictures
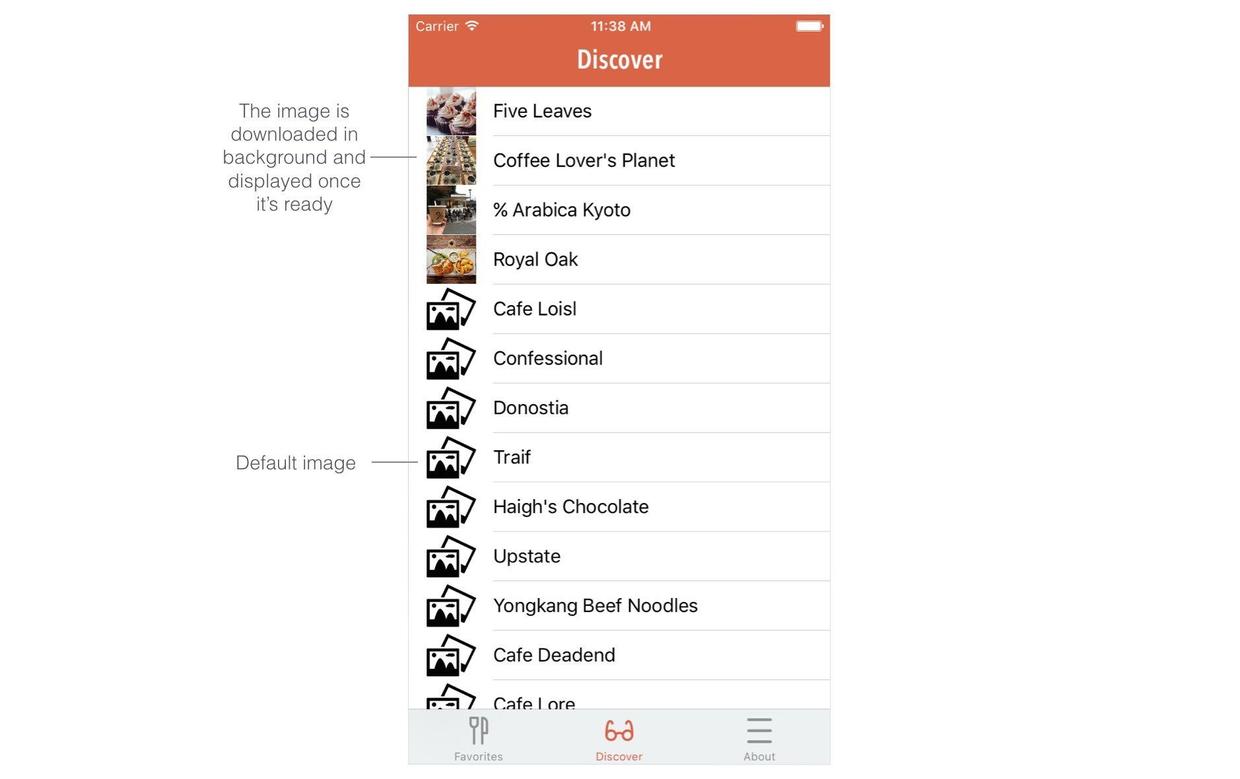
Lazy loading image is to first load a local default image, temporarily do not load remote images, when the picture is ready to update the picture view.
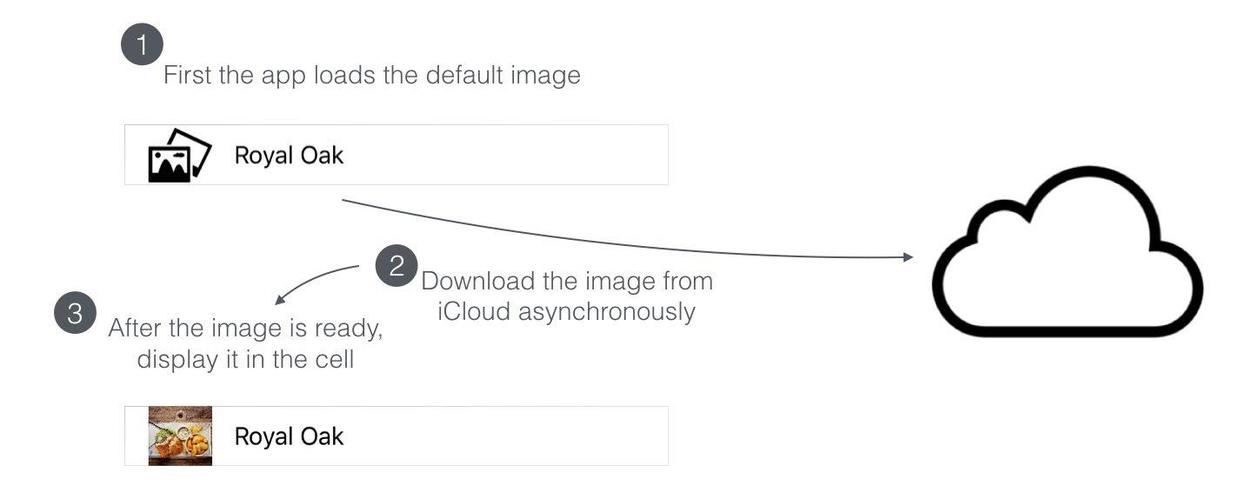
Modify the request field desireKeys so that no pictures are added at the beginning: queryOperation.desiredKeys = ["name"]
Update tableView (: CellForRowAt:):
    override func tableView(_ tableView: UITableView, cellForRowAt indexPath: IndexPath) -> UITableViewCell {
        let cell = tableView.dequeueReusableCell(withIdentifier: "Cell", for: indexPath)

        let restaurant = restaurants[indexPath.row]
        cell.textLabel?.text = restaurant.object(forKey: "name") as? String


        // Set the default image
        cell.imageView?.image = UIImage(named: "photoalbum")
        // Fetch Image from Cloud in background
        let publicDatabase = CKContainer.default().publicCloudDatabase
        let fetchRecordsImageOperation = CKFetchRecordsOperation(recordIDs:[restaurant.recordID])
        fetchRecordsImageOperation.desiredKeys = ["image"]
        fetchRecordsImageOperation.queuePriority = .veryHigh
        fetchRecordsImageOperation.perRecordCompletionBlock = { (record, recordID, error) -> Void in
            if let error = error {
                print("Failed to get restaurant image: \(error.localizedDescription)")
                return
            }
            if let restaurantRecord = record {
                OperationQueue.main.addOperation() {
                    if let image = restaurantRecord.object(forKey: "image") {
                        let imageAsset = image as! CKAsset
                        print(imageAsset.fileURL)
                        if let imageData = try? Data.init(contentsOf:
                            imageAsset.fileURL) {
                            cell.imageView?.image = UIImage(data: imageData)
                        }
                    }
                }
            }
        }
        publicDatabase.add(fetchRecordsImageOperation)
        return cell
    }
- CKFetchRecords Operation obtains a specific Record through the recordID.
- Some methods of CKFetchRecords Operation are similar to CKQuery Operation.
After lazy loading, it is found that the images are displayed in other views and then slowly loaded and displayed.
Dropdown refresh
UIRefreshControl provides a standard drop-down refresh feature.
- Add:
        // Pull To Refresh Control
        refreshControl = UIRefreshControl()
        refreshControl?.backgroundColor = UIColor.white
        refreshControl?.tintColor = UIColor.gray
        refreshControl?.addTarget(self, action: #selector(fetchRecordsFromCloud), for: UIControlEvents.valueChanged)
Each drop-down displays the chrysanthemum turn and calls the fetchRecordsFromCloud method.
- Remove chrysanthemum transcoding after adding data to queryCompletion Block of fetchRecords FromCloud method:
if let refreshControl = self.refreshControl {
    if refreshControl.isRefreshing {
        refreshControl.endRefreshing()
    }
}
- Refreshing results in duplicate data, which is cleaned up at the beginning of the fetchRecords FromCloud method:
restaurants.removeAll()
tableView.reloadData()
Use CloudKit to save data to iCloud
The save (: completionHandler:) method of CKDatabase can be used to save data to iCloud.
When the user adds new data, both local Core Data and iCloud are saved.
Add: import CloudKit to AddRestaurant Controller.
-
Add methods in AddRestaurantController:
// Save to Core Data as well as iCloud func saveRecordToCloud(restaurant:RestaurantMO!) -> Void { // Prepare the record to save let record = CKRecord(recordType: "Restaurant") record.setValue(restaurant.name, forKey: "name") record.setValue(restaurant.type, forKey: "type") record.setValue(restaurant.location, forKey: "location") record.setValue(restaurant.phone, forKey: "phone") let imageData = restaurant.image as! Data // Resize the image let originalImage = UIImage(data: imageData)! let scalingFactor = (originalImage.size.width > 1024) ? 1024 / originalImage.size.width : 1.0 let scaledImage = UIImage(data: imageData, scale: scalingFactor)! // Write the image to local file for temporary use let imageFilePath = NSTemporaryDirectory() + restaurant.name! let imageFileURL = URL(fileURLWithPath: imageFilePath) try? UIImageJPEGRepresentation(scaledImage, 0.8)?.write(to: imageFileURL) // Create image asset for upload let imageAsset = CKAsset(fileURL: imageFileURL) record.setValue(imageAsset, forKey: "image") // Get the Public iCloud Database let publicDatabase = CKContainer.default().publicCloudDatabase // Save the record to iCloud publicDatabase.save(record, completionHandler: { (record, error) -> Void in try? FileManager.default.removeItem(at: imageFileURL) }) } -
Before dismiss(animated:completion:) of save method, add:
saveRecordToCloud(restaurant: restaurant)
sort
CKQuery has the attribute sortDescriptors that can be used for sorting.
In the fetchRecords FromCloud method of DiscoverTableViewController, after the query definition, add:
query.sortDescriptors = [NSSortDescriptor(key: "creationDate", ascending: false)]
Creation Date is the default creation time field.
Exercise: Modifying Discover Styles
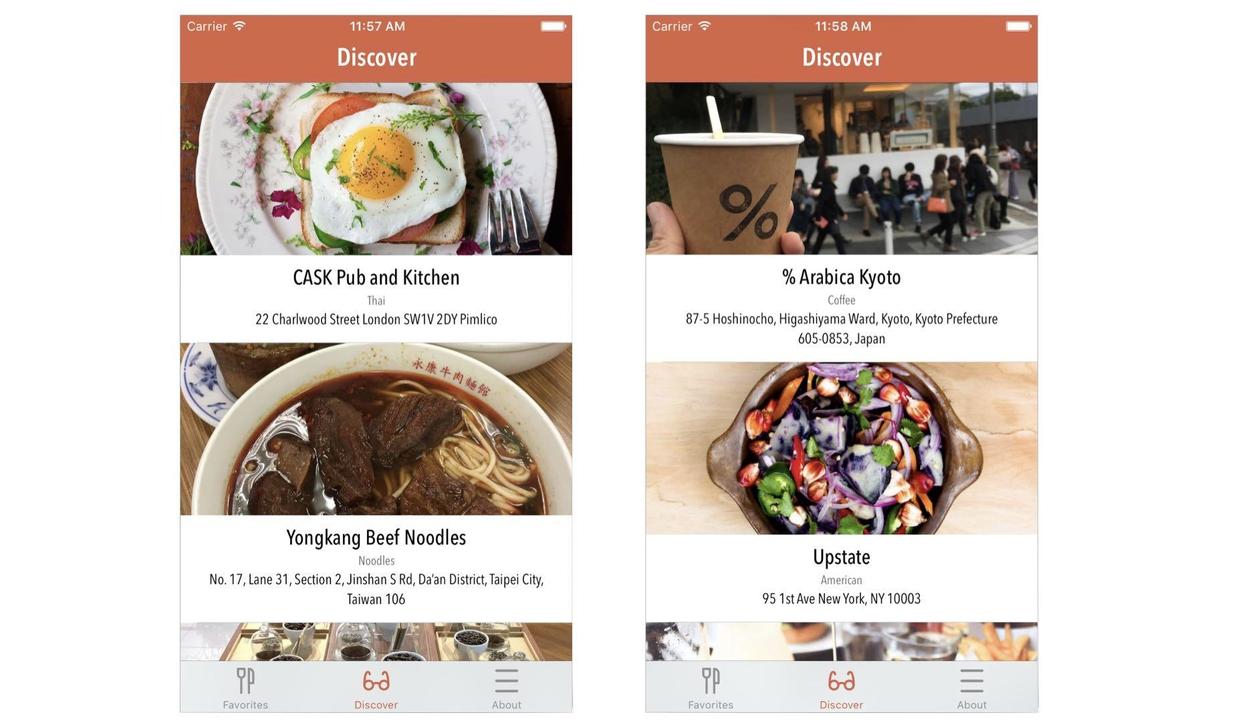
- Create a new Discover Table ViewCell, inherit it to UITable ViewCell, and associate Discover cell.
- Modify the appropriate cell style, such as the following
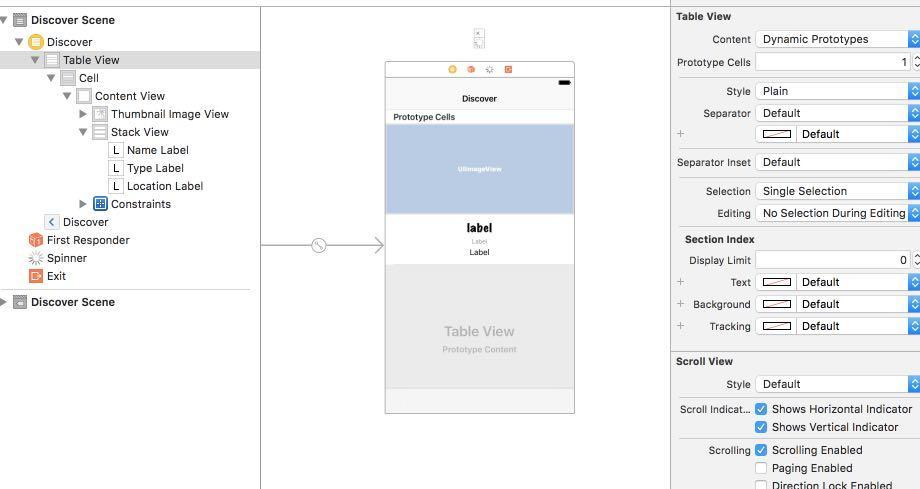
- Create four new interfaces in DiscoverTable ViewCell and associate them.
    @IBOutlet var nameLabel: UILabel!
    @IBOutlet var locationLabel: UILabel!
    @IBOutlet var typeLabel: UILabel!
    @IBOutlet var thumbnailImageView: UIImageView!
- Update tableView (: CellForRowAt:) and fetchRecords FromCloud related code
Code
Beginning-iOS-Programming-with-Swift
Explain
This article is about learning. appcode A book published on the website <Beginning iOS 10 Programming with Swift> A Record
Catalogue of Series Articles
- Start developing iOS 10 - 1 with Swift
- Start developing iOS 10 - 2 Hello World with Swift! First Swift APP
- Start developing iOS 10 - 3 with Swift and introduce Auto Layout
- Start developing iOS 10-4 with Swift and design UI with Stack View
- [Introduction to start developing iOS 10-5 prototype with Swift]
- Start developing iOS 10 - 6 with Swift to create a simple Table Based App
- Start developing iOS 10 - 7 custom Table Views with Swift
- Start developing iOS 10-8 Table View and UIAlert Controller interaction with Swift
- Start developing iOS 10 - 9 Table Row deletion with Swift, UITableViewRowAction and UIActivityViewController usage
- Introduction to Starting Developing iOS 10-10 Navigation Controller with Swift
- Introduction to Developing iOS 10-11 Object-Oriented Programming with Swift
- Start developing iOS 10 - 12 with Swift to enrich Detail View and customize Navigation Bar
- Start developing iOS 10 - 13 Self Sizing Cells and Dynamic Type with Swift
- Start developing iOS 10 - 14 basic animations, blurring effects and Unwind Segue with Swift
- Start developing iOS 10 - 15 maps with Swift
- Start developing iOS 10 - 16 with Swift to introduce static Table Views, UI Image Picker Controller and NSLayout Constraint
- Start developing iOS 10 - 17 with Swift using Core Data