Project start
# 01 - create project
Objective: to create a Vue 3.0 project using Vue cli.
Step 1: open the command line window.

- Note that the directory will be the directory where you created the project.
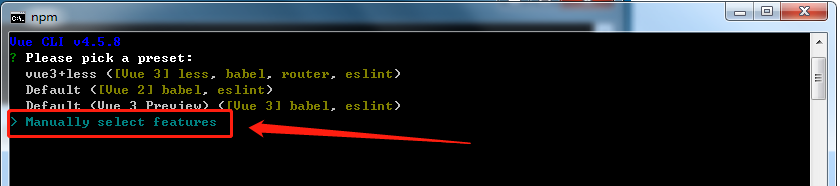
Step 2: execute the create project command line

Step 3: select custom creation
Step 4: select the Vue router, vuex and CSS pre processors options
Step 5: select vue3.0 version
Step 6: select the route in hash mode
Step 7: select less as the preprocessor
Step 8: select standard code style
Step 9: save the code, verify the code style, and verify the code style when submitting the code
Step 10: save the configuration files that depend on plug-ins or tools in separate files
Step 11: whether to record the above operations, select No
Step 12: wait for installation
Finally: installation is complete
# 02 - catalog adjustment
Objective: to split the functional modules of the project.
General steps:
- Delete useless code and files
- Improve the infrastructure of the project
- Read the code generated by default
Drop code:

Note: the above structure and catalogue are for reference
Some documents needing attention are:
- router/index.js
import { createRouter, createWebHashHistory } from 'vue-router'

const routes = [

]

// Create routing instance
const router = createRouter({
  // Using hash to realize routing
  history: createWebHashHistory(),
  // Configure routing rules in the same way as before
  routes
})

export default router
In vue3.0, createRouter is used to create a routing instance, and createWebHashHistory represents a route using hash mode.
- store/index.js
import { createStore } from 'vuex'

// Create vuex warehouse and export
export default createStore({
  state: {
    // data
  },
  mutations: {
    // Change data function
  },
  actions: {
    // Request data function
  },
  modules: {
    // Sub module
  },
  getters: {
    // Calculated properties of vuex
  }
})
Create a vuex instance using createStore in vue3.0.
- main.js
import { createApp } from 'vue'
import App from './App.vue'
import router from './router'
import store from './store'

// Create a vue application instance
createApp(App).use(store).use(router).mount('#app')
Create app in vue3.0 to create an application app.
Two additional profiles are added:
- jsconfig.json
{
  "compilerOptions": {
    "baseUrl": ".",
    "paths": {
      "@/*": ["./src/*"],
    }
  },
  "exclude": ["node_modules", "dist"]
}
When we use the path alias @, we can prompt the path.
- .eslintignore
/dist
/src/vender
eslint ignores dist and vender when doing style checking.
Summary:
- Adjust the directory and interpret the generated code
- Add configuration file, path prompt, ignore style verification.
# 03 vuex Foundation
Purpose: know the function of each configuration, the usage of root module vue3.0, and the usage of module with namespace and then vue3.0
- Usage of root module
definition
vue2.0 Create warehouse new Vuex.Store({})
vue3.0 Create warehouse createStore({})
export default createStore({
  state: {
    username: 'zs'
  },
  getters: {
    newName (state) {
      return state.username + '!!!'
    }
  },
  mutations: {
    updateName (state) {
      state.username = 'ls'
    }
  },
  actions: {
    updateName (ctx) {
      // Send request
      setTimeout(() => {
        ctx.commit('updateName')
      }, 1000)
    }
  },
  modules: {

  }
})
use
<template>
  <!-- vue2.0 Root element required, vue3.0 It can be code snippets Fragment -->
  <div>
    App
    <!-- 1. Use root module state Data   -->
    <p>{{$store.state.username}}</p>
    <!-- 2. Use root module getters Data   -->
    <p>{{$store.getters['newName']}}</p>
    <button @click="mutationsFn">mutationsFn</button>
  </div>
</template>
<script>
import { useStore } from 'vuex'
export default {
  name: 'App',
  setup () {
    // Using vuex warehouse
    const store = useStore()
    // 1. Use the data of the root module state
    console.log(store.state.username)
    // 2. Use the data of the root module getters
    console.log(store.getters.newName)
    const mutationsFn = () => {
      // 3. Submit the root module mutations function
      // store.commit('updateName')
      // 4. Call the actions function of the root module
      store.dispatch('updateName')
    }
    return { mutationsFn }
  }
}
</script>
- modules
- There are two situations
- Default module, state Distinguish modules, others getters mutations actions All in the overall situation.
- With namespace namespaced: true Modules, all functions distinguish modules, higher encapsulation and reuse.
import { createStore } from 'vuex'

const moduleA = {
  // Submodule state is suggested to be written as a function
  state: () => {
    return {
      username: 'modular A'
    }
  },
  getters: {
    changeName (state) {
      return state.username + 'AAAAAA'
    }
  }
}

const moduleB = {
  // Module with namespace
  namespaced: true,
  // Submodule state is suggested to be written as a function
  state: () => {
    return {
      username: 'modular B'
    }
  },
  getters: {
    changeName (state) {
      return state.username + 'BBBBBB'
    }
  },
  mutations: {
    // Modify the mutation of the name
    update (state) {
      state.username = 'BBBB' + state.username
    }
  },
  actions: {
    update ({ commit }) {
      // Hypothetical request
      setTimeout(() => {
        commit('update')
      }, 2000)
    }
  }
}

// Create vuex warehouse and export
export default createStore({
  state: {
    // data
    person: [
      { id: 1, name: 'tom', gender: 'male' },
      { id: 2, name: 'lucy', gender: 'female' },
      { id: 3, name: 'jack', gender: 'male' }
    ]
  },
  mutations: {
    // Change data function
  },
  actions: {
    // Request data function
  },
  modules: {
    // Sub module
    a: moduleA,
    b: moduleB
  },
  getters: {
    // Calculated properties of vuex
    boys: (state) => {
      return state.person.filter(p => p.gender === 'male')
    }
  }
})
use:
<template>
 <div>APP assembly</div>
 <ul>
   <li v-for="item in $store.getters.boys" :key="item.id">{{item.name}}</li>
 </ul>
 <!-- Use module A of username -->
 <p>A of username --- {{$store.state.a.username}}</p>
 <p>A of changeName --- {{$store.getters.changeName}}</p>
 <hr>
 <p>B of username --- {{$store.state.b.username}}</p>
 <p>B of changeName --- {{$store.getters['b/changeName']}}</p>
 <button @click="$store.commit('b/update')">modify username</button>
 <button @click="$store.dispatch('b/update')">Asynchronous modification username</button>
</template>
# 04 vuex persistence
Purpose: let the status data managed in vuex be stored locally at the same time. You can avoid the link of your own storage.
- In the process of development, user information (name, avatar, token) needs to be stored in vuex and stored locally.
- For another example, shopping carts are also supported when they are not logged in. If they are managed in vuex, pages need to be stored locally.
- We need the category module to store the classification information, but the classification information does not need to be persistent.
1) First of all, we need to install a vuex plug-in vuex persistent state to support the state persistence of vuex.
npm i vuex-persistedstate
2) Then: in src/store New under folder modules File, in modules New under user.js and cart.js
src/store/modules/user.js
// User module
export default {
  namespaced: true,
  state () {
    return {
      // User information
      profile: {
        id: '',
        avatar: '',
        nickname: '',
        account: '',
        mobile: '',
        token: ''
      }
    }
  },
  mutations: {
    // Modify user information. payload is the user information object
    setUser (state, payload) {
      state.profile = payload
    }
  }
}
src/store/modules/cart.js
// Shopping cart status
export default {
  namespaced: true,
  state: () => {
    return {
      list: []
    }
  }
}
src/store/modules/category.js
// Classification module
export default {
  namespaced: true,
  state () {
    return {
      // Classification information set
      list: []
    }
  }
}
3) Continue: in src/store/index.js Import the user cart module from.
import { createStore } from 'vuex'

import user from './modules/user'
import cart from './modules/cart'
import cart from './modules/category'

export default createStore({
  modules: {
    user,
    cart,
    category
  }
})
4) Finally: use the vuex persistent state plug-in for persistence
import { createStore } from 'vuex'
+import createPersistedstate from 'vuex-persistedstate'

import user from './modules/user'
import cart from './modules/cart'
import cart from './modules/category'

export default createStore({
  modules: {
    user,
    cart,
    category
  },
+  plugins: [
+    createPersistedstate({
+      key: 'erabbit-client-pc-store',
+      paths: ['user', 'cart']
+    })
+  ]
})
be careful:
===>The default is stored in localStorage
===>Key is the name of the key where the data is stored
===>Paths is the data stored in the state. If it is the specific data under the module, you need to add the module name, such as user.token
===>After the state is modified and triggered, you can see the changes of locally stored data.
Test: The user module defines a mutation, which is called in main.js to observe the data under the localStorage of the browser application.
src/App.js
<template>
  <div class="container">
    <!-- Modify the data and test whether it is persistent -->
    App {{$store.state.user.profile.account}}
    <button @click="$store.commit('user/setUser',{account:'zhousg'})">Set user information</button>
  </div>
</template>
<script>
export default {
  name: 'App'
}
</script>
# 05 - Request tool
Purpose: encapsulate a request tool based on axios and use it when calling the interface.
- Installing axios
npm i axios
- newly build src/utils/request.js Module, code as follows
// 1. Create a new axios instance
// 2. Request the interceptor to carry the header if there is a token
// 3. Response Interceptor: 1. Stripping invalid data 2. Processing token failure
// 4. Export a function, call the current axsio instance to send a request, and return the value promise

import axios from 'axios'
import store from '@/store'
import router from '@/router'

// Reason for exporting the reference address: the reference address is used in other places where the request is not sent through axios
export const baseURL = 'http://pcapi-xiaotuxian-front-devtest.itheima.net/'
const instance = axios.create({
  // Some configurations of axios, baseurl timeout
  baseURL,
  timeout: 5000
})

instance.interceptors.request.use(config => {
  // Intercept business logic
  // Make changes to the requested configuration
  // If there is a local token, it will be carried in the head
  // 1. Get user information object
  const { profile } = store.state.user
  // 2. Judge whether there is a token
  if (profile.token) {
    // 3. Set token
    config.headers.Authorization = `Bearer ${profile.token}`
  }
  return config
}, err => {
  return Promise.reject(err)
})

// Res = > res.data takes out the data. When calling the interface in the future, the data directly obtained is the background data
instance.interceptors.response.use(res => res.data, err => {
  // 401 status code, enter the function
  if (err.response && err.response.status === 401) {
    // 1. Clear invalid user information
    // 2. Jump to login page
    // 3. The jump needs to pass the parameter (current routing address) to the login page number
    store.commit('user/setUser', {})
    // Current routing address
    // Inside the component: ` / user? A = 10 ` $route. Path = = / user $route. Fullpath = = = / user? A = 10
    // js module: route.currentroute.value.fullpath is the current route address, and route.currentroute is ref responsive data
    const fullPath = encodeURIComponent(router.currentRoute.value.fullPath)
    // encodeURIComponent converts uri codes to prevent problems in resolving addresses
    router.push('/login?redirectUrl=' + fullPath)
  }
  return Promise.reject(err)
})

// Request tool function
export default (url, method, submitData) => {
  // Responsible for sending requests: request address, request method and submitted data
  return instance({
    url,
    method,
    // 1. If it is a get request, you need to use params to pass SubmitData? a=10&c=10
    // 2. If it is not a get request, you need to use data to pass the parameters of the submitData request body
    // [] set a dynamic KEY and write a js expression. The execution result of the js expression is regarded as a KEY
    // method parameters: get, get, convert to lowercase and then judge
    // In the object, ['params']:submitData ===== params:submitData
    [method.toLowerCase() === 'get' ? 'params' : 'data']: submitData
  })
}
# 06 - Routing Design
Objective: to know the design of project routing level
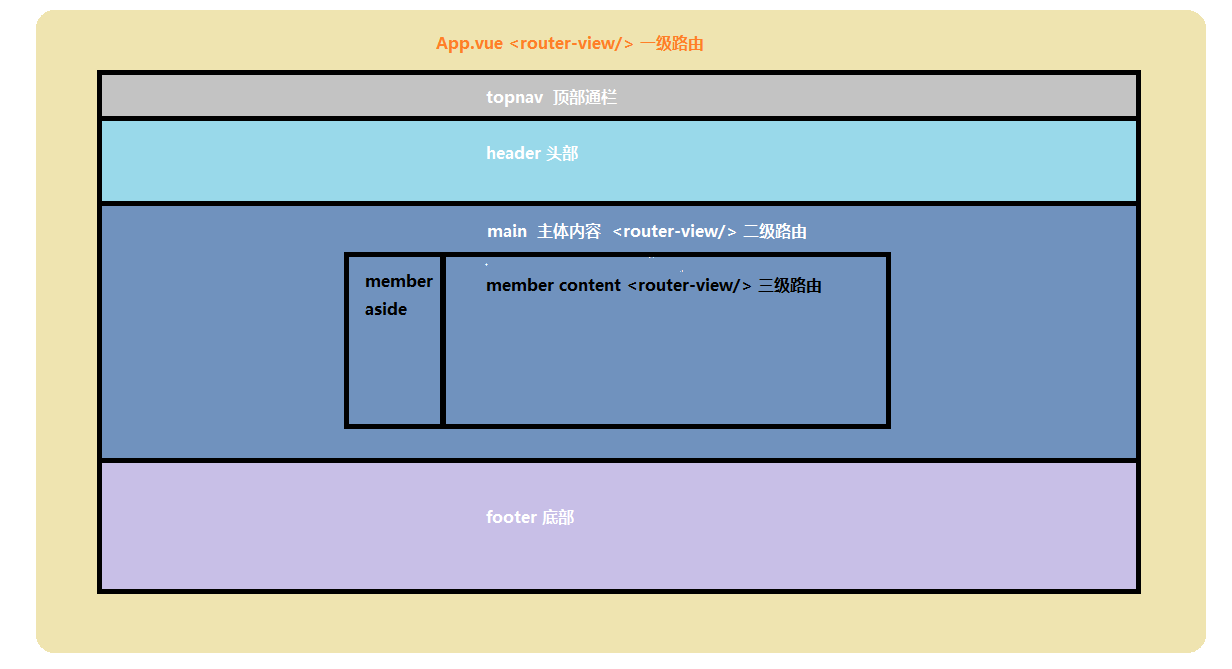
| route | Components (functions) | Nesting level |
|---|---|---|
| / | Home page layout container | Level 1 |
| / | home page | Level 2 |
| /category/:id | Primary classification | Level 2 |
| /category/sub/:id | Secondary classification | Level 2 |
| /product/:id | Product details | Level 2 |
| /login | Sign in | Level 1 |
| /login/callback | Third party login callback | Level 1 |
| /cart | Shopping Cart | Level 2 |
| /member/checkout | Fill in the order | Level 2 |
| /member/pay | Make payment | Level 2 |
| /member/pay/result | Payment results | Level 2 |
| /member | Personal center layout container | Level 2 |
| /member | Personal Center | Level 3 |
| /member/order | Order management | Level 3 |
| /member/order/:id | Order details | Level 3 |