After the project is developed and launched, a series of preparations need to be made, including but not limited to:
- Compress CSS, JavaScript and HTML files
- If SASS or LESS is used, it needs to be compiled, otherwise the whole project cannot run
- Similarly, if there is a version requirement for JavaScript, you also need to use babel to translate JavaScript, otherwise some functions cannot be realized
- ...
If all processes are completed manually, it will take time and involve many human errors, so many automatic construction tools came into being.
Gulp is based on node JS is a front-end automated build tool for dealing with the problems listed above.
Basic use of gulp
Learn how to use single task, combined task and asynchronous operation to learn how to use gulp.
gulp's individual tasks
The basic use of gulp. Here, the version of gulp uses v4 For versions after 0, the syntax used is also the syntax of ES6.
-
Create a new folder and initialize a node project structure
gulp> mkdir gulp-sample
gulp> cd .\gulp-sample\
gulp-sample> yarn init
-
Download and install gulp dependency package
Because gulp is used to package projects in the development environment, you only need to install it in the development environment
gulp-sample> yarn add gulp --dev
-
Add a gulpfile in the root directory js
gulpfile.js is the entry file of gulp, which is required.
The first step is to try to have output on the command line to see if gulp can run normally
gulpfile.js contents are as follows:
// gulp entry file

exports.default = () => {
  console.log('hello world');
};
v4. After 0, gulp defines a task by exporting a function, so here you can export a function directly through commonJS
Exporting a function named default indicates that this is the default execution function
Note: v3 The writing method of 0, that is, the way of passing in the task by calling the task() function, can also be run, but it is easier to use the writing method of arrow function
const gulp = require('gulp'); gulp.task('default', function () { console.log('hello world'); }); -
Run default function
Run on terminal:
gulp-sample> yarn gulp
yarn run v1.22.10
$ C:\assignment\front\gulp\gulp-sample\node_modules\.bin\gulp
[04:00:14] Using gulpfile C:\assignment\front\gulp\gulp-sample\gulpfile.js
[04:00:14] Starting 'default'...
hello world
[04:00:14] The following tasks did not complete: default
[04:00:14] Did you forget to signal async completion?
error Command failed with exit code 1.
info Visit https://yarnpkg.com/en/docs/cli/run for documentation about this command.
At [04:00:14] Starting 'default' After that, you can see the output of hello world, which means that there is no problem with the operation of gulp.
However, an error message appears after the operation, saying:
The following tasks did not complete: default
That is, the task of default has not been completed.
-
Solve the not complete error
The error message appears because v4 After 0, the synchronous processing mechanism is cancelled, and all functions are treated as asynchronous functions. Therefore, an instruction needs to be passed to inform gulp that the task has been processed
gulp itself includes this indicator in the function. The calling method is as follows:
exports.default = (done) => {
  console.log('hello world');

  done(); // Indicates that the task is complete
};
Run again:
gulp-sample> yarn gulp
 yarn run v1.22.10
 $ C:\assignment\front\gulp\gulp-sample\node_modules\.bin\gulp
 [04:19:00] Using gulpfile C:\assignment\front\gulp\gulp-sample\gulpfile.js
 [04:19:00] Starting 'default'...
 hello world
 [04:19:00] Finished 'default' after 2.53 ms
 Done in 1.17s.
Combined tasks of gulp
It is mainly completed through two functions provided by gulp. The main code is:
const { series, parallel } = require('gulp');

const task1 = (done) => {
  setTimeout(() => {
    console.log('task1 done');
    done();
  }, 2000);
};

const task2 = (done) => {
  setTimeout(() => {
    console.log('task2 done');
    done();
  }, 1000);
};

const task3 = (done) => {
  setTimeout(() => {
    console.log('task3 done');
    done();
  }, 1000);
};
series
Serial task
Using serial tasks, you must complete the specified task before completing the next task. Application scenarios include: compiling SASS first, and then deploying CSS code
exports.seriesTask = series(task1, task2, task3);
Terminal operation:
  gulp-sample> yarn gulp seriesTask
  yarn run v1.22.10
  $ C:\assignment\front\gulp\gulp-sample\node_modules\.bin\gulp seriesTask
  [05:00:42] Using gulpfile C:\assignment\front\gulp\gulp-sample\gulpfile.js
  [05:00:42] Starting 'seriesTask'...
  [05:00:42] Starting 'task1'...
  task1 done
  [05:00:44] Finished 'task1' after 2.02 s
  [05:00:44] Starting 'task2'...
  task2 done
  [05:00:46] Finished 'task2' after 2 s
  [05:00:46] Starting 'task3'...
  task3 done
  [05:00:48] Finished 'task3' after 2.01 s
  [05:00:48] Finished 'seriesTask' after 6.04 s
  Done in 7.22s.
It can be seen that there is a sequence of execution, and although task1 takes more time than others - task1 needs to wait 2 seconds and the other two wait 1 second - task1 is still executed and completed first.
parrllel
Parallel task
Using parallel tasks does not interfere with each other. Application scenarios include: you can compile CSS and JavaScript at the same time
exports.parallelTask = parallel(task1, task2, task3);
Terminal operation:
gulp-sample> yarn gulp parallelTask
  yarn run v1.22.10
  $ C:\assignment\front\gulp\gulp-sample\node_modules\.bin\gulp parallelTask
  [05:02:23] Using gulpfile C:\assignmentF\front\gulp\gulp-sample\gulpfile.js
  [05:02:23] Starting 'parallelTask'...
  [05:02:23] Starting 'task1'...
  [05:02:23] Starting 'task2'...
  [05:02:23] Starting 'task3'...
  task2 done
  [05:02:24] Finished 'task2' after 1.02 s
  task3 done
  [05:02:24] Finished 'task3' after 1.02 s
  task1 done
  [05:02:25] Finished 'task1' after 2.01 s
  [05:02:25] Finished 'parallelTask' after 2.01 s
  Done in 3.31s.
In contrast, parallel is different here. task2 and task3 run before task1.
Asynchronous process processing operation of gulp
gulp has been upgraded to v4.0 After 0, each task is called asynchronously in the way of callback function. This makes it a problem to confirm whether the operation is completed. Here are the three most commonly used solutions that use JavaScript native operations.
VC & Delphi
As mentioned above, gulp v4 After 0, the synchronization operation has been cancelled. Instead, it receives the signal that the task has been completed by passing in an indicator - done, a callback function.
Therefore, when an error exception occurs, you can also notify gulp by calling the done() function and throwing an exception in the middle. The specific operation is the same as the callback function of native JavaScript, which is an error first mechanism.
It should be noted that once an exception is thrown, other tasks will be terminated and continue to run.
const { series, parallel } = require('gulp');

const task1 = (done) => {
  setTimeout(() => {
    console.log('task1 done');
    done();
  }, 2000);
};

const task2 = (done) => {
  setTimeout(() => {
    console.log('task2 done');
    // Modified here ↓
    done(new Error('task failed'));
    // Modified here ↑
  }, 1000);
};

const task3 = (done) => {
  setTimeout(() => {
    console.log('task3 done');
    done();
  }, 1000);
};

exports.seriesTask = series(task1, task2, task3);

exports.parallelTask = parallel(task1, task2, task3);

exports.default = (done) => {
  console.log('hello world');

  done(); // Indicates that the task is complete
};
Operation results:
-
series error
gulp-sample> yarn gulp seriesTask
yarn run v1.22.10
$ C:\assignment\front\gulp\gulp-sample\node_modules\.bin\gulp seriesTask
[10:00:12] Using gulpfile C:\assignment\front\gulp\gulp-sample\gulpfile.js
[10:00:12] Starting 'seriesTask'...
[10:00:12] Starting 'task1'...
task1 done
[10:00:14] Finished 'task1' after 2.01 s
[10:00:14] Starting 'task2'...
task2 done
[10:00:15] 'task2' errored after 1.02 s
[10:00:15] Error: task failed
    at Timeout._onTimeout (C:\assignment\front\gulp\gulp-sample\gulpfile.js:13:10)
    at listOnTimeout (internal/timers.js:554:17)
    at processTimers (internal/timers.js:497:7)
[10:00:15] 'seriesTask' errored after 3.03 s
error Command failed with exit code 1.
info Visit https://yarnpkg.com/en/docs/cli/run for documentation about this command.
You can see that an exception is thrown in task2 and task3 does not continue to run
-
parallel error
gulp-sample> yarn gulp parallelTask
yarn run v1.22.10
$ C:\assignment\front\gulp\gulp-sample\node_modules\.bin\gulp parallelTask
[10:01:09] Using gulpfile C:\assignment\front\gulp\gulp-sample\gulpfile.js
[10:01:09] Starting 'parallelTask'...
[10:01:09] Starting 'task1'...
[10:01:09] Starting 'task2'...
[10:01:09] Starting 'task3'...
task2 done
[10:01:10] 'task2' errored after 1.02 s
[10:01:10] Error: task failed
    at Timeout._onTimeout (C:\assignment\front\gulp\gulp-sample\gulpfile.js:13:10)
    at listOnTimeout (internal/timers.js:554:17)
    at processTimers (internal/timers.js:497:7)
[10:01:10] 'parallelTask' errored after 1.03 s
error Command failed with exit code 1.
info Visit https://yarnpkg.com/en/docs/cli/run for documentation about this command.
You can see that task2 threw an exception here, and task1 and task3 did not continue to run
Using promise
Promise can be used to solve the problem that the code is too deeply nested. The specific method is to return promise:
const { series, parallel } = require('gulp');

const task1 = (done) => {
  setTimeout(() => {
    console.log('task1 done');
  }, 2000);
  return Promise.resolve('this will be ignored');
};

const task2 = (done) => {
  setTimeout(() => {
    console.log('task2 done');
  }, 1000);
  return Promise.reject(new Error('task2 failed'));
};

const task3 = (done) => {
  setTimeout(() => {
    console.log('task3 done');
    done();
  }, 1000);
};

exports.seriesTask = series(task1, task2, task3);

exports.parallelTask = parallel(task1, task2, task3);
Operation results:
gulp-sample> yarn gulp seriesTask
yarn run v1.22.10
$ C:\assignment\front\gulp\gulp-sample\node_modules\.bin\gulp seriesTask
[10:07:41] Using gulpfile C:\assignment\front\gulp\gulp-sample\gulpfile.js
[10:07:41] Starting 'seriesTask'...
[10:07:41] Starting 'task1'...
[10:07:41] Finished 'task1' after 1.41 ms
[10:07:41] Starting 'task2'...
[10:07:41] 'task2' errored after 1.03 ms
[10:07:41] Error: task2 failed
    at task2 (C:\assignment\front\gulp\gulp-sample\gulpfile.js:14:25)
    at bound (domain.js:413:15)
    at runBound (domain.js:424:12)
    at asyncRunner (C:\assignment\front\gulp\gulp-sample\node_modules\async-done\index.js:55:18)
    at processTicksAndRejections (internal/process/task_queues.js:75:11)
[10:07:41] 'seriesTask' errored after 6.61 ms
error Command failed with exit code 1.
info Visit https://yarnpkg.com/en/docs/cli/run for documentation about this command.
Using async/await
Since promise can be used, you can also use the syntax sugar provided by ES7: async/await. As long as the node environment is more than 8, you can use async/await. The usage is as follows:
const { series, parallel } = require('gulp');

const timeout = (time) => {
  return new Promise((resolve) => {
    setTimeout(resolve, time);
  });
};

const task1 = async (done) => {
  await timeout(2000);
  console.log('task1 done');
};

const task2 = async (done) => {
  await timeout(1000);
  console.log('task2 done');
};

const task3 = async (done) => {
  await timeout(1000);
  console.log('task3 done');
};

exports.seriesTask = series(task1, task2, task3);
Operation results:
gulp-sample> yarn gulp seriesTask
yarn run v1.22.10
$ C:\assignment\front\gulp\gulp-sample\node_modules\.bin\gulp seriesTask
[10:14:36] Using gulpfile C:\assignment\front\gulp\gulp-sample\gulpfile.js
[10:14:36] Starting 'seriesTask'...
[10:14:36] Starting 'task1'...
task1 done
[10:14:38] Finished 'task1' after 2.02 s
[10:14:38] Starting 'task2'...
task2 done
[10:14:39] Finished 'task2' after 1.01 s
[10:14:39] Starting 'task3'...
task3 done
[10:14:40] Finished 'task3' after 1.01 s
[10:14:40] Finished 'seriesTask' after 4.05 s
Done in 5.20s.
It can be seen that after using the syntax sugar of async/await, the code becomes more concise and readable.
The core of gulp construction process
In fact, the processing of documents is logically common, and the steps are:
- Manually copy and paste the file into the compression tool
- Get compressed results
- Paste the file back into the folder where you want to go online
The principle of using gulp is the same, but the original part of manual operation is transferred to the machine (code), which is faster and has a lower error rate.
Here, we will use node's native API to simulate the internal implementation process of gulp.
-
The read of the created file is also written to the stream
This step is the IO of the file, which is not very difficult:
const fs = require('fs');

exports.default = () => {
  // File read stream
  const read = fs.createReadStream('normalize.css');
  // File write stream
  const write = fs.createWriteStream('normalize.min.css');

  // Put the read file into the write stream
  read.pipe(write);

  return read;
};
default is exported here, so the operation mode is still yen gulp
Operation results:
gulp-sample> yarn gulp
 yarn run v1.22.10
 $ C:\assignment\front\gulp\gulp-sample\node_modules\.bin\gulp
 [10:32:21] Using gulpfile C:\assignment\front\gulp\gulp-sample\gulpfile.js
 [10:32:21] Starting 'default'...
 [10:32:21] Finished 'default' after 9.68 ms
 Done in 1.53s.
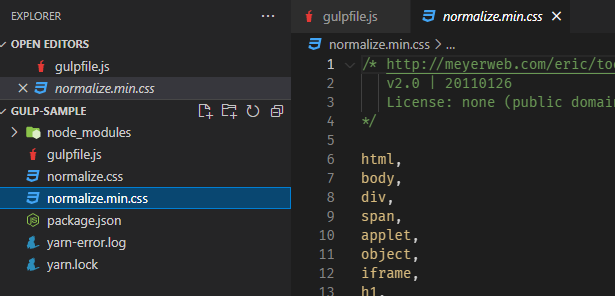
Can see one with normalize The file with the same CSS content is exported.
Normalize. Net is used here CSS uses Two common methods of CSS initialization For testing purposes, any file can be used.
-
Compressed file
This step will be implemented by using stream's API: Transform.
const fs = require('fs');
// Add file conversion stream
const { Transform } = require('stream');

exports.default = () => {
  // File read stream
  const read = fs.createReadStream('normalize.css');
  // File write stream
  const write = fs.createWriteStream('normalize.min.css');

  // File conversion stream
  const transform = new Transform({
    transform: (chunk, encoding, callback) => {
      // chunk => buffer
      const input = chunk.toString();
      const output = input
        // Remove all spaces
        .replace(/\s+/g, '')
        // Remove all comments
        .replace(/\/\*.+?\*\//g, '');
      callback(null, output);
    },
  });

  // The read file is first compressed and then put into the write stream
  read.pipe(transform).pipe(write);

  return read;
};
If the running command remains the same, the running result will be different:
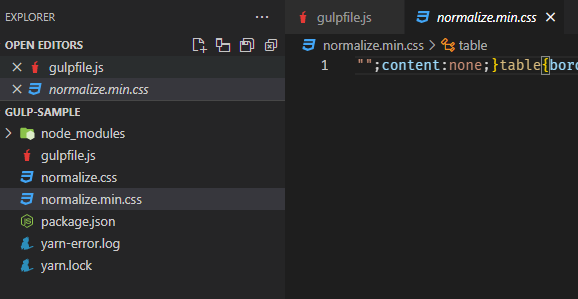
At this time, normalize Min.css has been compressed without retaining the original format.
It can be seen that the core of gulp is through file operation.
gulp file operation api
The main use method of gulp is to use the file operation method encapsulated by gulp, together with some plug-ins, and finally realize the processing of project files.
Here we will use some gulp encapsulated APIs for demonstration.
-
File reading and writing
const { src, dest } = require('gulp');

exports.default = () => {
  // Create a read stream of files through src
  return src('src/normalize.css').pipe(dest('dist'));
};
In fact, this is step 1 corresponding to the core construction project, and the file is not compressed. The results after completion are as follows:
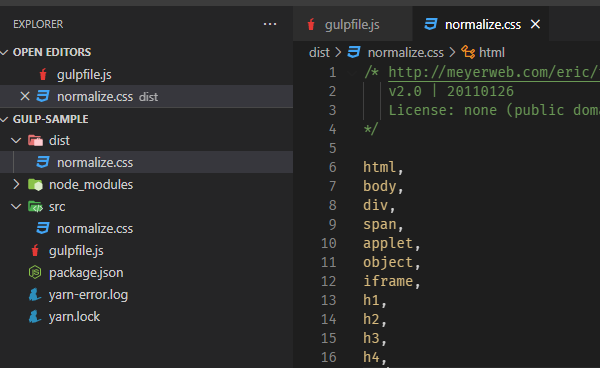
It can be seen that the I/O effect is the same.
-
Use of wildcards
Compared with the native API provided by node, the biggest advantage of the API provided by gulp is that it can use wildcards:
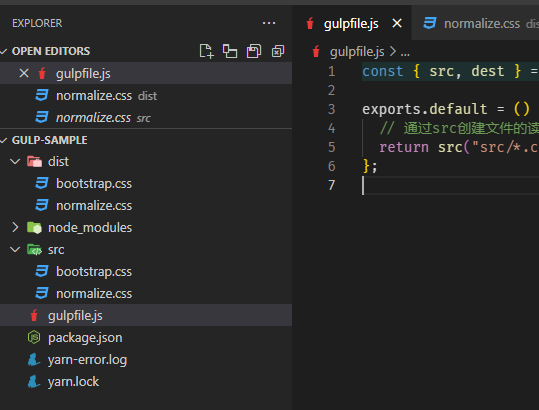
const { src, dest } = require('gulp');

exports.default = () => {
  // Create a read stream of files through src
  // New wildcard
  return src('src/*.css').pipe(dest('dist'));
};
Then all css files in the src directory will be read and written to the dist folder:
-
Compression conversion of files
So far, the I/O of css files has been completed, but the compression has not yet been completed. The compression and conversion of css files can be completed with the help of a very mature plug-in: gulp clean css.
Plug in installation:
gulp-sample> yarn add gulp-clean-css --dev
The method of using the plug-in is also very simple. Obtain the function through require, and then add it to the pipeline through pipe:
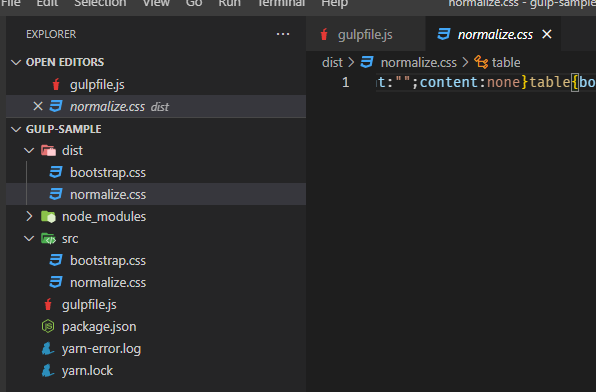
const { src, dest } = require('gulp');

const cleanCss = require('gulp-clean-css');

exports.default = () => {
  // Create a read stream of files through src
  return src('src/*.css').pipe(cleanCss()).pipe(dest('dist'));
};
After you run the script again with yarn gulp, you can see that the compression of CSS is completed:
-
Add rename plug-in
The purpose is to rename the compressed file name to file Min.css, following standard naming conventions
This function needs to be completed with the help of gulp rename plug-in, which is still installed in the development environment:
gulp-sample> yarn add gulp-rename --dev
Similarly, obtain the plug-in through require, and then add it to the pipeline:
const { src, dest } = require('gulp');
const cleanCss = require('gulp-clean-css');
const rename = require('gulp-rename');

exports.default = () => {
  // Create a read stream of files through src
  return src('src/*.css')
    .pipe(cleanCss())
    .pipe(rename({ extname: '.min.css' }))
    .pipe(dest('dist'));
};
Note that the use of rename function is different here. It needs to pass in a suffix.
Results after running yarn gulp:
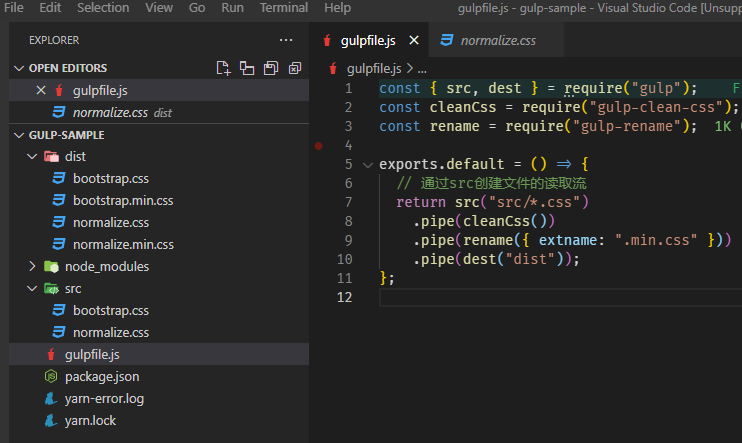
You can see that two new files with the suffix min.css have been generated.
The above is the general process of gulp.