*How to transfer files from Mac to virtual machine:
-
Connect the host as follows:
-
Transfer file:
scp file location and file name root@IP Address: the location where files need to be stored
1. Configure NAT network
Note: change the network adapter of vm to NAT mode
-
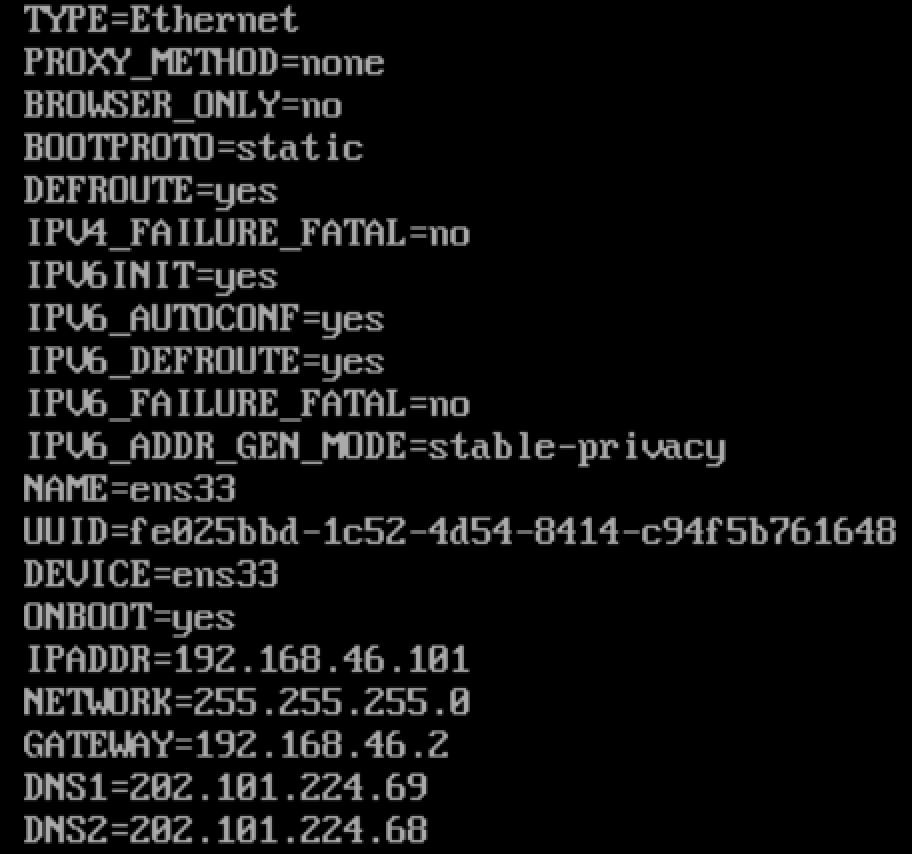
edit
/etc/sysconfig/network-scripts/ifcfg-ens33 file
-
Modified as BOOTPROTO=static
ONBOOT=yes
(the following configuration is the IP or gateway of your computer)
-
Add at the end:
IPADDR=192.168.46.101		(Last 101 (pick it up for yourself)
NETWORK=255.255.255.0
GATEWAY=192.168.46.2
DNS1=202.101.224.69
DNS2=202.101.224.68
-
Restart the network:
service network restart
-
Verification: ping www.baidu.com com
ping 192.168.46.2
The final configuration results are as follows:
Enter the Mac terminal to view: enter cd /Library/Preferences/VMware\ Fusion/vmnet8 and open NAT Conf, check ip and network, (ip = GATEWAY above); Just check DNS in network preferences.
2. Modify the host name (three hosts operate separately)
hostnamectl set-hostname master
hostnamectl set-hostname slave1
hostnamectl set-hostname slave2
bash //Effective immediately
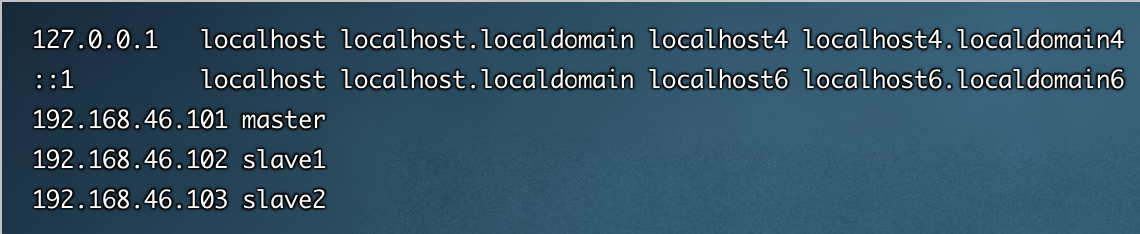
3. Configure the host file (all three hosts operate). Pay attention to save and exit
vi /etc/hosts
192.168.46.101 master
192.168.46.102 slave1
192.168.46.103 slave2
4. Turn off the firewall (all three hosts operate)
View firewall status: systemctl	status	firewalld

notice active (running)	Means open

notice inactive (dead)	Means close

Temporary:

- On: systemctl	start	firewalld
- close: systemctl	stop	firewalld

Permanent:

- close: systemctl	disable	firewalld
- On: systemctl	enable	firewalld

Restart: firewall-cmd --reload
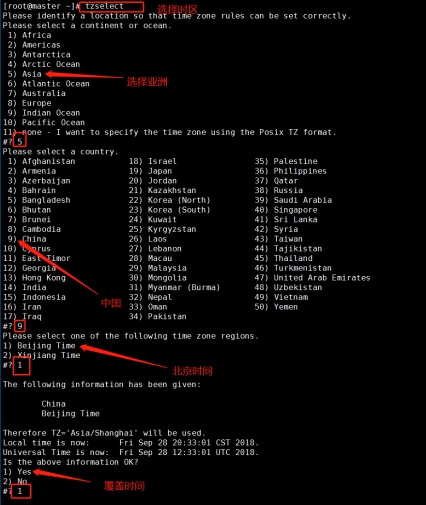
5. Time synchronization
You can use date to view the time of your machine
Select time zone: tzselect
1. Download ntp (all three hosts operate)
∙ yum install –y ntp
2. Set the time clock (master operation)
vi /etc/ntp.conf
server 127.127.1.0 # local clock

fudge 127.127.1.0 stratum 10 #stratum can also be set to other values, ranging from 0 to 15
3. Restart ntp service (master operation)
/bin/systemctl restart ntpd.service
Synchronization of other machines (slave1, slave2 operation)
ntpdate master
*Start cloning virtual machines here
And change: 1 New network IP 2 host name
6. Configure ssh security free
(1). Each node generates public and private keys respectively: (all three machines operate)
ssh-keygen -t dsa -P '' -f ~/.ssh/id_dsa
The secret key generation directory is in the user's home directory SSH directory, enter the corresponding directory to view: CD ssh/
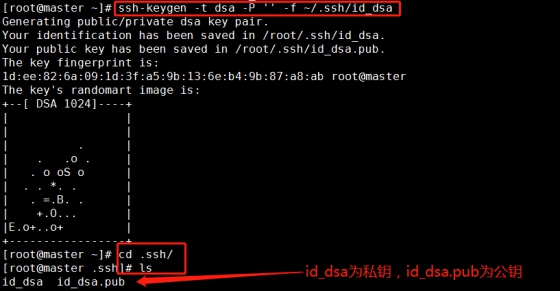
(2).Id_dsa.pub is the public key, id_dsa is the private key, and then copy the public key file to authorized_keys file: (only operate on the master machine)
cat id_dsa.pub >> authorized_keys
(note to operate under. ssh / path)

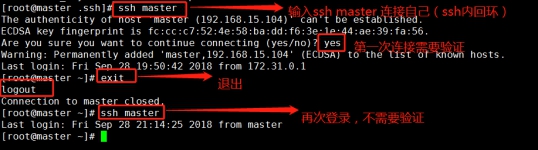
Connect yourself on the host, also known as ssh inner loop.
ssh master
(3). Enable the master node of the master node to log in to the slave node of two child nodes through SSH password free. (operate in slave1 and slave2 respectively)
cd .ssh/
scp master:~/.ssh/id_dsa.pub ./master_dsa.pub
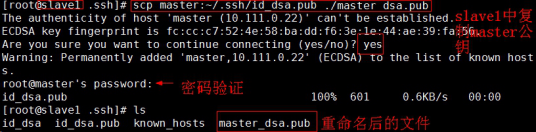
Append the public key file of the master node to authorized_keys file.
cat master_dsa.pub >> authorized_keys
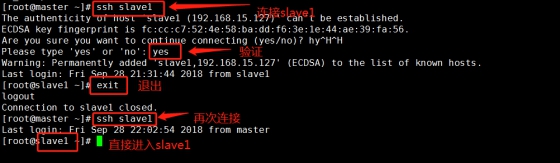
At this time, the master can connect to slave1.
This is also the case with Slave2
7. Install JDK
(1) First, create the working path of jdk / usr/java
cd /usr
mkdir java
tar -zxvf /opt/soft/jdk-8u171-linux-x64.tar.gz -C /usr/java
(2) Modify environment variables
vi /etc/profile
Add the following:
export JAVA_HOME=/usr/java/jdk1.8.0_171
export CLASSPATH=$JAVA_HOME/lib/
export PATH=$PATH:$JAVA_HOME/bin
export PATH JAVA_HOME CLASSPATH
Effective environment variables:
source /etc/profile
View java version:
java -version
(3) Remote distribution
After the master node operation is successful, you can use the remote copy command to remotely copy the JDK to slave1 and slave2 nodes: (this command operates in the master)
scp -r /usr/java root@slave1:/usr/
scp -r /usr/java root@slave2:/usr/
(4) Configure slave1 and slave2 environment variables (both slave1 and slave2 operate)
Modify environment variables:
vi /etc/profile
Add the following:
#jdk environment variable
export JAVA_HOME=/usr/java/jdk1.8.0_171
export CLASSPATH=$JAVA_HOME/lib/
export PATH=$PATH:$JAVA_HOME/bin
export PATH JAVA_HOME CLASSPATH
Effective environment variables:
source /etc/profile
View jdk version:
java -version
8. Installation
(1) Modify the host name to IP address mapping configuration (all three hosts operate). Pay attention to the IP address
vi /etc/hosts
192.168.46.101 master master.root
192.168.46.102 slave1 slave1.root
192.168.46.103 slave2 slave2.root
(2) Create zookeeper working environment (operation in master)
∙ cd /usr
∙ mkdir -p /usr/zookeeper
(3) Unzip zookeeper into the folder just created (operation in master)
tar -zxvf /opt/soft/zookeeper-3.4.10.tar.gz -C /usr/zookeeper/
(4) Modify configuration file (operation in master)
Configuration file conf / zoo CFG, enter the zookeeper-3.4.10/conf directory with the cd command, and_ sample. A copy of CFG file named "zoo.cfg"
cd /usr/zookeeper/zookeeper-3.4.10/conf
cp zoo_sample.cfg zoo.cfg
zoo.cfg file configuration (add the following content)
vi zoo.cfg
(edit the zoo.cfg file)
dataDir=/usr/zookeeper/zookeeper-3.4.10/zkdata

dataLogDir=/usr/zookeeper/zookeeper-3.4.10/zkdatalog
server.1=master:2888:3888
server.2=slave1:2888:3888
server.3=slave2:2888:3888
(5) Create two folders zkda and zkda
Under zookeeper-3.4.10, create two folders: zkdata and zkdata log. zkdatalog folder is used to specify the corresponding path of the generated log of zookeeper.
∙ mkdir zkdata zkdatalog
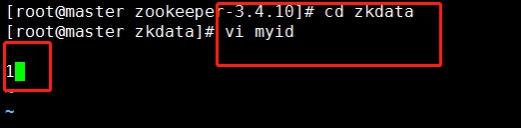
Enter the zkdata folder and create the file myid (and edit it as 1)
cd zkdata
vi myid
(6) Remotely copy and distribute installation files
ZooKeeper has been configured on a machine master. Now you can remotely copy the configured installation file to the corresponding directory of each node in the cluster:
∙ scp -r /usr/zookeeper root@slave1:/usr/
∙ scp -r /usr/zookeeper root@slave2:/usr/
(7) Set myid (operate on slave1 and slave2 respectively)
cd /usr/zookeeper/zookeeper-3.4.10/zkdata
2 in slave1;
3 in slave2;
(8) Configure the environment variables and start ZooKeeper. (all three hosts operate)
vi /etc/profile
Add the following:
#set zookeeper environment
export ZOOKEEPER_HOME=/usr/zookeeper/zookeeper-3.4.10
PATH=$PATH:$ZOOKEEPER_HOME/bin
take effect:
source /etc/profile
(9) Start zookeeper cluster
Under the zookeeper-3.4.10 file, (make sure that the current firewall is closed, systemctl status firewalld view)
If the firewall is on, turn it off through systemctl stop firewalld and start it
cd /usr/zookeeper/zookeeper-3.4.10/
Start:
bin/zkServer.sh start
View status:
bin/zkServer.sh status
 Check whether the process starts: jps
Stop zookeeper:
stop it zookeeper: bin/zkServer.sh stop
In master:

In slave1:

In slave2:
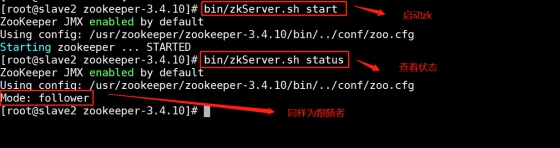
It can be seen from the above status query results that one node is a Leader and the other nodes are followers.
9. Install Hadoop
*Note: the environment variable configuration of master is different from slave1 and slave2
(1) Create Hadoop working path (operate on the master node)
cd /usr
mkdir hadoop
(2) Unzip Hadoop into the corresponding directory
tar -zxvf /opt/soft/hadoop-2.7.3.tar.gz -C /usr/hadoop/
(3) Configure environment variables after decompression
vi /etc/profile
Add the following:
#Hadoop environment variable
export HADOOP_HOME=/usr/hadoop/hadoop-2.7.3
export CLASSPATH=$CLASSPATH:$HADOOP_HOME/lib
export PATH=$PATH:$HADOOP_HOME/bin
Effective environment variables:
source /etc/profile
(4) Modify relevant configuration files
① Add jdk environment variable to Hadoop env SH file
cd /usr/hadoop/hadoop-2.7.3/etc/hadoop/
vi hadoop-env.sh
Add the following
export JAVA_HOME=/usr/java/jdk1.8.0_171
② Edit core site XML file and add the content to it
vi core-site.xml
Add the following
<configuration>
<property>
 <name>fs.default.name</name>
 <value>hdfs://master:9000</value>
</property>
<property>
 <name>hadoop.tmp.dir</name>
 <value>/usr/hadoop/hadoop-2.7.3/hdfs/tmp</value>
<description>A base for other temporary directories.</description>
</property>
<property>
 <name>io.file.buffer.size</name>
 <value>131072</value>
</property>
<property>
 <name>fs.checkpoint.period</name>
 <value>60</value>
</property>
<property>
 <name>fs.checkpoint.size</name>
 <value>67108864</value>
</property>
</configuration>
③ Edit yarn site XML file
vi yarn-site.xml
Add the following
<configuration>
<property>
 <name>yarn.resourcemanager.address</name>
 <value>master:18040</value>
 </property>
 <property>
 <name>yarn.resourcemanager.scheduler.address</name>
 <value>master:18030</value>
 </property>
 <property>
 <name>yarn.resourcemanager.webapp.address</name>
 <value>master:18088</value>
 </property>
 <property>
 <name>yarn.resourcemanager.resource-tracker.address</name>
 <value>master:18025</value>
 </property>
 <property>
 <name>yarn.resourcemanager.admin.address</name>
 <value>master:18141</value>
 </property>
 <property>
 <name>yarn.nodemanager.aux-services</name>
 <value>mapreduce_shuffle</value>
 </property>
 <property>
 <name>yarn.nodemanager.auxservices.mapreduce.shuffle.class</name>
 <value>org.apache.hadoop.mapred.ShuffleHandler</value>
 </property>
<!-- Site specific YARN configuration properties -->
</configuration>
④ Write slave files
vi slaves
Add the following

⑤ Write master file
vi master
Add the following

⑥ Edit HDFS site XML file
vi hdfs-site.xml
Add the following
<configuration>
<property>
 <name>dfs.replication</name>
 <value>2</value>
 </property>
 <property>
 <name>dfs.namenode.name.dir</name>
 <value>file:/usr/hadoop/hadoop-2.7.3/hdfs/name</value>
 <final>true</final>
</property>
 <property>
 <name>dfs.datanode.data.dir</name>
 <value>file:/usr/hadoop/hadoop-2.7.3/hdfs/data</value>
 <final>true</final>
 </property>
 <property>
 <name>dfs.namenode.secondary.http-address</name>
 <value>master:9001</value>
 </property>
 <property>
 <name>dfs.webhdfs.enabled</name>
 <value>true</value>
 </property>
 <property>
 <name>dfs.permissions</name>
 <value>false</value>
 </property>
</configuration>
⑦ Edit mapred site Xmll file
But there is no mapred site in the folder XML, so we need to use the cp command to convert mapred site xml. Copy template as mapred site xml:
cp mapred-site.xml.template mapred-site.xml
vi mapred-site.xml
Then add the following
<configuration>
<property>
 <name>mapreduce.framework.name</name>
 <value>yarn</value>
 </property>
 </configuration>
⑧ Distribute Hadoop
scp -r /usr/hadoop root@slave1:/usr/
scp -r /usr/hadoop root@slave2:/usr/
⑨ Configure the environment variables of slave1 and slave2 (operation in slave1 and slave2)
vi /etc/profile
Add the following environment variables
#hadoop environment variable
export HADOOP_HOME=/usr/hadoop/hadoop-2.7.3
export CLASSPATH=$CLASSPATH:$HADOOP_HOME/lib
export PATH=$PATH:$HADOOP_HOME/bin:$HADOOP_HOME/sbin
take effect:
source /etc/profile
⑩ Format Hadoop and start cluster (operation in master)
Enter the following command to format hadoop
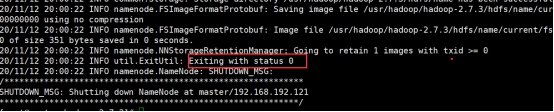
hadoop namenode -format

The format is successful, as shown in the following figure:
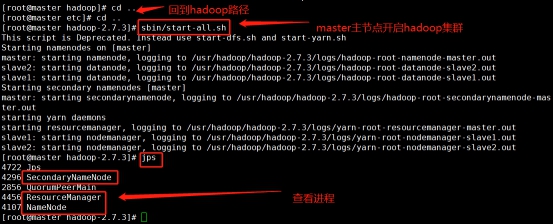
After formatting, go back to / usr/hadoop/hadoop-2.7.3 directory and use SBIN / start all The SH command starts the Hadoop cluster
(master operation)
cd /usr/hadoop/hadoop-2.7.3
Start: sbin/start-all.sh
 stop it: sbin/stop-all.sh
Enter jps in the master node to view the process:
Enter jps in the slave1 node to view the process:

Enter jps in slave2 node to view the process:

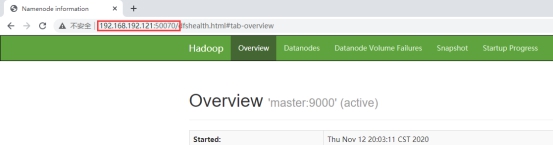
Access master node: 50070
hadoop script command exercise
To view dfs root files:
hadoop fs -ls /
Create file data on hdfs:
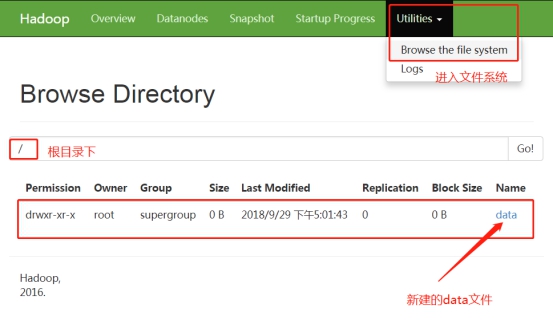
hadoop fs -mkdir /data
Review again:
hadoop fs -ls /
You can also use the browser to view the cluster. Enter "Utilities" - > "Browse the file system" in sequence
10. hbase installation
① Create hbase working path first (operation in master)
cd /usr
mkdir hbase
② Decompress hbase
tar -zxvf /opt/soft/hbase-1.2.4-bin.tar.gz -C /usr/hbase
③ Modify profile
cd /usr/hbase/hbase-1.2.4/conf
Modify the configuration file: conf / HBase env sh
vi hbase-env.sh
Add the following
export HBASE_MANAGES_ZK=false
export JAVA_HOME=/usr/java/jdk1.8.0_171
export HBASE_CLASSPATH=/usr/hadoop/hadoop-2.7.3/etc/Hadoop
Configure conf / HBase site xml
vi hbase-site.xml
Add the following:
<configuration>
<property>
     <name>hbase.rootdir</name>
     <value>hdfs://master:9000/hbase</value>
   </property>
   <property>
     <name>hbase.cluster.distributed</name>
     <value>true</value>
   </property>
   <property>
     <name>hbase.master</name>
     <value>hdfs://master:6000</value>
   </property>
   <property>
     <name>hbase.zookeeper.quorum</name>
     <value>master,slave1,slave2</value>
   </property>
   <property>
     <name>hbase.zookeeper.property.dataDir</name>
     <value>/usr/zookeeper/zookeeper-3.4.10</value>
   </property>
</configuration>
Configure conf/regionservers
vi regionservers
Add the following

Copy the. hadoop configuration file to the directory of hbase
cp /usr/hadoop/hadoop-2.7.3/etc/hadoop/hdfs-site.xml /usr/hbase/hbase-1.2.4/conf
cp /usr/hadoop/hadoop-2.7.3/etc/hadoop/core-site.xml /usr/hbase/hbase-1.2.4/conf
Distribute hbase
scp -r /usr/hbase root@slave1:/usr/
scp -r /usr/hbase root@slave2:/usr/
Configure environment variables
vi /etc/profile
Add the following
# set hbase environment
export HBASE_HOME=/usr/hbase/hbase-1.2.4
export PATH=$PATH:$HBASE_HOME/bin
Effective environment variables:
source /etc/profile
Run and test (operate in master)
cd /usr/hbase/hbase-1.2.4
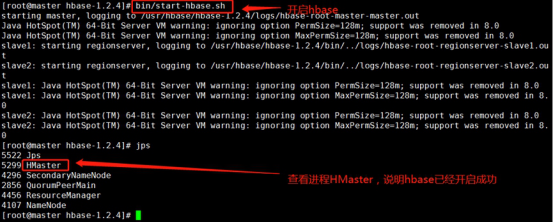
Start: start-hbase.sh
stop it: stop-hbase.sh
Jps view master node process
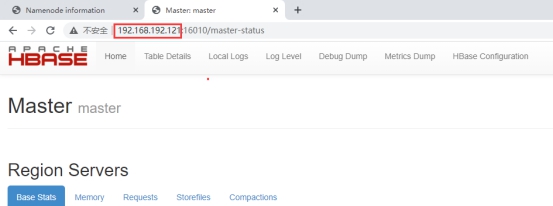
Access the hbase web interface of master
http: //master IP:16010/master-status
Enter the HBase interactive interface and check the status and Version (/ usr/hbase/hbase-1.2.4 directory) (operation in master)
cd /usr/hbase/hbase-1.2.4
hbase shell
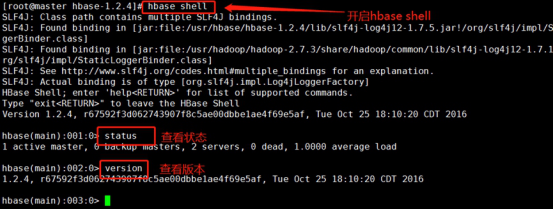
Exit through exit
11. Data warehouse construction
1. Install mysql server on slave2
yum -y install wget
Download MySQL source installation package
wget http://dev.mysql.com/get/mysql57-community-release-el7-11.noarch.rpm
Install MySql source
yum -y install mysql57-community-release-el7-11.noarch.rpm
Install MySQL server
yum install mysql-community-server
2. Start service
· reload all modified configuration files:
systemctl daemon-reload
· turn on the service:
systemctl start mysqld
· startup and self start:
systemctl enable mysqld

- After installation, a random password will be generated and logged in after obtaining it
· get initial password:
grep "temporary password" /var/log/mysqld.log
[the external chain image transfer fails. The source station may have an anti-theft chain mechanism. It is recommended to save the image and upload it directly (img-vananetrfg-1617926788286)( https://i.loli.net/2021/04/08/pfAvNkztQ2JTwcK.png )]
· login (note Chinese and English)
mysql -uroot -p
. MySQL password security policy settings:
· set password strength to low level:
set global validate_password_policy=0;
· set password length:
set global validate_password_length=4;
· change local password:
alter user 'root'@'localhost' identified by '123456';
· exit:
\q
Set up remote login
· log in to MySQL with a new password:
mysql -uroot -p123456
∙ create root user:
create user 'root'@'%' identified by '123456';
∙ add a remote login user:
grant all privileges on *.* to 'root'@'%' with grant option;
· refresh permissions:
flush privileges;
Install hive
Create working paths on master and slave1, and decompress hive (operation on master and slave1)
cd \usr
mkdir hive
tar -zxvf /opt/soft/apache-hive-2.1.1-bin.tar.gz -C /usr/hive/
Send hive to slave1 remotely through the master (operation in the master)
scp -r /usr/hive/ root@slave1:/usr/hive/
Modify the / etc/profile file to set the hive environment variable. (both master and slave1 execute)
vi /etc/profile
Add the following
#set hive
export HIVE_HOME=/usr/hive/apache-hive-2.1.1-bin
export PATH=$PATH:$HIVE_HOME/bin
Effective environment variables:
source /etc/profile
slave1 is configured as a hive server
First, in slave2, perform the following operations: (in slave2)
∙ view lib:
ls /lib
cd /lib
Upload dependent packages:
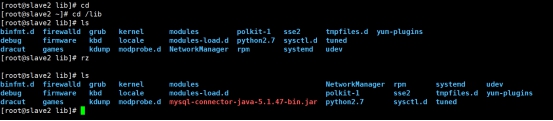
Here rz: to upload the dependent package, if this method cannot upload, you can directly upload the file using finlassell
Remote copy dependent package to slave1:
scp /lib/mysql-connector-java-5.1.47-bin.jar root@slave1:/usr/hive/apache-hive-2.1.1-bin/lib
Go back to slave1 and modify HIV Env Hadoop in SH file_ Home environment variable. Enter the hive configuration directory, because the template of the configuration file hive env has been given in hive Sh.template, copy it directly and modify it:
cd $HIVE_HOME/conf
ls
cp hive-env.sh.template hive-env.sh
vi hive-env.sh

hive-env. Modify Hadoop in SH file_ Home environment variable, as follows:
HADOOP_HOME=/usr/hadoop/hadoop-2.7.3

3. Modify hive site XML file
vi hive-site.xml
Add the following:
<configuration>
<property>
 <name>hive.metastore.warehouse.dir</name>
 <value>/user/hive_remote/warehouse</value>
</property>
<property>
 <name>javax.jdo.option.ConnectionURL</name>
 <value>jdbc:mysql://slave2:3306/hive?createDatabaseIfNotExist=true</value>
</property>
<property>
 <name>javax.jdo.option.ConnectionDriverName</name>
 <value>com.mysql.jdbc.Driver</value>
</property>
<property>
 <name>javax.jdo.option.ConnectionUserName</name>
 <value>root</value>
</property>
<property>
 <name>javax.jdo.option.ConnectionPassword</name>
 <value>123456</value>
 </property>
<property>
 <name>hive.metastore.schema.verification</name>
 <value>false</value>
 </property>
<property>
 <name>datanucleus.schema.autoCreateAll</name>
 <value>true</value>
 </property>
</configuration>
master is configured as a client
Resolve version conflicts and jar package dependencies.
Since the client needs to communicate with Hadoop, the version of jline in Hadoop needs to be changed. That is, keep a high-level jline jar package and copy it from the Lib package of hive to Hadoop. The Lib location is / usr/hadoop/hadoop-2.7.3/share/hadoop/yarn/lib.
cp /usr/hive/apache-hive-2.1.1-bin/lib/jline-2.12.jar /usr/hadoop/hadoop-2.7.3/share/hadoop/yarn/lib/

\2. Modify HIV Env Hadoop in Sh_ Home environment variable:
cd /usr/hive/apache-hive-2.1.1-bin/conf
cp hive-env.sh.template hive-env.sh
vi hive-env.sh
HADOOP_HOME=/usr/hadoop/hadoop-2.7.3
3. Modify hive site xml:
vi hive-site.xml
<configuration>
<property>
 <name>hive.metastore.warehouse.dir</name>
 <value>/user/hive_remote/warehouse</value>
</property>
<property>
 <name>hive.metastore.local</name>
 <value>false</value>
</property>
<property>
 <name>hive.metastore.uris</name>
<value>thrift://slave1:9083</value>
</property>
</configuration>
12. Start hive
\1. As the server side, slave1 starts the hive server.
cd /usr/hive/apache-hive-2.1.1-bin/
bin/hive --service metastore

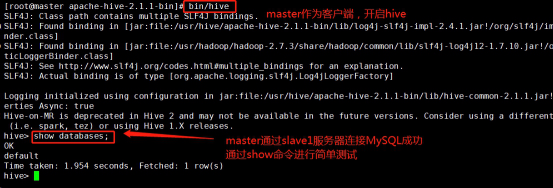
\2. Start the hive as the client. (operation in master)
cd /usr/hive/apache-hive-2.1.1-bin/
bin/hive
Test whether hive starts successfully:
show databases;
3. Copy the last master and check its process as follows:
jps
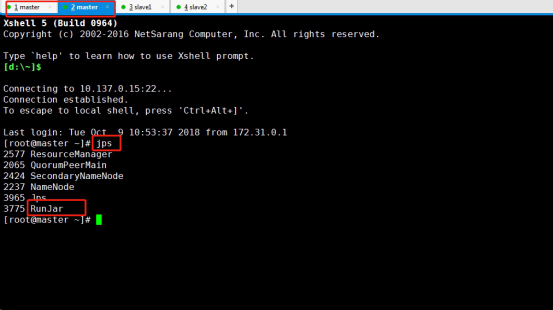
Stop running: Ctrl + Z