Forum original address (continuously updated): http://www.armbbs.cn/forum.php?mod=viewthread&tid=93149
Chapter 7 RTX5 task management
For beginners, especially those without RTOS foundation, it is very important to understand the task management of RTX5. The purpose of understanding task management is to make beginners transition from bare metal and single task programming to OS and multi task programming. Understand this, then RTX5 learning is an entry-level.
7.1 important tips for beginners
7.2 single task system
7.3 multi task system
7.4 RTX5 task setting
7.5 RTX5 task stack setting
7.6 RTX5 system stack setting
7.7 RTX5 stack overflow detection
7.8 RTX5 initialization and startup function osKernelInitialize
7.9 RTX5 startup function osKernelStart
7.10 RTX5 task creation function osThreadNew
7.11 RTX5 task deletion function osThreadTerminate
7.12 RTX5 idle tasks
7.13 experimental routine description
7.14 summary
7.1 important tips for beginners
Before learning this chapter, it is necessary to have a comprehensive understanding of various alignment methods:
http://www.armbbs.cn/forum.php?mod=viewthread&tid=109400 .
7.2 single task system
Before learning multitasking system, let's review the programming framework of single task system, that is, the programming framework of bare metal. Bare metal programming mainly adopts super loops system, also known as front and back-end system. The application is an infinite loop, and the corresponding functions are called in the loop to complete the corresponding operations. This part can be regarded as backstage behavior, and interrupt service programs deal with asynchronous events, which can be regarded as the foreground behavior. The background can also be called task level, and the foreground can also be called interrupt level.
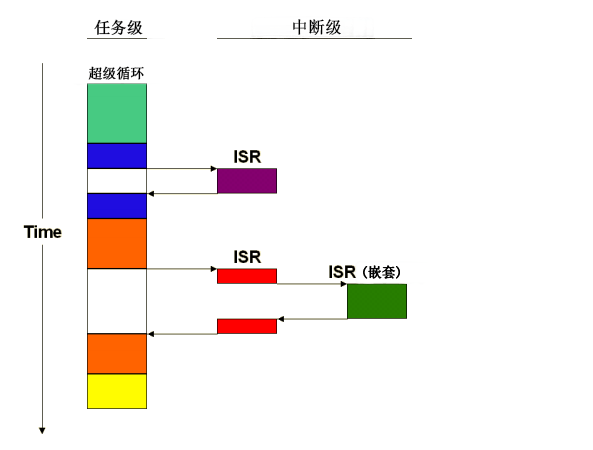
Figure 7.1 single task system
There are two main ways to program the front and rear console system:
7.2.1 query method
For some simple applications, the processor can query whether the data or message is ready, process it after it is ready, and then wait. This cycle continues. For simple tasks, this method is simple and easy to handle. However, in most cases, if multiple interface data or messages need to be processed, they need to be processed multiple times, as shown in the following flow chart:
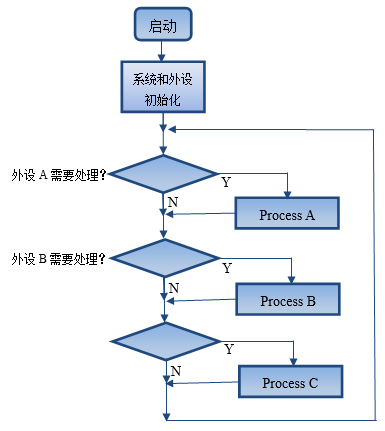
The effect of using query method to deal with simple applications is better, but with the complexity of the project, the project realized by query method becomes difficult to maintain. At the same time, because the priority of query task cannot be defined, this query method will make important interface messages not respond in time. For example, the program has been waiting for a non emergency message to be ready. If there is an emergency message to be processed after this message, the emergency message will not be executed for a long time.
7.2.2 interrupt mode
For the situation that the query method cannot effectively perform emergency tasks, the interruption method can effectively solve this problem. The following is a simple flow chart of the interruption method:
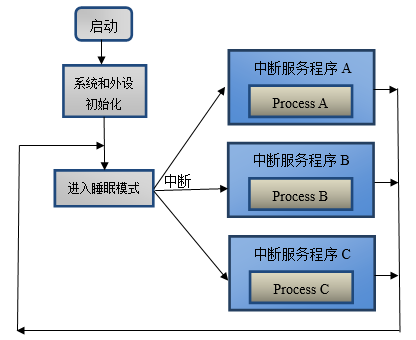
The combination of interrupt and query can solve most bare metal applications, but with the complexity of the project, the shortcomings of bare metal methods are exposed
1. Time critical operations must be processed within an interrupt (ISR):
- ISR functions become very complex and take a long time to execute.
- ISR nesting can result in unpredictable execution time and stack requirements.
2. The data exchange between super loop and ISR is carried out through global shared variables:
- Application programmers must ensure data consistency.
3. The super cycle can be easily synchronized with the system timer, but:
- If the system needs many different cycle times, it will be difficult to achieve.
- Time consuming functions that exceed the super cycle period need to be split.
- Increase software overhead and make applications difficult to understand.
4. Super loops make applications very complex and therefore difficult to scale:
- A simple change can produce unpredictable side effects, which is very time-consuming to analyze.
- These disadvantages can be solved by using the concept of RTOS.
7.3 multi task system
In view of these situations, the use of multi task system can solve these problems. The following is the flow chart of a multi task system:

The implementation of multitasking system or RTOS focuses on this scheduler, and the role of scheduler is to use relevant scheduling algorithms to determine the tasks to be executed at present. As shown in the figure above, after the task is created and the OS initialization is completed, the scheduler can determine the operation of task A, Task B and task C, so as to realize the multitasking system. In addition, it should be noted by beginners that the multitasking system mentioned here can only have one task to run at A time. It looks like all tasks run at the same time through the decision of the scheduler. In order to better illustrate this problem, another detailed operation example is given. The operation conditions are as follows:
- Use preemptive scheduler.
- 1 idle task with the lowest priority.
- Two application tasks, one high priority and one low priority, have higher priority than idle tasks.
- Interrupt service program, including USB interrupt, serial port interrupt and system tick timer interrupt.
The following figure 7.2 shows the running process of the task, in which the abscissa is the task priority from low to high, the ordinate is the running time, and the time scale is from small to large.
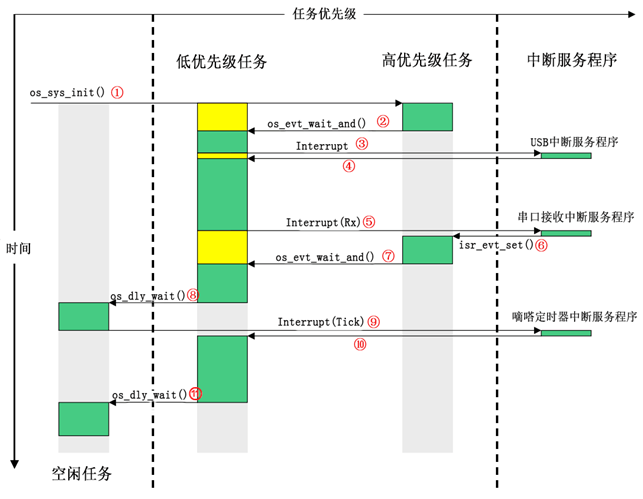
Figure 7.2 operation process of multi task system
(1) Start RTOS and execute high priority tasks first.
(2) The high priority task wait event flag (os_evt_wait_and) is suspended, and the low priority task is executed.
(3) USB interrupt is generated during the execution of low priority tasks, and enter the USB interrupt service program.
(4) Exit the USB interrupt reset program and return to the low priority task to continue.
(5) The serial port receiving interrupt is generated during the execution of low priority tasks, and enters the serial port receiving interrupt service program.
(6) Exit the serial port to receive the interrupt reset program and send the event flag setting message (isr_evt_set). The suspended high priority tasks will enter the ready state again. At this time, both high priority tasks and low priority tasks are in the ready state, and the priority based scheduler will let the high priority tasks execute first, All will now enter the high priority task.
(7) The high priority task will be suspended again due to the waiting event flag (os_evt_wait_and), and the low priority task will continue to execute.
(8) Low priority task call function os_dly_wait, the low priority task is suspended, and the idle task is executed.
(9) When the ticking timer is interrupted during the execution of idle tasks, enter the ticking timer interrupt service program.
(10) The exit tick timer is interrupted. Due to the delay time of low priority task, the low priority task continues to execute.
(11) The low priority task calls the delay function os again_ dly_ Wait, low priority tasks are suspended, switching to idle tasks. Idle tasks are executed.
Through the explanation of the above examples, you should have a comprehensive understanding of the complete operation process of multi task system. With the explanation of knowledge points such as tuner and task switching later in the tutorial, you will have a deeper understanding of this operation process.
RTX is a real-time operating system that supports multitasking. It has three scheduling methods: time slice, preemptive and cooperative. RTX real-time operating system can divide program functions into independent tasks and provide reasonable scheduling mode for them. At the same time, RTX real-time operating system provides the following important advantages for multitasking:
- Task scheduling - tasks are called when needed to ensure better program execution and event response.
- Multitasking - task scheduling can produce the effect of executing multiple tasks at the same time.
- Deterministic behavior - handling events and interrupts within a defined time.
- Shorter ISR - enables more deterministic interrupt behavior.
- Inter task communication - manage the sharing of data, memory and hardware resources among multiple tasks.
- Defined stack usage - each task allocates a stack space to achieve predictable memory usage.
- System management - you can focus on application development rather than resource management.
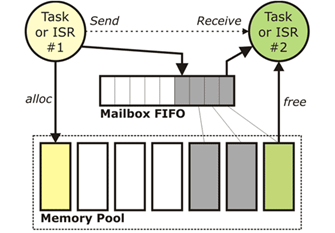
Figure 7.3 task communication in RTX
7.4 rtx5 task setting
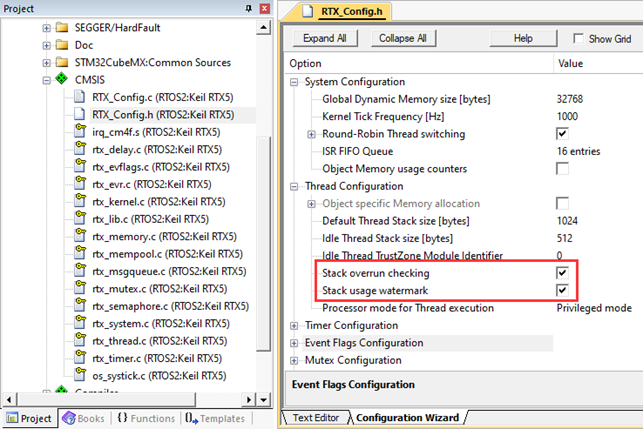
The configuration of RTX5 operating system is through the configuration file RTX_Config.h implementation. Open RTX file in MDK project_ Config. h. You can see the project configuration wizard shown in Figure 7.4 below:
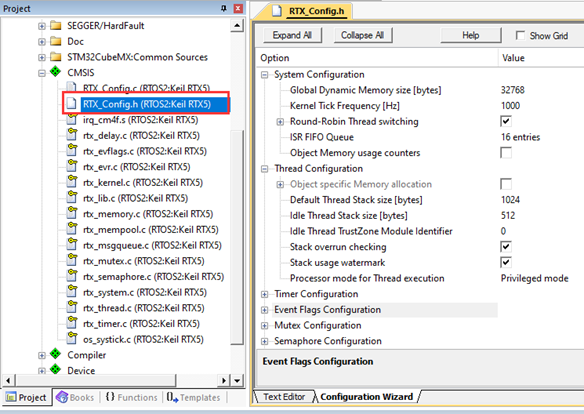
Figure 7.4 RTX Configuration Wizard
We use global dynamic memory, that is, Global Dynamic Memory size, so we don't need to make special modifications here.
7.5 rtx5 task stack setting
Whether it is bare metal programming or RTOS programming, the allocation size of the stack is very important. Local variables, function timing, on-site protection and return address, formal parameters of the function, before entering the interrupt function and interrupt nesting all need stack space. A small definition of stack space will cause system crash.
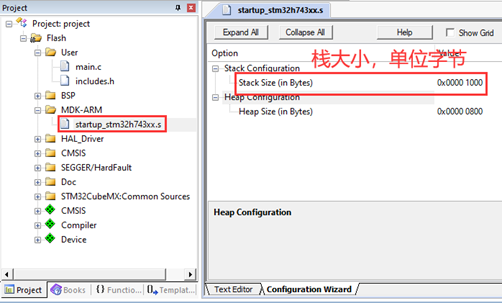
In the case of bare metal, you can configure the stack size here:
Different from bare metal programming, in RTOS, each task has its own stack space. The stack size of tasks can be configured through the following parameters in the Configuration Wizard:
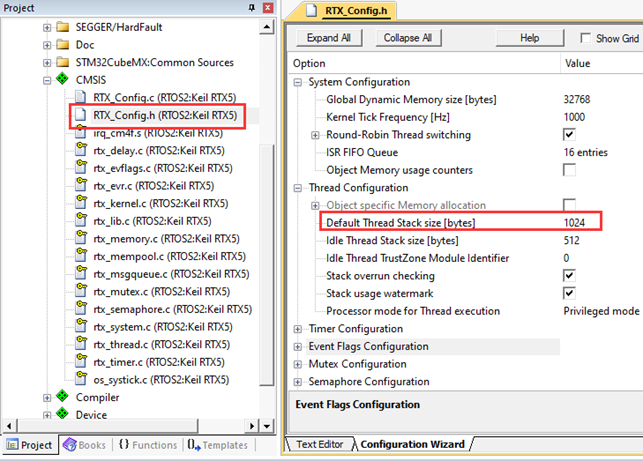
It should be noted that by default, the size of the task stack created by the user is determined by the parameter Default Thread Task stack size. If it is inconvenient for each task to allocate the same size of stack space, you can create tasks by customizing the task stack. It is more flexible to use custom methods.
How much stack space is suitable for the task in practical application? At this time, a slightly larger stack space can be opened for the task in advance, and then the use of the task stack can be displayed through the RTX5 debugging method introduced in section 6.3 of Chapter 6, so as to debug how much stack space is suitable for the task.
The impact of task switching and interrupt nesting of RTX5 on stack space will be discussed in detail when we explain the chapter of task switching and double stack pointer of RTX5 (this chapter will be matched when the later RTX5 tutorial is upgraded). This part of knowledge is also very important. For beginners, you can understand the knowledge points explained here first.
7.6 rtx5 system stack setting
The above explained to you what is the task stack and what is the system stack here? In the case of bare metal machines, the stack space is used wherever the stack space is used. The stack space configured here:

Under RTOS, the stack size set in the above two screenshots has a new name called system stack space, and the task stack does not use this space. The task stack does not use the stack space here. Where do you use the stack space here? The answer lies in interrupt function and interrupt nesting.
For this problem, a brief description is as follows. More details will be explained when we explain RTX5 task switching and double stack pointer (this chapter will be matched when the later RTX5 tutorial is upgraded).
1. Since Cortex-M3, M4 and M7 cores have dual stack pointers, MSP main stack pointer and PSP process stack pointer, or PSP task stack pointer, are also possible. In RTX5 operating system, the main stack pointer MSP is used for system stack space, and the process stack pointer PSP is used for task stack. In other words, in the RTX5 task, all stack space usage is pointed to through the PSP pointer. Once the interrupt function is entered, the possible interrupt nesting is the MSP pointer. Remember this knowledge point. You can't know why at present, but you must remember it.
2. In practical application, the allocation of system stack space mainly depends on the number of possible interrupt nesting layers. Next, we will consider the worst-case implementation. All registers need to be stacked. At this time, there are two cases:
- 64 bytes
For Cortex-M3 kernel and cortex-m4 without FPU (floating point arithmetic unit) function, M6 kernel needs to stack all 16 general registers in case of interrupt, and each register occupies 4 bytes, that is, 16 * 4 = 64 bytes.
There may be several interruptions. Nesting is 64 times a few. Of course, this is the worst-case implementation, that is, all registers are stacked.
(Note: if an interrupt occurs during task execution, 8 registers are automatically stacked. This stack is the task stack. After entering the interrupt, the rest of the registers are stacked and the interrupt nesting is the system stack).
- 200 bytes
For Cortex-M4 and M7 cores with FPU (floating-point operation unit), if floating-point operation is carried out in the task, in addition to 16 general registers, 34 floating-point registers also need to be stacked in case of interruption, that is, (16 + 34) * 4 = 200 bytes of space. Of course, this is the worst-case implementation, that is, all registers are stacked.
(Note: if an interrupt is sent during task execution, 8 general registers and 18 floating-point registers are automatically stacked. This stack is the task stack. After entering the interrupt, the rest of the general registers and floating-point registers are stacked and the nesting of interrupts is the system stack.).
7.7 rtx5 stack overflow detection
If you are afraid of task stack overflow, this function is very useful. You only need to enable task stack detection in the configuration wizard of RTX5:
If the task stack of a task overflows during debugging, you will be prompted here:
(Note: it is found in the actual test that this function is not enabled, and the task stack overflow can be correctly displayed in the debugging state, which will be further tested).
7.8 rtx5 initialization function osKernelInitialize
Function prototype:
osStatus_t osKernelInitialize (void)
Function Description:
This function initializes the RTX5 kernel. Before calling this function, only osKernelGetInfo and osKernelGetState can be called.
Function parameters:
Return value:
- osOK indicates success.
- osError indicates an error of unspecified type.
- osErrorISR indicates that calling in the interrupt service program is not supported.
- osErrorNoMemory indicates that there is not enough memory space.
matters needing attention:
This function cannot be called in the interrupt service program.
Use examples:
/*
*********************************************************************************************************
*    Function name: main
*    Function Description: standard c program entry.
*    Formal parameter: None
*    Return value: None
*********************************************************************************************************
*/
int main(void)
{
     /* HAL Library, MPU, Cache, clock and other system initialization */
    System_Init();

    /* Time benchmark for closing HAL before kernel startup */
    HAL_SuspendTick();

    /* Enter ThreadX kernel */
    tx_kernel_enter();

    while(1);
}
7.9 rtx5 startup function osKernelStart
Function prototype:
osStatus_t osKernelStart (void )
Function Description:
This function is used to start the RTX5 kernel and start task switching. Normally, this function will not return. If it returns, it indicates that the startup fails. Before calling this function, only osKernelGetInfo, osKernelGetState and osXxxNew (created by task and task communication component) can be called.
Function parameters:
Return value:
- osError indicates an error of unspecified type.
- osErrorISR indicates that calling in the interrupt service program is not supported.
matters needing attention:
- This function cannot be called in the interrupt service program.
Use examples:
/*
*********************************************************************************************************
*    Function name: main
*    Function Description: standard c program entry.
*    Parameter: None
*    Return value: None
*********************************************************************************************************
*/
int main(void)
{
     /* HAL Library, MPU, Cache, clock and other system initialization */
    System_Init();

    /* Time benchmark for closing HAL before kernel startup */
    HAL_SuspendTick();

    /* Enter ThreadX kernel */
    tx_kernel_enter();

    while(1);
}
7.10 RTX5 task creation function osThreadNew
Function prototype:
osThreadId_t osThreadNew(osThreadFunc_t     func,
                         void *     argument,
                         const osThreadAttr_t *     attr )
Function Description:
This function is used to realize the task creation of RTX5 operating system, and can also customize the size of task stack.
Function parameters:
- The first parameter is filled with the function name of the creation task.
- The second parameter is the formal parameter passed to the task.
- The third parameter is the task attribute. If NULL is written, the default attribute (including the default task stack size) will be used. It can also be user-defined. The parameters can be defined as follows:
typedef struct {
  const char                   *name;   ///< task name
  uint32_t                 attr_bits;   ///< task attribute, which supports independent Detached and joint modes
  void                      *cb_mem;    ///< task control block address
  uint32_t                   cb_size;   ///< task control block size
  void                   *stack_mem;    ///< task stack address
  uint32_t                stack_size;   ///< task stack size
  osPriority_t              priority;   ///< task priority (defau lt: osPriorityNormal)
  TZ_ModuleId_t            tz_module;   ///< TrustZone identifier
  uint32_t                  reserved;   ///< defau lt (must be 0)
} osThreadAttr_t;- The return value of the function is the ID of the task. Different tasks can be distinguished by using the ID number.
matters needing attention:
- This function cannot be called in the interrupt service program.
- This function can be called before osKernelStart, but it can not be invoked before osKernelInitialize.
Usage example 1: simple creation
__NO_RETURN void thread1 (void *argument)
{
  // ...
  for (;;) {}
}

int main (void) {

  osKernelInitialize();
  ;
  osThreadNew(thread1, NULL, NULL);     // Create using default properties
  ;
  osKernelStart();
}
Use example 2: custom task stack creation
__NO_RETURN void thread1 (void *argument) {
  // ...
  for (;;) {}
}

const osThreadAttr_t thread1_attr = {
  .stack_size = 1024           // Set the task stack size to 1024 bytes, and use the default configuration for other parameters. Note that this writing method needs the help of C language
C99 Standard support.
};

int main (void) {
  ;
  osThreadNew(thread1, NULL, &thread1_attr);   // Create task
  ;
}
Use example 2: custom task stack creation
const osThreadAttr_t thread1_attr = {
  .stack_size = 1024           // Set the task stack size to 1024 bytes, and use the default configuration for other parameters. Note that this writing method needs the help of C language
C99 Standard support.
};

__NO_RETURN void thread1 (void *argument) {
  // ...
  for (;;) {}
}

int main (void) {
  ;
  osThreadNew(thread1, NULL, &thread1_attr);   // Create task
  ;
}
Use example 3: create a task in a static way, that is, define a global variable array. Note that the task stack should be aligned with 8 bytes. You can define the task stack array as uint64_t type is enough, which can ensure that the task stack is 8-byte aligned:
http://www.armbbs.cn/forum.php?mod=viewthread&tid=109400
static uint64_t thread1_stk_1[1024/8];

const osThreadAttr_t thread1_attr = {
  .stack_mem  = &thread1_stk_1[0],  //Use static array to set the size and address of task stack, and use default configuration for other parameters.
Note that this writing requires C Linguistic C99 Standard support.
  .stack_size = sizeof(thread1_stk_1)
};

__NO_RETURN void thread1 (void *argument) {
  // ...
  for (;;) {}
}


int main (void) {
  ;
  osThreadNew(thread1, NULL, &thread1_attr);   // Create task
  ;
}
Use example 4: create a task control block in a static way
static osRtxThread_t thread1_tcb;

const osThreadAttr_t thread1_attr = {
  .cb_mem  = &thread1_tcb,        //Set the task control block with static variables, and use the default configuration for other parameters.
                                    Note that this writing requires C Linguistic C99 Standard support
  .cb_size = sizeof(thread1_tcb),
};

int main (void) {
  ;
  osThreadNew(thread1, NULL, &thread1_attr);    // Create thread with custom tcb memory
  ;
}
Use example 5: create different task priorities
__NO_RETURN void thread1 (void *argument) {
  // ...
  for (;;) {}
}

const osThreadAttr_t thread1_attr = {
  .priority = osPriorityHigh      //Set task priority

};

int main (void) {
  ;
  osThreadNew(thread1, NULL, &thread1_attr);
  ;
}
Use example 6: create task Joinable federation mode
After the task is set to Joinable mode, the functions osThreadExit and osThreadJoin can be used together. It is only used for this purpose and has no other use. In the task, call the function osThreadExit (note that only stop the task call and do not destroy the task) to exit the task. And finally return through the function osThreadJoin.
__NO_RETURN void worker (void *argument) {
  ; // work a lot on data[]
  osDelay(1000U);
  osThreadExit();
}

__NO_RETURN void thread1 (void *argument) {
  osThreadAttr_t worker_attr;
  osThreadId_t worker_ids[4];
  uint8_t data[4][10];
  memset(&worker_attr, 0, sizeof(worker_attr));
  worker_attr.attr_bits = osThreadJoinable;

  worker_ids[0] = osThreadNew(worker, &data[0][0], &worker_attr);
  worker_ids[1] = osThreadNew(worker, &data[1][0], &worker_attr);
  worker_ids[2] = osThreadNew(worker, &data[2][0], &worker_attr);
  worker_ids[3] = osThreadNew(worker, &data[3][0], &worker_attr);

  osThreadJoin(worker_ids[0]);
  osThreadJoin(worker_ids[1]);
  osThreadJoin(worker_ids[2]);
  osThreadJoin(worker_ids[3]);

  osThreadExit();
}
7.11 RTX5 task deletion function osThreadTerminate
Function prototype:
osStatus_t osThreadTerminate (osThreadId_t thread_id);
Function Description:
This function is used to delete the task of RTX5 operating system.
Function parameters:
1. The first parameter is the ID of the task to be deleted.
2. Return value:
- osOK indicates that the task was deleted successfully.
- osErrorParameter indicates that the task ID is NULL or invalid
- osErrorResource indicates an invalid task state.
- osErrorISR indicates that calling in the interrupt service program is not supported.
matters needing attention:
- This function cannot be called in the interrupt service program.
- Be careful not to delete the task whose ID does not exist or the task has been deleted.
- osThreadTerminate deletes the Detached independent task, and subsequent access to the task ID (such as osThreadGetState)) will return osThreadError.
osThreadTerminate will not destroy the Joinable task. Calling the function osThreadGetState will return the state osThreadTerminated. It will not be completely destroyed until the function osThreadJoin is called.
Use examples
#include "cmsis_os2.h"

void Thread_1 (void *arg);                      // Mission statement

void ThreadTerminate_example (void) {
  osStatus_t status;
  osThreadId_t id;

  id = osThreadNew(Thread_1, NULL, NULL);       // Create task

  status = osThreadTerminate(id);               // Delete task
  if (status == osOK) {
                                                // Task deleted successfully
  }
  else {
                                               // Task deletion failed
  }
}
7.12 RTX5 idle tasks
Almost all small RTOS will have an idle task. The idle task should belong to the system task and must be executed. The user program cannot close it. There are idle tasks not only in small systems, but also in large systems, such as WIN7. The following screenshot is the idle process in WIN7.
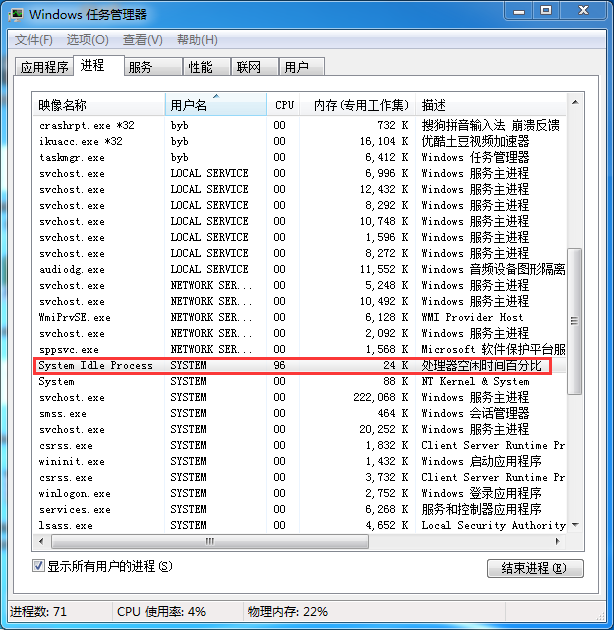
Idle tasks mainly have the following functions:
- Users cannot keep the system executing various application tasks all the time. In this case, the system utilization rate is 100%, and the system will always be overloaded. Therefore, idle tasks are very necessary.
- In order to better realize low power consumption, idle tasks are also necessary. Users can realize low power consumption measures such as sleep and shutdown in idle tasks.
The idle tasks of RTX5 operating system are in the file RTX_Config.c file, the source code is as follows:
// OS Idle Thread
__WEAK __NO_RETURN void osRtxIdleThread (void *argument) {
  (void)argument;

  for (;;) {}
}
7.13 experimental routine description
Supporting examples:
V7-403_RTX5 Task Control
Purpose of the experiment:
- Learn the task management of RTX.
Experiment content:
- Press the K2 key to delete the task AppTaskLED.
- Press the K3 key to re create the task AppTaskLED.
- The functions of each task are as follows:
- AppTaskUserIF task: key message processing.
- AppTaskLED: the LED flashes.
- AppTaskMsgPro task: message processing.
- AppTaskStart task: start the task, which is also the highest priority task. Here, key scanning is realized.
- osRtxTimerThread task: timer task, not used yet.
Serial port printing information:
Baud rate 115200, data bit 8, parity bit none, stop bit 1.

RTX configuration:
The details of RTX configuration wizard are as follows:

System Configuration
- Global Dynamic Memory size
Global dynamic memory, set to 32KB here.
- Kernel Tick Frequency
The system clock beat is set to 1KHz here.
Thread Configuration
- Default Thread Stack size
The default task stack size is 1024 bytes
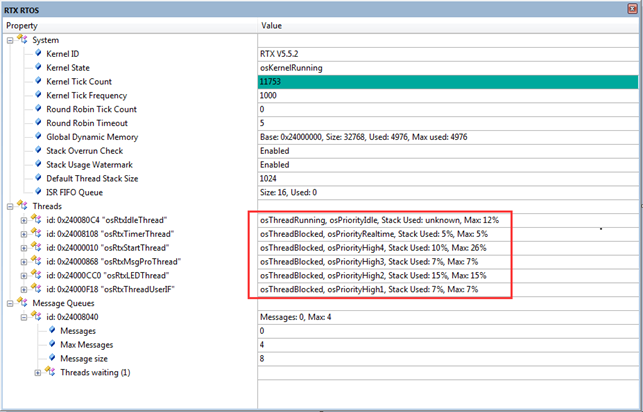
RTX5 task debugging information:
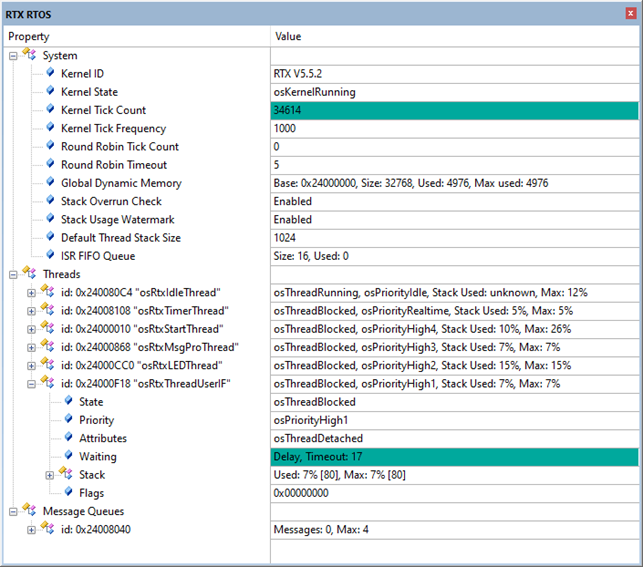
Programming:
Task stack size allocation:
All configurations are independent, and RTX5 default configuration is not used:
/*
**********************************************************************************************************
                                             variable
**********************************************************************************************************
*/
/* Task property settings */
const osThreadAttr_t ThreadStart_Attr =
{
    /* not used */
//    .cb_mem = &worker_thread_tcb_1,
//    .cb_size = sizeof(worker_thread_tcb_1),
//    .stack_mem = &worker_thread_stk_1[0],
//    .stack_size = sizeof(worker_thread_stk_1),
//    .priority = osPriorityAboveNormal,
//    .tz_module = 0

    .name = "osRtxStartThread",
    .attr_bits = osThreadDetached,
    .priority = osPriorityHigh4,
    .stack_size = 2048,
};

const osThreadAttr_t ThreadMsgPro_Attr =
{
    .name = "osRtxMsgProThread",
    .attr_bits = osThreadDetached,
    .priority = osPriorityHigh3,
    .stack_size = 1024,
};

const osThreadAttr_t ThreadLED_Attr =
{
    .name = "osRtxLEDThread",
    .attr_bits = osThreadDetached,
    .priority = osPriorityHigh2,
    .stack_size = 512,
};

const osThreadAttr_t ThreadUserIF_Attr =
{
    .name = "osRtxThreadUserIF",
    .attr_bits = osThreadDetached,
    .priority = osPriorityHigh1,
    .stack_size = 1024,
};
System stack size allocation:

RTX5 initialization:
/*
*********************************************************************************************************
*    Function name: main
*    Function Description: standard c program entry.
*    Parameter: None
*    Return value: None
*********************************************************************************************************
*/
int main (void)
{
    /* HAL Library, MPU, Cache, clock and other system initialization */
    System_Init();

    /* Time benchmark for closing HAL before kernel startup */
    HAL_SuspendTick();

    /* Kernel initialization */
    osKernelInitialize();

    /* Create task */
    ThreadIdStart = osThreadNew(AppTaskStart, NULL, &ThreadStart_Attr);

    /* Turn on multitasking */
    osKernelStart();

    while(1);
}
RTX5 task creation:
/*
*********************************************************************************************************
*    Function name: AppTaskCreate
*    Function Description: create application task
*    Parameter: None
*    Return value: None
*********************************************************************************************************
*/
static void AppTaskCreate (void)
{
    ThreadIdTaskMsgPro = osThreadNew(AppTaskMsgPro, NULL, &ThreadMsgPro_Attr);
    ThreadIdTaskLED = osThreadNew(AppTaskLED, NULL, &ThreadLED_Attr);
    ThreadIdTaskUserIF = osThreadNew(AppTaskUserIF, NULL, &ThreadUserIF_Attr);
}
Implementation of four RTX tasks:
/*
*********************************************************************************************************
*    Function name: AppTaskUserIF
*    Function Description: key message processing
*    Parameter: None
*    Return value: None
*   Priority: ospriorityhig1 (the smaller the value, the lower the priority, which is opposite to uCOS)
*********************************************************************************************************
*/
void AppTaskUserIF(void *argument)
{
    uint8_t ucKeyCode;

    while(1)
    {
        ucKeyCode = bsp_GetKey();

        if (ucKeyCode != KEY_NONE)
        {
            switch (ucKeyCode)
            {
                /* K1 Press the key to delete the task AppTaskLED */
                case KEY_DOWN_K1:
                    printf("K1 Press the key to delete the task HandleTaskLED\r\n");
                    if(ThreadIdTaskLED != NULL)
                    {
                        if(osThreadTerminate(ThreadIdTaskLED) == osOK)
                        {
                            ThreadIdTaskLED = NULL;
                            printf("task AppTaskLED Deleted successfully\r\n");
                        }
                        else
                        {
                            printf("task AppTaskLED Delete failed\r\n");
                        }
                    }
                    break;

                /* K2 Press the key to recreate the task AppTaskLED */
                case KEY_DOWN_K2:
                    printf("K2 Press the key to recreate the task AppTaskLED\r\n");
                    if(ThreadIdTaskLED == NULL)
                    {
                        ThreadIdTaskLED = osThreadNew(AppTaskLED, NULL, &ThreadLED_Attr);
                    }
                    break;

                /* Other key values are not processed */
                default:
                    break;
            }
        }

        osDelay(20);
    }
}

/*
*********************************************************************************************************
*    Function name: AppTaskLED
*    Function Description: LED flashes.
*    Parameter: None
*    Return value: None
*   Priority: ospriorityhig2
*********************************************************************************************************
*/
void AppTaskLED(void *argument)
{
    const uint16_t usFrequency = 200; /* Delay period */
    uint32_t tick;

    /* Get current time */
    tick = osKernelGetTickCount();

    while(1)
    {
        bsp_LedToggle(2);
        /* Relative delay */
        tick += usFrequency;
        osDelayUntil(tick);
    }
}

/*
*********************************************************************************************************
*    Function name: AppTaskMsgPro
*    Function Description: message processing, not used for the time being.
*    Parameter: None
*    Return value: None
*   Priority: ospriorityhig3
*********************************************************************************************************
*/
void AppTaskMsgPro(void *argument)
{
    while(1)
    {
        osDelay(10);
    }
}

/*
*********************************************************************************************************
*    Function name: AppTaskStart
*    Function Description: start task, which is used here as BSP driver package processing.
*    Parameter: None
*    Return value: None
*   Priority: ospriorityhig4
*********************************************************************************************************
*/
void AppTaskStart(void *argument)
{
    const uint16_t usFrequency = 1; /* Delay period */
    uint32_t tick;

    /* Initialize peripherals */
    HAL_ResumeTick();
    bsp_Init();

    /* Create task */
    AppTaskCreate();

    /* Get current time */
    tick = osKernelGetTickCount();

    while(1)
    {
        /* Programs that need periodic processing correspond to systick called by bare metal projects_ ISR */
        bsp_ProPer1ms();

        /* Relative delay */
        tick += usFrequency;
        osDelayUntil(tick);
    }
}
7.14 summary
The API involved in task management is the basic operation function of RTX5. Beginners should master it skillfully. In addition, the task stack and system stack should be clarified with the later study.