1, Linux system basic instructions and text editor
1. Basic instructions of Linux system
1.1 shutdown and restart
(1) Shutdown:
1.shutdown -h                //Turn it off immediately
2.shutdown -h 5              // Shutdown in 5 minutes
3.shutdow -h 20:25           //Shut down at 8:25 p.m
4.poweroff                   // Turn it off immediately
Restart:
1.shutdown -r now            //Restart now
2.shutdown -r 5              //Restart in 5 minutes
3.shutdow -r 20:25           //Restart at 8:25 PM
4.reboot                     //Restart now
(2) Logout: logout
sync: synchronization, which writes the memory data to the disk and uniformly saves the unsaved data
halt: shutdown
1.2 help command
The help command is to see how other commands are used
Commands in Linux are mainly divided into two types: internal commands (some shell scripts provided by Linux) and external commands (some shell scripts found through environment variables)
-- help command (mainly for internal commands):
1.help cd
2.help help
3.ls --help
4.rm --help
5.shutdown --help
6.ifconfig  --help  //View network card information
man command (instruction manual, basically OK):
1.man cd
2.man ls
3.man shutdown
Note: man shutdown after opening the command manual, use the key q to exit
1.3 directory operation command
(1) Switch directory execution
1.cd /                 //Switch to system root
2.cd XXX               //Switch to XXX directory, provided that there is XXX directory under the current path
3.cd ~                 //Switch to the home directory of the current user. If it is root /root, if it is an ordinary user / home / user name
4.cd ..                //Switch to parent directory
5.cd /AAA/BBB/CCC      //Switch to CCC in BBB in AAA under root directory
6.cd AAA/BBB/CCC       //Switch to CCC in BBB in AAA in current directory
7.pwd                  //View the location of the current path
Command composition: Command [options] {target}
- Command: what do you want to do?
- Option: what do you want to do about it?
- Goal: who did you do this to?
Example: switch to pic in study in root under the current directory
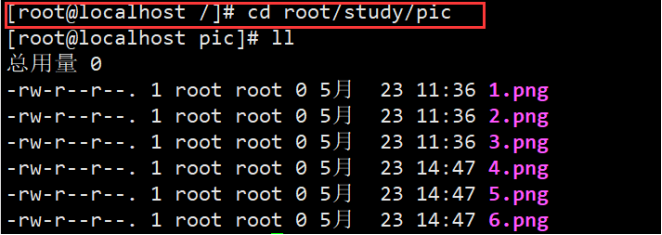
View the location of the current path:

(2) View directory instructions
1.ls   //View the names of all files and directories in the current path (. Files starting with.. hidden files.. parent directory)
2.-l   //Listing content in a long list is equivalent to ll
3.-r   //List in reverse order
4.-d   //View current directory
5.-a   //List all files, including hidden and parent directories
6.-la  //Long list display - a
7.-A   //The same as - a has no parent directory
8.-c   //Sort by the modification time of the file. Who has recently modified who is the first
9.-lh  //The same as - l only displays the file or directory size in appropriate units kb mb b
10.-R  //Display all files and directories in the current directory recursively
11.-i  //Displays the inode number of the file or directory. A node represents the first file, which is equivalent to the number of the file on the disk
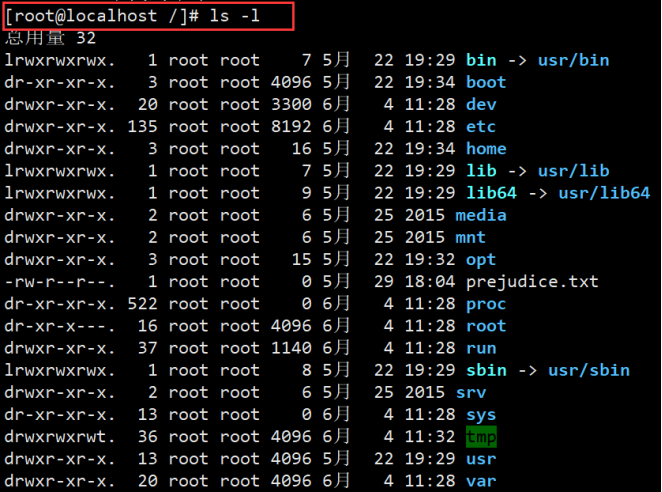
Example: listing contents in the form of long list is equivalent to ll:
List and view the current directory in reverse order:

List all files including hidden and parent directories...:

Sorted by the modification time of the file, the unit is displayed kb mb b:

Displays the inode number of the file or directory:

(3) mkdir create directory
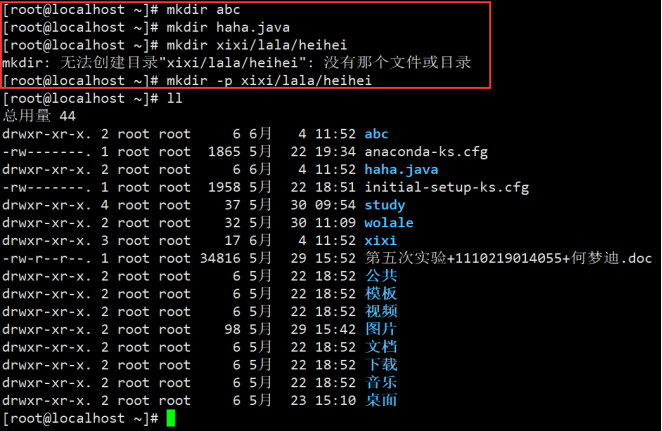
1.mkdir abc                  //Create a single level directory
2.mkdir haha.java            //The directory name is haha java
3.mkdir xixi/lala/heihei     //report errors
4.mkdir -p xixi/lala/heihei  //Create multi-level directory
Instance: create directory:
(4) rmdir delete directory
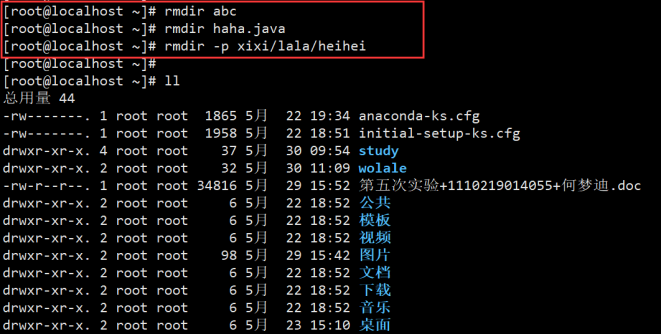
1.rmdir abc                   //Delete abc directory
2.rmdir haha.java             //Delete the directory named haha java
3.rmdir                       //You cannot delete a non empty directory directly
4.rmdir -p xixi/lala/heihei   //Recursive deletion
5.rmdir a/b/c a/b a           //Recursive deletion
6.rm -r aaa                   //Much like the above, they are all recursive deletion
7.rm -rf aaa                  //-r recursion - f force no query
Instance: delete directory
Recursive deletion:

Recursive forced deletion:

(5) cp copy files / directories
1.cp [option] Source order
2.cp hehe.java haha.java  //Copy file
3.cp -a aaa ppp  //duplicate catalog
(6) mv move / cut files / directories
1.mv haha.java kaka.java //If the mv operation is performed in the current directory, it is equivalent to renaming the file
2.mv kaka.java /home/heng/kaka.java   //True movement
3.mv aaa /home/heng/aaa
4.mv kkk uuu
1.4 document operation
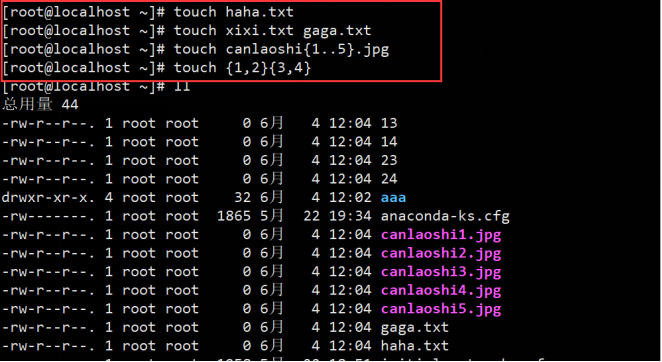
(1) touch create file
1.touch haha.txt  //Create haha Txt file
2.touch xixi.txtx gaga.txtx   //Create two files
3.touch canlaoshi{1..5}.jpg   //Create files from 1 to 5
4.touch {1,2}{3,4}
5.rm  //Delete file - r -f
Instance: create file:
1.5 how to write data to a file
(1) Output redirection
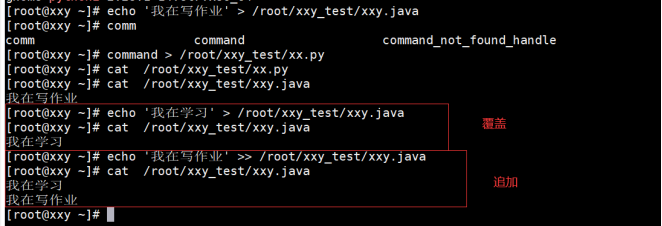
1.echo HelloWorld! > haha.txt
2.echo Hello world > haha.txt
>: redirection overwrites the input to the file
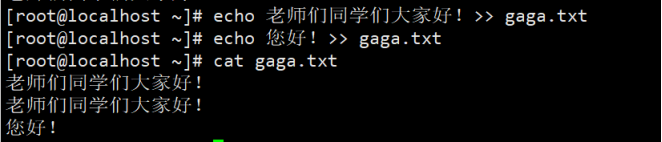
1.echo my bad >> haha.txt
2.echo Hello! >> haha.txt
>>: append redirection appends the input to the end of the file
Example: redirection overwrites the input into the file

Append redirection appends the input to the end of the file:
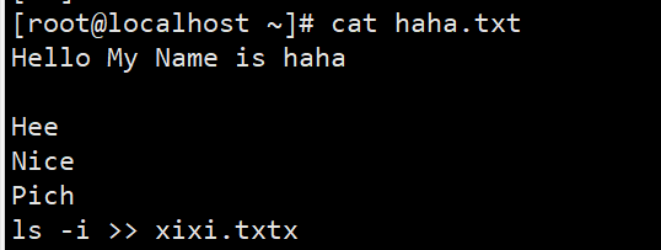
(2) The tee command prints the contents entered in the console first and then writes them to the file
[root@localhost ~]# tee haha.txt
Hello My Name is haha
Hello My Name is haha
[root@localhost ~]# cat ha
[root@localhost ~]# tee >> haha.txt
Hello
Nice
Pich
ls -i >> xixi.txt t
Example: tee command:

What will be entered on the console:

Print on the console before writing to a file:
2.Linux system text editor
The text editor under Linux system is VIM editor; It is equivalent to office and WPS under our Windows system. Its basic operations are as follows:
VIM editor has three modes: general mode, edit mode and command mode. In different modes, we have different operation permissions for files. The details are as follows:
2.1 general mode
1.dw  //Delete the word where the cursor is
2.u   //revoke
3.dd  //Delete the line where the current cursor is located
4.yy  //Copy the line where the cursor is sitting
5.p   //Paste to the next line under the cursor
6.P   //Paste one line above the cursor
7.cc  //Cut the line of the cursor
8.$   //Go to the end of the line where the cursor is located
9.^   //Line beginning
Enter i or a to enter edit mode
2.2 editing mode
Press esc to enter general mode
2.3 command mode
1.wq       //Save exit
2.q        //Exit can be exited if it is not modified. If it has been modified, it cannot be exited
3.wq!      //Force save exit
4.set nu   //set number
5.set nonu //set nonu
6.//The line number jumps directly to the first line
7.3,5 d    //Delete 3 ~ 5 lines
2, Linux file system operation
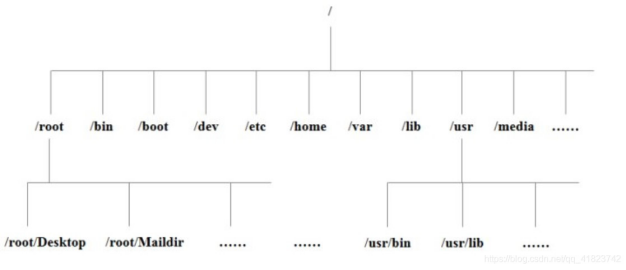
1. Linux directory structure
CentOS system directory:
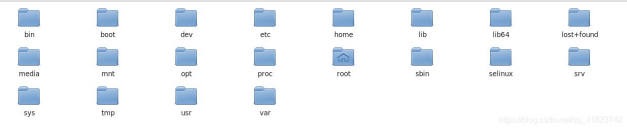
Directory tree:
-
/Bin (key): the abbreviation of binary. This directory mainly stores the most frequently used commands (ordinary). The command itself is the executable program under Linux (C Python Shell) / usr/bin
-
/boot (key): it stores some core files for starting Linux, including some connection files and image files
-
/dev: device stores all hardware information. Each hardware is stored in this directory in the form of a file, similar to the device manager in Windows
-
/etc (key): the configuration files related to the system are stored below
-
/Home: the home directory of all ordinary users
-
/Lib: library is the most basic dynamic link shared library required for system startup / usr/lib
-
/media: U SB flash disk, optical drive and other peripheral storage hardware devices are usually mounted in this place
-
/mnt (key): mount temporarily mounts other file systems. External storage can be mounted in this folder
-
/opt: option option the third-party software packages and data files stored in the optional directory are equivalent to Download in Windows
-
/proc: the virtual directory mainly stores the mapping of the system in memory to obtain system information
-
/root (key): the home directory of the super administrator is inaccessible to ordinary users
-
/run: files required for system operation
-
/sbin: s means SuperUser. It stores some instructions that super administrators can use
-
/srv: service stores data accessed after service startup
-
/sys: system is similar to proc and mainly records Linux kernel information
-
/tmp: where temp temporary files are stored
-
/usr (key): similar to program files in Windows, it mainly stores application programs and instruction files
-
/var (key): store expanding content, the most common log
1.- //Ordinary files are similar to Notepad files. txt also contains other exe mp3 avi
2.d //Directory file director
3.c //Character device file character serial port device reading and writing, keyboard
4.b //Block device block the interface device available for storage reads and writes memory randomly and stores hard disk persistently
5.p //Pipeline file to file used for interprocess communication
6.s //Socket file socket is usually used for network communication
7.l //The link file link is similar to a shortcut in Windows
2. Linux file type
(1) Soft link (symbolic link)
The soft link file is fully understood by referring to the shortcut in Windows. It is only the path to store the source file. When we open the soft link, read the path and then open the file corresponding to the path
ln -s Source file link file
example:

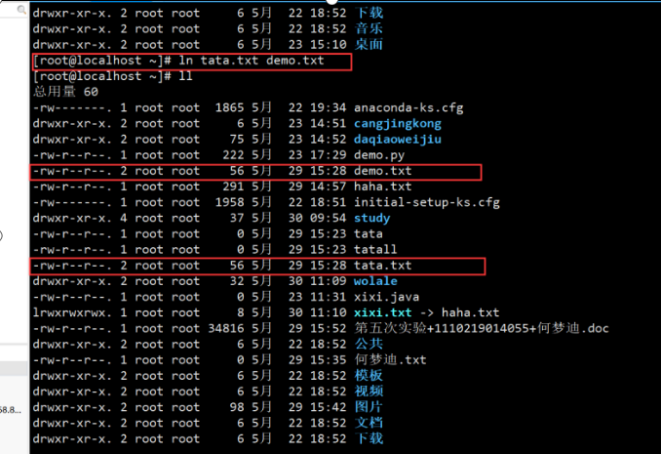
(2) Hard link
The hard link stores the inode (physical memory address) of the source file, which can be understood as a pointer in C language. In fact, it stores the data of the source file (the copied file that follows the modification of the source file)
ln Source file link file
example:
3. cat more less head tail text viewing
(1) cat views text content as read-only
-
-n display line number more is a text viewer / editor based on VIM editor, which mainly displays text information by page in a full screen manner;
-
Enter the next line;
-
Space next page;
-
Ctrl+f scroll down one page;
-
Ctrl+b scroll up one page;
-
q end text display and exit directly.
(2) The less effect is similar to that of more. The biggest difference is that more directly loads all text information into memory. If you look at it, you can only see a small part; Less is where you need to read, then load there to save some memory space;
-
/The string searches downward from the current page. The string n is up and N is down;
-
? String searches the string n up n down from the beginning of the current page.
(3) head view part of the contents of the header of the text file;
head file name //View the first 10 lines of the file
-n number //View the contents of the first n lines of the file
(4) tail view the contents at the end of the text file.
1.tail file name //View the last 10 lines of the file
2.-n number     //View the contents of the first n lines of the file
3.-f         //The content of real-time tracking file updates (generally added) is suitable for logs
4. wc cut sort uniq grep text statistical sorting and filtering
(1) wc text statistics;
1.-w //Show only the number of words
2.-c //Show only bytes
3.-l //Show only rows
4.-m //Show only characters
5.-L //Displays only the number of characters in the longest line
(2) cut text cutting;
Used to extract text content by column
1.-f //Cut column
2.-d //Cut separator
(3) uniq removes duplicate text (lines);
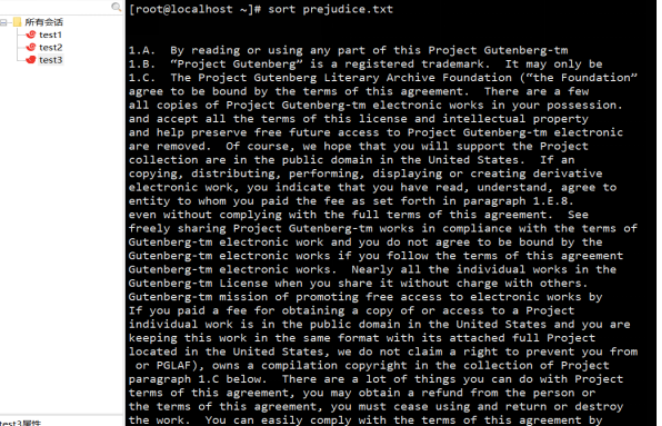
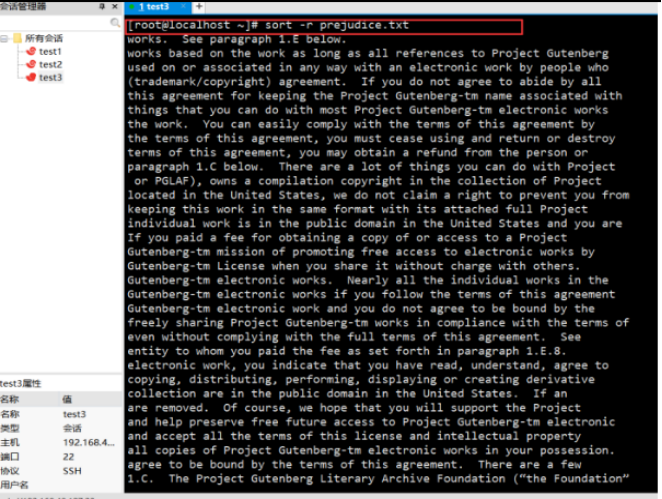
(4) sort sorts the text content (by line);
1.-f //ignore case
2.-b //Ignore indents and spaces
3.-n //Sort by number
4.-r //Reverse sort
5.-u //Repeat while sorting
6.-t //Specify spacer
7.-k //Set field range
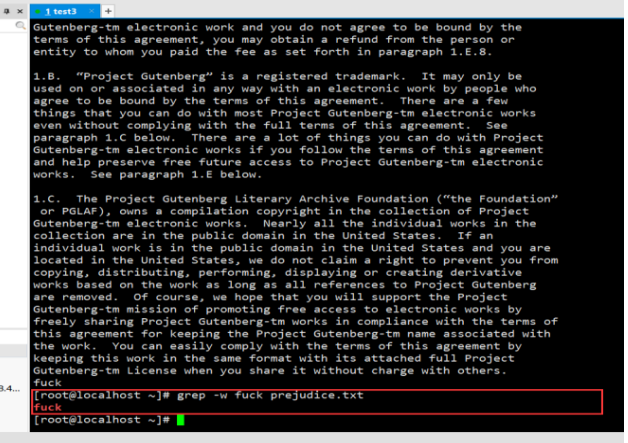
(5) grep can search each line in the specified file according to a specific string. If it is found, it will directly output the line of the string.
1.grep h       //File name finds the line containing the string h in the file and outputs it
2.grep -w      //Word file name finds the line containing the word in the file and outputs it
3.grep ^[q]    //The file name looks for a line that matches a line beginning with q
4.grep q$      //The file name looks for a line that matches the line ending with q
5.grep ^[0-9]  //Start with a number
6.grep xx[q]oo //File name search matches xx, oo, and q in the middle
example:
Implementation monitoring examples:
View the contents of the file:
View the number of words in the file:

Sort files alphabetically:
Reverse order:
Look up the word fuck (no):
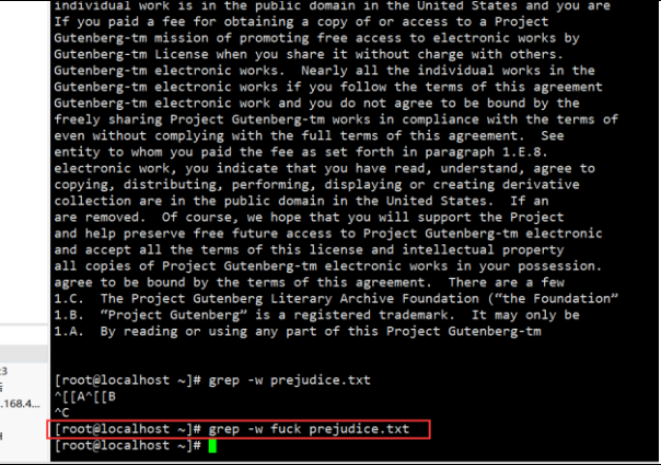
Check whether to add the word "fuck":
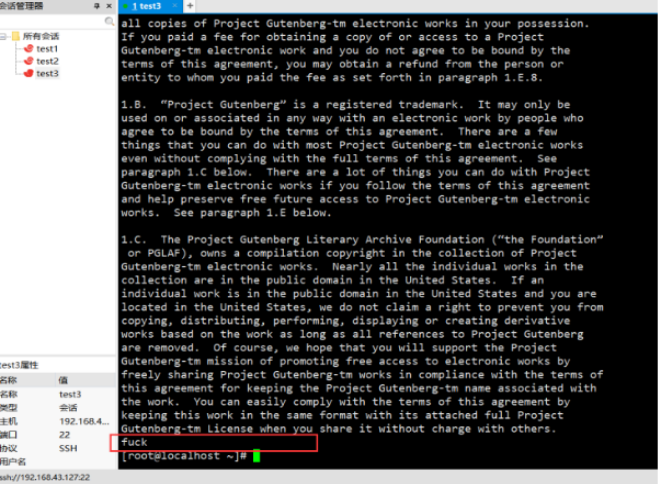
Check the word "fuck":
3, Date and time command, search command, decompression command
1. Date and time command
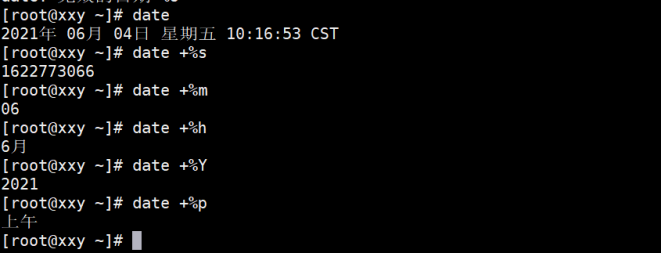
(1) Date displays the date and time of the current system (hardware time BIOS Basic Input Output System)
%S    //second
%M   //minute
%H   //hour
%m   //month
%Y    //particular year
%d   //Day of the month
%j   //What day of the year
%p  //Show AM or PM
The example operation is shown below:
(2) Basic operation
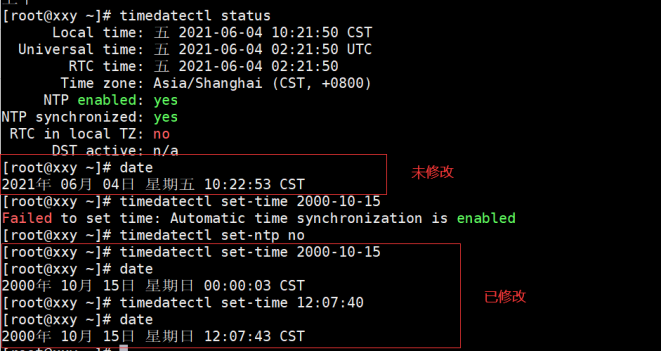
timedatectl Set system time
status Display time status information
list-timezones List known time zones
set-time Set system time
set-timezone Set system time zone
The example operation is shown below:
(3) clock view hardware time
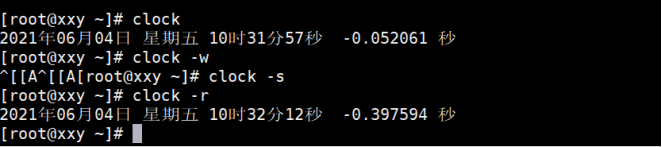
The Linux clock command is used to adjust the RTC time. RTC is the hardware time built in the computer. Executing this instruction can display the current time, adjust the time of the hardware clock, set the system time to be consistent with the time of the hardware clock, or save the system time back to the hardware clock.
-w   //System time to hardware
-s   //Hardware time to system
-utc //Display UTC time
The example operation is shown below:
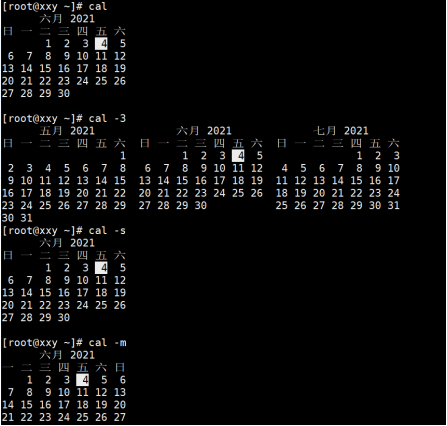
(4) cal view calendar
-l, --one Show only the current month(default)
-3, --three Display last month, current month and next month
-s, --sunday Sunday is the first day of the week
-m, --monday Monday is the first day of the week
-j, --julian Output Julian day
-y, --year Output throughout the year
-V, --version Display version information and exit
-h, --help Show this help and exit
The example operation is shown below:
2. Search command
(1)whereis
The command to search system commands. This command can not search ordinary files, but can only search commands.
[root@localhost ~]# whereis ls
ls: /usr/bin/ls /usr/share/man/man1/ls.1.gz /usr/share/man/man1p/ls.1p.gz
The path of the command the help document of the command the help document of the command.
(2)which
[root@localhost ~]# which ll
alias ll='ls -l --color=auto'
/usr/bin/ls
The same as where is, but search the address of the command and the alias of the command.
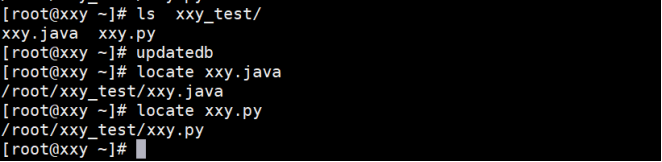
(3)locate
Commands that search for ordinary files by file name
Advantages: according to the built-in database of Linux, the search speed is faster and the resource consumption is less. By default, the database is updated every day. You can also manually update / var / lib / mlocate / mlocate DB, manually update the database updatedb.
Disadvantages: files can only be searched by file name (permission, size, modification time)
[root@localhost ~]# updatedb / / manually update the database first, and then find the new file
[root@localhost ~]# locate haha.java
[root@localhost ~]# locate python | more
[root@localhost ~]# locate *python
The example operation is shown below:
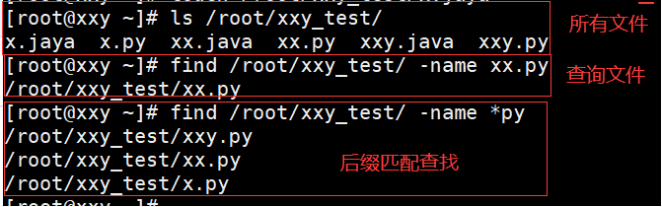
(4)find
It is used to find files according to specified conditions, including file name, size, modification time, access time and permission.
-
Match file name lookup
[root@localhost ~]# find /root -name haha.java //-name file name
/root/haha.java
[root@localhost ~]# find / -name haha.java
/root/haha.java
[root@localhost /]# find / -iname abc //-iname ignore case file names
/root/abc
/root/ABC
/root/aBC
/root/Abc
/root/aBc
[root@localhost ~]# find / -inum 53562145 //-inum find according to the inode of the file
/root/abc
[root@localhost ~]# find / -name *python / / files ending in python
The example operation is shown below:
-
Match file size
[root@localhost ~]# find /root -size +10000 / / files over 10000b
[root@localhost ~]# find /root -size -100 / / files smaller than 100b
The example operation is shown below:

-
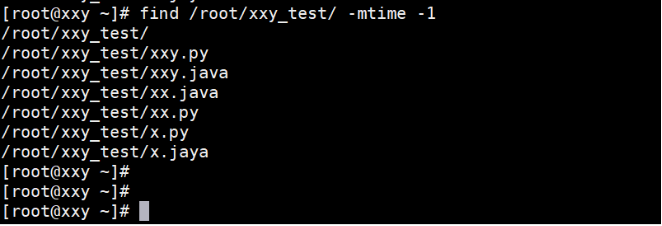
Match modification time
[root@localhost ~]# find /root -mtime -1
-mtime Modification time
-atime Access time
-ctime Permission modification time
+n n Days ago
-n n Within days
n express n~n+1 day
The example operation is shown below:
-
Match owner / group
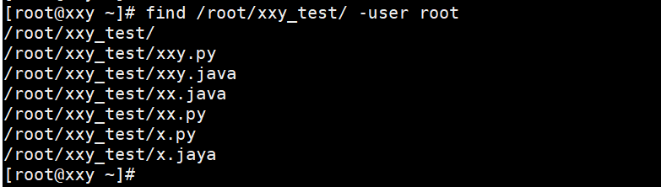
[root@localhost ~]# find / -uid 1000
[root@localhost ~]# find /root -user root
-uid user id
-gid group id
-user user name
-group Group name
-nouser No owner
-nogroup No all groups
The example operation is shown below:
-
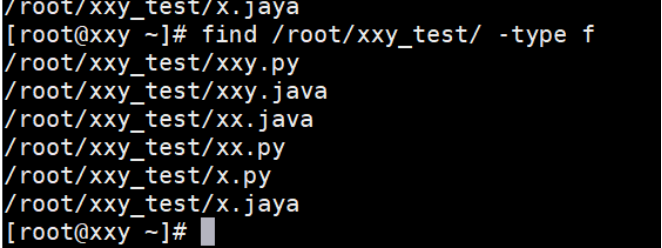
Matching file types
b Block device
d catalogue
c Character device
p Piping equipment
l Link file
s socket
f Plain text file
[root@localhost ~]# find /dev -type l
The example operation is shown below:
-
Logical operation
[root@localhost ~]# find /root -size +10000 -a -user root
-a and
-o or
-not not
The example operation is shown below:

(5) Input output correlation
- Pipe symbol|
Take the output of the previous command as the input of the next command through an invisible pipeline, that is, take the output data of the previous command as the data source parameters required by the next command.
Main usage: if there are too many output results of a command, you can let more or less view them through the pipeline, or grep can find the file content by line.
The pipeline does not handle the error output of the previous command!
/ / view all installed software and filter out Python related packages
[root@localhost ~]# rpm -qa | grep python
/ / sort the users according to UID size, and write the data to the file after taking the first 10
[root@localhost ~]# sort -t : -k 3 -n /etc/passwd | head > a.txt
The example operation is shown below:

-
Redirection operator
Output redirection: > overwrite > > append
Input redirection: < overwrite < < append
In Linux, the default input device is the keyboard, and the default output device is the display (command line). The so-called redirection is to change the default input or output position.
command > file : take command The output result of is overwritten to the specified file. If the file does not exist, it is created;
command 1> file : take command The output result of is overwritten to the specified file. If the file does not exist, it is created;
command 2>file: take command The error output result of is overwritten to the specified file. If the file does not exist, it is created;
command &> file: take command Overwrite the correct or wrong result of the specified file. If the file does not exist, create it;
command >> file: Add
command < file: Causes the command to read data from the specified file
command < < End identifier: read the command input until the end identifier specified by the input behavior is encountered
The example operation is shown below:
3. Decompression command
3.1 zip and unzip
zip is both an archive and a compression command. You can compress directories.
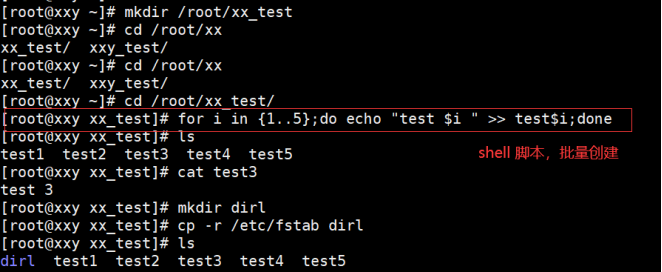
(1) Prepare some data
[root@localhost ~]# mkdir test
[root@localhost ~]# cd test/
[root@localhost test]# for i in {1..5}; do echo "test$i" > test$i.txt; done
[root@localhost test]# mkdir dir1
[root@localhost test]# cp -r /etc/fstab dir1
The example operation is shown below:
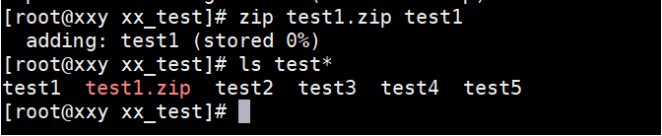
(2) Compress test1.0 using zip Txt (reserved)
[root@localhost test]# zip test1.txt.zip test1.txt
[root@localhost test]# ls test*
test1.txt test1.txt.zip test2.txt test3.txt test4.txt test5.txt
The example operation is shown below:
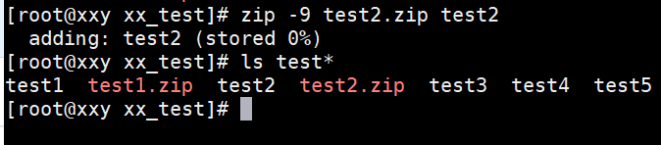
(3) Compress test2 with the highest compression rate Txt (reserved)
[root@localhost test]# zip -9 test2.txt.zip test2.txt
[root@localhost test]# ls test*
The example operation is shown below:
(4) Compress the directory dir1 with all the files under it
[root@localhost test]# zip -r dir1.zip dir1/
The example operation is shown below:
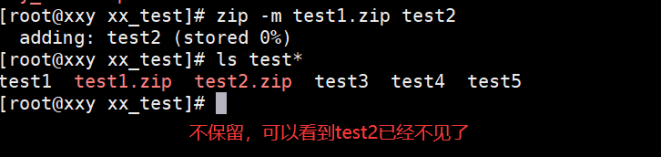
(5) Add a file to the compressed package and put Text1 txt. Add test2.0 to zip Txt (files directly into the compressed package are not retained)
[root@localhost test]# zip -m test1.txt.zip test2.txt
The example operation is shown below:
(6) Delete a file in a compressed package
[root@localhost test]# zip -d test1.txt.zip test2.txt
deleting: test2.txt
The example operation is shown below:

(7) Exclude some files when compressing files (keep source files)
[root@localhost test]# zip test1.txt.zip *.txt -x test1.txt
The example operation is shown below:

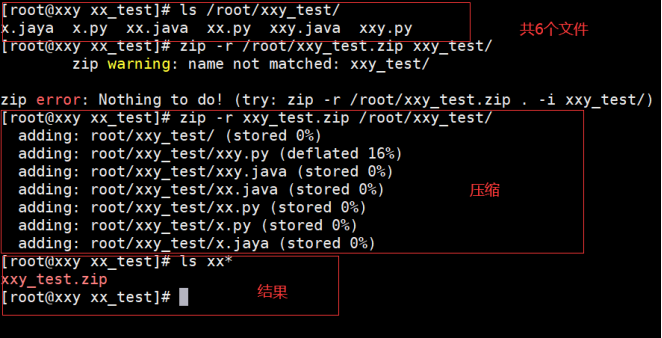
//Note: zip XXY zip /root/xxy_ test/*. java -x xxy. java
Compressed directory / root/xxy_test / below All files at the end of Java, excluding XXY Java file.
(8) Unzip test2 txt. Zip specifies the path
[root@localhost test]# unzip test2.txt.zip -d dir1
Archive: test2.txt.zip
extracting: dir1/test2.txt
The example operation is shown below:

(9) Direct current decompression
[root@localhost test]# unzip dir1.zip
Archive: dir1.zip
replace dir1/fstab? [y]es, [n]o, [A]ll, [N]one, [r]ename: r
new name: dir2
inflating: dir2
The example operation is shown below:

(10) View the contents of a compressed package
[root@localhost test]# unzip -v test1.txt.zip
Archive: test1.txt.zip
Length   Method   Size   Cmpr      Date     Time    CRC-32     Name
-------- ------ ------- ---- ---------- ----- -------- ---- - ----- -------- ----
6      Stored    6      0%    05-30-2021  15:21  7c59371b  test1.txt
6      Stored    6      0%    05-30-2021  15:21  4e6f5599  test3.txt
6      Stored    6      0%    05-30-2021  15:21  012ec35e  test4.txt
6      Stored    6      0%    05-30-2021  15:21  1835f21f  test5.txt
-------- ------- --- ------- - ----- -------- ----- ----- -------- ----- -----
24              24      0%                                  4 files
3.2 gzip and gunzip
(1) Directly compress a file. The name of the compressed package is the file name gz
[root@localhost test]# gzip test1.txt
The example operation is shown below:

(2) Compress a directory and add a file to the compressed package
[root@localhost test]# gzip test3. txt > test1. txt. Gz / / not reserved
[root@localhost test]# gzip -c test4. txt > test1. txt. Gz / / - C keep source files
The example operation is shown below:

3.3 bzip2 and bunzip2
The latest Linux compression tool is more efficient than the first two.
[root@localhost ~]# bzip2 -z Jin Yong - carving hero biography txt refined edition txt / / do not keep the source file
[root@localhost ~]# bzip2 -9 -c pride-and-prejudice.txt > ppp.bz2
[root@localhost ~]# bunzip2 Jin Yong - carving hero biography TXT refined edition txt.bz2
The example operation is shown below:

3.4 xz and unxz
[root@localhost ~]# xz pride-and-prejudice.txt / / press a file
[root@localhost test]# xz dir1 / * / / press a single level directory without - r
[root@localhost test]# unxz dir1.zip.xz / / unzip
The example operation is shown below:

3.5 tar packages and compresses files
tarcommand Can be Linux Create an archive of files and directories. With tar, you can create a file (backup file) for a specific file, change the file in the file, or add a new file to the file. Tar was originally used to create files on tape. Now users can create files on any device. Using tar command , a large number of files and directories can be packaged into one file, which is very useful for backing up files or combining several files into one file for network transmission.
First, we should clarify two concepts: packaging and compression. Packaging refers to turning a large number of files or directories into a total file; Compression is to turn a large file into a small file through some compression algorithms.
Why distinguish between these two concepts? This is because many compression programs in Linux can only compress one file, so when you want to compress a large number of files, you have to first type the large number of files into a package (tar command), and then compress them with the compression program (gzip bzip2 command).
-A or--catenate: Add files to existing backup files;
-B Set block size;
-C < catalogue>: This option is used for decompression. To decompress in a specific directory, you can use this option;
-d Differences in recording documents;
-c establish.tar Package file in format x release.tar Package file in format;
-t View the list of files in the package;
-v Display details;
-f Specify the file name;
-z Use while packing zip Compression;
-j Use while packing gzip Compression;
-J Use while packing xz Compression;
-l File system boundary setting;
-k Keep the original file without overwriting;
-m The reserved file is not overwritten;
-w Confirm the correctness of the compressed file;
example:
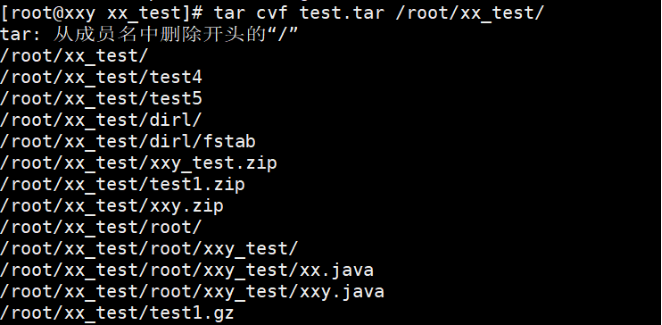
(1) Create an uncompressed package file
[root@localhost ~]# tar cvf test.tar test/
The example operation is shown below:
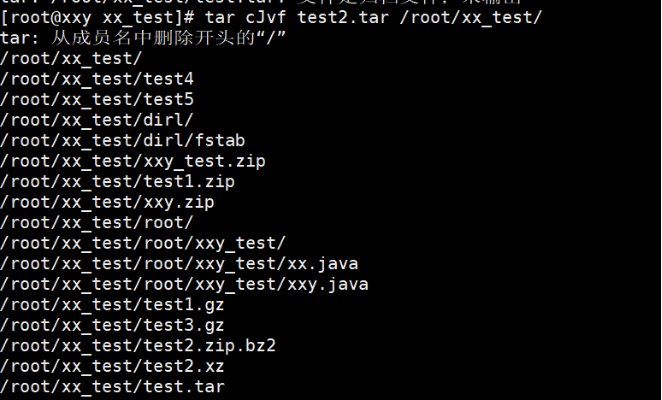
(2) Create a compressed package file c[z|j|j|vf
[root@localhost ~]# tar cJvf test2.tar test
The example operation is shown below:
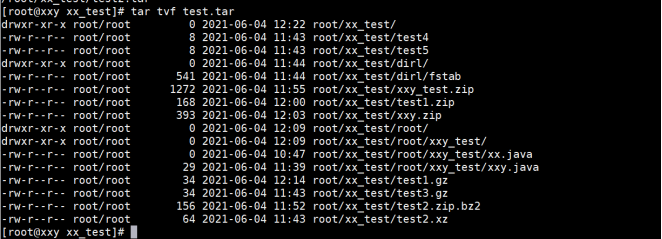
(3) Lists the files in the package
[root@localhost ~]# tar tvf test.tar
The example operation is shown below:
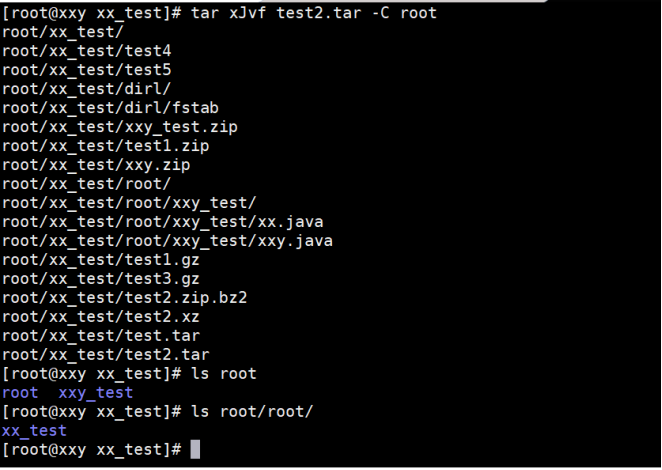
(4) Unpack
The example operation is shown below:

4, User and group management and file permissions
1. User and group management
1.1 understanding of user and group management
User: the security device at the bottom of the Linux system belongs to the authority problem. The system should recover the power. The system user is the user of the system. User management is the management of files.
User group: user group is the extension of users. The existence of group is to share users' rights. Group and user are two different mechanisms. The components are divided into initial group and additional group.
Linux is a multi-user operating system. Each user has at least one group, and each user has its own home directory.
1.2 under Linux system, users are divided into three types
(1) super user: when the user name is root and has all permissions to maintain the system (create a new user and delete some files);
(2) system user (pseudo user): unable to log in. The meaning is that Linux needs built-in users during normal operation, mainly to meet the operation of files by corresponding system processes;
(3) ordinary users: used to manage Linux and common operations.
1.3 under Linux system, the components are divided into three categories
(1) basic group (private group): when creating a new user, if the group is not specified, the system will automatically create a group with the same user name and as the user's basic group;
(2) additional group (public group): a group that can accommodate multiple users. All users in the group have all the permissions corresponding to the group. When a basic group joins other users, the basic group becomes an additional group;
(3) system group: root group, saving system users.
1.4 each user will be assigned a label UID unique representation
Superuser: 0
System user: 1 ~ 999
Ordinary users: ≥ 1000
If a newly created ordinary user does not specify a UID, it starts from 1000 by default and then + 1
1.5 user and group management files
(1)/etc/passwd
A text file stores some user definition information. Because the permissions of this file are readable by all users, the content of the password is encrypted. The specific password is in / etc/shadow.
Format: user name: login password not displayed: UID:GID: Profile: home directory path: Shell type (user type)
(2)/etc/shadow
A text file that stores the user's password and time management.
Format: Login Name: encryption password: time of last modification: minimum time interval: maximum time interval: warning time: inactive time: expiration time: Flag (reserved)
① encryption password: the password encrypted by SHA-512/SHA-256/MD5 algorithm. If it is blank, it means that the user has no password to log in; if it is *, it means that the user cannot log in; if it is "!" Indicates that the user password has been locked
② time of last modification: the date of the last password change, expressed in days from January 1, 1970. The larger the value, the closer it is to the current time
③ minimum time interval: the password cannot be modified in how many days. The default value is 0, unlimited
④ maximum time interval: the number of days after which the password must be modified. The default value is 99999, unlimited
⑤ warning time: warn the user how many days in advance that the password will expire. The default value is 7. 0 means no warning is provided
⑥ inactive time: how many days after the password expires, disable this user
⑦ expiration time: Specifies the time when the password expires, expressed in days from January 1, 1970. It is blank by default and will not expire forever
⑧ identification: reserved
(3)/etc/group
A text file that stores group information
Group name: group encryption password: GID: group members (separate them if they are multiple members) / etc/gshadow stores the password information of the group
1.6 user related operations
(1) View user information
id [user name]	   //View user UID and GID information
who	           //View the list of all currently logged in users
whoami	       //View the account name of the currently logged in user
(2) useradd: add a user, create a user and a user group with the same name
-d     //Specify home directory
-e     //Specify expiration date YYYY-MM-DD format
-f     //Specify how many days to disable, 0 will be disabled immediately after expiration, and - 1 will never be disabled
-g     //The specified group can write the group name or GID, provided that the group must exist
-G     //Specify additional groups multiple groups, each separated by
-M     //Do not create home directory
-N     //Do not create a base group with the same name as the user
-p     //Specify password
-s     //Specifies the Shell type of the user
-u     //Specify UID
(3) userdel: delete user
userdel User name: delete the user without deleting the user's home directory
userdel -r User name: delete all
(4) usermod: modify user information except for the parameter with useradd
usermod -l New user name original user name	    //Change user name
usermod -u 6666 user name	        //Change user uid
usermod -g 21 user name	        //Change user initial group information
usermod -G 21 user name	        //Change user additional group information
usermod -aG 72 user name	        //Add additional groups for users
usermod -G "" user name	        //Delete all additional group information
usermod -c "hello" user name	    //Change the user description to "hello"
usermod -d /home/lee user name	    //Change the direction of the user's home directory
usermod -md /home/lee user name	//Change the point of the user's home directory and the name of the home directory
usermod -s /bin/sh user name	    //Change the user's default shell
usermod -L user name	            //Freeze user
usermod -U user name	            //Unlock user
1.7 user group related operations
(1) Group add: add a group
-g appoint GID
-r Establish a system group, and g Not used at the same time, and a 1 is assigned~999 of GID
(2) groupdel: delete a group
groupdel: the primary group of the user "naruto" cannot be removed. / / there are users in the basic group. The group cannot be deleted directly
(3) gpasswd: adding and deleting members to a group
-a    //Add the user to the group without changing the original user's group
-d    //Delete the user from the group. The group cannot be empty
-M    //You can add multiple users at the same time
-A    //Assign administrators to groups
useradd -g       //Change grouping for users
usermod -g       //Modify user group
2. File permissions
2.1 permission type
In Linux system, there are three kinds of permissions: r Read read w Write write x eXecute
(1) rwx works on files
-
r can read and view the contents of the file
-
w you can modify the file content, but it does not mean you can delete the file. The prerequisite for deleting a file is to have write permission to the directory where the file is located
- x change file can be executed
(2) rwx acts on the directory
-
r you can view the contents of the directory
-
w directory contents can be created, deleted and renamed
-
x can enter the directory
(3) The first character is generally used to distinguish between files and directories:
d: Indicates a directory, in fact Ext2 FS In, a directory is a special file.
-: Indicates that this is an ordinary file.
l: Indicates that this is a symbolic link file, which actually points to another file.
b,c: It represents block devices and other peripheral devices respectively, and is a special type of file.
s,p: These files are related to the data structure and pipeline of the system, which are rarely seen.
(4) Every 3 of the 2nd to 10th characters are a group; As shown in the following figure:
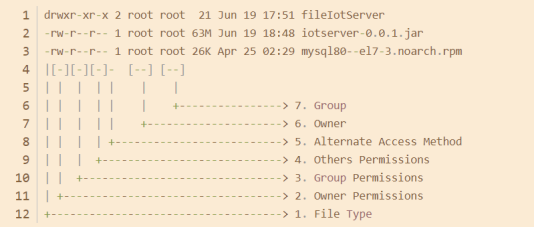
Drwxr-xr-x. 2 root 6 May 22 13:31 public
Representative: date of the last modification of the size of the owner group file / directory name
-
The first character d indicates the file type;
-
The second to fourth characters rwx indicate the permission of the file owner;
-
The 5th ~ 7th characters r-x represent the permissions of the file group;
-
The 8th ~ 10th characters r-x represent the permissions of all other users on the file;
-
11th character "." Indicates the access control ACL of the file, "." Indicates access by SELinux security context, and a space indicates no access;
-
Number: if it is a file, it indicates the number of hard links corresponding to the file; If it is a directory, it indicates the number of subdirectories of the directory ("." Is the current directory "..." the parent directory of the current directory); Permissions can also be expressed in numbers.
2.2 modification authority
(1) The first form: + - = change permission
① Chmod, u = RWX, g = RW, o = x file / directory (U belongs to the main group, G belongs to the group, O all other users, a owner)
② chmod o+w file / directory
③ chmod a-x file / directory
[heng@localhost ~]$ touch abc
-rw-rw-r--. 1 heng heng 0 6 May 15:50 abc
 //1. Read / write to the abc owner and execute other read / write to the group
[heng@localhost ~]$ chmod u=rwx,g=rx,o=rw abc
-rwxr-xrw-. 1 heng heng 0 6 May 15:50 abc
//2. Remove the execution permission from the abc file owner and add the write permission to the abc file owner group
[heng@localhost ~]$ chmod u-x,g+w abc
-rw-rwxrw-. 1 heng heng 0 6 May 15:50 abc
(2) The second form: through numerical change, as shown in the figure below:
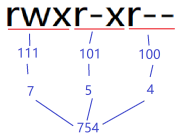
//Modify the abc file permissions to rwx r-x r-x
[heng@localhost ~]$ chmod 755 abc
-rwxr-xr-x. 1 heng heng 0 6 May 15:50 abc
[heng@localhost ~]$ chmod 123 abc
---x-w--wx. 1 heng heng 0 6 May 15:50 abc
[heng@localhost ~]$ chmod 000 abc
----------. 1 heng heng 0 6 May 15:50 abc
(3) The modified file belongs to the master chown
[root@localhost heng]# chown root abc
----------. 1 root heng 0 6 May 15:50 abc
[root@localhost ~]# chown -R heng test / / change all files and directories in the test directory, including the owner, to heng
(4) Modify file group chgrp
[root@localhost ~]# chgrp -R heng test
Example exercise:
① Establish two groups of immortals and monsters;

② Establish four users: Tang monk, Wukong, Bajie and Sha monk; Put Wukong, Bajie and into the monster; Put Tang monk, Sha monk and into immortals;
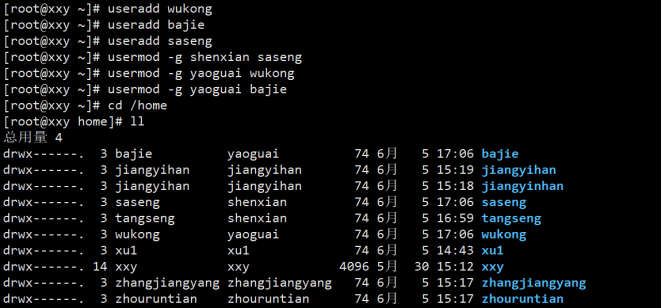
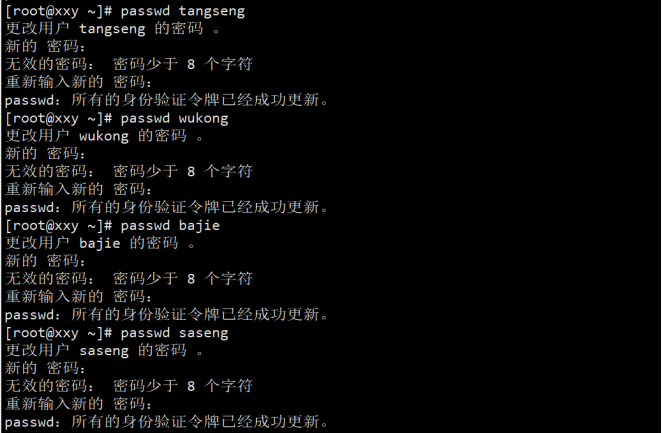
③ Set passwords for four users respectively;
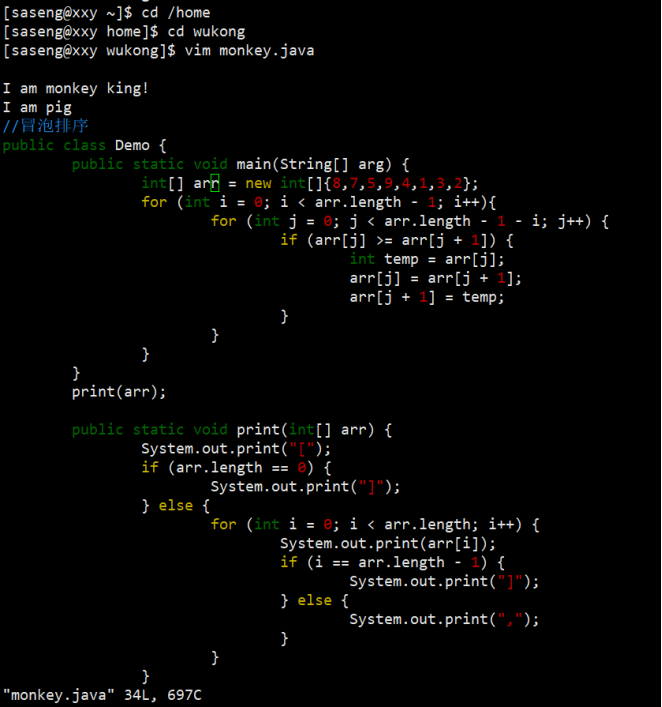
④ Use Wukong to create a file monkey Write a paragraph "I am monkey king!" in the java file;

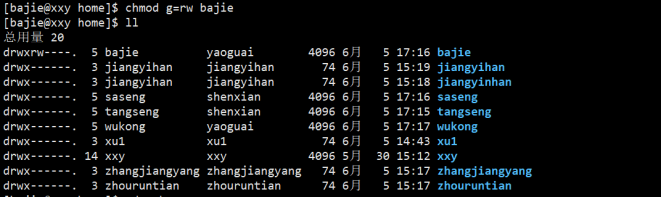
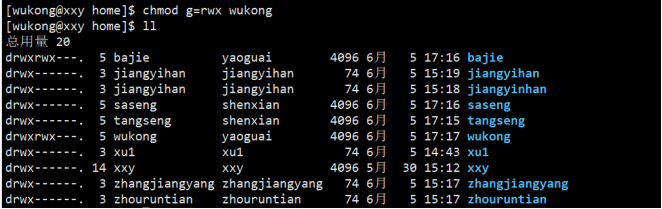
⑤ Give Bajie a permission that can rw be used;
⑥ Bajie modify monkey Java and add a sentence "I am pig";

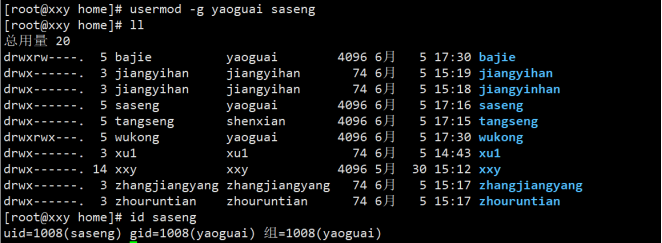
⑦ Tang Seng and Sha Seng have no authority over this document; Put monk Sha into the monster group;
⑧ Let monk Sha modify the file monkey Java adds a bubble sort "...";
5, Task scheduling and disk management
1. Task scheduling
1.1 general
In Linux, timed task call means that the system executes relevant commands or programs at a specified time
There are two types of task scheduling:
(1) system work: daily log processing and virus scanning every day
(2) work of individual users: a series of operations related to our first server software, backup the database at 2:00 every day (automatic operation and maintenance Shell Python)
1.2 basic use
Format: crontab task scheduling instruction
Common instructions:
-e           //Edit a scheduled task
-l           //Query all scheduled tasks of the current user
-r           //Delete all scheduled tasks of the current user
1.3 parameter details
(1) meaning of placeholder
-
The first few minutes in the first hour 0 ~ 59;
-
Hours 0 ~ 23 in the second day;
- The day 0 ~ 31 in the third month;
-
The fourth month of the year 1 ~ 12;
-
The day of the fifth week is 0-7 (0-7 are all Sundays).
(2) description of special symbols
-
*Represents any time, and the first * represents every minute;
-
, representing discontinuous time 0, 8, 12, 16 * * means doing something at 8:00, 12:00, 16:00 every day;
-
-Represents continuous time 0 5 * * 1-6, which means 5:00 from Monday to Saturday every week;
-
*/n stands for how often it is executed. For example, / 10 * * means every 10 minutes.
(3) cases at a specific time
-
45 * *: executed at 22:45 every day;
-
0 17 * * 1: every Monday at 17:00;
-
0 5 1,15 * *: at 5:00 on the 1st and 15th of each month;
-
40 4 * * 1-5: every Monday to Friday at 4:40;
-
/10 4 * *: every 10 minutes at 4:00 every day;
-
0 0 1,15 * 1: at 00:00 on Monday of each week on the 1st and 15th of each month.
2. Disk management and mounting
2.1 basic knowledge of zoning
(1) mbr zoning
It supports up to four primary partitions. The system can only be installed in the primary partition, and the extended partition accounts for one primary partition. mbr it supports 2TB at most, but has the best compatibility.
(2) gtp zoning
It supports unlimited number of primary partitions (but the OS is limited. Windows supports 128 at most), and supports a maximum capacity of 18EB (1eb = 1024pb, 1PB = 1024tb, 1TB = 1024gb). After Windows7 x64, it is a new OEM that supports gtp partitions.
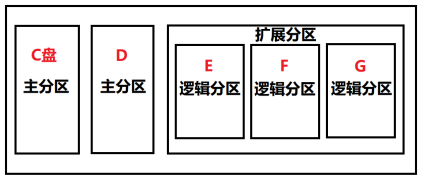
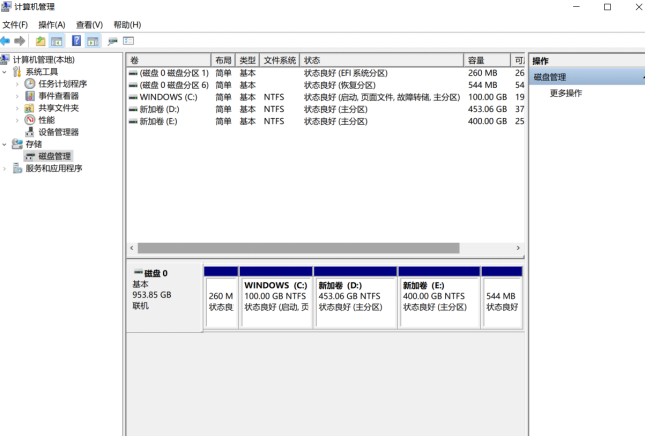
2.2 Windows disk partition
(1) primary partition: also known as boot partition, up to 4 may be created. When you create four primary partitions, you can no longer create extended partitions. Of course, there are no logical partitions. The primary partition is independent, corresponding to the first partition on the disk, and "general" is disk C. Windows system calls all primary partitions and logical partitions "disks" or "drives", and displays all storable media as "disks" of the operating system. Therefore, it is impossible to distinguish between primary partition and logical partition from the concept of "disk". And the drive letter can be modified in the operating system, which is why the word "general" should be added.
(2) extended partition: in addition to the primary partition, the remaining disk space is an extended partition. Extended partition is a concept that can not be seen in fact. When the whole hard disk is divided into a primary partition, there is no extended partition.
(3) logical partition: multiple logical partitions can be created above the extended partition. A logical partition is equivalent to a storage partition. It has nothing to do with the operating system and other logical partitions and primary partitions. It is "independent".
As shown in the following figure, Windows disk partition and computer partition:
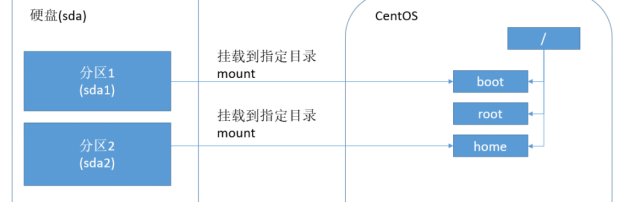
2.3 Linux disk partition
(1) for Linux, no matter how many partitions are allocated to which directory, in the final analysis, they have only one root directory /, an independent and unique file structure. Each partition in Linux is used to form a part of the whole file system.
(2) Linux adopts a processing method called "loading", which links directories and partitions.
The following figure shows the Linux disk partition:
2.4 Linux hard disk number Description
(1) Linux hard disk is divided into IDE (parallel port) and SCSI (serial port). At present, serial port is basically used
(2) for IDE hard disk, the drive identifier is "hdx~"
-
hd: indicates the device type where the partition is located. hd refers to IDE and sd refers to SCSI;
-
x: Is a hard disk individual with independent disk numbers (a basic disk, b Basic slave disk, c auxiliary master disk, d auxiliary slave disk...);
-
~: it refers to the partition of a hard disk. Generally, the first four partitions 1 ~ 4 represent the main partition or extended partition, and the logical partition after 5.
As shown in the figure below, Linux hard disk number Description:
2.5 how to add a hard disk to Linux
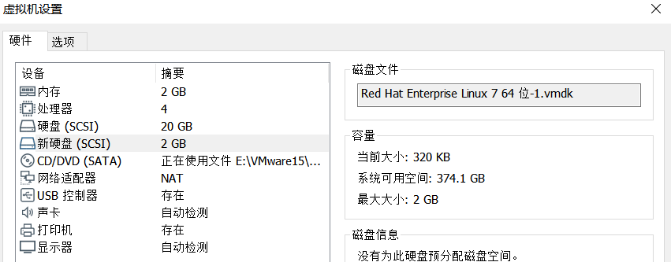
(1) Create a directory to mount the new hard disk
[root@localhost ~]# mkdir newdisk
(2) In the virtual machine settings, add a 1GB hard disk
In the menu bar virtual machine - > settings, click Add - > hard disk - > next
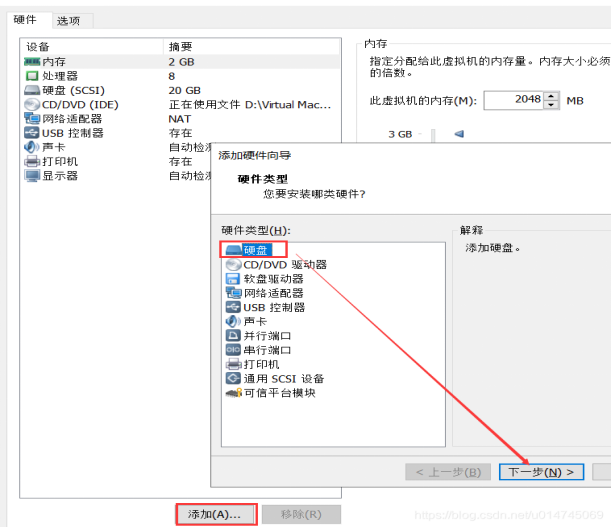
Then select [SCSI (recommended)] - > [next] - > [create new virtual disk] - > [next] - > change the disk size to 2 GB - > [next] - disk file default] - > [finish]. After seeing "new hard disk" in the virtual machine hardware information column, restart the virtual machine for subsequent steps.
(3) Check the new hard drive and restart it
Code (before adding):
[root@localhost ~]# lsblk
NAME          MAJ:MIN RM  SIZE RO TYPE MOUNTPOINT
sda             8:0    0   20G  0 disk
├─sda1          8:1    0    1G  0 part /boot
└─sda2          8:2    0   19G  0 part
  ├─rhel-root 253:0    0   10G  0 lvm  /
  ├─rhel-swap 253:1    0    4G  0 lvm  [SWAP]
  └─rhel-home 253:2    0    5G  0 lvm  /home
sr0            11:0    1  3.8G  0 rom  /run/media/root/RHEL-7.2 Server.x86_64
Code (after adding):
[root@localhost ~]# lsblk
NAME          MAJ:MIN RM  SIZE RO TYPE MOUNTPOINT
sda             8:0    0   20G  0 disk
├─sda1          8:1    0    1G  0 part /boot
└─sda2          8:2    0   19G  0 part
  ├─rhel-root 253:0    0   10G  0 lvm  /
  ├─rhel-swap 253:1    0    4G  0 lvm  [SWAP]
  └─rhel-home 253:2    0    5G  0 lvm  /home
sdb             8:16   0    2G  0 disk
sr0            11:0    1  3.8G  0 rom  /run/media/root/RHEL-7.2 Server.x86_64
(4) Partition hard disk
[root@localhost ~]# fdisk /dev/sdb
 Welcome fdisk (util-linux 2.23.2).

The changes remain in memory until you decide to write the changes to disk.
Think twice before using the write command.

Device does not contain a recognized partition table
 Use disk identifier 0 x030720f7 Create a new DOS Disk label.

command(input m get help): m
 Command operation
   a   toggle a bootable flag
   b   edit bsd disklabel
   c   toggle the dos compatibility flag
   d   delete a partition
   g   create a new empty GPT partition table
   G   create an IRIX (SGI) partition table
   l   list known partition types
   m   print this menu
   n   add a new partition
   o   create a new empty DOS partition table
   p   print the partition table
   q   quit without saving changes
   s   create a new empty Sun disklabel
   t   change a partition's system id
   u   change display/entry units
   v   verify the partition table
   w   write table to disk and exit
   x   extra functionality (experts only)

command(input m get help): n
Partition type:
   p   primary (0 primary, 0 extended, 4 free)
   e   extended
Select (default p): p
 Partition number (1-4,Default 1): 1
 Start sector (2048-4194303,The default is 2048):
The default value 2048 will be used
Last a sector, +a sector or +size{K,M,G} (2048-4194303,The default is 4194303):
The default value 4194303 will be used
 Partition 1 is set to Linux Type, size set to 2 GiB

command(input m get help): w
The partition table has been altered!

Calling ioctl() to re-read partition table.
Synchronizing disks.
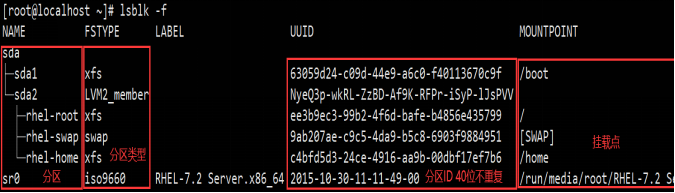
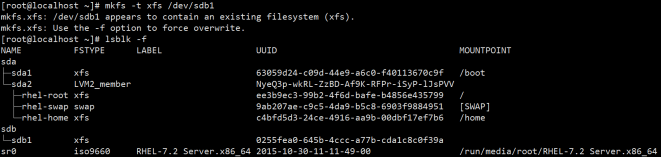
[root@localhost dev]# mkfs -t xfs /dev/sdb1
[root@localhost dev]# lsblk -f
(5) Format
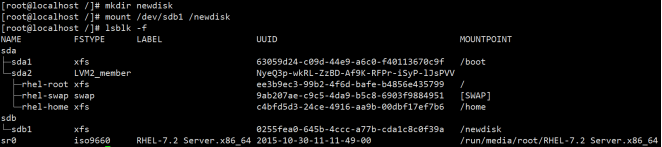
(6) Mount (temporary mount fails after restart)
[root@localhost /]# mkdir newdisk
[root@localhost /]# mount /dev/sdb1 /newdisk
(7) Permanent mount
[root@localhost /]# vim /etc/fstab
 Add:/dev/sdb1        /newdisk        xfs    defaults      0 0
[root@localhost /]# mount -a / / auto mount

6, RPM and YUM package management
1. RPM
The software package management tool of RPM Redhat Package Manager red hat is similar to setup.0 on Windows exe.
The command is as follows: rmp
-i            //install
-v            //Display process
-h            //hash encryption
-e            //uninstall
-q            //see
-a            //All
-p            //software package
-ql           //View the installation file path of the software in the system
-qlp          //View the path of the file generated by the uninstalled software package in the system after installation
-qf           //Find out which installation package this file belongs to according to a file
-qc           //View the profile name of the software
-qd           //View help information for the software
--scripts     //View script
--nodeps      //Installing software ignores software dependencies
--force       //Force software installation
-Kv           //Detect whether the software package has been tampered with
example:
RPM:
[root@localhost ~]# rpm -qa / / find all installed applications
[root@localhost ~]# rpm -qa | grep firefox / / query the application with the specified name
firefox-38.3.0-2.el7_1.x86_64
[root@localhost ~]# rpm -qi firefox / / query the information about the installer
Name        : firefox
Version     : 38.3.0
Release     : 2.el7_1
Architecture: x86_64
Install Date: 2021 Saturday, may 22, 2014 19:31:24
..........
[root@localhost ~]# rpm -ql firefox / / query the files in the package
/usr/bin/firefox
/usr/lib64/firefox
/usr/lib64/firefox/LICENSE
/usr/lib64/firefox/application.ini
..........
Uninstall software:
[root@localhost ~]# rpm -e firefox
Install software:
[root@localhost /]#  cd /run/media/root / / go to the path where the system image is located
[root@localhost root]#  cd RHEL-7.2\ Server.x86_64 / / enter the system processing file
[root@localhost RHEL-7.2 Server.x86_64]# cd Packages / / enter the package folder in the system image
[root@localhost Packages]# ls -l firefox-38.3.0-2.el7_1.x86_64.rpm / / view the Firefox installation package
-r--r--r--. 150 root root 74994236 9 January 21, 2015 firefox-38.3.0-2.el7_1.x86_64.rpm
[root@localhost Packages]# cp firefox-38.3.0-2.el7_1.x86_64.rpm /opt / / copy the Firefox installation package to / opt
[root@localhost Packages]# cd /opt / / enter the opt directory
[root@localhost opt]# rpm -ivh firefox-38.3.0-2.el7_1.x86_64.rpm / / install Firefox
 Warning: firefox-38.3.0-2.el7_1.x86_64.rpm: head V3 RSA/SHA256 Signature, secret key ID fd431d51: NOKEY
 In preparation...                          ################################# [100%]
Upgrading/install...
   1:firefox-38.3.0-2.el7_1           ##########################         ( 13%)
2. YUM
YUM's RPM based package management command can download and execute RPM packages from the specified server (specified local). It can automatically handle the dependencies between some packages and install them in turn.
The command is as follows: yum
yum: clean all              //Clear the original yum cache
     repolist               //List warehouse information
     install software       //Install software
     update                 //to update
     list installed         //List installed
     list available         //Installable software
     list all               //List all software
     reinstall software     //Reinstall the software
     remove software        //Uninstall software
     info dhcp              //View dhcp information
     search dhcp            //Software information search, search according to keywords
     whatprovides file      //Find the software containing this file according to the file
 Install software group:
yum: groups list             //List software groups
     groups info             //View software group information
     groups install sfgroup  //Install software group
     groups remove sfgroup   //Uninstall software group
example:
//View which packages can be installed on the current YUM source
[root@localhost opt]# yum list
[root@localhost opt]# yum list | grep firefox
firefox.x86_64                          38.3.0-2.el7_1             @anaconda/7.2
[root@localhost opt]# rpm -e firefox / / remove the local Firefox
[root@localhost opt]# yum install firefox-38.3.0-2.el7_1.x86_64.rpm / / install Firefox browser from YUM source
 Plug in loaded: langpacks, product-id, search-disabled-repos, subscription-
          : manager
This system is not registered to Red Hat Subscription Management. You can use subscription-manager to register.
Checking firefox-38.3.0-2.el7_1.x86_64.rpm: firefox-38.3.0-2.el7_1.x86_64
firefox-38.3.0-2.el7_1.x86_64.rpm Will be installed
3 RSA/SHA256 Signature, key ID fd431d51: NOKEY
In preparation... ######################################################[100%]
Upgrading / installing
1:firefox-38.3.0-2.el7_1 ########################## ( 13%)
#### 2. YUM
YUM be based on RPM A package management command can be downloaded from the specified server (specified local) RPM Package and execution, you can automatically handle the dependencies between some packages and install them in turn.
The command is as follows: yum
```shell
yum: clean all //Clear the original yum cache
repolist //List warehouse information
install software //Install software
update //to update
list installed //List installed
list available //Installable software
list all //List all software
reinstall software //Reinstall the software
remove software //Uninstall software
info dhcp //View dhcp information
search dhcp //Software information search, search according to keywords
whatprovides file //Find the software containing this file according to the file
Install software group:
yum: groups list //List software groups
groups info //View software group information
groups install sfgroup //Install software group
groups remove sfgroup //Uninstall software group
example:
//View which packages can be installed on the current YUM source
[root@localhost opt]# yum list
[root@localhost opt]# yum list | grep firefox
firefox.x86_64                          38.3.0-2.el7_1             @anaconda/7.2
[root@localhost opt]# rpm -e firefox / / remove the local Firefox
[root@localhost opt]# yum install firefox-38.3.0-2.el7_1.x86_64.rpm / / install Firefox browser from YUM source
 Plug in loaded: langpacks, product-id, search-disabled-repos, subscription-
          : manager
This system is not registered to Red Hat Subscription Management. You can use subscription-manager to register.
Checking firefox-38.3.0-2.el7_1.x86_64.rpm: firefox-38.3.0-2.el7_1.x86_64
firefox-38.3.0-2.el7_1.x86_64.rpm Will be installed