catalogue
6 delete the selected function
6.1 delete the selected logic diagram
7.1 analysis and logic diagram
8 complex condition paging query
In order to facilitate future viewing, some interfaces and functions of this small project are analyzed and summarized
1 login
Generally, at the beginning, there will be a login interface to realize some login functions
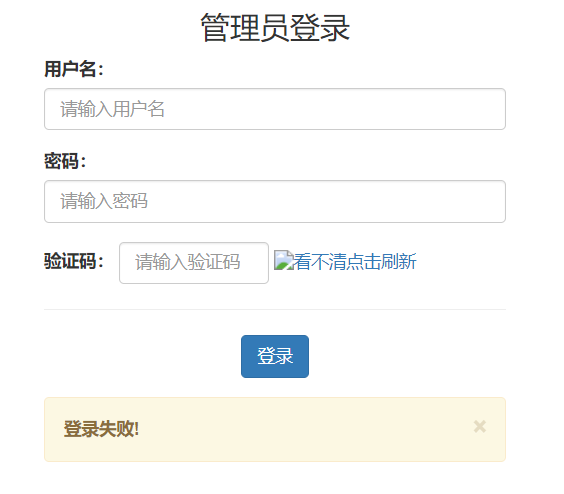
1.1 login interface
The following shows the login jsp page. The code is an html interface. It will be modified into a jsp page, which can be modified based on it in the future
html page display
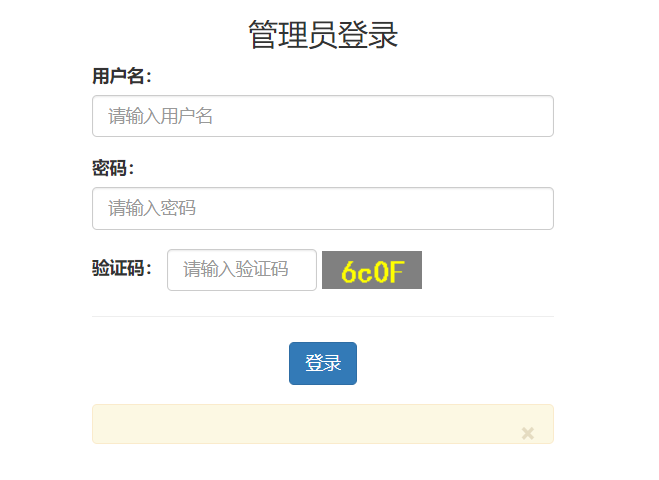
Modified jsp page display
html interface code
<!DOCTYPE html>
<html lang="zh-CN">
<head>
<meta charset="utf-8"/>
<meta http-equiv="X-UA-Compatible" content="IE=edge"/>
<meta name="viewport" content="width=device-width, initial-scale=1"/>
<title>Administrator login</title>
<!-- 1. Import CSS Global style for -->
<link href="css/bootstrap.min.css" rel="stylesheet">
<!-- 2. jQuery Import, 1 is recommended.9 Version above -->
<script src="js/jquery-2.1.0.min.js"></script>
<!-- 3. Import bootstrap of js file -->
<script src="js/bootstrap.min.js"></script>
<script type="text/javascript">
</script>
</head>
<body>
<div class="container" style="width: 400px;">
<h3 style="text-align: center;">Administrator login</h3>
<form action="login" method="post">
<div class="form-group">
<label for="user">user name:</label>
<input type="text" name="user" class="form-control" id="user" placeholder="enter one user name"/>
</div>
<div class="form-group">
<label for="password">password:</label>
<input type="password" name="password" class="form-control" id="password" placeholder="Please input a password"/>
</div>
<div class="form-inline">
<label for="vcode">Verification Code:</label>
<input type="text" name="verifycode" class="form-control" id="verifycode" placeholder="Please enter the verification code" style="width: 120px;"/>
<a href="javascript:refreshCode()"><img src="vcode" title="Can't see clearly, click refresh" id="vcode"/></a>
</div>
<hr/>
<div class="form-group" style="text-align: center;">
<input class="btn btn btn-primary" type="submit" value="Sign in">
</div>
</form>
<!-- Error message box -->
<div class="alert alert-warning alert-dismissible" role="alert">
<button type="button" class="close" data-dismiss="alert" >
<span>×</span></button>
<strong>Login failed!</strong>
</div>
</div>
</body>
</html>A verification code Servlet is added on the basis of the original. There are many ways to copy, which will not be shown here
 Here, we improve the refreshCode() method of javascript and modify the path of src

Method perfection
<script type="text/javascript">
        function refreshCode() {
            //1. Get verification code picture object
            var vcode = document.getElementById("vcode");
            //2. Set src attribute and add time stamp
            vcode.src="${pageContext.request.contextPath}/checkCodeServlet?time="+new Date().getTime();
        }
    </script>
1.2 Servlet
Accept the form information, process the data, feed back the information to the login interface, and jump to the index interface after successful login
//1. Set code
request.setCharacterEncoding("utf-8");
//2. Obtain data
//2.1 obtain the verification code entered by the user
String verifycode = request.getParameter("verifycode");
//2.2 obtain the automatically generated verification code
String checkcode = (String)request.getSession().getAttribute("CHECKCODE_SERVER");
//Ensure that the verification code is one-time
request.getSession().removeAttribute("CHECKCODE_SERVER");
//2.2 case ignored in verification code verification
if (!checkcode.equalsIgnoreCase(verifycode)){
//Incorrect, jump prompt
request.setAttribute("login_msg","Verification code error");
//request.removeAttribute("login_msg");
//web add/
request.getRequestDispatcher("/login.jsp").forward(request,response);
return;
}
//2.3 obtaining all data
Map<String, String[]> map = request.getParameterMap();
//3. Encapsulation object
User user = new User();
try {
BeanUtils.populate(user,map);
} catch (IllegalAccessException e) {
e.printStackTrace();
} catch (InvocationTargetException e) {
e.printStackTrace();
}
//4. Call the service method
UserServiceImpl userService = new UserServiceImpl();
User login = userService.login(user);
//5. Judgment
if (login!=null){
//success
request.getSession().setAttribute("user",login);
response.sendRedirect(request.getContextPath()+"/index.jsp");
}
else {
//fail
//Incorrect, jump prompt
request.setAttribute("login_msg","Wrong user name or password");
//web add/
request.getRequestDispatcher("/login.jsp").forward(request,response);
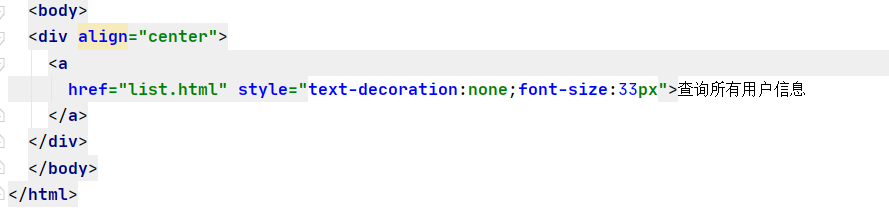
}2 index interface

html code
Modify to jsp page
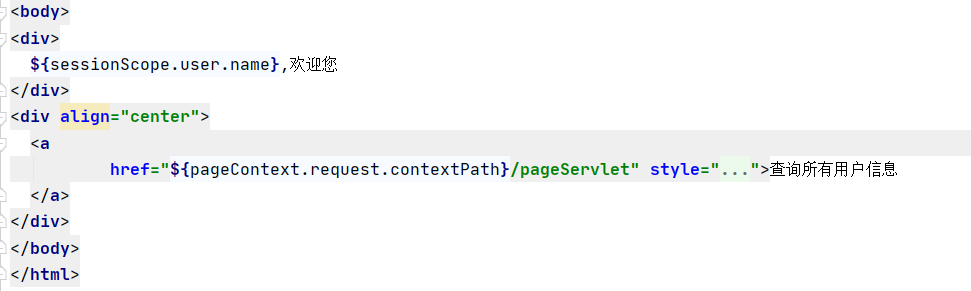 Get the user in the session domain in the servlet above
The display result is

After that, it will jump to pageServlet for data processing, and then forward to list JSP page display
pageServlet code
 request.setCharacterEncoding("utf-8");
        //Gets the number of pages and rows
        String currentPage = request.getParameter("currentPage");
        String rows = request.getParameter("rows");
        //Judge whether the two parameters are empty
        if (currentPage==null||"".equals(currentPage)){
            currentPage="1";
        }
        if (rows==null||"".equals(rows)){
            rows="5";
        }
        //Get condition query
        Map<String, String[]> condition = request.getParameterMap();

        //Call the service method
        UserServiceImpl userService = new UserServiceImpl();
        PageBean<User> pb = userService.findUserByPage(currentPage, rows,condition);

        //System.out.println(pb);

        //Save to request field
        request.setAttribute("pb",pb);
        request.setAttribute("condition",condition);

        //forward
        request.getRequestDispatcher("/list.jsp").forward(request,response);
list interface display
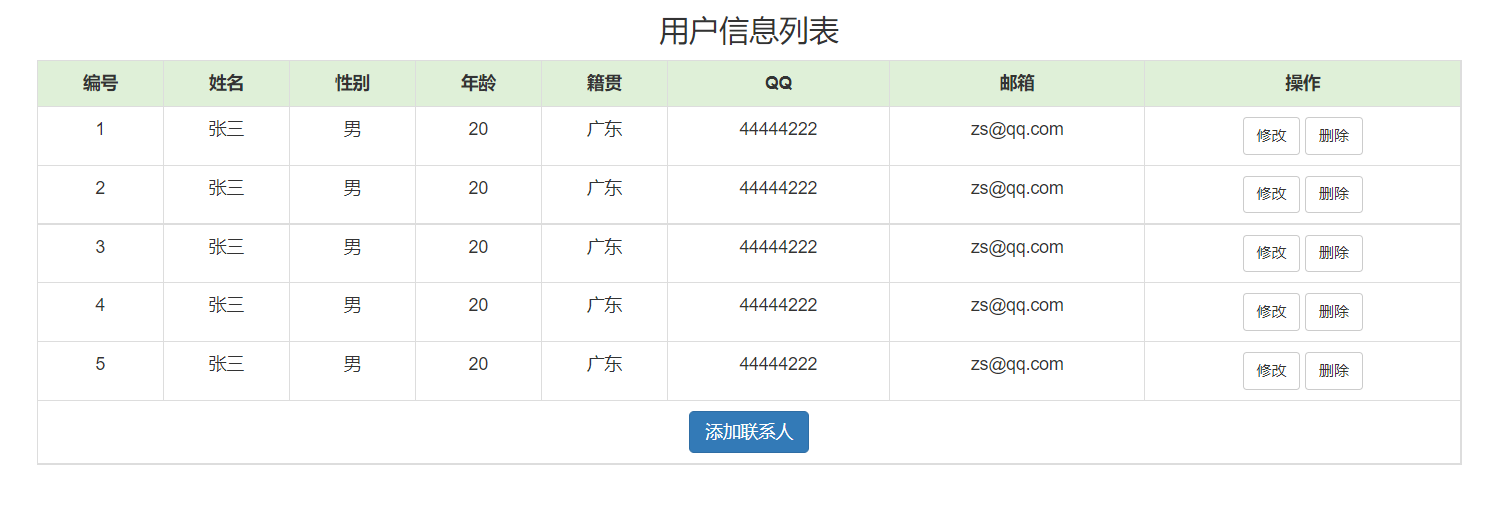
list.html code
<!DOCTYPE html>
<!-- Language of the web page -->
<html lang="zh-CN">
<head>
<!-- Specify character set -->
<meta charset="utf-8">
<!-- use Edge The latest browser rendering -->
<meta http-equiv="X-UA-Compatible" content="IE=edge">
<!-- viewport Viewport: the web page can be automatically adapted according to the set width. A container is virtual inside the browser, and the width of the container is the same as that of the device.
width: The default width is the same as the width of the device
initial-scale: The initial zoom ratio is 1:1 -->
<meta name="viewport" content="width=device-width, initial-scale=1">
<!-- Above 3 meta label*must*Put it first, anything else*must*Follow! -->
<title>User information management system</title>
<!-- 1. Import CSS Global style for -->
<link href="css/bootstrap.min.css" rel="stylesheet">
<!-- 2. jQuery Import, 1 is recommended.9 Version above -->
<script src="js/jquery-2.1.0.min.js"></script>
<!-- 3. Import bootstrap of js file -->
<script src="js/bootstrap.min.js"></script>
<style type="text/css">
td, th {
text-align: center;
}
</style>
</head>
<body>
<div class="container">
<h3 style="text-align: center">User information list</h3>
<table border="1" class="table table-bordered table-hover">
<tr class="success">
<th>number</th>
<th>full name</th>
<th>Gender</th>
<th>Age</th>
<th>Native place</th>
<th>QQ</th>
<th>mailbox</th>
<th>operation</th>
</tr>
<tr>
<td>1</td>
<td>Zhang San</td>
<td>male</td>
<td>20</td>
<td>Guangdong</td>
<td>44444222</td>
<td>zs@qq.com</td>
<td><a class="btn btn-default btn-sm" href="update.html">modify</a> <a class="btn btn-default btn-sm" href="">delete</a></td>
</tr>
<tr>
<td>2</td>
<td>Zhang San</td>
<td>male</td>
<td>20</td>
<td>Guangdong</td>
<td>44444222</td>
<td>zs@qq.com</td>
<td><a class="btn btn-default btn-sm" href="update.html">modify</a> <a class="btn btn-default btn-sm" href="">delete</a></td>
</tr>
<tr>
<td>3</td>
<td>Zhang San</td>
<td>male</td>
<td>20</td>
<td>Guangdong</td>
<td>44444222</td>
<td>zs@qq.com</td>
<td><a class="btn btn-default btn-sm" href="update.html">modify</a> <a class="btn btn-default btn-sm" href="">delete</a></td>
</tr>
<tr>
<td>4</td>
<td>Zhang San</td>
<td>male</td>
<td>20</td>
<td>Guangdong</td>
<td>44444222</td>
<td>zs@qq.com</td>
<td><a class="btn btn-default btn-sm" href="update.html">modify</a> <a class="btn btn-default btn-sm" href="">delete</a></td>
</tr>
<tr>
<td>5</td>
<td>Zhang San</td>
<td>male</td>
<td>20</td>
<td>Guangdong</td>
<td>44444222</td>
<td>zs@qq.com</td>
<td><a class="btn btn-default btn-sm" href="update.html">modify</a> <a class="btn btn-default btn-sm" href="">delete</a></td>
</tr>
<tr>
<td colspan="8" align="center"><a class="btn btn-primary" href="add.html">Add a Contact </a></td>
</tr>
</table>
</div>
</body>
</html>
After all the functions are improved, it will be improved step by step
3. Add function
Click add contact to jump to the add interface add jsp
3.1 add logic diagram

Generally, the servlet acts as the controller to obtain the data from the client browser (that is, on the page), encapsulate it, call the service, and finally jump. The service acts as the business logic layer, generally performs logical operation on the data, and the Dao acts as the data processing layer, generally interacts with the database to obtain the data, and finally displays the data on the page
3.2 code modification
Added html code
<!-- HTML5 file-->
<!DOCTYPE html>
<!-- Language of the web page -->
<html lang="zh-CN">
<head>
<!-- Specify character set -->
<meta charset="utf-8">
<!-- use Edge The latest browser rendering -->
<meta http-equiv="X-UA-Compatible" content="IE=edge">
<!-- viewport Viewport: the web page can be automatically adapted according to the set width. A container is virtual inside the browser, and the width of the container is the same as that of the device.
width: The default width is the same as the width of the device
initial-scale: The initial zoom ratio is 1:1 -->
<meta name="viewport" content="width=device-width, initial-scale=1">
<!-- Above 3 meta label*must*Put it first, anything else*must*Follow! -->
<title>Add user</title>
<!-- 1. Import CSS Global style for -->
<link href="css/bootstrap.min.css" rel="stylesheet">
<!-- 2. jQuery Import, 1 is recommended.9 Version above -->
<script src="js/jquery-2.1.0.min.js"></script>
<!-- 3. Import bootstrap of js file -->
<script src="js/bootstrap.min.js"></script>
</head>
<body>
<div class="container">
<center><h3>Add contact page</h3></center>
<form action="" method="post">
<div class="form-group">
<label for="name">full name:</label>
<input type="text" class="form-control" id="name" name="name" placeholder="Please enter your name">
</div>
<div class="form-group">
<label>Gender:</label>
<input type="radio" name="sex" value="male" checked="checked"/>male
<input type="radio" name="sex" value="female"/>female
</div>
<div class="form-group">
<label for="age">Age:</label>
<input type="text" class="form-control" id="age" name="age" placeholder="Please enter age">
</div>
<div class="form-group">
<label for="address">Native place:</label>
<select name="address" class="form-control" id="jiguan">
<option value="Guangdong">Guangdong</option>
<option value="Guangxi">Guangxi</option>
<option value="Hunan">Hunan</option>
</select>
</div>
<div class="form-group">
<label for="qq">QQ: </label>
<input type="text" class="form-control" name="qq" placeholder="Please enter QQ number"/>
</div>
<div class="form-group">
<label for="email">Email: </label>
<input type="text" class="form-control" name="email" placeholder="Please enter email address"/>
</div>
<div class="form-group" style="text-align: center">
<input class="btn btn-primary" type="submit" value="Submit" />
<input class="btn btn-default" type="reset" value="Reset" />
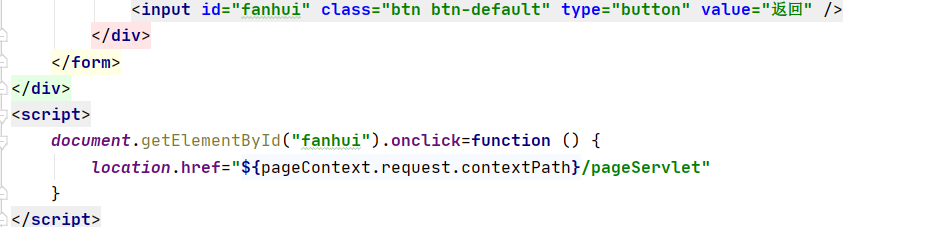
<input class="btn btn-default" type="button" value="return" />
</div>
</form>
</div>
</body>
</html>After completing the data filling in the add page, submit the form to addServlet for data processing

The reset function is not perfect. The return is perfect. Add a click event according to the id and jump to the list page
3.3 addUserServlet
        //1. Set code
        request.setCharacterEncoding("utf-8");
        //2. Obtain data
        Map<String, String[]> map = request.getParameterMap();
        //3. Encapsulation object
        User user = new User();
        try {
            BeanUtils.populate(user,map);
        } catch (IllegalAccessException e) {
            e.printStackTrace();
        } catch (InvocationTargetException e) {
            e.printStackTrace();
        }
        //4. Call the service method
        UserServiceImpl userService = new UserServiceImpl();
        userService.addUser(user);
        //5. Jump to userListServlet
        response.sendRedirect(request.getContextPath()+"/pageServlet");
4 delete function
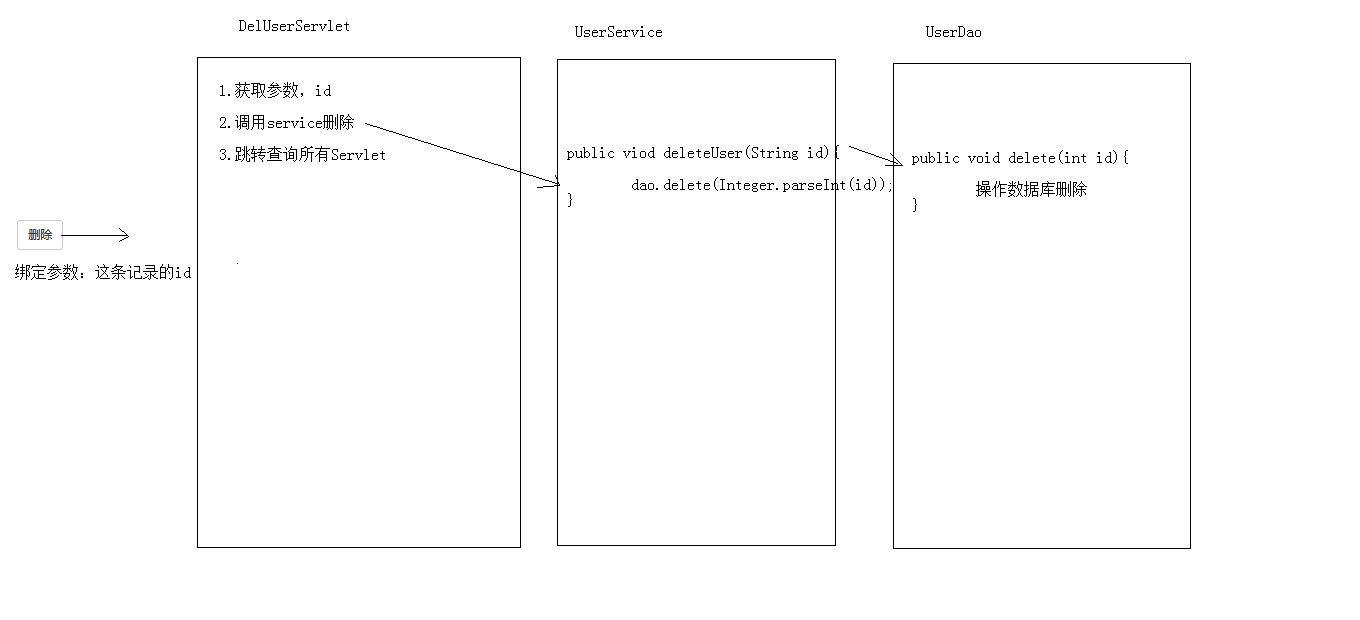
4.1 delete logic diagram
To complete the dynamic display of data, use the for loop to modify the original code
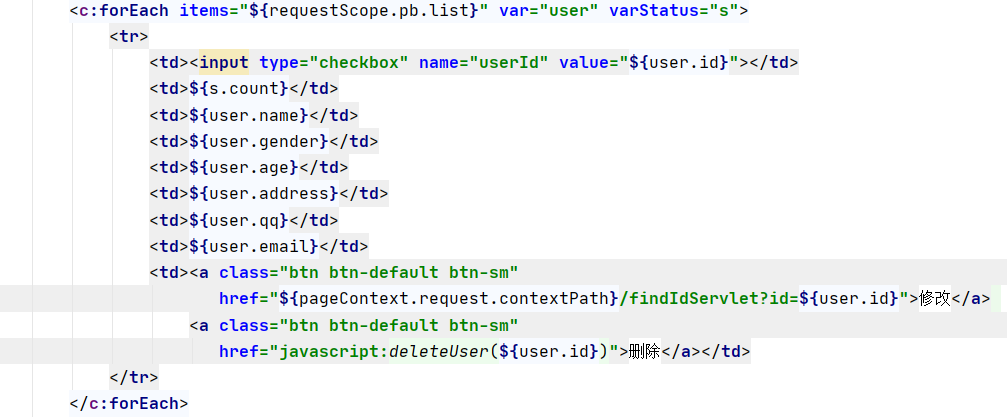
To delete data, pass the unique id of user to the deleteUser method. Click Delete to execute the method
 To ensure that the data is accidentally deleted, add a confirm prompt to the button. After passing the id to delUserServlrt, the data can be deleted
4.2 delUserServlrt
        String[] userIds = request.getParameterValues("userId");

        UserServiceImpl userService = new UserServiceImpl();
        userService.delSelectedUser(userIds);

        response.sendRedirect(request.getContextPath()+"/pageServlet");
new a service object, call the delete method, and jump to the list display page
5 modification function
5.1 modify logic diagram
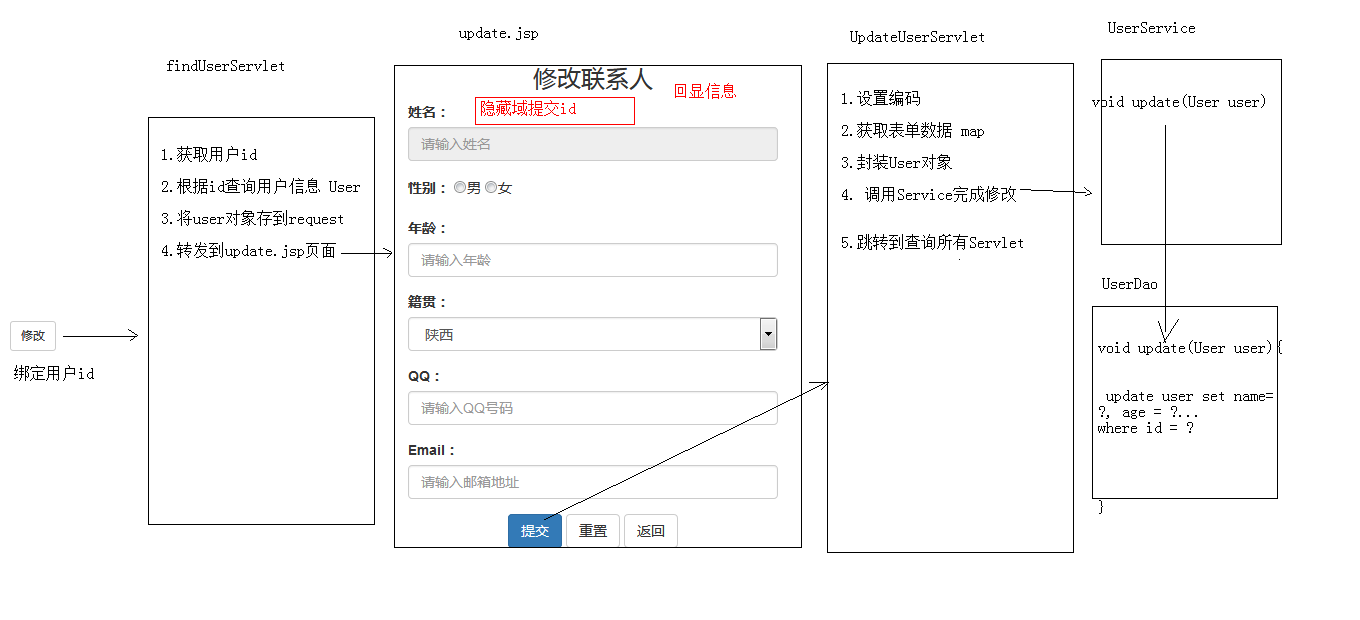
It can be seen from the update page that we submit no id, but modify it in the database and need id to determine it. Therefore, two servlets are used. findUserServlet is the same as the above deletion to obtain the id and forward the id to the update page, so write # findUserServlet first
5.2 findUserServlet
        //1. Obtain data
        String id = request.getParameter("id");

        UserServiceImpl userService = new UserServiceImpl();
        User user = userService.findUserById(id);

        //System.out.println(user);

        //Save user in request
        request.setAttribute("user",user);

        request.getRequestDispatcher("/update.jsp").forward(request,response);
Because the message is echoed in the form, that is, the information of the data before modification is displayed, all the information is obtained and saved in the request field while obtaining the id
5.3 udate html page code
<!DOCTYPE html>
<!-- Language of the web page -->
<html lang="zh-CN">
    <head>
    	<base href="<%=basePath%>"/>
        <!-- Specify character set -->
        <meta charset="utf-8">
        <meta http-equiv="X-UA-Compatible" content="IE=edge">
        <meta name="viewport" content="width=device-width, initial-scale=1">
        <title>Modify user</title>

        <link href="css/bootstrap.min.css" rel="stylesheet">
        <script src="js/jquery-2.1.0.min.js"></script>
        <script src="js/bootstrap.min.js"></script>

    </head>
    <body>
        <div class="container" style="width: 400px;">
        <h3 style="text-align: center;">Modify contact</h3>
        <form action="" method="post">
          <div class="form-group">
            <label for="name">full name:</label>
            <input type="text" class="form-control" id="name" name="name"  readonly="readonly" placeholder="Please enter your name" />
          </div>

          <div class="form-group">
            <label>Gender:</label>
              <input type="radio" name="sex" value="male"  />male
                <input type="radio" name="sex" value="female"  />female
          </div>

          <div class="form-group">
            <label for="age">Age:</label>
            <input type="text" class="form-control" id="age"  name="age" placeholder="Please enter age" />
          </div>

          <div class="form-group">
            <label for="address">Native place:</label>
             <select name="address" class="form-control" >
                <option value="Guangdong">Guangdong</option>
                <option value="Guangxi">Guangxi</option>
                <option value="Hunan">Hunan</option>
            </select>
          </div>

          <div class="form-group">
            <label for="qq">QQ: </label>
            <input type="text" class="form-control" name="qq" placeholder="Please enter QQ number"/>
          </div>

          <div class="form-group">
            <label for="email">Email: </label>
            <input type="text" class="form-control" name="email" placeholder="Please enter email address"/>
          </div>

             <div class="form-group" style="text-align: center">
                <input class="btn btn-primary" type="submit" value="Submit" />
                <input class="btn btn-default" type="reset" value="Reset" />
                <input class="btn btn-default" type="button" value="return"/>
             </div>
        </form>
        </div>
    </body>
</html>
Echo information modification

Add a value attribute, just like other locations
Note: the name attribute is required for form submission, otherwise the data cannot be obtained
You can see the submission without id in the form, and the user can't see the id, so you need to write a hidden field
Note: form submission only submits the fields in the form. Hidden fields can be written anywhere in the form, but not outside the form

5.4 updateUserServlet
        request.setCharacterEncoding("utf-8");
        Map<String, String[]> map = request.getParameterMap();
        User user = new User();
        try {
            BeanUtils.populate(user,map);
        } catch (IllegalAccessException e) {
            e.printStackTrace();
        } catch (InvocationTargetException e) {
            e.printStackTrace();
        }

        //System.out.println(user);

        UserServiceImpl userService = new UserServiceImpl();
        userService.updateUser(user);

        response.sendRedirect(request.getContextPath()+"/pageServlet");
6 delete the selected function
6.1 delete the selected logic diagram
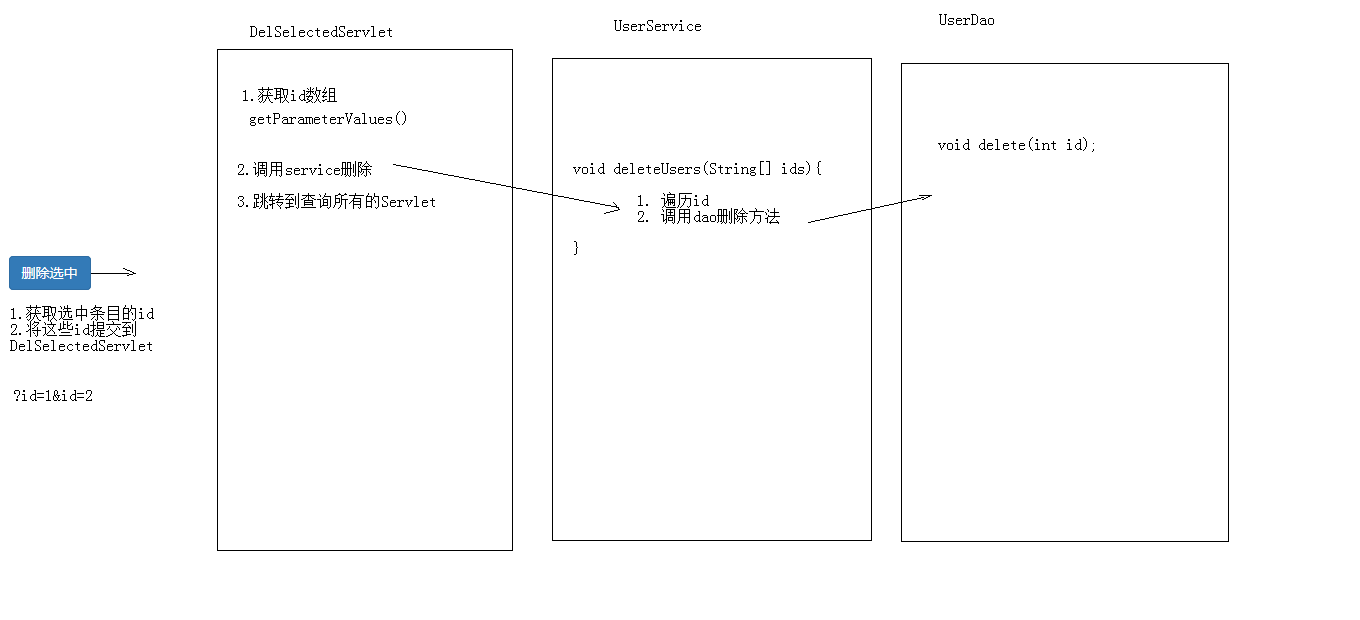
The most important thing is to get the selected id and submit it to the DeletedServlet
First complete a function, select all and deselect all
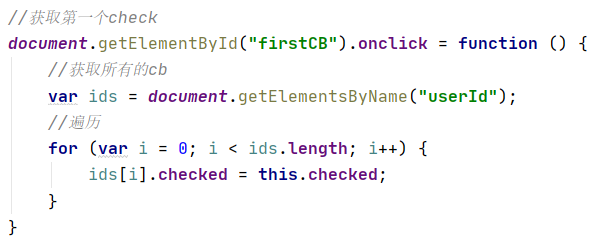
6.2 select all or none
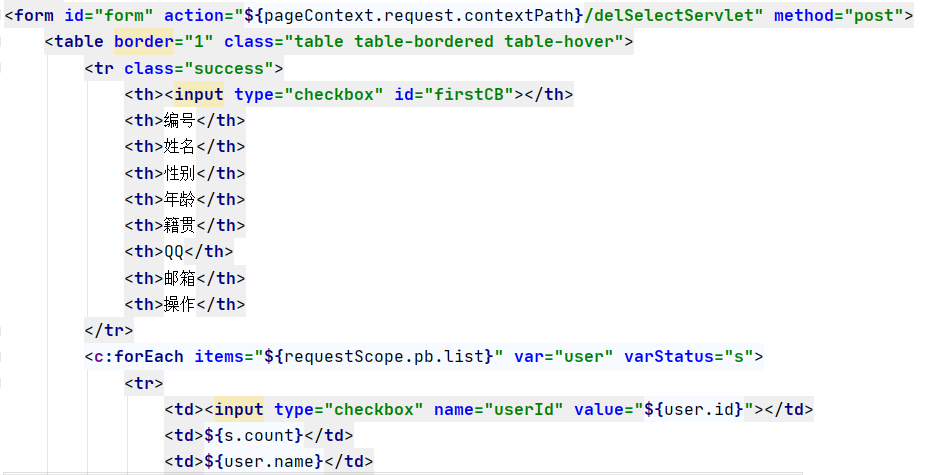
Add a checkbox in front of each line and write a method according to id=firstCB
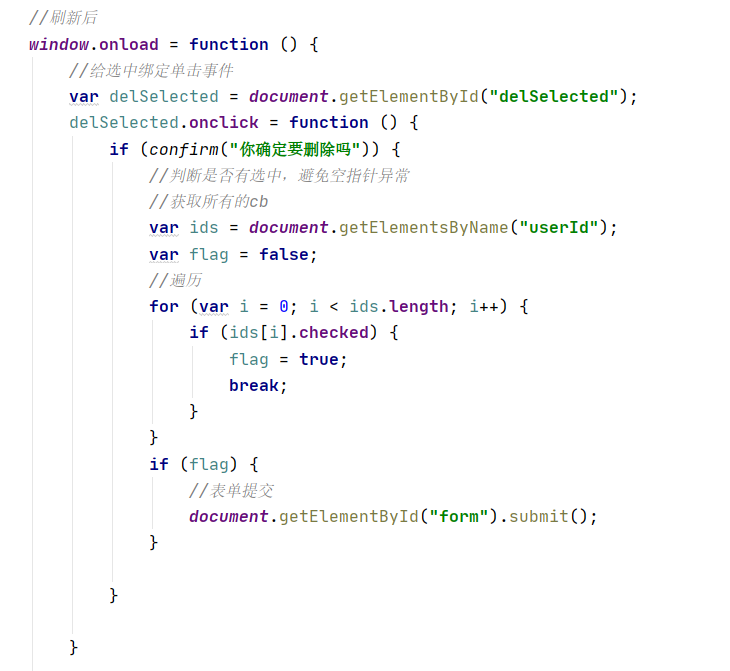
6.2 delete selected
Bind a click event to the delete selected button and submit the id array
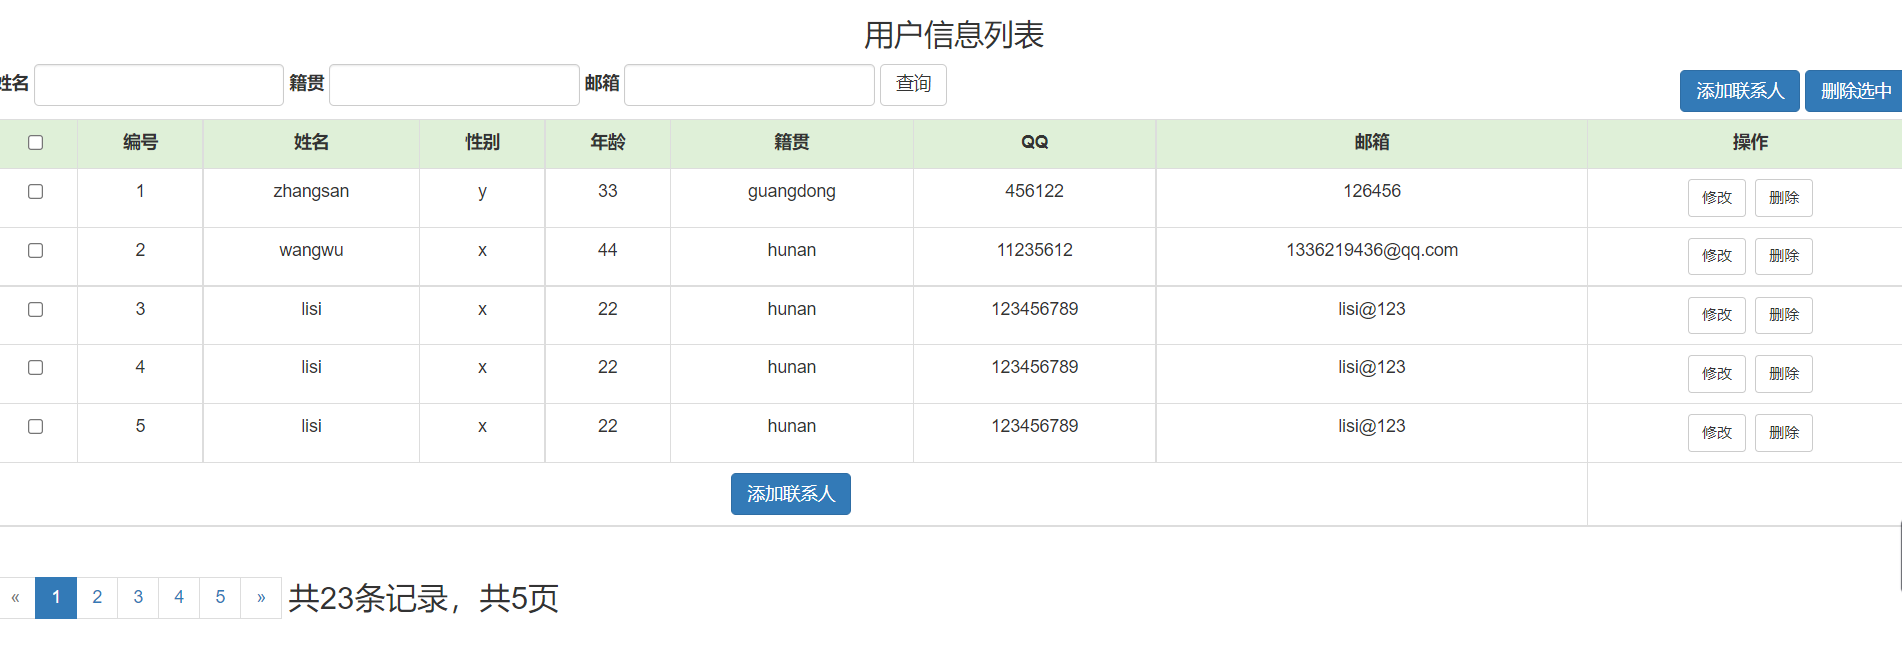
7 paging query
7.1 analysis and logic diagram
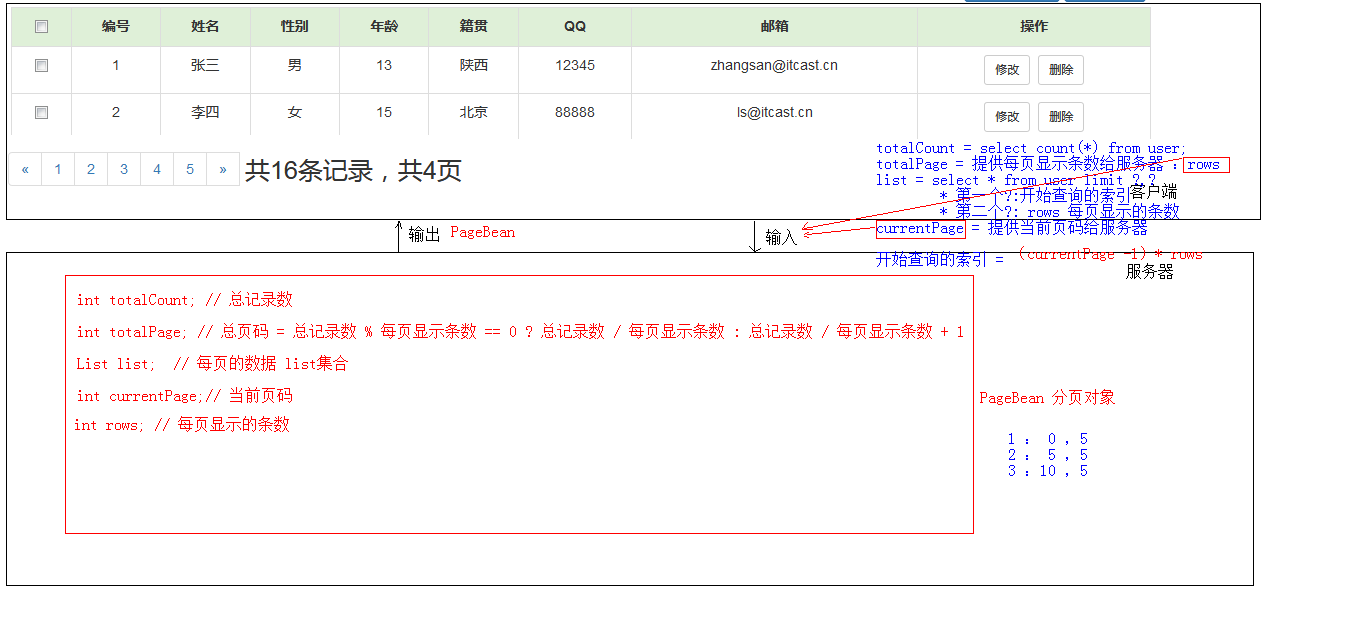

Paging, you can write according to this routine in the future. First, you need to write an entity class to store the above five kinds of data
7.2. PageBean entity class
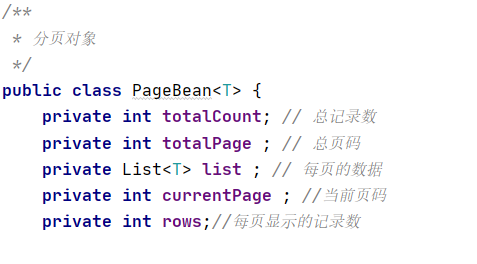
After analysis, we only need to know the current number of pages and the number of display lines per page to get the remaining three data
7.3 pagination display
Dynamically generate the number of pages through the for loop, give a default number of lines per page, and then give a judgment that is selected and activated
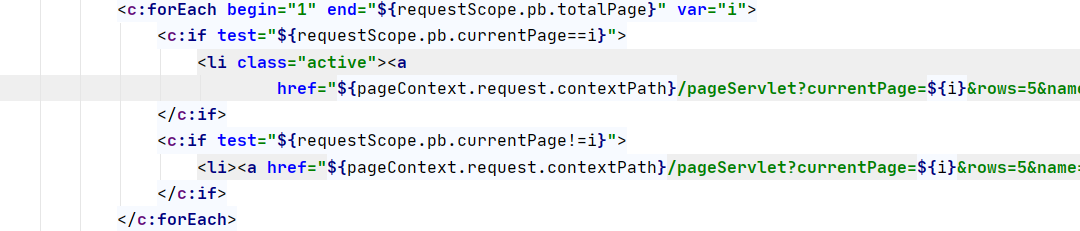
Text prompt after the number of pages

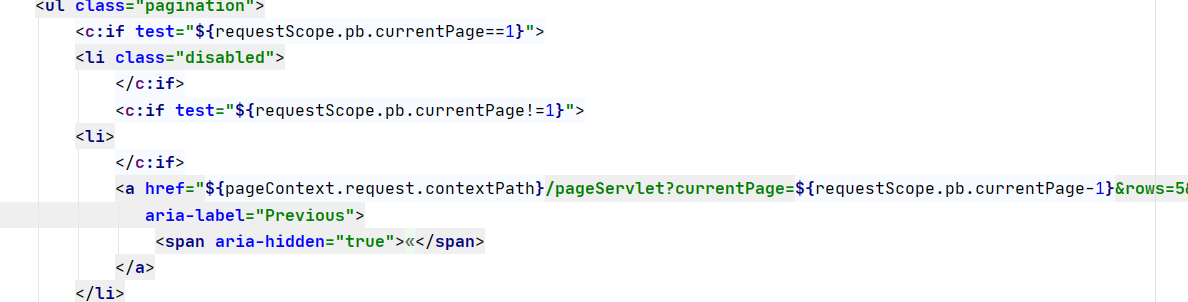
Give the previous page and the next page a non clickable prompt on the first page and the last page, and it is still the first page or the last page after clicking
7.4 service method
    @Override
    public PageBean<User> findUserByPage(String _currentPage, String _rows, Map<String, String[]> condition) {
        int currentPage = Integer.parseInt(_currentPage);
        int rows = Integer.parseInt(_rows);

        if (currentPage<=0){
            currentPage=1;
        }

        PageBean<User> pb = new PageBean<>();
        //Set parameters
        pb.setRows(rows);

        //Total number of queries
        int totalCount = userDao.findTotalCount(condition);
        pb.setTotalCount(totalCount);
        //Query list collection
        int start=(currentPage-1)*rows;
        List<User> list = userDao.findByPage(start, rows,condition);
        pb.setList(list);
        //Calculate total pages
        int totalPage=totalCount%rows==0?totalCount/rows:(totalCount/rows)+1;
        pb.setTotalPage(totalPage);

        pb.setCurrentPage(currentPage);

        return pb;
    }
8 complex condition paging query
8.1 analysis chart
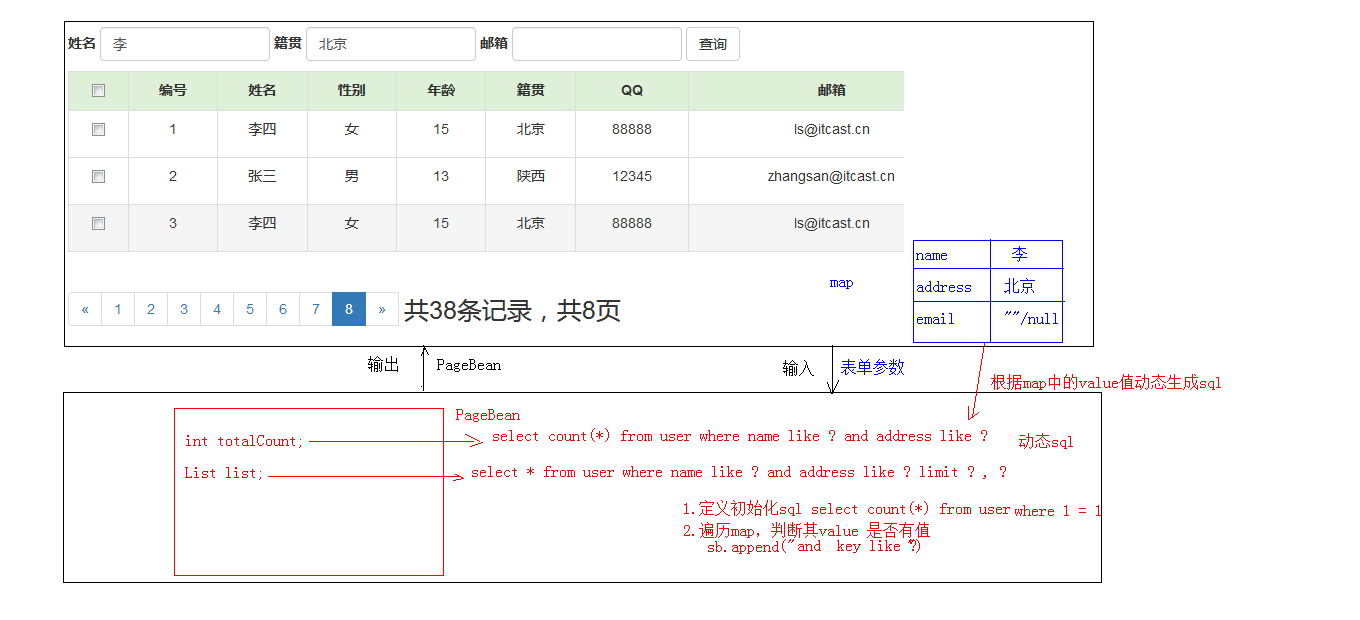
The most important thing is to write sql statements
8.2 sql statement
  @Override
    public int findTotalCount(Map<String, String[]> condition) {
        //Define template initialization sql
        String sql="select count(*) from user where 1=1 ";
        //Traversal map
        StringBuilder sb = new StringBuilder(sql);
        Set<String> keySet = condition.keySet();

        ArrayList<Object> list = new ArrayList<>();
        for (String key:keySet
             ) {
            if ("currentPage".equals(key)||"rows".equals(key)){
                continue;
            }
            String value = condition.get(key)[0];
            if (value!=null&&!"".equals(value)){
                //Valuable
                //Note that more spaces can be added to sql statements
                sb.append(" and "+key+" like ? ");
                //Deposit? Value of
                list.add("%"+value+"%");
            }
        }
        return template.queryForObject(sb.toString(),Integer.class,list.toArray());
    }

    @Override
    public List<User> findByPage(int start, int rows, Map<String, String[]> condition) {
        String sql="select * from user where 1=1 ";
        //Traversal map
        StringBuilder sb = new StringBuilder(sql);
        Set<String> keySet = condition.keySet();

        ArrayList<Object> list = new ArrayList<>();
        for (String key:keySet
        ) {
            if ("currentPage".equals(key)||"rows".equals(key)){
                continue;
            }
            String value = condition.get(key)[0];
            if (value!=null&&!"".equals(value)){
                //Valuable
                //Note that more spaces can be added to sql statements
                sb.append(" and "+key+" like ? ");
                //Deposit? Value of
                list.add("%"+value+"%");
            }
        }
        //Add paging
        sb.append(" limit ?,?");
        list.add(start);
        list.add(rows);
        sql=sb.toString();

//        System.out.println(sql);
//        System.out.println(list);

        return template.query(sql,new BeanPropertyRowMapper<>(User.class),list.toArray());
    }
There are many details in writing this small project. If you don't pay attention to it, you will report an error. You still have to write it slowly and read it slowly. It may be better after mastering it