Super detailed Git learning notes
The video of Shang Silicon Valley found from station B learned Git, recorded the learning content, and gained a lot
Learning address:
https://www.bilibili.com/video/BV1vy4y1s7k6?p=11&share_source=copy_web
Git introduces distributed version control tools VS centralized version control tools
- What is Git?
The free and open source distributed version control system can quickly and efficiently handle various projects from small to large
- What are the advantages of Git?
Easy to learn, small footprint and fast performance. It has the characteristics of cheap local library, convenient staging area and multiple workflow branches. Its performance is better than version control tools such as Subversion, CVS, Perforce and ClearCase
-
What is version control?
Version control is a system that records changes in file content so that you can view the revision of a specific version in the future
The most important thing of version control is to record the file modification history, so that users can see the historical version and facilitate version switching
(scenario: when I am writing, I am not sure whether the modified next version is better than the previous version. At this time, I need to return the previous version and save a copy of each version of the file. I can easily return to the previous version and realize a simple version control.)
-
Why use version control tools?
Transition from individual development to teamwork
(scenario: during team development, both students need to modify their own part of the content. They download the original content from the company's server and then modify it. When the modification is completed, if both parties upload files and overwrite them, then one student's must be replaced by another student's. at this time, version control tools are needed to Two person modification (combined)
-
Version control tool
-
Centralized version control tool
CVS,SVN(Subversion),VSS...
There is a single centralized management server to save the revised versions of all files, and people working together connect to the server through the client to take out the latest files or submit updates.
-
Benefits: everyone can see what others are doing in the project to a certain extent. The administrator can easily control the permissions of each developer and manage a centralized version control system, which is much easier than maintaining a local database on each client
-
Disadvantages: single point of failure of the central server. If the server cannot work for one hour, no one can submit updates and work together within that hour
-
-
Distributed version control tool
Git,Mercurial,Bazaar,Darcs...
Each client is a code base. Everyone does version control on their own local computer. Before writing code, clone the code from the remote library to their own local library, and then do version control based on their own local library. After writing it on their own computer, push it to the remote library, even if the remote library is gone, You can also do version control on your own computer.
Advantages: everyone has a complete code with history
-
-
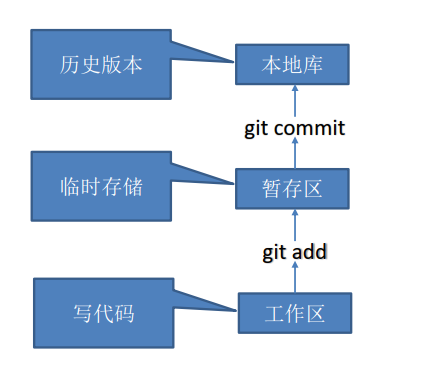
Git working mechanism
Work area (local directory of code storage) - [add to the temporary storage area through git add command] - temporary storage area (after writing code in the work area, it is added to the temporary storage area, and the code of the temporary storage area can be deleted and modified) - [submit to the local library through git commit command, and the code of the local library cannot be deleted and modified] - local library—— [push to remote library through git push command] - remote library
-
Git and code hosting Center
Code hosting center is a remote code warehouse based on Web server
- LAN
- GitLab
- internet
- GitHub (extranet)
- Gitee code cloud (domestic website)
- LAN
Git installation is based on the latest version 2.32.0.2 released on the official website
Git official website: Git (git-scm.com) , you can search directly in the search engine. Usually the first one is Git
Download installation steps:
-
After entering the official website, click Download for Windows on the small computer on the right, and the computer can automatically download Git
-
When the download is complete, open the Git installation file
-
The protocol interface goes directly to the next step
-
After selecting the installation directory, go to the next step
-
Check the Select Components option (just use the default, and then go to the next step directly):
-Additional icons    //create shortcut
--On the Desktop    //On the desktop
-Windows Explorer integration //Right click menu ✔
--Git Bash Here    //Git's command line client ✔
--Git GUI Here    //Git's GUI client (graphical interface) ✔
-Git LFS (Large File Support)    //Large file support ✔
-Associate .git* configuration files with the default text editor    //Configure default editor ✔
-Associate .sh files to be run with Bash    //relation. sh format file ✔
-Check daily for Git for Windows updates    //Check whether Git uses Windows update every day
-(NEW!)Add a Git Bash Profile to Windows Terminal    //(New!) Add Git Bash configuration file to window terminal
-
Select Start Menu Folder select the location of the start menu and click next
-
Choosing the default editor used by Git selects the default editor and decides the next step according to your own situation (Vim used in the video can also use your own familiar editor)
-
Adjusting the name of the initial branch in new repositories let Git decide by default whether to modify the name of the initial branch in new repositories
-Let Git decide    //Let Git decide to use master as the name no matter which library is created in the future (default)

-Override the default branch name for new repositories   //Custom initialization branch name
-
Adjusting your PATH environment whether you want to modify environment variables depends on your own situation. Next step
-Use Git from Git Bash only    //Only use git in Git Bash client (environment variables will not be modified) (default)
-Git from the command line and also from 3rd-party software    //Git can be used in Git Bash or in the console of third-party software
-Use Git and optional Unix tools from the command Prompt    //Some Windows tools will be modified (generally not selected)
-
Choosing HTTPS transport backend: select the background client connection protocol. The default is OpenSSL. The next step is
-Use the OpenSSL library    //Connect using OpenSSL protocol
-Use the native Windows Secure Channel library
-
Configuring the line ending conversion configures the line break character at the end of the line. By default, select the first line to go to the next step
-Check Windows-style ,cimmit Unix-style line endings    //Auto select style
-Checkout as-is ,commit Unix-style line endings
-Checkout as-is ,commit as-is
-
Configuring the terminal emulator to use with Git Bash
-Use MinTTY(the default terminal of MSYS2)
-Use Windows' default console window    //This requires the dos command
-
**Choose the default behavior of git pull * * select the default behavior of pulling code from the remote library to the local library, and go to the next step by default
-Default(fast-forward or merge)
-Rebase
-Only ever fast-forward
-
Choose a credential helper credential manager select the first next step
-Git Credential Manager Core    //Select a cross platform credential manager
-Git Credential Manager    //Credential manager selection for windows
-None
-
Configuring extra options
-Enable file system caching    //Use the file caching mechanism, which is checked by default
-Enable symbolic links    //Use symbolic connection, check
-
Configuring experimental options is not checked in the lab features video and then installed
-Enable experimental support for pseudo consoles    //Allow third-party programs to run in Git Bash
-Enable experimental built-in file system monitor    //Enable the built-in file system monitor in the experiment (the built-in file system monitor is automatically allowed to speed up the common operations in the work tree containing many files, such as' Git status', 'Git add', 'Git commit', etc. the Git version in this video is not available and should be checked
-
Then the installation is completed. After the installation is completed, right-click on the desktop to see the shortcut menu of Git
Git command based on the development case, learn more about the common commands of GIT
| Command name | effect |
|---|---|
| git config --global user.name username | Set user signature |
| git config --global user.email mailbox | Set user signature |
| git init | Initialize local library |
| git status | View local library status |
| git add file name | Add to staging area |
| git rm --cached file name | Delete staging area file |
| git commit -m "log information" file name | Commit to local library |
| git reflog | View history |
| git reset --hard version number | Version shuttle |
Set user signature
-
Right click Git Bush Here
-
Enter the following command and press enter (user name and mailbox enter your own user name and mailbox)
git config --global user.name [Write user name here]

git config --global user.email [Write email here]
-
After completion, it can be found in the user directory of user C disk gitconfig contains its own user signature
Note: signature is used to distinguish the identities of different operators. The user's signature information can be seen in the submission information of each version to confirm who made this submission The first time Git is installed, the user signature must be set, otherwise the code cannot be submitted
Note: the user signature here has nothing to do with the account that will log in to GitHub (or other code hosting Center) in the future
Initialize local library
- Right click in the directory where the local library needs to be created to open Git Bush Here
- Enter the command git init and enter
- Then you can see it in the directory git directory. If it is not displayed, you can click the menu bar to view - hidden items
View local library status
After initializing the local library, you can view the status of the local library by using the command git status
If no item is created, it will be displayed
On branch master
No commit yet
nothing to commit (create/copy files and use "git add" to track)
You can create a file in it
Then use git status
It will be displayed at this time (if you find a file that has not been tracked, you need to add the temporary storage area with git add command)
On branch master
No commit yet
Untracked files:
  (use "git add <file>..." to include in what will be committed)
        hello.txt

nothing added to commit but untracked files present (use "git add" to track)
Add staging area
Enter the command git add [enter file name here] my name is git add hello Txt, save the file to the temporary storage area
warning: LF will be replaced by CRLF in hello.txt.
The file will have its original line endings in your working directory
Use git rm --cached [file name] to delete the contents of the temporary storage area. git rm --cached hello txt
After deletion, you can add git add [file name] to the temporary storage area
Submit local library
Use the command git commit -m "log information" file name to submit the files in the staging area to the local library to form a historical version on your computer
git commit -m "first commit" hello.txt
After execution, git status will be displayed
On branch master
nothing to commit, working tree clean
You can view the history through git reflog, which will be displayed after entering
c5b235a (HEAD -> master) HEAD@{0}: commit (initial): first commit
//The first seven digits are the version number of the reduced version and the first seven digits of the version number
//(head - > Master) indicates that the pointer points to the current version
You can view the version details through git log, which will be displayed after entering
commit c5b235add282638e3f41d30ed3ebc2bb7a676f6e (HEAD -> master)  //Version number
Author: zqq <991521874@qq.com>
Date:   Mon Jul 19 16:29:03 2021 +0800

    first commit
Modify file
Modify your own file, save it after modification, and then enter the command git status, which will be displayed
On branch master
Changes not staged for commit:
  (use "git add <file>..." to update what will be committed)
  (use "git restore <file>..." to discard changes in working directory)
        modified:   hello.txt

no changes added to commit (use "git add" and/or "git commit -a")
//It is detected that the file has been modified. You need to add the staging area again and submit the local library
Use git add hello Txt and git commit - M "second commit" hello Txt is displayed as follows
warning: LF will be replaced by CRLF in hello.txt.
The file will have its original line endings in your working directory
[master 622bb3c] second commit
 1 file changed, 1 insertion(+), 1 deletion(-)
At this time, enter git log to view the details of the historical version, as shown below
commit 622bb3c70c8270ff345b61856c77787e8c77d10e (HEAD -> master)
Author: zqq <991521874@qq.com>
Date:   Mon Jul 19 16:41:51 2021 +0800

    second commit

commit c5b235add282638e3f41d30ed3ebc2bb7a676f6e
Author: zqq <991521874@qq.com>
Date:   Mon Jul 19 16:29:03 2021 +0800

    first commit
Version shuttle
Use git reset --hard [version number (the first seven digits are OK)]
First, use git reflog to view the version information and display it
622bb3c (HEAD -> master) HEAD@{0}: commit: second commit    //This points to the second version
c5b235a HEAD@{1}: commit (initial): first commit
Then use git reset --hard c5b235a to point to the first version. At this time, you will find that the contents of the files in the directory have also become the contents of the first version. Use git reflog command to display as follows
c5b235a (HEAD -> master) HEAD@{0}: reset: moving to c5b235a
622bb3c HEAD@{1}: commit: second commit
c5b235a (HEAD -> master) HEAD@{2}: commit (initial): first commit    //This points to the first version
You can switch from the second version to the first version, and you can also switch back to the second version. After cutting, the content of the submitted file will be changed
Branch merge attribute create branch merge operation Git branch merge conflict resolution
What is a branch
During version control, multiple tasks can be promoted at the same time, and separate branches can be created for each task. Using branches means that programmers can separate their work from the development main line. When developing their own branches, they will not affect the operation of the main line branches, (scenario: it can be imagined as a copy. When the main branch has been put into use, and new functions need to be added, copy the content of the main branch as a branch. After the new content is developed on this branch, merge the new branch into the main branch)
Branch operation
| Command name | effect |
|---|---|
| git branch branch name | Create branch |
| git branch -v | View branch |
| git checkout branch name | Switch branch |
| git merge branch name | Merges the specified branch onto the current branch |
-
View branch
The command git branch -v can view the branches, and the results are as follows
master c5b235a first commit
-
Create branch
Command git Branch [branch name] to create a branch. After git branch hot fix, git branch -v results are as follows
  hot-fix c5b235a first commit
* master  c5b235a first commit
-
Switch branch
git is still followed by master, indicating that it is still a master branch
Use git checkout [branch name] to switch branches. First git checkout hot fix, then git branch -v, and you can see that you have switched to the hot fix branch
* hot-fix c5b235a first commit
  master  c5b235a first commit
-
Modify branch
After switching branches, you can modify the contents of the workspace (. Under the directory where the git file is located)
After modification, you need git add [file name] git commit -m "[version information]" [file name]
My side is git add hello txt git commit -m "hot-fix first commit" hello. txt
Then git reflog, you can see that the hot fix branch is pointed to
a6f5eea (HEAD -> hot-fix) HEAD@{0}: commit: hot-fix first commit c5b235a (master) HEAD@{1}: checkout: moving from master to hot-fix c5b235a (master) HEAD@{2}: reset: moving to c5b235a 622bb3c HEAD@{3}: commit: second commit c5b235a (master) HEAD@{4}: commit (initial): first commit -
Merge branch
To merge hot fix into the master branch, first switch to the master branch, and then execute the command git merge hot fix under the master branch to merge hot fix into the master branch
I found the git checkout master after switching Hello. Directory where git directory is located The contents of the txt file become the contents of the previous master, and then git merge hot fix. At this time, it is found that the branches are merged, hello The contents of TXT file become the contents of hot fix
-
Conflict
When merging branches, two branches have two completely different sets of modifications in the same location of the same file. Git can't decide which one to use for us. We must manually decide the content of the new code
Modify the contents of the master branch file first
git add hello.txt, GIT commit - M "master test" hello txt
Then modify the contents of the hot fix branch file
Git checkout hot fix git add hello Txt, GIT commit - M "master test" hello txt
At this time, execute git checkout master, switch to master, and then merge git merge hot fix. The following contents will be displayed
Auto-merging hello.txt
CONFLICT (content): Merge conflict in hello.txt
Automatic merge failed; fix conflicts and then commit the result.
At this time, execute the command git status, and you will be prompted that both files have been modified, so you need to merge the code manually
On branch master You have unmerged paths. (fix conflicts and run "git commit") (use "git merge --abort" to abort the merge) Unmerged paths: (use "git add <file>..." to mark resolution) both modified: hello.txt no changes added to commit (use "git add" and/or "git commit -a") -
Conflict resolution
In case of conflict, after the merge fails, open hello Txt file will be marked in the file, the contents in the file will be merged manually, and then the following merge prompt ` ` ` < < < < head ` ` and its subsequent contents will be deleted. After modification, they will be saved, and then added to the temporary storage area and submitted to the local library. In the (master|MERGING) state, there is no need to write the file name when submitting to realize manual merging
git add hello.txt to the staging area git commit -m "merge test"
Then the manual merge succeeded
Git team collaboration mechanism
Team collaboration
After the basic code is written in the local library of team a, push it to the remote library with the push command
In the team, Party B has the permission granted by Party A. Party B expands and modifies the clone code from the remote library, and then push es it to the remote library
A then uses the pull command to pull the modified code from the remote library, so as to realize the synchronization of team code
Cross team collaboration
If the code in team A encounters problems that cannot be solved, ask Team B for help
Team B
People use the fork command as A branch to copy the remote library code of team A as their own remote library
Team B comes down from its own remote library clone, then modifies its own local library, and then push es it to its own remote library
After team B completes, it needs to pull request to send A request to team A, and then team A reviews it
After review, team A uses merge to merge the code, and then pulls it to the local library to realize cross team collaboration
GitHub
GitHub official website https://github.com
Create remote library
-
1. After logging into GitHub, click the + sign in the upper right corner of the web page and select new repository
-
2. The name of the remote library should be the same as that of the local library (the name of the local library refers to the folder name where the. git folder is located)
After entering the remote library name, it will automatically detect whether it is available
-
3. Public library is the option of private library. Because it is a test, the public library is used by default
-
4. Directly click Create repository at the bottom to create a remote repository
-
5. A page will pop up. You can select the link of remote library. There are two different protocols: HTTPS and SSH
Let's use the HTTPS link first. You can directly click the following button to copy the link
https://github.com/zqq2017123491/git-demo.git
-
The command git remote -v to view the remote library link alias has no alias at this time
-
Commands for creating remote library link aliases
git remote add git-demo https://github.com/zqq2017123491/git-demo.git
At this time, view the alias, and the results are as follows: (two aliases appear, indicating that the alias can be pulled or pushed)
git-demo       https://github.com/zqq2017123491/git-demo.git (fetch)
git-demo       https://github.com/zqq2017123491/git-demo.git (push)
-
Code Push
Basic syntax git push alias branch
For example, if I push the master branch, then git push git demo master
After execution, a window will pop up to let us log in. We can log in with the browser account. After logging in, we will be prompted for authentication
After binding, you will be prompted with Authentication Succeeded. If the authentication is successful, Git Bash will display as follows
Enumerating objects: 24, done.
Counting objects: 100% (24/24), done.
Delta compression using up to 8 threads
Compressing objects: 100% (16/16), done.
Writing objects: 100% (24/24), 1.84 KiB | 471.00 KiB/s, done.
Total 24 (delta 7), reused 0 (delta 0), pack-reused 0
remote: Resolving deltas: 100% (7/7), done.
To https://github.com/zqq2017123491/git-demo.git
 * [new branch]      master -> master
Then you can see the files you pushed in the github library
Pull code
On github, you can directly click the in the upper right corner of the file 🖊 After modifying the file content, you need to enter the version information in the commit changes below and submit it, so that you can start the pull attempt
The code pull command git pull link alias branch. Here is git pull git demo master. The results are as follows. Open it at this time The modified contents can be seen in the file in the directory where Git is located, indicating that the pull is successful
remote: Enumerating objects: 5, done.
remote: Counting objects: 100% (5/5), done.
remote: Compressing objects: 100% (2/2), done.
remote: Total 3 (delta 1), reused 0 (delta 0), pack-reused 0
Unpacking objects: 100% (3/3), 671 bytes | 5.00 KiB/s, done.
From https://github.com/zqq2017123491/git-demo
 * branch            master     -> FETCH_HEAD
   26143e9..0e77469  master     -> git-demo/master
error: could not spawn fsmonitor--daemon in the background
Updating 26143e9..0e77469
error: could not spawn fsmonitor--daemon in the background
Fast-forward
 hello.txt | 2 +-
 1 file changed, 1 insertion(+), 1 deletion(-)
Code Clone
After the project is built, other people in the same team can obtain the code through Clone. Before attempting Clone, delete the account information of github under windows credential manager. The Clone code does not need to log in to the account, and Clone needs to know the link of remote library first
-
Search for "credential manager" in the windows start menu search box, and then delete the login credentials of github
-
Create a new folder and right-click to open Git Bush
-
Execute the command git clone [remote library link]
git clone https://github.com/zqq2017123491/git-demo.git
give the result as follows
Cloning into 'git-demo'...
remote: Enumerating objects: 27, done.
remote: Counting objects: 100% (27/27), done.
remote: Compressing objects: 100% (11/11), done.
remote: Total 27 (delta 8), reused 23 (delta 7), pack-reused 0
Receiving objects: 100% (27/27), done.
Resolving deltas: 100% (8/8), done.
At this point, you will find that there is one more folder under the directory you just created. After you open it, it will be Directory where git is located
Use git remote -v to view link aliases
give the result as follows
origin  https://github.com/zqq2017123491/git-demo.git (fetch)
origin  https://github.com/zqq2017123491/git-demo.git (push)
Team collaboration
-
The person who created the remote library invited team members
-
Open the remote library in GitHub and click the settings menu at the top right
-
Select Manage access on the left
-
Click Invite a collaborator
-
Enter the user name or email address of the team member, and the user will pop up automatically. Select it
-
Then click Pending Invite to invite users at the bottom to get an invitation link
https://github.com/zqq2017123491/git-demo/invitations
-
-
Team members accept the invitation and push the modified content
-
Log in to the team member's account
-
Then open the invitation link in the browser
-
Click Accept invitation to accept the invitation
-
Then you can log in to the account of team members to push after modifying the file content
Execute git add hello txt
Execute git commit - M "other test push" hello txt
Execute git push origin master
Login authentication is also required
The results are as follows: (then all members of the team can see the content in github)
Enumerating objects: 5, done.
Counting objects: 100% (5/5), done.
Delta compression using up to 8 threads
Compressing objects: 100% (2/2), done.
Writing objects: 100% (3/3), 290 bytes | 290.00 KiB/s, done.
Total 3 (delta 1), reused 0 (delta 0), pack-reused 0
remote: Resolving deltas: 100% (1/1), completed with 1 local object.
To https://github.com/zqq2017123491/git-demo.git
   0e77469..90b33e0  master -> master
-
-
The person who created the remote library pulls the modified file
-
Delete the github account of the member in the credential manager first
-
Log in to the account for creating the remote library on github
-
Folder before opening
-
Right click to open Git Bash
-
Execute git pull [link] and [branch] here is git pull git demo master. The execution result is:
remote: Enumerating objects: 5, done.
remote: Counting objects: 100% (5/5), done.
remote: Compressing objects: 100% (1/1), done.
remote: Total 3 (delta 1), reused 3 (delta 1), pack-reused 0
Unpacking objects: 100% (3/3), 270 bytes | 1024 bytes/s, done.
From https://github.com/zqq2017123491/git-demo
 * branch            master     -> FETCH_HEAD
   0e77469..90b33e0  master     -> git-demo/master
error: could not spawn fsmonitor--daemon in the background
Updating 0e77469..90b33e0
error: could not spawn fsmonitor--daemon in the background
Fast-forward
 hello.txt | 1 +
 1 file changed, 1 insertion(+)
-
Then you can synchronize the workspace where the remote library is created with the remote library
-
Cross team collaboration
If you want to cooperate with other teams, after you log in to your account, open the remote library connection address of other teams, or find the remote library by searching, and then click Fork under the avatar at the top right to create the same remote library on your account. You can modify it in clone or directly in GitHub. After you finish, select the Pull requests menu at the top, Click the create pull request button, you can enter the title and comments to complete the request, and then click Create pull request to wait for the other team's review
After logging in, the other team should also click the Pull requests menu to view the modified contents and review them. After passing the review, click the conversation menu above, click the Merge pull request button, and then click Confirm merge to merge them into their own project
SSH password free login
There is also an SSH connection in the Code drop-down box of the remote warehouse
-
First, open the "users" folder on Disk C of your computer. Under the "users" folder, find the folder of your computer users and open it
-
If there's anything in it ssh, delete first
-
Then right-click Git Bash Here
-
Enter the command SSH keygen - t RSA - C [description]. After entering, press enter several times
ssh-keygen Is to generate a password free login protocol
-t         Specify which encryption algorithm is used to generate, here rsa It is an asymmetric encryption algorithm
-C 		   Description. It can be used to describe which account this password free login protocol is for
The results are as follows
Generating public/private rsa key pair.
Enter file in which to save the key (/c/Users/99152/.ssh/id_rsa):
Created directory '/c/Users/99152/.ssh'.
Enter passphrase (empty for no passphrase):
Enter same passphrase again:
Your identification has been saved in /c/Users/99152/.ssh/id_rsa
Your public key has been saved in /c/Users/99152/.ssh/id_rsa.pub
The key fingerprint is:
SHA256:qDF2Aiqfrrw+VW2xFvJRBedxCgeIFUm3C+vAZzqHkoM coderZqq
The key's randomart image is:
+---[RSA 3072]----+
|      ++=*+= .   |
|     o *. * +    |
|  .   +.=. o     |
| . ... Bo .      |
|o   *o=+S.       |
|...+.*B          |
| E++.+ o         |
|.o  o o          |
|o=+              |
+----[SHA256]-----+
-
At this time, it is found that a file has been generated under the directory The ssh folder contains a private key and a public key. Copy the contents of the public key (id_rsa.pub)
ssh-rsa AAAAB3NzaC1yc2EAAAADAQABAAABgQDBdkPYGxBXWLc1zlvy+d2CKB6CHJJgVeN3txMwEYB2gAKb9glPcee40CCO7oYX0ih/aeJ8Akek1Bh+rkHku7JjkAdmFNCG3dtU8NqjnPF1yXcpB8saKP9ixbYEO9MqZUd2GQmTUN8e59orLSLDjXLnV4FqH9X0+g/GIPvEasB8n6LRc8LHcvXn3dTvgMIIaoI6V7CT2fu8Wa8nQod5KHioNxL25rULz72jt90BLVavbMyqvEz21j84DDWrTjxQgK0wYJP+kvLkNZbGH2bJyKopYLKoSh8SJPEZg6EpsyYniAiy1P76IMX/t3CIhEIxLPKXo3ugBN6lnAg9N6lZDP3QqmBM9ezMKB9sQZdh9/oXNUltinTMWXs4O+voqP3tvQsDsMryYxjO/Lsj0zfJBPFsxi9OBqP09KKB1mLNbnUi65eSAZp08W6ziD48hijsX74wmuGPUg3wDomBdKpmwO/EhKazTZkzxsUl+YKhyrNHQM/1bKyzONiwcmwhtiqAhMM = coderZqq
-
Log in to GitHub, click the avatar drop-down menu, select Settings, and then select SSH and GPG keys in the left menu bar
Click New SSHkey, name it casually, and then paste the public key in the key
-
Open the directory of the local workspace (. Git directory), and right-click to open git demo
-
Execute the command git pull [ssh link]
My side is git pull git@github.com:zqq2017123491/git-demo.git, get the following results, and enter yes
The authenticity of host 'github.com (13.229.188.59)' can't be established.
RSA key fingerprint is SHA256:nThbg6kXUpJWGl7E1IGOCspRomTxdCARLviKw6E5SY8.
This key is not known by any other names
Are you sure you want to continue connecting (yes/no/[fingerprint])?
Then you can get the following results. At this time, you can find that the file content of the workspace (. git directory) has been pulled. You can modify the content, and then try push ing
After modifying the content, execute the command git add hello Txt and then git commit - M "coderzqq commit" hello Txt and then git push git@Github.com :zqq2017123491/git-demo. The results of GIT master are as follows. Check Github and the modification is successful!
Enumerating objects: 5, done.
Counting objects: 100% (5/5), done.
Delta compression using up to 8 threads
Compressing objects: 100% (2/2), done.
Writing objects: 100% (3/3), 291 bytes | 291.00 KiB/s, done.
Total 3 (delta 1), reused 0 (delta 0), pack-reused 0
remote: Resolving deltas: 100% (1/1), completed with 1 local object.
To github.com:zqq2017123491/git-demo.git
   0f0b69a..34de50c  master -> master
IDEA integration Git
Configure Git ignore files
-
Why ignore them?
It has nothing to do with the actual function of the project and does not participate in the deployment and operation on the server. Ignoring them can mask the differences between IDE tools
-
How to ignore?
Create ignore rule file XXXX Ignore (prefix name is optional, GIT. Ignore is recommended)
-
You need to find your own user folder in the user directory of Disk c and create a GIT Ignore file, open Notepad, copy the following contents and save them (files to be ignored)
# Compiled class file
*.class

# Log file
*.log

# BlueJ files
*.ctxt

# Mobile Tools for Java (J2ME)
.mtj.tmp/# Package Files #
*.jar
*.war
*.nar
*.ear
*.zip
*.tar.gz
*.rar

hs_err_pid*

.classpath
.project
.settings
target
.idea
*.iml
Then open the in the user directory Configure in gitconfig file (add two lines later, and write the path according to your own path)
[core]
	excludesfile = C:/Users/99152/git.ignore
Note: the path here uses "/" instead of "\"
After saving, the configuration is completed
-
Locate Git program
Open IDEA and create a Maven project
Open file Settings, find Version Control, find Git, and then set the installation directory of Git in the first line
Find GIT. Git in the bin directory of GIT's installation directory Exe, click OK, and then click Test. At this time, a pop-up window will appear, indicating that IDEA has been located in Git program, and then click OK
Initialize local library
Click VCS - import into Version Control - create git repository in the menu above IDEA
The selected directory is the root directory of the current project, and then click OK. Right click the project to see Git and POM The XML file turns red, which means that the file has not been tracked. It can be found in POM Right click the XML file and select Git -- Add to Add it to the temporary storage area
At this point, you can create a class and automatically prompt whether you need to add the file to the staging area
After writing the class, you can add the class to the staging library or add the whole project to the staging library
When you click add, you will be asked whether to submit the ignored file, and click Cancel
After adding, it will be automatically tracked to the file. You can click submit to modify the file later
Click Submit and enter the version information in the Commit Message to submit
After submitting, you can view the submitted version in the Log in the Version Control under the IDEA. Select a version to view the version details
Switch version
After submitting multiple versions, you can view them in the Log, select a version, right-click and select checkout reversal to switch to the selected version
branch
Create branch
Method 1: right click the project name, select Git, find the Repository, select Branches, and then click New Branches to create a branch
Method 2: click a Git:master in the lower right corner of the IDEA. Similarly, click New Branches to create a branch
After creation, the lower right corner will change from master to your branch name
To switch branches, you can use Git: branch name in the lower right corner, and then select the branch you want to switch, Checkout, to switch
Merge branch
After modifying the branch created by yourself, submit it to the local library. In the Log below, you can see the Yellow header pointer on your newly created branch
Switch to the master branch, click Git: branch in the lower right corner, select the branch just created, and then select Merge into current to merge the branches.
Merge branch code conflict
When you create and modify the content of a new branch and modify the content of the master branch, there will be conflicts. You can modify the page that pops up during merging, and click the arrows on the left and right sides to synthesize
IDEA integration GitHub
IDEA login GitHub
Find GitHub in Version Control in IDEA Settings (if not, you can download it directly in Plugins). Click Add account to log in to GitHub
If you can't log in, you can click Enter token. You need to apply for a Token from GitHub first
GitHub token application method
On the GitHub official website, click the avatar drop-down, select Settings, Developer settings, and find Personal access tokens
Generate new token: fill in the permission of the password, and copy the password after generation
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
Then you can log in to GitHub through your personal password
IDEA share project to GitHub
IDEA can directly click import into Version Control, Share Project On GitHub in the VCS menu to share the project to GitHub (it is not necessary to create a remote library in GitHub, but it will automatically create a remote library)
IDEA Push push project to remote library
-
Right click the project directly and select Git - Repository - Push to Push the project to the remote library
-
Or click Git - Push under the VCS menu to Push
It may be slow to push with HTTPS protocol. You can copy the SSH of GitHub remote library, click the alias, select Define Remote, modify the alias, paste the SSH link, and select the modified alias to push faster
IDEA Pull pulls the remote warehouse code to the local
If the remote library code is inconsistent with the local library code, it will be merged automatically. If the automatic merge fails, it will also involve manual conflict resolution
Also under the Git menu, there is a Pull, which can be pulled directly by clicking
Similarly, you can switch the SSH link to pull
IDEA clone clone code to local
Re find a folder and open IDEA. There is a Get from Version Control in the initial interface of IDEA. Click and select Git. Enter the address and path to clone the code locally
Gitee code cloud
Code cloud official website: https://gitee.com
Create remote library from code cloud
After logging in the account, click "+" in the upper right corner to create a remote library. Similar to GitHub, the code cloud also supports SSH password free login. The configuration method is the same as GitHub
IDEA integrated Gitee code cloud
You need to download a Gitee in Plugins of settings
Then you can modify the path in Git and push your own project
The code cloud connects GitHub for code replication and migration
When creating a warehouse in the code cloud, you can directly find and import the existing warehouse at the bottom, copy the HTTPS link of the remote library in GitHub, paste it in the code cloud, and then directly click the Create button to copy the GitHub project
After the GitHub project is updated, there is a refresh button behind the code cloud project name to synchronize the project
GitLab LAN based hosting Center
Before using GitLab, you need to have a server. If not, you can use VMware virtual machine to build it
Here, CentOS 7 is used as the operating system of the server (I didn't use the materials in the tutorial of station B)
-
VMware download link:
Link: https://pan.baidu.com/s/1dxE9mYk-39gir8b4vxaBfA
Extraction code: 1s2r -
GitLab website: https://about.gitlab.com
-
CentOS 7 download link:
Link: https://pan.baidu.com/s/1IlTfOHwo_FAA4pbb_ghoSQ
Extraction code: 1e2e
Construction and deployment of GitLab server
Server preparation
-
Prepare a CentOS7 or above server with 4G memory and 50G disk
-
Close the firewall and configure the host name and IP to ensure that the server can access the Internet
-
Click the edit menu on the virtual machine and select virtual network editor
-
Click change settings in the lower right corner of the pop-up box, and then select VMent8 to modify the subnet ip, mainly the last two digits (192.168.8.0 is set here)
-
Click NAT settings to modify the gateway IP. I set 192.168.8.2
-
Click DHCP settings to modify the start ip to 192.168.8.128 and the end ip to 192.168.8.254
-
Then search the windows start menu search box for "network connection",
After opening, find your own WLAN, right-click properties, share, select a home network, select VMWare NetworkAdapter VMnet8, and then save
Then select VMWare NetworkAdapter VMnet8, right-click properties, and double-click Internet protocol version 4(TCP/IPv4)
Click to use the following IP address. The IP address, subnet mask and gateway settings should be consistent with those in vmware
My is:
ip address:192.168.8.1
 Subnet mask:255.255.255.0
 Default gateway:192.168.8.2
-
root connects to the server and executes the command CD / etc / sysconfig / network scripts/
-
Execute instruction vi ifcfg-ens33 and press i to edit
-
Modify BOOTPROTO=none (representing static allocation IP) and ONBOOT=yes, and add IP and gateway DNS1 on the last side. Mine is
-
IPADDR=192.168.8.100 #IP address
NETMASK=255.255.255.0#Subnet mask
#The ip address here is consistent with the ip address of C:\Windows\System32\drivers\etc\host set earlier to realize mapping
GATEWAY=192.168.8.2  #The gateway must be the same as that in VMware
DNS1=8.8.8.8
-
After editing, press esc and enter: wq save to exit
-
Then execute service network restart
-
Then you can ping www.baidu.com Com try to see if you can connect to the Internet normally
-
Then modify the host name, vi /etc/hostname to git server, and restart the server
-
-
Open C:\Windows\System32\drivers\etc\host on your computer
Add mapping in it, as shown below, and add ip and host name at the end (the mapping server here is not configured temporarily, because I do not configure static ip, so I can only use DHCP protocol for networking first to facilitate the download of GitLab related files later. I configured it after installing GitLab)
# Copyright (c) 1993-2009 Microsoft Corp.
#
# This is a sample HOSTS file used by Microsoft TCP/IP for Windows.
#
# This file contains the mappings of IP addresses to host names. Each
# entry should be kept on an individual line. The IP address should
# be placed in the first column followed by the corresponding host name.
# The IP address and the host name should be separated by at least one
# space.
#
# Additionally, comments (such as these) may be inserted on individual
# lines or following the machine name denoted by a '#' symbol.
#
# For example:
#
#      102.54.94.97     rhino.acme.com          # source server
#       38.25.63.10     x.acme.com              # x client host

# localhost name resolution is handled within DNS itself.
#	127.0.0.1       localhost
#	::1             localhost
127.0.0.1       activate.navicat.com
192.168.8.100      gitlab-server
Execute the ifconfig command on the server. If not, install ifconfig on the server
Execute yum search ifconfig, then Yum install -y net tools x86_ Install successfully, 64
After successful execution of ifconfig, you can see that the ip address has become the ip address we set
Installing GitLab on the server
Since I didn't use the resources provided in the video, I downloaded gitlab on the server myself. The installation process is as follows
My system already has ssh, postfix and firewall, so directly execute the following content
sudo yum install curl policycoreutils openssh-server openssh-clients
-
Start ssh service
sudo systemctl enable sshd
sudo systemctl start sshd
-
Add http service to firewalld(– permanent means permanent)
sudo firewall-cmd --permanent --add-service=http
-
service iptables restart
sudo systemctl reload firewalld
-
postfix start
sudo systemctl start postfix
systemctl enable postfix.service//Set to startup
-
New / etc / yum.com repos. d/gitlab-ce. repo
Command:
cd /
cd etc
cd yum.repos.d
vi  gitlab-ce.repo
The content is (configure image). Press i to start editing
[gitlab-ce]
name=Gitlab CE Repository
baseurl=https://mirrors.tuna.tsinghua.edu.cn/gitlab-ce/yum/el$releasever/
gpgcheck=0
enabled=1
Then press esc to enter: wq
Then execute
sudo yum makecache
sudo yum install gitlab-ce
Initialize GitLab service
Execute the command GitLab CTL reconfigure to initialize the GitLab service
Start GitLab service
Execute the command GitLab CTL start to start the GitLab service
To stop the service, execute the command gitlab CTL stop
Use a browser to access GitLab server or http://192.168.8.100 , you can enter the GitLab page to log in, change the password and log in
IDEA integration GitLab
-
You can search GitLab in the Settings Plugins of IDEA, and then install the GitLab plug-in
-
Click File - Settings - Version Control - GitLab, and select Add New GitLab Server
-
Enter GitLab server address https://gitlab-server/ Select the HTTPS protocol and click OK
-
Open the browser to create a GitLab remote library, click Clone, copy the remote library link, and modify GitLab example. COM is my own address. Mine is GitLab server, or 192.168.8.100
-
The operation of the rest Git is the same as that of IDEA integration Gitee