Image super-resolution using MMEditing
Installing MMEditing
# Check PyTorch version
!pip list | grep torch

# Install the corresponding version of mmcv full
!pip install mmcv-full -f https://download.openmmlab.com/mmcv/dist/cu101/torch1.8.0/index.html

# Source code installation MMEditing(git clone command)
%cd /content
!rm -rf mmediting
!git clone https://github.com/open-mmlab/mmediting.git

# Install with pip
%cd mmediting
!pip install -e .

# Check PytorchCheck Pytorch installation
import torch, torchvision
print(torch.__version__,torch.cuda.is_available())

import mmedit
print(mmedit.__version__)

Use the pre training model to complete reasoning
Find and download pre training models
https://mmediting.readthedocs.io/en/latest/
# Download SRCNN's pre training model
!test -d checkpoint || mkdir checkpoint
!wget -c https://openmmlab.oos-accelerate.aliyuncs.com/mmediting/restorers/srcnn/srcnn_x4k915_1x16_1000k_div2k_20200608-4186f232.pth\
    -o ./checkpoint/srcnn_x4k915_1x16_1000k_div2k_20200608-4186f232.pth

# Download sample data
!rm -rf data
!git clone https://github.com/kckchan-dev/Datasets.git data

# Display image
import matplotlib.pyplot as plt
import mmcv

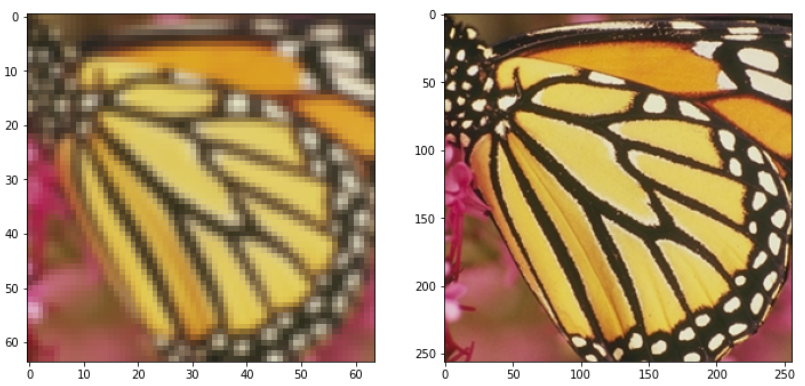
img_LR = mmcv.imread('./data/Set5/LR/butterfly.png',channel_order='rgb')
img_HR = mmcv.imread('./data/Set5/GT/butterfly.png',channel_order='rgb')

plt.figure(figsize=(12,8))
plt.subplot(1,2,1)
plt.imshow(img_LR)
plt.subplot(1,2,2)
plt.imshow(img_HR)
plt.show()

# Set the path between the configuration file and the training model
config_file = 'configs/restorers/srcnn/srcnn_x4k915_g1_1000k_div2k.py'
checkpoint_file = 'checkpoint/srcnn_x4k915_1x16_1000k_div2k_20200608-4186f232.pth'
Call API to build model
# Call init_model initialization model
from mmedit.apis import init_model
model = init_model(config_file,checkpoint_file,device='cuda:0')

# Show model
model


SRCNN bicubic interpolation upper sampling three-layer convolution L1 loss
Call API for reasoning
call restoration_inference reasoning
from mmedit.apis import restoration_inference
result = restoration_inference(model, 'data/Set5/LR/butterfly.png')
result

Four dimensional tensor of pytorch
result = torch.clamp(result,0,1) # If the pixel value is between 0 and 1, truncate it with clamp, and set those less than 1 as 0 and those greater than 1 as 1
img_SR = result.squeeze(0).permute(1,2,0).numpy()# (n,c,h,w) remove the dimension N, convert (c,h,w) to (h,w,c), and then convert it to numpy array
Analyze the effect of image restoration
import matplotlib.pyplot as plt

fig = plt.figure(figsize=(15,12))
ax1 = fig.add_subplot(1,3,1)
plt.title('LR',fontsize=16)
ax1.axis('off')
ax2 = fig.add_subplot(1,3,2)
plt.title('SR',fontsize=16)
ax2.axis('off')
ax3 = fig.add_subplot(1,3,3)
plt.title('HR',fontsize=16)
ax3.axis('off')
ax1.imshow(img_LR)
ax2.imshow(img_SR)
ax3.imshow(img_HR)
plt.show()

It can be seen from the results that the output is still a little fuzzy, which is actually a normal phenomenon
The data we use has Gaussian fuzzy filter before downsampling,
However, the data used in the training of the pre training model does not add Gaussian blur,
The above problems are caused by the absence of training data and test data.
Fine tune the model using a custom dataset
Using MMEditing to fine tune the model requires three steps:
- Prepare training data
- Modify profile
- Start training
Prepare training data
To train the super-resolution model using MMEditing, the data needs to be sorted into the following format:
- Place high-resolution images and low-resolution images in different folders, and use the same file name for the corresponding high and low resolutions
- Annotation is the file name of a high-resolution image, and each annotation file contains a list of high-resolution images
Here, a subset of DIV2K data set is used, and Gaussian filtering is used when generating low resolution images (which has been processed in the sample data)
# Generate image list
import glob
gt_paths = sorted(glob.glob('./data/DIV2K/GT/*.png'))
with open('data/training_ann.txt','w')as f:
  for gt_path in gt_paths:
    filename = gt_path.split('/')[-1]
    line = f'{filename} (480,480,3)\n'# Write the resolution of the image to the file
    f.write(line)
Modify the configuration file accordingly
# Load the configuration file of the original SRCNN
from mmcv import Config
cfg = Config.fromfile('configs/restorers/srcnn/srcnn_x4k915_g1_1000k_div2k.py')
print(f'Config:\n{cfg.pretty_text}')
# The original configuration file is based on the complete DIV2K data set training, and we need to make corresponding modifications
from mmcv.runner import set_random_seed
# Specify the catalog and label file for the training set
cfg.data.train.dataset.lq_folder='./data/DIV2K/LR'
cfg.data.train.dataset.gt_folder='./data/DIV2K/GT'
cfg.data.train.dataset.ann_file='./data/training_ann.txt'
# Specifies the directory of the validation set
cfg.data.val.lq_folder='./data/Set5/LR'
cfg.data.val.gt_folder='./data/Set5/GT'
# Specifies the directory of the test set
cfg.data.test.lq_folder='./data/Set5/LR'
cfg.data.test.gt_folder='./data/Set5/GT'
# Specify pre training model
cfg.load_from='./checkpoint/srcnn_x4k915_1x16_1000k_div2k_20200608-4186f232.pth'
# Set working directory
cfg.work_dir='./tutorial_exps/srcnn'
# Configure batch size
cfg.data.samples_per_gpu=4
cfg.data.workers_per_gpu=0
cfg.data.val_workers_per_gpu=0
# Set total iterations
cfg.total_iters = 200
# Reduce the learning rate in 100 iterations and step by step
cfg.lr_config={}
cfg.lr_config.policy='Step'
cfg.lr_config.by_epoch=False
cfg.lr_config.step=[100]
cfg.lr_config.gamma=0.5
# Verify every 20 rounds and save the results
if cfg.evaluation.get('gpu_collect',None):
  cfg.evaluation.pop('gpu_collect')

cfg.evaluation.interval=200
cfg.checkpoint_config.interval=200
# Print log every N rounds of iteration
cfg.log_config.interval=40
# Set seeds and the results can be reproduced
cfg.seed=0
set_random_seed(0,deterministic=False)
cfg.gpus=1

print(f'Configs:\n{cfg.pretty_text}')
Start training
Call the corresponding Python API to start the training
import os.path as osp

from mmedit.datasets import build_dataset
from mmedit.models import build_model
from mmedit.apis import train_model
from mmcv.runner import init_dist

import mmcv
import os
# Building data sets
datasets = [build_dataset(cfg.data.train)]
# Build model
model = build_model(cfg.model,train_cfg=cfg.train_cfg,test_cfg=cfg.test_cfg)
# Create work path
mmcv.mkdir_or_exist(osp.abspath(cfg.work_dir))
# Additional information
meta = dict()
if cfg.get('exp_name',None) is None:
  cfg['exp_name']=osp.splitext(osp.basename(cfg.work_dir))[0]
meta['exp_name']=cfg.exp_name
meta['mmedit Version']=mmedit.__version__
meta['seed']=0
# Start training
train_model(model,datasets,cfg,distributed=False,validate=True,meta=meta)

PSNR and SSIM are pixel level evaluation criteria. It can be seen that Loss decreases and the two indicators increase during training, which is in line with expectations
Use the fine tuned model to complete the reasoning
The fine-tuning model is stored in the working directory, and the recovery effect of the fine-tuning model is improved
from mmedit.apis import init_model
from mmedit.apis import restoration_inference

model = init_model(config_file, F'{cfg.work_dir}/latest.pth', device='cuda:0')
result = restoration_inference(model,'data/Set5/LR/butterfly.png')

result = torch.clamp(result,0,1)
img_SR_ft = result.squeeze(0).permute(1,2,0).numpy()
# Compare the results of low resolution super-resolution and high resolution
fig=plt.figure(figsize=(15,12))
ax1 = fig.add_subplot(1,3,1)
plt.title('Before finetune',fontsize=16)
ax1.axis('off')
ax2 = fig.add_subplot(1,3,2)
plt.title('After finetune',fontsize=16)
ax2.axis('off')
ax3 = fig.add_subplot(1,3,3)
plt.title('HR image',fontsize=16)
ax3.axis('off')
ax1.imshow(img_SR)
ax2.imshow(img_SR_ft)
ax3.imshow(img_HR)
plt.show()
