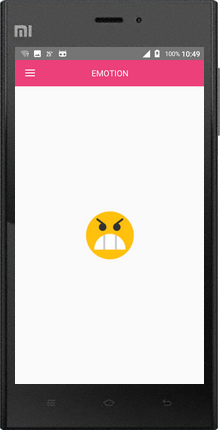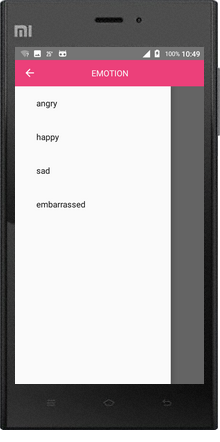

Then you can click the menu to change the icon. For example, click happy, and the homepage will become a smiling face. The implementation process is super simple
Step 1: you need to use two new controls: ToolBar and DrawableLayout
First, I need to write three xml layout files. The layout file here is embedded with the include tag. The code is as follows
- headbar_toolbar.xml
<?xml version="1.0" encoding="utf-8"?>
<android.support.v7.widget.Toolbar xmlns:android="http://schemas.android.com/apk/res/android"
    android:id="@+id/tbHeadBar"
    android:layout_width="match_parent"
    android:layout_height="50dp"
    android:background="@color/red">

    <TextView
        android:layout_width="wrap_content"
        android:layout_height="wrap_content"
        android:layout_gravity="center"
        android:text="@string/emotion"
        android:textColor="@color/white"
        android:textSize="16sp" />

</android.support.v7.widget.Toolbar>
- my_drawablelayout.xml
<?xml version="1.0" encoding="utf-8"?>
<android.support.v4.widget.DrawerLayout xmlns:android="http://schemas.android.com/apk/res/android"
    android:id="@+id/dlMenu"
    android:layout_width="match_parent"
    android:layout_height="match_parent">

    <LinearLayout
        android:id="@+id/llContent"
        android:layout_width="match_parent"
        android:layout_height="match_parent"
        android:background="@color/white"
        android:gravity="center"
        android:orientation="vertical">

        <ImageView
            android:id="@+id/ivContent"
            android:layout_width="100dp"
            android:layout_height="100dp"
            android:src="@drawable/angry" />

    </LinearLayout>

    <!--android:layout_gravity="start"Attribute to make this part a sideslip part-->
    <!--Be sure to put it down!!! About the level of control if you don't know to Baidu! Oh, no Google-->
    <LinearLayout
        android:id="@+id/llMenu"
        android:layout_width="match_parent"
        android:layout_height="match_parent"
        android:layout_gravity="start"
        android:background="@color/white"
        android:orientation="vertical">

        <!--Used to set menu items-->
        <ListView
            android:id="@+id/lvMenu"
            android:layout_width="match_parent"
            android:layout_height="match_parent"
            android:divider="@null" />

    </LinearLayout>

</android.support.v4.widget.DrawerLayout>- main_activity.xml
<?xml version="1.0" encoding="utf-8"?>
<LinearLayout xmlns:android="http://schemas.android.com/apk/res/android"
    xmlns:tools="http://schemas.android.com/tools"
    android:layout_width="match_parent"
    android:layout_height="match_parent"
    android:orientation="vertical"
    tools:context="com.demo.usher.demo_slidingmenu.MainActivity">

    <!--head-->
    <include layout="@layout/headbar_toolbar" />

    <!--Main layout-->
    <include layout="@layout/my_drawablelayout" />

</LinearLayout>
How to apply it to java files
package com.demo.usher.demo_slidingmenu;

import android.os.Bundle;
import android.support.v4.widget.DrawerLayout;
import android.support.v7.app.ActionBarDrawerToggle;
import android.support.v7.app.AppCompatActivity;
import android.support.v7.widget.Toolbar;
import android.view.View;
import android.widget.AdapterView;
import android.widget.ArrayAdapter;
import android.widget.ImageView;
import android.widget.LinearLayout;
import android.widget.ListView;

import java.util.ArrayList;
import java.util.List;

import butterknife.BindView;
import butterknife.ButterKnife;

public class MainActivity extends AppCompatActivity {

    @BindView(R.id.tbHeadBar)
    Toolbar mTbHeadBar;

    /*Sideslip menu layout*/
    @BindView(R.id.llMenu)
    LinearLayout mLlMenu;

    /*Sideslip menu ListView place menu item*/
    @BindView(R.id.lvMenu)
    ListView mLvMenu;

    @BindView(R.id.ivContent)
    ImageView mIvContent;

    @BindView(R.id.dlMenu)
    DrawerLayout mMyDrawable;

    ActionBarDrawerToggle mToggle;

    private List<String> lvMenuList = new ArrayList<String>() {{
        add("angry");
        add("happy");
        add("sad");
        add("embarrassed");
    }};

    private List<Integer> imageList = new ArrayList<Integer>() {{
        add(R.drawable.angry);
        add(R.drawable.happy);
        add(R.drawable.sad);
        add(R.drawable.embarrassed);
    }};

    @Override
    protected void onCreate(Bundle savedInstanceState) {
        super.onCreate(savedInstanceState);
        setContentView(R.layout.activity_main);
        ButterKnife.bind(this);

        /*Initialize Toolbar and DrawableLayout*/
        initToolBarAndDrawableLayout();

        mLvMenu.setAdapter(new ArrayAdapter(this, android.R.layout.simple_expandable_list_item_1, lvMenuList));
        mLvMenu.setOnItemClickListener(new AdapterView.OnItemClickListener() {
            @Override
            public void onItemClick(AdapterView<?> parent, View view, int position, long id) {
                mIvContent.setImageResource(imageList.get(position));
                mMyDrawable.closeDrawers();/*Put away the drawer*/
            }
        });
    }

    private void initToolBarAndDrawableLayout() {
        setSupportActionBar(mTbHeadBar);
        /*The following two methods are available to set the return key*/
        getSupportActionBar().setHomeButtonEnabled(true);
        getSupportActionBar().setDisplayHomeAsUpEnabled(true);
        /*Set title text not to be displayed*/
        getSupportActionBar().setDisplayShowTitleEnabled(false);

        mToggle = new ActionBarDrawerToggle(this, mMyDrawable, mTbHeadBar, R.string.open, R.string.close) {
            @Override
            public void onDrawerOpened(View drawerView) {
                super.onDrawerOpened(drawerView);
                //Toast.makeText(MainActivity.this, R.string.open, Toast.LENGTH_SHORT).show();
            }

            @Override
            public void onDrawerClosed(View drawerView) {
                super.onDrawerClosed(drawerView);
                //Toast.makeText(MainActivity.this, R.string.close, Toast.LENGTH_SHORT).show();
            }
        };
        /*mMyDrawable.setDrawerListener(mToggle);Not recommended*/
        mMyDrawable.addDrawerListener(mToggle);
        mToggle.syncState();/*Synchronization status*/
    }
}
Comments and styles on butterknife
butterknife is directly configured in the gradle file as follows
apply plugin: 'com.android.application'
apply plugin: 'android-apt'

android {
    compileSdkVersion 24
    buildToolsVersion "24.0.2"

    defaultConfig {
        applicationId "com.demo.usher.demo_slidingmenu"
        minSdkVersion 15
        targetSdkVersion 24
        versionCode 1
        versionName "1.0"
    }
    buildTypes {
        release {
            minifyEnabled false
            proguardFiles getDefaultProguardFile('proguard-android.txt'), 'proguard-rules.pro'
        }
    }

}

buildscript {
    repositories {
        mavenCentral()
    }
    dependencies {
        classpath 'com.neenbedankt.gradle.plugins:android-apt:1.8'
    }
}

dependencies {
    compile fileTree(include: ['*.jar'], dir: 'libs')
    testCompile 'junit:junit:4.12'
    compile 'com.android.support:appcompat-v7:24.2.0'
    compile 'com.jakewharton:butterknife:8.4.0'
    /*butterknife relevant*/
    apt 'com.jakewharton:butterknife-compiler:8.4.0'
    compile 'com.android.support:support-v4:24.2.0'
}
Style [modify the color style of the return key in the style file]
<resources>

    <style name="AppTheme" parent="Theme.AppCompat.Light.NoActionBar">
        <item name="drawerArrowStyle">@style/AppTheme.DrawerArrowToggle</item>
    </style>

    <style name="AppTheme.DrawerArrowToggle" parent="Base.Widget.AppCompat.DrawerArrowToggle">
        <item name="color">@android:color/white</item>
    </style>

</resources>
Just run

benefit
In fact, we often don't know how to realize it when we use the third-party control. Using the native control can help us better understand the principle of an interaction or a function, which is conducive to making an APP with excellent performance and interaction