1, Basic knowledge of Nginx
1. What is Nginx?
Nginx is an open source, lightweight, high-performance HTTP server and reverse proxy server.
It is characterized by less memory and strong concurrency.
2. What does Nginx do?
It can be used as an HTTP server to access and publish websites.
It can also be used as a reverse proxy server to achieve load balancing.
2, Forward agent, reverse agent
1. What is an agent?
The agent is essentially a transfer station, which is used to process one target to another.
That is, there is no real connection between the two targets, but through a channel.
As shown in the figure below:
If the client wants to access the real server, it needs to go through the proxy server first and then access the real server through the proxy server.
The real server responds to the request and returns the request result to the client through the proxy server.

2. Forward agent?
(1) What is a forward agent?
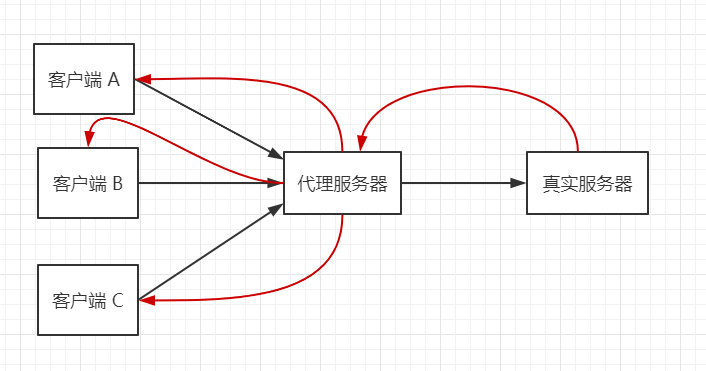
The essence of forward agent is client agent, that is, agent client, which receives and sends requests for clients. The server does not know which client actually initiates the request.
As shown in the figure below:
Set the forward proxy server (IP address + port number) on the client.
Multiple clients can connect to the same proxy server to access the real server through the proxy server.
The real server responds and then returns the data to the specified client through the proxy server.
The real server doesn't know which client is responding to the request.
(2) Forward proxy usage scenario:
Visiting foreign websites (Google, YouTube, etc.) requires turning over the wall (proxy server) to access.
Cache can be done to speed up access to resources.
3. Reverse proxy?
(1) What is reverse proxy?
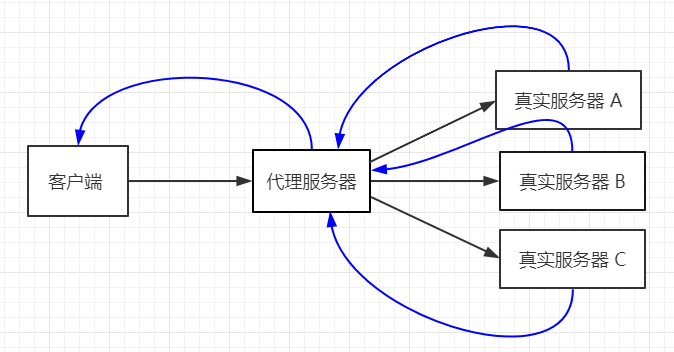
In essence, the reverse proxy refers to the server proxy, that is, the proxy server, which receives and sends requests for the server. The client does not know which server actually processes the requests.
As shown in the figure below:
A client accesses resources on the network through a proxy server.
The proxy server responds and finds a real server to process and return data.
The proxy server returns the data to the client.
The client does not know which real server responded to its request.
(2) Reverse proxy usage scenario:
Load balancing, optimize the load of the website through reverse agent.
Take the proxy server as the public access address and the real server as the internal network resource to ensure the security of the internal network.
4. Apply forward agent and reverse agent at the same time?
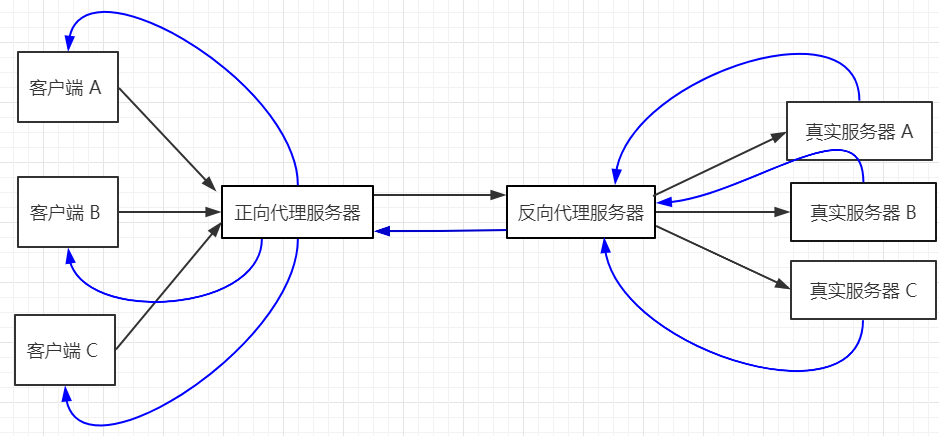
In a business scenario, both forward and reverse agents can be applied at the same time.
Forward proxy, used to proxy clients to access the server (proxy multiple clients).
Reverse proxy is used to proxy the server to respond to client requests (proxy multiple servers).
As shown in the figure below:
The client and server interact with each other through forward proxy server and reverse proxy server.
3, Load balancing, dynamic and static separation
1. Load balancing
(1) Why is load balancing?
A small project, a server can handle (can improve the ability of machine hardware).
For large-scale projects, the efficiency of one server is very low. Using multiple servers to process can improve the efficiency of processing, but how to reach the server and how to process the number of requests in each server is a problem to be solved.
The reverse proxy can be used to proxy multiple servers (to solve the problem of requests arriving at the server), and the server can be specified to process the requests according to some rules, so that the number of requests processed by each server is as uniform as possible, that is, load balancing (to solve the problem of servers processing requests).
As shown in the figure below:
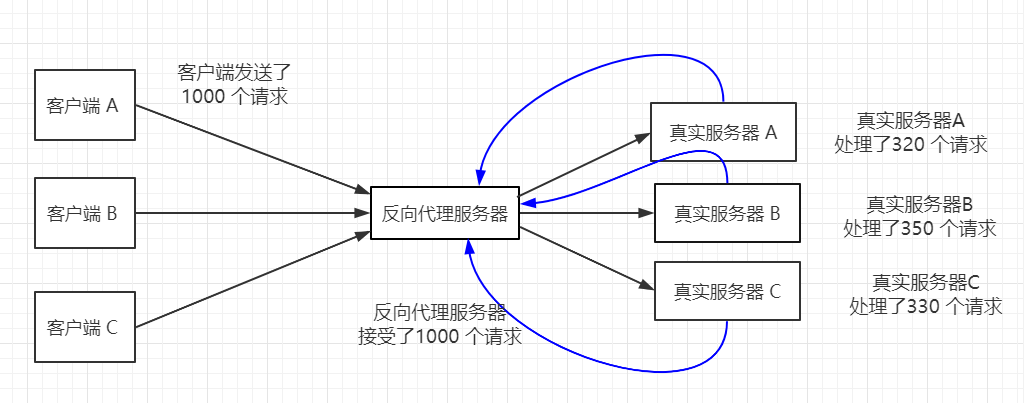
The client sent 1000 requests to the reverse proxy server.
The reverse proxy server distributes the request to different real servers through some load balancing algorithm.
For example, real server A processes 320 requests, B processes 350 requests, and C processes 330 requests.
(2) Load capacity? Equilibrium? What is load balancing?
The role of Nginx in load balancing is reverse proxy.
In essence, the load refers to the number of requests sent by the client and received by the reverse proxy server.
The essence of equilibrium is that according to some rules, the reverse proxy server will send the received requests to different real servers for processing (to make the number of requests processed by each real server as uniform as possible).
So the essence of load balancing is that the reverse proxy server receives requests and sends them to different real servers according to some rules.
(3) How to balance the load?
Load balancing can be divided into hardware load balancing and software load balancing.
Hardware load balancing is usually expensive, but data transmission is more stable. For example: F5 load balancing.
Software load balancing is usually implemented by some load balancing algorithm (a message queue distribution mechanism).
2. Dynamic and static separation
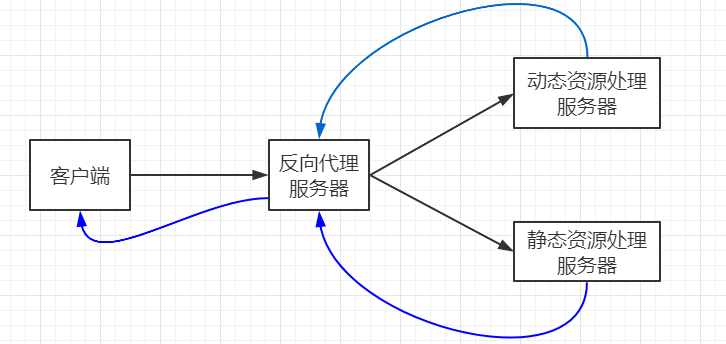
In order to speed up the parsing speed of the website, the dynamic page and the static page content are usually placed on different servers for processing, so as to reduce the pressure of a single server and speed up the parsing speed.
The essence of dynamic static separation is to separate dynamic resources and static resources, and put them on different servers.
As shown below:
The real server is divided into dynamic resource processing server and static resource processing server. According to different business requirements, the reverse agent sends processing to different servers to process and return content.
4, Using Docker to install Nginx
1. Find the Nginx version to install
[Method 1: official website search]
    https://hub.docker.com/
    https://hub.docker.com/_/nginx?tab=tags

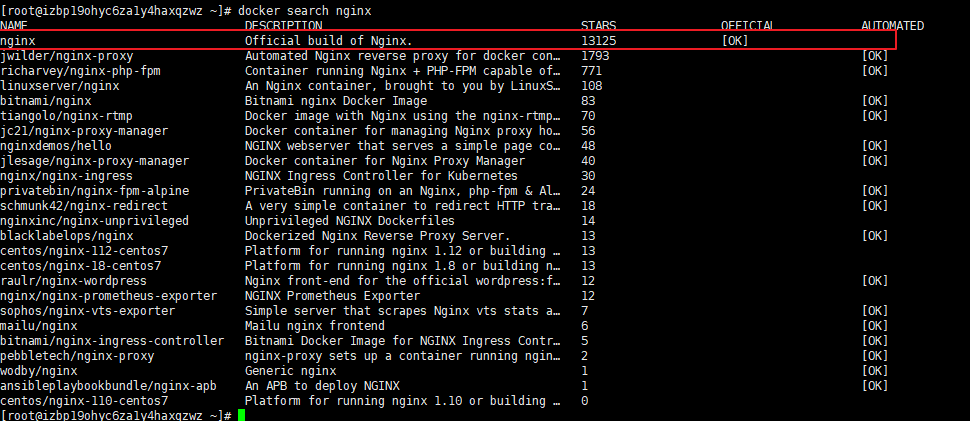
[Mode 2:(Query from the command line)]
    docker search nginx
2. Download Image
[Download the latest image:]
    docker pull nginx

3. Run container (common method)
[view all image files:]
    docker images

[operation container, binding port number: (not used in general)
    docker run -p 80:80 --name nginx -d nginx
 Note:
    --name nginx means the container name is nginx
    -d stands for background operation
    -p 80:80 indicates that the binding port number is 80


4. Mount custom directory to run container (recommended)
[catalog analysis:]
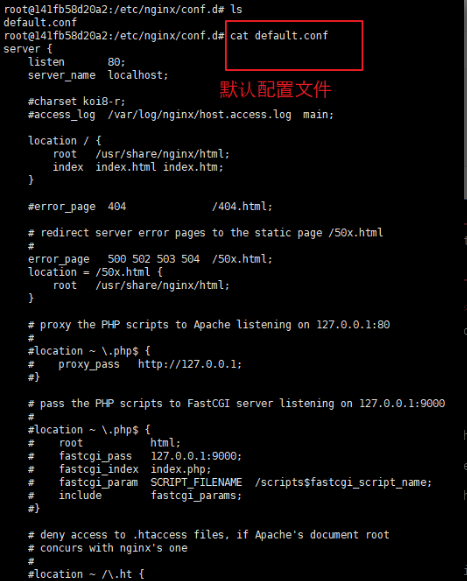
    /etc/nginx/conf.d/default.conf is the default configuration file.
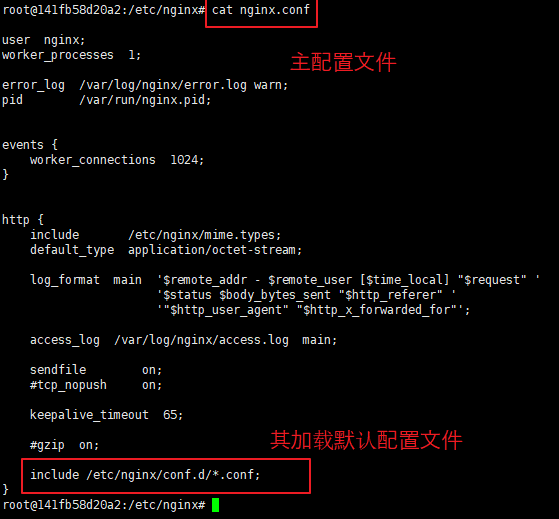
    /etc/nginx/nginx.conf file is the main configuration file.
    /The var/log/nginx directory is used to save log files.
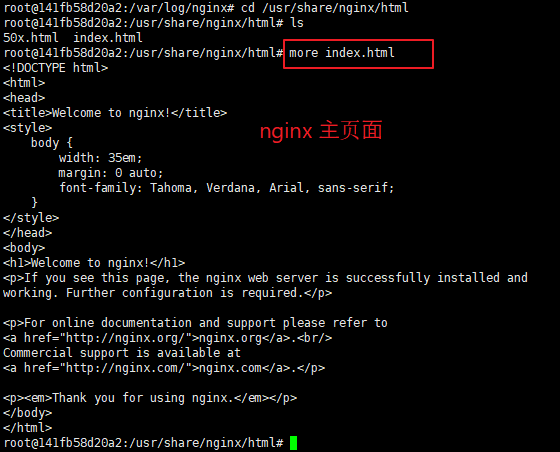
    /The usr/share/nginx/html directory is used to save the nginx main page.
Customize each directory, and copy the corresponding configuration file and index.html page to the corresponding customized file directory.
Step1:
The default data of / etc/nginx/conf.d/default.conf is as follows.
Copy the content to the / usr/mydata/nginx/conf.d/default.conf file.
[/etc/nginx/conf.d/default.conf]

server {
    listen       80;
    server_name  localhost;

    #charset koi8-r;
    #access_log  /var/log/nginx/host.access.log  main;

    location / {
        root   /usr/share/nginx/html;
        index  index.html index.htm;
    }

    #error_page  404              /404.html;

    # redirect server error pages to the static page /50x.html
    #
    error_page   500 502 503 504  /50x.html;
    location = /50x.html {
        root   /usr/share/nginx/html;
    }

    # proxy the PHP scripts to Apache listening on 127.0.0.1:80
    #
    #location ~ \.php$ {
    #    proxy_pass   http://127.0.0.1;
    #}

    # pass the PHP scripts to FastCGI server listening on 127.0.0.1:9000
    #
    #location ~ \.php$ {
    #    root           html;
    #    fastcgi_pass   127.0.0.1:9000;
    #    fastcgi_index  index.php;
    #    fastcgi_param  SCRIPT_FILENAME  /scripts$fastcgi_script_name;
    #    include        fastcgi_params;
    #}

    # deny access to .htaccess files, if Apache's document root
    # concurs with nginx's one
    #
    #location ~ /\.ht {
    #    deny  all;
    #}
}
Step2:
The default data of / etc/nginx/nginx.conf is as follows.
Copy the content to the / usr/mydata/nginx/conf/nginx.conf file.
[/etc/nginx/nginx.conf ]

user  nginx;
worker_processes  1;

error_log  /var/log/nginx/error.log warn;
pid        /var/run/nginx.pid;


events {
    worker_connections  1024;
}


http {
    include       /etc/nginx/mime.types;
    default_type  application/octet-stream;

    log_format  main  '$remote_addr - $remote_user [$time_local] "$request" '
                      '$status $body_bytes_sent "$http_referer" '
                      '"$http_user_agent" "$http_x_forwarded_for"';

    access_log  /var/log/nginx/access.log  main;

    sendfile        on;
    #tcp_nopush     on;

    keepalive_timeout  65;

    #gzip  on;

    include /etc/nginx/conf.d/*.conf;
}
Step3:
The default data of / usr/share/nginx/html/index.html is as follows.
Copy the content to the / usr/mydata/nginx/html/index.html file.
[/usr/share/nginx/html/index.html]

<!DOCTYPE html>
<html>
<head>
<title>Welcome to nginx!</title>
<style>
    body {
        width: 35em;
        margin: 0 auto;
        font-family: Tahoma, Verdana, Arial, sans-serif;
    }
</style>
</head>
<body>
<h1>Welcome to nginx!</h1>
<p>If you see this page, the nginx web server is successfully installed and
working. Further configuration is required.</p>

<p>For online documentation and support please refer to
<a href="http://nginx.org/">nginx.org</a>.<br/>
Commercial support is available at
<a href="http://nginx.com/">nginx.com</a>.</p>

<p><em>Thank you for using nginx.</em></p>
</body>
</html>
Step4: start the container.
Run the container and mount the configuration file to the custom Directory: (recommended)
docker run --name nginx -d -p 80:80 \
  -v /usr/mydata/nginx/log:/var/log/nginx  \
  -v /usr/mydata/nginx/conf/nginx.conf:/etc/nginx/nginx.conf \
  -v /usr/mydata/nginx/conf.d:/etc/nginx/conf.d  \
  -v /usr/mydata/nginx/html:/usr/share/nginx/html \
  nginx

Note:
    Nginx starts according to the file nginx.conf and default.conf,
    If the above statement is run directly, a nginx.conf folder will be created directly and an error will be reported.
    You need to manually create a nginx.conf file, paste the Step2 data, and then start the container.


Step 5: in the page mount directory, customize an index.html to test whether the directory mount is successful.
If the index.html page effect is successfully modified, the directory is successfully mounted. Next time, you can modify the nginx configuration file according to the mount directory.
[/usr/mydata/nginx/html/index.html]

<!DOCTYPE html>
<html>
<head>
<title>Welcome to nginx!</title>
</head>
<body>
<h1>Hello!!! Welcome to nginx!</h1>
</body>
</html>

Visit the page, and you can see that the content of index.html page has changed. That is, the directory is successfully mounted.

5, Nginx implements reverse proxy
1. Effect?
Using nginx as the reverse agent, we can jump to different port services according to different access paths.
Among them:
nginx listens to port 80 (can be omitted),
visit:
http://120.26.184.41/blog, go to https://www.cnblogs.com/l-y-h/.
http://120.26.184.41/baidu, go to https://www.baidu.com/.
2. Modify nginx configuration file
(1) Simple profile analysis
The / etc/nginx/conf.d/default.conf configuration file is as follows:
[Common keyword resolution in configuration file:( server Block)
    listen           Used to configure network listening, listening port IP Address, etc.
        //For example:
            listen port              Monitor port All connections for the port.
            listen IP_address        Monitor IP_address All ports.
            listen IP_address:port   Monitor IP_address Of port Port.

    server_name      Used to set up a virtual host, which can be a domain name IP Address.

    location        For matching URL.
        //For example:
            location = uri     Represents a strict match uri,Non regular expression matching.
            location ~ uri     Regular expression matching, case sensitive.
            location ~* uri    Regular expression matching, case insensitive.

[location Common key words in block:]
    proxy_pass       Used to set the address of the proxy server
    index            Used to set the default homepage of the website

[/etc/nginx/conf.d/default.conf The configuration file is as follows:]

server {
    listen       80;
    server_name  localhost;

    #charset koi8-r;
    #access_log  /var/log/nginx/host.access.log  main;

    location / {
        root   /usr/share/nginx/html;
        index  index.html index.htm;
    }

    #error_page  404              /404.html;

    # redirect server error pages to the static page /50x.html
    #
    error_page   500 502 503 504  /50x.html;
    location = /50x.html {
        root   /usr/share/nginx/html;
    }

    # proxy the PHP scripts to Apache listening on 127.0.0.1:80
    #
    #location ~ \.php$ {
    #    proxy_pass   http://127.0.0.1;
    #}

    # pass the PHP scripts to FastCGI server listening on 127.0.0.1:9000
    #
    #location ~ \.php$ {
    #    root           html;
    #    fastcgi_pass   127.0.0.1:9000;
    #    fastcgi_index  index.php;
    #    fastcgi_param  SCRIPT_FILENAME  /scripts$fastcgi_script_name;
    #    include        fastcgi_params;
    #}

    # deny access to .htaccess files, if Apache's document root
    # concurs with nginx's one
    #
    #location ~ /\.ht {
    #    deny  all;
    #}
}
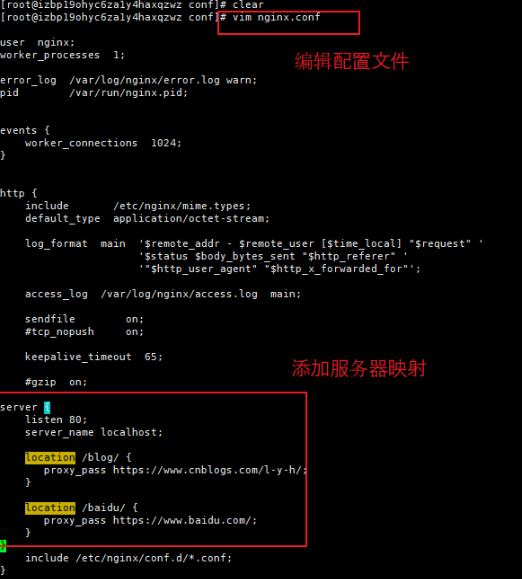
(2) Modify the nginx.conf configuration file to add a proxy map.
[Add mapping relationship:( server Block)
server {
    listen 80;
    server_name localhost;

    location /blog/ {
       proxy_pass https://www.cnblogs.com/l-y-h/;
    }

    location /baidu/ {
       proxy_pass https://www.baidu.com/;
    }
}

[complete nginx.conf]
user  nginx;
worker_processes  1;

error_log  /var/log/nginx/error.log warn;
pid        /var/run/nginx.pid;


events {
    worker_connections  1024;
}


http {
    include       /etc/nginx/mime.types;
    default_type  application/octet-stream;

    log_format  main  '$remote_addr - $remote_user [$time_local] "$request" '
                      '$status $body_bytes_sent "$http_referer" '
                      '"$http_user_agent" "$http_x_forwarded_for"';

    access_log  /var/log/nginx/access.log  main;

    sendfile        on;
    #tcp_nopush     on;

    keepalive_timeout  65;

    #gzip  on;

    server {
        listen 80;
        server_name localhost;

        location /blog/ {
           proxy_pass https://www.cnblogs.com/l-y-h/;
        }

        location /baidu/ {
           proxy_pass https://www.baidu.com/;
        }
    }
    include /etc/nginx/conf.d/*.conf;
}
3. Test effect
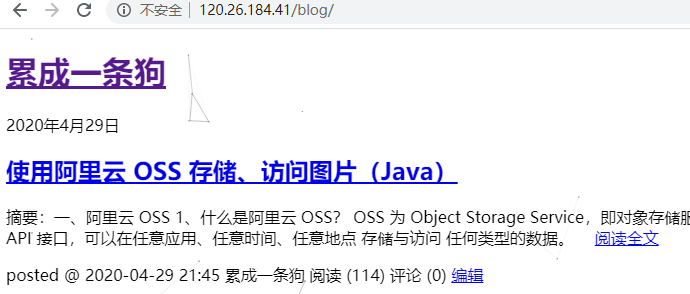
Restart the nginx container and access the address.
Visit http://120.26.184.41/blog and go to https://www.cnblogs.com/l-y-h/.
Visit http://120.26.184.41/baidu and you will go to https://www.baidu.com/.
