1, Why build Elasticsearch cluster?
Elasticsearch is an open source and highly extended distributed full-text search engine.
The complexity of Lucene is hidden through a simple RESTful API, which makes full-text search simple.
ES mainly solves the following problems:
- Retrieve relevant data
- Return statistics
- Be fast
1. High availability
The design reduces the time when the system cannot provide services. Assuming that the service node is down at a certain time, the node is temporarily unavailable. If the system can provide services all the time, its availability is 100%. Therefore, in order to reduce the unavailable time of Elasticsearch service, the function of cluster is reflected.
Of course, if you want to ensure that the ES data is not lost during downtime, you need to back up its data. Therefore, there is the concept of fragmentation and replica.
Slicing: data is divided into multiple parts, and all data is stored in ES Index, but the actual index only maintains the relationship with multiple partitions, and the data is routed to multiple partitions. For example, if an index has 5 shards, the index will have 0,1,2,3,4, which specifies the partition in which each document data is stored according to the routing operation formula has(_routing)%number_of_primary_shards specifies that the data Evenly distributed among clusters.If there is one or several slices with a large amount of data stored, you can use Index partition index.routring_partition_size, but there are restrictions after use Cannot create join_feild relationship mapping _ routing will become a necessary pass in parameter for writing data
Copy: copy is The replication partition of the primary partition can be flexibly adjusted to improve the performance of the whole cluster Fault tolerance, and it should be noted that Replica shards cannot be on the same node as primary Shards. Generally speaking, Elasticsearch will try to store different fragments of an index on different hosts, and the copies of the fragments will also be stored on different hosts as much as possible, so as to improve the fault tolerance rate and high availability.
2. Health status
Elasticsearch cluster has three health states, and single node elasticsearch can also be regarded as a cluster.
- Green: indicates that the primary partition and replica of all indexes are allocated and available, and the cluster is 100% available;
- Yellow: the primary partition has been allocated and all primary partitions are available, but not all replicas are available. It may be missing or the replica of an index has not been allocated. You can allocate it through the API of the move cancel allocate command or move the partition to the specified node. Note here Second hand mobile phone auction platform The master partition and its replica must not be on the same node. At this time, the system fault tolerance and cluster high availability are weakened;
- Red (red): not all primary partitions are available, which means that there is likely to be a risk of data loss. If there is only one single node Elasticsearch, it belongs to a yellow state because there is no replica;
3. Storage space
An ES cluster with multiple nodes has more storage space than a single node. You can set elasticsearch.yml and set the mount directory of data and log.
2, ES cluster and node type
The cluster consists of multiple nodes, each host is called a node, and each ES instance in the pseudo cluster is a node.
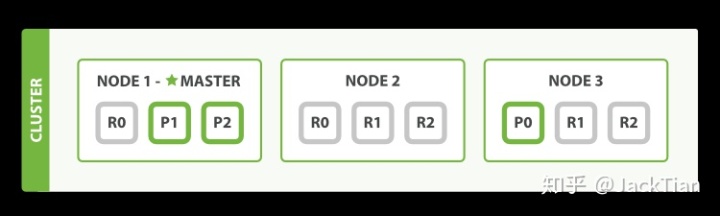
The above figure shows a cluster, in which Node-1 is the master node. The master node has permission to control the whole cluster and has permission to control the whole cluster. Each node has three partitions, where P0, P1, P2 represents the Primary partition, and the one beginning with R represents the replica partition corresponding to each Primary partition. There are three Primary partitions in total, and each Primary partition has two corresponding replica partitions.
- Master node: master node. The primary node is mainly responsible for contents related to cluster operations, such as creating or deleting indexes, tracking which nodes are part of the cluster, and determining which partitions are assigned to relevant nodes. A stable master node is very important to the health of the cluster. By default, a node in any cluster may be selected as the primary node. Indexing data, searching and querying operations will occupy a lot of cpu, memory and io resources. In order to ensure the stability of a cluster, it is a better choice to separate the master node and the data node. Although the master node can also coordinate nodes, route search and add data from the client to the data node, it is best not to use these dedicated master nodes. An important principle is to do as little work as possible;
- Data node: the data node. The data node is mainly a node that stores index data. It is mainly used to add, delete, modify, query and aggregate documents. Data nodes have high requirements for CPU, memory and IO. During optimization, the status of data nodes needs to be monitored. When resources are insufficient, new nodes need to be added to the cluster;
- Load balancing node: also known as Client node, also known as Client node. When a node is neither configured as a master node nor a data node, the node can only process routing requests, search, distribution index operations, etc. in essence, the Client node acts as an intelligent load balancer. An independent Client node is very useful in a large cluster. It coordinates the master node and the data node. The Client node can get the status of the cluster by joining the cluster, and the requests can be routed directly according to the status of the cluster;
- Preprocessing node: also called ingrest node. You can preprocess data before indexing data. All nodes support ingrest operation by default, or you can configure a node as an ingrest node. The above are several types of nodes. A node can actually correspond to different types. For example, a node can become a master node, a data node and a preprocessing node at the same time. However, if a node is neither a master node nor a data node, it is a load balancing node. Specific types can be set through specific configuration files;
When Elasticsearch processes query requests, the node workflow is as follows:
- The request is handed over to the master node;
- The master node receives the request and broadcasts the request to each shard of the index on the data node;
- Each partition executes a search request and returns the result;
- The segmented results are merged on the master node, sorted and returned to the user;
3, Build Elasticsearch7.X pseudo cluster
1. Download ES
Here, we install ES in the opt directory of the server
# Use Huawei image super fast!! And rename elasticsearch7.4-x86.tar.gz (x86 is the system instruction Architecture)
$ wget -O elasticsearch7.4-x86.tar.gz https://mirrors.huaweicloud.com/elasticsearch/7.4.0/elasticsearch-7.4.0-linux-x86_64.tar.gz
# decompression
$ tar -zxvf elasticsearch7.4-x86.tar.gz
2. Modify jvm.options and elasticsearch.yml configuration
# Enter es configuration directory
$ cd /opt/elasticsearch7.4-x86/config

# Modify jvm related parameters and adjust jvm heap memory size
$ vim jvm.options

# Configure es
$ vim elasticsearch.yml
jvm.options configuration
## Modify import: JVM heap size, and the memory ego will be set like this
-Xms512m
-Xmx512m
Configure elasticsearch.yml
# Do not set index related configuration in this file
cluster.name: waybill-center # Setting the cluster name is more important!
# ------------------------------------ Node ------------------------------------
node.name: es-master # Configure node name
node.master: true # Are you eligible to be elected as master? By default, the first machine in the ES cluster is the master node
node.data: false # Whether to store index data. The default value is true. One role and one class node are recommended in a large cluster. Do not have multiple roles
node.ingest: false #By default, all nodes can be ingest nodes
# ----------------------------------- Paths ------------------------------------
#path.conf: /opt/elasticsearch7.4-x86/config # Set the storage path of the configuration file. The default is the config directory under the es root directory
path.data: /data/es-master/data # Set the index data storage path. The default is the data directory under the es root directory
path.logs: /data/es-master/log # Set the log file storage path. The default is the log directory under the es root directory
# ----------------------------------- Memory -----------------------------------
#bootstrap.memory_lock: true # Lock the memory without switching to avoid suppressing the JVM virtual memory when the system memory is insufficient
# ---------------------------------- Network -----------------------------------
#network.host: 192.168.0.1 # Also set bind_host and publish_host
network.bind_host: 0.0.0.0 # Set the node binding ip, which can be used for http access
network.publish_host: x.x.x.x # Setting the interaction ip of other nodes with this node can make the intranet ip list must be a real ip
# Set a custom port for HTTP:
http.port: 9200 # Set external service http port
transport.tcp.port: 9300 # Set the tcp port for interaction between nodes
transport.tcp.compress: true # Set whether to compress data during tcp transmission. The default value is false
# --------------------------------- Discovery ----------------------------------
#
# Pass an initial list of hosts to perform discovery when this node is started:
# The default list of hosts is ["127.0.0.1", "[::1]"]
#
discovery.seed_hosts: ["x.x.x.x:9300", "x.x.x.x:9301","x.x.x.x:9302"]
# The IP address of each node of the cluster can also use els, els.shuaiguoxia.com and other names, which need to be resolved by each node
#
# Bootstrap the cluster using an initial set of master-eligible nodes:
#
cluster.initial_master_nodes: ["es-master"]
discovery.zen.minimum_master_nodes: 2  # In order to avoid cerebral fissure, the number of cluster nodes is at least half + 1
# For more information, consult the discovery and cluster formation module documentation.
# ---------------------------------- Gateway -----------------------------------
gateway.recover_after_nodes: 3 # Set data recovery when N nodes in the cluster are started. The default value is 1
3. Configure ES to use its own jdk (recommended)
Modify the Elasticsearch script file in the bin directory
source "`dirname "$0"`"/elasticsearch-env # Here you can see that the elastic search env script loaded first sets the environment
# use es internal jdk
export JAVA_HOME=$ES_HOME/jdk/
export PATH=$JAVA_HOME/bin:$PATH
View elasticsearch env
#!/bin/bash

set -e -o pipefail

CDPATH=""

SCRIPT="$0"

# SCRIPT might be an arbitrarily deep series of symbolic links; loop until we
# have the concrete path
while [ -h "$SCRIPT" ] ; do
  ls=`ls -ld "$SCRIPT"`
  # Drop everything prior to ->
  link=`expr "$ls" : '.*-> \(.*\)$'`
  if expr "$link" : '/.*' > /dev/null; then
    SCRIPT="$link"
  else
    SCRIPT=`dirname "$SCRIPT"`/"$link"
  fi
done

# determine Elasticsearch home; to do this, we strip from the path until we find
# bin, and then strip bin (there is an assumption here that there is no nested
# directory under bin also named bin)
ES_HOME=`dirname "$SCRIPT"` # Here you can see that ES has been set_ HOME

# now make ES_HOME absolute
ES_HOME=`cd "$ES_HOME"; pwd`

while [ "`basename "$ES_HOME"`" != "bin" ]; do
  ES_HOME=`dirname "$ES_HOME"`
done
ES_HOME=`dirname "$ES_HOME"`
4. Copy the current es build other data nodes
Copy current ES directory
# Copy two copies of the directory of the data node
cp -r /opt/elasticsearch7.4-x86 /opt/es-data-node1
cp -r /opt/elasticsearch7.4-x86 /opt/es-data-node2
To modify the configuration files of two data nodes, modify the first data node first
# vim /opt/es-data-node1/config/elasticsearch.yml
node.name: es-node1 # Configure node name
node.ingest: false #By default, all nodes can be ingest nodes
node.master: false # Are you eligible to be elected as master? By default, the first machine in the ES cluster is the master node
node.data: true # Whether to store index data. The default value is true
#path.conf: /opt/es-data-node1/config # Set the storage path of the configuration file. The default is the config directory under the es root directory
path.data: /data/es-node1/data # Set the index data storage path. The default is the data directory under the es root directory
path.logs: /data/es-node1/log # Set the log file storage path. The default is the log directory under the es root directory
http.port: 9201 # Set external service http port
transport.tcp.port: 9301 # Set the tcp port for interaction between nodes
Modify the configuration files of the two data nodes, and then modify the second data node
# vim /opt/es-data-node2/config/elasticsearch.yml
node.name: es-node2 # Configure node name
node.master: false # Are you eligible to be elected as master? By default, the first machine in the ES cluster is the master node
node.data: true # Whether to store index data. The default value is true
#path.conf: /opt/es-data-node2/config # Set the storage path of the configuration file. The default is the config directory under the es root directory
path.data: /data/es-node2/data # Set the index data storage path. The default is the data directory under the es root directory
path.logs: /data/es-node2/log # Set the log file storage path. The default is the log directory under the es root directory
http.port: 9202 # Set external service http port
transport.tcp.port: 9302 # Set the tcp port for interaction between nodes
5. Create ES storage data and log directory
# Create or modify the path according to the configuration file of each node
mkdir -p /data/es-master/data
mkdir -p /data/es-node1/data
mkdir -p /data/es-node2/data
mkdir -p /data/es-master/log
mkdir -p /data/es-node1/log
mkdir -p /data/es-node2/log
6. Because ES cannot be started by root, create a new user
groupadd es # New user group es
useradd es -g es# Create a new user and add to es user group
passwd es # You can also change the user password (enter 123123)
7. Authorize ES users to operate on the directory
chown -R es:es  /data/es-master/
chown -R es:es  /data/es-node1/
chown -R es:es  /data/es-node2/
8. Start ES cluster
# Need to switch to es user
su es
# Start service
./opt/elasticsearch7.4-x86/bin/elasticsearch -d
./opt/es-data-node1/bin/elasticsearch -d
./opt/es-data-node2/bin/elasticsearch -d
When running ES in the background, you can add the - p command to let ES run in the background. The - p parameter records the process ID as a file # setting for background startup
./opt/elasticsearch7.4-x86/bin/elasticsearch -p /tmp/elasticsearch-pid -d
End process
# View running pid
cat /tmp/elasticsearch-pid && echo
# End process
kill -SIGTERM {pid}
4, Startup exception (system resource restriction level)
1. Current maximum file descriptor exceeded
If max file descriptions appears, modify limits.conf
vim /etc/security/limits.conf # Modify restriction file
Number of files added to the file
*  soft nofile 65536
*  hard nofile 65536
2. The current maximum number of threads has been exceeded
If max number of threads appears, modify limits.d/20-nproc.conf
vim /etc/security/limits.d/20-nproc.conf
modify parameters
*  soft    nproc   4096
*  hard   nproc   4096
# Or no restrictions
# root       soft    nproc     unlimited
3. Current maximum virtual memory exceeded
If virtual memory areas appears, modify sysctl.conf
vim /etc/sysctl.conf
modify parameters
vm.max_map_count=262144
# You can also use the following command to temporarily modify the memory limit
sysctl -w vm.max_map_count=262144
5, Verify on the master node machine
After configuring and starting the cluster, because the primary node opens http.port and the primary node is mainly used for the management of the whole cluster, it is recommended to configure only the primary node when configuring kibana.
However, when we verify, we can use the following commands to verify the setup status of the cluster
curl  -X GET http://localhost:9200/_cat/nodes # get requests to view cluster health status

# The response will be as follows. The asterisk is the primary node pointed to
127.0.0.1 69 93 1 0.06 0.07 0.06 dilm * es-master
127.0.0.1 69 93 1 0.06 0.07 0.06 dil  - es-node1
127.0.0.1 56 93 1 0.06 0.07 0.06 dil  - es-node2